brake AUDI R8 SPYDER 2015 User Guide
[x] Cancel search | Manufacturer: AUDI, Model Year: 2015, Model line: R8 SPYDER, Model: AUDI R8 SPYDER 2015Pages: 232, PDF Size: 58.36 MB
Page 43 of 232
..... N
r-N "': ..... \!) ..,.,
N ..,., .....
This is called the wind deflector position
¢ fig . 38 .
The rear w indow can be extended comp lete ly for
cleaning. This is ca lled the cleaning posit io n.
Extend ing the rear window into the w ind
deflector position
~ Pull and hold the rear window switch ¢ fig. 39.
~ Re lease the switch once the rear window has
reached the wind deflector position.
Extending the rear window into the cleaning
posit ion
~ P ull and hold t he rear window switch ~ fig. 39.
~ Release the switch once the rear window has
reached the wind deflector position.
~ Pull and hold the rear window switch again .
~ Pull and hold the convertible top switch within
one second
¢page 38, fig. 35.
Retracting th e rear w indow
~ Press and ho ld the rear window switch until the
window has been retracted .
Retracting the rear w indow using the one
touch fun ction
~ Press the rear window switch briefly . There is
no need to hold the switch.
The rear w indow can on ly be operated when the
ignition is switched on.
The rear w indow can also be extended or retract
ed when the convertible top is closed .
A WARNING
-Do not use the rear window to secure cargo
or othe r ob jects. This co uld res ult in inj ury .
- Always pay attention and be ca reful when
extend ing o r ret racting the rea r window.
It
cou ld cause injury by pinching.
(D Tips
- Keepi ng a ll of the w indows raised provides
the best wi nd p rotection .
- The v ehicle must be stat ionary to bring the
r ear w indow into the cleaning position. The
rear w indow w ill retract on ce you beg in driv
i ng.
Con vertible top
Convertible top
emergency operation
General information
The convertible top can be closed by hand if
there is a malfunction.
First check if overload protection is active
~ page 39. I f this is the case, the conve rtible top
will operate again after a short delay. Otherwise
the following s teps mus t be comp leted befo re
closing the convertible top :
~ Activate the parking brake.
~ Open the side windows , if necessa ry.
~ Remove the key from the igni tion .
~ Pull or p ress the convertib le top switch
¢
page 38, fig . 35 for approximate ly 10 sec
onds.
Emergency locking is not intended for long -term
u se or long dr ives. The convertib le top wi ll not be
complete ly waterproof afte r using the emergency
l ocking procedure because the seals wi ll not be
seated correctly. Only close the convertible top
manua lly in an emergency . P lease see an autho r
ized Audi R8 dealer to have the cause of the mal
funct ion corrected.
A WARNING
- The ignition must be sw itched off d uring the
entire clos ing pro cedure.
- When pos itioning the convertib le top, avoid
contact w ith the s upports o r other moving
pa rts. Otherwise you cou ld pinch your
hands .
- I f conve rtible top operation fails whe n
open ing or closing the top, do not hold o r
touch the supports or other moving pa rts
when releasing the pressure. The converti
b le top will sink down and co uld p inch your
hands.
- Never d rive when the convert ible top is not
locked correctly. The wind from dr iving
could cause the convertible top to open.
This can result in injuries and damage to the
veh icle. .,,.
41
Page 45 of 232
.... N
l'
N "1: .... I.O
"' N
"' ....
_& WARNING
When working in the engine compartment:
- Turn the engine off .
- Activate the parking brake.
- In vehicles with a manual transmission,
move the shifter lever into idle. In vehicles
with the R tronic transmission, move these
lector lever into the N position.
- Remove the ignition key.
- Let the engine cool down.
- Keep children away from the engine com-
partment .
0 Note
To prevent damage to the vehicle, only open
the convertible top storage bay lid when the
engine compartment lid is closed.
Step 3: Remove the covers
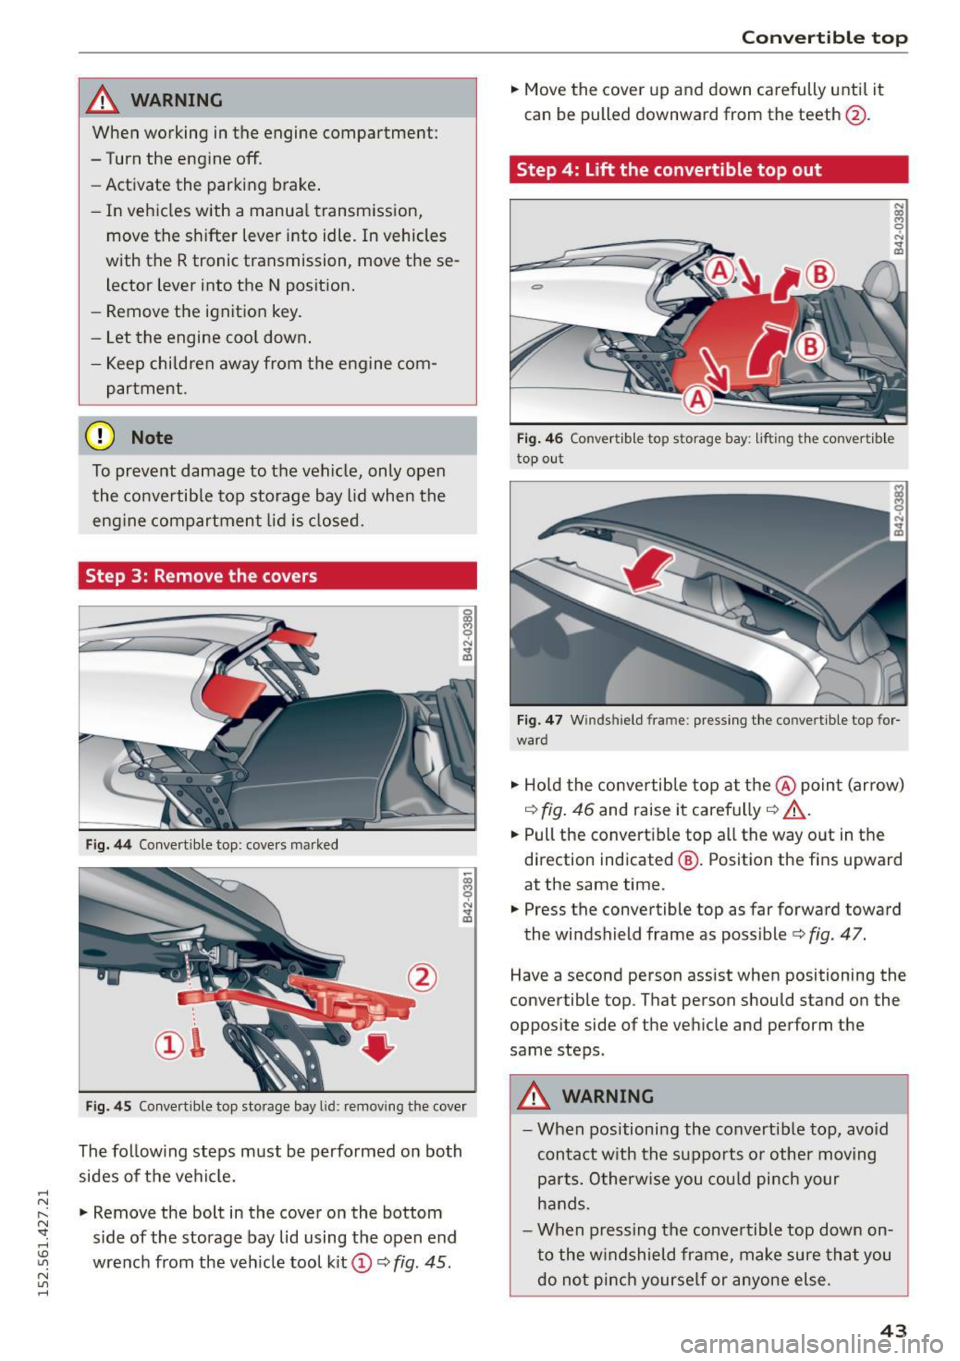
Fig. 44 Convertible top: covers marked
. '
®Ir
! N .., a,
Fig. 45 Convertible top sto rage bay l id : removing the cover
The following steps must be performed on both
sides of the vehicle.
.,. Remove the bolt in the cover on the bottom
side of the storage bay lid using the open end
wrench from the vehicle tool kit@ c::>
fig. 45 .
Convertible top
.,. Move the cover up and down carefully until it
can be pulled downward from the teeth @.
Step 4: Lift the convertible top out
Fig. 46 Convertible top s torage bay: lifting the conver tible
top out
Fig. 47 W inds hield fra me: pressing the co nve rtible top for
ward
.,. Hold the convertible top at the @ point (arrow)
c::>
fig. 46 and raise it carefully c::> &, .
.,. Pull the convertible top all the way out in the
direction indicated @. Position the fins upward
at the same time .
.,. Press the convertible top as far forward toward
the windshield frame as possible c::>
fig. 47.
Have a second person assist when positioning the
convertible top. That person should stand on the
opposite side of the vehicle and perform the
same steps.
_& WARNING
-- When positioning the convertible top, avoid
contact with the supports or other moving
parts. Otherwise you could pinch your
hands.
- When pressing the convertible top down on
to the windshield frame, make sure that you
do not pinch yourself or anyone else.
43
Page 61 of 232
.... N
l'
N "1: rl I.O
"' N
"' ....
and damage your vehicle's electronic
equipment or stain the upholstery, etc.
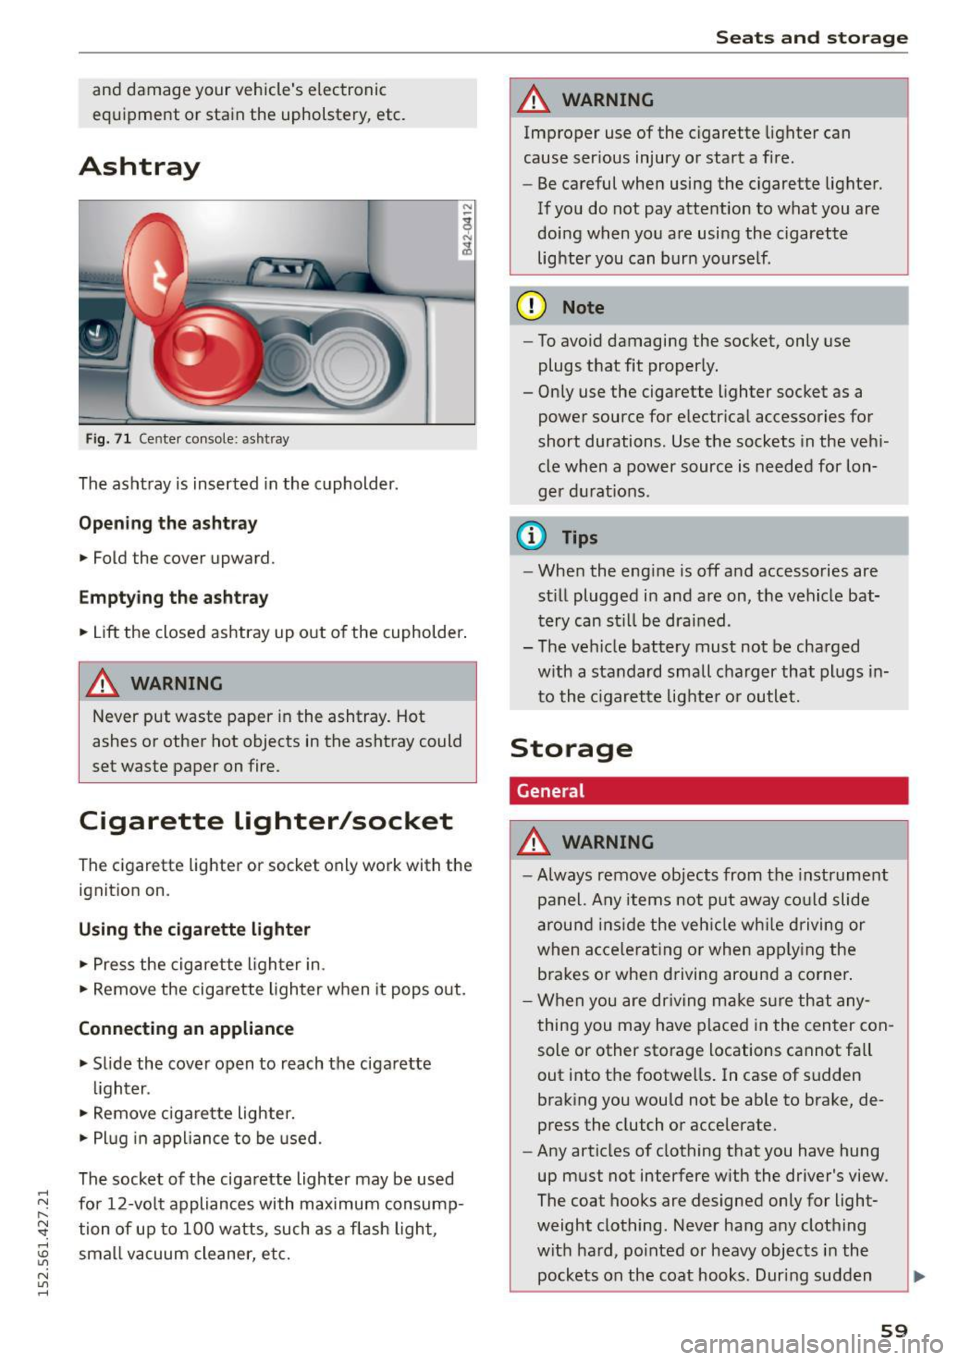
Ashtray
F ig . 71 Cen te r co nsole: ash tray
The ashtray is inserted in the cupholder.
Opening the a shtra y
• Fold the cover upward.
Emptying the ashtray
• Lift the closed ashtray up out of the cupholder .
A WARNING
-
Never put waste paper in the ashtray. Hot
ashes or other hot objects in the ashtray could
set waste paper on fire.
Cigarette lighter/socket
The cigarett e lighter o r socket only work with the
ignit ion on.
Using the cigar ett e lig hter
• Press the cigarette lighter in .
• Remove the cigarette ligh ter when it pops out.
Conn ecting an appliance
• Slide the cover open to reach the cigarette
lighter .
• Remove cigare tte lighte r.
• Pl ug in appliance to be used.
The socket of the cigarette lighter may be used
for 12-volt appliances with maximum consump· tion of up to 100 watts , such as a flash light,
small vacuum cleaner, etc.
Seats and storage
A WARNING
-Improper use of the cigarette lighter can
cause ser ious injury o r start a f ire.
- Be careful when using the c igarette Lighter.
If you do not pay attention to what you are
doing when you are using the cigarette
lighter you can bur n yourse lf .
(D Note
- To avoid damaging the socket, only use
plugs that fit proper ly.
- Only use the cigarette lighter socket as a power source for e lectr ical accessories for
short durations. Use the sockets in the veh i
cle when a power source is needed for lon·
ger d urat ions .
(i} Tips
-When the eng ine is off and accessories are
st ill plugged in and are on, the vehicle bat·
tery can st il l be drained .
- The vehicle battery must not be charged
with a standard small charger that plugs in
to the c igarette lighte r or outlet.
Storage
General
A WARNING
=
- Always remove objects from the instrument
panel. Any items not put away co uld slide
around ins ide the veh icle w hile driving or
when accele rating o r when app ly ing the
brakes or when driving around a corner .
- When you are dr iv ing make s ure that any
thing you may have placed in the center con
sole or other storage locations cannot fa ll
out into the footwe lls. I n case of sudden
braking you would not be ab le to brake, de
press the clutch or accelerate.
- Any articles of clothing that you have hung
up must not interfere with the driver's view .
The coat hooks are designed only for light·
weight clothing . Never hang any clothing
with ha rd, po inted or heavy objects i n the
pockets on the coat hooks. Dur ing sudden ..,.
59
Page 69 of 232
..... N
r-N "': ..... \!) 1.1"1
N 1.1"1 .....
leave your vehicle . This makes vehicle theft even
more difficu lt
c::> & .
Ign ition on @
After switching the ignition on, the needles move
all the way up and then down.
If it is difficult to turn the key after you have in
serted it into the ign ition lock, turn the steering
wheel back and forth. This w ill take the load off
the steering lock mechanism and you will be able
to turn the key freely and start the engine.
Starting the engine @
In this position the engine starts . Wh ile the en
g ine is starting, the power supply to the head
l ights and other elect rical consume rs is tempo ra
ri ly inte rrupted to conserve battery power . After
the engine has started, re lease the key and it will
return to position @.
Before the sta rter can be opera ted again the key
m ust be t urned back to position (!). The
n on-re
pe at lo ck
prevents you from damaging the start
er when the engine is running .
A WARNING
-Never remove the key from the ignition lock
wh ile the vehicle is mov ing. The steer ing
wheel will lock causing loss of control.
- If you have to leave your vehicle - even for
just a min ute - a lways remove the ignit ion
key and take it with you. This is espec ially
important if you are going to leave ch ildren
behind in the veh icle . The ch ildren could
start the engine o r use other veh icle con
t ro ls. Unsuperv ised use of vehicle controls
( f or example, power windows) can c ause se
rious persona l injuries .
@ Tips
If the veh icle battery has been d isconnected
and then reconnected, then yo u m ust leave
t he key in posit ion @ for abou t 5 seconds be
fore you can start the engine .
On the road
Starting and stopping
the engine
Starting the engine
The engine can only be started with your original
Audi key.
On vehicles with S tronic*, the engine can be
sta rted in the neutra l position N and in each gear
(1 - 7 and R).
.,. Set the park ing brake
c::> .&_ .
.,. On veh icles with manual transmiss ion*, fully
dep ress the clutch peda l.
.,. Press and hold the bra ke peda l.
.,. Tu rn the ignition key to posit ion @
c::> page 66,
fig. 77 -do not depress the gas pedal when
starting the engine.
.,. Let go of the key as soon as the engine starts -
the starter m ust not cont inue to run. On
veh ides with S tronic, se lect gear position N .
A cold engine may at first be loud afte r it has
been started. This is due to the hydraulic valves
building up the oil pressure. This is normal and
no need for concern .
If the engine does not start immediately, stop
trying after 10 seconds and then try to restart
the engine about 30 seconds later .
A WARNING
--
-Never start or let the eng ine run in a con
f ined or enclosed area. Exhaust fumes from
the eng ine contain carbon mo noxide, a co l
o rl ess and odo rless gas. Carbon monoxide
can be fatal if i nhaled .
- Never leave the engine id ling unattended .
A n unattended ve hicl e w ith a running en
g in e poses a dange r of pe rsonal inj ury or
theft .
- W ith the engine r unning and a gear engag
ed, you have to ho ld the vehicle wi th the
foot b rake .
(D Note
-Avo id h igh engine speeds, fast acceleration
o r heavy engi ne loads whi le the engine is
st il l c old . T his could d amage t he engine.
67
Page 70 of 232
On the road
- The engine cannot be started by pushing or
towing the vehicle .
@I For the sake of the environment
To avoid unnecessary eng ine wear and to re
duce exhaust emissions , do not let your vehi
cle stand and warm up. Be ready to drive
off
immediately after starting your vehicle.
Stopping the engine
On vehicle s wi th S tron ic*, the engine can be
turned
off in the neutral position N and in each
gear (1 -7 and R) .
.. Tu rn the ignition key to posit ion (!) co
page 66,
fig. 77 .
A WARNING
- Never turn off the engine until the vehicle
has come to a complete stop .
- The brake booster and servotronic only work
when the eng ine is running . W ith the igni
t ion turned
off , you have to apply more force
when steering or braking. Since you cannot
steer and stop normally , this can lead to ac
c idents and serious injuries .
(D Note
-If the engine has been under heavy load for
an extended period of time, heat builds up
i n the eng ine compartment after the engine
i s switched
off -there is a r isk of damag ing
the engine . A llow the engine to continue to
run at id le for a short time or drive until it
has coo led down before you turn it off
q page 73.
-If the engine has been under heavy load for
an extended period of time, it can become
extremely hot . You should not park your ve
hicle over easily combustible objects or
areas (e .g . grass or leaves) . There is a risk of
starting a fire .
{!) Tips
After the engine has been switched off, the ra
diator fan can continue to run for up to 10 m i
nutes - even w ith the ignition switched
off . It
68
can also switch on again after some time if
the coo lant temperature rises as the result of
heat bu ildup or if the engine compartment is
heated by the sun's rays and the engine is hot .
Parking brake
Parking brake
When the parking brake is set, it prevents the ve
hicle from rolling away unintentionally.
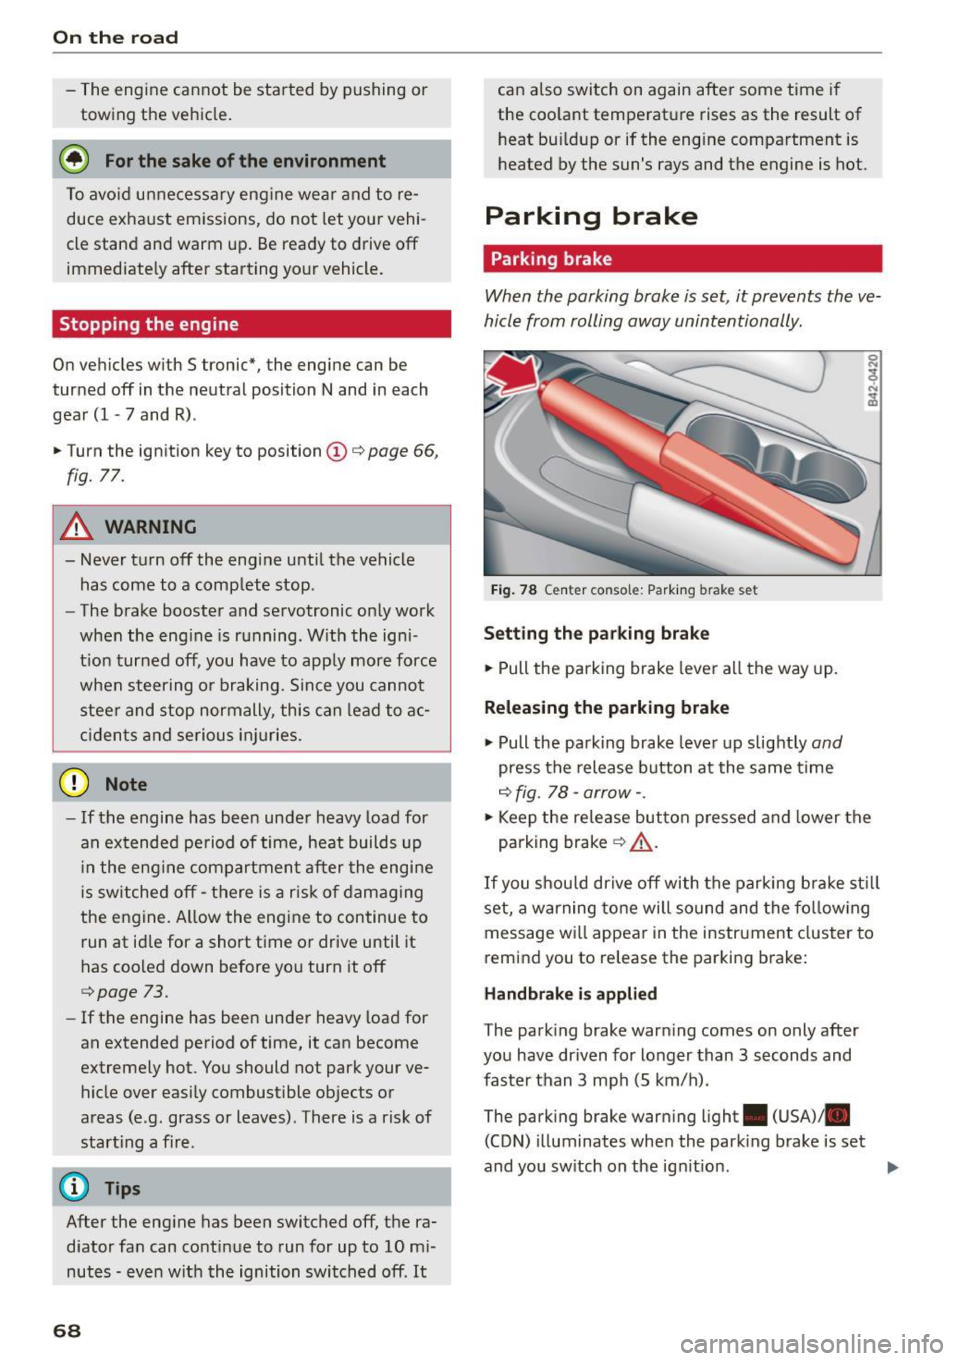
Fig . 78 C ente r co nsol e: Park ing bra ke set
S etting th e pa rking brak e
.. Pull th e parking brake lever all the way up.
Releasing the p arkin g brake
.. Pull the parking brake lever up slightly and
press the release button at the same time
c::> fig . 78 -arrow- .
.. Keep the release button pressed and lower the
parking brak e
q &_.
If you shou ld drive off with the parking bra ke st ill
set, a warning tone will sound and the fo llow ing
message wi ll appear in the instrument cluster to
r e mind you to release the parking brake:
H and brake i s appli ed
T he park ing brake warn ing comes on only after
you have driven for longer than 3 seconds and
faster than 3 mph (5 km/h) .
The parking brake warning ligh t. (USA)/ .
(CON) illuminates whe n the park ing brake is set
and you sw itch on the ign it ion .
Page 71 of 232
..... N
r-N "': ..... \!) ..,.,
N ..,., .....
A WARNING
-=
Always release t he parkin g brake completely.
A part ially engaged brake will over heat th e
rear brakes, reduce their effect iveness and
cause excess ive wear. This could lead to brake
fai lure and an accident.
([) Note
Only after the ve hicle has come to complete
stop, sho uld you firmly set the parking brake
and move the gearshift lever into a gear.
Parking
Parking
~ Stop t he vehicle using the brake pedal.
~ Set the parking b ra ke firmly.
~ Swi tch off the engine.
~ Move t he se lecto r lever into the P pos ition ( au
tomatic t ransmis sion )
or move the gearshift
lever into 1st . gear
(manual transmission )
c:>.&_ .
~ When on incl ines or declines, turn the steering
whee l so that t he vehicle w ill roll into the curb
if it beg ins to move .
A WARNING
This is how yo u can reduce the risk of in jury
w hen leav ing you r vehicle.
-
- Never park the vehicle whe re it ca n come i n
co ntact wi th dry g rass, spilled fuel or a ny
other flammable mater ials.
- Never allow anyone - especially small chi l
dre n -to remai n in t he vehicle when it is
locked. Locke d doors ma ke i t mo re d iff icult
for rescuers to access the passenger com
partment in the event of an emergency .
Dange r to life!
- Never leave c hildren unsupervised in the ve
hicle. C hildren cou ld re lease the par king
brake or move the gearshift lever out of
gear. The vehicle could sta rt to roll away and
cause an accident .
- No matter what the season is, the tempera
ture in a parked veh icle can reach dangerous
levels.
On th e road
Starting on hills
Applies to vehicles: wit h hill ho ld assist
Hill ho ld assist makes it eas ier to sta rt on hills.
The system is activated when the brake peda l is
depressed
for a few seconds .
After releasing the brake pedal, the b rake power
is he ld for a
brief moment to prevent the vehicle
from rol ling back when starting . At this time, you
can eas ily beg in to move your vehicle.
A WARNING
- I f you did not begin moving imme diate ly af
ter re leasi ng the b ra ke peda l, unde r ce rtain
cir cumstan ces, the vehicle w ould beg in to
roll bac kward. Depress t he brake pe dal im
mediately or engage the hand brake.
- Should t he e ngine sta ll, dep ress the brake
pe dal immed iately or enga ge the hand
b rake.
- I n or der to preven t the vehicle from roll ing
back unintentionally when s tarting in s top
and-go traffic, keep the brake pe dal de
pressed for a few seconds before driving off.
(D Tips
You can find o ut if yo ur vehicle is eq uipped
wi th "Hill hold ass ist" at an autho riz ed Au di
d ealersh ip.
Speed warning system
Speed warning system
The speed warning system helps you to keep your
driving speed below a set speed limit .
The speed warn ing system warns the driver if he
exceeds a previously stored max imum speed. A
warning tone will sound as soon as the veh icle
speed exceeds the set speed by about
3 mph
(3 km/h) . At the same t ime, a warning symbo l
appea rs i n the display .
The speed warn ing system has
two warn ing
thre sholds
tha t function independe ntly of each
othe r and t hat have somewhat d iffe rent pu rpos
es:
69
Page 73 of 232
.... N
l'
N "1: .... I.O
"' N
"' ....
To store maximum speed
•Turnoff the ignit ion.
• Briefly press the button in the instrument clus
ter
9 page 70, fig. 79. The odometer and the
digital clock are now illuminated.
• Press the button for at least 2 seconds. The cur
rently stored maximum speed appears in the
display
or the crossed out symbol for warning
threshold 2, if no maximum speed was set pre
viously.
• Press the function selector sw itch in the wiper
lever @r=>
fig. 80 up or down to change the set
val ue. Values run up or down in steps of 6 mph
(10 km/h).
To delete maximum speed
•Turnoff the ignition .
• Briefly press the button in the instrument clus
ter
9 page 70, fig. 79 . The odometer and the
digital clock are now illum inated.
• Press the button for at least 2 seconds. The cur
rently stored maximum speed appears in the
display.
• Press the
iRESETI button in the wiper lever @
r:=> fig. 80 until the crossed out speed warning
symbol for warning threshold 2 appears in the
display.
A few seconds after the adjustment is completed,
the illumination for the odometer and the digital
clock w ill go out.
@ Tips
This warning threshold can also be controlled
through the trip computer
r=> page 23, Navi
gating the menu.
On the road
Cruise control
Switching the system on
The cruise control system makes it possible to
drive at a constant speed starting at 20 mph (30kmlh).
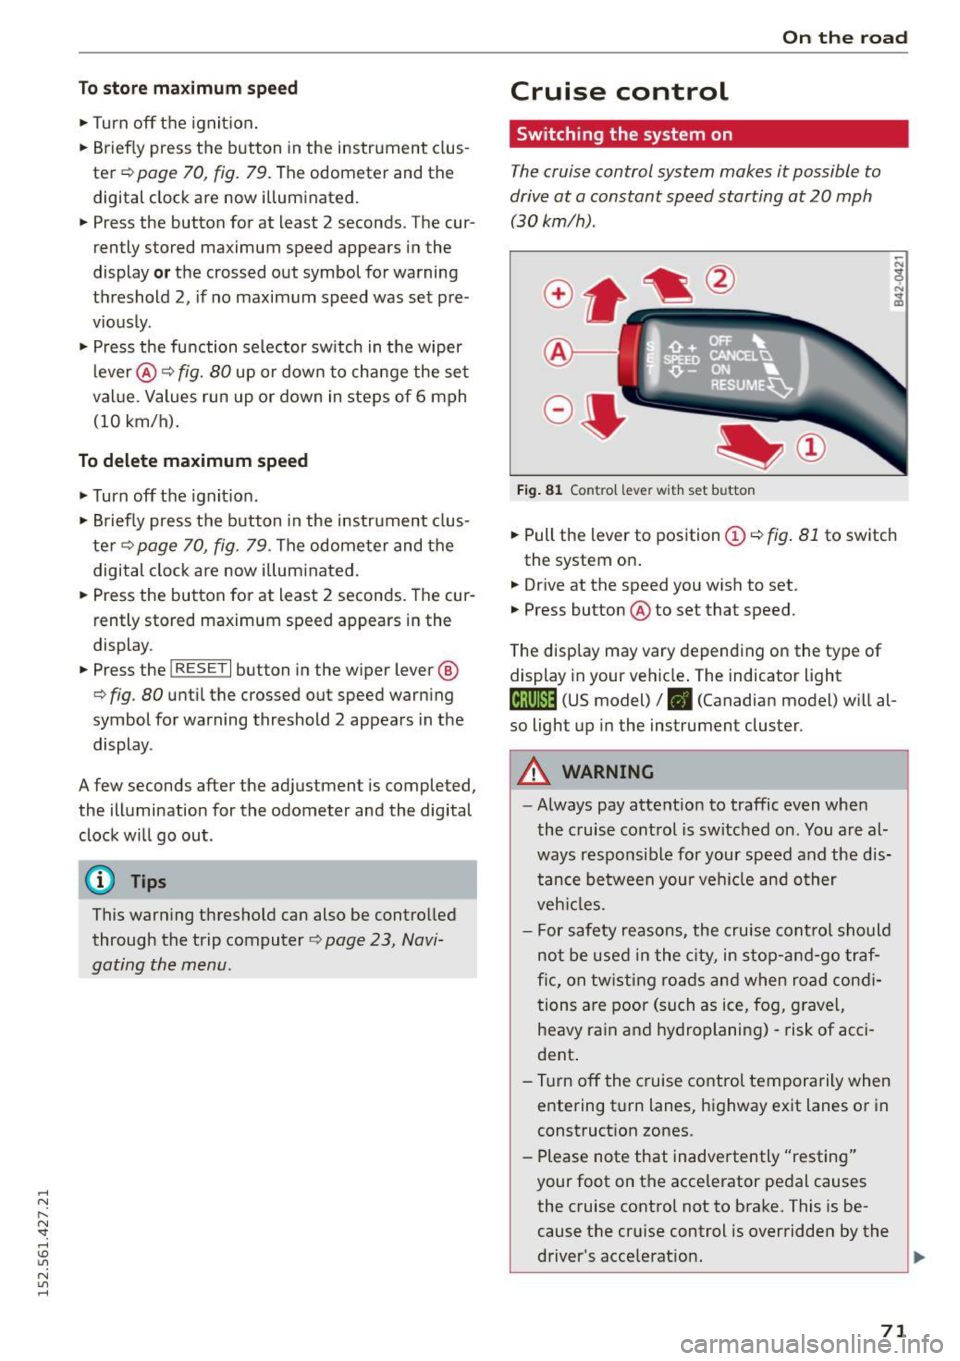
Fig. 81 Contro l lever with set button
• Pull the lever to position (Dr=> fig . 81 to switch
the system on .
• Drive at the speed you wish to set.
• Press button @to set that speed.
The display may vary depending on the type of
display in your vehicle. The indicator light
(lj;jl)~i~ (US model)/ . (Canadian model) will al
so light up in the instrument cluster.
A WARNING
--
-Always pay attention to traffic even when
the cruise control is switched on. You are al
ways responsible for your speed and the dis
tance between your veh icle and other
veh icles.
- For safety reasons, the cruise control should
not be used in the city, in stop-and -go traf
fic, on twisting roads and when road condi
tions are poor (such as ice, fog, gravel,
heavy rain and hydroplaning) -risk of acci
dent .
- T urn off the cruise control temporarily when
entering turn lanes, highway exit lanes or in
construction zones.
- Please note that inadvertently "resting"
your foot on the accelerator pedal causes
the cruise control not to brake. This is be
cause the cruise control is overridden by the
driver's acce lerat ion.
71
Page 74 of 232
On the road
@ Tips
-Vehicles with manua l transmission: You can
attain the set speed only if the currently en
gaged gear a llows it and the engine is not
stressed. Shifting to a h igher or lower gear
promptly will allow the engine to run
smoothly.
- The cruise control cannot maintain a con
stant speed when driving downhill. The ve
hicle will accelerate under its own weight .
Downshift to a lower gea r or use the brakes
to slow down.
Changing speed
.. Press lever in the 0 or O direction¢ page 71,
fig .
Bl to increase or decrease your speed .
.. Re lease the lever to save that speed .
You ca n also press the accelera tor pedal down to
increase your speed, e.g . if you want to pass
someone . The speed you saved earlier will re
sume as soon as you release the accelerator ped
al.
If , however, you exceed your saved speed by
S mph
(10 km/h) for longer than S minutes , the
cruise control will turn off temporarily. The sym
bol will go out but the saved speed will be re
tained.
Presetting your speed
You can preset your desired speed while the vehi
cle is not moving .
.. Turn on the ignition .
.. Pull lever into position@¢
page 71 , fig . Bl .
.. Press the lever in the 0 or O direction to in-
crease or decrease your speed .
.,. Release the lever to save that speed .
This function makes it possible, for example, to
save the speed you want before driving on the
highway. Once on the highway, activate the cruise
control by pulling the lever toward @.
72
Switching the system off
Temporary deactivation
.. Press the brake pedal, or
.. Keep the clutch pedal pressed down longe r, or
.,. Press the lever into position @(not clicked into
place)
¢page 71, fig. Bl, or
.. Drive for longer than 5 minutes at more than
S mph
(10 km/h) above the stored speed .
Switching off completely
.,. Press lever into position @(clicked into place),
or
.. Switch the ignition off.
The system retains the saved speed if you deacti
vate the cruise control temporarily. To resume
the saved speed, release the brake or clutch ped
al and pull the lever to pos ition @.
Switch ing the ignition off erases the saved speed.
.&_ WARNING
You should only return to the saved speed if it
is not too fast for the current traffic condi
tions -risk of an accident!
Audi magnetic ride
Damping can be adjusted to the driver's prefer
ence and it adapts automatically to the current
driving situation .
SPORT •
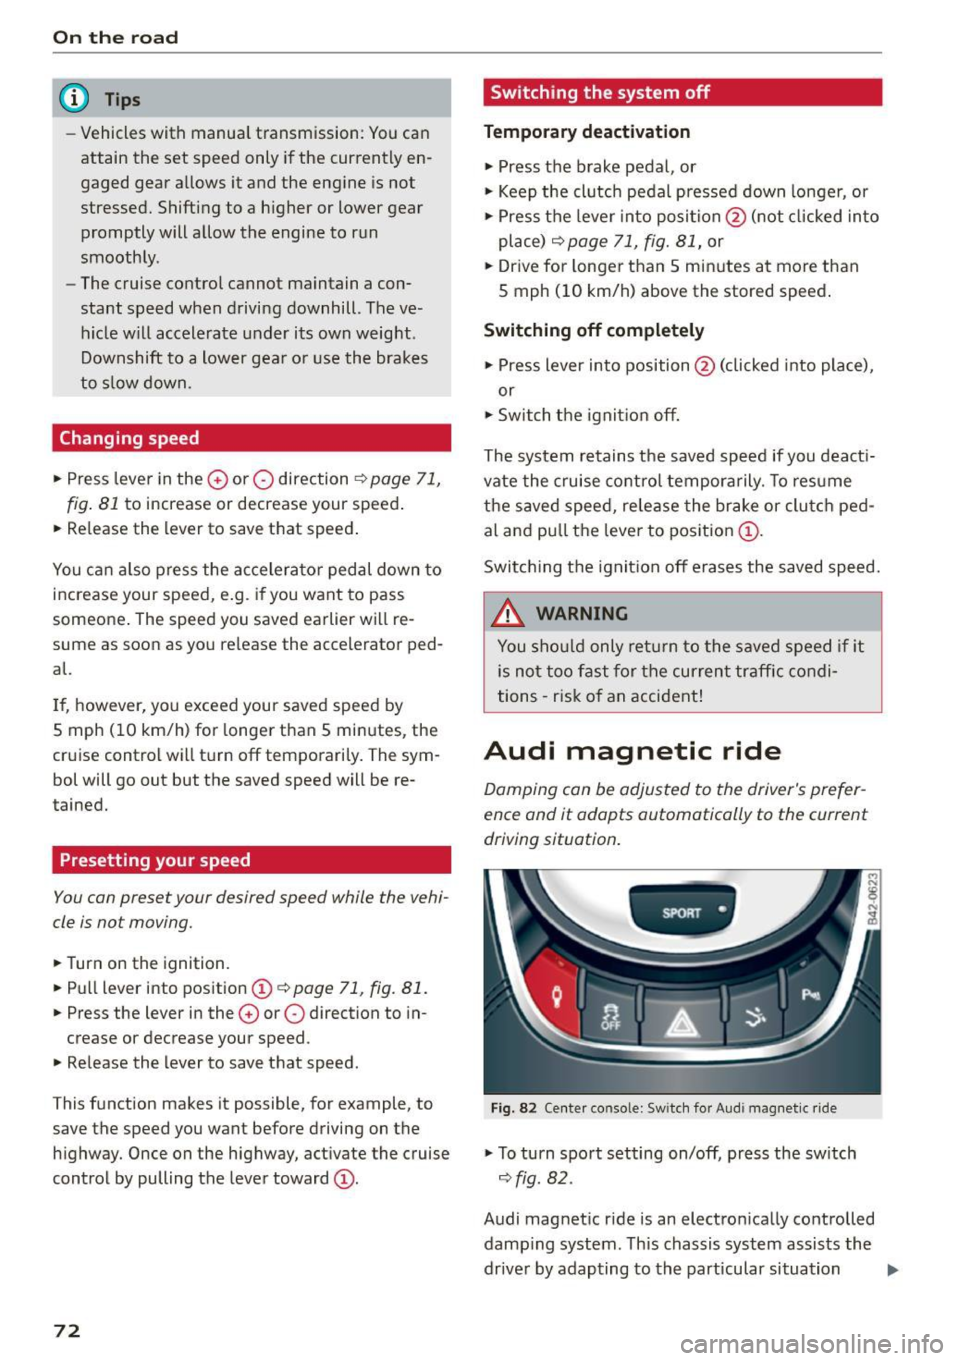
Fig. 82 Center console: Sw itch for Audi magnet ic ride
.,. To turn sport setting on/off, press the sw itch
¢ fig. 82.
Audi magnetic ride is an electronically controlled damp ing system . This chassis system assists the
driver by adapting to the particular situation
liJI,
Page 75 of 232
throug h im perce ptib le contro l processes . The
damping provides individua l modulation of
damping forces. For example, with damping
characterist ics set to prov ide greater comfort,
damping is set somewhat harder for a brief peri
od only as requ ired, when round ing a curve and
when braking .
Standard setting
Select the standard sett ing if you prefer a sus
pension setting emphasi zing comfort.
Sport s etting
Select the sport setting if you prefe r a spor ty sus
pension setting. The LED in the button
[l] comes
on to indicate sport setting .
@ Tips
The warning/indicato r ligh t R in the instr u
ment cluster comes on in the event of a mal
function. Drive to the closest a uthorized Audi
dea ler as soon as possible and have the mal
function repaired.
Sporty driving
Warming up and cooling down
B y care fully warming up and cooling down you r
veh icle, you can he lp ensure tha t it is not over
stressed unnecessarily du ring sporty driving.
W hen warming up , the veh icle is driven a t a max
i mum eng ine speed of 6 000 R PM
(Vl O engine) or
70 00 RPM (V8 engine) in order to raise the en
g ine oi l tempe ratu re to a minimum of 140 °F
(60 °() . The tires also only reach the ir full road
h olding capability once they have warmed up.
The cooling fan can continue to run in you r vehi
cle after the engine is switched off . However,
d riving the vehicle to cool it down is part icu larly
important. During sporty driving, the engine and
brakes, the exhaust system, and the transmission
all become extremely hot . Before you park the
ve hicle, you should dr ive it for a few m iles/kilo-
~ mete rs a t light load in the low rpm range to al-
~ low i t to cool down. "': ,...., \!) 1.1'1
N 1.1'1 ,....,
On th e road
Driving on a track
Befo re you take your veh icle o ut on a track, en
s u re th at i t is in perfe ct condi tion. Fo r ex ample ,
yo u should chec k the tire trea d an d the bra ke
pads . It is bes t to inc rease tire pressu re by about
0 .3 bar.
W hen dr iving on a track , oil consump tion may be
somewhat higher than in "norma l" ope rat ion
¢ page 159 .
You should definitely inspec t your ve hicle afte r
s u bje cting it to seve re condi tions. Are the br ake
pads OK? Is there any thing unusua l about the
t ir es, including the inner and outer sidewalls (e .g.
tread , blistering)? A re the air intakes free of
l eaves and tire dust? Is the o il level OK?
Your a uth orized Audi dea ler or q ua lified wor k
sho p will be happy to underta ke an inspection be
fore and after use on the race track .
A WARNING ._
Some race tracks (e.g. steeply banked turns)
may affect the response of t he ESC.
(D Tips
- Review the t rack requ irements and condi
tions befo re you sta rt driv ing.
- W hen d riven on a race track, all vehicle
parts are severe ly stressed. This can result
in increased wear .
73
Page 77 of 232
.... N
l'
N "1: .... I.O
"' N
"' ....
heavy loads. This can result in increased
wear .
- The Launch Control Program only funct ions
when the parking brake is released and the
vehicle speed is less than 3 mph (5 km/h).
S tronic
Description
Applies to vehicles: with S tronic
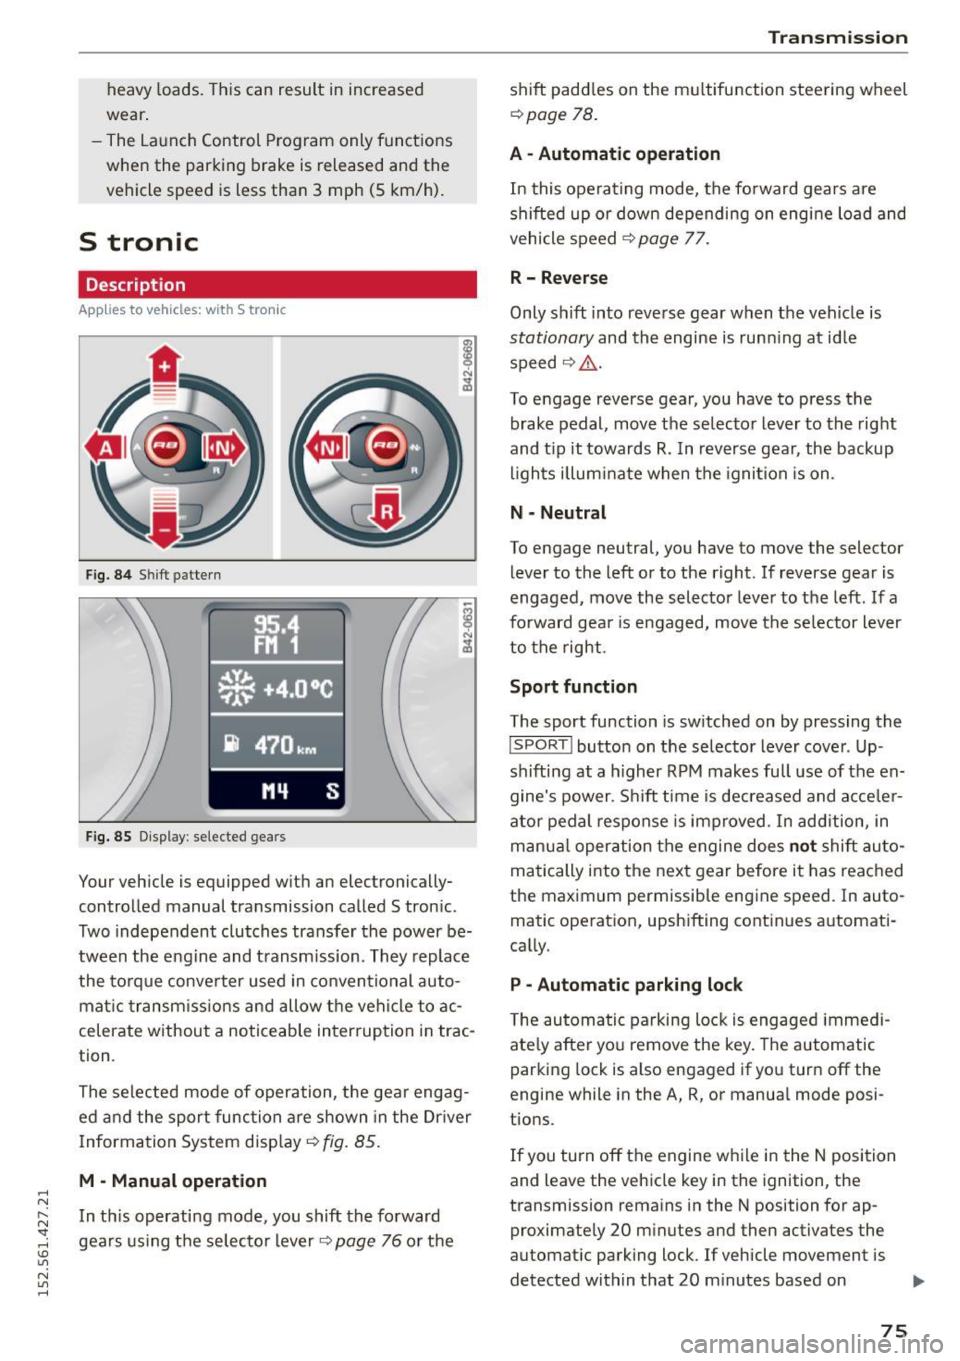
Fig. 84 Shift pattern
Fig. 85 Display : selected gea rs
Your vehicle is equipped with an electronically
controlled manual transmission called S tronic .
Two independent clutches transfer the power be
tween the eng ine and transmission. They replace
the torque converter used in conventional auto
mat ic transmissions and allow the vehicle to ac
celerate without a noticeable interruption in trac
tion .
The selected mode of operation, the gear engag ed and the sport function are shown in the Dr iver
Information System display ¢
fig. 85.
M -Manual operation
In this operating mode, you shift the forward
gears using the selector lever
r=>v page 76 or the
Transmission
shift paddles on the multifunction steering wheel
¢ page 78.
A - Automatic operation
In this operating mode, the forward gears are
shifted up or down depending on engine load and
vehicle speed
¢ page 77.
R- Reverse
Only s hift into reverse gear when the vehicle is
stationary and the engine is runn ing at idle
speed ¢
Li')...
To engage reverse gear, you have to press the
brake pedal, move the selector lever to the right
and t ip it towards
R. In reverse gear, the backup
lights illuminate when the ignition is on .
N -Neutral
To engage neutral, you have to move the selector
lever to the left or to the right . If reverse gear is
engaged,
move the selector lever to the left . If a
forward gea r is engaged, move the selector lever
to the right.
Sport function
The sport function is switched on by pressing the
I SPORT ! button on the selector lever cover . Up
shifting at a higher RPM makes full use of the en
gine's power . Shift time is decreased and acceler
ator pedal response is improved . In addition, in
manua l operation the engine does
not shift au to
matically into the next gear before it has reached
the maximum permissible engine speed. In auto
matic operation, upshifting continues automati
cally.
P -Automatic parking lock
The automatic parking lock is engaged immedi
ately after you remove the key. The automatic
parking lock is also engaged if you turn off the
engine while in the A, R, or manual mode posi
tions .
If you turn off the engine while in the N position
and leave the vehicle key in the ignition, the
transmission remains in the N position for ap proximately 20 minutes and then activates the
automatic parking lock . If vehicle movement is
detected within that 20 minutes based on
IIJI.
75