instrument cluster AUDI RS5 CABRIOLET 2013 Owner's Guide
[x] Cancel search | Manufacturer: AUDI, Model Year: 2013, Model line: RS5 CABRIOLET, Model: AUDI RS5 CABRIOLET 2013Pages: 286, PDF Size: 71 MB
Page 213 of 286
temperatures stay below freezing point for l ong periods.
Detergent add itives in the o il w il l make fresh
oil look dark after the eng ine has been run
ning fo r a short time . This is norma l and is not
a reason to change the oi l more often than
recommended.
D am ag e or m alfun ction s due to lack of
ma intenanc e
It is essential that you change your oil at the
r ecommended inte rva ls using only engine o il
t hat complies with A udi oi l standard
VW 502 00 . Your Limited New Vehicle War
ranty does not cover damage or malfunctions
due to fa ilure to fo llow recommended mainte
nance and use requ irements as set forth in
the Audi Owner's Manual and Warranty
&
Maintenance book let . Your dealer will have to
deny warranty coverage u nless you present to
the dea ler p roof in the fo rm of Serv ice or Re
pa ir Orde rs that all s chedu led maintenance
was pe rformed in a t imely manner .
Engine oil consumption
The engine in your vehicle depends on an ade
quate amount of oil to lubricate and cool all
of its moving parts.
In o rder to provide effective lubrication and
cool ing of internal engine components, a ll in
ternal combustion eng ines consume a certa in
amo unt of o il. Oil consumption varies from
engine to engine and may change significantly
over the life of the engine. Typ ica lly, engines
with a specified break-in period (see
¢
page 184) consume more oil during the
break-in per iod than they consume after oil
consumption has stabilized .
Under normal conditions, the rate of oil con
sumpt ion depends on the quality and viscosity
of the oil, the RPM (revo lutions per m inute) at
which the engine is operated, the ambient
temperature and road condit ions. Furthe r fac
tors are the amount of o il d ilution from wate r
condensation or fuel residue and the ox ida
tion level of the oil. As any engine is s ubje ct to
Checkin g and fillin g 211
wear as mi leage builds up, the oil consump
tion may increase over time until replacement
of worn components may become necessary.
Wi th a ll these variab les coming into p lay, no
standard rate of oil consumpt ion can be es
tablished or specified. There is no alternative
to regular and frequent check ing of the o il lev
el, see
Note .
If the yellow engine oil leve l warning symbo l
1\1 in the instrument cluster lights up , you
shou ld check the oil leve l as soon as possib le
¢
page 212. Top off the oil at your earliest
convenience
¢ page 212.
A WARNING
Before you check anythi ng i n the engine
compartment, always read a nd heed all
WARNINGS¢ .&.
in Working in the engine
c ompartment on page 207.
(D Note
Driving w ith an insufficient o il level is like
ly to cause severe damage to the engine .
(D Tips
- The oil pressure warning display. is
not an indi cator of the oil le vel. Do not
rely on it . Instead, check the oil level in
your engine at regu lar intervals, pref
erably ea ch time you r efuel, and alway s
before going on a long trip .
-If you have the impression you r engi ne
c ons umes ex cess ive amoun ts of o il, we
recommend that you consul t an a uthor
ized Aud i dea ler to have the cause of
your concern properly diagnosed. Keep in mind that the accurate measurement of
oil consumption requ ires great care and
may take some t ime. An authorized Aud i
dealer has instructions about how to
measu re oil consumption accurately.
-
•
•
Page 214 of 286
212 Checking and filling
Checking the engine oil level
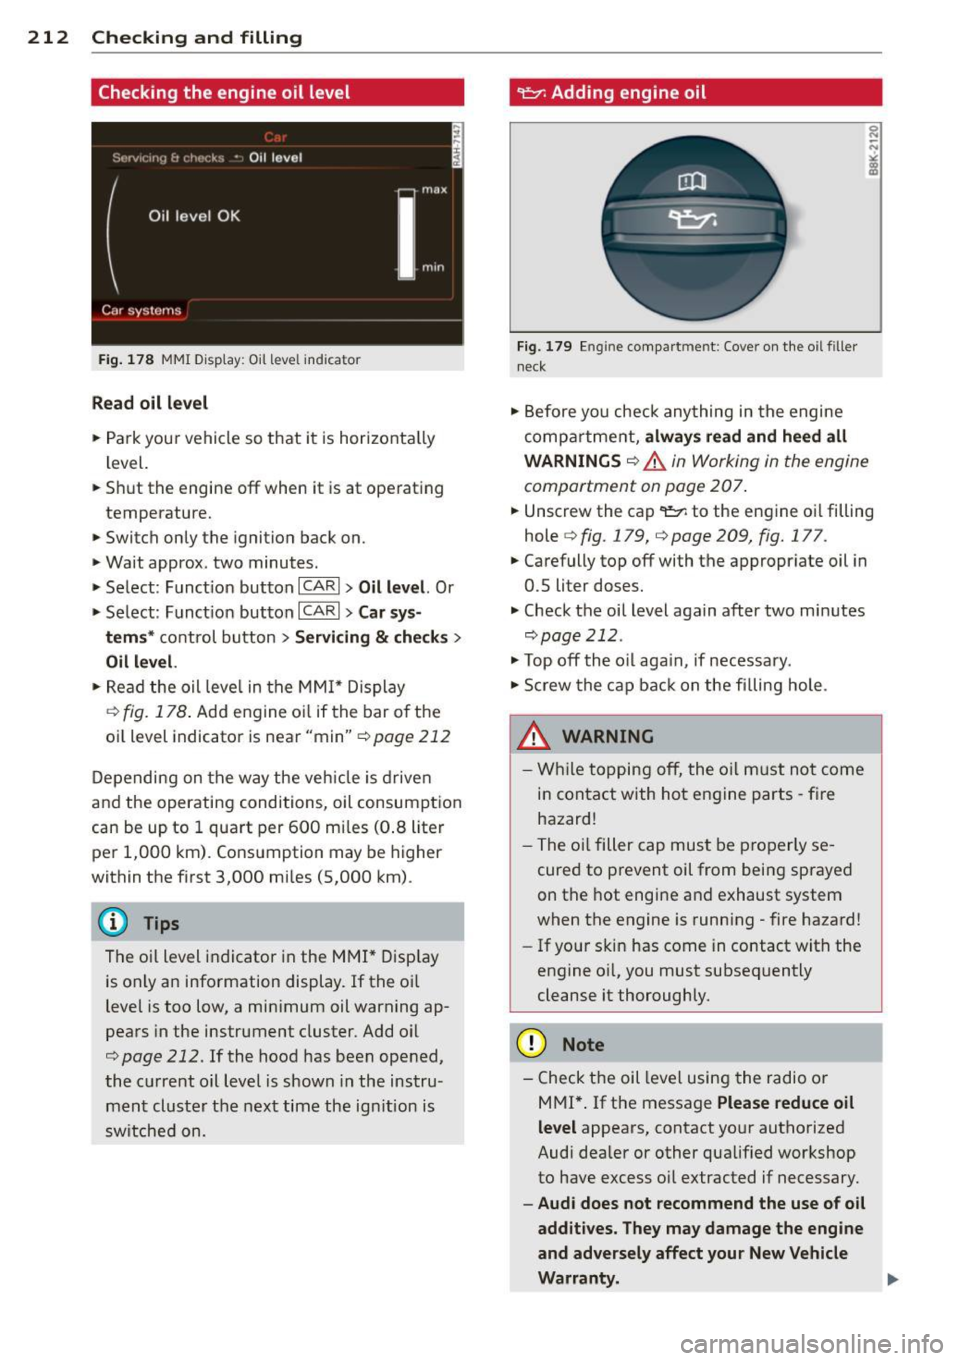
Fig. 178 MMI Display: Oil level in dicator
Read oil level
.. Park your vehicle so that it is horizontally
lev el.
.. Shut the engine off when it is at operating
temperature.
• Switch only the ignition back on.
• Wait approx. two minutes.
> Select: Function button ICARI > Oil level. Or
> Select: Function button ICAR I > Car sys-
tems *
control button > Servicing & checks >
Oil level.
.. Read the oil level in the MMI* Display
¢
fig. 178. Add engine oil if the bar of the
oil level indicator is near "min"¢
page 212
Depending on the way the vehicle is driven
and the operating conditions, oil consumption
can be up to 1 quart per 600 miles (0.8 liter
per 1,000 km). Consumption may be higher
within the first 3,000 miles (5,000 km).
The oil level indicator in the MMI* Display
is only an information display. If the oil
level is too low, a minimum oil warning ap
pears in the instrument cluster. Add oil
¢
page 212. If the hood has been opened,
the current oil level is shown in the instru
ment cluster the next time the ignition is
switched on.
~ Adding engine oil
Fig. 179 Engine compartment: Cover on the oil filler
n ec k
• Before you check anything in the engine
compartment,
always read and heed all
WARNINGS
¢ .A in Working in the engine
compartment on page 207 .
.. Unscrew the cap '1:::1: to the engine oil filling
hole
q fig. 179, q page 209, fig. 177.
.. Carefully top off with the appropriate oil in
0.5 liter doses.
.. Check the oil level again after two minutes
qpage212.
• Top off the oil again, if necessary.
• Screw the cap back on the filling hole .
.8_ WARNING
- While topping off, the oil must not come
in contact with hot engine parts -fire
hazard!
- The oil filler cap must be properly se
cured to prevent oil from being sprayed
on the hot engine and exhaust system
when the engine is running -fire hazard!
- If your skin has come in contact with the
engine oil, you must subsequently
cleanse it thoroughly.
(D Note
- Check the oil level using the radio or
M Ml*.
If the message Please reduce oil
level
appears, contact your authorized
Audi dealer or other qualified workshop
to have excess oil extracted if necessary.
- Audi does not recommend the use of oil
additives. They may damage the engine
and adversely affect your New Vehicle
Warranty. .,..
Page 231 of 286

-Read the requir ed tire pressure from the tire
pressure label. The tire pressure label is lo
cated on the driver's side B-pillar. The tire
pressure label lists the recommended cold
t ire inf lation pressures for the vehicle at its
maximum capacity weight and the tires that
were on your vehicle at the time it was man
ufactured . For recommended tire pressures
for normal load conditions, please see chap
ter ~
page 226.
- Turn the valve stem cap counter-clockwise
to remove it from the tire valve.
- Place the air pressure gauge on the valve .
- The tire pressures should only be checked
and adjusted when the tires are cold . The
slightly raised pressures of warm tires must
not be reduced.
- Adjust the tire pressure to the load you are
carry ing.
- Reinstall the valve stem cap on the valve .
When should I check the tire pressure?
The correct tire pressure is especially impor
tant at high speeds. The pressure should
therefore be checked at least once a month
and always before starting a journey .
When should I adjust the tire pressures?
Adjust the tire pressure to the load you are
carry ing. After changing a wheel
or replacing
wheels you have to adjust the tire pressures
on all wheels. In addition, you must then initi
alize the new tire pressures in the tire pres
sure monitoring system*~
page 240.
A WARNING
Incorrect tire pressures and/or underinfla
tion can lead sudden tire failure, loss of
control, collision, serious personal injury
or even death.
- When the
[9] warning symbol appears in
the instrument cluster, stop and inspect
the tires.
- Incorrect tire pressure and/or underinfla
tion can cause increased tire wear and
can affect the handling of the vehicle and
stopping ability.
Tires and wheels 229
- Incorrect tire pressures and/or underin
flation can also lead to sudden tire fail
ure, including a blowout and sudden de
flation, causing loss of vehicle control.
- The driver is responsib le for the correct
tire pressures for all tires on the vehicle.
The applicable pressure values are locat
ed on a sticker on the driver's side B-pil lar.
- Only when all tires on the vehicle are fil
led to the correct pressure, the tire pres
sure monitoring system* can work cor
rectly.
- The use of incorrect tire pressure values
can lead to accidents or other damage.
Therefore it is essential that the driver
observe the specified tire pressure values
for the tires and the correct pressures for
the function of the tire pressure monitor ing system*.
- Always inflate tires to the recommended
and correct tire pressure before driving
off.
- Driving with underinflated tires bend
more, letting them get too hot resulting
in tread separation, sudden tire failure
and loss of control.
- Excessive speed and/overloading can
cause heat build-up, sudden tire failure
and loss of control.
- If the tire pressure is too low or too high,
the t ires will wear prematurely and the
vehicle will not handle well.
- If the tire is not flat and you do not have
to change a wheel immediately , drive at
reduced speed to the nearest service sta
tion to check the tire pressure and add
air as required.
(D Note
Driving without valve stem caps can cause
damage to the tire valves. To prevent this,
always make sure that factory installed
valve stem caps on all wheels are securely
mounted on the valve.
•
•
Page 243 of 286

replacement or alternate tires and wheels a l
l ow the TPMS to continue to function proper
l y.
Tire pressure indicator appears
Applies to vehicles: with tire pressure monitoring system
The tire pressure indicator in the instrument
cluster informs you if the tire pressure is too
low or if there is a system malfunction.
F ig. 190 Display: underinflatio n warn ing
Using the ABS sensors , the t ire pressure mon i
toring system compa res the t ire tread circum
fe rence and v ibration characteristics of the in
d iv idual tires. If the pressure decreases in one
or mo re tires, th is is indicated in the instru
ment cluster with a
ti] warn ing symbol and a
message ¢
fig. 190. The driver message in the
disp lay goes out after S seconds. The driver
message can be d isplayed again by pressing
the
! S ET ! button. If only one tire is affected,
the display will indicate its pos ition .
T he t ire pressure monitoring system must be
reset via radio or MMI* each t ime the pres
sures are adjusted (e.g . when sw itching be
tween partia l and full load pressure) or after
changing o r replacing a t ire on your vehicle
¢
page 242. The TPMS indicator only moni
tors the tire p ressure that you have prev iously
stored . Yo u ca n find the recommended tire
p ress ures for you r vehi cle on the labe l on dr iv
er's side B -pi llar ¢
page 226 .
T ire tread c ircumfe rence and vibration c harac
ter ist ics can ch ange and ca use a ti re pressure
warn ing if:
- the tire pressure in one o r more t ires is too
low,
Tire s an d wheel s 241
- the t ire has struc tural damage,
- t he t ire press ure w as c hanged, wheels ro ta t-
ed or rep laced but the TPMS was not reset
¢ page 242.
Warning symbols
ti] Loss of pressure in at least one tire¢& .
Check the t ire o r tires and rep lace or repa ir if
necessary. The
ti] indi ca to r li ght in the inst ru
ment cluster a lso illuminates
¢ page 13.
Check/cor rect the press ures of all fo ur tires
and reset TPMS via radio or MMI*.
11il~1 (T ir e Pressure Monitoring System) Tire
pre ssure: Sy stem m alfunction!.
IfllilB appears after switching the ignition
o n or while d rivi ng and the
ti] ind icator l ight
i n the instr ument cluster blinks for app roxi
mately one minute and then stays on, there is
a system malfunct ion .
Attempt to sto re the co rrect tire pressu re
¢
page 242. If the ind ic a tor lig ht does not
turn off or i f it turns on sho rtly the rea fter, im
med iate ly dr iv e your vehicle to an authorized
A udi dealer or authorized repair faci lity to
have the malfunct ion corrected.
A WARNING
- If the tire pressure ind icator appears in
the instrument cluster display, one or more of your t ires is sign ificant ly unde r
inflated . Reduce you r speed immediately
a nd avoid any hard steer ing or b rak ing
maneuvers. Stop as soon as possib le and
check the tires and their pressu res . In
f late the tire pressure to the prope r pres
sure as indicated o n the vehicle's tire
pressure labe l
¢page 226. D riving on a
sign ificantly under-inflated tire causes
the t ire to overheat and can lead to tire
fa ilure. Under-inflation also is likely to
impair the vehicle's ha ndling and stop
ping ab ility .
- The drive r is responsib le for maintaini ng
the co rrect tire pressures . You must
check the tire pressures regu larly. .,..
•
•
Page 255 of 286
--No. Consumer Amps
I a
Gateway (Databus diagnos-
5 tic interface)
I
9 Supplementary heater
Fuse panel ® (brown )
1 CD/DVD playe r
2
Wi-Fi
3 MMI/Radio
4 Instrument cluster
5 Gateway (instrument cluster
control module)
6 Ignition lock
7 Light switch
8
Climate cont
rol system
blower
9 Steering column lock
10 Climate control system
11 Terminal 30 diagnostic con-
nector
-
12 Steering column switch
module
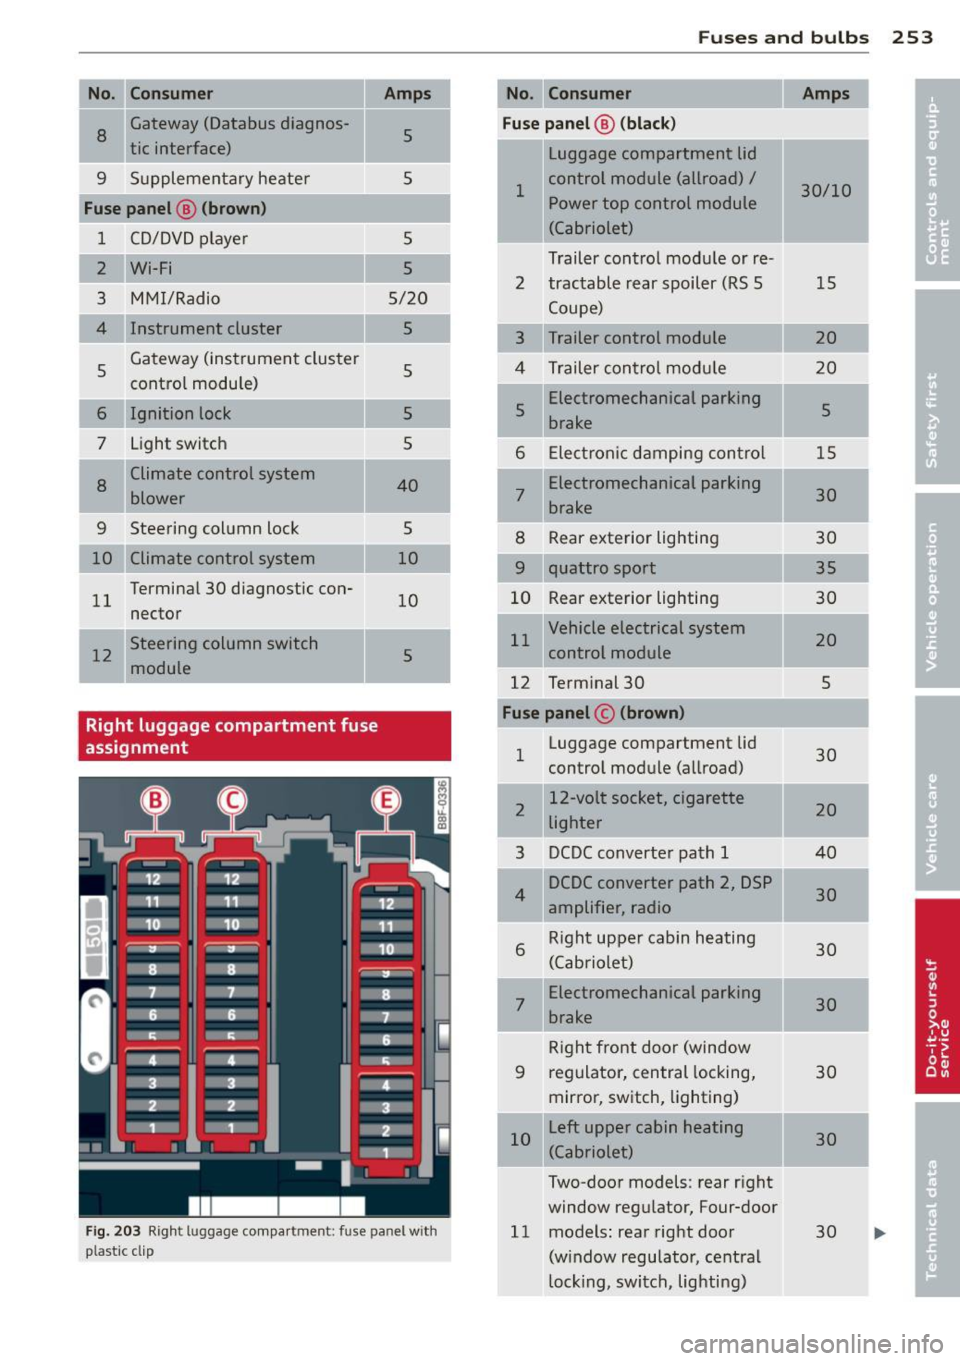
Right luggage compartment fuse
assignment
5
5
5
5/20
5
5
5
5
40
5
10
10
5
F ig. 203 R igh t lu ggage compar tmen t: fu se pan el w ith
pla stic cl ip
-
Fu se s and bulb s 253
No . Consumer Amps
Fuse panel @ (blac k)
Luggage compartment lid
1 control module (all
road) /
30/10
Power top control module
(Cabriolet)
Trailer con trol modu le or re-
2 tractable rear spoiler (RS 5 15
Coupe)
3 Trailer control module 20
4 Trailer contro l modu le 20
5 Electromechanical parking
5
brake
6 E lectron ic damping con trol 1 5
7
Electromechanical parking
30
brake
8 Rear exterior lighting 30
9 quattro sport
35
10 Rear exterior lighting
30
11 Vehicle electrical system
20
con trol module
12 Term inal 30
5
Fuse panel © (brown )
1 Luggage compartment lid
30
control module (allroad)
-.
2 12-volt
socket, cigarette
20
lighter
3 DCDC converte
r path 1 40
4 DCDC converter path
2, DSP
30
amplifie r, radio
6
Right upper cabin heating
30
(Cabriolet)
7
Electromechanical parking
30
brake
R ig ht front door (window
9 regulator, central locking,
30
mirror, switch, lighting)
10 L
eft upper cabin heating
30
(Cabriole t)
Two-door models : rear r ight
window regu lator, Four-door
11 models : rear right door
30
(w indow regulato r, ce ntra l
l ock ing, switch , lighti ng)