tow AUDI RS7 SPORTBACK 2015 Owners Manual
[x] Cancel search | Manufacturer: AUDI, Model Year: 2015, Model line: RS7 SPORTBACK, Model: AUDI RS7 SPORTBACK 2015Pages: 302, PDF Size: 74.76 MB
Page 5 of 302
M N
0:: <.J 'SI: ,...., \!) ..,.,
,...., ..,., ,....,
Safet y fir st . . . . . . . . . . . . . . . . . . . . 120
Driving Safely . . . . . . . . . . . . . . . . . 120
General notes . . . . . . . . . . . . . . . . . . . . 120
Proper occupant seating posit ions . . . 121
Driver and passenger side footwell . . . 125
Pedal area . . . . . . . . . . . . . . . . . . . . . . . 125
Stowing luggage . . . . . . . . . . . . . . . . . 126
R eport ing Safety Defects . . . . . . . . . . . 128
Safety belts . . . . . . . . . . . . . . . . . . . 130
General notes . . . . . . . . . . . . . . . . . . . . 130
Why safety bel ts? .. .. .. .. .. . . .. . . 13 1
Safety belts . . . . . . . . . . . . . . . . . . . . . 133
Safety belt p re tens ioners . . . . . . . . . . 136
Airbag system . . . . . . . . . . . . . . . . . 139
I mpor tan t th ings to know . . . . . . . . . . 139
Fr ont airbags . . . . . . . . . . . . . . . . . . . . 14 3
M onitoring the Advanced Airbag
System . . . . . . . . . . . . . . . . . . . . . . . . . 151
Knee airbags . . . . . . . . . . . . . . . . . . . . . 156
Side airbags . . . . . . . . . . . . . . . . . . . . . 158
Side curta in a irbags . . . . . . . . . . . . . . . 161
Ch ild Safety . . . . . . . . . . . . . . . . . . . 165
Important things to know .. .. .. .. . .
C hi ld safety seats ............ .... .
Install ing a chi ld safety seat .. .. ... .
L A TC H L ower ancho rages and tethe rs
fo r ch ild ren . ............. .... .. . .
A ddit io nal Informa tion
Audi pre sense .......... .. .. . .
Pr even ta ti ve passe nger p rotec tion
Vehicle operation ....... .. .. . .
Intelligent technology .. .. .. . .
N ot ice about da ta re corded by the
E vent Data Recorder and vehi cle 165
171
176
179
183
184
18 4
186
186
control mo dules . . . . . . . . . . . . . . . . . . 186
Elect ronic Stabilization Control (ESC) . 187
Rear spoiler . . . . . . . . . . . . . . . . . . . . . 190
Braking . . . . . . . . . . . . . . . . . . . . . . . . . 191
Elect romechan ical power assist,
dynam ic steering . . . . . . . . . . . . . . . . . 192
Table of contents 3
Driving with your q uattro . . . . . . . . . . 193
Energy management . . . . . . . . . . . . . . 193
Driving and environment . . . . . 196
T he first 1,000 miles (1 ,500 km) and
afterwards . . . . . . . . . . . . . . . . . . . . . . 196
Avoid damaging the vehicle . . . . . . . . . 197
Driving throug h water on roads . . . . . 197
Warmi ng up and coo ling down . . . . . . 197
Catalytic co nverter . . . . . . . . . . . . . . . . 197
Sh utting down vehicle . . . . . . . . . . . . . 198
Operate your vehicle economically a nd
min imi ze poll ution . . . . . . . . . . . . . . . . 198
Vehicle care . . . . . . . . . . . . . . . . . . . 201
Vehicle care and cleaning . . . . . 201
Gener al infor mation . . . . . . . . . . . . . . 201
Car washes . . . . . . . . . . . . . . . . . . . . . . 201
Cleaning and care information . . . . . . 202
Fuel supply and filling your
fuel tank . . . . . . . . . . . . . . . . . . . . . . .
206
Gasoline . . . . . . . . . . . . . . . . . . . . . . . . 206
Fuel tank. . . . . . . . . . . . . . . . . . . . . . . . 207
Checking and filling . . . . . . . . . . . 211
Engine hood . . . . . . . . . . . . . . . . . . . . . 211
Engine compartment.............. 213
Engine oil . . . . . . . . . . . . . . . . . . . . . . . 213
Engine cooling system . . . . . . . . . . . . . 217
Brake fluid . . . . . . . . . . . . . . . . . . . . . . 220
Battery . . . . . . . . . . . . . . . . . . . . . . . . . 221
Windsh ie ld/headlight* washer
c ont ainer . . . . . . . . . . . . . . . . . . . . . . . 224
Tires and wheels . . . . . . . . . . . . . . 226
T ires . . . . . . . . . . . . . . . . . . . . . . . . . . . 226
T ire pressure mo nitor ing system 255
Do-it -yourself service . . . . . . . . . 2 59
What do I do now? . . . . . . . . . . . . 259
E mergency warn ing triangle . . . . . . . . 259
Vehicle tool kit . . . . . . . . . . . . . . . . . . . 259
T ire repa ir . . . . . . . . . . . . . . . . . . . . . . . 260
Changi ng a wheel . . . . . . . . . . . . . . . . . 263
•
•
Page 6 of 302
4 Table of contents
Fuses and bulbs . . . . . . . . . . . . . . .
269
F uses .. .... ... . ...... ... .. .. .... 269
Bulbs . . . . . . . . . . . . . . . . . . . . . . . . . . . 272
Emergency situations ... .. .... 273
G ene ral . . . . . . . . . . . . . . . . . . . . . . . . . 273
St arting by push ing or tow ing . . . . . . . 2 73
St art ing with jumper cables . . . . . . . . 273
Useofjumpercab les ... .... ... .. .. 274
Eme rgency towing with commercial
tow truck . . . . . . . . . . . . . . . . . . . . . . . 275
Lift ing vehicle. .... .... ... .... .. .. 277
Technical data . . . . . . . . . . . . . . . . . 279
Technical data . . . . . . . . . . . . . . . . . 279
Vehicle ident ifica tion . . . . . . . . . . . . . . 279
Weights . . . . . . . . . . . . . . . . . . . . . . . . 279
D imensions . . . . . . . . . . . . . . . . . . . . . . 280
Capacities . . . . . . . . . . . . . . . . . . . . . . . 280
RS 7 Sportback 4 .0, 8 cylinder . . . . . . 281
Consumer Information . . . . . . . 282
Warranty coverages . . . . . . . . . . . . . . . 282
Operating your vehicle o utside the
U.S.A . or C anada . . . . . . . . . . . . . . . . . 282
Audi Service Rep air Manu als and
Literature . . . . . . . . . . . . . . . . . . . . . . . 282
Maintenance . . . . . . . . . . . . . . . . . . . . . 282
Addit ional accessories , modifications
and pa rts replacement . . . . . . . . . . . . 284
D eclar ation o f Compliance,
T e lecommunication and Electronic
Systems . . . . . . . . . . . . . . . . . . . . . . . . 285
Inde x ... .. ... ... .... ... .. .. .... 28 6
Page 19 of 302
M N
0:: <.J 'SI: ,...., \!) 1.1"1 ,...., 1.1"1 ,....,
Instruments and warning/indicator lights 17
level warning a. By then, your engine
may already have suffered serious dam
age.
!::. , Engine oil level
• WARNING: Please add oil immediately
If the indicator lig ht and the driver message
ap pear , add eng ine oi l immediately
¢page 213.
Ill Add oil , max. x qt (l). You may continue
driving
Wh en the sy mbol and t he dr ive r m essage ap
pea r, a dd t he am oun t of oil a pp ear ing in t he
d is pl ay at the ne xt opport uni ty
¢ page 213.
~ - Steering column lock
• Do not drive vehicle: Steering defective
If the ind ic a to r lig ht tur ns on and t he mes
sage ap pears, the re is an ele ct ro nic steer ing
col umn loc k ma lf u nction. You ca nnot switch
the ign ition on.
D o
not to w y our ve hicle bec ause it c annot be
steere d. Seek pro fes sional assistance.
Ill Steering lock: system fault. P lease con
tact dealer
If the i ndicator lig ht tu rns on and the mes
sage ap pears, the re is a n elect ro nic s teer ing
col umn loc k ma lfunction .
Drive to yo ur authorized Audi dea ler immedi
ately to have the malfunction cor rected.
A WARNING
Y our veh icle mus t not be towed in the
eve nt of a malfun ct ion in th e ele ctron ic
s teeri ng colu mn lock becau se i t ca nno t be
steered due t o the l ocked s tee ring. If it is
t owed w ith the stee ring loc ked, there is
the risk of an accident .
©-. Engine start system
• Engine sta rt system fault. Please contact
dealer
I f the indica tor ligh t turns on and the mes
sage a ppears , do
not switch the ign ition off
because you may not be ab le to sw itch it on
again.
Drive to your authori zed A udi dealer immedi
ate ly to have the ma lfunction corrected .
Ill Engine start system fault . Please contact
dealer
If t h e i ndica to r ligh t turns on and the m es
sage appea rs, t here is a malf unctio n in the en
gine start system.
D rive to your author ized A udi dealer immed i
ate ly to have th e ma lfunction corr ected .
0 Air suspension
Applies to vehicles : wit h air suspensio n
• Air suspension: system fault. Can contin
ue slowly with max . 35 mph .
There is a malfunction that can result in re
stricte d driving stability.
Carefully drive at a maximum speed of 35
mph (60 km/h) to your authorized Audi dealer
o r q ualified wor ks h op to have the ma lf u nc tion
correc ted.
• Air suspens ion: service mode. Vehicle can
only be moved with restrictions
Carefu lly drive to your author ized Audi dealer
o r qualified works hop immed iate ly to have
the service mode deactivated.
II Ai r suspension fault
The re is a system mal func tion th at ca n res ult
i n rest ric te d d rivi ng stability or redu ced
g ro und clea rance.
D rive to your au th oriz ed A udi dealer immed i
ate ly to h ave the mal func tion correc ted.
II Air suspension: vehicle too low. Ground
clearance reduced
The ground clearance is very low due to a sys
tem malfunction . Wa it until the air suspe n
s io n system has resto red no rma l groun d clear
an ce . Ot he rwis e, cond it ions su ch as an uneven
r oad su rfa ce can lead to vehicle damage .
Page 47 of 302
"' N
a:: I.J "". rl I.O
"' rl
"' rl
visibility conditions. For example, fog cannot be detected by the light sensors.
So always switch on the headlights 1§.D under these weather conditions and
when driving in the dark.
- Crashes can happen when you cannot see
the road ahead and when you cannot be
seen by other motorists . Always turn on
the headlights so that you can see ahead
and so that others can see your car from
the back.
- Please observe legal regulations when
using the light ing systems descr ibed .
(D Note
The rear fog lights should only be turned
on in accordance with traffic regulation, as
the lights are bright for following traffic.
@ Tips
- The light sensor* for automatic head light range control* is located in the rear
view mirror mount. You should therefore not apply any stickers to the windshield
in this area in order to prevent malfunc
tions or failures.
- In the event of a light sensor malfunc
tion, the driver is notified in the instru
ment cluster display ¢
page 21.
-You will hear a warning tone if you open
the driver door when the exterior lights
are switched on .
- In cool or damp weather, the inside of
the headlights, turn signals and tail
lights can fog over due to the tempera
ture difference between the inside and
outside. They will clear shortly after
switching them on. This does not affect
the service life of the lighting .
Clear vision 45
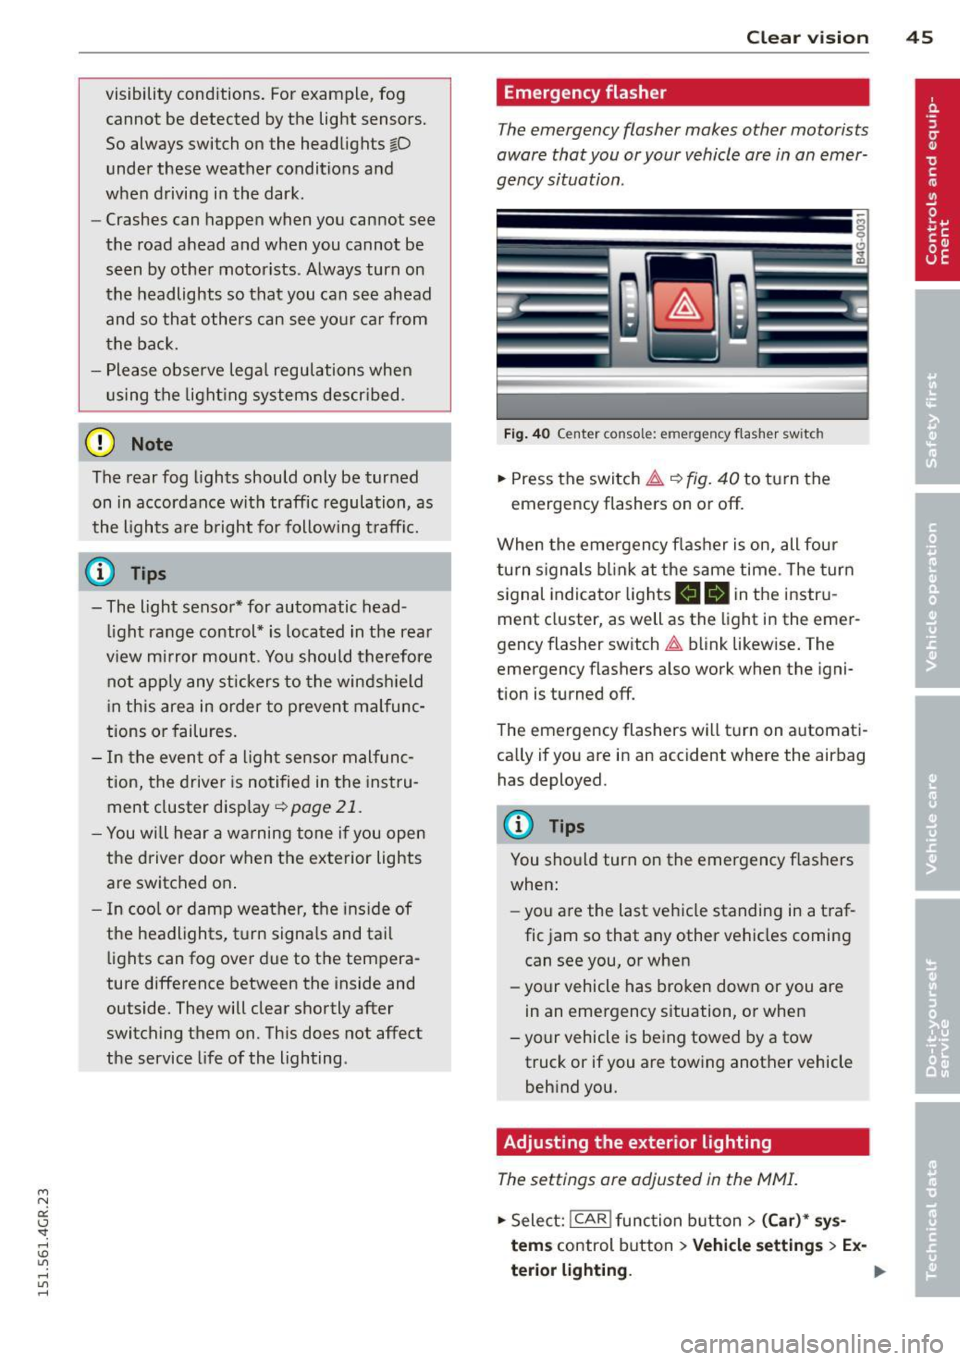
Emergency flasher
The emergency flasher makes other motorists
aware that you or your vehicle are in an emer
gency situation .
Fig. 40 Ce nt er co nsol e: em erge ncy flash er sw itc h
.,. Press the switch &..¢ fig. 40 to turn the
emergency flashers on or off.
When the emergency flasher is on, all four
turn signals blink at the same time . The turn
signal indicator lights
B DI in the instru
ment cluster, as well as the light in the emer
gency flasher switch &.. blink likewise. The
emergency flashers also work when the igni
tion is turned off.
The emergency flashers will turn on automati
cally if you are in an accident where the airbag has deployed.
@ Tips
You should turn on the emergency flashers
when:
- you a re the last vehicle standing in a traf
fic jam so that any other vehicles coming
can see you, or when
- your vehicle has broken down or you are
in an emergency situation, or when
- your vehicle is being towed by a tow
truck or if you are towing another vehicle
behind you.
Adjusting the exterior lighting
The settings are adjusted in the MMI.
.,. Select: !CAR ! function button> (Car)* sys
tem s
control button > Vehicle settings > Ex-
terior lighting. ..,.
Page 48 of 302
46 Clear vision
Automatic headlights
You can adjust the following settings in the
Automatic headlights menu:
Headlights a ctivation time -You can adjust if
the head lights switch on Early, Med. or Late
according to the sensitivity of the light sensor.
Audi adaptive light* -You can sw itch adaptive
light On and Off.
Daytime running lights
USA models : You can switc h the dayt ime run
ning lights on and off.
Canada models: The function cannot be
turned off . It is activated automatica lly each
time the ign ition is switched on. This menu
item is shown "greyed out".
Coming home, Leaving home
The coming home function illuminates the
area outside the vehicle when yo u switch the
ignition off and open the driver's door. To turn
the function on, select Lights when leaving
car> On .
The leaving home function illuminates the
area outside the vehicle when you un lock the
vehicle. To turn the funct ion on, select Lights
when unlocking car > On .
The coming home and leaving home functions
only operate when it is dark and the light
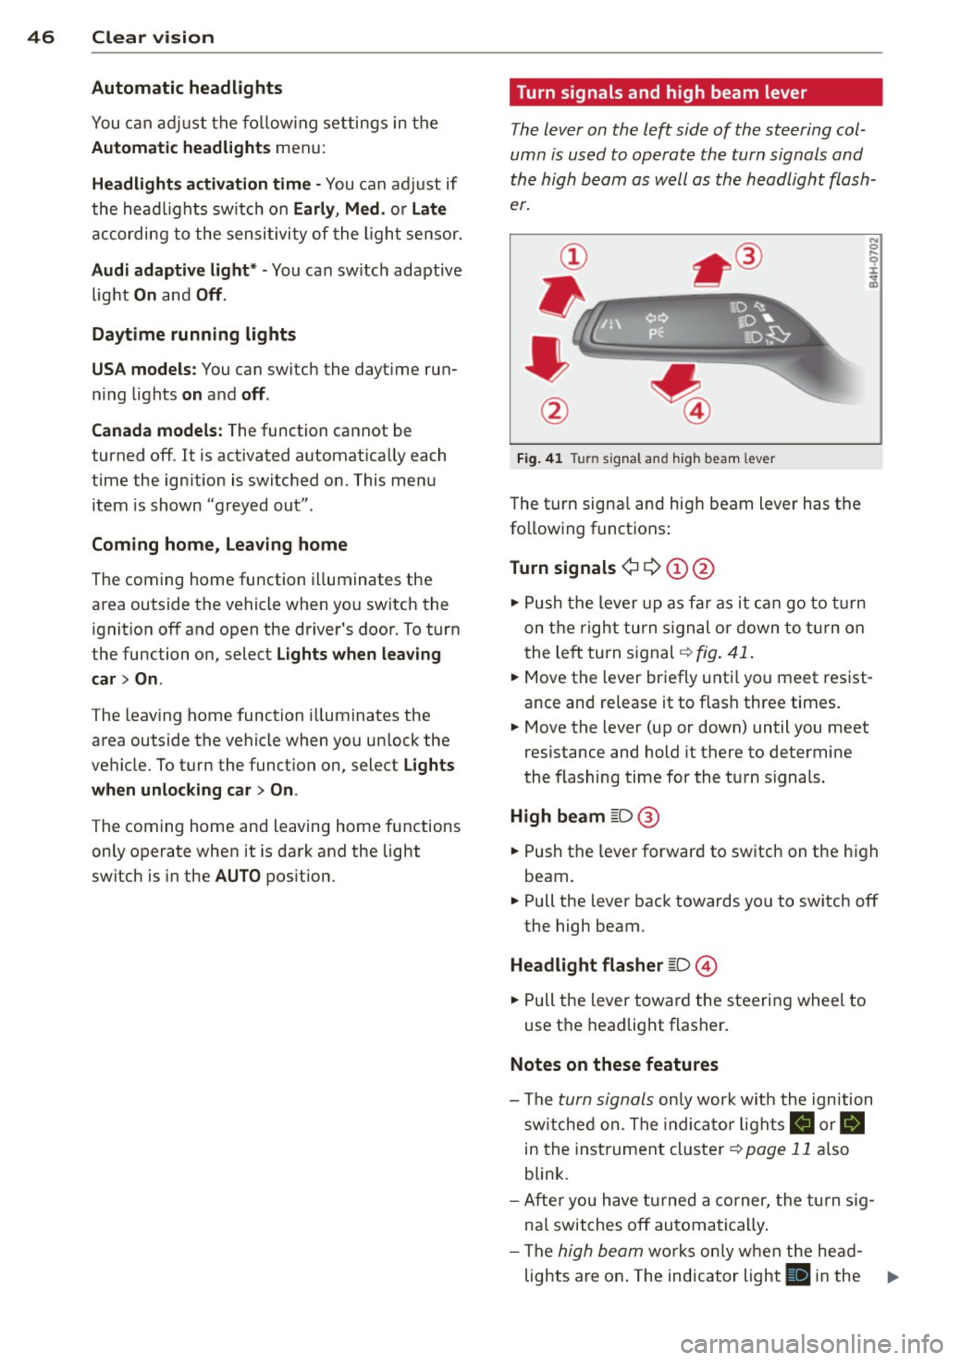
switch is in the AUTO position. Turn signals and high beam lever
The lever on the left side of the steering col
umn is used to operate the turn signals and
the high beam as well as the headlight flash
er.
Fig. 41 Turn signal and high beam lever
The turn signa l and hig h beam lever has the
following functions:
Turn signals ¢
9 (D@
.. Push the lever up as far as it can go to turn
on the right turn signal or down to turn on
t he left turn signal ¢
fig. 41.
N 0 ... 'i' :r
~
.. Move the lever briefly unti l you meet res ist
ance and re lease it to flash three times.
.. Move the lever (up or down) until you meet
resistance and hold it there to determine
the flashing time for the turn signals.
High beam
[D @
.. Push the lever forward to switch on the high
beam.
.. Pull the lever back towards yo u to switch off
the high beam.
Headlight flasher
[D ©
.. Pull the lever toward the steering whee l to
use the headlight flasher.
Notes on these features
- The
turn signals only work w ith the ignition
switched on. The indicato r lights
B or B
in th e instrument cluster¢ page 11 also
blink.
- After you have turned a corner, the turn sig
na l switches off automatically.
- The
high beam works only when the head-
lights are on. The indicator light
El in the ..,.
Page 49 of 302
"' N
a:: I.J "". rl I.O
"' rl
"' rl
instrument cluster illuminates when the
high beams are on.
- The
headlight flasher works only as long as
yo u hold the lever -even if there are no
l ights turned on . The indicator light
II in
the instrument cluster illuminates when you
use the headlight flasher.
A WARNING
Do not use the high beam or headlight
flasher if you know that these could blind
oncoming traffic.
Interior lights
Front and rear interior lighting
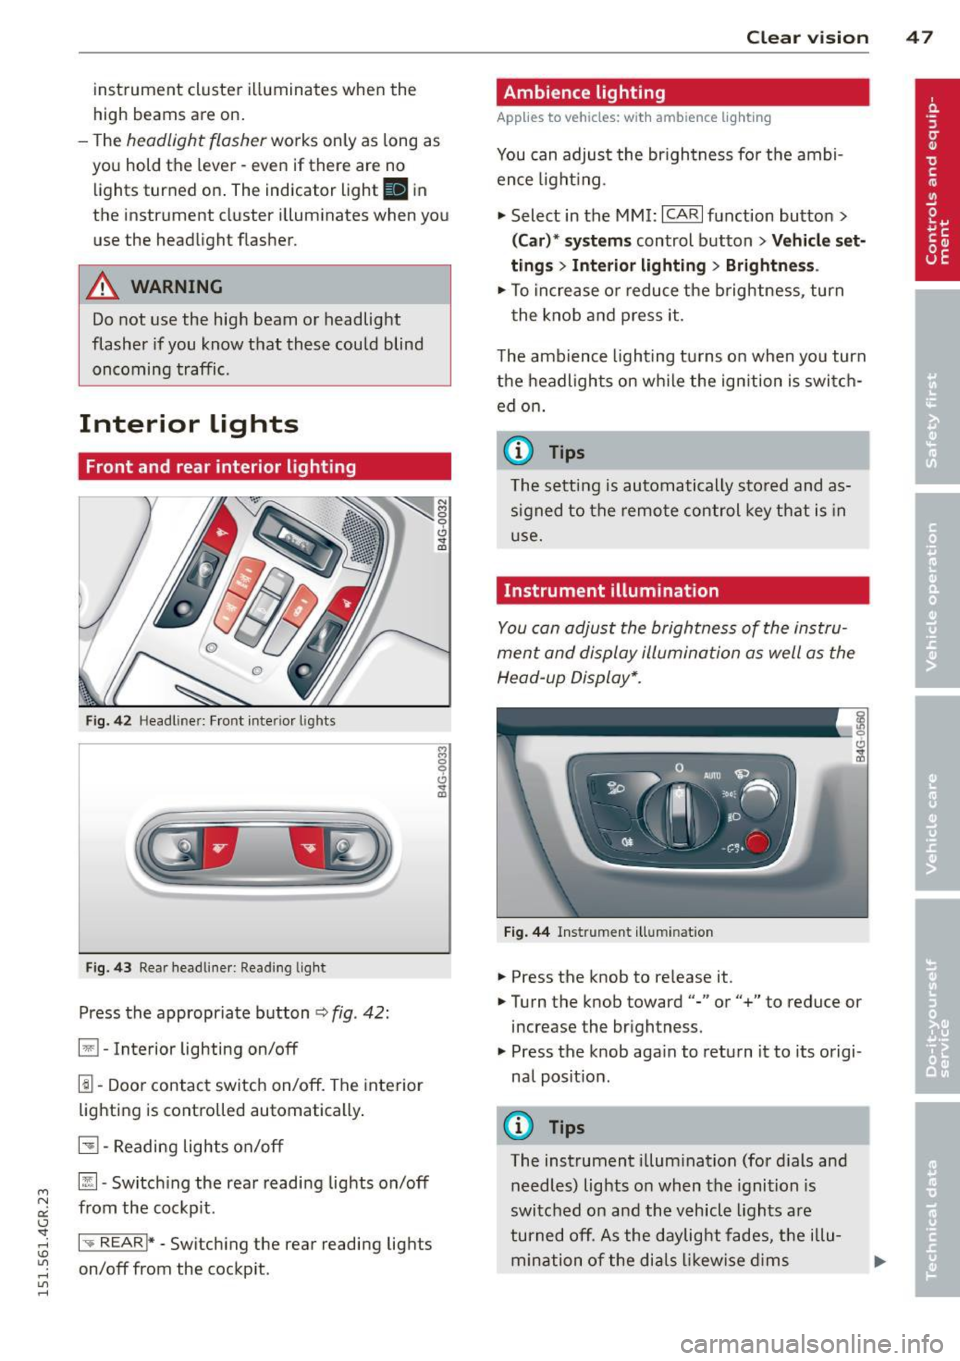
Fig. 42 Headl iner: Front inter ior l ights
F ig. 43 Rear headl iner: Reading lig ht
Press the appropriate button ¢ fig. 42:
§1 -Interior lighting on/off
1!1-Door contact switch on/off. The inte rior
lighting is controlled automatically .
51-Reading lights on/off
~- Switch ing the rear reading lights on/off
from the cockp it.
1-.. REAR !* -Switch ing the rear reading lights
on/off from the cockp it.
Clear vi sion 4 7
Ambience lighting
Applies to veh icles : w ith amb ience lig hting
You can adjust the brightness for the ambi
ence ligh ting.
.,. Select in the MMI: ICARlfunction button>
(Car)* systems control button > Vehicle set
tings
> Interior lighting > Brightne ss.
.,. To increase or reduce the brightness, turn
t he knob and press it.
The ambience lighting turns on when yo u turn
the headlights on while the ign ition is switch
ed on.
(D Tips
The setting is automatically stored and as
signed to the remote control key that is in
u se.
Instrument illumination
You can adjust the brightness of the instru
ment and display illumination as well as the
Head -up Display*.
Fig. 44 Instrument illumination
.. Press the knob to release it .
.. Turn the knob toward"-" or"+" to reduce or
increase the brightness.
.,. Press the knob aga in to return it to its origi
nal posit ion .
(D Tips
The instrument illumination (for dials and
needles) lights on when the ignition is
switched on and the vehicle lights are
turned off. As the daylight fades, the illu
mination of the dials likewise dims
Page 50 of 302
48 Clear vis ion
automatically and will go o ut comp letely
when the outside light is very low. This
feature is meant to remind you to switch on the headlights when outs ide light con
ditions become poor.
Vision
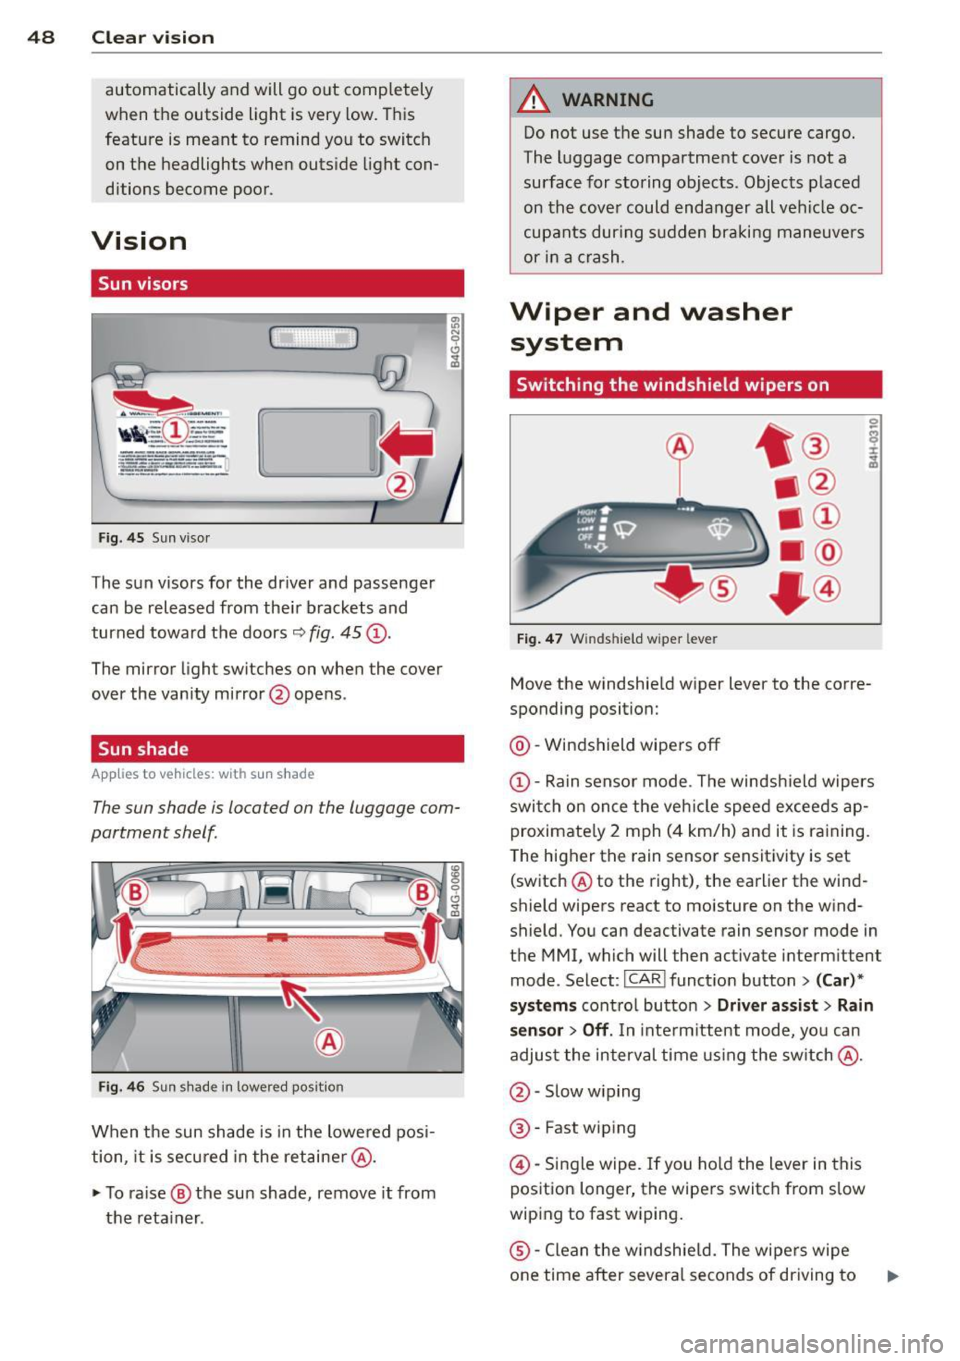
Sun visors
( )
Fig. 45 Sun viso r
The sun visors for the dr iver and passenge r
can be released from the ir brackets and
turned toward the doors
9 fig. 45 (D .
The mirror light switches on whe n the cover
over the vanity mirror @opens .
Sun shade
Applies to vehicles: with s un shade
The sun shade is located on the luggage com
partment shelf.
Fi g. 4 6 Sun s hade in lowered position
When the sun shade is in the lowe red posi
tion, it is secured in the retaine r@ .
~ To ra ise ® the su n shade, remove it from
the reta iner .
A WARNING
-Do not use t he sun shade to secure cargo.
The luggage compartme nt cover is not a
surface for storing objects. Objects p laced
on th e cove r could enda nger all vehi cle oc
cup ants dur ing s udden braki ng maneuvers
or i n a crash.
Wiper and washer
system
Switching the windshield wipers on
Fig. 47 Windshield wiper leve r
Move the windshie ld wiper lever to the corre
sponding position:
@ -Windshield wipers off
(D-Rain sensor mode . The windsh ie ld wipers
swi tch on once the veh icle speed exceeds ap
proximate ly 2 mph ( 4 km/h) and it is ra ining.
T he higher t he rain sensor sensit ivity is set
(switch @to the right), the earlier the wind
shield wipers react to moisture on the w ind
shield. You can deactivate rain sensor mode in
the MMI, which will then activate interm ittent
mode. Select:
I CAR ! funct ion button > (Car )*
systems
cont ro l butto n > Driver as sist > Rain
sensor > Off .
In inte rm ittent mode, yo u can
adjust the interval time using the sw itch @.
@ -Slow w iping
® -Fast wiping
@ -Single wipe. If you ho ld the lever in this
position longer, the wipe rs switch from s low
wiping to fast w iping.
® -Clean the w indshie ld. The wipe rs wipe
one time after severa l seconds of driving to
Page 66 of 302
64 Seats and storage
-Items on the roof rack must always be
sec urely mo unted.
- The use of a roof rack can negative ly af
fect the way a vehicle handles. Cargo
that is large, heavy, bulky, long or flat
will have a greater negative inf lue nce on
the vehicle's aerodynamics, center of gravity and overall handling . Always
dr ive slowly, avo id sudden braking and
maneuvers when tra nsporting cargo on
the roof of you r vehicle.
- Never exceed the maximum perm iss ible
load carryi ng capacity of the roof of yo ur
vehicle, the perm issib le axle weights and
the permiss ible total weight of your veh i
cle
¢ page 279, Weights .
@ For the sake of the environment
As a res ult of the increased w ind resist
ance crea ted by a roof rack, your ve hicle is
using fue l unnecessarily . So remove the
roof rack after using it .
Luggage compartment
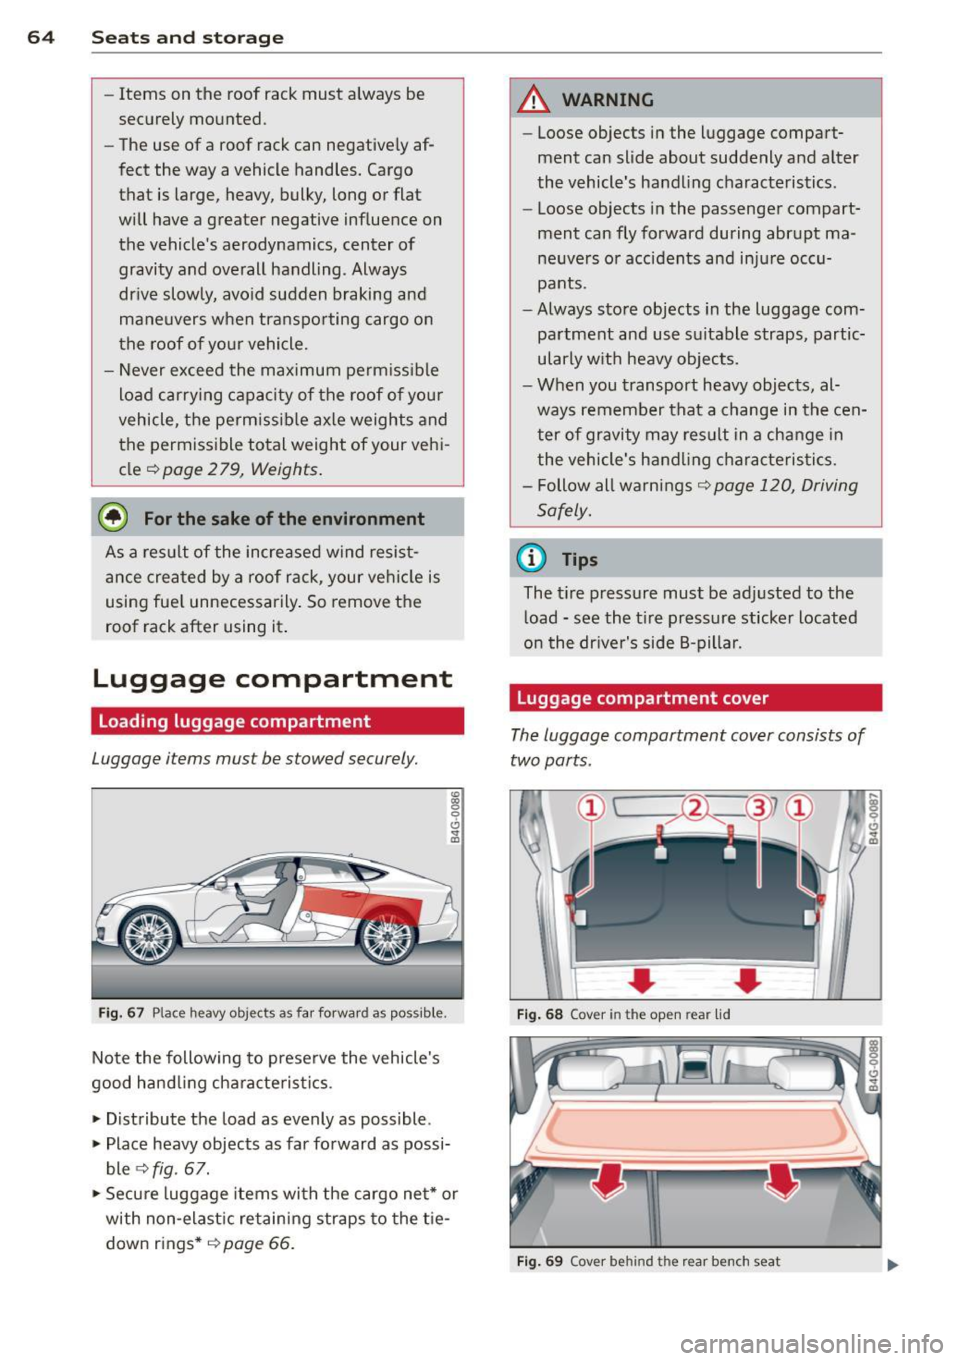
Loading luggage compartment
Luggage items must be stowed securely.
Fig . 6 7 Place heavy obj ects as far forwar d as po ssible .
Note the following to prese rve the vehicle's
good hand ling cha ra c te ris tic s .
.. Distribute the load as evenly as possible .
.. Place heavy objects as far fo rward as possi
ble ¢
fig. 67 .
.. Secure luggage items wi th the cargo ne t* or
with non -elast ic retain ing s traps to the t ie
down r ings*
¢ page 66.
A WARNING """-iiiiiiiii
- Loose objects i n the l uggage compa rt-
ment can slide about suddenly and a lter
the vehicle's ha nd ling characteristics .
- Loose objects i n the passenge r compart
ment can fly forward during abrupt ma
ne uvers or accidents and inju re occu
pants .
- Always sto re objects in the luggage com
partment and use s uitable straps, partic
ularly w it h heavy objects.
- When you t ransport heavy objects, al
ways remember that a change in the cen
ter of gravity m ay result in a change in
the vehicle's hand ling c harac teristi cs.
- Follow all warnings
¢ page 120, Driving
Safely.
(D Tips
The t ire pressure mus t be adj usted to the
l oad -see the t ire p ressure sticker located
o n the dr iver's side 8-pilla r.
Luggage compartment cover
The luggage compartm ent cover consists of
two parts .
• • Fig. 68 Cover in th e open rear lid
F ig . 6 9 Cover be hind th e r ear bench seat
Page 68 of 302

66 Seats and st o rage
Belts showing damage to webbing, bind
ings, buckles, or retractors must be re
placed.
(D Note
- If you move the front seat back when the
rear seat backrest is fo lded forward, you
could damage the head restraints on the
rear seat.
- Slide the belt guide on the outside safety
belt all the way up before folding the
backrest back forward. Make sure the
seat belt is not p inched or damaged
when the rear seat backrest if folded
back. Other objects shou ld be removed
from the rear seat bench to protect the
seatbac k from d amage.
Tie -downs and cargo net
The cargo net" prevents small objects from
sliding.
Fig . 71 Locat ion of the tie-downs in the luggage com
partment
Fig. 72 Luggage compartme nt: ca rgo net*
... To secure objects with the luggage compa rt
ment net*, fold the tie-down bracket up
ward
c::::,fig. 71.
... Insert the hooks on the luggage compart
ment net* into the tie-downs
c::::, fig . 72.
... Read and heed all WARNINGS c::::, page 126,
Stowing luggage.
In a collision, the laws of physics mean that
even smaller items that are loose in the vehi
cle wi ll turn into heavy missi les that can cause
serious injury. Items in the vehicle pick up ki
netic energy which varies with the veh icle and
the weight of the item . Vehicle speed is the
most sign ificant factor .
For example, in a frontal collision at a speed
of 30 mph (48 km/h), the forces acti ng on a
10-lb (5 kg) object are about
20 times the
normal we ight of the item . This means that
the weight of the item would sudden ly be the
equivalent of abo ut 200 lbs (90 kg). One can
easily imagine the injuries that an item of that
weight flying freely through the passenge r
compartment ca n cause in a collision at a
speed considered relatively low.
A WARNING
-
Weak, damaged or improper straps used
to secure items to tie-downs can fail dur
ing hard braking or in a collision and cause
serious personal injury.
- Always use suitable retaining straps and
properly secure items to the tie-downs in
the l uggage compartment to help pre
vent items from shift ing or fly ing for
ward.
- Never attach a chi ld seat tether strap to
a tie-down.
- For strength-related reasons, the mou nt
ing hooks can only be used to secure ob
jects weigh ing up to 10 lb. (5 kg). Heavi
er objects will not be adequ ately sec ured
- there is a risk of injury.
Page 70 of 302

68 Seats and storage
@ Tips
You can a lso open the pass-through from
the luggage compartment. Push the re
lease button down and p ush the cover for
ward.
Securing the ski sack
App lies to vehicles: with sk i sack
The ski sock must be secured in the luggage
compar tmen t.
Fig. 76 Lu ggage compartme nt: Sec uri ng th e bag
Fig. 77 Sec uring th e o bjects in t he s ki s ack
Securing the ski sack in the luggage
compartment
.. The ski sack has two be lts with hooks o n the
unders ide
9 fig. 76 @. Hang the hooks to
t h e rear fastening eye lets in the luggage
compartment .
Securing the objects in the ski sack
.. The re is also a securi ng strap q fig . 77 @ in
the sack . Pu ll the strap taut using the free
end of the s trap.
& WARNING
- Th e ski sac k is intended only fo r the
t ransportation of skis and ot her ligh t ob- jects
. To reduce the risk of serio us per
sonal injury, never transport heavy or
pointed objects in the sk i sack.
- When braking rapid ly or during an acci
dent, the load could be d isplaced and
cause injury to occupa nts .
- Sharp edges on the load must be covered
for protection. A lways fasten the belt
tightly around the sack and its contents
9 fig. 77.
(D Tips
- Never stow the ski sack away when it is
st ill wet or damp (for example, snow
me lting from skis) . Allow it to dry com
pletely before stow ing it away .
- Pos ition skis in the sk i sack with the
pointed ends facing the front and ski
poles with the pointed ends facing the
rear.