ECU AUDI S3 2009 Owners Manual
[x] Cancel search | Manufacturer: AUDI, Model Year: 2009, Model line: S3, Model: AUDI S3 2009Pages: 324, PDF Size: 76.02 MB
Page 20 of 324

Driver informati on displ ay
Driver information display
Introduction
Introduction
The Driver information display inside the instrument
cluster provides you , the driver, with important informa
tion.
Ce nter d isplay
Fig . 6 Inst rum ent
c lu ster : cente r dis pl ay
Fig .
7 Wiper lever :
co ntrol s for t he m enu
d isp lay
W ith th e ignition on, the displ ay in th e Driver Info rmation System
shows the follow ing information :
• CD* inserted or Radio* station set •
Outside tempe rature *: At temperatures below 41 °F ( +5 °C l, a
snowflake symbol appea rs in front of the temp erature display ~& .
• Warning: front lid , door or engine compartment l id open: The
display appears if the door, the engine compartment lid or front lid
is not closed .
• Warning : close fuel tank cap: The Driver information display indi
cates when the filler cap is not secured or missing~
page 221.
Additional fun ctions
You can open the following fun ctions in the Driver Information
System display by pressing the
I RESE T] button ~ fig. 7 one or more
times :
Trip computer Digital s peedometer*
Menu display
~ page22
~ page23
The speed warning system is also displayed in the Driver Informa
t ion System. You can read how to set it in~
page 26.
Auto Check Con trol
Some functions and vehicle componen ts are scanned for their oper
ating status when you switch the ignition on and wh ile you are
driving. Malfunc tions or required service procedures are signa led
audib ly and indicated by red and yel low illuminated symbols and
rem inders in the display~
page 28 .
& WARNING
• Never rely e xclusivel y on the outside temperature di spla y to
det ermine if a road surface is ic y or not. Keep in mind that road
s urface s, esp ec ia lly bridge s and overp asses, co uld be i ce cove red
and slippery even at an out side t emperatur e above 41 °F (+ 5
°C l. -.,
Page 38 of 324
Opening and closing
[ i J Tips
• If you open the driver's door with the key left in the ignition lock,
a chime will sound. This is your reminder to remove the key and lock
the door.
• For security reasons, replacement keys are only available from
authorized Audi dealers. •
Master key vvith remote control
The remote control allows you to Jock or unlock the
vehicle electronically.
Fig . 23 Fold-up master
key with remote
control
To fold the key out and back in place, press the release
button
=> fig. 23.
The transmitter and battery are located in the head of the remote control. The receiver is located inside the vehicle. The maximum
effective range depends on several things. Remember, if the battery
is weak, the effective range decreases.
If you need to replace the remote control, or if you need to have it
repaired, you must see your authorized Audi dealer. On ly then can
you use the key again.
[ i J Tips
• If the ignition is switched on, the remote control system is deac
tivated.
• The remote control system can be affected by other systems
operating in the same frequency range close to the vehicle, such as
mobile telephones, television broadcasting stations, etc.
• For Declaration of Compliance to United States FCC and Industry
Canada regulations~
page 307. •
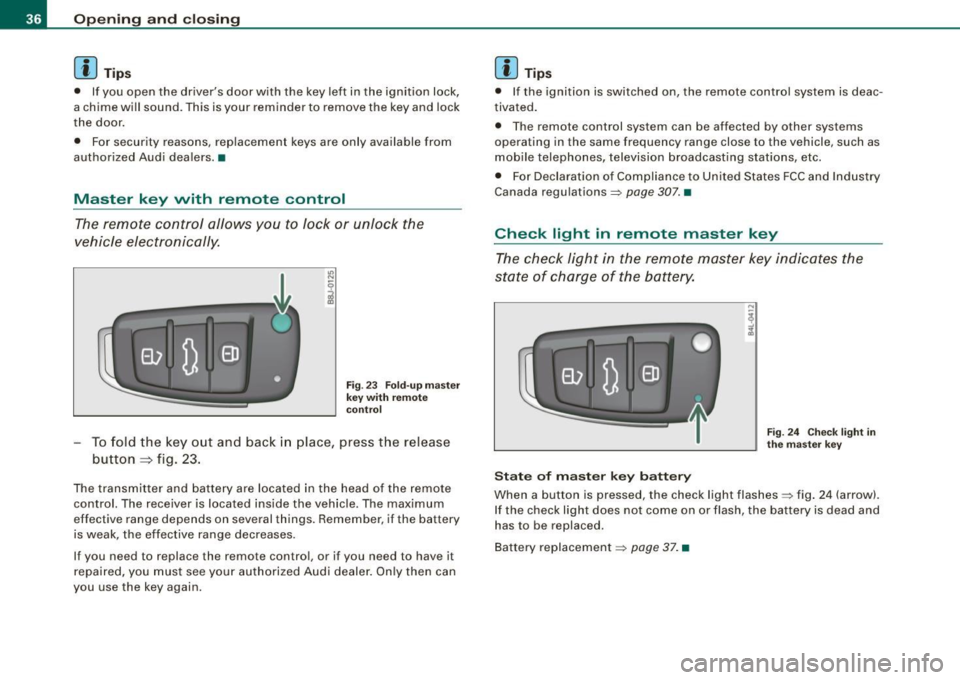
Check light in remote master key
The check light in the remote master key indicates the
state of charge of the battery.
State of master key battery
Fig. 24 Check light in
the master key
When a button is pressed, the check light flashes~ fig . 24 (arrow).
If the check light does not come on or flash, the battery is dead and
has to be replaced.
Battery replacement
~ page 37. •
Page 41 of 324

• You are well advised not to keep valuables inside an unattended
vehic le, visible or no t. Even a properly locked vehicle cannot provide
the security of a safe! •
Unlocking and locking the vehicle with the
remote control
How the remote control works.
Fig. 2 6 Remo te
c on tro l: fu ncti on
bu ttons
To unlock the v ehi cle doors and rear lid CD
- Press button @ once to un lock driver' door.
- Press b utton @twice to unlock all doors and the rea r lid .
To lo ck th e vehicl e doors and rear lid
rn
- Press butto n @ => ,& in "General description" o n
page 37.
-Watch that a ll turn signal lights flash once.
To op en r ear lid only
e::5
- Press button @ for approx imately one seco nd.
Con tro ls and eq uip
ment
Op ening and clo sing
PANIC Button
- Push the red butto n@ to ac tivate the panic function . T he
horn sounds and the t urn signa ls flash.
- P ush the button @again to deact ivate the panic func-
t ion.
The remote controls allows you to :
• lock or unlock the vehicle
• selectively un lock the rear lid.
The turn signals will f lash briefly whenever yo u lock or unlock the
vehicle. A lso, the interior light will come on or go off whenever you
open or close the driver's door .
The transmitter and battery are located in the head o f the remote
control. The receiver is located inside the vehicle. The maximum
effective range depends on several things . Remember, if the battery
is weak, th e effective range decreases.
The remote -c o ntro l key c ontains a fold -out key tha t you can use to
manually lock or unlock the vehicle and to start the engine.
If you need to replace the remote control, or if you need to have it
repai red , you mus t see your authorized Audi dealer . Only the n can
you use the key again .
& WARNING
Read and follo w all WARNINGS => & in "General de scr iption " on
page
3 7.
[ i ] Tip s
• The remote control key is automatically deactivated when the
ign ition is switched on.
• The operation of the remote control key can be temporarily
disrupted by interference from transmitters in the vicinity of the ..,
Vehicle care I I irechnical data
Page 43 of 324

& WARNING
Alw ays rea d and he ed W ARNIN G => 6 in "Genera l descripti on" on
page 37. •
Locking and unlocking the vehicle from inside
The vehicle can be locked or unlocked from the inside
using the power locking switches located in the driver's
and the front passenger's door.
F ig . 2 8 Dri ver's do or:
powe r locking switch
In addition to t he central locking switches in t he doors,
there is a locking switch on the rear center console for the
rear -seat passengers
~ page 42 .
How to lo ck all doors and the rear lid
simultaneously
- P ress lower part of t he power locking switch m ~ fig. 28
~ & -
How to unlo ck all doors and the rear lid
s imultan eo usly
- Press the upper part of the switch m .
Controls and equip
ment
Opening and clo sing
How to unlo ck / op en eac h front door separat ely
using th e door handle
- Pull the door handle once to release the lock and simul -
taneously ope n the door.
How to un lock / open each r ear door separat ely
using th e door handle
- Pull the doo r handle once to release the lock.
- Pull the handle
twice to open the door.
If you lock the vehicle using the pow er lockin g swit ch G'.i, please note
the following :
• You cannot open the doors or the rear lid from the
outside
(inc reased security, for examp le when you are stopped at a red
light) .
• The diode in the power locking switch i lluminate when a ll the
doors and the rear lid are closed and locked .
• You can unlock and open the doors individually from the inside
by pulling o nce on the door hand le for the front doors and twice for
the rear doors.
• If the driver's door is opened (a fter you have locked the vehicle
from the inside using the power locking switch), the door will
remain un locked to prevent you from locki ng yourself out of your
vehicle. After you close the door, you have to lock the d river 's door
again .
• If you have a crash and the airbag is activated, the doors au to
matically un lock .
& WARNING
• If you u se the power l ock ing switch w ith the door s clo sed ,
r e memb er t ha t all the vehic le doors will lo ck .
• Locking door s from th e in side c an h elp pr event inadv ertent
do or op en in g durin g an accident and can also prevent un want ed ...
I • •
Page 65 of 324
Applies to vehicles: wi th Sun blind
Sun blind
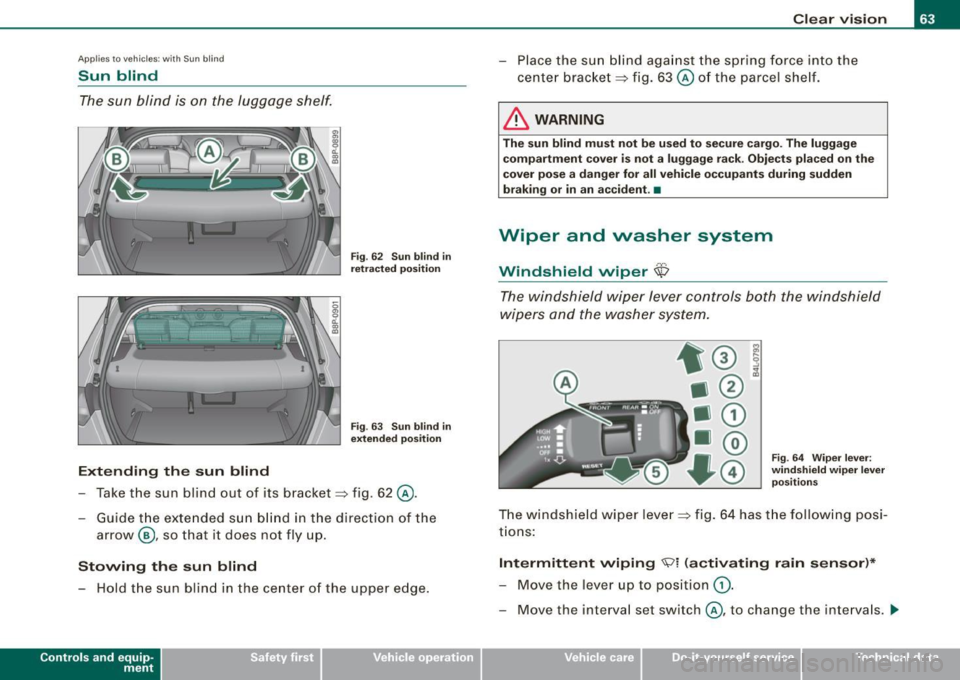
The sun blind is on the luggage shelf.
Extending the sun blind
Fig. 62 Sun blind in
retracted position
Fig . 63 Sun blind in
extended position
-Take the sun blind out of its bracket=:> fig. 62 @.
- Guide the extended sun blind in the direction of the
arrow @, so that it does not
fly up.
Stowing the sun blind
-Hold the sun blind in the center of the upper edge.
Contro ls and eq uip
ment
Clear vision
- Place the sun blind against the spring force into the
center bracket=:> fig. 63@ of the parcel shelf.
& WARNING
The sun blind must not be used to secure cargo. The luggage
compartment cover is not a luggage rack . Objects placed on the
cover pose a danger for all vehicle occupants during sudden
braking or in an accident. •
Wiper and washer system
I'',",
Windshield wiper 'Z\)
The windshield wiper lever controls both the windshield
wipers and the washer system.
Fig. 64 Wiper lever:
windshield wiper lever positions
The windshield wiper lever=:> fig. 64 has the following posi
tions:
Intermittent wiping ~ ! (activating rain sensor)*
- Move the lever up to position G).
- Move the interva l set switch @, to change the intervals. _.
Vehicle care I I irechnical data
Page 85 of 324
Luggage compartment
Increasing the size of the luggage
compartment
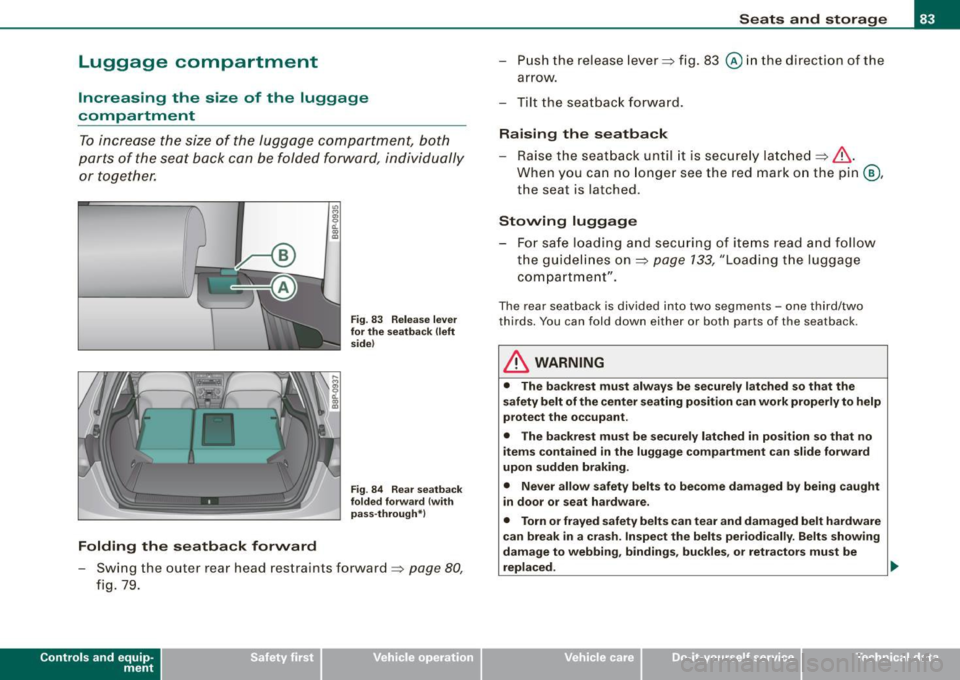
To increase the size of the luggage compartment, both
parts of the seat back can be folded forward, individually or together.
Folding the seatback forward
U')
"'
"' 0 a. ., CD
Fig . 83 Release lever
for the seatback (left
side)
Fig . 84 Rear seatback
folded forward {with
pass-through*)
- Swing the outer rear head restraints forward=> page 80,
fig. 79.
Con tro ls and eq uip
ment
Seats and storage
- Push the release lever=> fig. 83
@ in the direct ion of the
arrow.
- Tilt the seatback forward.
Raising the seatback
- Raise the seatback until it is securely latched=>& .
When you can no longer see the red mark on the pin@,
the seat is latched .
Stowing luggage
- For safe loading and securing of items read and follow the guidelines on=> page
133, "Loading the luggage
compartment".
The rear seatback is divided into two segments -one third/two
thirds. You can fold down either or both parts of the seatback .
& WARNING
• The backrest must always be securely latched so that the
safety belt of the center seating position can work properly to help
protect the occupant.
• The backrest must be securely latched
in position so that no
items contained in the luggage compartment can slide forward
upon sudden braking.
• Never allow safety belts to become damaged by being caught
in door or seat hardware.
• Torn or frayed safety belts can tear and damaged belt hardware
can break in a crash. Inspect the belts periodically. Belts showing
damage to webbing, bindings, buckles, or retractors must be
replaced.
~
Vehicle care I I Technical data
Page 86 of 324
Seats and storage
& WARNING
Always read and heed WARNINGS => & in uloading the luggage
c ompartment " on
page 133 .
0 Note
When folding the backre st back into place, make su re the safe ty belt
does not get caught, because it can be damaged . A damaged belt
can fail to p rov ide safe restraint. •
Fastening eyes
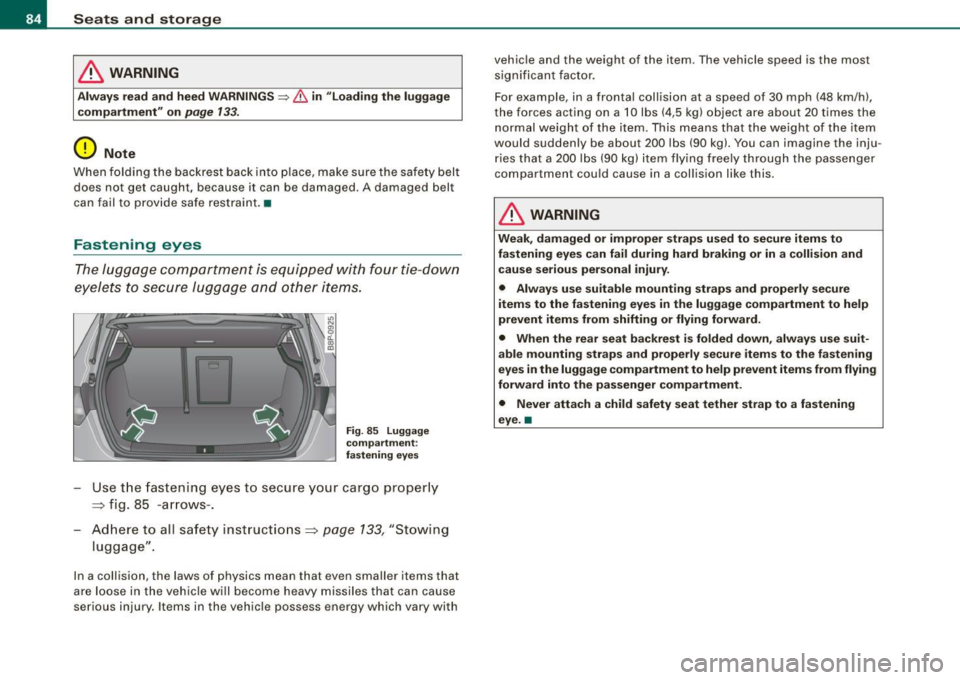
The luggage compartmen t is e qui pped with four tie -down
eyele ts to secure lug ga ge and o ther items .
Fig. 85 Lugg age
compartment :
fa stening eyes
Use t he fastening e yes to secu re you r ca rgo pr oper ly
=> fig. 85 -a rr ow s-.
- Ad here to all safet y instruc tions => page 133, "Stowing
lugg age".
In a collision, the laws of physics mean that even smalle r items that
a re loo se in t he vehi cle will bec ome he avy missiles that ca n ca use
se rious inju ry . I tems in the vehicle possess e nergy which vary with vehicle and the weight of the item
. T he vehicle speed is the most
significan t factor.
For exam ple, in a fronta l collision at a speed of 3 0 mph (48 km/h),
the forces acting on a 10 lbs ( 4,5 k g) object are about 20 times the
n ormal w eight of th e ite m. Th is mea ns that the weight of the it em
woul d suddenly be about 200 lbs (90 kg). You can imagine the inju
ri es th at a 20 0 lb s (90 kg) item fl ying fr ee ly t hroug h the passe nge r
compartment cou ld cause in a co llis ion li ke this.
& WARNING
Weak , damaged or improper straps used to secure items to
fastening eyes can fail during hard braking or in a collision and cause serious personal injury .
• Always use suitable mounting straps and properly secure
items to the fastening eyes in the luggage compartment to help
prevent items from shifting or flying forward.
• When the rear seat backrest is folded down , always use suit
able mounting straps and properly secure items to the fastening
eyes in the luggage compartment to help prevent item s from flying
forward into the passenger compartment .
• Never attach a child safety seat tether strap to a fastening
eye. a
Page 87 of 324
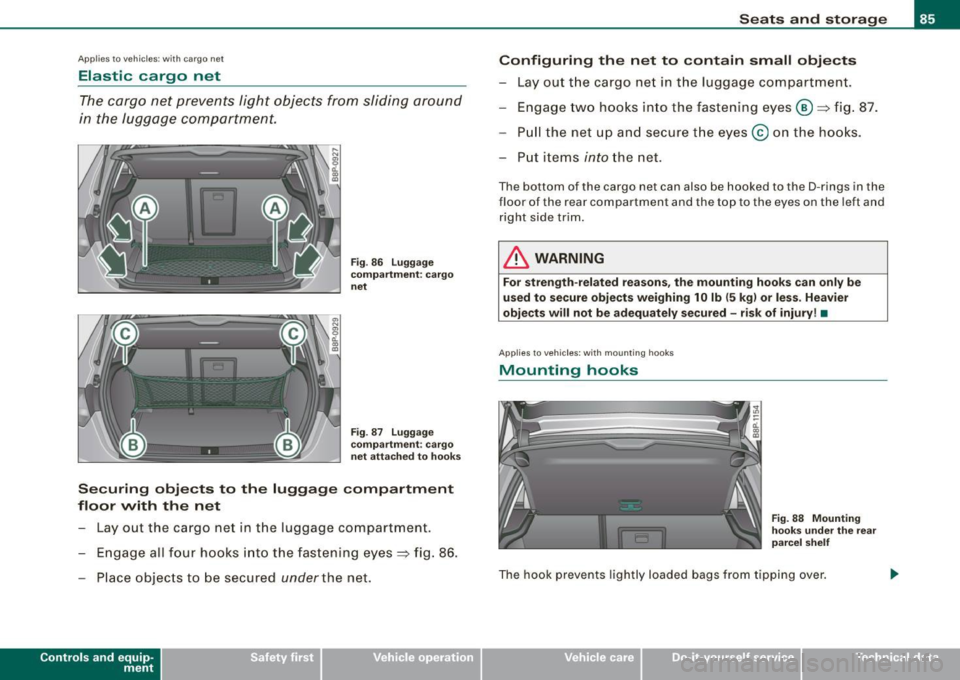
Applies to vehic les: w it h ca rgo ne t
Elastic cargo net
The cargo net prevents light objects from sliding around
in the luggage compartment.
Fig . 86 Luggage
compartment : cargo
net
Fig . 87 Luggage
compartment : cargo
net attached to hooks
Securing objects to the luggage compartment
floor with the net
- Lay out the cargo net in the luggage compartment .
- Engage all four hooks into the fastening eyes~ fig. 86.
- Place objects to be secured
under the net.
Con tro ls and eq uip
ment
Seats and storage
Configuring the net to contain small objects
- Lay out the cargo net in the luggage compartment.
- Engage two hooks into the fasten ing eyes ®~ fig. 87.
- Pull the net up and secure the eyes @ on the hooks.
Put items
i nto the net.
The bo ttom of the cargo ne t can al so be hooked to the D-rings in the
floor of the rear compartment and th e top to the eyes on the left and
right side t rim.
& WARNING
For strength-related reasons, the mounting hooks can only be
used to secure objects weighing 10 lb (5 kg) or less . Heavier
objects will not be adequately secured -risk of injury! •
Applies to v ehic les: with mo unt ing hooks
Mounting hooks
Fig . 88 Mounting
hooks under the rear
parcel shelf
The hook prevents lightly loaded bags from tipping over.
Vehicle care I I Technical data
Page 88 of 324

Seats and storage
& WARNING
For strength-related reasons, heavy objects must not be hung on
the hooks. Heavy objects are not adequately secured -this
increases the risk of injury. •
Retractable luggage compartment cover
The luggage compartment cover keeps luggage or other
objects out of view.
Fig. 89 Rear lid open
with luggage compart ment cover
Removing the luggage compartment cover
Detach the retaining straps=> fig. 89 at the rear hatch G).
-Pull the cover 0 horizontally out of the mount@ in the
direction of the arrow.
Installing the luggage compartment cover
- Push the cover horizontally into the mounts provided
=> fig. 89@ on the side panel until the cover seats.
- Install the retaining straps in the rear hatch => fig. 89
G)
=>& .
& WARNING
• The luggage compartment cover must never be installed
without being secured -this creates an accident hazard.
• Whenever driving, never place any hard or heavy objects on the
luggage compartment or allow pets to sit on the luggage compart
ment cover . They could become a hazard to vehicle occupants in
the event of sudden braking or in an accident.
0 Note
Make sure that the heating wires in the rear lid do not get damaged
by objects scraping against them.
[ i ] Tips
• You can use the luggage compartment cover to store light
weight clothing but do not leave any heavy or sharp objects in the
pockets of the clothing.
• Remember that placing clothing on the luggage compartment
cover can block the driver's vision in the rear view mirror. This also
applies especially when you have to transport large objects.
• So that stale air can escape from the vehicle be sure not to cover
the ventilation slot between the rear lid and the luggage compart
ment cover installed. •
Page 89 of 324

Applies to vehic les: w ith revers ible cargo area floor
Reversible cargo area floor (protective liner )
Use the protective liner when transporting dirty or wet
objects .
Reversing the cargo area floor
-Open the luggage compartment lid.
Fig. 90 Luggage
compartment : cargo
area floor
Fig . 91 Luggage
compartment : protec
tive liner
-Raise the cargo area floor at both handles=> fig. 90,
remove it
G) and rotate it 180 degrees @.
- In sert the reversed cargo area floor (protective liner)
again => fig. 91 . •
Con tro ls and eq uip
ment
Seats and storage
App lies to vehicles: w ith s ki sack
Ski sack
The ski sack allows a maximum of 4 pairs of skis or 2
snowboards to be carried inside the vehicle .
Loading
-Open t he rear hatch.
Fig . 92 Section of the
rear seat from the rear:
ski sack hatch cover
Fig. 93 Securing the
ski sack at the center
rear seat belt buckle
- Slide the release button for the pass -through down (with
the center arm rest)=> fig. 92 -Arrow- and tilt the pass
through forward.
- Remove the sack from the luggage compartment and
unfold it.
Vehicle care I I irechnical data