lock AUDI S3 2009 Repair Manual
[x] Cancel search | Manufacturer: AUDI, Model Year: 2009, Model line: S3, Model: AUDI S3 2009Pages: 324, PDF Size: 76.02 MB
Page 215 of 324

Cleaning and prote ction -
----------------
•
Chassis
Have the underco ating checke d for damage from time to
time .
The lower body shell of your Audi is a lso thorough ly protected
against corros ion.
Any damage to the undercoating caused by road hazards should be
repa ired p romptly.
& WARNING
Too mu ch undercoat ing in the wrong place s can cau se a fire.
• Do not app ly additional undercoating or rustproofing on or
near the exhau st manifold , ex haust p ipe s, cat alytic con verter or
heat shields . While d riving, the sub stan ce used for undercoating
c o uld overhe at and cause a fire.
• Alw ays read a nd heed all WARNINGS and other information
=> p age 206 . •
Care of interior
Aluminum trim
Use only neutral-pH products to remove spots and deposits from
a luminum surfaces. Chrome care products and alka line cleaners
w ill attack aluminum s urfaces and ca n damage them over time.
& WARNING
Alway s read and he ed all WARNINGS and other information
=> page 206. •
Fabrics and fabric coverings
Fabrics and fabric coverings (e.g. seats, door trim pane ls, etc.)
shou ld be c leaned at regular intervals with a vacuum cleaner . This
removes surface dirt partic les which could become embedded in
t he fabric through use. Steam clea ners shou ld not be used, because
the steam tends to push the dirt deeper into the fabric and lock it
there .
No rmal cleaning
Genera lly, we recommend using a soft sponge or a lint-free
microfiber c loth to the clean fabric. Brushes should only be used for
carpe ts and floor mats, since other fabric su rfaces co uld be harmed
by brushes.
N orma l surface stains can be cleaned using a commercially avail
able foam cleaner. Spread the foam on the surface o f the fabric with
a soft sponge and work it in gent ly. Do not saturate the fabric . Then
pat the foam dry us ing absorbent, dry cloths (e.g. microfiber cloth)
and vacuum it after it has dried completely.
C leaning stains
Stains caused by beverages (e.g. coffee, fruit juice, etc.) can be
t reated with a mild detergent so lution . Apply the detergent so lution
with a sponge. In the case of stubborn stains, a detergent paste can
be applied directly to the stain and worked into the fabric . After
wards, use copious amounts of clean water to remove the
re maining dete rgent . Apply the water w ith a damp cloth or sponge
and pat the fabric dry with an absorbent, dry c loth .
Stains from chocolate or makeup should have detergent paste (e.g .
ox -ga ll soap) rubbed into them. Afterwards, remove the soap with
water (damp sponge).
A lcoho l can be used to treat s tains from grease, oi l, lipst ick or a ba ll
point pen . Melted grease or dye must be patted off using absorbent
ma terial. It may be neces sary to retrea t the areas with de tergent
paste and water. _.,
Vehicle care
I t •
Page 217 of 324
____________________________________________ ...:C :..: l:..: e :.: a::. n:....:..:..: in~ g~ a~n .:..:d::....! p::. r :..:o:::..::. te:::..::: c:..::t ..:..:io ::::.: n:...__IJIIII
•
soiling, etc.), you will need to be somewhat careful with these
leathers, and a certain type of care is required. For example, dark
clo thing materials can discolor leather sea ts (especially if such
clothing is damp and was not dyed correctly) . Dust and dirt particles
in pores , folds, and seams can have an abrasive effect and can
damage the leather surface as well as weaken seams.
The leather should be cleaned regularly as needed. After having
been used for a rela tiv ely long tim e, your lea ther seats will acquire
a rich aged finish. This is a characteristic of natural leather and a
sign of true quality.
In order to maintain the value of this natural product over the life of
your vehicle, you should follow the recommendations below:
0 Note
• To keep your leather from bleaching out, do not allow it to be
exposed to bright sunlight for long periods of time. If you have to
leave the vehicle parked outside for long periods, cover the leather
to protect it from direct exposure to sunlight.
• Sharp objects on clothing, such as zippers, rivets or sharp pieces
on belts can leave permanent scratches or scrape marks on the
surface of the leather.
[ i] Tips
• After each time you clean the leather and at regular intervals, use
a leather preservative creme that contains UV -blockers and that
works into the leather. This creme will nourish and moisturize the leather , helping it to breathe and stay supple . It also helps to build
up a protective coating on the surface.
• Clean the leather every 2 -3 months, and clean any areas that get
soiled.
• Remove fresh marks made by ballpoint pens, ink, lipstick, shoe
polish, etc . as soon as possible.
• Preserve the color of the leather as needed by using a special
colored leather care creme to touch up areas of uneven color .•
Ap plies to veh ic les : wi th n atural leat her
Cleaning and caring for leather upholstery
and trim
Natural leather requires special care and attention.
Normal cleaning
-Clean soiled areas with a slightly moistened cotton or
woolen cloth.
More stubborn dirt
- More stubborn dirt can be removed using a cloth satu
rated with a mild soap solution (2 tablespoons mild
liquid soap).
- Never allow the soap solution to saturate the leather, and
make certain that no water soaks into the seams.
Wipe off the soap solution with a soft, dry cloth.
Cleaning spots
- Remove fresh water-based spots (such as coffee, tea,
juices, blood) with an absorbent cloth or paper towel.
- Remove fresh grease or oil-based spots (such as butter,
mayonnaise, chocolate) with an absorbent cloth or paper
towel, or use the cleaner from the leather care kit if the
spot has not yet penetrated into the surface of the
leather.
- Use an oil/grease dissolving spray, if oil/grease spots
have dried on.
- Remove specific kinds of spots (ballpoint pen, felt
marker, fingernail polish, water-based paint, shoe polish,
etc.) with a spot remover specifically formulated for leather. ._.
Vehicle care I t •
Page 219 of 324
_____________________________________________ C_ l_ e _ a_ n_ in--= g'--- a_n _d___, p_ r _o_ te_ c_t _io _ n __ fflllll
•
Safety belts
Only well-maintained safety belts work reliably when
needed.
- Keep belts clean.
- For cleaning, use a mild soap and water solution. Let
belts dry thoroughly and away from direct sunlight.
- Do not allow inertia reel safety belts to retract before
they are completely dry.
- Check the condition of your safety belts
regularly.
Heavily soiled safety belts may not retract properly.
& WARNING
Damaged safety belts can break in a crash .
• Anything that might damage your safety belts could mean that
you and your passengers would not be adequately protected in an
accident.
• Safety belt performance depends on correct installation. Never
remove belts from the vehicle to clean them .
• Do not use chemical cleaning agents, bleach or dyes. They have
corrosive properties which weaken the webbing.
• When cleaning your safety belts, inspect them for damage. If
you discover damage, see your authorized Audi dealer.
• Always read and heed all WARNINGS and other information
=:, page 206. •
Engine compartment
Be especially careful when cleaning the engine compart
ment.
Always switch off the ignition before cleaning the engine =:> &.
Plenum panel
Remove leaves from the plenum panel in front of the windshield
under the engine hood. This prevents the water drain holes from
becoming blocked, and it prevents debris from entering the vehicle
interior through the heating and ventilation ducts .
Corrosion protection
The engine compartment and transmission have been corrosion
protected at the factory.
Good anti-corrosion treatment is very important, particularly in the
winter. If the vehicle is frequently driven on salt treated roads, the
entire engine compartment and plenum panel should be thor
oughly cleaned at the end of winter and retreated to prevent salt
damage. At the same time, the underside of the vehicle should be
washed as well.
If the engine compartment is cleaned at any time with grease
removing solutions
3l, or if you have the engine washed , the anti
corrosion treatment is almost always removed as well . It is therefore
essential to have a long-lasting corrosion protection reapplied to all
surfaces, seams, joints and components in the engine compart
ment.
& WARNING
Be aware: The engine compartment of any motor vehicle is a
potentially hazardous area.
• Before working in the engine compartment, be sure to read the
information
=:> page 217 . .,,_
31 Use only the correct cleaning solutions. Never use gasoline or diesel fuel.
Vehicle care I t •
Page 222 of 324
Fuel supply and filling your fuel tank
Blend of gasoline and ethanol (grain alcohol or ethyl alcohol}
• Anti -knock index must be 87 AKI or higher.
• Blend must not contain more than 10% ethanol.
Blend of gasoline and MTBE
• Anti-knock index must be 87 AKI or higher.
• Blend must contain not more than 15% MTBE.
Seasonally adjusted gasoline
Many gasoline grades are blended to perform especially well for
winter or summer driving. During seasonal change -over, we suggest
that you fill up at busy gas stations where the seasonal adjustment
is more likely to be made in time.
0 Note
• Methanol fuels which do not meet these requirements may
cause corrosion and damage to plastic and rubber components in
the fuel system.
• Do not use fuels that fail to meet the specified criteria in this
chapter.
• If you are unable to determine whether or not a particular fuel
blend meets the specifications, ask your service station or its fuel
supplier.
• Do not use fuel for which the contents cannot be identified.
• Fuel system damage and performance problems resulting from
the use of fuels different from those specified are not the responsi
bility of Audi and are not covered under the New Vehicle or the
Emission Control System Warranties.
• If you experience a loss of fuel economy or driveability and
performance problems due to the use of one of these fuel blends,
we recommend that you switch to unblended fuel. •
Gasoline additives
A major concern among many auto manufacturers is carbon
deposit build-up caused by the type of gasoline you use.
Although gasoline grades differ from one manufacturer to another,
they have certain things in common . All gasoline grades contain
substances that can cause deposits to collect on vital engine parts,
such as fuel injectors and intake valves. Although most gasoline
brands include additives to keep engine and fuel systems clean,
they are not equally effective.
Audi recommends using TOP TIER Detergent Gasoline. For more
information on TOP TIER Detergent Gasoline, please go to the offi
cial website (www.toptiergas.com).
After an extended period of using inadequate fuels, built-up carbon
deposits can rob your engine of peak performance.
(D Note
Damage or malfunction due to poor fuel quality is not covered by
the Audi New Vehicle Limited Warranty. •
Fuel tank
Fuel filler neck
The fuel filler neck is located on the right rear side panel behind the
fuel filler flap.
If the power locking system should fail, you can still open the flap
manually - for detailed instructions see=>
page 223.
You can find the fuel tank capacity of your vehicle in Technical Data
=> page 300. .,_
Page 223 of 324
Fuel supply and filling your fuel tank -------------=-=--=-------=:a....:.--------J
The labe l on the inside of the fuel filler flap tel ls you the correct fuel
fo r your vehicle . For mo re information about fuel specifications, see
=> page 279.
Your vehicle fuel tank has an on -board refuelling vapor recovery
sys tem. Th is feature helps to prevent fue l vapors from escapin g
from the tank and polluting the environment wh ile you refue l your
veh ic le . I n order to fill the tank properly while protecti ng the envi
ronment, please follow this refuel ing procedure carefully .
& WARNING
Under normal operating conditions , never carry additional fuel
c ontainers in your car . Ga s canister s and other containers used to
transport fuel can be dangerous . Such conta iners , full or empty,
may leak and could cause a fire in a collision . If you mu st transport
fuel to use for your l awn mower , snow blower , etc. , be very c areful
and always ob serve local and state laws regarding the u se , tran s
port ation and storage of su ch fuel containers . Make certain the
c ontainer meets industry standard s (ANSI/ASTM F852 · 86 1.
0 Note
Neve r drive yo ur vehicle un til the fue l tank is comp le tely d ry. The
irregular supp ly of fuel can cause misfiring . Gasoline could enter
int o t he exhaus t system and damage the cataly tic conver ter. •
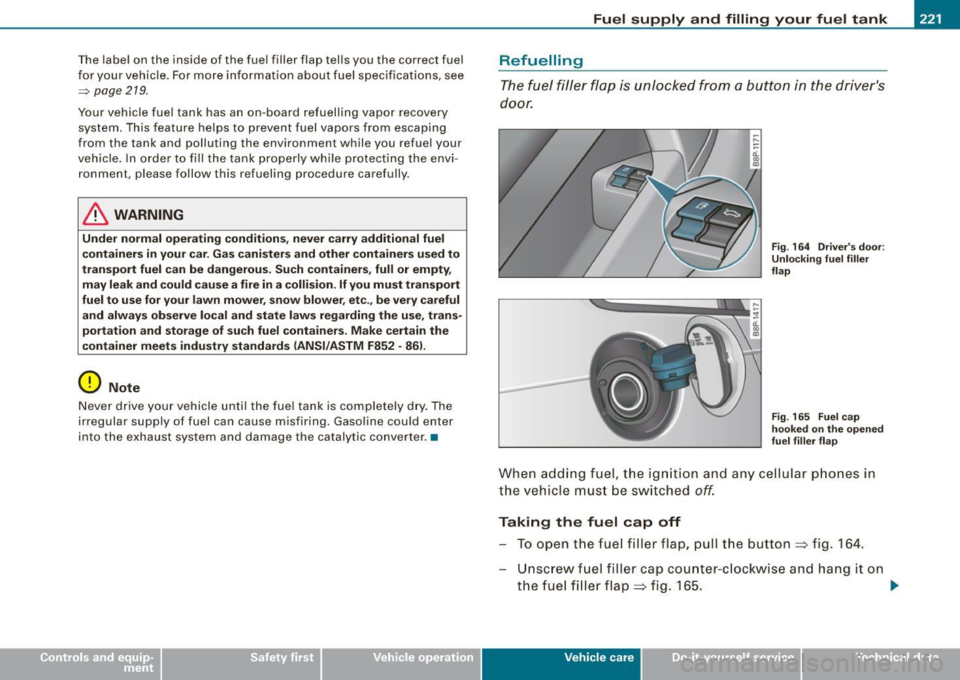
Refuelling
The fuel filler fl ap is unl ocked f rom a but ton i n the driver' s
door.
F ig . 164 Driver 's do or:
Unlo cking fuel filler
flap
F ig . 165 Fue l cap
ho oked on th e op ened
fuel fi ller flap
W hen a dding f uel, the ig nitio n and a ny c ellu lar phones in
th e ve hicl e m ust b e sw it c hed
off.
Taking the fuel cap off
To open t he fue l fille r flap, pull the button~ fig. 164.
U nsc re w fu el filler c ap co unter-c lockwise and hang it on
t h e fue l fi ller flap ~ fig. 165 . ..,
Vehicle care I I irechnical data
Page 224 of 324
-Fuel supply and filling your fuel tank Pll:I-----=--=----:.------=-=---------------
Refuelling procedure
-Insert the fuel nozzle from the gasoline pump into the
fuel filler neck as far as it will go.
- Select a medium refuelling rate so that the nozzle switches off automatically when the tank is full.
Putting the fuel cap back on
- After filling your tank, twist the fuel filler cap clockwise
until you hear a definite click.
Close the fuel filler flap.
To avoid fuel spilling or evaporating from the fuel tank always close
fuel filler cap properly and completely. An improperly closed fuel
filler cap may also cause a message in the driver information system
or cause th e MIL lamp => page 21 to come on.
& WARNING
Improper refueling or handling of fuel can cause fire, explosion
and severe burns.
• Fuel is highly flammable and can cause severe burns and other
injuries.
• Failure to shut the engine off while refueling and/or to insert
the pump nozzle fully into the fuel filler neck could cause fuel to
spray out of filler neck or to overflow. Fuel spray and overflowing
fuel can cause a fire.
• Never use a cellular telephone while refueling. The electromag
netic radiation can cause sparks that can ignite fuel vapors and
cause a fire.
• Never get back into your vehicle while refueling.
If in excep
tional circumstances you must get back in your vehicle while refu eling, make certain that you close the door and touch metal to
discharge static electricity before touching the filler nozzle again.
& WARNING (continued)
Static electricity can cause sparks that can ignite fuel vapors
released during refueling.
• Never smoke or have an open flame anywhere in or near your
vehicle when refueling or filling a portable fuel container.
• For your safety, we strongly recommend that you do not travel
with a portable fuel container in your vehicle. The container, full or empty may leak and could cause a fire, especially in a crash.
• If, under exceptional circumstances, you must transport a
portable fuel container, please observe the following: -Never fill a portable fuel container while it is anywhere in or
on the vehicle (for example, in the luggage compartment, or on
the trunk). Static electricity can build up while filling and can ignite fuel vapors causing a fire.
- Always place a portable fuel container on the ground before
filling.
- Always keep the filler nozzle completely inside the portable
container before and during filling.
- If filling a portable container made of metal, the filler nozzle
must always be in contact with the container. This will help
prevent static electricity from discharging and cause a fire.
- Never spill fuel inside the vehicle or luggage compartment. Fuel vapors are highly flammable .
- Always observe local and state/provincial laws regarding the
use, storage and transportation of fuel containers.
- Make certain the fuel container meets industry standards
(ANSI / ASTM F852-861.
(D Note
If any fuel has spilled onto the car, it should be removed immedi -
ately to prevent damage to the paint.
~
Page 225 of 324
Fuel supply and filling your fuel tank -------------=-=--=-------=:a....:.--------J
<£> For the sake of the environment
As soon as the correctly operated nozzle switches off automatically
for the first time, the tank is full. Do not try to add more fuel because
fuel may spill out. In addition, the expansion space in the fuel tank
will be filled -causing the fuel to overflow when it becomes warm
and pollute the environment.
[ i] Tips
• Running your engine while refuelling may cause vapors to
escape or even fuel to spill out of the tank. This would then shut off
the fuel nozzle before the tank is full.
• Do not refuel your vehicle with the ignition switched on. The fuel
gauge may otherwise not indicate the correct fuel level after
refuelling. •
Unlocking th e fuel filler flap by hand
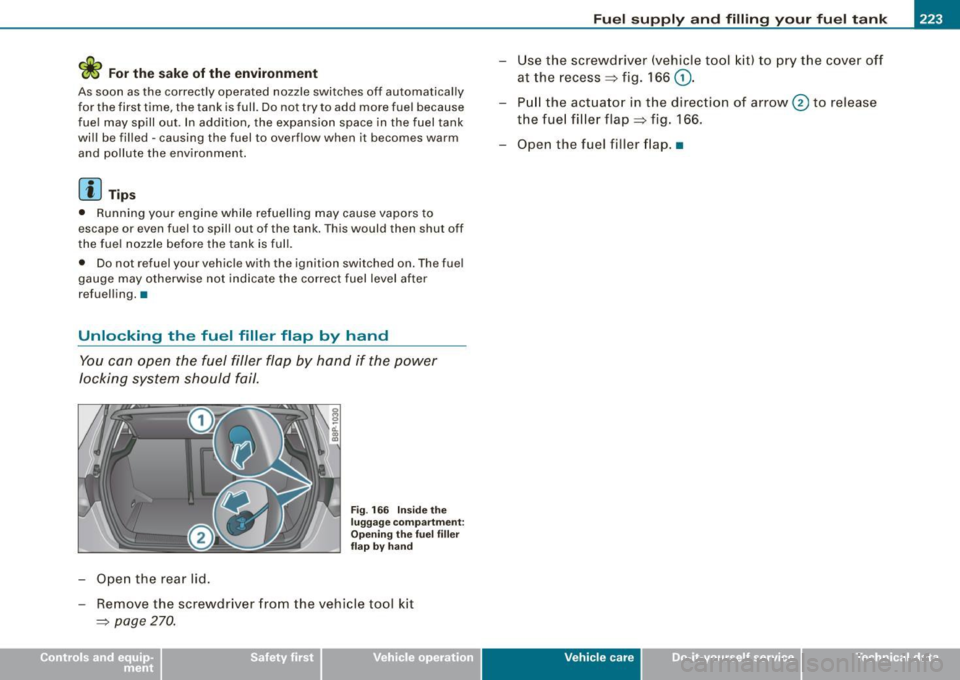
You can open the fuel filler flap by hand if the power
locking system should fail.
- Open the rear lid.
Fig . 166 Inside the
luggage compartment:
Opening the fuel filler
flap
by hand
- Remove the screwdriver from the vehicle tool kit
=> page 270.
-Use the screwdriver (vehicle tool kit) to pry the cover off
at the recess => fig. 166
G).
- Pull the actuator in the direction of arrow @ to release
the fuel filler flap
=> fig. 166 .
- Open the fuel filler flap.•
Vehic le care I I irechnical data
Page 227 of 324
Checking and filling -
--------------~-
•
Closing the engine hood
-Pull the hood dow n until the pressure fro m t he s trut is
r edu ce d .
- Let the hood
drop dow n and latch in p lace . Do not try to
pus h it shut ;
it ma y fail to enga ge => & .
& WARNING
A hood that is not completely latched could fly up and block your
view while driving.
• When you close the engine hood, check it to make sure the
safety catch has properly engaged. The hood should be flush with
the surrounding vehicle body parts .
• If you notice while driving that the hood is not secured prop
erly , stop at on ce and close it. •
Working in the engine compartment
B e e speci ally ca reful wh ene ver you work in th e e ng in e
co mpartmen t!
Whenever you must perform any work in the engine compartment ,
for example checking and filling different fluids , there is a ri sk of
injury , burns and accidents . To prevent personal injury always
observe the following WARNINGS . The engine compartment of any
vehicle is a hazardous area!
~ &
& WARNING
To help avoid injury , before you check anything under the hood :
• Turn off the engine.
• Remove the ignition key .
• Set the parking brake fully .
& WARNING (continued )
• Move selector lever of automatic transmission to "P" (Park) ;
put manual transmission in Neutral .
• Always let the engine cool down . Hot components will burn
skin on contact.
• To reduce the risk of being burned , never open the hood if you
see or hear steam or coolant escaping from the engine compart
ment . Wait until no steam or coolant can be seen or heard before
carefully opening the hood .
• Keep children away from the engine compartment .
• Never spill fluids on hot engine components . They can cause a
fire.
• Never touch the radiator fan. The auxiliary electric fan is
temperature controlled and can switch on suddenly.
• Never open the coolant reservoir cap when the engine is still
warm . The coolant system is pressurized and hot coolant could
spray out!
• Protect your face , hands and arm from steam or hot engine
coolant by placing a thick rag over the cap when you open the
coolant reservoir .
• If work on the fuel system or the electri cal system is necessary :
- Always disconnect the battery .
- Never smoke or work near heaters or open flames . Fluids in
the engine compartment could start a fire .
- Keep an approved fire extinguisher immediately available.
• To avoid electrical shock and personal injury while the engine
is running or being started , never touch :
- Ignition cables
- Other components of the high voltage electronic ignition
system .
• If you must perform a check or repair with the engine running : ..,
Vehicle care
I t •
Page 236 of 324
-~_C_ h_e _c _ k_ i_n ...:::g::;...._ a_n_ d_ f_ i_ll _in -'g:::;.._ ___________________________________________ _
tion and performance of your cooling system and could resu lt in
d am age not co vered by yo ur Ne w Vehicle Li mited Warranty .•
Adding coolant
B e very caref ul whe n addin g engine c oo lant.
Before you check a nything in the e ngine compartmen t,
always read and heed all WARNINGS=> & in "Work ing in
the en gine compartmen t" on
pa ge 225.
- Turn off the engine.
- Le t the engin e coo l down.
Place a thi ck ra g o ver th e c oolan t expansio n ta nk
=> pa ge 233, fi g. 1 75 a nd carefully twi st th e cap coun te r
cl ockwi se
=> &.
- Add cool ant.
- Twist the cap on aga in
tightly.
Replacement engine coolant must conform to exact specifications
~ page 232, "Coola nt". Even in a n eme rge ncy, if co olant add itive
G 12++. G12+ or G 12 is not availab le, do
not use a diffe rent additive.
Use plain water instead unt il you ca n get the c orrect additive and
can restore the correct ratio . This should be done as soon as
possible.
If you have lost a considerable amount of coo lant, then you should
add co ld antifreeze and cold water only when the engine is cold.
A lways use
new e n gin e c oolan t wh en refi llin g.
Do not fi ll coo lant above the "MAX" mark. Excess coolant will be
f o rced ou t through the pressure re lief va lve in the cap when the
engine becomes hot.
& WARNING
• The cooling system is under pressure and can get very hot .
Redu ce the risk of scalding from hot coolant by following these
steps .
- Turn off the engine and allow it to cool down.
- Protect your face , hands and arms from e scaping fluid and
steam by covering the cap with a large, thick rag.
- Turn the cap slowly and very carefully in a counter -clockwise
direction while applying light , downward pressure on the top
of the cap.
- To avoid being burned , do not spill antifreeze or coolant on
the e xhaust system o r hot engine parts . Under certain condi
tions , the ethylene glycol in engine coolant can catch fire.
• Antifreeze is poisonous . Always store antifreeze in its original
container and well out of the rea ch of children.
• If you drain the coolant , it must be caught and safely stored in
a proper container clearly marked "poison".
0 Note
• Coo la n t po llutes t he environ ment and cou ld cause a n engine
fire . Excess coolant will be forced out through the pressure re lief
va lve in t he cap when t he eng in e b ecomes hot .
• I f, in an emergency, on ly water can be added, the correct ratio
be tween wa ter and antifree ze~
page 232 mus t be restore d as soon
as possib le .
'£> For the sake of the environment
D rained coolant should not be reused. Always d ispose of used
coo la nt whi le observing all e nvi ro n men tal reg ulat ions .•
Page 252 of 324
.,,.___T_ ir_e_ s _ a_ n_d_ w_ h_ e_e _ l_s _________________________________________________ _
& WARNING
• Incorrect tire pressures and/or underinflation can lead to a
serious or fatal accident.
• Incorrect tire pressures and/or underinflation cause increased
tire wear and can affect the handling of the vehicle.
• Incorrect tire pressures and/or underinflation can also lead to
sudden tire failure, including a blowout and sudden deflation,
causing loss of vehicle control. •
Checking tire pressure
The correct tire pressure for the tires originally installed
on your vehicle is listed on the tire pressure label located
either on driver's side 8-pillar or inside the fuel filler flap.
The recommended tire pressures are on the tire pressure label and
in the table=> page 247, "Cold tire inflation pressure". This means
that the pressure must be checked and adjusted when the tire has
not been driven for more than a couple of miles (kilometers) at low
speeds during the previous three hours. Air in the tires expands
when the tire heats up as a result of internal friction as it flexes in
use. The tire pressure is higher when the tire has warmed up than
when it is "cold."
It is the inflation pressure in a "cold" tire that counts. Therefore, you
should never let air out of a warm tire to match "Cold tire inflation
pressure" recommendations=>
page 247. The tires would then be
underinflated and could fail suddenly.
The tire pressure label on your Audi lists the recommended cold tire inflation pressures for the new, original equipment tires that were
on your vehicle at the time it was manufactured. For the location of
the label=>
page 247, fig. 180.
Most tires lose air naturally over time. They can also lose some air if
you drive over a pothole or hit a curb while parking. It is usually not possible to see whether the radial tires used today are underinflated
just by looking at them.
Therefore , be sure to check tire pressures at least once a month and
always before going on a long trip. Make sure to take the number of
people and the amount of luggage into account when adjusting tire
pressure for a trip -even one that you would not consider to be
"long." See=>
page 251, "Tires and vehicle load limits" for more
important information .
Always use an accurate tire pressure gauge when checking and
adjusting inflation pressures . Check all of the tires and be sure not
to forget the spare tire. If the pressur e in any tire is too high when
the tire is "cold," let air out of the tire slowly with the edge of the tire
gauge and keep checking the pressure until you reach the pressure
that is correct for the load (passengers and luggage) and kind of
driving you plan to do.
If the pressure in any tire is too low, note the difference between the
pressure in the cold tire and the pressure you need and add the air
that you need to reach the correct pressure for the vehicle load
(passengers and luggage) for the tires on your vehicle as listed on
the on your vehicle and in this manual and the kind of driving you
plan to do.
Never exceed the maximum inflation pressure listed on the tire
sidewall for any reason.
Remember that the vehicle manufacturer, not the tire manufacturer,
determines the correct tire pressure for the tires on your vehicle.
It is important to check the tire pressure when the tires are cold.
• Read the required tire pressure from the tire pressure label. On
USA vehicles, the tire pressure label is located on driver's side B
pillar. On Canada vehicles, the tire pressure label is located either on
the driver's side B-pillar or inside the fuel filler flap.
• Turn the valve stem cap counter-clockwise to remove it from the
tire valve.
• Plac e the air pressure gauge on the valve. .,_