stop start AUDI S3 2015 Owner's Guide
[x] Cancel search | Manufacturer: AUDI, Model Year: 2015, Model line: S3, Model: AUDI S3 2015Pages: 310, PDF Size: 76.15 MB
Page 207 of 310
M N
0 > co ,...., \!) ..,.,
M ..,., ,....,
Care and cleaning
General information
Regular, proper care helps to maintain your
vehicle's val ue . It can also be a requirement
when submitting warranty claims for corro
sion damage and paint defects on the body.
The necessary care products can be obtained
from your a uthorized Audi dea ler . Read and
follow the instructions for use on the packag ing.
A WARNING
- Us ing clean ing and care products incor
rect ly can be dangerous to your hea lth .
- Always store cleaning and care products
out of reach of children to reduce the r isk
of po isoning.
@ For the sake of the environment
- Preferably use environmentally-friendly
products when buying cleaning agents.
- Do not d ispose of leftover cleaning and
care products with household trash.
-
Car washes
The longer that deposits such as insects, bird
droppings, tree sap or road sa lt rema in on the
veh icle, the more the surface can be dam
aged . High tempe ratures such as those
caused by sunlight increase the damag ing ef
fect .
Before washing, rinse off heavy depos its with
p lenty of water .
Stubborn depos its s uch as bird dropp ings or
tree sap are best removed with plenty of wa
ter and a m icrof iber cloth.
A lso, wash the underside of your vehicle once
road salt stops be ing used for the season.
Pressure washers
When washing your veh icles w ith a pressure
washer, always fo llow the operating instr uc
tions provided with the pressure washer. This is especially important in regard to the pres -
Care and cleanin g 205
sur e and sp raying distance. Do not aim the
spray direct ly at sea ls on side windows, doors,
the hood, the rear lid or the sunroof* or at
tires, rubber hoses, insulating material, sen
sors* or camera lenses*. Keep a d istance of at
least 16 inches (40 cm) .
Do not remove snow and ice with a pressure
washer.
Never use rotary nozzles or h igh pressure noz
zles .
T he wate r temperature m ust not be above
140
° F (60 °().
Automatic car washes
Spray off t he ve hicle before washing .
Make sure that the w indows and roof* are
closed and the winds hield wipers are off. Fol
low instructions from the car wash operator,
especially if there are accessories attached to
you r vehicle .
If possible, use car washes that do not have
brushes .
Washing by hand
Clean t he ve hicle starting from the top and
working down us ing a soft sponge or cleaning
brush. Use solvent-free clean ing products .
Washing vehicles with matte finish paint
by hand
To avoid damaging the paint when washing,
first remove dust and large particles from
your vehicle. Insects, grease spots and finger
pri nts are best removed w ith a spec ial cleane r
for matte finish paint .
Apply the product us ing a microfiber cloth. To
avo id damaging the paint surface, do not use
too much pressure.
Rinse the vehicle thoroughly with water. Then
clean using a neutral shampoo and a soft mi
crofiber cloth.
Rinse the ve hic le thoroughly again and let it
air dry . Remove any water residue using a
shammy.
•
•
•
Page 217 of 310
....,
N
0 > co
rl I.O
"' ....,
"' rl
Selective catalytic reduction
General information
Applies to vehicles: with diesel e ngine
In vehicles with se lective cata lytic reduction, a
urea solut ion (Ad Blue) is injected into the ex
haust system before a nitrogen oxide catalytic
converter to reduce nitrogen -emissions .
Ad Blue is the marketing name for Diese l Ex
ha ust Fluid (DEF) .
The AdBlue is carried in a separa te tank in t he
vehicle . The AdBl ue usage accounts for ap
proximately 0.5% to 1.2% of the diese l fuel
that is used .
When a message abo ut refil ling the Ad Blue
appears in the inst rume nt cl uste r dis play, you
must refi ll the Ad B lue yourse lf or have it refil
l ed by an authorized Audi dealer or aut horized
Aud i Service Facility
Q page 216.
A WARNING
Failure to heed Ad Blue refill information in
the inst rume nt cluste r can p revent the
ve
hicle from being started and driven . If the
veh icle cannot be driven and an eme rgency
ar ises, perso na l inju ry can occur.
- Always have the Ad Blue tank refilled well
before the tank r uns d ry.
(!) Tips
- The instrument cluster display indicates
the d istance remaining that ca n be dr iv
en
Q page 215. If the AdBlue tank is
complete ly empty, the engi ne will not
sta rt again after the ign ition is switched
o ff.
- Ad B lue is requ ired by law to operate this
vehicle.
Che cking and Fillin g 215
Indicators in the instrument cluster
d isplay
Appl ies to vehicles: with diesel engine
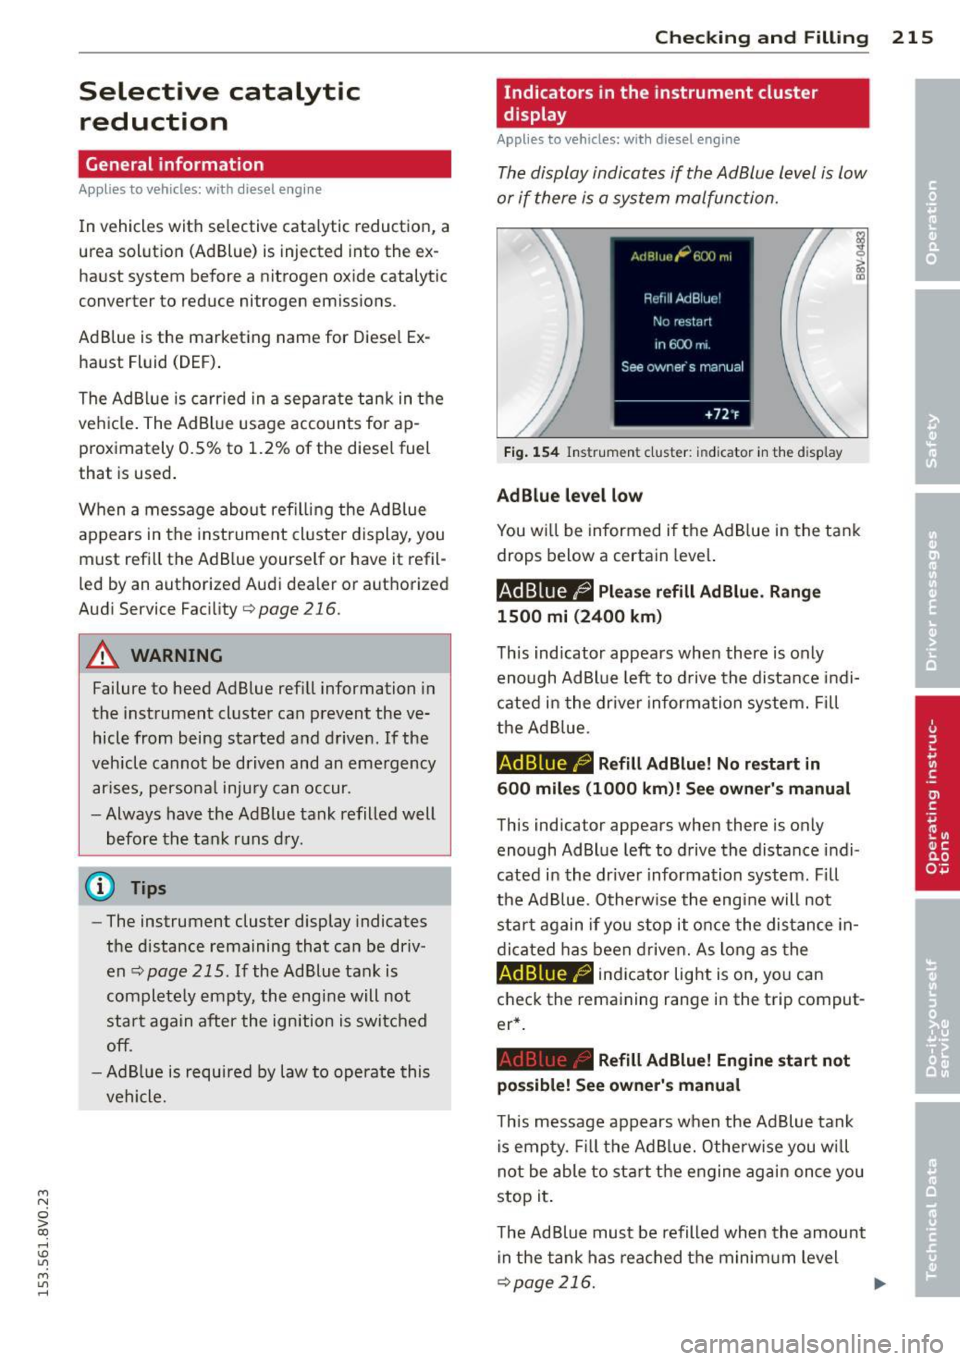
Th e display indicates if th e Ad Blue lev el is low
or if there is a system malfunction.
Fi g. 1 54 Ins trum ent cluster : indicator in the display
AdBlue level low
You w ill be informed if t he AdBlue in the ta nk
drops below a certain leve l.
Ad Blue /9 Please refill Ad B lu e. Range
1500 mi (2400 km)
T his ind icator appea rs whe n there is only
eno ugh Ad Bl ue left to d rive the distance i ndi
cated in the driver information system. F ill
the Ad Blue .
AdBlue /9 Refill AdBlue! No re start in
600 mile s (1000 km )! See owner' s manual
This indicator appears when there is only
enough AdBlue left to drive the distance indi
cated in the dr iver information syst em. F ill
the Ad Blue. Otherwise the eng ine will not
star t again if you s top it o nce the dis tance in
dicated has been drive n. As long as the
AdBlue /9 ind icator light is on, yo u can
check the remaining range in the trip comput
er* .
Refill AdBlue! Engine start not
po ssible! See owner' s manual
This message appears w hen the Ad Blue tank
i s emp ty. Fill the AdB lue. Othe rw ise you w ill
not be able to sta rt the engine ag ain on ce you
stop it .
T he Ad Blu e mu st be refilled when the amount
i n the tank has rea ched t he minim um level
Q poge 216.
Page 218 of 310
216 Checking and Filling
¢..ij Incorrect filling /sy stem malfunction
A message ap pears if the Ad Bl ue tank was fil
l ed with a fluid other t han Ad B lue and the sys
tem has detected t hat the tank was fi lled in
correctly, or if the re is a system malfunction .
Ad Blue/ Ad Blue: Sy stem fault! No re start
in 600 miles (1000 km ). See owner' s man
ual.
This message appears whe n it is only poss ible
to drive the distance i ndi cated in the dr iver in
formation system. Drive to the neares t au
thorized A udi dealer or author ized A udi Se rv
ice Facility to have the ma lfunction co rrected.
Otherwise the engine will not start again if
you stop it once the distance i nd icated has
been drive n.
AdBlue: system fault . Engine
start not possible! See owner 's manual
This message appears if the system has de
tected t hat the ta nk was fi lled incorrectly or
that the re is a ma lfunction . Drive immediate ly
to the nearest authorized A udi dealer or au
thor ized Audi Serv ice Facility to have the ma l
function corrected . Otherwise you will not be
ab le to start the engine aga in o nce you stop
it .
Filling the Ad Blue
App lies to vehicles: with selective cata lyt ic reduction
A special refill bottle must be used to fill the
AdBlue .
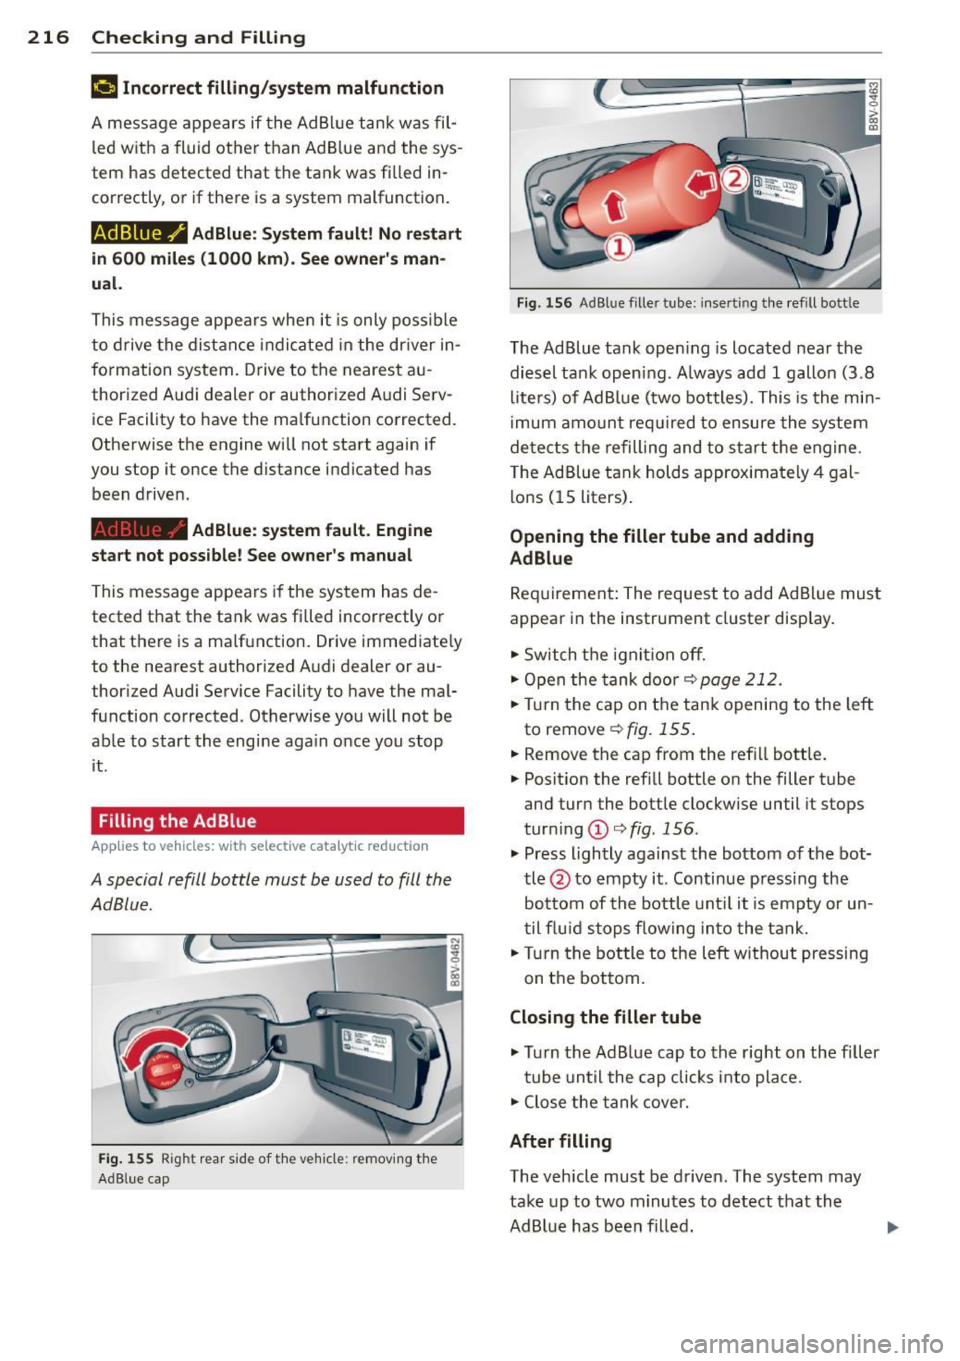
Fig. 155 R ig ht re ar s id e of th e v ehi cle: re mov ing the
Ad Blue cap
F ig . 1 56 AdBl ue f ille r tube: i nse rtin g the ref ill bottl e
The Ad Blue tank ope ning is located near the
di ese l ta nk open ing . A lways ad d 1 gallon (3.8
li te rs) of AdB lue ( two bottles). This is the min
i mum amo unt req uired to ensure the system
de te ct s the refilling and to s tart the engine .
T he Ad Blue tank holds approximately
4 gal
lo ns
(1 5 liters) .
Opening the filler tube and adding
AdBlue
Req uirement : The request to add Ad Blue mus t
appea r in the instrument cluster disp lay.
" Switch th e ignit io n off.
.. Open the tank door¢
page 212.
.. Tur n the cap on the tank opening to the left
to remove
¢ fig . 155 .
.. Remove the cap from the ref ill bott le.
.. Posit ion the refill bottle on the filler tube
and tur n the bottle clockwise until it stops
turn ing (D ¢fig .156 .
" Press lightly aga inst the bottom of the bot
tle @to empty it . Continue pressing the
bo ttom of the bottle unt il it is empty or un
t il f lu id stop s flow ing in to the ta nk.
" Turn the bottle to t he left w it h out pressing
on t he bot tom.
Closing the filler tube
" Tur n the Ad B lue cap to the right on the filler
t ube until the cap clicks into pla ce.
" Clo se the tank cover.
After filling
The vehicle must be driven. The system may
ta ke up to two m inutes to detect that the
AdBl ue has been f illed . .,.
Page 249 of 310
Tires and wheels 24 7
It is important to check the tire sure for the spare wheel
pressure when the tires are
¢page 268.
cold.
When should I adjust the
-Read the required tire pres-tire pressures?
'
sure from the tire pressure la-
Adjust the tire pressure to the •
•
bel. The tire pressure label is load you are carrying. After
located on the driver's side B- changing a wheel
or replacing
pillar. wheels you have to adjust the
-Turn the valve stem cap coun- tire pressures on all wheels. In
ter-clockwise to remove it addition, you must then store
from the tire valve. the new tire pressures in the
-Place the air pressure gauge tire pressure monitoring sys-
on the valve. tern
¢ page 264.
-The tire pressures should only
A WARNING
be checked and adjusted when
Incorrect tire pressures and/
the tires are cold . The slightly
or underinflation can lead
raised pressures of warm tires
sudden tire failure, loss of
must not be reduced.
control, collision, serious per-
-Adjust the tire pressure to the
sonal injury or even death.
load you are carrying.
-When the warning symbol
-Reinstall the valve stem cap
RI] appears in the instru-
on the valve.
ment cluster, stop and in-
When should I check the tire spect the tires.
pressure? -Incorrect tire pressure and/
The correct tire pressure is es- or underinflation can cause
pecially important at high increased tire wear and can
speeds. The pressure should affect the handling of the
therefore be checked at least vehicle and stopping ability.
once a month and always be- -Incorrect tire pressures
fore start ing a journey. Do not
and/or underinflation can
' • M N
forget to check the tire pres-0 > co .... \!) 1.1'1
M 1.1'1 ....
Page 283 of 310
....,
N
0 > co
rl I.O
"'
@ Tips
The discharged battery must be pr operly
connected to the vehicle's electrical sys
tem. When jump starting or charg ing the
battery, never connect the negative
ground cable to the batte ry negative post
because the ba ttery manager system must
be able to detect the battery's state of
charge. Always connec t the negative
g roun d cab le to t he negative ground pos t
of t he battery manager cont ro l unit.
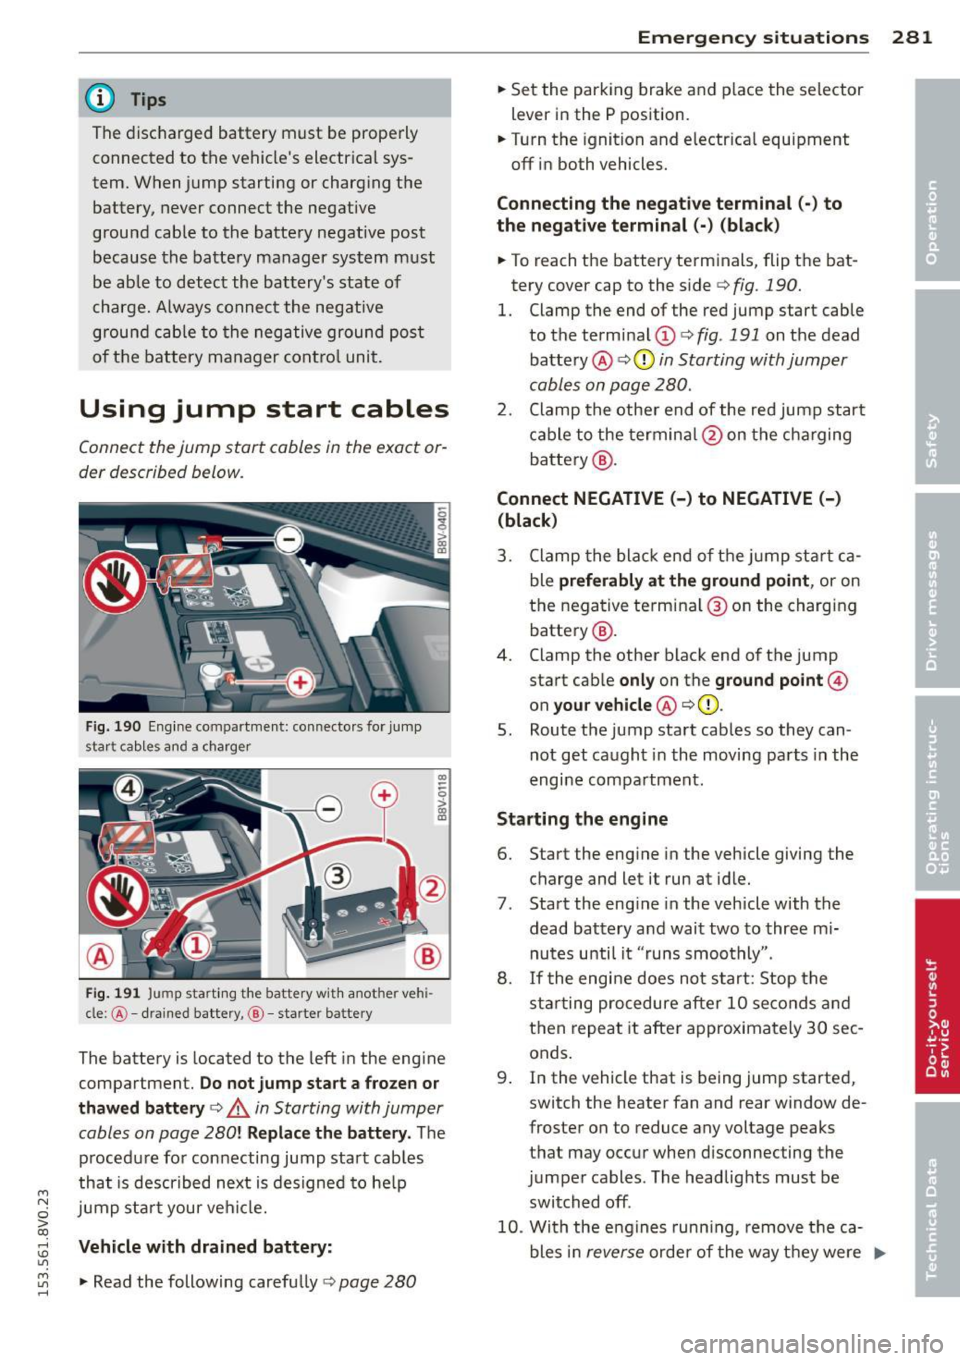
Using jump start cables
Connect the jump start cables in the e xact or
der described below .
Fig . 190 Eng ine co mpar tment : connecto rs for jum p
star t cab le s an d a charger
Fig. 1 91 Jump start in g the batte ry w ith anot her ve hi
cle: @-dra ined battery ,@ -starte r bat tery
The batte ry is located to the left in the eng ine
compartment.
Do not jump start a frozen or
thawed battery
¢ A in Starting with jumper
cables on page
280 ! Replace the battery. The
p rocedu re for connecting jump start cab les
that is descr ibed next is designed to he lp
jump sta rt your ve hicl e.
Vehicle with drained battery:
~ .. Read the following carefully ¢ page 280 rl
Emergency situ ation s 281
.. Set the parking brake and p lace the selector
lever in the P position.
.. Turn the ignition and e lectr ica l equ ipment
off in both vehicles.
Connecting the negati ve terminal (-) to
the negat ive terminal (- ) ( black )
.. To r each the battery term inals, flip the bat
tery cover cap to the side ¢
fig. 190.
1. Clamp the end of the red jump start cable
to the terminal (!)¢
fig. 191 on the dead
battery @ ¢CI)
in Starting with jumper
cables on page 280 .
2. Clamp the othe r end of the red jump star t
c able to the termin al@ on t he charging
battery @.
Connect NEGATIVE (-) to NEGATIVE (-)
(black )
3. Clamp the blac k end of t he j ump sta rt ca
ble
preferably at the ground point , or on
the nega tive terminal @ on the charging
batte ry @ .
4. Clamp the other black end of the jump start cab le
onl y on the ground point@
on your vehicle @ ¢CI).
S. Route the jump start cab les so they can
not get ca ugh t in the moving parts in the
engine compa rtment.
St arting the engine
6. Start the engine in the vehicle giving the
charge and let it run at idle.
7 . Start the eng ine in the vehicle with the
dead battery and wait two to three m i
nu tes unti l it "runs smoothly".
8.
If t he engine does not s tart: Stop the
st art ing procedure afte r 10 seco nds and
then repeat it afte r approximately 30 sec
onds.
9 . In the vehicle that is be ing jump started,
switch the heater fan and rear window de
froster on to reduce any voltage peaks
t hat may occur when disconnecting the
j u mper cables . The headlights must be
switched off .
10 . Wi th the e ngin es runn ing , remov e th e ca
bles in
rever se orde r of the way t hey were ..,.
Page 299 of 310
M N
0 > co ,...., \!) 1.1'1
M 1.1'1 ,....,
Driver information system ... .. .. .. .. .. 27
Boost ..... .. .. .. .. .... ... .. .. .... 29
CD/radio display ....... ... .. .. .. .. .. 27
Door/rear lid warning ..... .. .. .. .. .. 27
Driver messages . . . . . . . . . . . . . . . . . . . . 14
Efficiency program . . . . . . . . . . . . . . . . . . 29
E ng ine o il temperature indicator .. .. .. 32
I ndicator lights . . . . . . . . . . . . . . . . . . . . 14
L ap time r .. ............... .. .. .. .. 3 2
On- boa rd comp ute r . . . . . . . . . . . . . . . . . 28
Outside tempera ture display . ... .. .. .. 27
Service interval disp lay . ... .. .. .. .. .. 13
Using the multifunction steer ing whee l . 27
Dr iver sea ting posi tion ...... .. .. .. .. . 126
Drive se lect
refer to Audi dr ive se lect . ...... ... .. 106
D riving safe ly . .. .. ..... ... .. .. .. .. . 125
D riving through water . . . . . . . . . . . . . . . 198
Driving time . . . . . . . . . . . . . . . . . . . . . . . . 28
D ust filter
refer to Po llutant filte r . . . . . . . . . . . . . . 68
E
EC O mode ( autom atic clima te control sys -
tem) . ..... .. .. ... .. ..... ... .. .. .... 70
E fficiency program . . . . . . . . . . . . . . . . . . . 29
D escr ipt io n ................. ... ... . 29
Fu el economy messages . . . . . . . . . . . . . 30
O the r equipmen t . . . . . . . . . . . . . . . . . . . 30
Elect rical accessories
refer to Socket . . . . . . . . . . . . . . . . . . . . . 60
Elect romechanical par king brake
refer to Parking brake ..... .. .. .. .. .. 80
E lect romechan ic a l steering .. .. .. .. .. . 193
I ndica tor ligh ts .. ..... ... .. .. .. .. . 193
E lect ron ic diffe rent ial loc k ... .. .. .. .. . 189
I ndicator light . . . . . . . . . . . . . . . . . . . . . 2 2
Electronic immobili zer ...... .. .. .. .. .. 40
also refer to Immobilizer .. .. .. .. .. .. 35
E lect ro nic spee d limiter .. ... .. .. .. .. .. 31
E lect ronic stabilization control (ESC)
I ndicator light . . . . . . . . . . . . . . . . . . . . . 2 2
Sport mode .. ........... .. .. .. .. . 190
Electro nic Stabilization Control (ESC) .. . 189
Eme rgency ass istance ... ... .. .. .. .. . 26 7
E mergency flasher ...... ... .... .. .. .. 47
Inde x 297
Emergency flashe rs
Indicator light ... .. . ... ...... ... .. . 26
Emergency operation Emergen cy bra king f unct ion ..... .. .. . 82
F ron t passenger's door/rear doors .. .. . 41
L uggage compartment lid .... ... .. .. 2 67
Pano rama sunroof . .. .. ..... ... .. .. . 4S
with convenience key . . . . . . . . . . . . . . . . 79
E mergency re lease
F uel fi ller doo r ... .. . .............. 214
S e lector lever . . . . . . . . . . . . . . . . . . . . . 116
Emergency starting ................. 280
Emergency towing . ................. 282
E nergy m anagement ............ .. .. 19 4
Ind icator lig ht ... .. .. .. ...... ... .. . 2 0
E ngine
Coolant ......... .. ............... 225
Pr ewa rm ing (butto n) ............... . 77
P rewarm ing ( key) . .... ........... .. . 74
Star ting with jumper cables .. ... .. .. 2 80
S tar ting (driver messages with conven -
ience key) . . . . . . . . . . . . . . . . . . . . . . . . . 79
Starting (eng ine) . .. ............... . 77
Starting
(key) . . . . . . . . . . . . . . . . . . . . . . 7 4
stopp ing (button) .................. 78
stopp ing (key) . ......... ........... 76
Engine compartment Closing the hood ..... ............. 219
Open ing the ho od ............. .. .. 219
Overview.. .. .. .. ............ 220,221
Safety precautions ... . .. ...... .... . 217
Engine co ntrol (indicato r light) . . . . . . . . . 23
En gine coolant .. .. ................. 225
Radiator fan . .. .. .... ............. 227
Engine o il .. .. .. .. .. . .. .. ..... ... .. 221
adding ......... .. ............... 223
Changi ng ... .. .. .. . .. .... .... .. .. 224
Checking the oi l level ............. .. 22 3
Dip stic k ... .... .. .. . ..... 2 20, 22 1,22 3
Ind icator lig ht . .. .... ........... .. . 20
Oil consumpt ion . ... . .. .. ..... ... .. 2 22
Specificatio n and viscosity .... ... .. .. 221
T emperature indicato r ... .... ... .. .. . 32
U se ...... .. .. .. ................. 223
Engine speed lim itation ( indica to r li gh t) . 24
•
•
•
Page 303 of 310
M N
0 > co ,...., \!) 1.1'1
M 1.1'1 ,....,
Index 301
-----------------------------------.......
Oil
Indicator light . . . . . . . . . . . . . . . . . . . . . 24
also r efe r to Eng ine oi l . . . . . . . . 221, 223
O il change interva l
with drive r informat ion sys tem .. .. .. .. 13
On -Board -Diagnostic System (OBD)
System indicator light (MI L) .. ... .... . 30
On-board computer ........ .... .. .. .. 27
Operation (mu lt ifunction steering
wheel) . .. .. ........ ......... .. .. .. 28
On -Board Diagnostic System (OBD)
Data Link Connector (DLC) . ... .. .. .. .. 31
On Board Diagnostic Sys tem (OBD)
E lect ronic speed lim iter . . . . . . . . . . . . . . 3 1
Opening . .. ... ............... .... ... 35
F uel filler door ... ... ... .. .. .. .. .. . 212
H ood .. ... ... .............. ... ... 219
L uggage compartmen t lid .. .. .. .. .. .. 42
Panorama sunroof ........ .. .. .. .. .. 44
W indows . ... .. ... . .... ... .. .. .. .. 4 3
Opening/clos ing
with the central locking switch . . . . . . . . 39
with the convenience key . . . . . . . . . . . . . 38
with the door lock ........ .. .. .. .. .. 39
Operate your vehicle econom ically and
minim ize po llution ............ .... .. 199
Othe r equipment (efficiency p rogram) ... 30
Outside temperature display . .. .. .. .. .. 1 1
Overv iew (cockp it) . . . . . . . . . . . . . . . . . . . . 8
p
Paint damage
207
P aint No . .. .. .. .. ......... .. .. .. ... 286
Panorama sunroof ... ...... .. .. .. .. .. 44
Conven ience opening/closing . .. ... ... 43
Eme rgency closing ............... ... 45
Park ing aid
C leaning sensors/camera lenses . .. .. . 206
P ark ing brake . .. .. ..... ... .. .. .. .... 80
Emergency braking function . . . . . . . . . . 82
Indicator light . . . . . . . . . . . . . . . . . . . . . 19
Park ing .. .. .. ........... .. .. .. .... 81
Power supply failure ...... .. .. .. .. .. 80
Sett ing/releasing . . . . . . . . . . . . . . . . . . . 80
Starting from a stop ........... .... . 82
also refer to Park ing brake . .. .. .. .. .. 80 Pa
rking light . ..... .. . .. .. ..... ... .. . 46
Pa rking system
Adjusting t he d isplay/war ning tone . .. 12 4
Cleaning the rearview camera .... .. .. 121
Malfunc tion . . . . . . . . . . . . . . . . . . . . . . 12 4
Parking system plus .. ... .... ... .. .. 119
Peripheral display . .. .. .. ... ... .. .. 119
Rea r parking system . ... .... ... .. .. 119
Rearv iew camera . .... ......... .. .. 120
also refer to Parking systems . . . 119, 120
Pa rking systems ..... . .. .. ..... ... .. 118
Pa rking (automatic t ransmission) 111, 112
Particulate f ilter
refer to Diese l part icu late filter .... .. . 23
Parts replacement ... .. .. ...... ... .. 291
Pass-through . . . . . . . . . . . . . . . . . . . . . . . . 67
PASSENGER AIR BAG OFF light . ... .. .. 157
Pedals ... .. .. .. .. .. .. ........... .. 130
Perip heral display .. ............. .. .. 119
Physical p rinciples of a frontal collision . 136
Polish ing ...... ... .. ............... 207
Pollen filter
refer to Poll utant filter ......... .. .. . 68
Pollutant f ilter .. .. .. . ... ...... ... .. . 68
Power seat adj ustment . . . . . . . . . . . . . . . . . . . . 58
Windows . .. .. .. .... ............. . 43
Power w indows .. .. ................. . 43
Convenience opening/clos ing ....... .. 43
Malfunction ... .. .. . .. ... ... .. .. .. . 44
Pregnant women Spec ial considerations when wear ing a
safety belt . . . . . . . . . . . . . . . . . . . . . . . 140
Pre sense . . . . . . . . . . . . . . . . . . . . . . . . . . . 94
Basic (description) . .. .. .. ..... ... .. . 94
Driver messages . . . . . . . . . . . . . . . . 92, 96
Front (description) . . . . . . . . . . . . . . . . . . 94
General information ........... .... . 94
General Information . . . . . . . . . . . . . . . . 86
Settings . . . . . . . . . . . . . . . . . . . . . . . . . . 96
Warnings ....... .. ................ 95
Pressure (tires) .. .. ................. 265
Prewa rm ing
With b utton . . . . . . . . . . . . . . . . . . . . . . . 77
With key . ... .... .. . .. .. ..... ... .. . 74
P roper occupant seating positions . .. .. 1 26
Proper safety belt position ........ .. .. 139
•
•
•
Page 305 of 310
M N
0 > co ,...., \!) 1.1'1
M 1.1'1 ,....,
Warning/indicator light . ... .. .. .. .. . 135
Worn properly . ... .... ... .. .. .. .. . 137
Safety belt warn ing light ............. 135
Safety central locking ............. .. .. 41
Safety compliance st icker ... .. .. .. .. . 286
Safety equipment . ................ .. 125
Safety features for occupant restraint and
protection . . . . . . . . . . . . . . . . . . . . . . . . . 125
Safety guide lines
Seat adjustment . . . . . . . . . . . . . . . . . . . . 56
Safety instructions for s ide curta in a irbags ............. 168
fo r us ing chi ld safety seats . .. .... .. . 174
for us ing safety be lts ............... 138
M on itoring the Advanced Airbag Sys -
tem ..... .. ... .. .. ..... ... .. .. ... 159
Safety systems ( indicato r light) . .. .. .. .. 2 1
Scheduled ma intenance interval
with driver i nformat ion system ........ 13
Screwdriver . ... .... .. .... ... .. .. ... 268
Seat adjustment Driver's sea t . . . . . . . . . . . . . . . . . . . . . . . 56
Fr ont passenger's se at . . . . . . . . . . . . . . . 5 7
H ead res traints ....... ... .. .. .. .. . 129
Safety guide lines . ..... ... .. .. .. .. .. 56
Seat heat ing .................... .... 72
Seating position Driver . ... . .... ............. .. .. . 126
Front passenger ................... 127
H ow to adjust the front seats ........ 127
I nco rrect seat position .............. 129
Occupa nts .. .... ............. .. .. . 126
Rear passengers .......... .... .. .. . 128
Seats ad justing . . . . . . . . . . . . . . . . . . . . . 57, 58
Folding .. ... .................. .. .. 65
Seats (number) . ........... .. .. .. .. . 135
Selec tive c ataly tic red uction
refer to AdBlue . .. ..... ... .. .. .. .. . 215
Select ive wheel torque control ........ 189
Selector leve r (automatic transmission)
Emergency operation ............... 116
Position . .. .... ............. .. .. . 109
Service and disposal Safety belt pretensioner ... .. .. .. .. . 142
Service interval d isp lay
wi th d river informat ion system ........ 13
Index 303
Setting clock . ....... . .. .. ..... ... .. . 10
Setting date ....... ................. 10
Setting the temperature automat ic climate control system ..... 71
Setting time . ... .. .. . ... ...... ... .. . 10
S ET UP (basic setting) . .............. .. 10
S hi ft padd les (automatic transmission) . 114
S hor t-t erm memory . . . . . . . . . . . . . . . . . . 28
S ide a irbags
Description ....... ........... ..... 163
How they work .... ................ 165
S ide assist ...... ...... ............. 102
Adjusting the brightness ........ .... 104
Cleaning the sensors ........... .. .. 206
Sensor range .. ... ................ 103
switching on and off ............... 104
S ide curtain airbags ................. 166
Description ....................... 166
How they work . .. ................. 168
Safety i nstr uctions .. ............... 168
Sliding/tilting s unroof
refer to Panorama sunroof ........... 44
Snow cha ins .. .. .. .... ........... .. 262
All wheel drive ... .. . .. ... .... ... .. 193
Socket ........ .... ........... ...... 60
Sources of information abo ut child re-
stra ints and their use ................ 188
S peed l imi ter . .. .. ................. . 31
Speedometer . . . . . . . . . . . . . . . . . . . . . . . 27
Speed rating letter code .. ..... ... .. .. 257
Speed warning system ........... .... . 83
Sport mode . .. .. .. .. ............... 190
Star but ton . . . . . . . . . . . . . . . . . . . . . . . . . 28
START ENGI NE S TOP button (conven ience
key) ...... ... .. .... ..... ..... ..... . 77
START ENGINE STOP (convenience key) .. . 78
St arti ng
Hill ho ld . ... .... .. . .. .. ..... ... .. . 82
Start ing from a stop
Hill start assis t ... .... ........... .. . 82
Starting (eng ine)
Automat ic start (button) . . . . . . . . . . . . . 77
Automat ic start (key) . . . . . . . . . . . . . . . . 7 4
Malfunction (button) . . . . . . . . . . . . . . . . 77
Malfunction ( key) .................. . 75
•
•
•