AUDI S3 SEDAN 2015 Owners Manual
Manufacturer: AUDI, Model Year: 2015, Model line: S3 SEDAN, Model: AUDI S3 SEDAN 2015Pages: 282, PDF Size: 71.14 MB
Page 241 of 282
M N
0 > co ,...., \!) 1.1'1
1.1'1
1.1'1
,....,
avoid scratches, move the scraper only in
one direction and not back and forth.
- Never remove snow or ice from door win
dows and mirrors using warm or hot water
because this could cause cracks to form.
- To avoid damage to the rear window de
fogger, do not apply any stickers on the
heating wires on the inside of the window.
- Decorative parts/trim
- Never use chrome care or cleaning prod-
ucts .
- Paint
- To reduce the risk of scratches, the vehicle
must be free of dirt and dust before pol
ishing or waxing.
- To prevent paint damage, do not polish or
wax the vehicle in direct sunlight.
- To reduce the risk of paint damage, do not
polish away rust spots.
- Remove cosmetics and sunscreen immedi
ately -these could damage the paint.
- Displays
- To avoid scratches, do not use dry cleaning
methods on displays.
- Controls
- Make sure that no fluids enter the con-
trols, because this could cause damage.
- Safety belts
- Do not remove the safety belts to clean
them.
- Never clean safety belts or their compo
nents chemically or with corrosive fluids
or solvents and never allow sharp objects
to come into contact with the safety belts.
This could cause damage to the belt web
bing.
- If there is damage to the webbing, the
connections, the retractors or the buckles,
have them replaced by an authorized Audi
dealer or authorized Audi Service Facility.
- Textiles/artificial leather/Alcantara
- Never treat artificial leather/Alcantara
with leather care products, solvents, floor polish, shoe polish, spot remove or similar
products.
- Have a specialist remove stubborn stains
to prevent damage.
Care and cleaning
- Never use steam cleaners, brushes, hard
sponges, etc. when cleaning.
- Do not turn on the seat heating* to dry
the seat.
- Objects with sharp edges such as zippers,
rivets on clothing or belts can cause dam
age to the surface.
- Open hook and loop fasteners, for exam
ple on clothing, can damage seat covers.
Make sure hook and loop fasteners are
closed .
- Natural leather
- Never treat leather with solvents, floor
polish, shoe polish, spot remover or simi
lar products .
- Objects with sharp edges such as zippers, rivets on clothing or belts can cause dam
age to the surface .
- Never use steam cleaners, brushes, hard
sponges, etc. when cleaning .
- Do not turn on the seat heating* to dry the seat.
- To help prevent the leather from fading,
do not leave the vehicle in direct sunlight
for long periods of time . If leaving the ve
hicle parked for long periods of time, you
should cover the leather to protect it from
direct sunlight.
(D Tips
- Insects are easier to remove from paint that
has been freshly waxed .
- Regular waxing can prevent rust spots from
forming.
239
Page 242 of 282
Emergency assistance
Emergency assistance
Luggage compartment
lid emergency release
The luggage compartment can be opened from
the inside in an emergency.
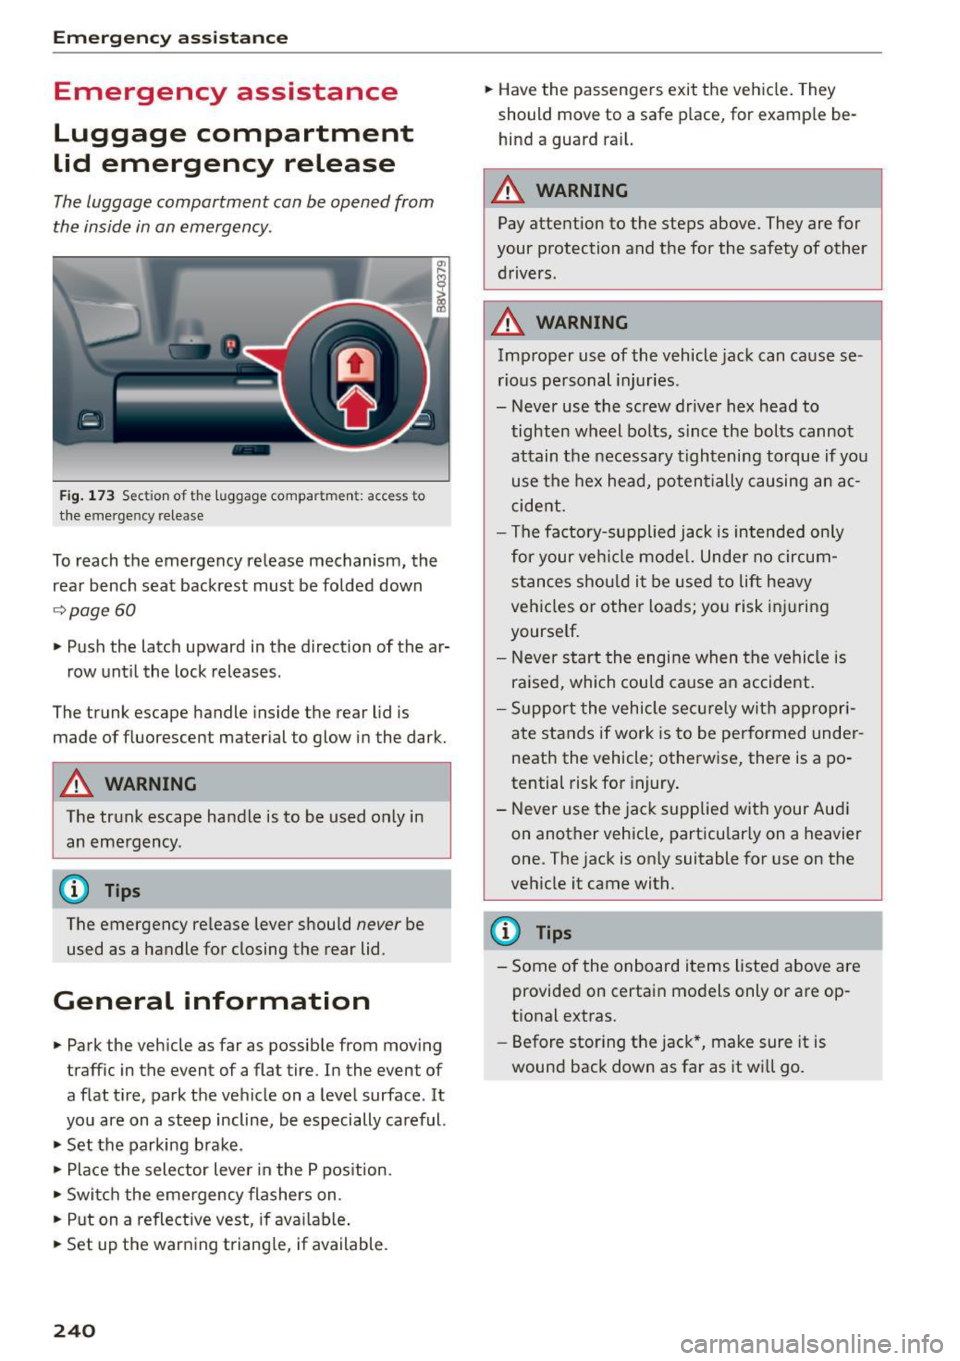
F ig. 1 73 Sect ion of t he luggage compartment: access to
t h e emergency release
To reach the emergency release mechanism, the
rear bench seat backrest must be folded down
~page 60
.,. Push the latch upward in the direct ion of the ar
row unt il the lock releases.
The trunk escape handle inside th e rear lid is
made of fluorescent material to glow in the dark.
A WARNING
The trunk escape handle is to be used only in
an eme rgency .
(D Tips
The emergency re lease lever should never be
used as a handle for closing the rear lid.
General information
.,. Park the veh icle as far as possib le from moving
traffic in the event of a flat tire. In the event of
a flat tire, park the vehicle on a leve l surface . It
you are on a steep incline, be especially careful.
.,. Set the parking brake .
.,. Place the selector lever in the P pos ition .
.,. Swi tc h the eme rgency flashers on .
.,. Put on a reflective vest, if ava ila b le .
.,. Set up the war ning triang le, if available.
240
.,. Have the passengers exit the vehicle. They
should move to a safe p lace, for example be
hind a guard ra il.
A WARNING
Pay attention to the steps above. They are for
your p rotection and the for the safety of other
drivers.
A WARNING
"'
Imp roper use of the vehicle jack can cause se-
rious pe rsonal injuries.
- Never use the screw driver hex head to
tighten wheel bolts, since the bolts cannot
attain the necessa ry tight ening torque if yo u
use the hex head, p oten tially cau sing an ac
cide nt.
- The factory-s upplied jack is intended only
for your veh icle mode l. Unde r no c ircum
s tances shou ld i t b e used t o lift heavy
veh icles or othe r loads; you risk inj uring
yourse lf.
- Never start the engi ne when t he vehicle is
raised, which could ca use a n accident .
- Suppor t the vehicle secu rely w it h a ppropri
ate stands if work is to be performed under
neath the vehicle; otherw ise, there is a po
tential risk for injury .
- Never use the jac k supplied with your Aud i
on another vehicle, part icu lar ly on a heavier
one. The jack is on ly suitable for use on the
veh icle it came with.
(D Tips
-Some of the onboard it ems listed above are
provided on certai n models only or are op
t ional extras.
- Before stor ing the jack*, make sure it is
wound back down as far as it wi ll go.
Page 243 of 282
....,
N
0 > co
rl I.O
"'
"'
"'
rl
Equipment
Vehicle tool kit
Applies to vehicles: with vehicle tool kit
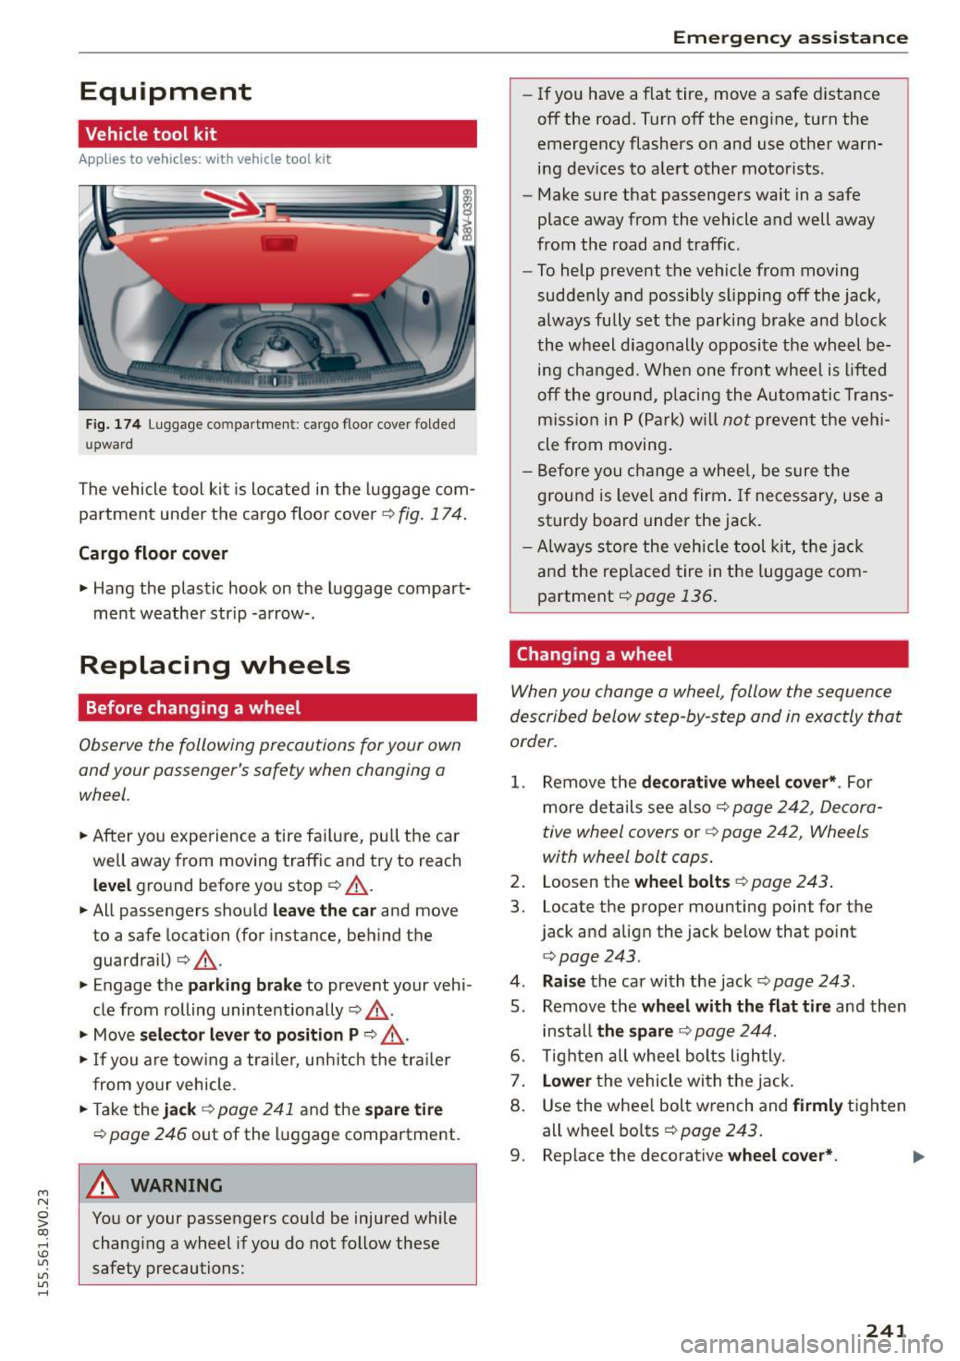
Fig. 174 Luggage co mpa rtmen t: ca rgo floo r cover folded
up ward
The vehicle tool kit is located in the luggage com
partment under the cargo floor cove r
r::!;> fig. 174.
Cargo floor cover
• Hang the plastic hook on the luggage compart
ment weather strip -arrow- .
Replacing wheels
Before changing a wheel
Observe the following precautions for your own
and your passenger's safety when changing a
wheel.
• After you experience a tire fa ilure, pu ll the car
well away from moving traffic and try to reach
le vel ground before you stop r::!;> _A .
• All passengers should leav e the ca r and move
to a safe location (for instance, beh ind the
guardrail) c:>
_A.
• Engage the parking b ra ke to prevent your vehi
cle from rolling unintentionally c:> ,& .
• Move
se le cto r le ver to p osition P c:> ,& .
• If you are tow ing a tra iler, unh itch the tra iler
from your vehicle.
• Take the
jack c:> pag e 241 and the sp ar e tire
c:> page 246 out of the l uggage compartment .
A WARNING
You or your passengers cou ld be injured while
chang ing a wheel if you do not follow these
safety precautions:
Em erg en cy ass is tan ce
-If you have a flat tire, move a safe d istance
off the road. Turn off the eng ine, turn the
emergency flashers on and use other warn
ing dev ices to alert other motor ists .
- Make sure that passengers wait in a safe
place away from the vehicle and well away
from the road and traffic.
- To help prevent the vehicle from moving
suddenly and possibly slipping
off the jack,
always fully set the parking brake and block
the wheel diagonally opposite the wheel be ing changed . When one front wheel is lifted
off the g round, placing the Automatic Trans
miss ion in P (Pa rk) w ill
not prevent the veh i
cle from moving .
- B efore you change a wheel, be sure the
ground is level and firm . If necessary, use a
sturdy board under the jack.
- Always s tore the veh icle tool kit, t he jack
a nd the rep laced tire in the luggage com
partment
r::!;> page 136.
Changing a wheel
When you change a wheel, follow the sequence
described below step-by -step and in exactly that
order.
1. Remove the dec orative whe el co ve r*. For
more details see also
c:> page 242, Decora
tive wheel covers
or c:> page 242, Wheels
with wheel bolt caps .
2. Loosen the wheel bolts r::!;>page 243.
3. Locate the proper mounting point for the
jack and align the jack below that point
r::!;> page 243.
4. Rai se the car with the jack~ page 243 .
5. Remove the wheel wit h th e fla t tir e and then
i ns tall
th e s pare c:> page 244.
6. Tighte n all whee l bolts lightly.
7.
L o wer the vehicle with the jack.
8 . Use the wheel bolt wrench and
firml y tighten
all wheel bo lts
c:> page 243.
9. Replace the decorative w hee l co ve r* . ..,.
241
Page 244 of 282
Emergency assistance
_& WARNING
Always read and follow all WARNINGS and in
formation
c:> & in Raising the vehicle on
page 244
and c:> page 245.
After changing a wheel
A wheel change is not complete without the do
ing the following .
.. Always store the vehicle tool kit, the jack* and
the replaced tire in the luggage compartment
c:> page 136 .
.. Check the tire pressure on the spare wheel im
med iate ly after mounting it .
.. As soon as possible, have the
tightening tor
ques
on all wheel bolts checked with a torque
wrench. The correct tightening torque is 90 ft
lb
(120 Nm) .
.. Have the flat tire
replaced as soon as possible.
@ Tips
-If you notice that the wheel bolts are cor
roded and difficult to turn while changing a
tire, they should be replaced before you
check the tightening torque.
- Drive at reduced speed until you have the
tightening torques checked.
- After changing a wheel, the tire pressure in
all four tires must be checked/corrected and
the tire pressure mon itoring indicator must
be stored in the MMI
c:> page 234.
Decorative wheel covers
Applies to vehicles: with decorative wheel covers
The decorative wheel covers must be removed
first to access the wheel bolts .
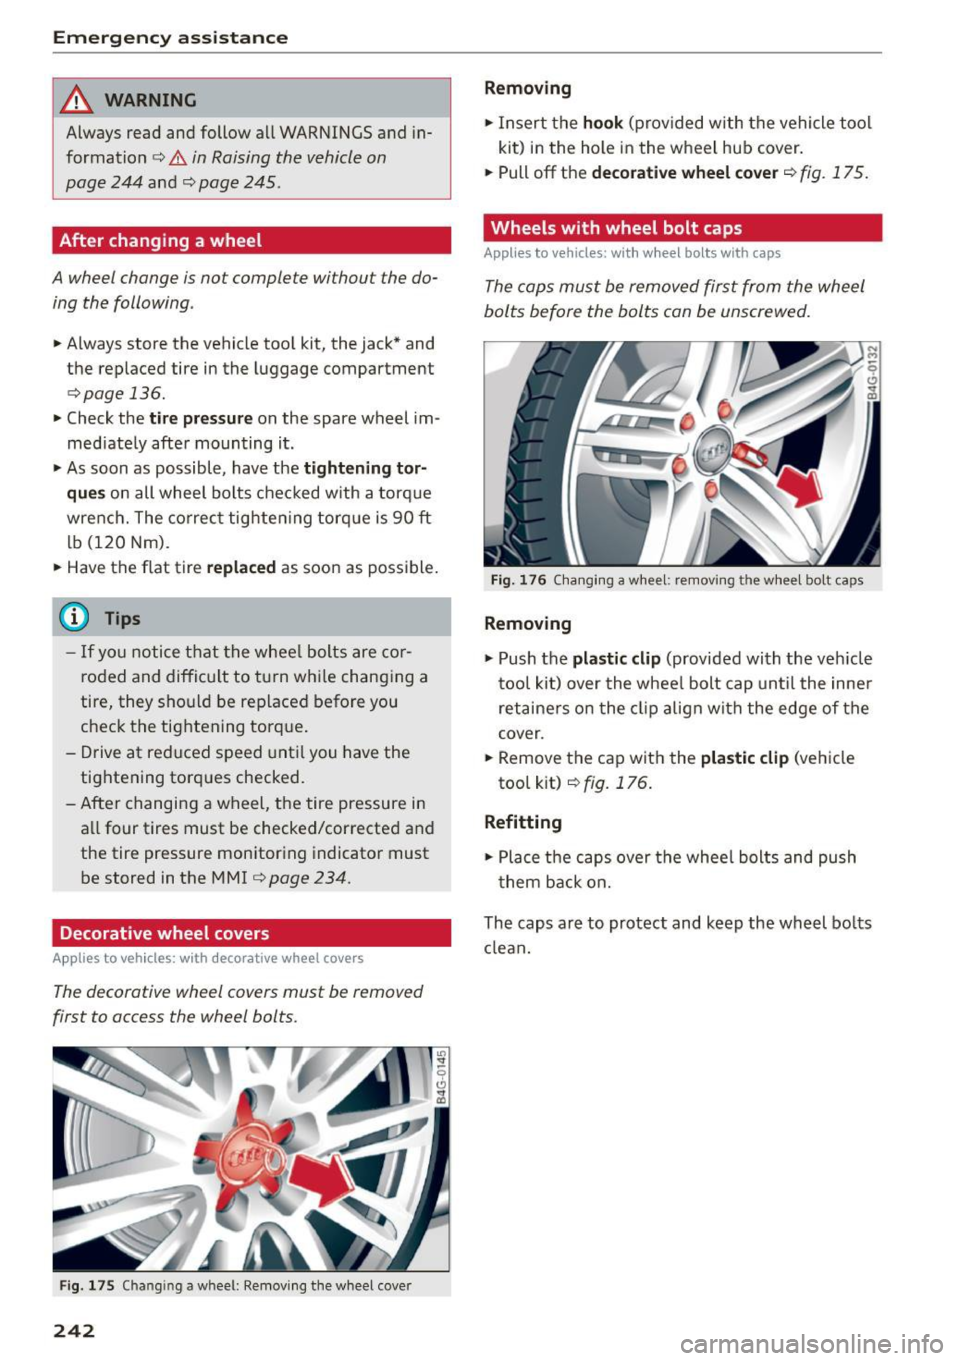
Fig. 175 Chan gin g a w hee l: Removing the wheel cover
242
Removing
.. Insert the hook (provided with the vehicle tool
kit) in the hole in the wheel hub cover.
.. Pull off the
decorative wheel cover c:> fig. 175.
Wheels with wheel bolt caps
Applies to vehicles: with wheel bolts with caps
The cops must be removed first from the wheel
bolts before the bolts con be unscrewed .
Fig. 176 Changing a wheel: removing th e whee l b olt caps
Removing
.. Push the plastic clip (provided with the veh icle
tool kit) over the wheel bolt cap until the inner
retaine rs on the clip align with the edge of the
cover .
.. Remove the cap with the
plastic clip (vehicle
tool k it)
c:> fig. 176.
Refitting
.. Place the caps over the wheel bolts and push
them back on.
The caps are to protect and keep the wheel bolts
clean.
Page 245 of 282
....,
N
0 > co
rl I.O
"'
"'
"'
rl
Loosening and tightening the wheel bolts
The wheel bolts must be loosened before raising
the vehicle.
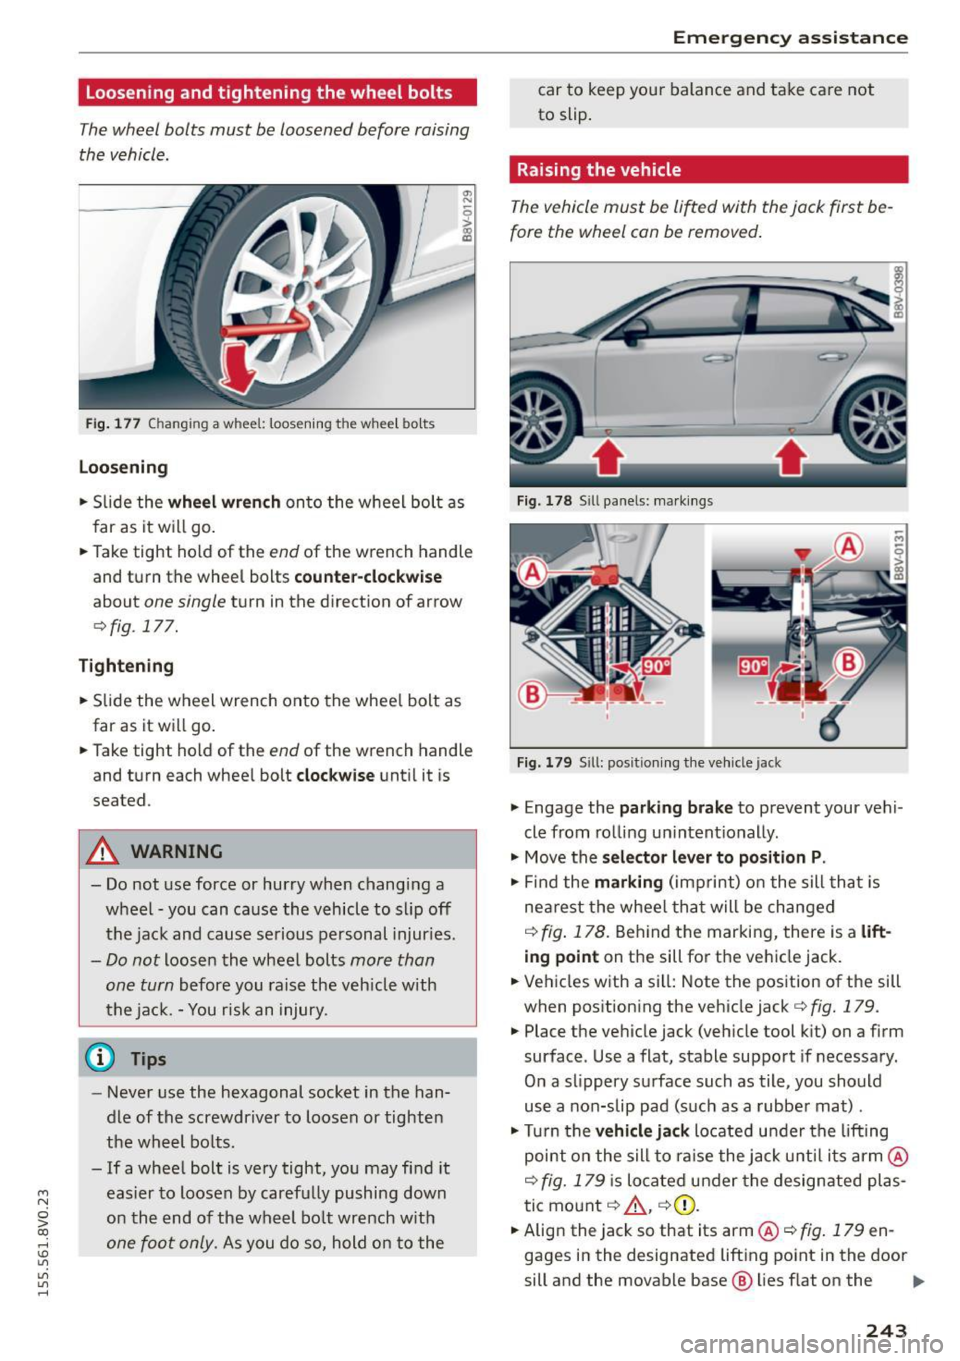
Fig . 177 Changing a wheel: loosening the whee l bo lts
Loosening
... Slid e the wheel wren ch onto the wheel bolt as
far as it will go .
... Take tight hold of the
end of the wrench handle
and turn the wheel bolts
counter-clockwise
about one single turn in the direction of arrow
r:=>fig. 177.
Tightening
... Slide the wheel wrench onto the whee l bolt as
far as it will go .
... Take tight hold of the
end of the wrench handle
and turn each whee l bolt
clockwise until it is
seated.
A WARNING
- Do not use force or hurry when changing a
wheel -you can ca use the vehicle to sl ip off
the jack and cause serious personal injuries.
-Do not loose n the wheel bolts more than
one turn
before you raise the vehicle with
the jack. -You risk an injury.
(D Tips
-Never use the hexagonal socket in the han
dle of the screwdriver to loosen or tighten
the wheel bolts.
- If a whee l bolt is very tight, you may find it
easier to loosen by carefully pushing down
on the end of the wheel bolt wrench with
one foot only . As you do so, hold on to the
Emergen cy assistance
car to keep your balance and take ca re not
to slip .
Raising the vehicle
The vehicle must be lifted with the jack first be
fore the wheel can be removed .
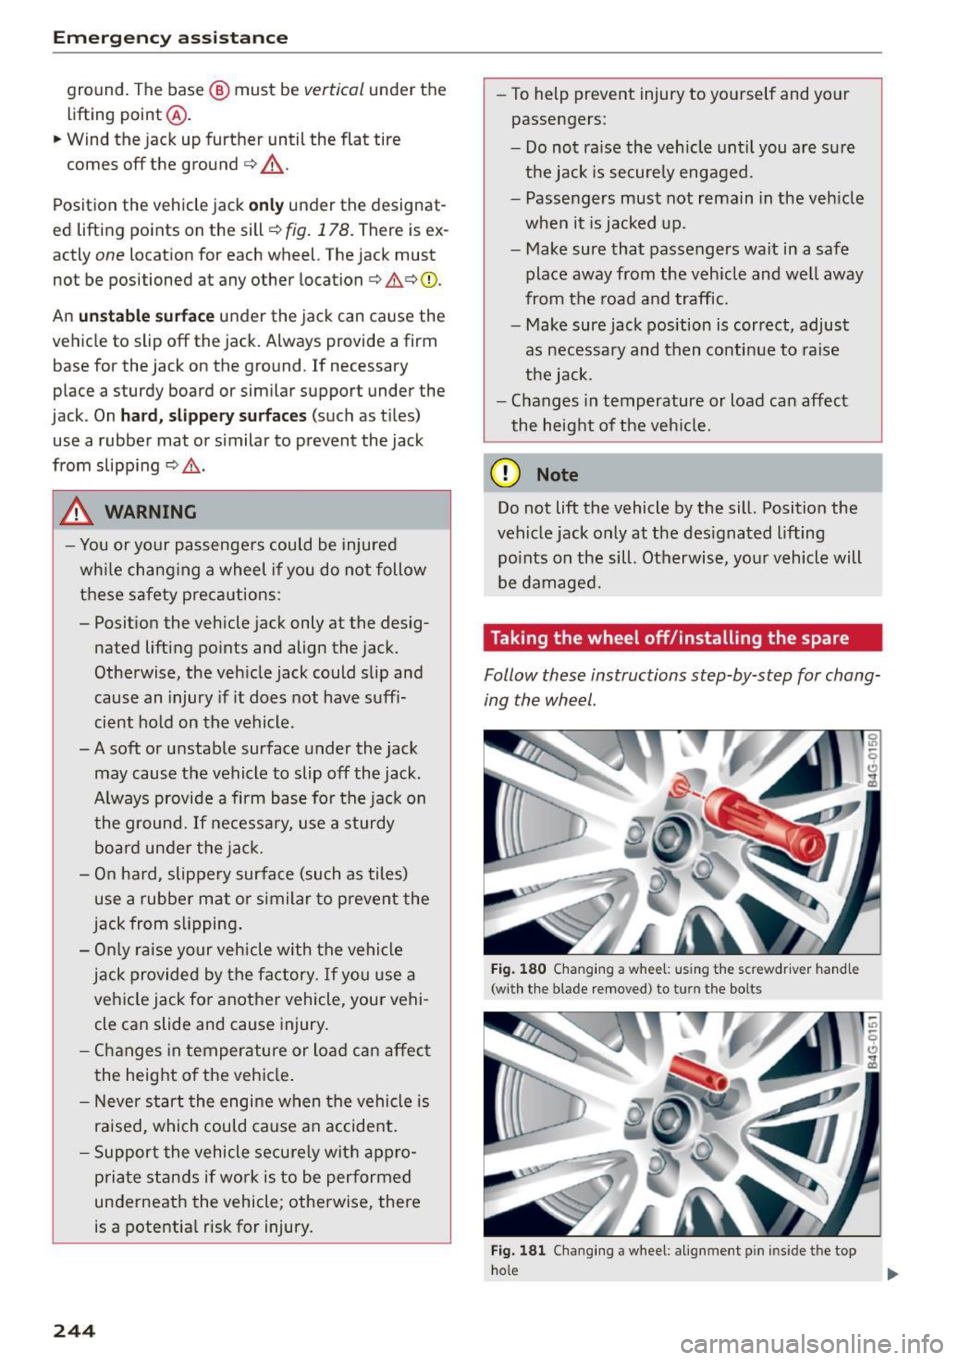
Fig. 178 Sill panels: marking s
Fig. 179 Sill: pos itio ning the vehicle jack
... Engage the parking brake to prevent your vehi
cle from rolling unintent ionally .
... Move the
selector lever to position P .
... Find the marking (imprint) on the sill that is
nea rest the wheel that will be changed
q fig. 178. Behind the marking, there is a lift
ing point on the sill for the vehicle jack.
... Vehicles with a si ll: Note the position of the sill
when position ing the vehicle jack
q fig. 179.
... Place the vehicle jack (vehicle tool k it) on a firm
surface. Use a flat, stable support if necessary.
On a slippery surface such as tile, you should
use a non-slip pad (such as a rubber mat) .
... Turn the
vehicle jack located under the lifting
point on the sill to ra is e the jack u ntil its arm@
Q fig. 179 is located under the designated plas
tic mount
q .&., q(j) _
... Align the jack so that its arm @ c:::> fig. 179 en
gages in the designated lifting point in the door
sill and the movable base @ lies flat on the ..,.
243
Page 246 of 282
Eme rge ncy ass ista nce
ground. The base @ must be vertical under the
lifting point @.
.. Wind the jack up further until the flat tire
comes off the ground
c> .&_.
Position the vehicle jack onl y under the designat
ed lifting points on the sill
c> fig. 178. There is ex
actly
one location for each wheel. The jack must
not be positioned at any other location
c> &c>Q) .
An uns table s urfac e under the jack can cause the
vehicle to slip off the jack. Always provide a firm
base for the jack on the ground . If necessary
place a sturdy board or similar support under the
jack. On
har d, sli ppery su rfaces (such as tiles)
use a rubber mat or similar to prevent the jack
from slipping
c> & .
A WARNING
-
-You or your passengers could be injured
wh ile chang ing a wheel if you do not follow
these safety precautions:
- Position the vehicle jack only at the desig
nated lifting points and align the jack.
Otherwise, the vehicle jack could slip and
cause an injury if it does not have suff i
cient hold on the vehicle.
-A soft or unstable surface under the jack may cause the vehicle to slip off the jack.
Always provide a firm base for the jack on
the ground. If necessa ry, use a sturdy
board under the jack.
- On ha rd, slippery surface (such as tiles)
use a rubber mat o r similar to prevent the
jack from slipping .
- On ly raise your vehicle with the vehicle
jack provided by the factory . If you use a
vehicle jack for another vehicle, your vehi
cle can slide and cause injury.
- Changes in temperature or load can affec t
the height o f the vehicle .
- Never start the engine when the vehicle is
raised, which could cause an accident.
- Support the vehicle securely with appro
priate stands if work is to be performed
underneath the vehicle; otherwise, there
is a potentia l risk for injury .
244
-To help prevent injury to yourself and your
passengers :
- Do not ra ise the vehicle until you are su re
the jack is securely engaged.
- Passengers must not remain in the veh icle
when it is jacked up.
- Make sure that passengers wait in a safe place away from the veh icle and we ll away
from the road and traffic.
- Make sure jack position is correct, adjust
as necessary and then continue to raise
the jack.
- Changes in temperature or load can affect
the height of the vehicle.
(D Note
Do not lift the vehicle by the sill. Position the
vehicle jack only at the des ignated lifting
po ints on the sill. Otherwise, your vehicle will
be damaged.
Taking the wheel off /installing the spare
Follow these instructions step-by-step for chang
ing the wheel.
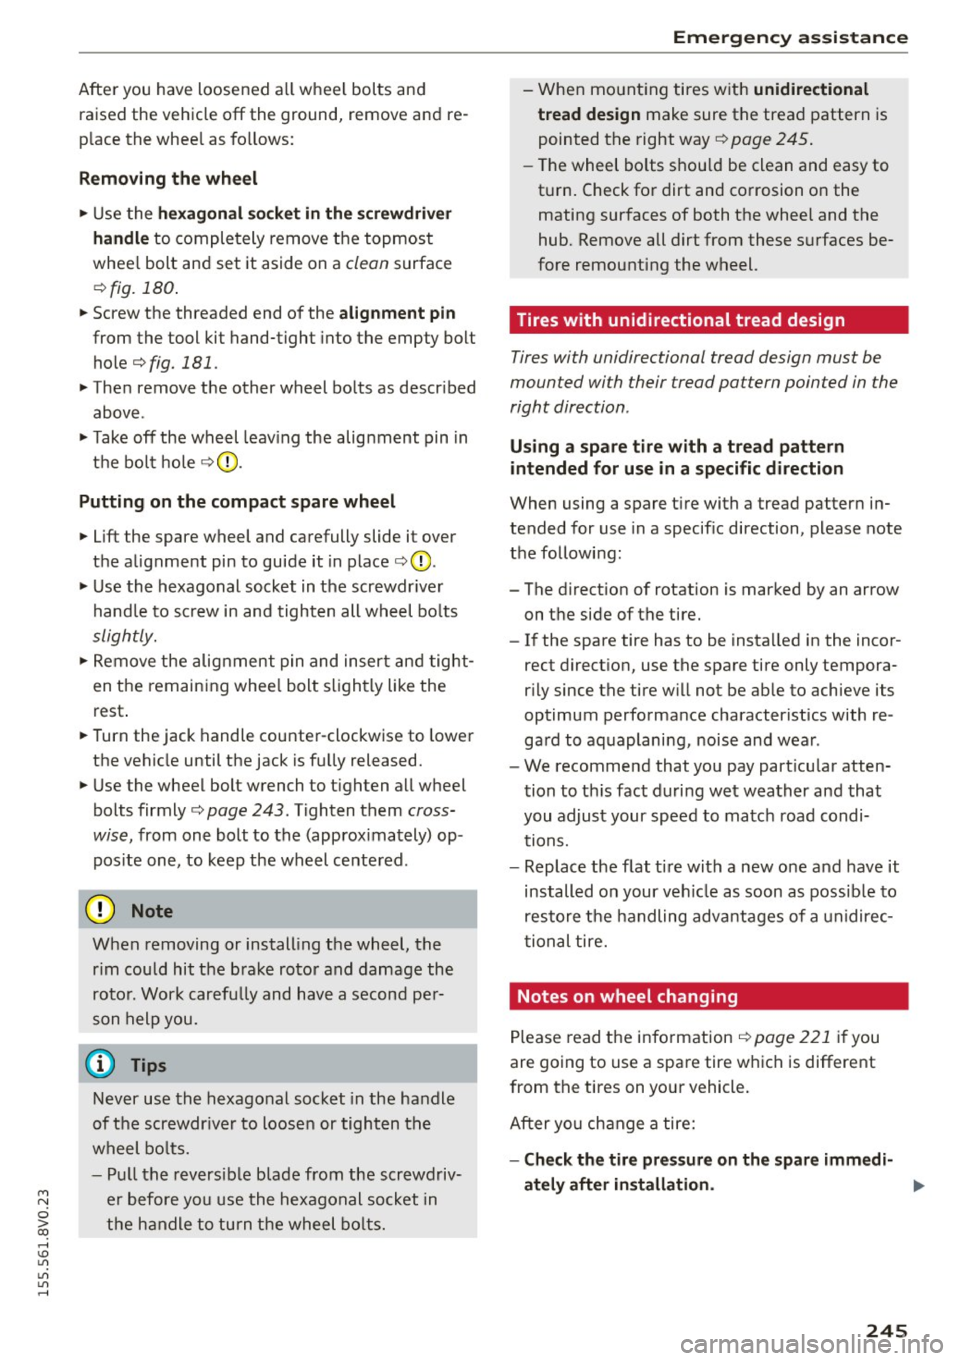
Fig. 180 Chang ing a whee l: us ing the screwdriver hand le
(w ith the blade removed) to turn the bolts
Fig. 181 Changing a w heel: alignment pin inside the top
hole
Page 247 of 282
M N
0 > co ,...., \!) 1.1'1
1.1'1
1.1'1
,....,
After you have loosened all wheel bolts and
raised the vehicle
off the ground, remove and re
place the whee l as fo llows:
Removing the wheel
.,. Use the hexagonal socket in the screwdriver
handle
to completely remove the topmost
whee l bolt and set it aside on a
clean surface
¢ fig. 180 .
.,. Screw the threaded end of the alignment pin
from the tool kit hand-tight into the empty bolt
hole¢
fig. 181.
.,. Then remove the other wheel bolts as descr ibed
above .
.,. Take
off the wheel leav ing the alignment pin in
the bolt hole ¢Q).
Putting on the compact spare wheel
.,. Lift the spare wheel and carefully slide it over
the a lignment pin to guide it in place ¢0 .
.,. Use the hexagonal socket in the screwdr iver
handle to screw in and tighten all wheel bolts
slightly.
.,. Remove the alignment pin and insert and tight
en the remaining whee l bolt slightly like the
rest .
.,. Turn the jack handle counter-clockwise to lower
the vehicle until the jack is fully released.
.,. Use the wheel bolt wrench to t ighten all wheel
bolts firmly¢
page 243. Tighten them cross
wise,
from one bolt to the (approx imately) op
pos ite one, to keep the wheel centered .
0 Note
When removing or installing the wheel, the
r im could hit the brake rotor and damage the
rotor. Work carefully and have a second per
son help you.
@ Tips
Never use the hexagonal socket in the handle
of the screwdr iver to loosen or tighten the
wheel bolts.
- Pull the reversible blade from the screwdriv
er before you use the hexagonal socket in
the handle to turn the wheel bolts.
Emergency assistance
-When mounting tires with unidirectional
tread design
make sure the tread pattern is
pointed the right way¢
page 245 .
-The wheel bolts shou ld be clean and easy to
t ur n. Check for dirt and corrosion on the
mating surfaces of both the wheel and the
hub. Remove all dirt from these surfaces be
fore remounting the wheel.
Tires with unidirectional tread design
Tires with unidirectional tread design must be
mounted with their tread pattern pointed in the
right direction .
U sing a spare tire with a tread pattern
intended for use in a specific direction
When using a spare t ire with a tread pattern in
tended for use in a specific direction, please note
the following:
- The direct ion of rotation is marked by an arrow
on the side of the tire.
- If the spare tire has to be insta lled in the incor
rect direction, use the spare tire only tempora
r ily since the tire w ill not be able to achieve its
optimum performance characteristics with re
gard to aquaplaning, noise and wear .
- We recommend that you pay part icular atten
tion to th is fact during wet weather and that
you adjust your speed to match road condi
tions.
- Replace the flat tire with a new one and have it
installed on your veh icle as soon as possible to
restore the handling advantages of a unidirec
tional tire.
Notes on wheel changing
Please read the information ¢ page 221 if you
are going to use a spare tire which is different
from the tires on your vehicle.
After yo u change a tire:
-Check the tire pressure on the spare immedi-
ately after installation.
lill-
245
Page 248 of 282
Emergency assistance
-Have the wheel bolt tightening torque
checked with a torque wrench as soon as pos
sible by your authorized Audi dealer or a
qualified service station .
- With steel and alloy wheel rims , the wheel
bolts are correctly tightened at a torque of
90
ft lb (120 Nm).
- If you notice that the wheel bolts are corroded
and difficult to turn while changing a tire ,
they should be replaced before you check the
tightening torque.
- Replace the flat tire w ith a new one and have
it installed on your vehicle as soon as possi
ble . Remount the wheel cover.
Until then, dri ve with extra care and at reduced
speeds .
A WARNING
-If y ou ar e go ing to equip y our vehicle with
t ir es or rims wh ic h differ from t hose w hich
were factory install ed , th en be s ure to read
t h e info rmat io n
~ pag e 22 1.
- Always make su re the damaged w heel or
ev en a flat tir e and t he ja ck and too l kit are
p ro perly secured i n the luggage compar t
m ent an d are no t lo ose in the p assenge r
comp artment.
- In an accide nt o r su dden mane uver they
c ou ld fly forw ard, injuring anyo ne in t he ve
hicle .
- Always store d amaged w heel, ja ck and tool s
se cur ely in the L uggage comp artment. Oth
erwise , in an acciden t or sudden maneuve r
t h ey could fly forward, ca using injury to pas
sengers in the vehicle.
246
-
Spare tire
General information
Applies to vehicles: with space -saving spare tire {compac t
spare tire)
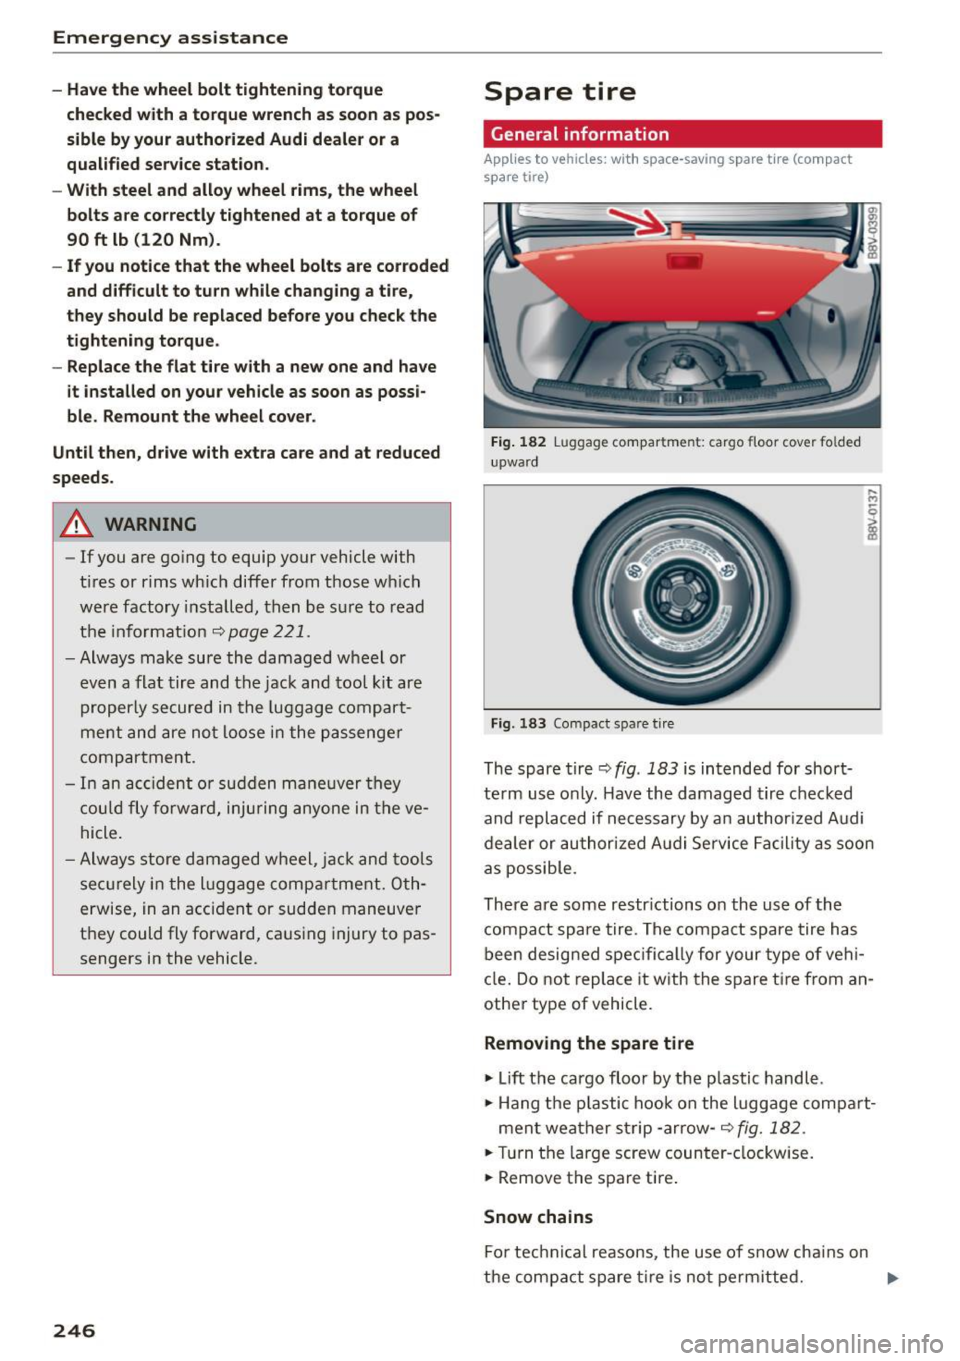
Fig. 1 82 Lu ggage compartme nt: cargo floor cove r fo lded
upward
Fi g. 183 Compact spare t ire
The spare t ire ~ fig . 183 is intended for short
te rm us e onl y. H ave the damaged tire c hec ked
and replaced if ne cessary by an authori zed Audi
de aler or au thori zed A udi Se rvice Facility as soon
as possible.
There are some restr ictions o n the use of the
compa ct spare tire . T he compa ct spare tire has
been desig ned spec ifi cal ly for your type o f ve hi
cl e. Do no t r eplace it w ith the s pare t ire from an
other type of vehicle.
Removing the spare tire
... lift th e cargo flo or by the p lastic handl e .
... Hang the p lastic hook on the luggage compart-
ment weather strip -arrow-~
fig. 182 .
... Tur n the lar ge screw coun ter -cl ockwise .
... Remove the spa re t ire .
Snow chains
Fo r tec hnical reasons, the use of s now cha ins on
the compact spare t ire is no t permitte d. .,.
Page 249 of 282
M N
0 > co ,...., \!) 1.1'1
1.1'1
1.1'1
,....,
If you have to drive with snow chains and a front
tire fai ls, mount the spare wheel in place of a rear
tire. Install the snow chains on the rear t ire that
you removed, and install that in place of the
front tire that failed.
A WARNING
-After installing a spare tire, the t ire pressure
must be checked as soon as possible. The
t ire pressure is availab le
onr::::;,page 224,
fig. 171.
- If the spare t ire is more than 6 years old,
use it only in an emergency and w ith ex
t reme caution and careful d riving.
- The spare tire is intended only for tempora
ry and short-term use.
It should be replaced
as soon as possible with the normal wheel
and tire.
- After mounting the compact spare tire, the
tire pressure must be checked as soon as
possible . The tire pressure o f the compact
spare tire must be 61 psi (420 kPA); other
wise, you risk having an accident .
- Do not drive faster than SO mph (80 km/h). You risk having an accident.
- Avoid fu ll-throttle acce leration, heavy brak
ing, and fast cornering . You risk having an
accident.
- Never drive using more than one spare wheel and tire. You risk having an accident .
- Norma l summer or winter tires must not be
mounted on the compact spare wheel rim.
- F or technical reasons, the use o f ti re chains
on the spare tire is not permitted . If it is
necessary to drive with tire chains, the spare
wheel m ust be mounted on the front axle in
the event of a flat in a rear tire. The newly
available front wheel must then be installed
in place of the rear wheel with the flat tire.
Installing the tire cha in before mounting
the wheel and t ire is recommended.
- loose items in the passenger compartment
can cause ser ious personal inju ry during
hard bra king or in an accident. Never store
the inflatable spare tire or jack and tools in
the passenger compartment.
- No rma l summer or winte r tires must not be
mounted on the comp act spare wheel r im.
Em erge ncy ass is tanc e
247
Page 250 of 282
Fuses and bulbs
Fuses and bulbs
Electrical fuses
Replacing fuses
A fuse that has blown will have metal strips that
have burned through.
Fig. 184 Steering column area: cover
Fig. 1 85 Left side of the engine compartment: fuse cover
Fuses in the interior
The fuses are behind the cover in the steering col
umn a rea
r::;,fig. 184.
" Switc h the ignition and all e lectr ica l equipment
off .
" Check the following table to see which fuse be
l o ngs to the equipment
r::;, page 249.
"Remove the cover ("AIRBAG" label) r::;,fig. 184 .
Begin at the bottom right corner -arrow-.
" Remove the plastic clip from the fuse panel
cover in the engine compartment<=>
fig. 185.
"Remove the fuse using the plastic clamp.
" Rep lace the bur ned fuse with an identical new
one .
" Install the cover .
Fuses in the engine compartment
"Turn off the ignit ion and the failed electrical
equipment.
248
" Check the following tab le to see wh ich fuse be
longs to the equipment¢
page 250.
" Remove the fuse panel cover ¢fig . 185.
" Remove the plastic clip from the fuse pane l
cover
r::;, fig. 185 .
.. Remove the fuse using the plastic clamp .
" Replace the burned fuse with an identical new
one .
.. Reins tall the cover.
The ind iv idual circuits are protected by safety
fuses . The fuses a re located under the steering
whee l beh ind a cover and in the left s ide of the
engine compa rtment.
Fuse color identification
Color Current rating
in amps
Bla ck 1
Purple 3
Light brown 5
Brown 7,5
Red 10
Blue 15
Yellow 20
Wh ite or transparent 25
green 30
orange 40
&, WARNING
Do not repa ir fuse s and never replace a blown
f u se w ith one that has a hig her amp rating.
T his c an c ause damage to t he e lectr ica l sys
tem and a fi re .
(D Note
If a new fuse blows again shortly after you
h ave installed i t, have the ele ct ric al sys tem
checked by an a uth orized Audi deale r o r au
thorized Audi Service Facili ty.
{!) Tips
- Th e followi ng table does not l ist fuse loca
t ions tha t are not u sed.