AUDI S3 SEDAN 2015 Owner's Guide
Manufacturer: AUDI, Model Year: 2015, Model line: S3 SEDAN, Model: AUDI S3 SEDAN 2015Pages: 282, PDF Size: 71.14 MB
Page 31 of 282
....,
N
0 > co
rl I.O
"'
"'
"'
rl
.. To confirm a selection, press the thum bwheel
@ .
.. To se lect a function programmed to a steer ing
whee l button , press the button @. For addi
tiona l information, see c:>
page 29, Assigning
a function to a programmable steering wheel
button
Opening the Vehicle functions
.. Se lect the f irst tab w ith the button (!) .
.,. Press the button @. The
Veh icle functions
menu is displayed 9 fig. 10.
.. To select a menu item, turn and press the
t hu mbwheel @.
Resetting values to zero
.. In the Vehicle funct ions menu, select On-board
computer or Efficiency program .
.. Se lect a va lue in the desired trip computer or in
t h e efficie ncy prog ram .
.,. To reset t he val ues in a memo ry, press and hold
t h e thu mbw heel @for on e secon d.
Recalling indicator lights and messages
.. Press the button CD repeated ly until the Q tab
appea rs.
The
Q tab is only visibl e when there is a mal
f u nction.
Assigning a function to a programmable
steering wheel button
.. Se lect: the I MENU j button >Car > Systems *
control button > Vehicle settings > Steering
wheel button programming .
The Q tab is only visible when there is at lea st
one ind icat or light or message displayed.
(D Tips
- If the vehicle battery is discon nected , all
memo ry values a re erased.
- In form ation on the e fficiency pr ogra m
c:> pag e 29 .
-There is more inf orm atio n on the m ultifunc
t io n st eering wheel in the MMI* owner 's
manua l.
Driver information system
Boost indicator
Applies to vehicles: with boost pressure indicator
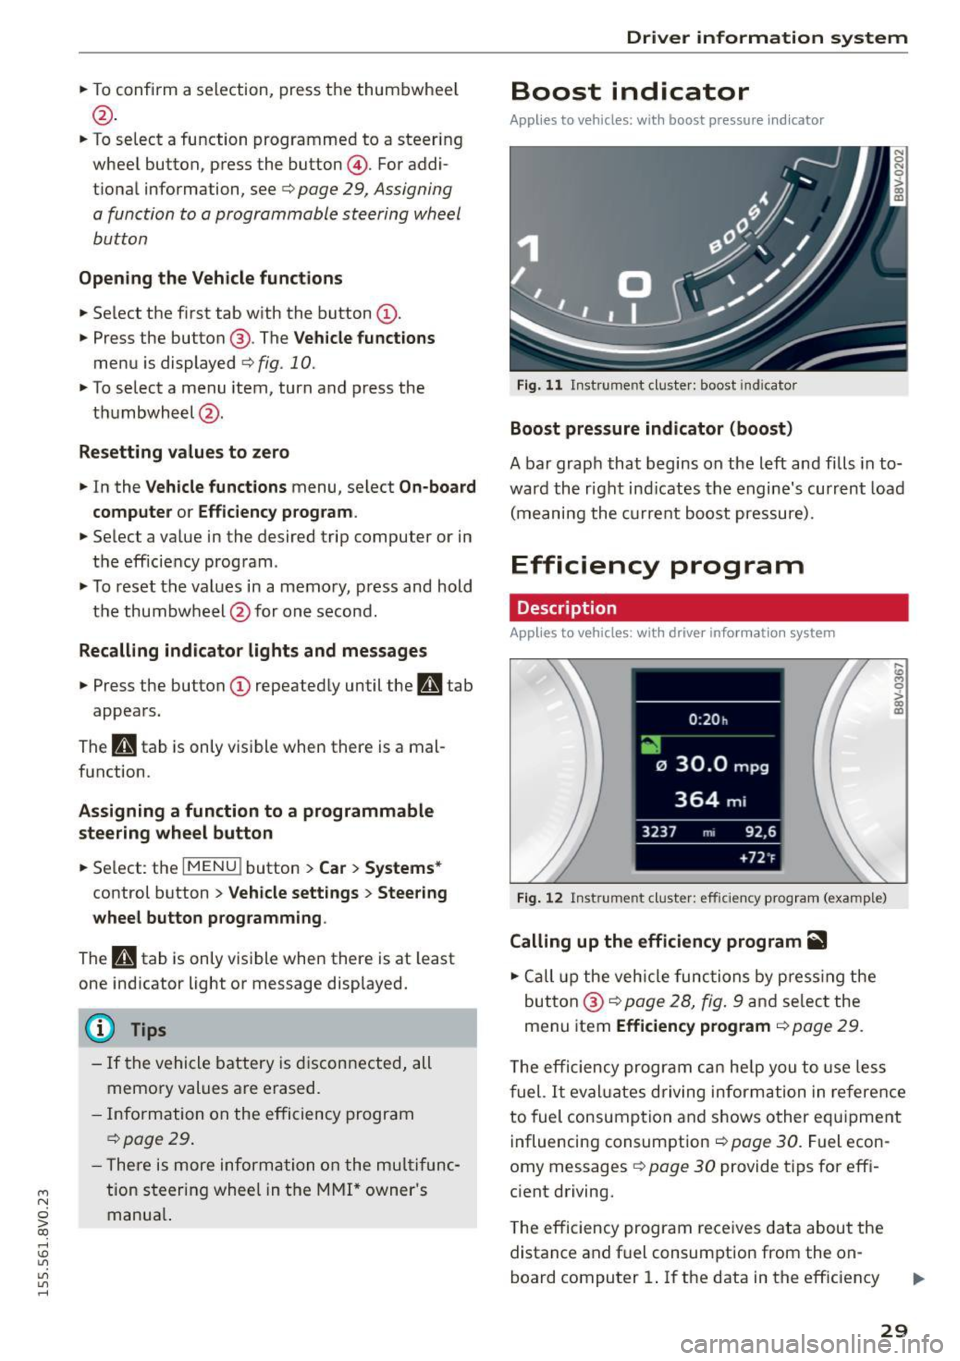
Fig. 11 Instrume nt cl ust e r: boost in dic ato r
Boost pressure indicator (boost)
A bar grap h that begins on the l eft and fills in t o
wa rd the righ t ind icates the engine's cu rrent load
( m eaning the cur rent b oost pressure).
Efficiency program
Description
App lies to vehicles: with driver info rmation system
Fig. 12 Inst rume nt clust er: effici ency p rogram (exa mple)
Calling up the efficiency program ii1
.. Call up the veh icle functio ns by pre ss in g the
but to n @ c:>
page 2 8, fig . 9 and se lec t the
menu item
Efficiency program c:> page 29.
,._
m
T he effi ciency pro gr am can he lp y ou to use le ss
f uel.
It eval uates driving inform ati on in ref ere nce
to fuel consump tion and shows o ther eq uipme nt
i nfluencing consumpt ion c:>
page 30 . Fue l econ
omy messages
c:> page 30 provide t ips for eff i
c ient driving .
T he efficiency program rece ives data abou t the
distance and f uel consumpt ion from the on
board compu ter
1. If the data in t he eff iciency
29
Page 32 of 282
Driver information system
program is deleted ¢page 29, the values in the
on-board computer 1 are also reset.
Other equipment
Applies to vehicles: with driver information system
Fig. 13 Instrument cluster: Other equ ipment (examp le)
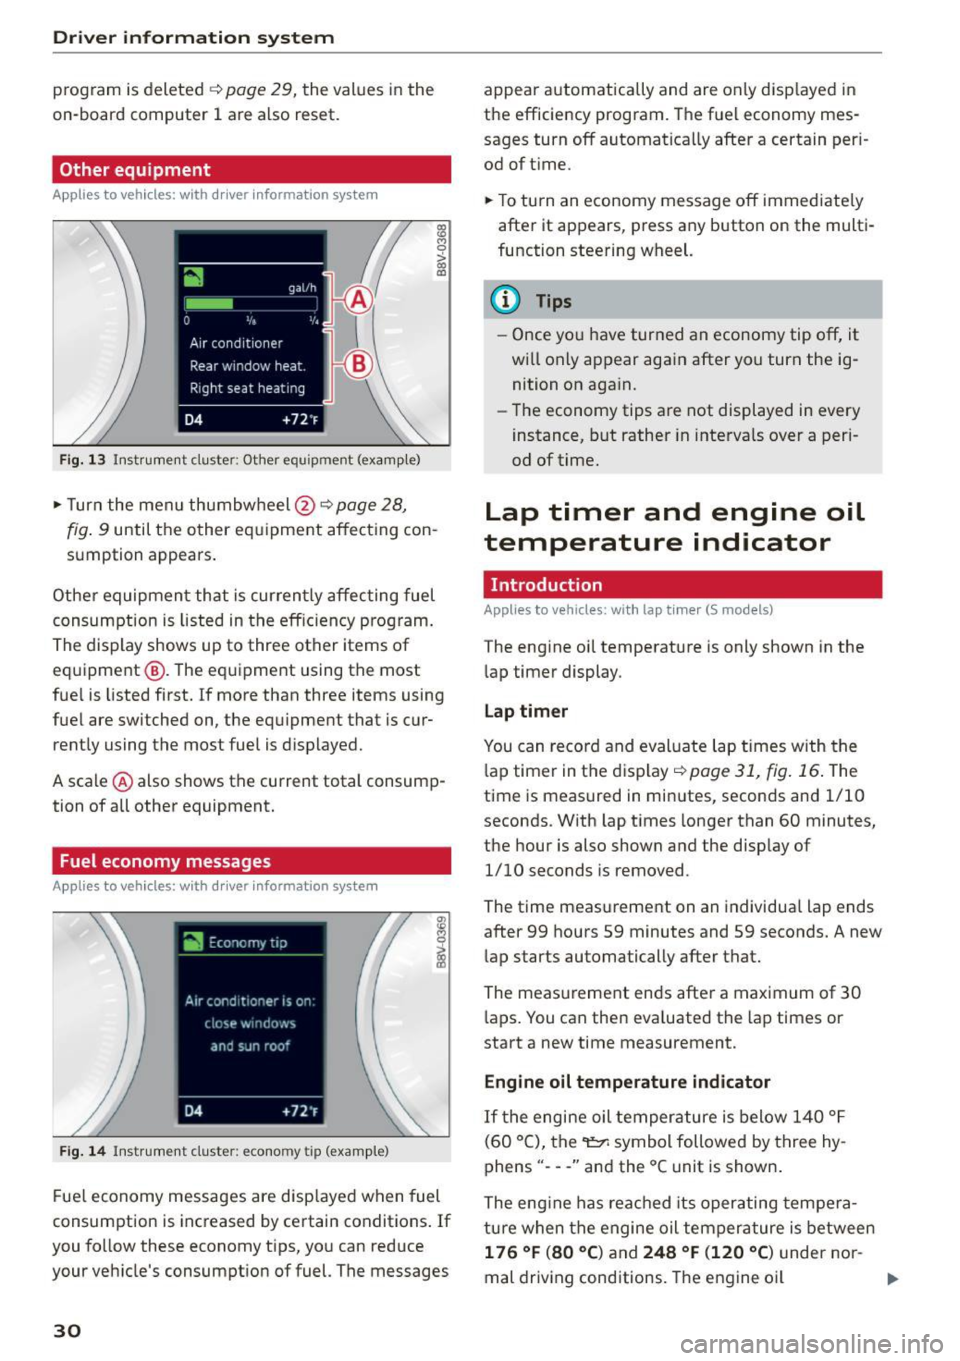
"'T urn the menu thumbwheel @ ¢ page 28,
l8 M 0
>
"' a,
fig. 9 until the other equipment affecting con
sumption appears.
Other equipment that is currently affecting fuel
consumption is listed in the efficiency prog ram.
The display shows up to three other items of
equipment @. The equipment using the most
fue l is listed first. If more than three items using
fuel are switched on, the equ ipment that is cur
rently using the most fuel is displayed.
A scale @ also shows the current total consump
tion of all other equipment.
Fuel economy messages
Applies to vehicles: with driver information system
Fig. 14 Instrument cluster: economy tip (example)
Fuel economy messages are disp layed when fuel
consumption is increased by certain conditions . If
you follow these economy tips, you can reduce
your veh icle's consumption of fuel. The messages
30
appear automatically and are only disp layed in
the efficiency program. The fuel economy mes
sages turn off automatically after a certain per i
od of t ime.
"'T o turn an economy message off immediate ly
after it appears, press any button on the multi
function steering wheel.
(D Tips
- Once you have turned an economy tip off, it
wi ll only appear again after you turn the ig
nition on again.
- The economy tips are not displayed in every
instance, but rather in intervals over a peri
od of time.
Lap timer and engine oil
temperature indicator
Introduction
Applies to veh icles: with lap tim er (S models)
The engine oil temperature is only shown in the
lap timer display.
Lap timer
You can record and evaluate lap times with the
l ap timer in the display¢
poge 31, fig. 16. The
time is measured in minutes, seconds and 1/10
seconds. With lap times longer than 60 minutes,
the hour is also shown and the display of
1/10 seconds is removed.
The time measurement on an individua l lap ends
after 99 hours 59 minutes and 59 seconds. A new
lap starts automatically after that.
The meas urement ends after a maximum of 30
laps. You can then eva luated the lap times or
start a new time measurement.
Engine oil temperature indicator
If the engine oil temperature is below 140 °F
(60 °C), the~ symbol followed by three hy
phens" ---" and the °C unit is shown .
The engine has reached its operating tempera
ture when the engine oil tempera ture is between
176 °F (80 °() and 248 °F (120 °C) under nor-
mal driving conditions. The engine oil
IJI>
Page 33 of 282
....,
N
0 > co
rl I.O
"'
"'
"'
rl
temperature may be higher if there is heavy en
gin e load and high temperatures outside. This is
not a cause for concern as long as the.
¢page 19 orllll ¢page23 indicator lights in the
display do not blink.
A WARNING
Your focus should always be on driving your
vehicle safely . As the dr iver, you have com
plete responsibility for safety in traffic . Only
use the functions such as the lap timer in such
a way that you a lways maintain complete con
trol over your vehicle in all traffic situations .
(D Tips
You can retr ieve information from the tr ip
computer while the lap timer stopwatch is
r u nning.
Opening the lap timer and measuring time
Applies to vehicles: with lap timer (5 models)
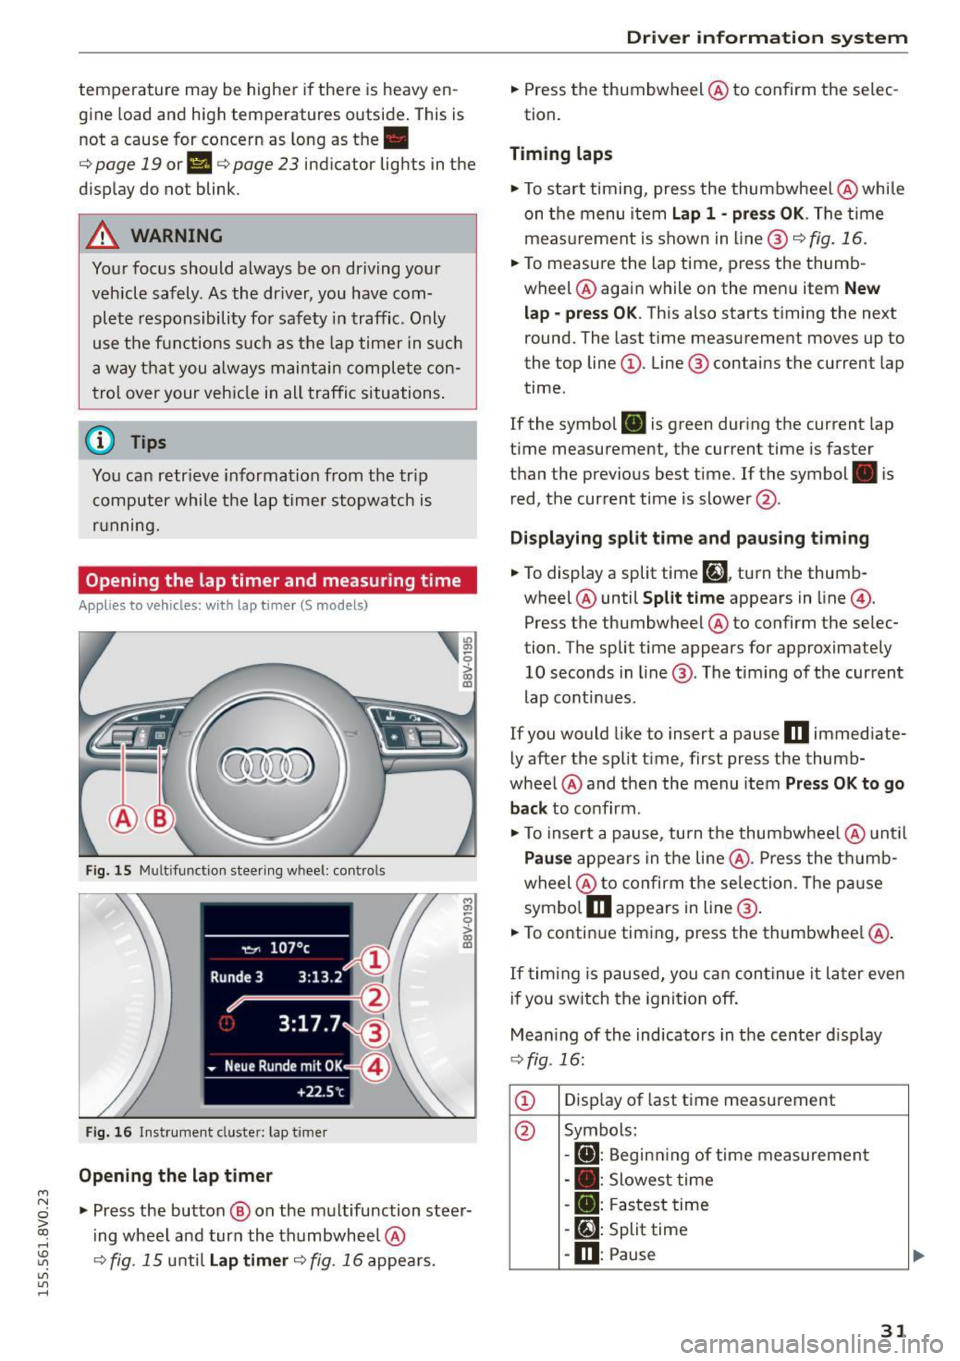
Fig. 15 Multifunction steer ing wheel: controls
Fig. 16 Instrument cluster: lap timer
Opening th e lap timer
-
"'Press the button @ on the multifunction steer
ing wheel and turn the thumbwheel @
¢fig. 15 unt il Lap timer ¢fig. 16 appea rs.
Dr iver inform atio n sy stem
.. Press the thumbwheel @ to confirm the selec
tion.
T im ing laps
"' To sta rt timing, press the thumbwheel @ while
on the menu item
Lap 1 - pre ss OK . The time
measurement is shown in line @
r=:> fig. 16.
.. To measure the lap time, press the thumb
wheel @ again while on the men u item
New
lap -pre ss O K. This also starts timing the next
round. The last time measurement moves up to
the top line
(D . Line ® contains the current lap
time .
If the symbol
ri) is green during the current lap
t ime measurement, the current time is faster
than the previous best time. If the symbol. is
red, the current time is slower @.
Displaying split time and pausing tim ing
.. To display a split time
[~l turn the thumb-
wheel @until
Split time appears in line @.
Press the thumbwheel @ to confirm the selec
tion. The split time appears for approximately 10 seconds in line @. The timing of the current
lap conti nues.
If you would like to insert a pause
m immediate
ly after the split t ime, first press the thumb
wheel @and then the menu item
Pr ess OK to go
back to confirm .
"' To insert a pause, turn the thumbwheel @ until
Pau se appears in the line @. Press the thumb
wheel @ to confirm the se lec tion . Th e pause
symbo l
m appears in line @ .
.. To continue timing, press the thumbwhee l@ .
If timing is paused , you can continue it la ter even
i f you sw itch the ignition off.
Mean ing of the indicators in the center d isp lay
¢ fig . 16:
CD Disp lay of last time measurement
@ Symbols:
-
[O]: Begin ning of time measuremen t
- . : Slowest time
- . : Fastest time
- [~]: Split time
-m : Pause
31
Page 34 of 282
Driver information system
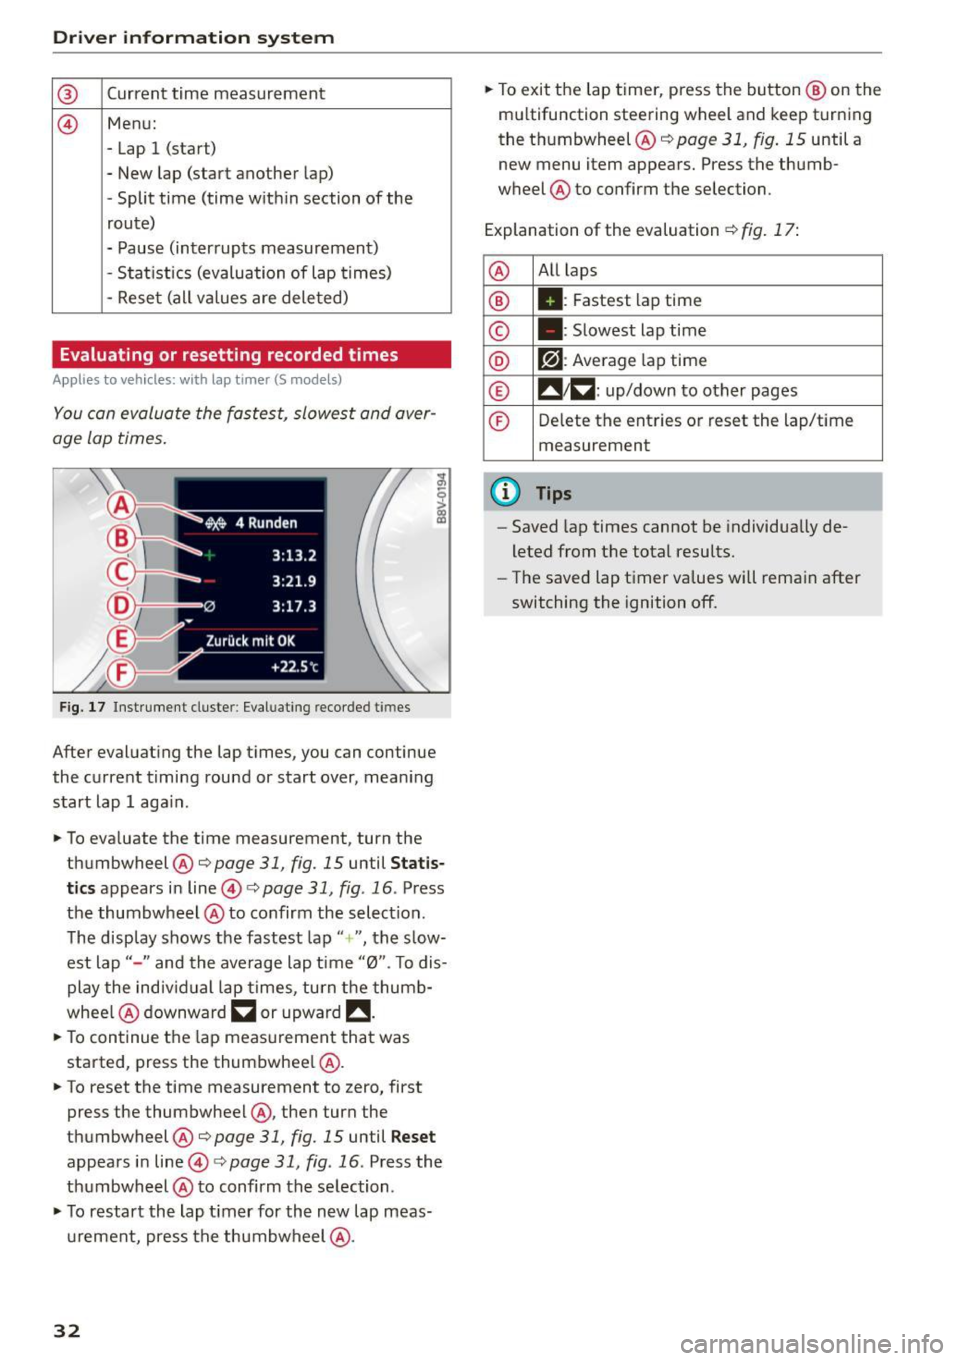
® Current time measurement
@ Menu:
- Lap 1 (start)
- New lap (start another lap)
- Split time (time with in section of the
route)
- Pause (interrupts measurement)
- Statistics (evaluation of lap times)
- Rese t (all values are deleted)
Evaluating or resetting recorded times
Applies to vehicles: with lap timer (S models)
You can evaluate the fastest, slowest and aver
age lap times.
Fig. 17 Instrument cluste r: Eval uat ing reco rded t imes
After evaluating the lap times, you can continue
the current timing round or start over, meaning
start lap 1 aga in.
• To eva luate the time measurement, turn the
thumbwheel @c::>
page 31, fig. 15 until Statis
tics
appears in line@c::> page 31, fig . 16 . Press
the thumbwheel @to confirm the select ion.
The disp lay shows the fastest lap"+ ", the s low
est lap" -" and the average lap time "0". T o dis
play the individual lap times, turn the thumb
whee l@ downward
~ or upward !!.
• To continue the lap measurement that was
started, press the thumbwheel @.
• To reset the time measurement to zero, first
press the thumbwheel @, then turn the
thumbwheel @c::>page
31, fig. 15 until Reset
appears in line@i=>page31 , fig .16 . Press the
thumbwheel @to confirm the se lection .
• To restart the lap timer for the new lap meas
urement, press the thumbwheel @.
32
• To exit the lap timer, press the button @ on the
mu ltifunction steering wheel and keep turning
the thumbwheel @c::>
page 31, fig. 15 until a
new menu item appears. Press the thumb
wheel @to confirm the selection.
Explanation of the evaluation c::>
fig. 17:
@ All
laps
® II: Fastest lap time
© . : Slowest lap time
® r?l : Average lap time
® !! 1~ : up/down to other pages
© Delete the entries or reset the lap/time
measurement
@ Tips
- Saved lap times cannot be individua lly de
leted from the total results.
- The saved lap timer values will remain after
switching the ignition off.
Page 35 of 282
M N
0 > co ,...., \!) 1.1"1
1.1"1
1.1"1
,....,
Opening and closing
Central locking
Key set
Fig. 18 Your vehicle key set
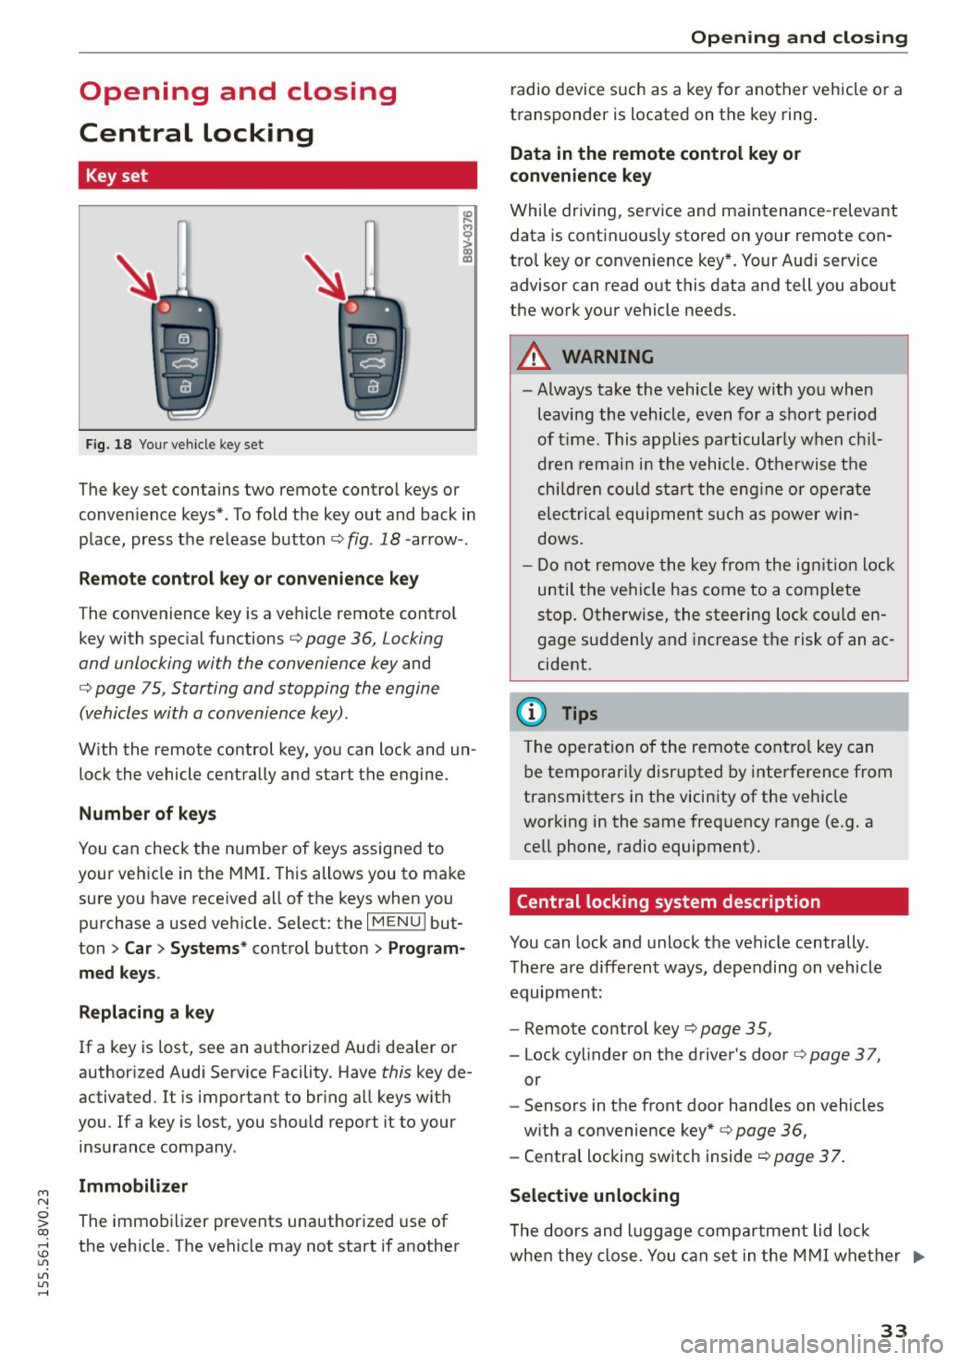
The key set contains two remote control keys or
conven ience keys*. To fold the key out and back in
place, press the release button¢ fig . 18 -arrow- .
Remote control key or convenience key
The convenience key is a vehicle remote contro l
key with special functions¢ page 36, Locking
and unlocking with the convenience key and
¢ page 75, Starting and stopping the engine
(vehicles with a convenience key) .
With the remote control key, you can lock and un
lock the vehicle centrally and start the engine.
Number of keys
You can check the number of keys assigned to
your vehicle in the MMI. This allows you to make
sure you have received all of the keys when you
purchase a used vehicle. Select: the
I MENU I but
ton
> Car> Systems * control button > Program
med keys.
Replacing a key
If a key is lost, see an authorized Audi dealer or
author ized Audi Service Facility. Have this key de
activated. It is important to bring all keys with
you .
If a key is lost, you should report it to your
insurance company.
Immobilizer
The immobilizer prevents unauthorized use of
the vehicle. The vehicle may not start if another
Opening and closing
radio device such as a key for another vehicle or a
transponder is located on the key ring.
Data in the remote control key or
convenience key
While driving, service and maintenance -relevant
data is continuous ly stored on your remote con
trol key or convenience key*. Your Audi service
advisor can read out this data and tell you about
the work your vehicle needs.
A WARNING
-- Always take the vehicle key with you when
leaving the vehicle, even for a short period
of time. This applies particularly when chil
dren remain in the vehicle. Otherwise the
children could star t the engine or operate
electrica l equipment such as power win
dows.
- Do not remove the key from the ignition lock
until the vehicle has come to a complete
stop. Otherw ise, the steering lock could en
gage suddenly and increase the risk of an ac
cident.
(D Tips
The operation of the remote control key can
be temporari ly disrupted by interference from
transmitters in the vicinity of the vehicle
working in the same frequency range (e .g. a
cell phone, radio equipment).
Central locking system description
You can lock and unlock the vehicle centrally.
There are d ifferent ways, depending on vehicle
equipment:
- Remote control key ¢page 35,
- Lock cylinder on the driver's door ¢page 37,
or
- Sensors in the front door hand les on vehicles
with a convenience key* ¢ page 36,
- Central locking switch inside <=:>page 37.
Selective unlocking
T he doors and luggage compa rtment lid lock
when they close. You can set in the MMI whether .,..
33
Page 36 of 282
Opening and closing
only the driver 's door or the entire vehicle should
un lock when unlocking
q page 3 7 .
Automatic locking (Auto L ock )
The Auto Lock funct ion loc ks all doors and the
luggage compartmen t lid once the speed has ex
ceeded approximate ly 9 mph (15 km/h).
The ca r is unlocked aga in once the ignition key is
removed . In add ition, the vehicle can be unlo cked
if the opening function in the power locki ng sys
tem sw itch is used or one o f the door handles is
pu lled .*
Add it io nally, in the event of a cr ash with a irbag
dep loymen t the doors are au tom atic ally un
lo cked to allow access to the vehicle.
Anti-theft alarm system*
If th e a nti-theft alarm system detects a ve hicle
break-in, audio and v is u a l warning s ignals are
tr iggered.
The ant i-theft alarm system tu rns on automati
cally when you lock the veh icle. It deact ivates
wh en unlocking usi ng the remote cont ro l key or
by to uchin g the se nsor on the door handle ( con
ven ience key).
To switch the a larm off, press th em butto n on
the r emote co ntro l key or convenience key or
sw itch the igni tion on. The alarm a lso stops au to
ma tica lly aft er a cer ta in amoun t of time.
Turn signals
W hen you unlock the vehicle, the t urn signa ls
flash twice . W hen you lock the vehicle, the t urn
signals flash once.
If they do not flash, one of the doo rs, the lug
gage compartment lid or the hood is not loc ked
or the ignition is still sw itched on (the la tter ap
plies to veh icles with a convenience key).
Unintentionally locking yourself out
In the following cases there safeguards to pre
ve nt you lock ing you r remote master key in the
ve hicle:
- The vehicle does not lock with the centra l lock
ing switch if the driver's door is open
c> page 37 .
34
-On veh icles with a convenience key*, the l ug
gage compa rtment lid unlocks again after clos
ing if the most recently used key is in the lug
gage compa rtment.
Do not loc k your vehicle w ith the remote control
key or convenience key * until all doors and the
l uggage compartment lid a re closed. In this way
you avoid locking yourse lf out accidentally .
@ Tips
-Do not leave va luab les unattende d in the ve
hicle. A locked veh icle is not a safe!
- If the LE D in the u pper edge of the drive r's
doo r tu rns o n for a bout 30 seconds after
the vehicle is locked, there is a ma lf u nction
in the power locki ng or the anti-theft alarm
system*. Have the problem corrected by an
autho rized Aud i dealer or autho rized Audi
Service Facility .
LED and batterie s in the remote control key
Fi g. 19 Remote con trol key: LED
Fig. 20 Remote con trol key: open ing the cove r
LED in the remote control key
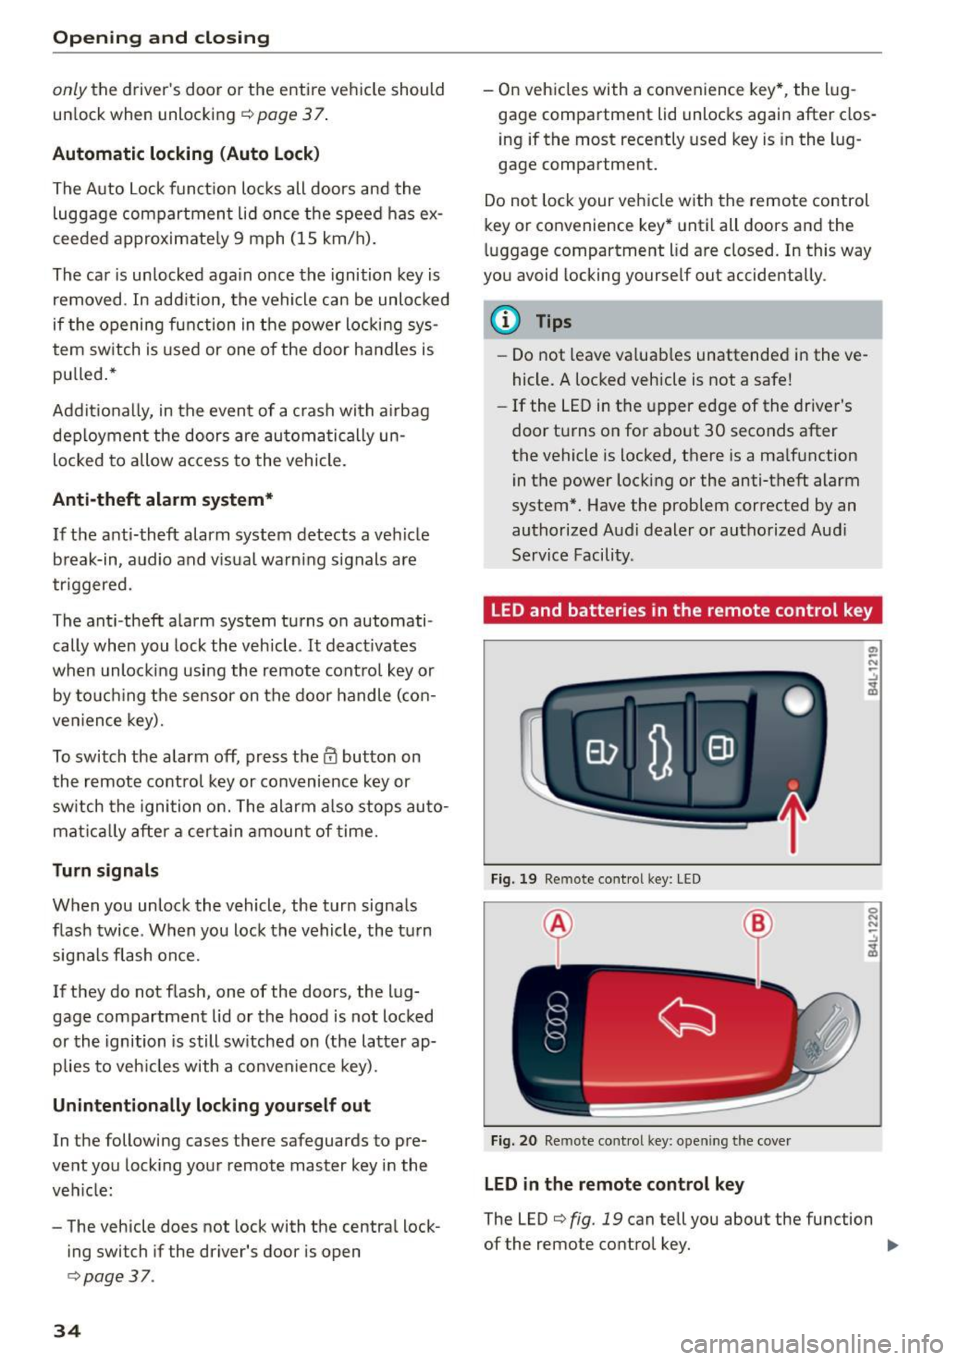
The LED c> fig. 19 can tell you about the fu nction
of the remote control key. ..,_
Page 37 of 282
....,
N
0 > co
rl I.O
"'
"'
"'
rl
• If you press a button quickly, the LED blinks
once .
• If you press a button longer (convenience open
ing*), the LED blinks several times.
• If the LED does not blink, the remote control
key battery is dead. The message=
Please
ch ange ke y batt ery
can also appear in the in
strument cluster d isplay . Replace the battery .
Replacing the remote cont rol ke y batte ry
"Pry off the cover with a co in c;, fig. 20.
• Insert the new battery w ith the" +" facing up .
• Press the cover back onto the key until it clicks
into place .
We recommend having the battery replaced by
an authorized Audi dealer or authorized Audi
Service Fac ility .
@.) For the sake of the environment
Dead batteries must be disposed of using
methods that will not harm the env ironment.
Do not dispose of them i n household trash .
{!) Tips
The replacement battery must meet the same
specifications as the original battery .
Remote control key synchronization
The remote control key must be synch ron ized if
the vehicle does not lock and unlock with the re
mote cont ro l.
• Press the remote control key button
l@J .
• Insert the key in the dr iver door lock within 30
seconds.
• Press the
[m] button o r Im button.
Opening and clo sing
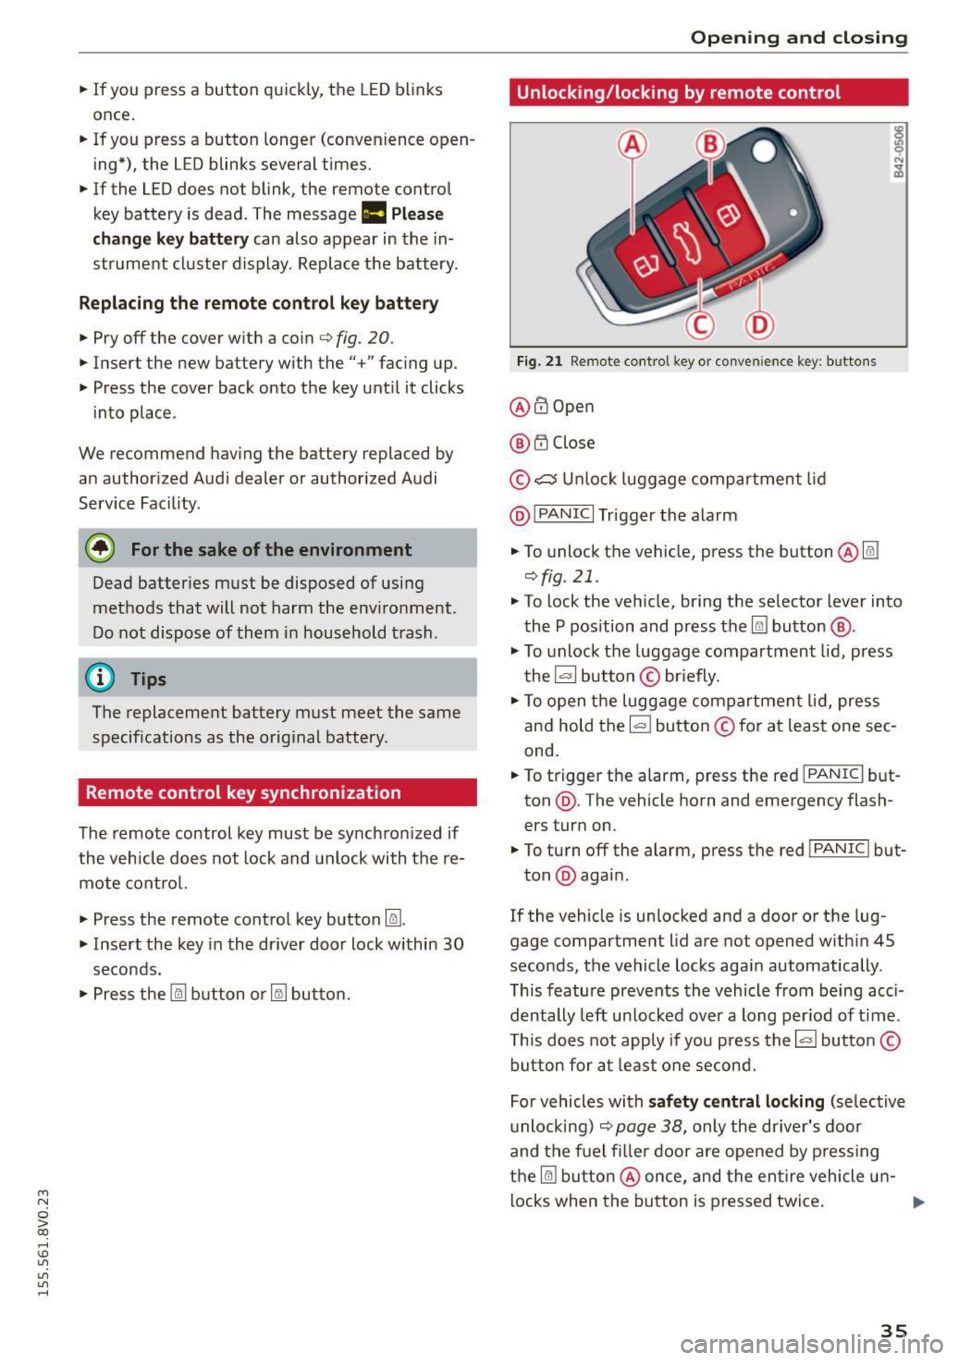
Unlocking/locking by remote control
Fig. 2 1 Remote cont rol key o r conven ience key: b uttons
@ @Open
@ t'.D Close
© ,;:::::::, U nlock luggage compartment lid
@ I
PANIC I Trigger the alarm
• To unlock the vehicle, press the button @@:!
¢fig.21 .
• To lock the ve hicle, br ing the selector lever into
the P position and press the
Im button @ .
• To unlock the luggage compartment lid, press
the~ button © briefly .
• To open the luggage compartmen t lid, press
and hold the I= ! button © for at least one sec
ond.
• To trigger the alarm, press the red I
PANIC I but
ton @. The vehicle horn and emergency flash
ers turn on.
• To turn off the alarm, press the red I
PANIC ! but-
ton @again .
If the vehicle is unlocked and a door or the lug
gage compartment lid are not opened w ith in 45
seconds, the vehicle locks aga in automatically .
This feature prevents the vehicle from being acci
dentally left un locked over a long per iod of t ime .
T his does not app ly if you press the~ button©
button for at least one second.
For vehicles with
s af ety ce ntral locking (se lective
u nlocking)
c;, page 38, only the dr iver's door
and the fuel filler door are opened by press ing
the
@I button @once, and the en tire vehicle u n-
locks when the button is pressed twice. ..,.
35
Page 38 of 282
Opening and closing
A WARNING
Read and following all WARNINGS. ¢ & in
Key set on page 33
(D Tips
- Only use the remote control key or conven
ience key within view of the vehicle.
- Do not use the remote control when you are
inside the vehicle. Otherwise, you could un
intentionally lock the vehicle. If you then
tried to start the engine or open a door, the
alarm would be triggered. If this happens, press the unlock button
m.
- The vehicle can only be locked when these
lector lever is in the
P posit ion.
- Only use the panic function in an emergen
cy.
- For information on additional remote con
trol key or convenience key functions, refer
to ¢
page 41, Convenience opening/clos
ing .
Locking and unlocking with the
convenience key
A ppl ies to veh icles: w ith conve nien ce key
The front doors and the luggage compartment
lid can be unlocked and locked without using the
remote control key .
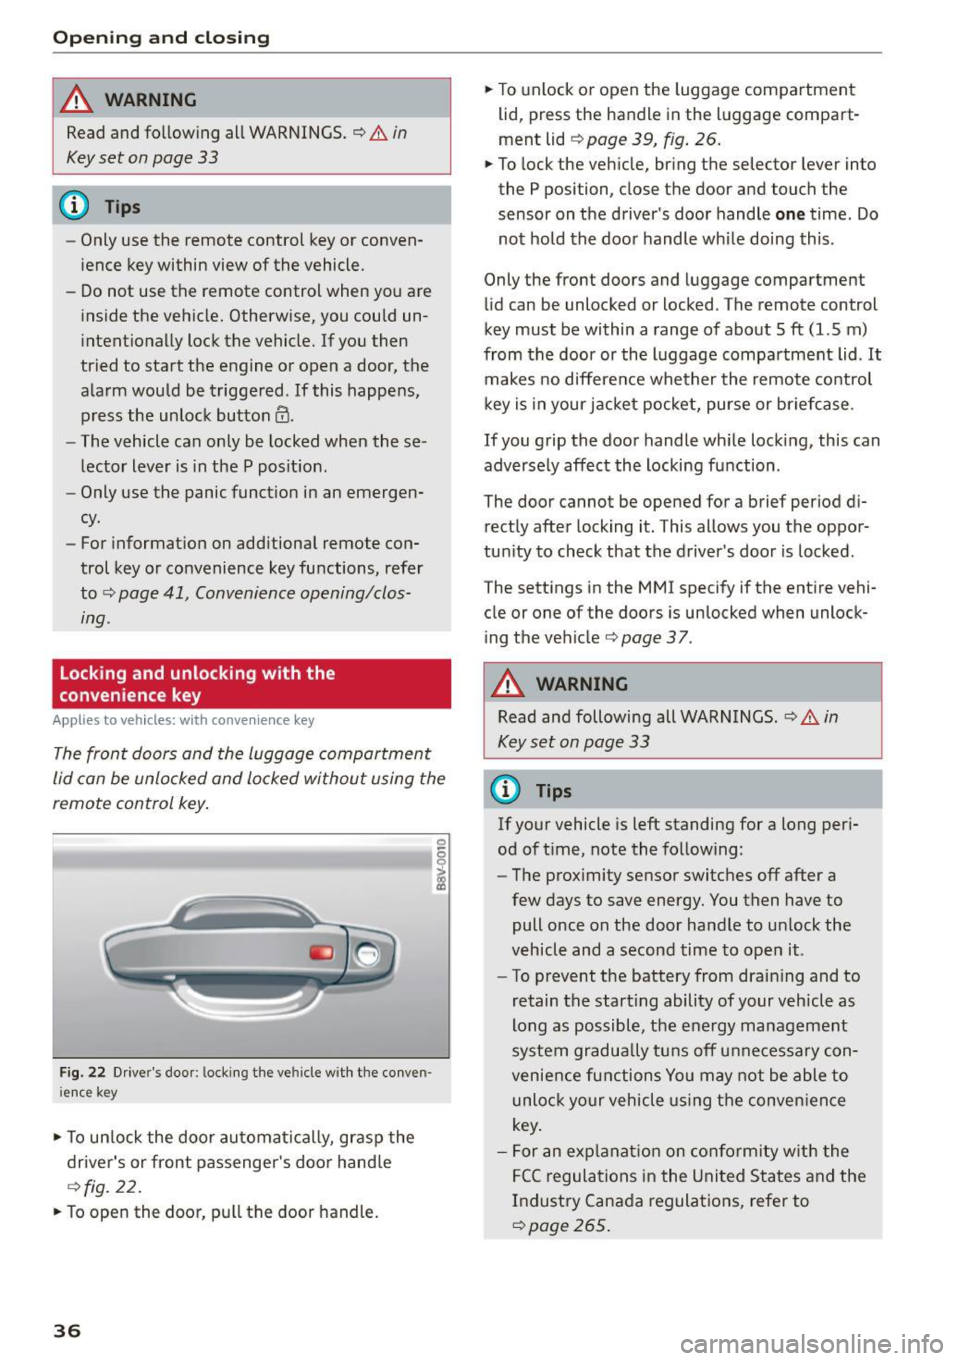
Fig. 22 Driver's door : locking the ve hicle with the conven
i ence key
• To unlock the door automatically, grasp the
driver's or front passenger 's door hand le
¢ fig. 22.
• To open the door, pull the door handle.
36
• To unlock or open the luggage compartment
lid, press the handle in the luggage compart
ment lid
¢ page 39, fig. 26.
• To lock the vehicle, bring the selector lever into
the P position, close the door and touch the
sensor on the driver's door handle
one time. Do
not hold the door handle while doing this .
Only the front doors and luggage compartment
lid can be unlocked or locked . T he remote control
key must be within a range of about
5 ft (1.5 m)
from the door or the luggage compartment lid . It
makes no difference whether the remote control
key is in your jacket pocket, purse or briefcase .
If you grip the door handle wh ile locking, this can
adversely affect the locking function .
The door cannot be opened for a brief period di rectly after locking it. This allows you the oppor
tunity to check that the driver's door is locked .
The settings in the
MMI specify if the entire vehi
cle or one of the doors is unlocked when unlock
ing the vehicle¢
page 37.
A WARNING
Read and following all WARNINGS . ¢ & in
Key set on page
33
@ Tips
If your vehicle is left standing for a long peri
od of time, note the following:
- The proximity sensor switches off after a
few days to save energy. You then have to
pull once on the door handle to unlock the
vehicle and a second time to open it.
- To prevent the battery from drain ing and to
retain the starting ability of your vehicle as
long as possible, the energy management
system gradua lly tuns off unnecessary con
venience functions You may not be able to
unlock your vehicle using the convenience
key .
- For an exp lanation on conformity with the
FCC regulations in the United States and the
Industry Canada regulations, refer to
¢page 265.
Page 39 of 282
....,
N
0 > co
rl I.O
"'
"'
"'
rl
Unlocking/locking with the key
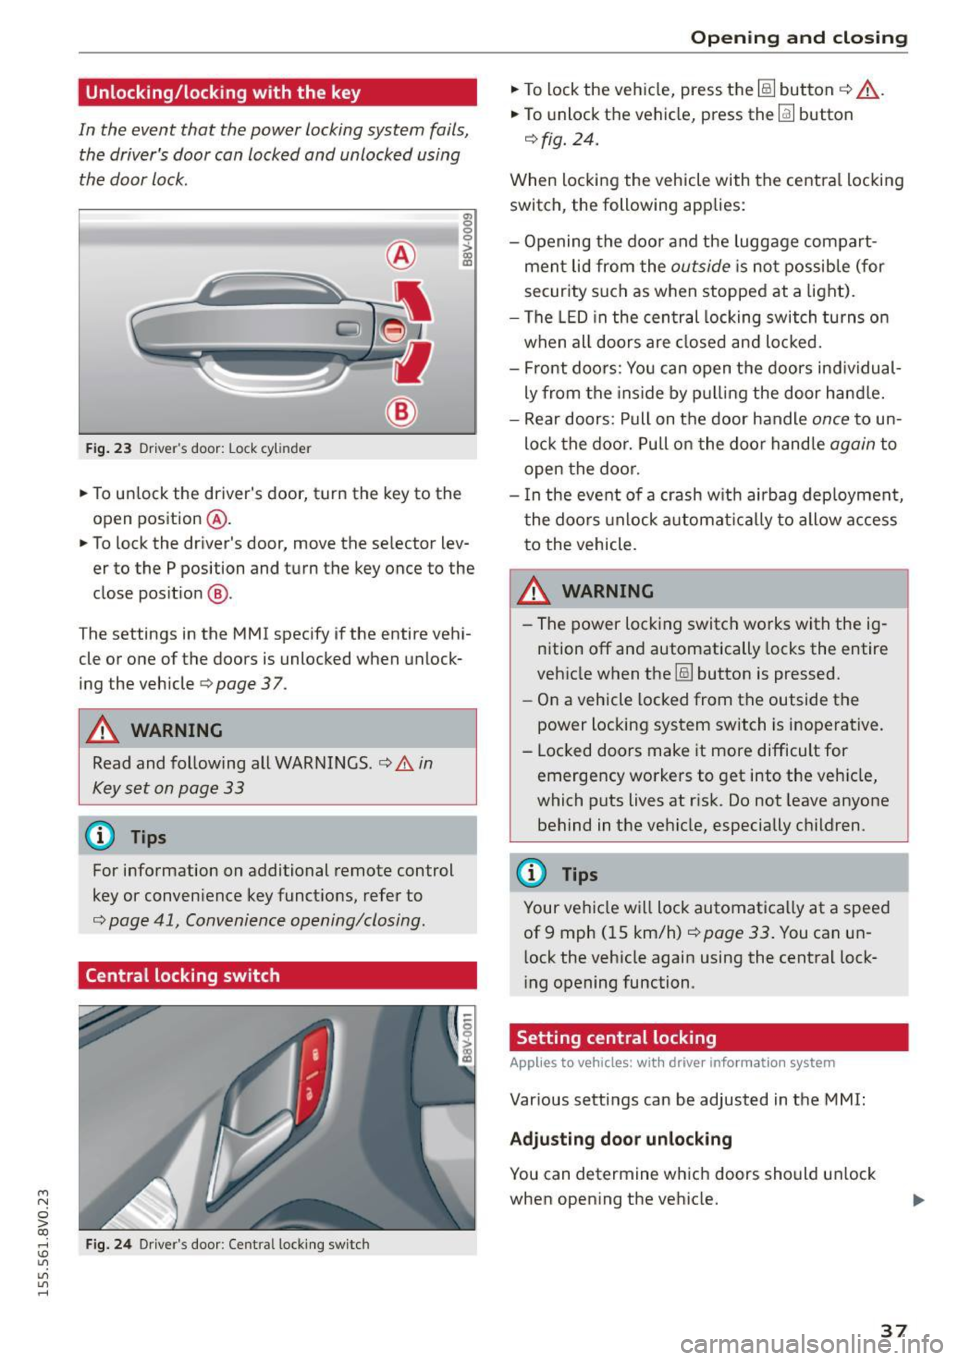
In the event that the power locking system fails,
the driver's door can locked and unlocked using
the door lock.
F ig . 23 Dr ive r's door: Lock cylinder
• To un lock the driver's door, turn the key to the
open position
® ·
a, 0 0 0 :> Q) a,
• To lock the driver's door, move the selector lev
er to the P position and turn the key once to the
close pos it ion
® ·
The settings in the MMI specify if the entire vehi
cle or one of the doors is unlocked when unlock
ing the vehicle
c:::> page 3 7.
A WARNING
Read and following all WARNINGS. c:::> &. in
Key set on page 33
@ Tips
For information on additional remote control
key or conven ience key functions, refer to
c::> page 41, Convenience opening/closing .
Central locking switch
Fig. 24 Dr iver 's door : Centra l lock ing switch
Open ing and clo sing
• To lock the vehicle, press the~ button c:::> .&_.
• To unlock the vehicle, press the~ button
c:::>fig. 24.
When loc king the vehicle with the centra l locking
switch, the following app lies:
- Opening the door and the luggage compart
men t lid from the
outside is not possible (for
secur ity such as when stopped at a light).
- The LED in the central locking switch tu rns o n
when all doors are closed and loc ked.
- Front doo rs: You can open the doors ind ividual
ly from the ins ide by p ulling the door hand le.
- Rear doors: Pull on t he door handle
once to un
lo ck the doo r. Pull on the doo r handle
again to
open the doo r.
- I n the event of a crash w it h ai rbag deploymen t,
t he doo rs unlock a utoma tically to allow access
to the vehicle.
_&. WARNING
- The power locking switch wo rks with the ig
n ition off an d automatically locks the entire
veh icle when the~ button is pressed.
- On a vehicle locked from the outside the
power loc king system switch is inoperative.
- Locked doors make it more difficult for emergency workers to get into the ve hicle,
which puts lives at ris k . Do not leave anyone
behind in the ve hicle, especially c hildren.
(D Tips
Your ve hicle w ill lock automatica lly at a speed
of 9 mph ( 15 km/h)
c::> page 33 . You can un
l ock the vehicle again using the central lock
i ng opening function.
Setting central locking
Applies to vehicles: with drive r in fo rmat io n system
Var ious settings can be adjusted in the MMI:
Adju sting door unlocking
You can determine wh ich doors should u nlock
when open ing the vehicle.
37
Page 40 of 282
Opening and closing
"'Select: the IMENU ! button> Car> Systems*
control button > Vehicle settings > Central
locking > Door unlocking.
Selecting All and pressing the~ button on the
remote control key unlocks the entire vehicle.
If you select
Driver and then press the~ button
on the remote control key, only the driver's door
will unlock. In vehicles with a convenience key,
only the front door whose handle you pull will
unlock. If you press the~ button twice, the en
tire vehicle will unlock. If you press the~ button,
the entire vehicle will always lock.
Folding* the exterior mirrors
"'Select: the IMENU ! button> Car> Systems*
control button > Vehicle settings > Central
locking > Fold mirrors when locking.
For more
information, refer to
c:> page 47, Adjusting
the exterior mirrors.
If you select On, the outside mirrors will fold in
automatically when you press the~ button on
the remote control key
i:> page 47.
Tone when locking
"'Select : the IMENU ! button> Car> Systems*
control button > Vehicle settings > Central
locking> Tone when locking.
When checked off./, a tone will sound when you
lock the vehicle.
If you press the~ button twice, the entire vehi
cle will lock. There is a locking tone at the same
time
1l .
Electronic immobilizer
The immobilizer prevents unauthorized use of
your vehicle.
A microchip in the key automatically deactivates
the electronic immobilizer when the key is locat
ed in the vehicle.
If you remove the key from the
vehicle, the electronic immobilizer activates
again automatically.
l) Thi s fu nct io n is not availabl e in all cou ntri es .
38
A WARNING ,_ -
Always take the key with you whenever you
leave your vehicle. The electronic immobilizer
can be deactivated with the key, so this could
make it possible for unauthorized persons to
start the engine and operate vehicle systems
such as the power windows or sunroof. This
can increase the risk of serious injury.
(D Tips
-The vehicle cannot be started if an unau
thorized key is used.
It may not be possible
to start the vehicle under certain circum
stances, for example if there is another ra
dio module like the key from another vehicle
or a transponder on the same keychain.
- For an explanation on conformity with the
FCC regulations in the United States and the
Industry Canada regulations, refer to
i:>page 265.
Safety central locking
App lies to vehicles : wi th safe ty cen tral lock ing
Safety central locking provides the possibility, to
only unlock the driver's door and the fuel filler
door. The rest of the vehicle remains locked.
Unlocking the driver's door and the fuel filler
door
"' Press the remote control key or convenience key
Ifill button once or turn the key once in the open
ing direction.
Unlocking all doors, the luggage
compartment lid and the fuel filler door
"' Press the remote control key or convenience key
Ifill button twice within five seconds or turn the
key
twice within five seconds in the opening di
rection.
When unlocking just the driver's door, the anti
theft alarm system* is also immediately deacti
vated.
In vehicles with an MMI, you can directly adjust
the safety central locking
c:> page 3 7.