AUDI S4 2015 Manual PDF
Manufacturer: AUDI, Model Year: 2015, Model line: S4, Model: AUDI S4 2015Pages: 304, PDF Size: 74.86 MB
Page 71 of 304
M N
~ co
rl I.O
"' rl
"' rl
Roof rack
Description and mounting locations
Additional cargo can be carried with a roof
luggage rack .
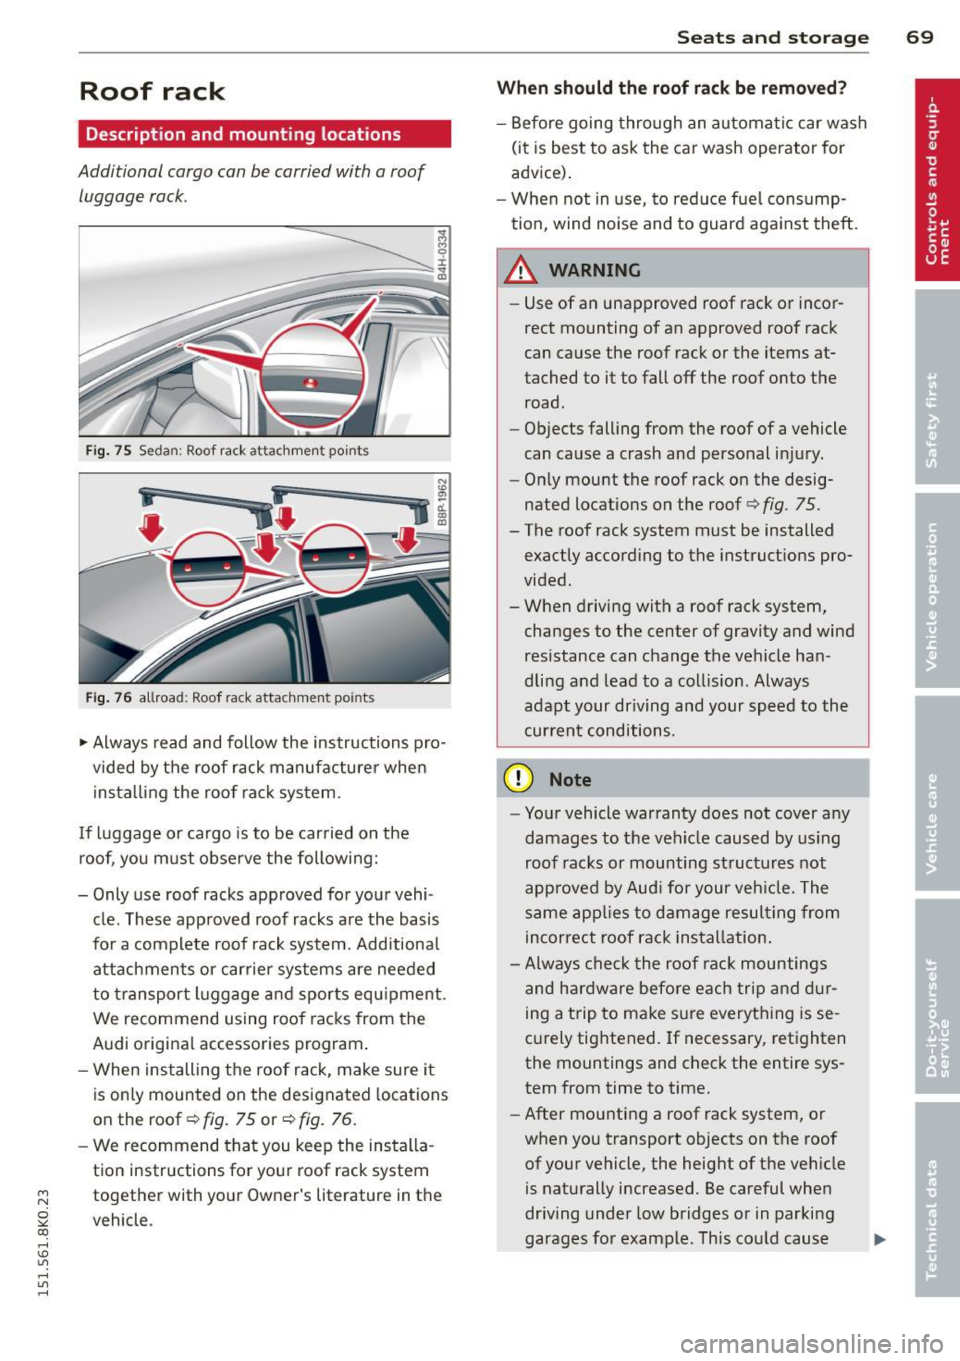
Fig. 75 Seda n: Roof ra ck atta chmen t po ints
Fig. 76 allroa d: Roof ra ck atta chm ent po ints
~ Always read and follow the instructions pro
vided by the roof rack manufacturer when
installing the roof rack system.
If luggage or cargo is to be carried on the roof, you must observe the following:
- Only use roof racks approved for your vehi
cle. These approved roof racks are the basis
for a complete roof rack system. Additional
attachmen ts or carrier systems are needed
to transport luggage a nd sports equ ipment .
We recommend using roof racks from the
Audi original accessories program.
- When installing the roof rack, make sure it
is only mounted on the designated locations
on the roof ¢
fig. 75 or¢ fig. 76 .
- We recommend that you keep the installa
tion instructions for your roof rack system
together with your Owner 's literature in the
veh icle .
Sea ts a nd s to rage 69
When sh ould th e ro of rac k be r emo ved ?
-Before going through an automatic car wash
(it is best to ask the car wash operator for
advice).
- When not in use, to reduce fuel cons ump
tion, wind noise and to guard against theft.
A WARNING
=
- Use of an unapproved roof rack or incor-
rect mounting of an approved roof rack
can cause the roof rack or the items at
tached to it to fall off the roof onto the road.
- Objects falling from the roof of a vehicle
can cause a crash and personal injury.
- Only mount the roof rack on the desig
nated locations on the roof
i:> fig . 75.
- The roof rack system must be installed
exactly according to the instruct ions pro
vided.
- When driving with a roof rack system,
changes to the center of gravity and wind
resistance can change the vehicle han
dling and lead to a collision . Always
adapt your driving and your speed to the
cur ren t conditions.
(D Note
- Your vehicle warranty does not cover any
damages to the veh icle caused by using
roof racks or mounting structures not
approved by Aud i for your veh icle. The
same app lies to damage resulting from
incorrect roof rack installation.
- Always check the roof rack mountings
and hardware before each trip and d ur
ing a trip to make sure everything is se
curely tightened. If necessary, retighten
the mountings and check the entire sys
tem from time to time.
- After mounting a roof rack system, or
when you transport objects on the roof
of your vehicle, the height of the veh icle
is naturally increased. Be careful when
dr iving under low bridges or in parking
garages for example . This cou ld cause
111>
Page 72 of 304
70 Seat s a nd s tor ag e
damage to the load and even the vehicle
itse lf.
- Make sure that the open rear lid and the
sunroof do not come into contact with
objects on the roof.
Loading the roof rack
Always distribute loads evenly. J\llake sure
anything on the roof rock is securely tied
down.
.. Always dist ribute the loads on the roof rack
evenly .
.. Always attach items to the roof rack securely
before you drive off.
The maximum permissible roof weight is
2 00 lb (90 kg ). The roof weight is the total of
the we ight of the roof rack, the attachments
and the cargo you are carry ing. You must also
not exceed the maximum load weight for the
roof rack you are using .
When us ing a roof rack system which has a
lower load carry ing capac ity , you must not use
up the total max imum perm issible load carry
ing capacity specified above. Instead, you
should load the roof rack system only to the maximum capacity spec ified by the manufac
turer of the roof rack system.
A WARNING
Weak, damaged or improper straps used
to secure items to the roof rack can fail
during hard braking or in a co llision and
cause serious personal injury.
- Make sure the roo f rack is insta lled exact
ly as specified above
,=;,page 69.
- Always use suitable mounting straps for
sec uring items to the roof rack to help
prevent items from shifting or flying for
ward.
- Items on the roof rack must always be
sec urely mo unted.
- T he use of a roof rack can negative ly af
fect the way a vehicle handles . Cargo
that is large, heavy, bulky, long or flat
will have a greater negative influence on
.
the vehicle's aerodynamics, center of
grav ity and overall handling. Always
drive s lowly, avoid sudden braking and
maneuvers when transporting cargo on
the roof of your vehicle.
- Never exceed the maximum permissible
load carrying capacity of the roof of your
veh icle, the permissible axle weights and
the permissible total weight of you r vehi
cle~
page 280, Weights.
(D Note
Make sure that the opened rear lid does
not come in contact with the cargo on the
r oof.
@ For the sake of the environment
As a result of the increased wind resist
ance created by a roof rack, you r vehicle is
us ing fuel unnecessarily . So remove the
r oof rack after using it.
Luggage compartment
General information
A WARNING
Read and follow t he important safety pre
cautions o n
~ page 132, S towing lug
gage.
Page 73 of 304
M N
~ co
rl I.O
"' rl
"' rl
Luggage compartment cover
Applies to vehicles: with luggage compartment cover
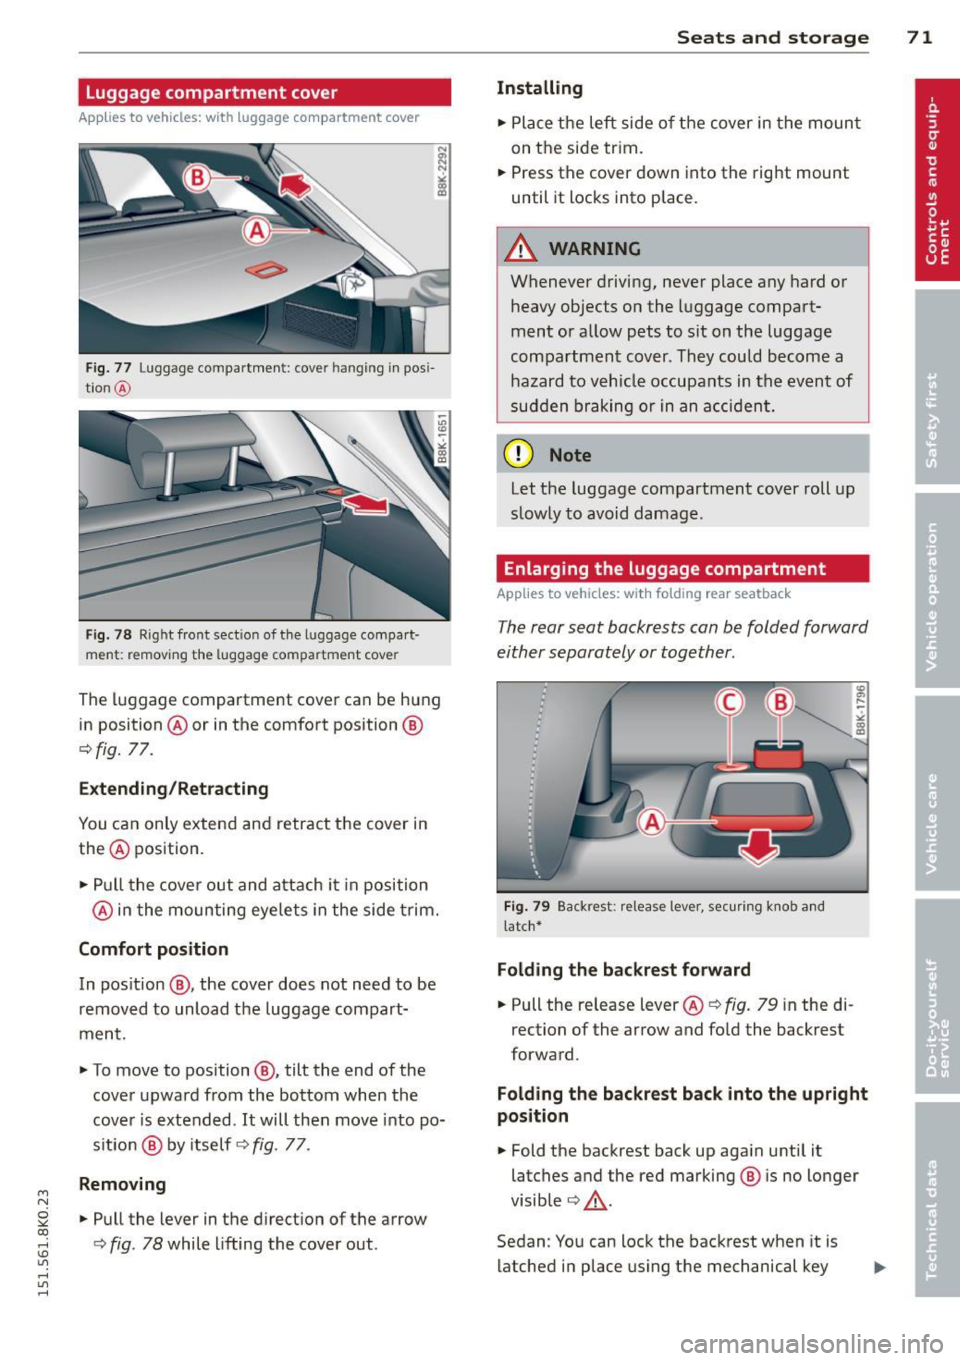
Fig. 77 Luggage compartment: cover hanging in pos i
t ion @
Fig. 78 R ight front section of the luggage compart
ment: remov ing the luggag e compartment cover
The luggage compartment cover can be hung
in position @or in the comfort position @
¢fig. 77.
Extending/Retracting
You can only extend and retract the cover in
the @ position .
• Pull the cover out and attach it in position
@ in the moun ting eyelets in the side trim.
Comfort position
In pos ition @, the cover does not need to be
removed to unload the luggage compart·
ment.
• To move to position @, tilt the end of the
cover upward from the bottom when the
cover is extended. It will then move into po·
s ition @ by itself ¢
fig. 77 .
Removing
• Pull the lever in the direction of the arrow
¢
fig . 78 while lifting the cover out .
Seats and storage 71
Installing
• Place the left side of the cover in the mount
on the side trim.
• Press the cover down into the rig ht mount
until it locks into place.
A WARNING
=
Whenever driving, never place any hard or
heavy objects on the luggage compart·
mentor allow pets to sit on the luggage
compartment cover . They could become a
hazard to vehicle occupants in the event of
sudden braking or in an accident.
ffi Note
Let the luggage compartment cover roll up
slow ly to avoid damage.
Enlarging the luggage compartment
Applies to vehicles: wit h fo lding rear seatback
The rear seat backrests can be folded forward
either separately or together.
Fig. 79 Backrest : relea se lever, securing knob and
l a tc h*
Folding the backrest forward
• Pull the release lever @¢ fig. 79 in the di
rection of the arrow and fold the backrest
forward.
Folding the backrest back into the upright
position
• Fold the backrest back up again until it
latches and the red marking @ is no longer
visible ¢
_&..
Sedan: You can lock the backrest when it is
latched in place using the mechanical key
Page 74 of 304
7 2 Seats and storage
.::> page 33 ©.::>fig. 79 . This prevents any ac
cess to the luggage compartment from the
vehicle interior.
You can on ly enlarge the luggage compar t
ment if the backrest is not locked .
~ WARNING
-
-The backrest must a lways be securely
latched so that the safety belt of the cen
ter seating pos ition can work properly to
help protect the occupant .
- The backrest must be secure ly latched in
posit ion so that no items contained in
the luggage compartment can slide for
ward upon sudden braking .
- Always check whether the latch is f ully
engaged by pu lling the seatback for
wa rd.
- Never allow safety belts to become dam
aged by being caught in doo r o r seat
hardware.
- Torn or frayed safety belts can tear and
damaged belt ha rdware can break in a
c rash. Inspect the be lts periodica lly.
B elt s showing damage to webbing, bind
ings, buckles, or retractors must be re
placed.
(D Note
- If you move the front seat back when the
r ear seat ba ckrest is fo lded fo rward, yo u
could d amage t he head res tra ints on the
rear sea t.
- Slide the belt guide on the outside safety
belt all the way up before folding the
backrest back forward. Make su re the
seat belt is not pinched o r damaged
when the rear seat backrest if folded back. Other objects shou ld be removed
from the rear seat bench to protect the seatback from damage. Partition net (seatback in upright
position)
Applies to vehicles: with partition net
The partition net is designed to pr event loose
objects from flying forward into the passen
ger compartment (e.g. under sudden brak
ing).
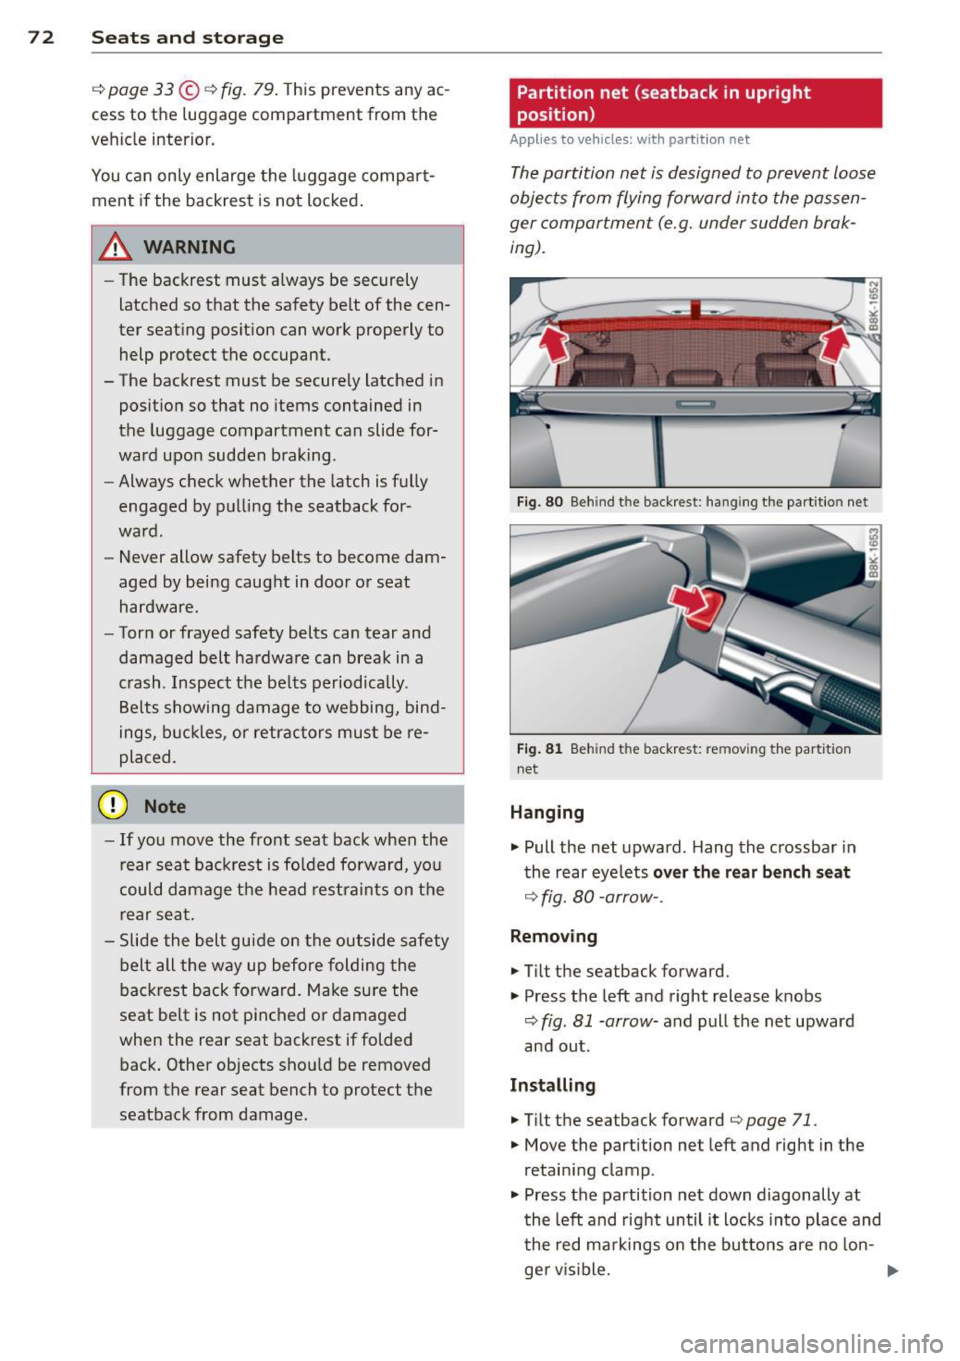
Fi g. 80 Beh ind t he backrest : hang ing t he part itio n net
Fi g. 8 1 Beh ind t he backrest: re m ov ing the part it ion
ne t
Hanging
.,. Pull the net upward . Hang the c rossbar in
the rear eye lets
over th e re ar bench seat
¢ fig. 80 -arrow-.
Removing
.,. Ti lt the seatback forward.
.,. Press the left and right release knobs
¢ fig. 81 -arrow-and pull the net upward
and out.
Installing
• Ti Lt the seatback forward
¢ page 71 .
.,. Move the partition net left and right in the
retain ing clamp .
.,. Press the partition net down diagonally at
t he left and right until it locks into place and
t he red ma rkings o n the bu ttons are no lon-
ger v is ible. ..,.
Page 75 of 304
M N
~ co
rl I.O
"' rl
"' rl
(D Note
Let the partition net roll up slowly to pre
vent damage.
Partition net (seatback tilted forward)
Applies to vehicles: with partition net
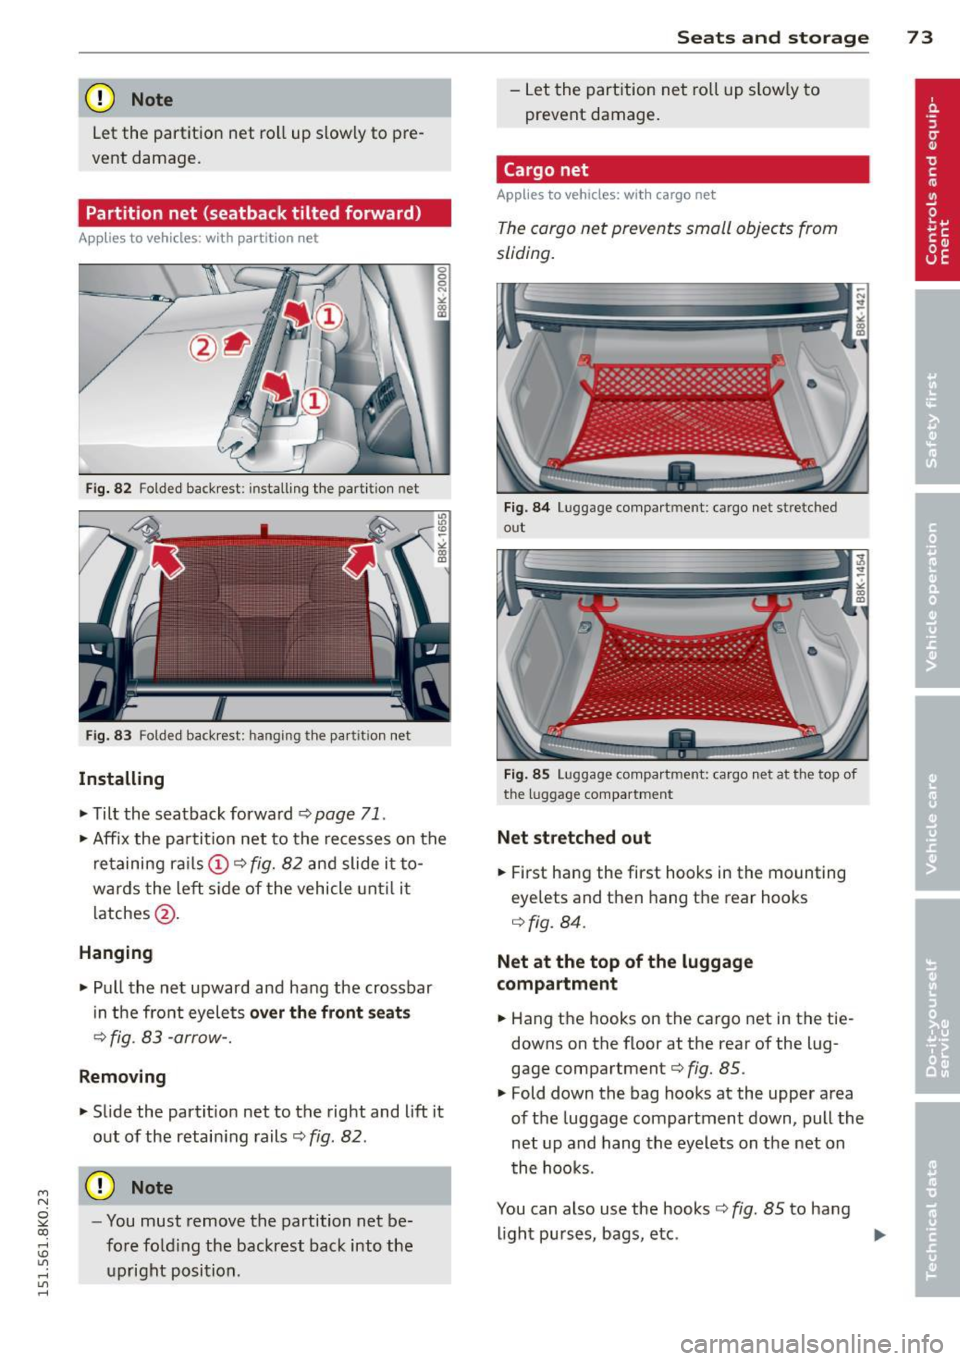
Fig. 82 Fol ded ba ckrest: install ing the part it ion net
Fig. 83 Folded backrest: hanging the partition net
Installing
• Tilt the seatback forward r::;, page 71.
0 0
0
~ gi
• Affix the partition net to the recesses on the
retaining rails (D r::!>fig.
82 and slide it to
wards the left side of the vehicle until it
latches @.
Hanging
• Pull the net upward and hang the crossbar
in the front eyelets
over the front seats
r=> fig. 83 -arrow-.
Removing
• Slide the partit ion net to the right and lift it
out of the retaining rails
r::;, fig. 82.
@ Note
-You must remove the partition net be
fore foldi ng the backrest back into the
upright position.
Seats and storage 73
-Let the partition net roll up slow ly to
prevent damage.
Cargo net
Applies to vehicles: with cargo net
The cargo net prevents small objects from
sliding.
Fig. 84 Luggage compartment: cargo net stretched
out
Fig . 85 Luggage compartment: ca rgo net at the top of
the luggage compartment
Net stretched out
• First hang the first hooks in the mounting
eyelets and then hang the rear hooks
r::;, fig. 84.
Net at the top of the luggage
compartment
• Hang the hooks on the cargo net in the tie
downs on the floor at the rear of the lug
gage compartment
r::;, fig. 85.
• Fold down the bag hooks at the upper area
of the luggage compartment down, pull the
net up and hang the eyelets on the net on
the hooks .
You can also use the hooks
r=> fig. 85 to hang
light purses, bags, etc.
1JJ,,
Page 76 of 304
7 4 Seats and storage
If nothing is hung on the hooks, they will fold
back in by themselves.
In a collision, the laws of physics mean that
even smaller items that are loose in the vehi
cle will turn into heavy missiles that can cause
serious injury. Items in the vehicle p ick up ki
netic energy which varies with the vehicle and
the weight of the item . Vehicle speed is the
most significant factor .
For example, in a frontal collision at a speed
of 30 mph (48 km/h), the forces acting on a 10-lb (5 kg) object a re about
20 times the
normal weight of the item. This means that
the weight of the item would suddenly be the
equ ivalent of about 200 lbs (90 kg). One can
easily imagine the injuries that an item of that
weight flying freely through the passenger
compartment can cause in a collision at a
speed considered relatively low .
8_ WARNING
Weak, damaged or improper straps used
to secure items to tie-downs can fail dur ing hard braking or in a collision and cause
serious personal injury.
- Always use suitable retaining straps and
properly secure items to the tie-downs in
the luggage compartment to help pre
vent items from shifting or flying for
ward .
- Never attach a child seat tether strap to
a tie -down.
- For strength-related reasons, the mount
ing hooks can only be used to secure ob
jects weighing up to 10 lb. (5 kg) . Heavi
er objects will not be adequately secured
- there is a r isk of injury.
Tie-downs
Applies to vehicles: with tie-downs
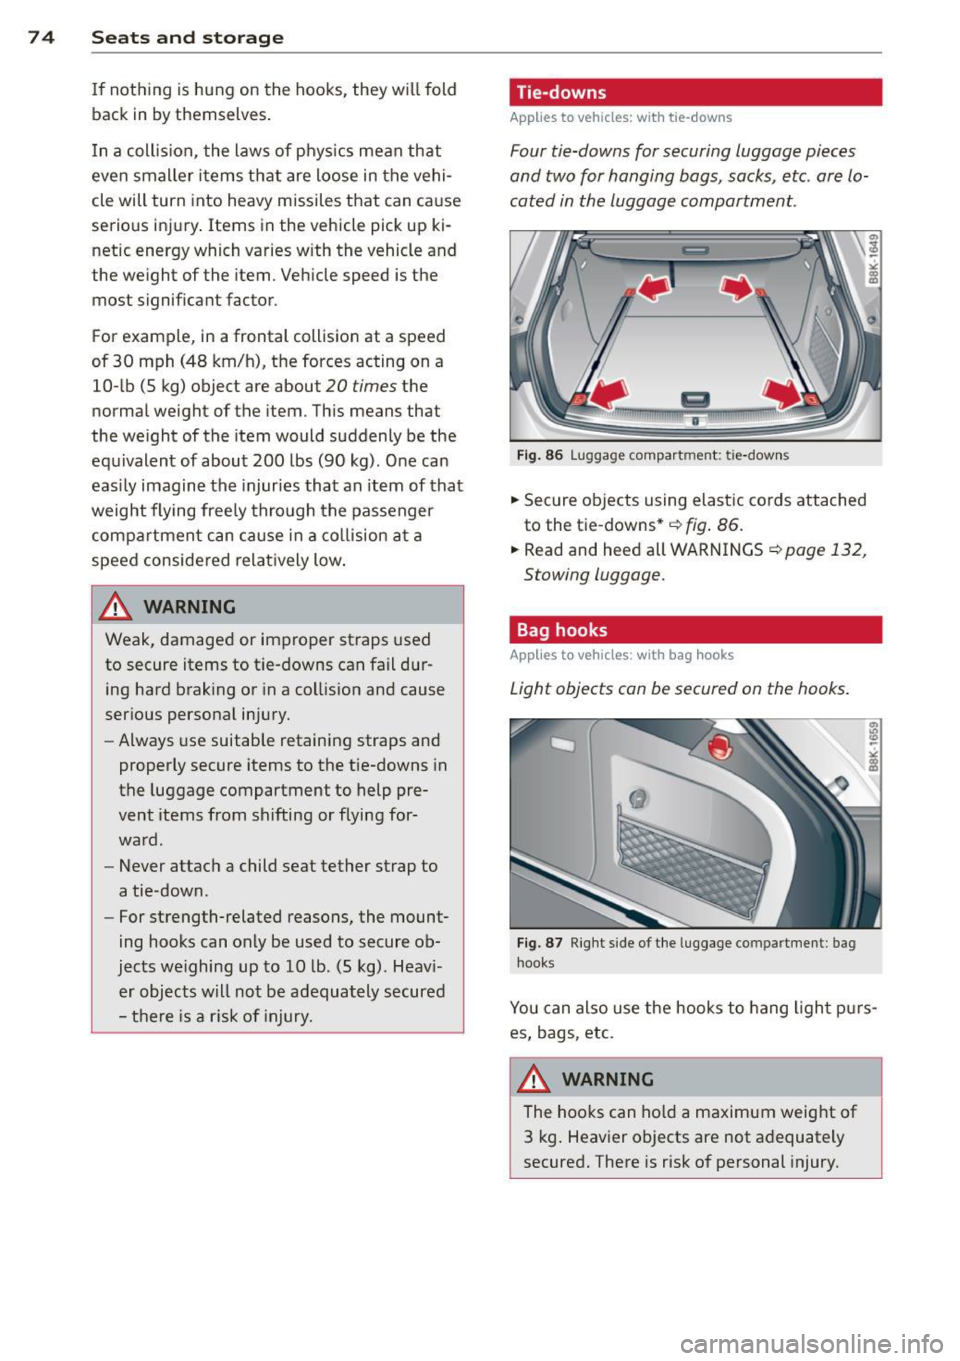
Four tie-downs for securing luggage pieces
and two for hanging bags , sacks, etc. are
lo
cated in the luggage compartment.
Fig. 86 Lugg age compart ment: tie-down s
,.. Secure objects using elastic cords attached
to the tie-downs* ¢
fig. 86.
,.. Read and heed all WARNINGS ¢ page 132,
Stowing luggage .
· Bag hooks
Applies to vehicles: with bag hooks
Light objects can be secured on the hooks.
Fig. 87 Right side of the luggage compar tment : bag
hook s
You can also use the hooks to hang light purs
es, bags, etc.
_&. WARNING
The hooks can hold a maximum weight of
3 kg. Heavier objects are not adequately
secured. There is risk of personal injury.
Page 77 of 304
M N
~ co
rl I.O
"' rl
"' rl
Luggage compartment covering (reversible mat )
Applies to vehicles: w it h lugg ag e compart men t cove ring
The reversi ble mat protects the luggage com
partment and bumper from dirt and scratch es.
Fig. 88 Luggage compartment: reversible mat wit h
backrest folded forward
You can use the reversible mat with the dirt
resistant side or the decorative side. After
loading or unloading, fold up the reversible
mat and close the luggage compartment lid.
Only store the reversible mat if it is dry .
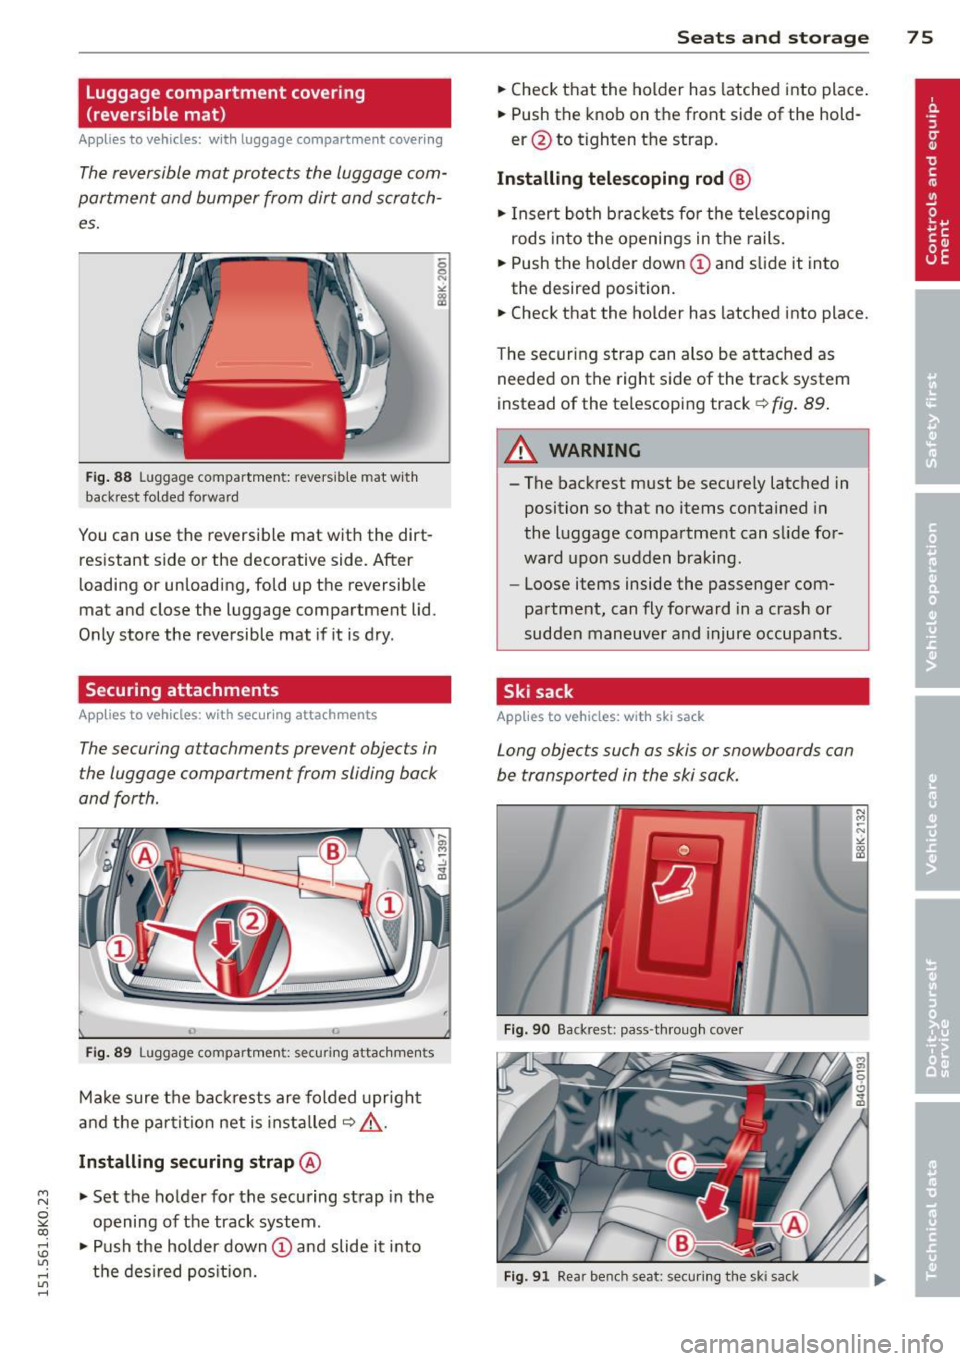
Securing attachments
Applies to vehicles: with sec uring attachments
The securing attachments prevent objects in
the luggage comportment from sliding bock
and forth.
,.
Fig. 89 Luggage compart men t: securi ng attachments
Make sure the backrests are folded upright
and the partition net is installed¢.&_ .
Installing securing strap @
.,. Set the holder for the securing strap in the
opening of the track system.
.,. Push the holder down
(D and slide it into
the desired position.
Seats and storage 75
.,. Check that the holder has latched into place.
.,. Push the knob on the front side of the hold
er @ to tighten the strap.
Installing telescoping rod @
.,. Insert both brackets for the telescoping
rods into the openings in the rails .
.,. Push the holder down
(D and slide it into
the desired position .
.,. Check that the holder has latched into place.
The securing strap can also be attached as
needed on the right side of the track system
instead of the telescoping track¢
fig. 89.
&_ WARNING ~
-The backrest must be securely latched in
position so that no items contained in
the luggage compartment can slide for
ward upon sudden braking.
- Loose items inside the passenger com
partment, can fly forward in a crash or
sudden maneuver and injure occupants.
, Ski sack
App lies to vehicles: wit h ski sack
Long objects such as skis or snowboards con
be transported in the ski sock.
Fig. 90 Backrest: pass-through cover
Fig. 91 Rear bench seat: sec uring the sk i sack
Page 78 of 304
76 Seats and storage
Loading
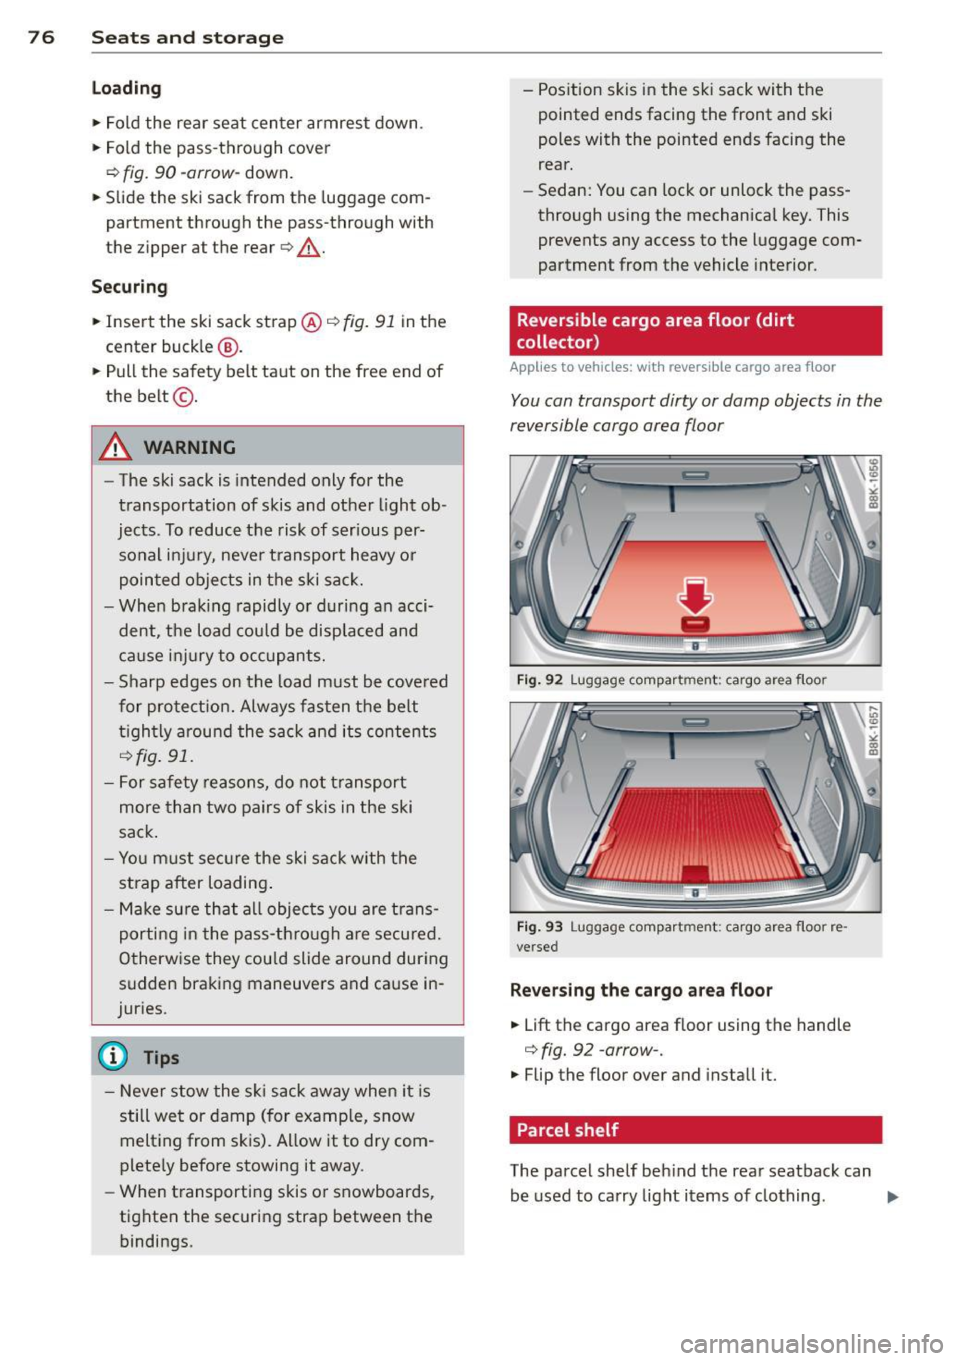
.,. Fold the rear seat center armrest down .
.,. Fold the pass-through cover
¢
fig. 90 -arrow -down.
.,. Slide the ski sack from the luggage com
partment through the pass-through with
the z ipper at the rear ¢.&. -
Securing
.,. Insert the ski sack strap @ ¢fig. 91 in the
center buckle @.
.,. Pull the safety belt taut on the free end of
the belt @.
A WARNING
-The ski sack is intended only for the
transportation of skis and other light ob
jects . To reduce the risk of serious per
sonal injury, never transport heavy or
pointed objects in the ski sack.
- When braking rapidly or during an acci
dent, the load could be displaced and
cause injury to occupants.
- Sharp edges on the load must be covered
for protection. Always fasten the belt
tightly around the sack and its contents
¢fig. 91.
- For safety reasons, do not transport
more than two pairs of skis in the ski
sack.
- You must secure the ski sack with the
strap after loading.
- Make sure that all objects you are trans
porting in the pass-through are secured.
Otherwise they could slide around during
sudden braking maneuvers and cause in
juries.
(D} Tips
- Never stow the ski sack away when it is
still wet or damp (for example, snow
melting from skis). Allow it to dry com
pletely before stowing it away.
- When transporting skis or snowboards,
tighten the securing strap between the
bindings. -
Position skis in the ski sack with the
pointed ends facing the front and ski
poles with the pointed ends facing the
rear.
- Sedan: You can lock or unlock the pass
through using the mechanical key. This
prevents any access to the luggage com
partment from the vehicle inte rior.
Reversible cargo area floor (dirt
collecto r)
Applies to vehicles: with reversible cargo area floor
You con transport dirty or damp objects in the
reversible cargo area floor
Fig. 92 Luggage compart ment : cargo area floor
Fig. 93 Luggage compartment: cargo area floor re·
versed
Reversing the cargo area floor
.,. Lift the cargo area floo r using the handle
¢ fig. 92 -arrow- .
.,. Flip the floor over and install it.
Parcel shelf
., U1 .,
-><
~
The parcel shelf behind the rear seatback can
be used to carry light items of clothing .
ll>-
Page 79 of 304
"" N
0 ::.,: co ,...., \!) 1.1'1 ,...., 1.1'1 ,....,
A WARNING ,~
No heavy or hard objects should be placed
on the pa rcel she lf. They are a hazard to
th e vehicle occupants duri ng sudden b rak
ing. Th e is a r is k of injury .
(D Note
Please make s ure that the heat ing wires
for the rear window defogger are not dam
age by abras ive objects.
(D Tips
To ensure problem-free vent ilation, the
ve ntilation s lots between the rear w indow
and the parce l shelf must not be cove red.
Seats and storage 77
Page 80 of 304
78 Warm and cold
Warm and cold Climate controls
Description
The climate control system warms, cools and
adds humidity to the air in the vehicle interior.
It is the most effect ive when the windows and
sunroof are closed . If there is a build-up of
heat inside the vehicle, ventilation can help to
speed up the cooling process.
I n all heating mode functions except
defrost,
the blower on ly switches to a higher speed
once the engine coolant has reached a certain
temperature.
Condensat ion from the cooling system can
drip and form a puddle of water under the ve
hicle. This is normal and does not mean there
is a leak.
Pollutant filter
The pollutant filter removes pollutants s uch
as dust and pollen from the air.
The air pollutants filter must be changed at
the intervals spec ified in you r Warranty
&
Maintenance booklet, so that the air condi
tioner can properly work.
If you drive your vehicle in an area with h igh
a ir po llution, the fi lter may need to be
changed more frequent ly than specified in
your Aud i Wa rranty
& Ma intenance booklet. If
in doubt, ask your authorized Audi Service Ad
visor for advice .
Key coded settings
The climate control settings are automat ically
stored and assigned to the remote control key
that is in use.
A WARNING
Reduced visibility is dangerous and can
cause accidents.
-
- For safe driving it is very important that
all windows be free of ice, snow and con
densation.
- Comp letely familiarize yourself with the
proper use and function of the heating
and ventilation system and especially how to defog and defrost the windows.
- Never use the windshield wiper/washer
system in freez ing weather unt il you
have warmed the windshield first, using
the heating and ventilation system. The
washer solution may freeze on the wind shie ld and reduce visib ility.
(D Note
- If you suspect that the air conditioner
has been damaged, switch the system
off to avoid further damage and have it
inspected by a qualified dealership.
- Repairs to the Audi air conditioner re
quire special technical know ledge and
special tools. Contact an authorized Aud i
dea ler fo r assistance.
@ For the sake of the environment
By reducing the amount of fuel you use,
you also reduce the amount of pollutants
emitted into the air.
(D Tips
-Keep the air intake s lots (in fro nt of the
w indshield) free from ice, snow and de
bris in order to maintain the proper func
tion of the climate control system.
- T he energy management system may
switch the seat heating* or rear window
defroster off temporarily . These systems
are available again as soon as the energy
balance has been restored.
- Air escapes through vents under the rear
window. When placing items of clothing
on the luggage compartment cover, en
sure that the openings are not covered.