display AUDI S8 2009 Manual PDF
[x] Cancel search | Manufacturer: AUDI, Model Year: 2009, Model line: S8, Model: AUDI S8 2009Pages: 408, PDF Size: 91.63 MB
Page 180 of 408

• ..__A_ d_v _ a_ n_c _e _ d_ P_ a_r _k _in ---== g'-- S...:y _ s_ t_ e_ m ___________________________________________ _
The rear-view camera section appearing in the MMI Display is
approximately the same as the coverage area represented in
~ page 177, fig. 198 or G) in ~ page 177, fig. 199. Objects located in
the rear -view camera's uncovered area
0 ~ page 177, fig. 199 or in
the close vicinity of the bumper are not recognized .
& WARNING
Please note that objects not touching the ground can appear to be
further away than they really are (for example, the bumper of a
parked vehicle, a trailer hitch, or the rear of a truck) . In this case,
you should not use the guide help lines to measure distance -
danger of accident! •
Applies to vehicles : with Advanced Parking Sys tem w it h rear view c ame ra
Parking mod e 1
"Parking mode 1" can aid when parking in a garage or
parking space, for example.
Fig. 200 MMI Display:
Aiming at the parking
spot by adjusting the
steering wheel angle Fig
. 201 MMI Display:
Orienting the vehicle
with aid of the blue
surface
- Before parking, switch on the Adaptive Air Suspension
=>
page 21 standard or automatic mode.
- Activate the Audi parking system=>
page 173. "Parking
mode 1" => fig. 200 is displayed by default. Dynamic
orange orientation lines
0 and a blue static surface G)
are projected into the rear-view camera picture.
- With the vehicle stationary, select the proper steering
wheel angle for the parking spot with the aid of the
orange orientation lines.
- While driving in reverse gear, adjust the steering wheel
angle to fit the parking space with the aid of the orange
orientation lines=>
0.
-Align your vehicle corresponding to the blue surface. The
blue surface should be parallel to the parking spot lines
=:> fig. 201.
G) Blue surface
The surface behind the vehicle, identified by various shades of blue,
represents an extension of the outer vehicle outline by approxi
mately 16 ft (5 m) to the rear. The transitions of the blue surfaces are
distanced approximately 3 ft (1 m), 6
ft (2 ml, and 16 ft (5 ml away
from the vehicle. .,
Page 181 of 408

_________________________________________ ...:A...:.= d:..:v :..:a:..: n:...:..:: c.::e :.:d :....:.. P:..:a:..: r...: k:..: i.::n:.::g :!...::S:.Jy~ s:::. t:.: e::.: m:..:.:._..JIIIIII
@ and 0 O ra ng e o rientati on line s
The orientation lines cha nge direction with the steering wheel
angle. These lines identify the direction of travel the rear of the
veh icle would be taking, d riving in reverse gear with t he current
steering whee l ang le.
T he dynamic orientation lines are provided with markers @. T hese
markers are each placed at a distance of app rox. 3 ft (1 ml from o ne
another. Through thes e markers, the distance to an obstacle can be
es timated .
©Redli ne
The distance between your rear bumper © and the red l ine is
approximately 16 inch es (40 cm)~& . Here, at the latest, you
should stop backing up~
page 182 .
© Rear bump er
The rear bumper of your vehicle also appears in the MMI Display, for
bett er orientation .
& WARNING
Please note that obje cts not touching the ground can appear to be
further away than they re ally are (for example , the bumper of a
parked vehicle , a trailer hitch , or the re ar of a truck ). In th is case ,
you should not use the guide help line s to mea sure distance -
danger of accident!
0 Note
I n the MMI Display, the direction of trav el of the vehicle rear is
shown depending on the steering wheel a ngle . The vehicle front
swings ou t more than the vehicle rear .
Contro ls and eq uip
ment
[ i ] Tips
• I n order for the rear -view camera to function properly, the
camera lens~
page 173, fig. 193 must be kept clean, and free of
snow and ice . Please follow the additional no tes on ~
page 186.
• The positions of the orientation lines / surfaces are disp laced up
or down if the parking process is car ried out with the rea r-view
camera in Adap tive Air Suspension ~
page 21 dynamic or lift mode .
Therefore , the accuracy is reduced. •
Applies to vehi cles : w ith Adva nce d Pa rki ng S yste m with rear view c amera
Parking mode 2
"P ar king m ode 2" ca n be u sed as aid when (pa rallel)
parki ng on the side of the r oad, for e xample.
Vehicle care I I
Fig . 2 02 MMI Di splay:
Blue surfa ce a ligned
with t argeted par king
s p ot ...
irechnical data
Page 182 of 408
• ..__A_ d_v _ a_ n_c _e _ d_ P_ a_r _k _in ---== g'-- S...:y _ s_ t_ e_ m ___________________________________________ _
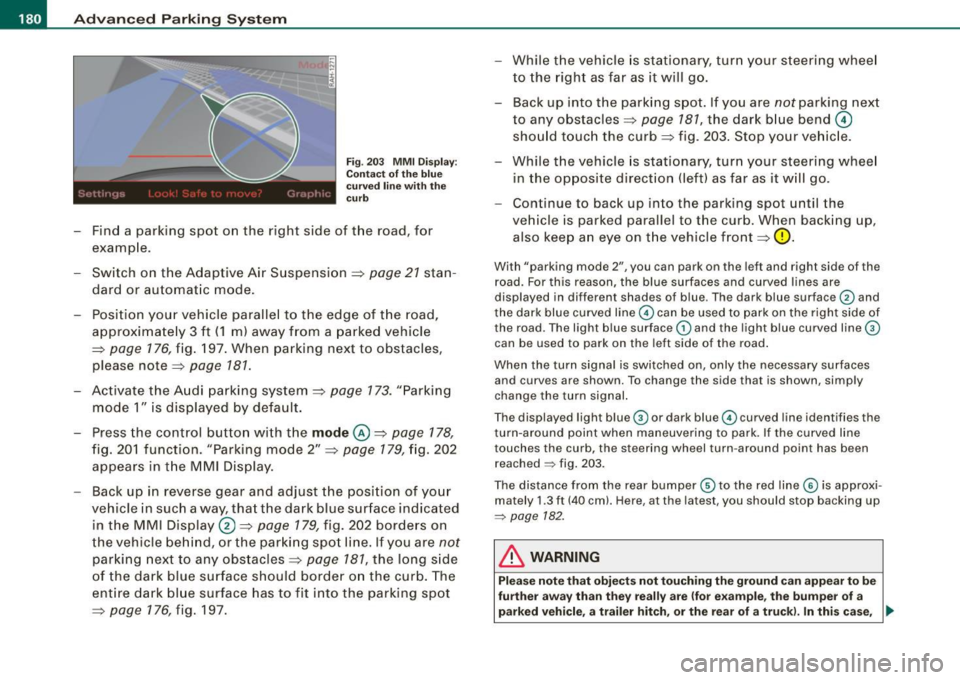
Fig. 203 MM I D isp lay:
Co ntac t of th e bl ue
c ur ved line with th e
c ur b
- Find a park ing spot on the right side of the road, for
examp le .
- Sw itch on the Adaptive Air Suspension=>
page 21 stan
dard or automat ic mode.
- Position your vehicle paralle l to the edge of t he road,
approximate ly 3 ft ( 1 m) away from a parked vehicle
=>
page 176 , fig. 197 . When parking next to obstacles ,
please note=:,
page 181.
-Activate the A udi p arking system => page 173. "Parking
mode 1" is displayed by default .
- Press the control butto n with t he
mode @=> pag e 178,
fig. 20 1 f uncti on. "Park ing mode 2" => page 179, fig. 202
appears in t he M M I Dis pla y.
- Back up in reverse gear and adjust the posi tion of your
vehicle in such a way, tha t the dark blue sur face indicated
in the MMI Display®=>
page 179, fig. 202 borde rs on
t he veh icle be hin d, o r the park ing spo t lin e. If you are
not
par king nex t to any obs tacles => page 781, the long s ide
of the dark blue surface shoul d border o n the curb. The
ent ire dark bl ue surface has to fit into the parking spot
=>
page 176 , fig. 197. While the vehicle
is stat io nary, tur n yo ur s teering whee l
to the righ t as far as it will g o.
- Back up into the parki ng spot. If you are
not parking next
to any obstacles =>
page 787, the dark b lue bend 0
sho uld touc h the curb => fig. 203 . Sto p your ve hic le.
- Wh ile t he vehicle is stationa ry, tur n your steering whee l
in the opposite direction (left) as far as it w ill go .
- Continue to bac k up into the parking spot until the
vehicle is parked parallel to the curb. When backing up,
also keep a n eye on t he vehicle front=>
0-
With "parking mode 2", you can park on the le ft and right sid e of the
road. For this reason, the blue surfaces and curved l ines are
displayed in differen t shades of blue . The dark blue surface
G) and
the dark blue curved line
G) can be used to park on the right side of
the road. The light b lue surface
G) and the light blue curved line®
can be used to park on the left side of the road .
When the turn signal is switched on, only the necessary surfaces and curves are shown. To change the side that is shown, simply
change the turn signal.
The displayed light blue ® or dark blue© curved line identifies the
turn -around point when maneuvering to park. If the curved lin e
touches the curb , the steering wheel turn -around point has been
reached
~ fig . 203.
The distance from the rear bumper ® to the red line © is approxi
mately 1.3 ft (40 cm). Here, at the latest, you should stop backing up
~ page 182.
& WARNING
Pl ea se note that obje cts not touching the ground can appea r to b e
fu rther awa y than the y re ally are (for e xample , the bumper of a
parked vehicl e, a trailer hitch, or the rear of a tru ck). In thi s cas e, •
Page 183 of 408
____________________________________________ A_d_ v_ a_n_ c_ e_d _ P_a_ r_ k_ i_ n ..::g==-- S_ y=- s_t _e _m __ ffllll
& WA RNIN G (continu ed )
you should not u se the guide help line s to mea sur e dist ance -
danger of accid ent !
0 Note
In the MMI Display, the direct ion of travel of the vehicle rear is repre
sented depending on the steering wheel angle. The vehic le front
swings out more than the vehic le rear.
[ i ] Tips
• I n order for the rear -view camera to function properly, the
camera lens=>
page 173, fig. 193 must be kept clean, and free of
snow and ice . P lease follow the additional notes on=>
page 186 .
• The positions of the orientation lines/ surfaces are disp laced up
or down if the parking process is carried ou t with the rear -view
camera in Adaptive Air Suspension=>
page 21 dynamic or lift mode .
Therefore, the accuracy is reduced .•
Controls and equip
ment
Special parking situations
Ap plies to vehicles: with Advance d Pa rk ing Sys tem w ith rear view came ra
Parking next to obstacles
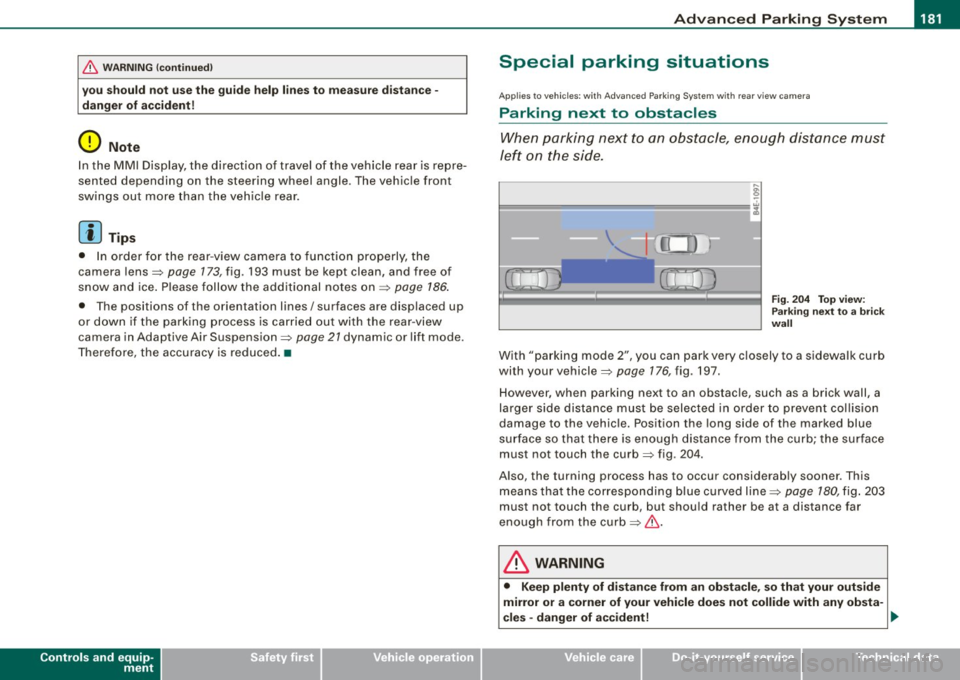
When parking next to an obstacle, enough distance must
left on the side.
Fig. 2 04 To p view:
P ark in g next t o a brick
w all
With "parking mode 2", you can park very c losely to a sidewalk curb
with your vehicle=>
page 176, fig. 197.
However, when parking next to an obstacle, such as a brick wall, a
larger side distance must be selected in o rder to prevent collision
damage to the vehicle. Position the long side of the marked blue
s u rface so that there is enoug h distance from the curb; the surface
must not touch the curb=> fig.
204.
Also, the turning process has to occur considerab ly sooner . This
means that the corresponding blue curved line=>
page 180, fig. 203
must not touch the curb, but shou ld rather be at a distance far
enough from the curb=>& .
& WARNING
• Keep plenty of di sta nce from an ob stacle , so that your out side
mirror or a corner of your vehi cle does not collide with any ob sta-
cle s -danger of a ccident!
~
I • •
Page 184 of 408
• ..__A_ d_v _ a_ n_c _e _ d_ P_ a_r _k _in ---== g'-- S...:y _ s_ t_ e_ m ___________________________________________ _
& WARNING (continued )
• The Audi parking system is not a substitute for being careful
and alert when backing up. Be especially careful during parking
and similar maneuvers . Always watch where you are driving and
make sure that nothing is in the way.
• When maneuvering or parking, do not only use the MMI Display
for orientation . Certain objects • depending on the screen resolu
tion -may not , or not entirely , be displayed ; for example trailer
hitches , chains , narrow posts , or fence s.
• Improper reliance on the Audi parking system can cause colli
sions and serious personal injury.
- Never rely only on parking assist when changing backing up .
- Always check rear view mirrors to make sure it is safe to ba ck
up. •
Applies to veh icles : wit h Ad vanced Pa rk ing System w ith rea r view c ame ra
Notes on distance information
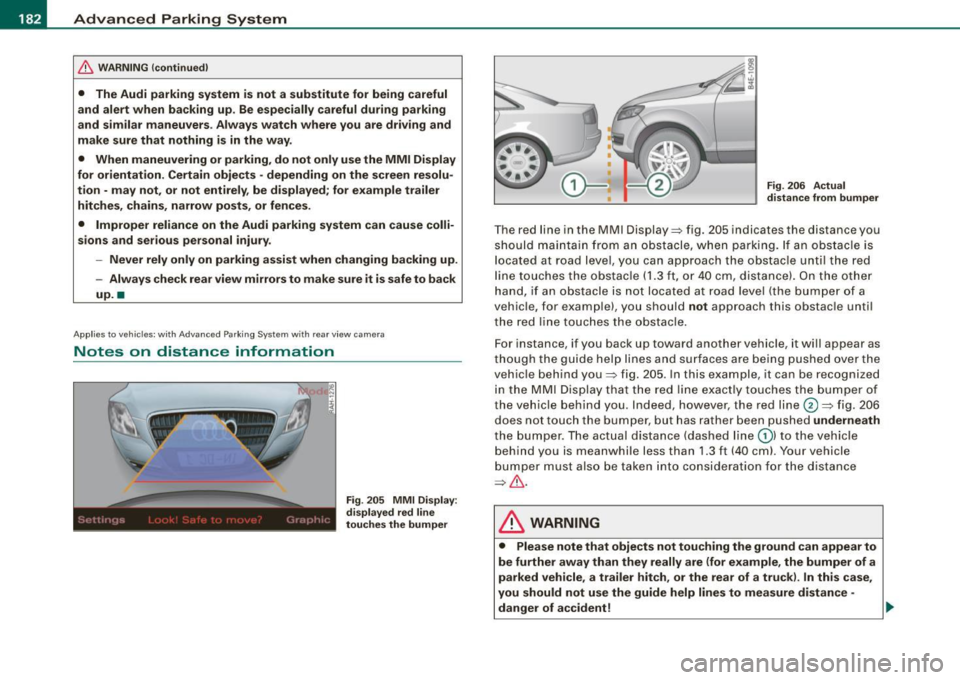
Fig . 205 MMI Displ ay:
di splayed red l ine
touche s the bumpe r F
ig . 206 Actu al
distan ce from bumpe r
The red line in the MMI Display~ fig. 205 indicates the distance you
should maintain from an obstacle, when parking. If an obs tac le is
l ocated at road l eve l, you can approach the obstacle unti l the red
l ine to uche s the obstac le ( 1.3
ft, or 4 0 cm , distance). On the o the r
h a n d, if an obstacle is no t locat ed a t road level (the bu mpe r of a
vehic le, for examp le), you should not approach this obstac le unti l
t h e red line touc hes the obstacle.
F or instance, if you back u p toward another vehicle, it will a ppear as
thou gh the gui de help line s and s urface s are be ing pushed over the
vehic le behind you~ fig. 205 . In this example, it can be reco gnized
in the M MI Display that t he re d l in e exac tly touc hes the bum per o f
th e ve hicle behind you . Ind eed, however, the red line@~ fig. 206
does not touch the bumper, b ut has rather been pushed underneath
t h e b umpe r. T h e actual d istance (dashed line G) l to the vehicle
behind you is meanwhile less than 1.3 ft ( 40 cm). Your vehicle
bu mper must als o be taken into co nsiderat ion for the d istance
~&. .
& WARNING
• Please note that objects not touch ing the ground can appear to
be further away than they really are (for example , the bumper of a
parked vehicle , a trailer hitch, or the rear of a truck) . In this case ,
you should not use the guide help lines to measure distance -
danger of accident ! .,_
Page 185 of 408
____________________________________________ A_d_ v_ a_n_ c_ e_d _ P_a_ r_ k_ i_ n ..::g==-- S_ y=- s_t _e _m __ lllll
& WARNING (continued)
• Maintain plenty of distance from an obstacle, so that your
outside mirror or a corner of your vehicle does not collide with any
obstacles -danger of accident!
• The Audi parking system is not a substitute for being careful
and alert when backing up. Be especially careful during parking
and similar maneuvers. Always watch where you are driving and
make sure that nothing is in the way.
• When maneuvering or parking , do not only use the MMI Display
for orientation. Certain objects -depending on the screen resolu
tion -may not, or not entirely, be displayed; for example trailer
hitches , chains, narrow posts, or fences . •
Appl ies to vehicles: with Advanced Park ing System with rear view came ra a nd a trailer hitch
i nsta lle d acco rding to fac tory s pecif ications
Towing hitch
For vehicles with a trailer hitch installed according to factory speci
fications, the rear acoustic parking sensors are not activated when
the vehicle is put in reverse gear while an electrical connection to
the trailer socket* is established. No distance alert occurs in the rear
~ page 173. The rear-view camera picture~ page 176 is displayed
wi thou t orienta tion lines and without blu e surfaces .•
Controls and equip
ment
Settings in the MMI
A pplies to v ehicles: with Advanc ed Park ing System w ith rear view camera
Adjusting the chimes -option 1
The volume and the pitch (frequency) of the chimes can
be adjusted in the MM/.
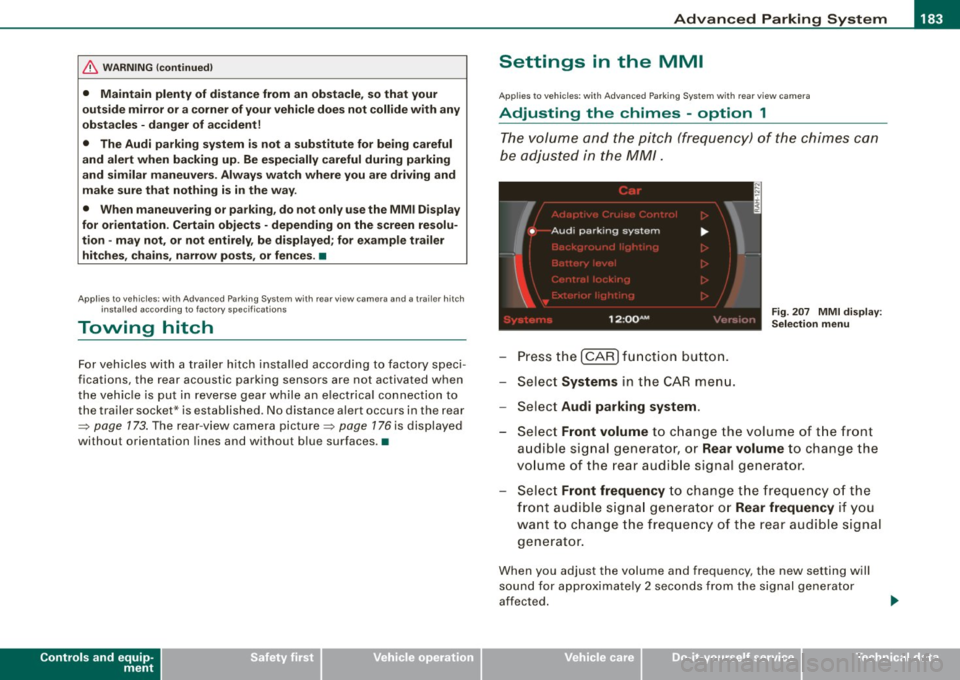
Press the [CAR] function button.
Select
Systems in the CAR menu.
- Select
Audi parking system .
Fig. 207 MMI display :
Selection menu
- Select Front volume to change the volume of the front
audible signal generator, or
Rear volume to change the
volume of the rear audible signal generator.
Select
Front frequency to change the frequency of the
front audible signal generator or
Rear frequency if you
want to change the frequency of the rear audible signal
generator.
When you adjust the volume and frequency, the new setting will
sound for approximately 2 seconds from the signal generator
affected.
I • •
Page 186 of 408

• ..__A_ d_v _ a_ n_c _e _ d_ P_ a_r _k _in ---== g'-- S...:y _ s_ t_ e_ m ___________________________________________ _
The volume and frequency settings are automatically stored and
assigned to the remote master key.
& WARNING
Always make sure that the volume and frequency of the chimes is
adjusted so that you can easily hear the acoustic distance signal
even if the radio is playing, the air-conditioner blower is on High or
there is a high level of outside noise. Check the settings whenever
someone else has driven the vehicle before you. •
Applies to veh icles: with Advanced Parking System with rear view ca me ra
Adjusting the chimes -option 2
The menu for adjusting signal sounds can also be called
up via the control button with the "settings" function.
Fig . 208 MMI Display:
Rear-view camera
picture Fig
. 209 MMI Display:
Audi parking system
-Activate the Audi parking system:::::, page 173 . The rear
view camera picture appears in the MMI Display.
- Select
Settings :::::, fig. 208. The menu for adjusting Front
volume, Front frequency , Rear volume
and Rear
frequency
appears in the MMI Display:::::, fig. 209.
Select
Front volume to change the volume of the front
audible signal generator, or
Rear volume to change the
volume of the rear audible signal generator.
- Select
Front frequency to change the frequency of the
front audible signal generator or
Rear frequency if you
want to change the frequency of the rear audible signal
generator.
- Select
Settings :::::, fig. 209, or
- Pressthe[RETURN]button. The rear -view camera picture
appears in the MMI Display again.
When adjusting the volume and frequency, the new setting will
sound for about 2 seconds from each audible signal generator. The
volume and frequency settings are automatically stored and
assigned to the master key with remote control. _..
Page 187 of 408
___________________________________________ A_ d_ v_ a_n _ c_ e_ d_ P_a _ r_ k_ i_n -=g=-- S_ yc..,_ s_t _ e _m _ __.lftll
& WARNING
Alwa ys make sure that the volu me and frequen cy of the ch ime s is
adjusted so that y ou can ea sily he ar the a coustic di stance signal
eve n if the r adi o i s pl aying , the air -condit io ne r blo wer i s on High o r
there i s a high level of outside noi se . Check the settings when ever
s omeon e el se ha s dri ven th e vehi cle before you .•
A pp lies to vehicles: w ith Adva nce d Par kin g S ystem with rear view camera
Switching the visual display /rear-view
camera on and off
The visual display and rear-view camera are preset in the
MM!.
Con tro ls and eq uip
ment
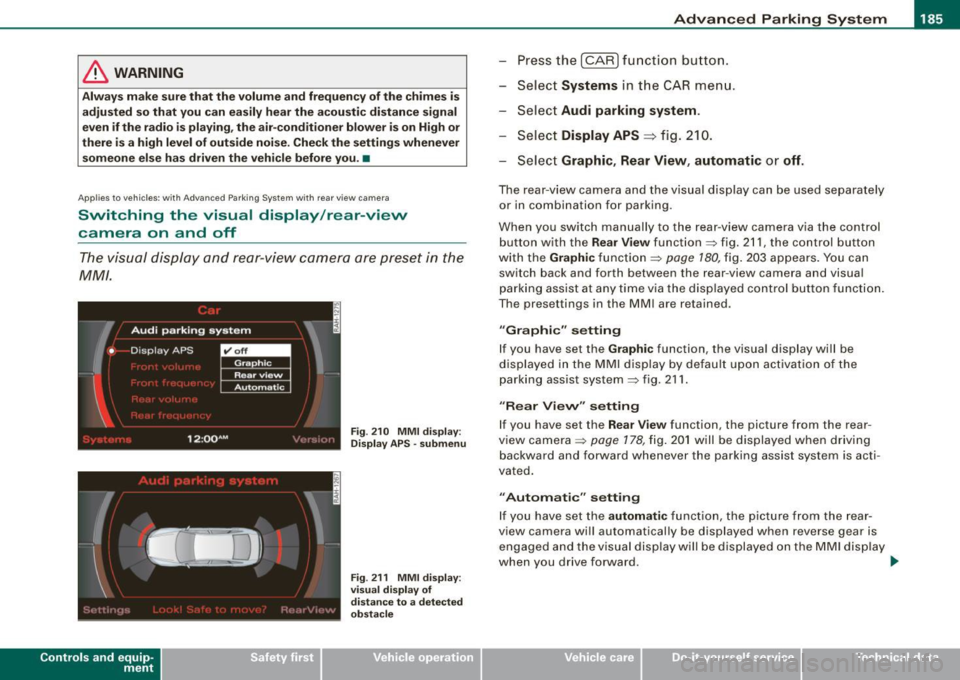
F ig . 2 10 MMI di splay:
Dis play A PS -su bmenu
Fig . 2 11 MMI di spl ay:
vi su al di splay o f
di sta nce to a detec te d
ob st ac le
Press the I CAR I fu nction b utton.
Selec t Systems in the
CAR menu.
Select Audi parking system .
Select Display APS
=> fig. 210 .
Select Graphic , Rear View , automati c or off.
The rear-view camera and the visual display can be used separately
or in combination for parking .
When you switch manually to the rear -view camera v ia the control
button with the
Re ar V ie w function => fig. 211, the control button
with the
Graphic function => page 180, fig. 203 appears . You can
switch back and forth between the rear-view camera and visua l
parking assist at any
time via the disp layed control button function .
The presettings in the MMI are retained .
"Graphic " setting
If you have set the Graphi c function, the visual display will be
displayed in the MMI display by defau lt upon activation of the
parking assis t system => fig . 211 .
"Rear Vi evv " s ett ing
If you have set the R ear View function , the picture from the rear
v iew camera =>
page 178, fig. 20 1 will be displayed when driving
backward and forward whenever the parking assist system is acti
vated.
" Autom atic" sett in g
If you have set the automat ic function, the picture fro m the rear
view camera will automatically be displayed when reverse gear is engaged and the visual disp lay will be displayed on the MM I display
when you drive forward . .,.
Vehicle care I I Technical data
Page 188 of 408
• .___A_ d_v_ a_ n_c_ e_ d_ P _a_r_k _i_ n -=g ,_ S-=y"- s_ t_ e_ m __________________________________________ _
"Off" sett ing
If you have set the off function, both the rear -view camera and the
visual display will be deac tiva ted . The acous tic pa rking assist
remains active .
[ i J Tip s
If you change the sett ings in the MM I, the new settings do not
become active unti l the parking assist is switched on aga in. •
Safety tips
Applie s to ve hic le s: wit h Advance d Par king Sy ste m wit h re ar vie w ca me ra
Acoustic parking system error message
If you hear a continuous tone for several seconds while the front
and back parking assist with visual display is activated and the LED
in the switch
P wA flashes when you engage the reverse gear , there is
a malfunction in the acoustic parking assist .
This system error is immediately output after: • Every manual activation via the switch
P wA ~ pag e 173,
• Reverse gear is engaged for the first time during an ign ition
cycle, or
• An error is detected during operation.
[ i J Tips
If the system reports an error, have an Audi dea ler or an authorized
dea le rship corr ect this system error. •
Applies to vehicles: w it h A dvanced Par king S ystem w it h rea r view ca mera
Rear-view camera tips
We recommend that you practice park ing with the rear -view camera
in a traffic -free location , or parking lot , to become familiar with the
system, the orientation lines, and their function . When doing this,
there should be good light and weather conditions .
I n the MM I Display, objects or vehicles appea r c loser or further away
if :
• you are driving in reverse g ear from a level surface onto an
incline, or a downward slope,
• you are driv ing in reverse gear toward protruding objects,
• the vehic le is carrying too much load in the rear.
T he accuracy of the orientation lines and b lue surfaces diminishes
if :
• the Adaptive Air Suspension is defective, or the dynamic or lift
mode is switched on,
• the rear -view camera does not provide a reliable image, for
example, in poor visibility condit ions or if the lens is d irty,
• the image on the screen is not visible due to sun glare and reflec
tion .
Car ing for the rear- vie w c amera l en s:
• Damp en the lens with a hous ehold a lcohol -based glass cleaner,
and c lean the lens w ith a dry cloth.
• Remove snow with a hand brush.
• Remove ice , preferably with de -icing spray~
0.
ln. WARNING
• The rear-view ca m era doe s not replace the view to the rear and
the rear view mirror s.
• The rea r-view camer a - be cause of t echni cal limit ation s - does
not show the ent ire area behind the vehicle
~ page 17 7, fig. 199. ~
Page 189 of 408
__________________________________________ A_ d_v _a_ n_ c_e _d _ P_a_ r_ k_ i_n ..:g =-- S...:y:- s_ t_ e_ m ___ !II
& WARNING (continued )
Be especially careful to check for small children and animals
before backing up . Small children and animals will not always be
shown in the rear-view display .
• The Audi parking system is not a substitute for being careful
and alert when backing up . Be especially careful during parking
and similar maneuvers . Always watch where you are driving and
make sure that nothing is in the way .
• Do not allow yourself to be distracted from traffic by the rear
v iew camera pictures.
• When maneuvering or parking , do not only use the MMI Display
for or ientation . Certa in objects -depending on the screen resolu
tion -may not , or not entirely , be di splayed; for example trailer
hitches , chains , narrow posts , or fences .
• Only use the rear -view camera for aid if it shows a good, clear
picture . The image may be obscured , for example , by the sun
shining into the lens, dirt on the lens , or as the result of a defect ·
danger of accident!
• If the image is hazy when the MMI Display is switched on or the
area behind the vehicle is not visible (for example , as the result of
a dirty or defective lens ), the rear -view camera must not be used
for aid in maneuvering -danger of ac cident!
• The rear -view camera generates two -dimensional images . For
this reason, please note that recesses in the ground and
protruding parts on another vehicle , or protruding objects fixed to
the ground , will be more difficult or impossible to recognize on the
MMI Display, due to the missing spacial depth.
• If the position and the installation angle of the camera has
changed , for example, after a rear end collision, do not continue to
use the system for safety reasons . Have it checked by an autho
rized Audi dealer or qualified workshop .
• Only use the rear-v iew camera when the rear lid is fully closed.
Make sure that objects mounted on the rear are not obscuring the
camera v iew .
Controls and equip
ment
& WARNING (continued )
• Remove ice, preferably with de-icing spray .
0 Note
• Never use warm or hot water to remove snow or ice from the
rear -view camera lens -danger of crack format ion on t he lens!
• Whe n cleani ng t he le ns, neve r use care p ro d uc ts wi th a n abr a
s ive effect.
[ i ] Tips
The positio ns of t he orientation lines/ surfaces are disp laced up or
down if the par king p rocess is car ried out with the rear -view camera
i n A dap tive A ir Susp ens ion
=> p ag e 2 1 dyna m ic or lift mode. T here
fore , the accuracy is red uced. •
I • •