check AUDI S8 2013 User Guide
[x] Cancel search | Manufacturer: AUDI, Model Year: 2013, Model line: S8, Model: AUDI S8 2013Pages: 318, PDF Size: 79.34 MB
Page 23 of 318

Instruments and warning/indicator lights 21
't'::1".., Engine oil sensor
II Oil level! Sensor defective
If the symbol illuminates, contact your au
thor ized Audi dealer and have the oil sensor
in spected. Until you have th is done, check the
oil level each time you refuel just to be on the
safe side¢
page 23 7.
Bil Fuel level indicator
ID] Please refuel
If the indicator light turns on for the first
time and the message appears, there are
about 4 gallons (15 liters) of fuel left in the
tank. Time to refue l
¢page 229.
1B] Tank system malfunction! Contact dealer
If the indicator light turns on and th is mes
sage appears, there is a malfunction in the
tank system .
Drive to your authori zed Aud i dea ler immedi
ately to have the malfunction corrected.
<;;> Windshield washer flu id level
- Please refill washer fluid
If the symbol illuminates, add windshield
washer fluid to the washer system/headlight
washer system* ¢
page 247.
'1:> Windshield wipers
E•$ vVindshield wiper defective
There is a malfunct ion with the w indshield
wipers .
Drive to your authorized Audi dea ler immedi
ately to have the malfunction corrected.
~ l}D 10$ Defective light bulb warning
i -If the indicator light turns on, a bulb has
fa iled . The message indicates the location of
the bulb.
El-if a fog lamp* has failed, the indicator
light turns on to indicate the location on the
vehicle.
au-if a rear fog lamp has failed, the indicator
light turns on to indicate the location on the
vehicle.
Vehicle lights : malfun ction
If the message appears, there is a malfunc
tion in the headlights or light sw itch .
Drive to your au thorized Audi dealer immedi
ate ly to have the malfunction corrected .
A WARNING
-Light bulbs are pressurized and could ex
plode wh ile they are being changed caus
ing serious personal injury.
- Work with due care when hand ling the
h igh-vo ltage sect ion of gas discharge
(xenon) lights . Failure to do so could re
sult in death or serious injury.
(D Tips
Have the bu lb replaced or the connect ion
repaired by your authorized Audi Service
department .
~0 Headlight range control
II Headlight range control: defective!
If the symbol illum inates, the headlight range
control is no longer working properly. Have
the system checked and repaired at your A udi
dealer.
§0 Adapt ive Light
Applies to vehicles: with Adaptive Light
mfJ Audi adaptive light: system fault
If the indicator light turns on and this mes
sage appears, there is a malfunct ion in the
adaptive light system . The headlights sti ll
functio n.
Go to an authorized dealership to have the
headlights or the control unit for the Adaptive
Light repaired.
Page 29 of 318
Instrument s and warning /indicator lights 2 7
The date and time are shown in the instru
ment cluster display ¢
page 23, fig. 4. There
is also an ana log clock in the center conso le
¢fig. 12.
When you open the drive r's door, the date and
time appear in the instrument cluster display for 30 seconds. When the ign ition is switched
on, the time is always displayed in the status
line © regard less of the current d isp lay.
You can set the time on both clocks and the
date display in the MMI. Refer to the M MI
owner's manual for instructions.
Service interval display
The service interval display reminds you when
your next service is due.
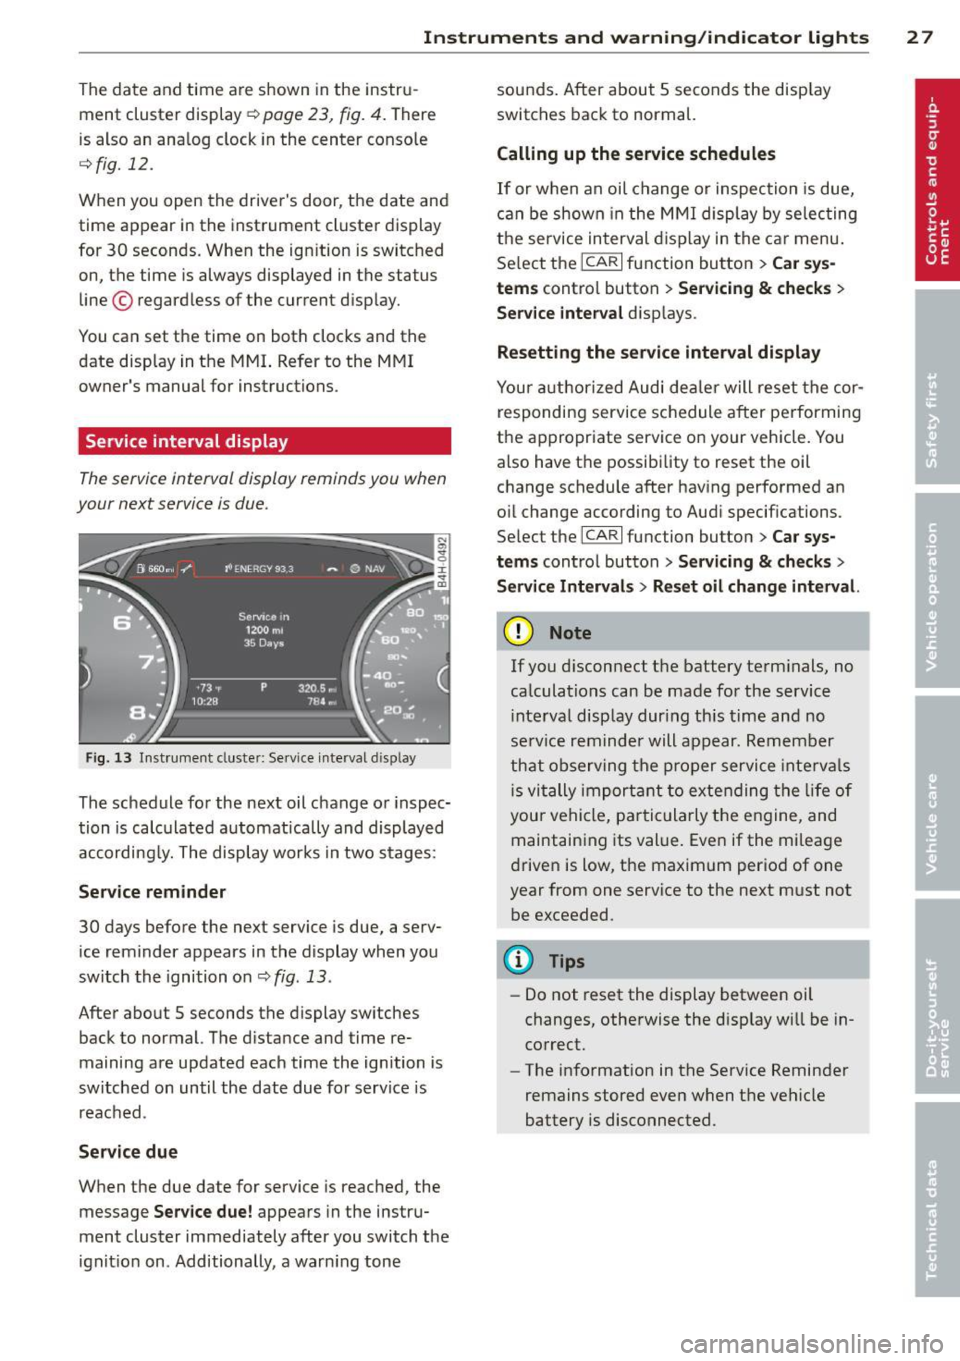
Fi g. 1 3 In st rume nt cluster: Service interva l d isp lay
The schedule for the next oil change o r inspec
tion is calculated a utomatically and displayed
according ly. The display works in two stages:
Service reminder
30 days before the next service is due, a serv
ice reminder appears in the display when you
switch the ignition o n
r:::;,fig. 13.
After abo ut 5 sec onds the display sw itches
back to n ormal. The d istance and time re
maining are updated each time the ignition is
switched on until the date due for serv ice is
reac hed.
Service due
W hen the due date for service is reached, the
message
Service due! appea rs in the instru
ment clus ter immediately after you switch the
i gnit io n on . Additionally, a war ning tone sou
nds. After about 5 seconds the disp lay
switc hes back to normal.
Calling up the service schedules
If or w hen an oi l change or inspection is due,
c a n be shown in the M MI di spl ay by selec ting
t h e service in terval d isplay in the c ar menu .
Se lect the
I CAR I function button > Car s ys
tems
control button > Ser vicing & checks >
Service interval d isp lays.
Resetting the service interval display
Your auth ori zed Audi de aler will reset the cor
responding service sc hedule a fter pe rforming
t h e a ppropriate service o n your vehicle. You
also have t he possibility to reset the oil
change schedule after hav ing performed a n
o il change according to Aud i specifications.
Se lect the
ICAR I function button > Car sys
tems
con trol button > Servicing & che cks >
Service Intervals > Reset oil change interval.
(D Note
If you d isconnect t he battery te rm inals , no
ca lculat ions can be made fo r the service
i nte rva l disp lay dur ing th is time and no
se rv ice rem inde r will appear. Remem ber
th at obs erving the prop er servi ce inte rva ls
i s vi tally imp ortant t o extending the lif e of
you r ve hicl e, p articu larly the engine, an d
maintain ing its val ue. Eve n if the milea ge
dr iven is low, the maximum period of one
year from one service to the next m ust n ot
be exceeded.
(D Tips
- Do not reset the display between oil
chan ges, otherwise the disp lay wi ll be in
co rrect.
- The i nfo rmation in the Service Reminder
remains stored eve n when t he ve hicle
battery is disconnected.
Page 33 of 318
Removing the mechanical key
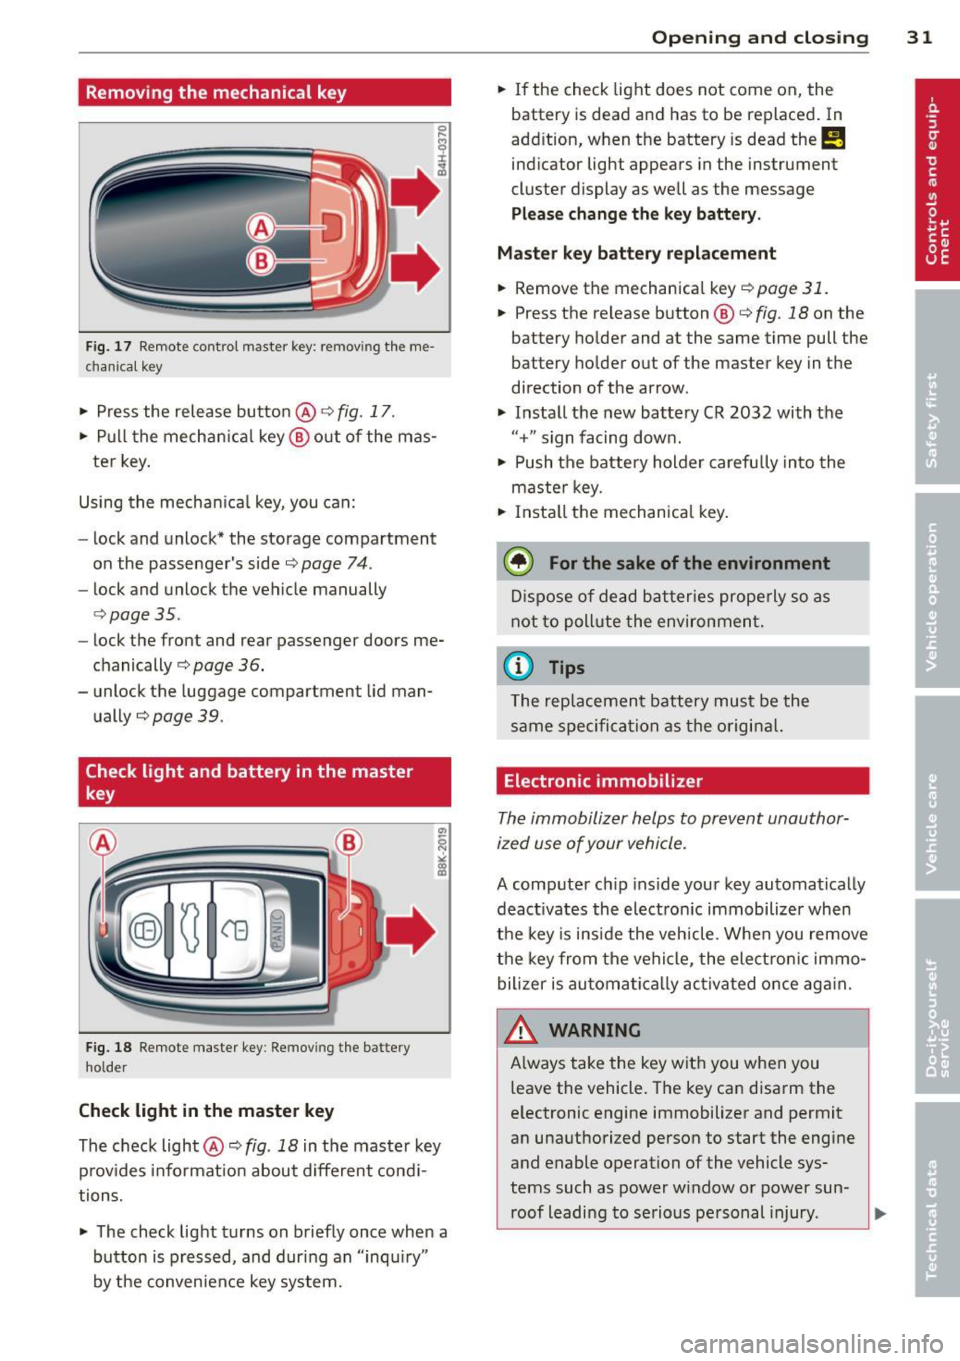
Fig. 17 Remote co ntrol maste r key : re mov ing the me
c han ical key
• Press the release button@ ¢ fig. 17.
• Pull the mechanica l key @ out of the mas
ter key.
Using the mechan ica l key, you can:
- lock and unlock* the storage compartment
on the passenger's side
<=:> page 74 .
-lock and unlock the vehicle manually
c:> page 35 .
-lock the front and rear passenger doors me
chanically
c:> page 36.
- unlock the luggage compartment lid man
ually
c:> page 39 .
Check light and battery in the master
key
Fig. 18 Remote master key: Re mov ing the batte ry
hold er
Check light in the maste r ke y
The check light @<=:> fig. 18 in the master key
p rov ides info rmat ion about d ifferent cond i
tions.
• The check light turns on briefly once when a
button is pressed, and dur ing an "inqu iry"
by the convenience key system.
Op enin g an d clos ing 31
• If the check light does not come on, the
battery is dead and has to be replaced. In
add ition, when the battery is dead
the m
indicator light appears in the instrument
cluster display as well as the message
Pl ease chang e th e key b attery .
Maste r ke y b atte ry replacement
• Remove the mechanical key c:> page 31.
• Press the re lease button ® c:> fig. 18 on the
battery holder and at the same time pull the
battery holder out of the master key in the
direction of the arrow .
• Install the new battery CR 2032 with the
"+ " sign facing down.
• Push the battery holder carefu lly into the
maste r key.
• Install the mechan ical key.
@ For the sake of the environment
D ispose of dead batteries properly so as
not to poll ute the environment.
@ Tips
The rep lacement battery must be the
same specifica tion as the o rigina l.
Electronic immobilizer
The immobilizer helps to prevent unauthor
ized use of your vehicle .
A computer chip ins ide your key automatically
deact ivates the electron ic immobilizer when
the key is inside the vehicle . When you remove
the key from the vehicle, the elect ron ic immo
bilizer is automa tically ac tivated once aga in.
& WARNING
A lways take the key with you when you
leave the vehicle. The key can disarm the
e lectronic engine immobilizer and permit
an unauthorized person to start the engine
and enable operation of the vehicle sys
tems such as power w indow or power sun-
roof leading to serious pe rsonal injury .
Ill>
Page 40 of 318
38 Openin g and clo sing
- You press the c::5 button on the remote con
tro l master key, or
- You press the
c::5 button in the luggage
compartment lid, or
- You push the handle in the luggage com
partment lid, or
- You pull the
c::5 button in the driver 's door ,
or
- When something b locks the luggage com
partment lid or makes it d iff icult for the lid
to move.
I f you press one of the buttons
c::5 now, the
l uggage compartment lid will either open or
close, depending on its ang le.
If you pull lightly on its handle, the luggage
compartment lid will close .
Closing will be stopped immediately when:
- You press the
c::5 button in the luggage
compartment lid, or
- You push the handle in the luggage com
partment lid, or
- You release the
c::5 button on the driver's
door, or
- When something b locks the luggage com
partment lid or makes it difficult for the lid
to move.
I f you press one of the buttons
c::5 now, the
l uggage compartmen t lid will either close or
open, depending on its ang le .
If you pull lightly on its handle, the l uggage
compartment lid w ill close.
You can manually stop the automatic open ing/closing of the luggage compartment lid.
The a utomat ic clos ing p rocess beg ins if you
pus h down on the l uggage compar tment lid .
_&. WARNING
-After closing the luggage compartment
lid, a lways pu ll up on it to make sure that
it is properly closed. Otherwise it could
open suddenly when the veh icle is mov
ing.
- To help prevent poisonous exhaust gas from being drawn into the veh icle, al- ways keep the
luggage compartment lid
closed while dr iv ing. Never transport ob
jects larger than those which fit com pletely into the luggage area, because
then the luggage compartment lid can not be fully closed .
- Never leave your vehicle unattended es pecia lly with the luggage compartment
lid left open. A chi ld co uld crawl into the
car through the luggage compartment
and pu ll the lid shut, becoming trapped
and unable to get out . To red uce the risk
of persona l inju ry, never let children play
in or around your vehicle. Always keep
the luggage compartment lid as well as
the vehicle doors closed when not in use.
- Never close the luggage compartment
lid inattentively or witho ut checking
first. Although the clos ing force of the
luggage compartment lid is limited, you
can st ill seriously injure yourself o r oth
ers .
- Always ensure that no one is within range of the luggage compartment lid
when it is moving, in particu la r close to
the hinges and the upper and lower
edges -finge rs or hands can be pinched.
- Neve r try to in terfere with the luggage
compartment lid o r help it when it is be
ing opened or closed automat ica lly.
(D Tips
- If there is a m echan ica l problem with au
tomati c clos ing for the luggage compart
ment lid o r there is an obstruc tion, it
opens again immediate ly. Check to see
why the luggage compartment lid could
not be closed before attempting to close
it again .
- The following applies to vehicles equip
ped with the Convenience key * feature: if
the remote control key is left in the lug
gage compartment, luggage compart
ment w il l automatically unlock itself af
ter you lock the vehicle . Th is prevents
you from unintentionally lock ing you r
key i n the l uggage compartment.
Page 43 of 318

Closing the windows
• Pull the switch to the first stop and hold it
until the window reaches the desired posi
tion.
• Pull the switch briefly to the
second stop to
automatically close the window.
Power window switches
@ Driver's door
@ Passenger's door
© Left rear door
@ Right rear door
® Safety button (or two safety buttons in
vehicles with power child safety locks
¢ poge40)
Child safety lock
When the safety button®¢ fig. 32 is press
ed, the LED in the button lights up. The fol
lowing features are switched off:
- The power windows in the rear doors,
- The buttons for the power sun shades* in
the side windows,
- The buttons for the power sun shade * in the
rear window,
- Front passenger power seat adj ustment*
button.
_& WARNING
- When you leave your vehicle - even if on
ly briefly- always take the ignition key
with you. This applies particularly when
children remain in the veh icle. Otherw ise
the ch ildren could start the engine or op
erate electrical equ ipment (e.g. power
w indows). The powe r windows are func
tional until the driver's door or passeng
er's door has been opened.
- Be careful when closing the windows.
Check to see that no one is in the way, or
serious injury could result!
- When locking the vehicle from outside,
the vehicle must be unoccupied sinc e the
windows can no Longer be opened in an
emergency.
Opening and closing
@ Tips
-The driver can Lower or raise the power
sun shades* in the side windows by using
switches © and @.
- After the ignition has been switched off,
the windows can still be opened or
closed for about 10 min utes. The power
windows are not switched off until the dr iver's door or passenger's door has
been ope ned.
What to do after a malfunct ion
The one-touch open and close function must
be reactivated if the battery hos been discon
nected .
• Pull and hold the power window switch un
til the w indow is fully closed.
• Release the sw itch and then pull it again for
at least one second.
Valet parking
The valet parking feature protects the lug
gage comportment from unauthorized
ac
cess .
Fig. 33 Valet parking bu tton
With "valet parking" activated, the luggage
compartment lid cannot be opened.
• Remove the mechanical key¢
page 31.
• Open the glove compartment and activate
¢
fig. 33 the "valet parking" feature by
pressing the
! VALE TI button . The indicator
light in the sw itch illuminates .
.,.. Close the glove compartment and lock it
w ith the mechanical key .
liJJ,,
41
Page 48 of 318
46 Clear vision
Highway light function* (vehicles with LED
headlights) -this function adapts the lighting
for highway driving based on vehicle speed.
.&_ WARNING
- Automatic headlights are only intended
to assist the driver. They do not relieve
the driver of his responsibility to check
the headlights and to turn them on man
ually according to the current light and
visibility conditions. For example, fog
cannot be detected by the light sensors.
So always switch on the headlights §.0
under these weather conditions and
when driving in the dark.
- Crashes can happen when you cannot see the road ahead and when you cannot be
seen by other motorists. Always turn on
the headlights so that you can see ahead
and so that others can see your car from
the back.
- Please observe legal regulations when
using the lighting systems described.
(D Note
The rear fog lights should only be turned
on in accordance with traffic regulation, as
the lights are bright for following traffic.
@ Tips
- The light sensor* for automatic dynamic
headlight range control* is located in the
rear view mirror mount. You should
therefore not apply any stickers to the
windshield in this area in order to pre
vent malfunctions or failures .
- In the event of a light sensor malfunc
tion, the driver is notified in the instru
ment cluster display¢
page 22 .
- You will hear a warning tone if you open
the driver door when the exterior lights
are switched on.
- In cool or damp weather, the inside of
the headlights, turn signals and tail
lights can fog over due to the tempera
ture difference between the inside and
outside. They will clear shortly after switching them on. This does not affect
the service life of the lighting.
Emergency flasher
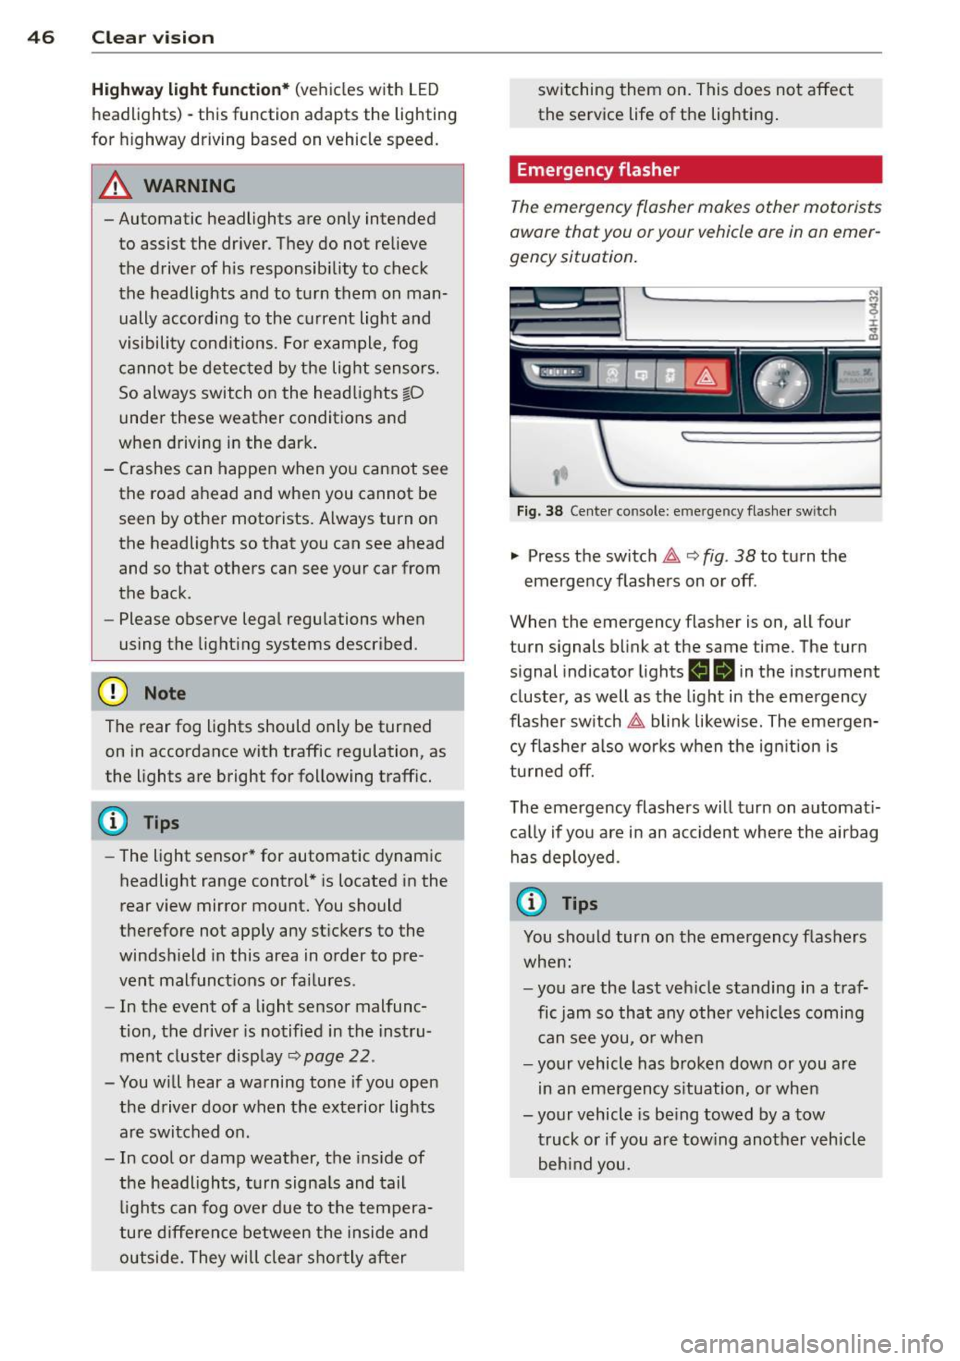
The emergency flasher makes other motorists
aware that you or your vehicle ore in an emer
gency situation.
,--~
,_'
. ;.' --- --~-.sc-
Fig. 38 Center console: emergency flasher switch
.,. Press the switch 11 ¢ fig. 38 to turn the
emergency flashers on or off .
When the emergency flasher is on, all four
turn signals blink at the same time. The turn
s ignal ind icator light s
N 1B in the instrument
cluster, as well as the light in the emergency
flasher switch
11 blink likewise. The emergen
cy flasher also works when the ignition is
turned off.
The emergency flashers will turn on automati
cally if you are in an accident where the airbag
has deployed.
(D Tips
You should turn on the emergency flashers
when:
- you are the last vehicle standing in a traf
fic jam so that any other vehicles coming
can see you, or when
- your vehicle has broken down or you are
in an emergency situation, or when
-your vehicle is being towed by a tow
truck or if you are towing another vehicle
behind you.
Page 54 of 318
52 Clear vision
Wiper and washer
system
Switching the windshield wipers on
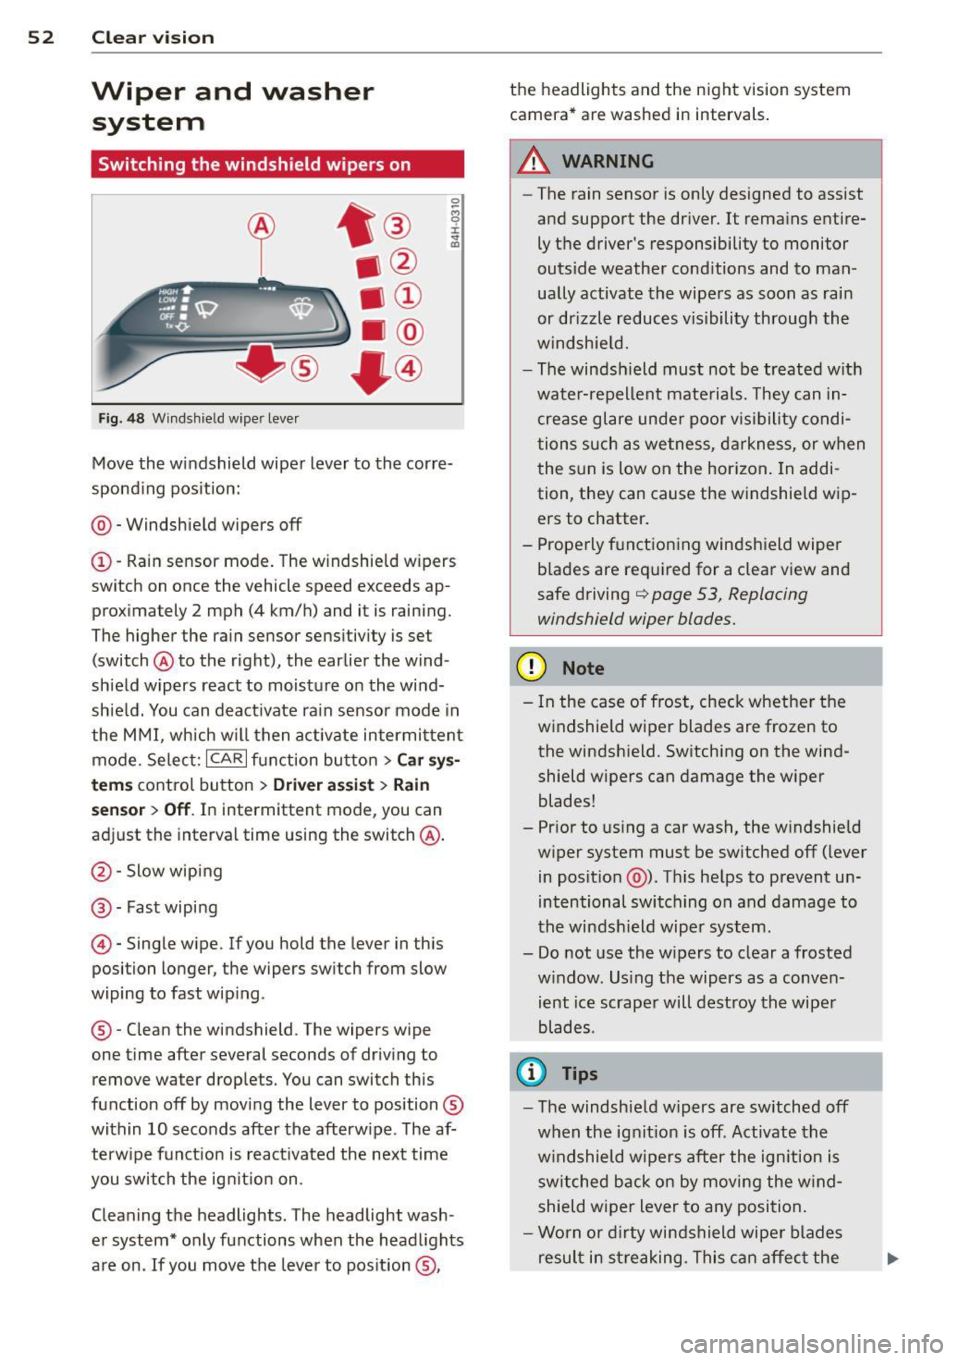
Fig. 48 Wind shie ld wipe r lever
Move the windshield wiper lever to the corre
sponding position:
@ - Windshield wipers off
(I) -Rain sensor mode. The windshield wipers
switch on once the vehicle speed exceeds ap
proximately 2 mph (4 km/h) and it is raining.
The higher the rain sensor sensitivity is se t
(switch @to the right), the earlier the wind
shield wipers react to moisture on the wind
shield. You can deactivate rain sensor mode in
the MMI, which will then activate intermittent
mode. Select:
ICARI function button > Car sys
tems
control button > Driver assist > Rain
sensor
> Off. In intermittent mode, you can
adjust the interval time using the switch @.
@-Slow wiping
@-Fast wiping
© -Single wipe. If you hold the lever in this
posi tion longer, the wipers switch from slow
wiping to fast wiping .
® - Clean the windshield . The wipers wipe
one time after several seconds of driving to remove water drople ts. You can switch this
function off by moving the lever to position ®
within 10 seconds after the afterwipe . The af
terwipe function is reactivated the next time
you switch the ignition on.
Cleaning the headlights. The headlight wash
er system* only functions when the headlights
are on . If you move the lever to position ®, the headlights and the night vision system
camera* are washed in intervals.
.&_ WARNING
-
- The rain sensor is only designed to assist
and support the driver.
It remains entire
ly the driver's responsibility to monitor
outside weather conditions and to man
ually activate the wipers as soon as rain
or drizzle reduces visibility through the
windshield.
- The windshield must not be treated with
water-repellent materials. They can in
crease glare under poor visibility condi
tions such as wetness, darkness, or when
the sun is low on the horizon. In addi
tion, they can cause the windshield wip
ers to chatter.
- Properly functioning windshield wiper
blades are required for a clear view and
safe driving
q page 53, Replacing
windshield wiper blades.
(D Note
- In the case of frost, check whether the
windshield wiper blades are frozen to
the windshield. Switching on the wind
shield wipers can damage the wiper
blades!
- Prior to using a car wash, the windshield
wiper system must be switched off (lever
in position @). This helps to prevent un
intentional switching on and damage to
the windshield wiper system.
- Do not use the wipers to clear a frosted
window . Using the wipers as a conven
ient ice scraper will destroy the wiper
blades .
(D Tips
-The windshield wipers are switched off
when the ignition is off . Activate the
windshield wipers after the ignition is
switched back on by moving the wind
shield wiper lever to any position.
- Worn or dirty windshield wiper blades
result in streaking. This can affect the
Page 55 of 318
rain sensor funct ion . Check your
windshield wiper b lades regularly.
- The washer fluid nozzles of the wind
sh ield washer system are heated at low
temperatures when the ig nitio n is on .
- When stopping temporarily, e .g. at a
traffic light , the set speed of the wind
sh ield wipers is automatically red uced by
one speed.
Replacing windshield wiper blades
Wip er blad es in good condition h elp keep the
windshield clear.
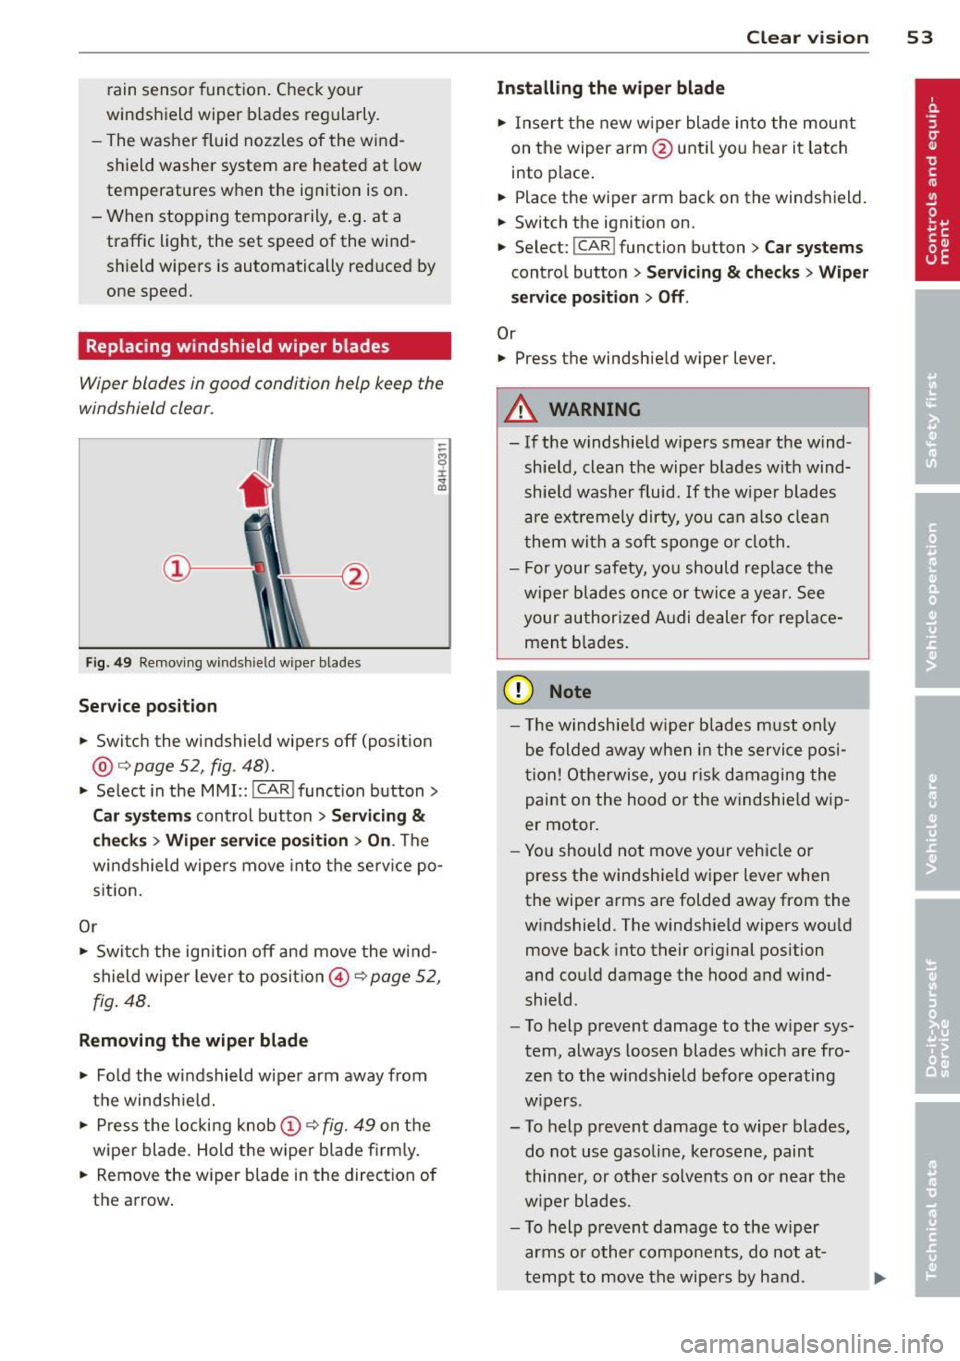
Fi g. 49 Rem ov ing wi nds hield w iper bla des
Service pos ition
.. Switc h the windshield wipers off (posit ion
@ ¢
page 52, fig . 48).
.. Se lect in the M MI:: !CAR ! function button>
Car s ystem s control button > Servicing &
che ck s > Wip er servic e po sition > On . The
wi ndshield wipe rs move into the serv ice po
s ition.
Or
.,. Swi tch the ignition off and move the wind
shield wipe r lever to posit io n © ¢
page 52 ,
fig . 48.
R emoving the wiper blade
.. Fold the w indshield wipe r arm away from
t h e windshie ld.
.,. Press the locking knob(!)
¢fig. 49 on t he
wiper blade . Hold the wiper blade fi rm ly.
.. Remove the w iper blade in the direction of
the arrow .
Clear vision 5 3
Installing the wiper blade
.. Insert the new w iper blade into the mount
on the wiper arm @unti l you hear it latch
i nto place .
.. Place the wiper arm back on the windshield.
.. Switch the ignit ion on.
.. Select:
I CAR ! function button > Car systems
control button > Servicing & checks > Wiper
serv ice position > Off .
Or
.. Press the windshie ld wiper lever.
.&_ WARNING
- If the windshie ld w ipers smear the w ind
shie ld , clean the wiper b lades with wind
shie ld washer fluid. If the w iper blades
are ex tremely dirty, you can a lso clea n
them with a so ft sponge o r clo th.
- For your safety, you should rep lace the
wiper blades once o r twi ce a year. See
your author ized Audi dealer for replace
ment b lades.
(D Note
- T he windsh ie ld w iper blades m ust only
be folded aw ay whe n in the service pos i
tion! Otherwise, yo u ris k damaging the
paint on the hood or the windshie ld wip
er motor.
- Yo u should not move your vehicle or
press the windshield wiper lever when
the wipe r arms are folded away from the
w indshield. The windsh ield wipers wou ld
move back into their or iginal position
and could damage the hood and wind
shield .
- To help prevent damage to the w iper sys
tem , always loosen blades wh ich are fro
zen to the windshield before operating
w ipers .
- To help p revent damage to wiper blades,
do not use gasoline, kerosen e, paint
thinne r, or other solvents on or near the
w iper blades .
- T o help prevent damage to the w iper
arms or other components, do not at-
t empt to move the wipe rs by hand. .,._
Page 60 of 318
58 Seats and storage
Front passenger's seat
Always move the front passenger seat into
the rearmost position.
To avoid contact with the airbag while it is de
ploying, do not sit any closer to the instru
ment panel than necessa ry and always wear
the three-point safety belt provided adjusted
correctly. We recommend that you adjust the
passenger's seat i n the fol low ing ma nner:
~ Bring the backrest up to an (almost) upright
posit ion.
D o not ride with the seat reclined .
~ Adjust the head restraint so the upper edge
i s as even a s poss ible with the top of your
head.
If that is not possible, try to a dju st
the head rest raint so that it is as close to
this position as possible ¢
page 64.
~ Place your feet on the floor in front of the
passenger's seat .
Front seats
Controls
Moving the seat forward or back and adjust
ing the height, backrest angle and seat an
gle.
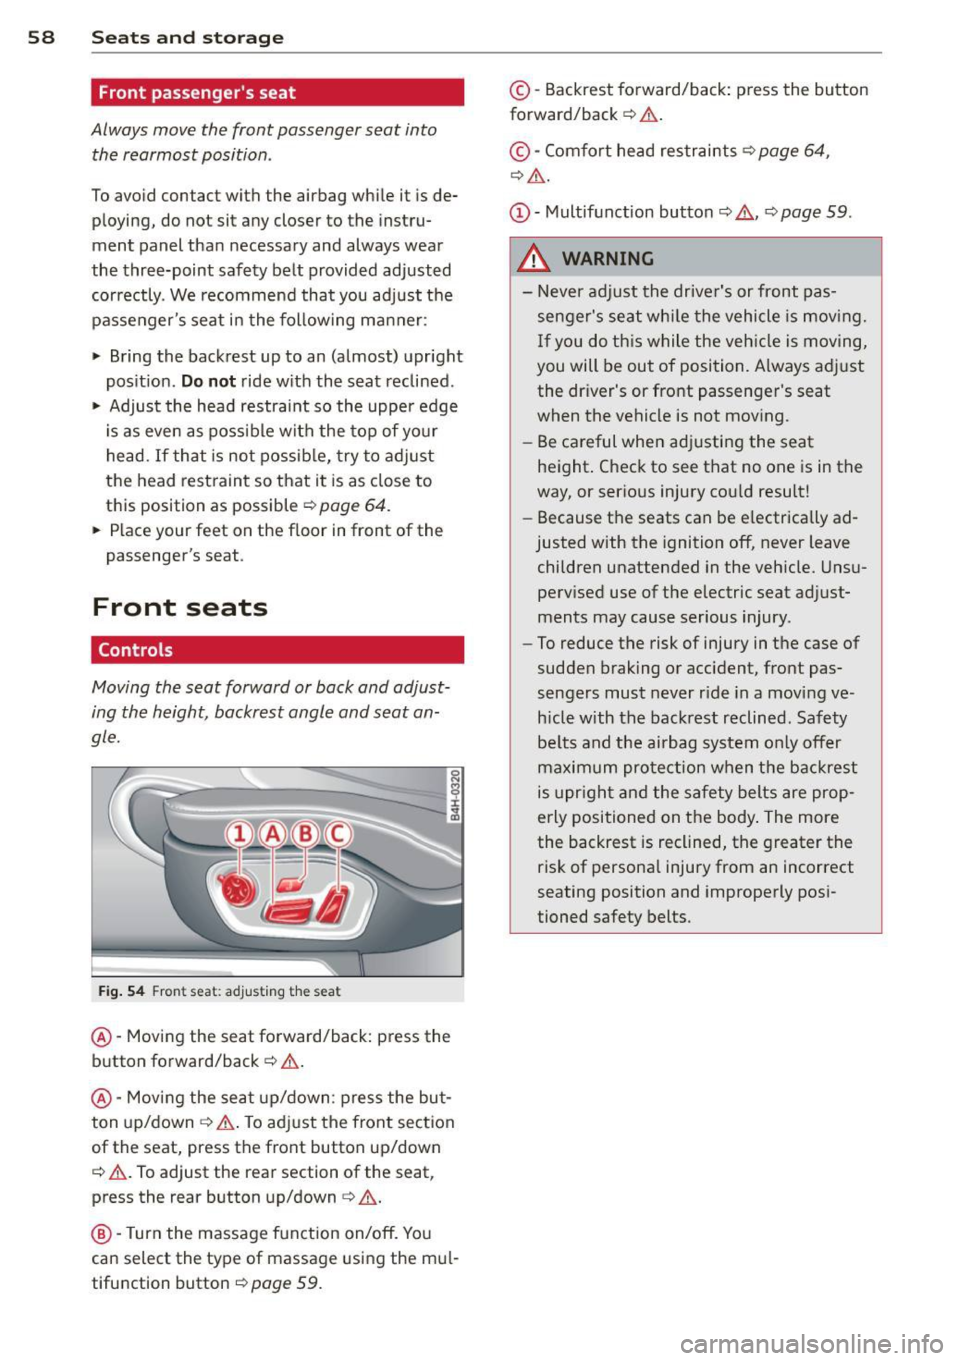
F ig. 54 Front seat: adju sting t he se at
@ -Moving the seat forward/back: press the
b utton forward/back ¢ .&. .
@ -Mov ing the se at up/down : press the but
ton up/down ¢,&. . To ad just the fron t sec tion
of the seat, press the front button up/down
¢ .&. .To adjust the rear section of the seat,
press the rear button up/down ¢,&. .
@ -Turn the massage f unction on/off. You
can select the type of massage using the mul
tifunction button
r:!> page 59.
© -Backrest forward/back: press the button
forward/back ¢ .&. .
©-Com fort head restraints ¢ page 64,
¢ .&. .
@ -Multif unction button ¢.&. ,¢ page 59 .
_&. WARNING -
- Never adjust the drive r's or front pas
senger's seat whi le the vehicle is moving.
If you do th is while the veh icle is moving,
you will be out of posi tion. A lways adjust
the dr iver's or front passenger's seat
when the vehicle is not mov ing.
- Be ca reful when ad justing the seat
height. Check to see that no one is in the
way, or ser ious injury could resu lt!
- Because the seats can be e lectrically ad
justed with the ignition off, never leave
children unattended in the veh icle. Uns u
perv ised use of t he electric seat ad just
ments may cause serious injury .
- To reduce the risk of injury in the case of
sudden b raking or accident, front pas
sengers must never r ide in a moving ve
h icle with the backrest reclined . Safety
be lts and the airbag system only offer
maximum pro tection when the backrest
is upr igh t and the safety belts are prop
erly positioned on the body . The more
the backrest is reclined, the greater the risk of persona l injury from an incorrect
seating position and improperly posi
tioned safety belts.
Page 61 of 318
Multifunction button
Applies to vehicles: with memory function
You con adjust the massage function, upper
section of the backrest, lumbar support, side bolsters, seating surface and safety belt
height using the multifunction button.
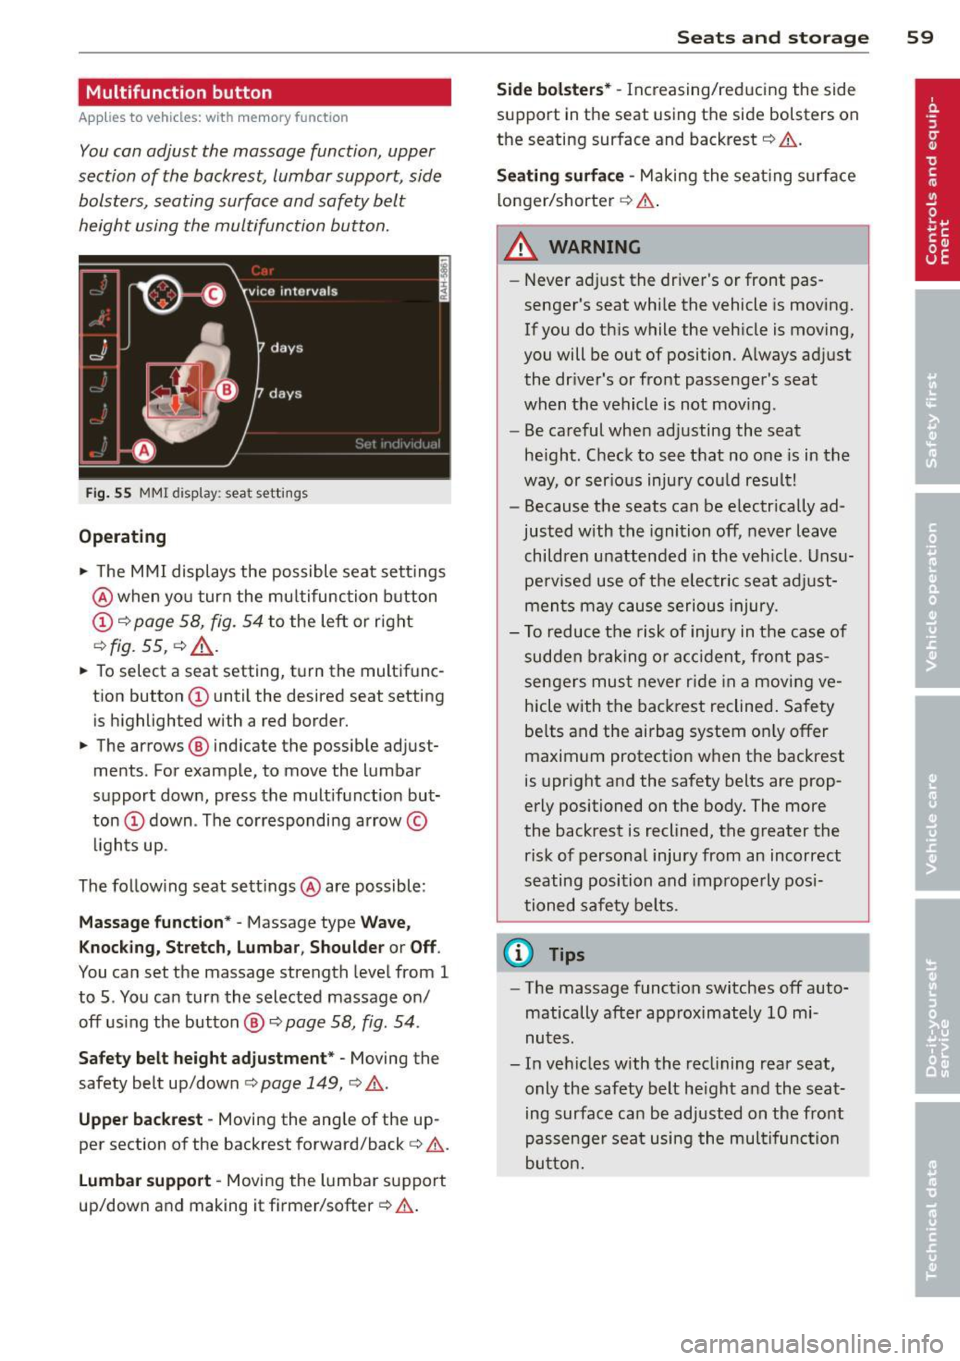
Fig . 55 MMI display : seat settings
Operating
.. The MMI displays the possible seat settings
@ when yo u turn the mu ltifunction b utton
(D c:> page 58, fig. 54 to the left or right
c:> fig. 55, c:> ,& .
.. To select a seat setting, turn the multifunc
tion button
(D until the desired seat setting
is highlighted with a red border.
.. The arrows @ indicate the possible adjust
ments. For example, to move the lumbar
support down, press the multifunction but
ton
(D down . The corresponding arrow ©
lights up.
The follow ing seat sett ings @are possible :
Massage fu nction* -Massage type Wave,
K no ckin g , Str etch, Lumb ar, S hould er or Off .
You can set the massage strength level from 1
to 5 . You can turn the selected massage on/
off us ing the button @
c:> page 58, fig. 54 .
Safety belt heig ht adju stme nt* -Moving the
safety belt up/down
c:> page 149, c:> &. .
Uppe r ba ckre st -Moving the ang le of the up
per section of the backrest forward/back
c:> .&. .
Lumb ar su pp ort -Moving the lumbar support
up/down and making it firmer/softer
c:> .&. .
Sea ts a nd s to rage 59
Side bol ster s* -Increasing/reducing the side
support in the seat using the side bolsters on
the seating surface and backrest
c:> .&. .
Sea ting surfa ce -Making the seating s urface
longer/shorter
c:> .&. .
A WARNING
-
- Never adjust the driver's or front pas
senger's seat whi le the vehicle is moving.
If you do this while the veh icle is moving,
you will be out of position. A lways adjust
the dr iver's or front passenger's seat
when the vehicle is not mov ing .
- Be careful when adjusting the seat
he ight. Check to see that no one is in the
way, or ser ious injury cou ld result!
- Because the seats can be e lectrically ad
justed with the ignition off, never leave
children unattended in the veh icle. Unsu
pe rvised use of the electric seat adjust
ments may cause serious injury.
- To reduce the risk of injury in the case of
sudden braking or accident, front pas
sengers mus t never r ide in a moving ve
hicle with the backrest reclined. Safety
be lts and the airbag system on ly offer
maximum protection when the backrest
is upright and the safety belts are prop
erly positioned on the body. The more
the backrest is reclined, the greater the risk of personal injury from an incorrect
seating position and improperly posi
tioned safety belts.
(D Tips
- The massage function switches off auto
matically after approximately 10 mi
nutes .
- In vehicles w ith the reclining rear seat,
only the safety belt he ight and the seat
ing surface can be adjusted on the front
passenger sea t using the multifunc tion
button.