AUDI S8 2014 Owners Manual
Manufacturer: AUDI, Model Year: 2014, Model line: S8, Model: AUDI S8 2014Pages: 314, PDF Size: 78.47 MB
Page 131 of 314
Corner view (front/rear)
Applies to vehicles: with top view camera system and cor
ner view (front/rear) mode
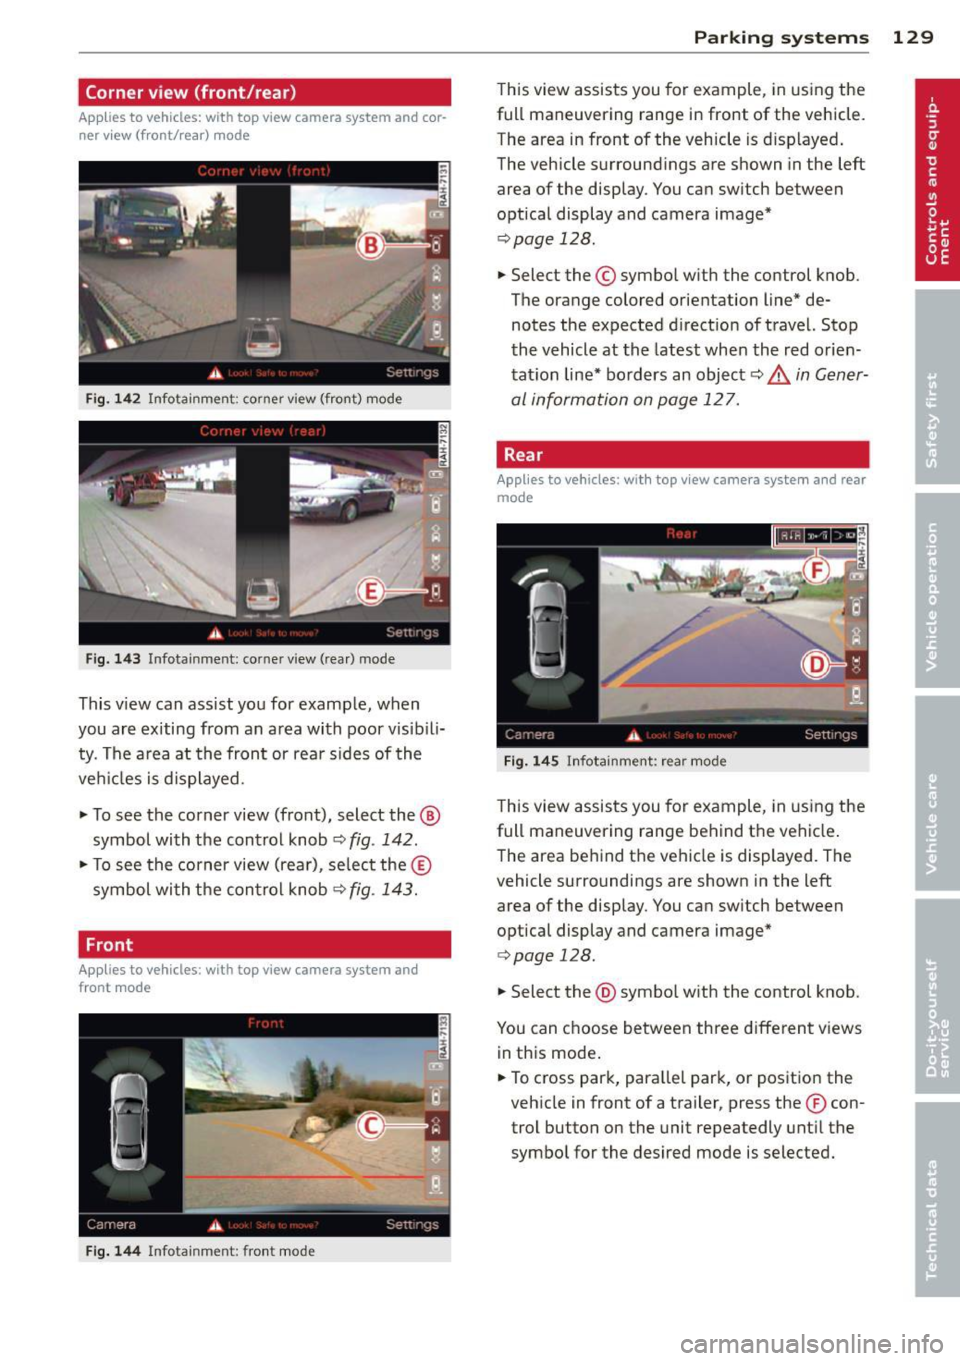
Fig. 1 42 Infotainment : corner view (front) mode
Fig. 1 43 Infota inment : co m er view (rear) mode
This v iew can ass ist you for examp le, when
you are exiting from an a rea with poor visib ili
ty. The a rea at the front or rea r sides of the
ve hicles is displayed.
.. To see the corner view (front), select the ®
symbol with the control knob
~ fig . 142 .
.. To see the corner view (rear), se lect the ®
symbol wi th the con trol knob~
fig. 143.
Front
Applies to vehicles: with top view camera system and
front mode
Fig. 144 In fo ta inm ent: fr ont mode
P arking systems 129
This view assists you for example, in us ing the
full maneuvering range in front of the vehicle.
The area in front of the vehicle is d isplayed .
The vehicle surround ings are shown in the left
area of the display. You can sw itch between
optical display and camera image*
~ page 128 .
.. Select the © symbo l with the control knob.
The orange colored orientation line* de notes the expected d irect ion of travel. Stop
the vehicle at the latest whe n the red orien
tat ion line* bo rders an object
c::> ..&, in Gener
al information on page 127.
, Rear
Applies to vehicles: with top view camera system and rear
mode
Fig . 14 5 Infota inm ent: r ear mod e
This view assists you for example, in us ing the
full maneuvering range behind the vehicle .
The area be hind the vehicle is displayed . The
vehicle surroundings are shown in the left
area of the display. You can sw itch between
optical display and camera image*
<=> page 128 .
.. Select the @symbo l w ith the control knob.
You can choose between three different v iews
in th is mode .
.. To cross park, para llel park, or pos ition the
veh icle in front of a trailer, press the ® con
trol button on the unit repeatedly unt il the
symbo l for the desired mode is selected.
Page 132 of 314
130 Parking systems
Cross parking
Applies to vehicles: with top vi ew camera system and rear
mode
This view may be used when parking in a ga
rage or in a parking space.
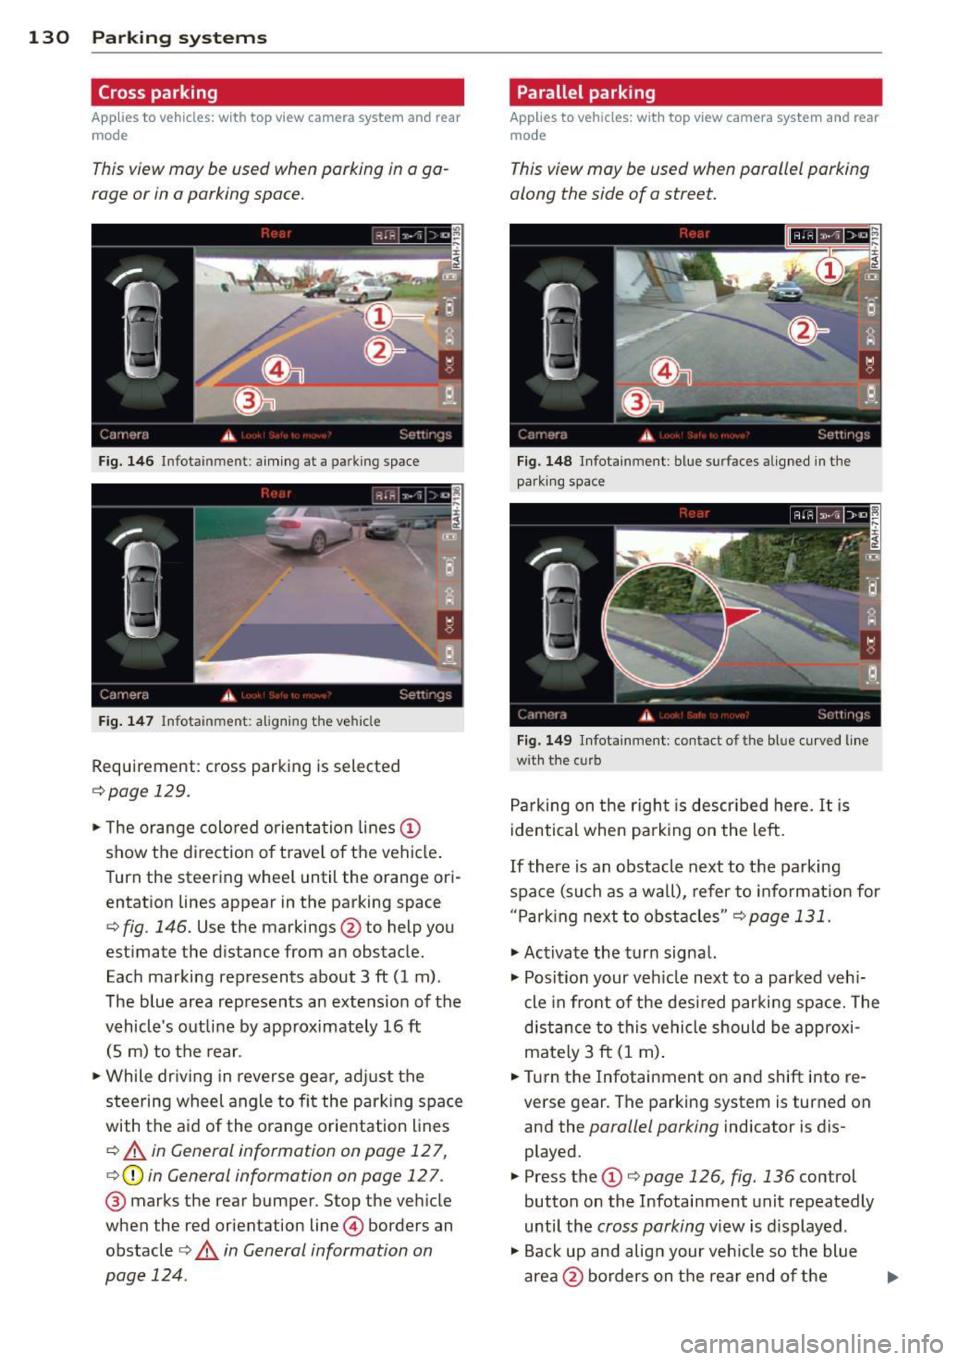
F ig. 146 Infot ainmen t: aim ing at a parking space
Fig. 147 In fo ta inm en t: ali gni ng th e ve hicle
Requirement : cross parking is selected
¢page 129.
.. The orange colored orienta tion lines CD
show t he direction of travel of the vehicle .
Turn the steering whee l until the orange ori
entation lines appear in the parking space
<=> fig . 146. Use the markings @to help you
estimate the distance from an obstacle.
Each marking represents about 3
ft (1 m) .
The blue area represents an extension of the
vehicle 's outline by approximately 16
ft
(5 m) to the rear .
.. While driv in g in reverse gear, adjust the
steering wheel angle to fit the park ing space
with the aid of the o range orientation lines
i::> A in General information on page 12 7,
<=>CD in General information on page 127 .
@ marks the rear bumper. Stop the veh icle
when the red orientation line@ borders an
obstacle
i:> .& in General information on
page 124 .
Parallel parking
Applies to vehicles: with top view camera system and rear
mode
This view may be used when parallel parking
along the side of a street.
Fig . 148 Infota inment : blue s urfa ces aligned in the
par king space
Fig . 149 Infota inmen t: contact of th e bl ue curved line
w ith the curb
Parking on the right is described here. It is
identical when parking on the left.
If there is an obstacle next to the parking
spa ce (such as a wa ll), refer to information for
" Parking next to obstacles "
i::> page 131.
.. Act ivate the turn signal.
.. Posit ion your vehicle next to a parked veh i
cle in front of the desired parki ng space. The
distance to this vehicle should be approxi
mate ly 3 ft (1 m) .
.. Turn the Infota inment on and shift into re
verse gear . The parking system is turned on
and the
parallel parking indicator is dis
played.
.. Press the
CD i:> page 126, fig. 136 control
button on the Infotainment unit repeatedly
until the
cross parking view is displayed .
.. Back up and align your vehicle so the blue
area @ borders on the rear end
of the
Page 133 of 314

vehicle or on the parking space line ¢ & in
General information on page 127,
¢@ in
General information on page 127 .
The blue
area represents an extension of the vehicle's
outline by approx imately 16
ft (5 m) to the
rear . The long side of the blue area should
be o n the curb. The enti re blue area must fit
into the parking space.
~ Wi th the veh icle stopped, turn t he steer ing
whee l to the r ight as far as it w ill go.
~ Back into the park ing space until the b lue
curve¢
page 126, fig . 137 touches the curb
¢ & in General information on page 127,
¢ @ in General information on page 127.
Stop the vehicle.
~ With the vehicle stopped, turn the steering
whee l to the left as far as it will go .
~ Continue to back into the pa rk ing space un
t il the vehicle is par ked pa ra ll el to th e curb
¢ & in General information on page 12 7,
¢(i) in General information on page 127.
@ marks the rear bumper. Stop the veh icle,
at the latest, when the red orientation line
@ borders an object. Keep an eye on the
front of your vehicle wh ile doing this.
Parking n ext to obstacles
When the re is an obs ta cl e (such as a wall)
nex t to the pa rk ing space, choose a space with
more space on the sides. Position the long
side of the b lue area so that there is sufficient
space from the curb. The area must not be on
the curb. You w ill also need to start turning
the steering wheel much earlier . There should
be a suffic ient amount of space between the
curb and the b lue c urve, and the blue curve
¢ page 126, fig. 137 must not touch the cu rb.
@ Tips
The left or right orientation li nes and sur
faces w ill be displayed, depend ing o n the
turn signa l bei ng used.
P arking systems 131
Trailer view
App lies to vehicles: wit h top v iew camera system and
t railer hitch
This view assists you in positioning the vehicle
in front of a trailer.
Fi g. 150 Infotainment: rear mode
Requ irement: the trailer mode is selected
¢page 129.
~ Now yo u can position your veh icle in front of
the trailer ¢
& in General information on
page 127,
¢ (i) in General information on
page 127.
The orange colored orientation
line denotes the expected path towa rd the
trailer hitch . Use the blue lines to help you
es timate the distan ce to the trailer hitch.
Setting the mode
A pp lies to vehicles: wi th top v iew came ra sys te m
~ Select: !CAR ! func tion b utton> C ar system s
contro l butto n > Driver a ssis t > Parking aid
> Change to front /rear > Auto or Manual.
Auto -
This view beh ind the vehicle ( Rear
mode) is displayed au tomatica lly when you
shift into reverse. T his view in front of the ve
hicle
( Front mode) is displayed automatica lly
when you shift into the forward gears.
Manual -This view behind the vehicle (Rear
mode) is always displayed when you turn on
the system .
Page 134 of 314

132 Parking systems
Adjusting the display and the warning tones
App lies to vehicles: with advanced park ing system wit h
rea r view camera/top v iew camera syste m
The display and warning tones can be adjust
ed in the Infotainment.
.. Se lect : ICAR !function button> Car systems
control button > Driver assist> Parking aid.
Display
On* -
optical display is shown for the parking
system plus, rear view camera image is shown
for parking system plus with rear view cam
era*.
Off -when the park ing system is switched off,
on ly audible signa ls are given.
Warning tones
Front volume -
Volume for the fro nt area
Rear volume -Volume for the rear area
Front frequency -Frequency for the front area
Rear frequency -Frequency for the rear area
Music volume while parking -When the park
ing system is turned on, the volume of the au
d io/v ideo source is lowered .
The newly adjusted value is briefly heard from
the signal generator .
(D Tips
-The warning tones can a lso be adjusted
directly from the visual display or the
rear view camera* image . S imply press
the
Settings cont rol button .
- Changed settings are activated when the
parking system is switched on again.
- The settings are automatically stored
and ass igned to the remote control key
that is in use .
Error messages
App lies to vehicles: with advanced park ing system with
rea r view camera/top v iew camera syste m
There is an error in the system if the LED in
the
P •1A b utton is blinking and you hear a con- t
in uous alarm for a few seconds after switch
ing on the parking system or when the park
ing system is already activated. If the error is
not corrected before you switch off the ign i
t ion, the LED in the
P' "A button will blink the
next t ime you sw itch on the parking system by
shifting into reverse .
If a sensor is faulty, the!¾ symbol will appear
in front of/behind the vehicle in the Infota in
ment display . If a rear sensor is faulty, only
obstacles that are in the front detection a rea
are shown . If a front sensor is fau lty, on ly ob
stacles that are in the rear area are shown.
Peripheral cameras*
There is also a system error if:
- the
'(l.Q ,, symbol appears i n the display and
the corresponding display area is shown in
blue. The camera is not work ing in this area.
- all segments around the vehicles are red or
if no segments are displayed.
Drive to your authorized A udi dealer or au
thorized repair facility immediately to have
the malfunction corrected .
Trailer hitch
Applies to vehicles: with adva nced parking sys te m with
rear view camera/top view camera system
For vehicles us ing the trailer socket, the park
ing system rear sensors do not turn on when
yo u shift into reverse gear or when you press
the
P 1JA button. This results in the following re
strictions:
T he re is no distance warning for the rear. The
front sensors remain activated. The visua l dis
play switches to the trailer towing mode . The
rear view camera image will not show the ori
entation lines and the blue surfaces.
(D Tips
Trailer hitches that are not installed at the
factory may ca use the parking system to
malfunction or they may restrict its func
tion.
Page 135 of 314

Homelink
Universal remote
control
General information
Applies to vehicles: with Home link unive rsal remote con
tro l
The Homelink universal remote control can
be programmed with hand -held transmitters
from existing equipment
Using the Homelink universal remote control,
you can operate equ ipment such as garage
doors, property gates and house lights from inside your vehicle .
Using the Homelink universal remote control,
you can replace up to three separate hand
held transmitters for equipment on your
property with just one universal remote con
trol. Most of these transmitters a re used to
operate ga rage doors and property gates. The
individual transmitters are programmed at
the front bumper. That is where the control
module is located.
The transmitters must be programmed first in
order to operate systems using the Homelink
universal remote control.
A WARNING , .,.
- Never use the Homelink transmitter
with any garage door opener that does
have not the safety stop and reverse fea
ture as required by federal safety stand
ards . Th is includes any garage door open
er model manufactured before April 1,
1982.
- A garage door opener which cannot de
tect an object, signaling the door to stop
and reverse does not meet current feder
al safety standards . Us ing a garage door
opener without these features increases
risk of serious injury or death.
- For safety reasons never release the
parking brake or start the engine while
anyone is standing in front of the vehicle .
- A garage door or an estate gate may sometimes be set in motion when the
H ome link 133
Homelink remote control is being pro
grammed. If the device is repeatedly ac
tivated, this can overstrain motor and
damage its electrical components -an
overheated motor is a fire hazard!
- To avoid possible injuries or property
damage, please always make absolutely
certa in that no persons or objects are lo
cated in the range of motion of any
equipment being ope rated.
(D Tips
- If you would like additional information
on the Home link Universal Transce iver
'
Homel ink compatib le products, or to
purchase other accessories such as the
Homelink Lighting Package, please con
tact Homelink at 1-800-355 -3515 or on
the Internet at www. homelink.com.
- For Declaration of Comp liance to United
States FCC and Ind ustry Canada reg ula
tions~
page 295.
Operation
Applies to vehicles: with Homeli nk
Fig. 151 Contro l u ni t in the head liner
"' 8 ±
" m
Requ irement: The buttons must be p rogram
med
~ page 134.
"Press the programmed button~ & in Gen
eral information on page 133
to open the
garage door. The light @will bl ink or turn
on .
" Press the button again to close the garage
door
¢ .&. in General information on
pag e 133 . .,.
Page 136 of 314

134 Homelink
@ Tips
To open t he ga rage door, p ress the butto n,
but do not press it for longer ten seco nds
or the Homelink modu le w ill switch to
programming mode.
Programming transmitters
App lies to vehicles: with Home link
F ig. 152 L eft front area of the bu mpe r
You can prog ram both fixed co de a nd rolling
code systems usi ng these instructions .
Programming a button
> Make sure your ve hicle is wi thin opera ting
r a nge o f th e remo te con trolle d garage door
opener .
> Set the parki ng brake¢ .&. in General infor
mation on page 133.
> Switch the ignition on. Do not s tart the en
gine!
> There are two ways to program a button: press the button that yo u wou ld like to pro
gram . The M MI w ill display i nstruct ions to
guide yo u thr oug h the programm ing. Or
> S e le ct: I CAR I function button> Car system s
control butt on > Vehicle settings > Garage
door opener
> Program garage door open
er .
.. Se lect the b utton t hat you wo uld like to pro
gram.
.. Fo llow the instructions in the MMI.
• If the garage door open ing must a lso be
synchronized wit h the Homelink mod ule,
refer to t he ow ner's manual fo r the ga rage
doo r ope ner.
Erasing the button programming
> Sele ct: I CAR I function butto n > Car sy stems
fu nction key > Vehicle setting s> Garage
door opener
> Clear program settings >
Yes .
Displaying the version/status/country
code
.. Select: I CAR I function button > Car systems
cont ro l button > Vehicle settings > Garage
door opener > Version information .
Programming a button
T he re quired di sta nce between the hand he ld
t ransmit ter and the Homel ink modu le in t he
bumpe r depe nds on the system that you are
programming . When programm ing a new de
vice, keep the b utton pressed for at least 15
seconds before trying aga in with the transm it
te r in a diffe rent position .
Each of the b uttons can be reprogrammed in
dividua lly . The p rocedure is the same as for in
it ial programm ing .
c> page 134 , Programming
a button .
Erasing the button programming
Individual b uttons ca n be re programmed . Fol
l ow the same steps used when first program
ming the button.
If you wo uld like to erase all prog rammed but
tons at the same time, select Erase butto n
programming.
(D Tips
- To ens ure yo ur safe ty, e ras ing t he pr o
gramme d Home link buttons before sell
ing the vehicle is rec ommende d.
- Depending on the model of t he gara ge
door o pener, you may need to release t he
button on the rem ote and press it again
w hen programming .
Page 137 of 314
Driving Safely
General notes
Safe driving habits
Please remember -safety first!
This chapter contains important information,
tips, instructions and warnings that you need
to read and observe for your own safety, the
safety of your passengers and others . We have
summarized here what you need to know
about safety belts, airbags, ch ild restra ints as
well as child safety. You r safety is for us
priori
ty number 1.
Always observe t he information
a nd warn ings in th is se ct ion - for yo ur own
safety as well as that of your passengers .
The information in this se ction applies to all
model ve rsion s of your veh icle . Some of the
feat ures descr ibed in th is sec tions may be
standa rd equipment on some models, or may
be optional equipment on others . If you are
not sure, ask yo ur authorized Aud i dea ler.
A WARNING
- Always make sure that you follow the in
st ruct ions and heed the WARNINGS i n
this Manual. It is in your interest and in
the inte rest of you r passengers.
- Always keep the complete Owne r's Liter
at ure in your Audi when you lend or sell
yo ur vehicle so that this important info r
mation will always be ava ilable to the
dr iver and passenge rs.
- Always keep the Owner's literature handy
so that you can find i t eas ily if you have
ques tion s.
Safety equipment
The safety features are part of the occupant
restraint syst em and work togeth er to help
redu ce the risk of injury in a wide variety of
accident situations .
Your safety and the safety of your passenge rs
should not be left to chance. Advances in
t echnology have made a var iety o f fea tures
avai lable to he lp red uce the risk of i njury in an
Dr iving Safel y 135
accident . The following is a list of just a few of
the safety features in yo ur Audi :
- sophis tic ated s afety be lts fo r driver and a ll
passenger sea ting posit ions,
- s afety bel t prete nsio ners ,
- safety belt force lim ite rs fo r the front sea ts,
- safety belt he ight adjustment systems for
the front seats ,
- front airbags,
- knee airbags for the front seats - side airbags in the front seats and outer rea r
seats,
- side c urtain airbags ,
- specia l LATCH anchorages for child re-
straints,
- he ad restr aints for each sea ting pos it ion,
- adj ustab le steeri ng colum n.
These ind iv idual safety features, can work to
ge ther as a system to he lp protect you and
you r passenge rs in a wide rang e of accide nts .
T hese features canno t wo rk as a system if
they are not always cor re ct ly adjus ted and co r
re ct ly used.
Safety is everybody's responsibil ity!
Important things to do before driving
Safety is everybody 's job! Vehicle and occu
pant safety always depends on the informed and careful driver .
For yo ur safety and the safety of your passen
gers,
before d riving always:
.. Make s ure that all lig hts and signa ls are op
erating correctly .
.,. Make sure that the tire pressure is correct .
.. Make s ure that all w indows are clean and a f
ford good vis ibility to the outs ide .
.,. Se cure all luggage a nd o ther items caref ully
I::!) page 70, I::!) page 75 .
.. Ma ke s ure that no thing can inte rfere wi th
the peda ls .
.. Adj ust front seat, head restraint and mirrors
correctly for your height.
.. Instruct passengers to adjust the head re-
straints according to the ir height . .,.. •
•
Page 138 of 314
136 Driving Safel y
• Make sure to use the right child restraint
correct ly to protect children¢
page 177,
Child Safety.
• Sit properly in your seat and make sure that
your passengers do the same
¢ page 58,
General recommendations.
• Fasten your safety belt and wear it properly .
Also instruct your passengers to fasten their
safety belts proper ly
r::::> page 145.
What impairs driving safety?
Safe driving is directly related to the condi
tion of the vehicle, the driver as well as the
driver 's ability to concentrate on the road
without being distracted.
The driver is respons ible for the safety of the
vehicle and all of its occupants.
If you r ability
to drive is impa ired, safety r isks for everybody
i n the vehicle increase and yo u also become a
hazard to everyone else on the road
r:::;, .&_ .
Therefore:
• Do no t let yourself be distracted by passe n
gers or by using a cellular telephone.
• NEV ER drive when your driving ability is im
paired (by medications, alcohol, drugs, etc.).
• Observe all traffic laws, rules of the road
and speed limits and plain common sense .
• ALWAYS adjust your speed to road, traffic
and weather condit ions .
• Take frequent breaks on long trips . Do not
dr ive for more than two hours at a stretch.
• Do NOT drive when you are t ired, under
pressure or when you are stressed.
_8. WARNING
Impaired driving safety increases the risk
of serious personal injury and death when
ever a vehicle is being used.
Proper occupant
seating positions
Proper seating position for the driver
The proper driver seating position is impor
tant for safe, relaxed driving.
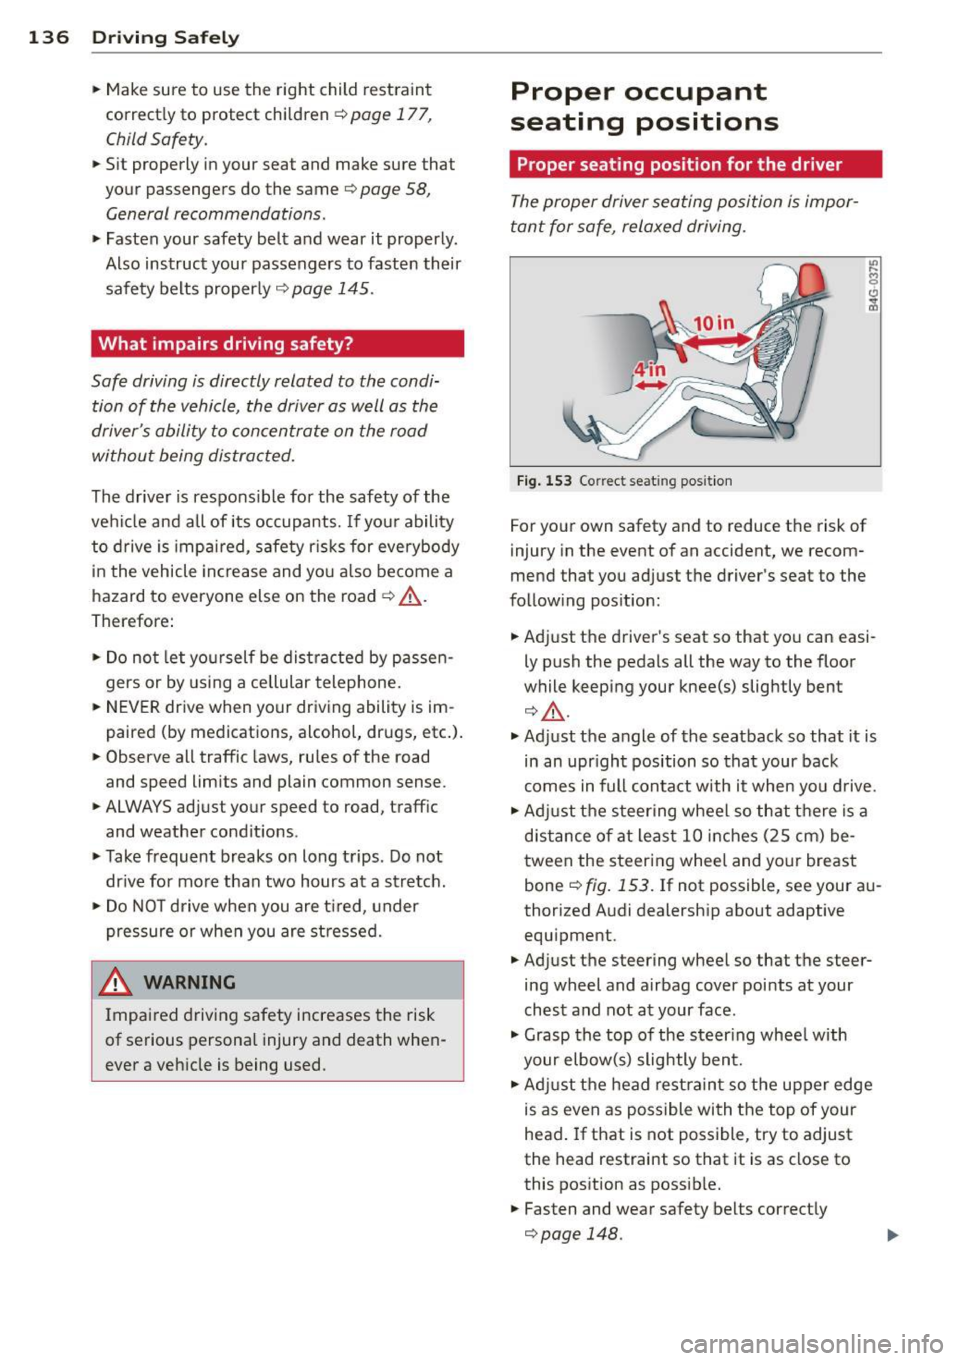
Fig. 153 Co rrect seat ing posit ion
For your own safety and to reduce the risk of
injury in the event of an accident, we recom
mend that you adjust the driver's seat to the
following position:
• Adjust the driver's seat so that you can easi
ly push the pedals all the way to the floor
while keeping your knee(s) slightly bent
r:::;, A.
• Adjust the angle of the seatback so that it is
in an upr ight position so that your back
comes in full contact with it when you drive.
• Adj ust the steering wheel so that there is a
distance of at least 10 inches (25 cm) be
tween the steering wheel and your breast
bone
r:::;, fig. 153. If not possible, see your au
thorized Audi dealership about adaptive equipment.
• Adjust the steering wheel so that the steer
ing wheel and airbag cover points at your
chest and not at your face .
• Grasp the top of the steer ing wheel with
your elbow(s) slightly bent.
• Adjust the head restraint so the upper edge
is as even as possible with the top of your
head.
If that is not possible, try to adjust
the head restraint so that it is as close to
this position as possib le.
• Fasten and wear safety belts correctly
r::::>page 148.
Page 139 of 314
~ Always keep both feet in the footwell so
that you are in control of the vehicle at all
times.
For detailed information on how to adjust the
driver's seat, see
c';> page 59.
A WARNING
Drivers who are unbelted, out of position
or too close to the airbag can be seriously
injured by an airbag as it unfolds. To help
reduce the risk of serious personal injury:
- Always adjust the driver's seat and the
steering wheel so that there are at least
10 inches (25 cm) between your breast
bone and the steering wheel.
- Always adjust the driver's seat and the
steering wheel so that there are at least
4 inches (10 cm) between the knees and
the lower part of the instrument panel.
- Always hold the steering wheel on the
outside of the steering wheel rim with
your hands at the 9 o'clock and 3 o'clock positions to help reduce the risk of per
sonal injury if the driver's airbag inflates.
- Never hold the steering wheel at the
12 o'clock position or with your hands at
other positions inside the steering wheel
rim or on the steering wheel hub. Hold
ing the steering wheel the wrong way
can cause serious injuries to the hands,
arms and head if the driver's airbag in
flates.
- Pointing the steering wheel toward your
face decreases the ability of the supple
mental driver's airbag to protect you in a
collision .
- Always sit in an upright position and nev
er lean against or place any part of your
body too close to the area where the air
bags are located.
- Before driving, always adjust the front
seats and head restraints properly and make sure that all passengers are prop
erly restrained.
- Never adjust the seats while the vehicle
is moving. Your seat may move unexpect-
Driving Safely 137
ed ly and you could lose control of the ve
hicle.
- Never drive with the backrest reclined or
tilted far back! The farther the backrests
are tilted back, the greater the risk of in
jury due to incorrect positioning of the safety belt and improper seating posi
tion .
- Children must always ride in child seats
c';> page 177. Special precautions apply
when installing a child seat on the front passenger seat¢
page 153.
Proper seating position for the front
passenger
The proper front passenger seating position
is important for safe, relaxed driving.
For your own safety and to reduce the risk of
injury in the event of an accident, we recom
mend that you adjust the seat for the front
passenger to the following position :
~ Adjust the angle of the seatback so that it is
in an upright position and your back comes
in full contact with it whenever the vehicle is
moving.
~ Adjust the head restraint so the upper edge
is as even as possible with the top of your
head. If that is not possible, try to adjust
the head restraint so that it is as close to
this position as possible¢
page 139.
~ Keep both feet flat on the floor in front of
the front passenger seat .
~ Fasten and wear safety belts correctly
¢page 148.
For detailed information on how to adjust the
front passenger's seat, see ¢
page 58.
A WARNING
Front seat passengers who are unbelted,
out of position or too close to the airbag
can be seriously injured or killed by the air
bag as it unfolds. To help reduce the risk of
serious personal injury:
•
•
Page 140 of 314
138 Driving Safely
-Passengers must always sit in an upright
position and never lean against or place
any part of their body too close to the
area where the airbags are located.
- Passengers who are unbelted, out of po
sition or too close to the airbag can be
seriously injured by an airbag as it un
folds with great force in the blink of an eye.
-Always make sure that there are at least 10 inches (25 cm) between the front
passenger's breastbone and the instru
ment panel.
-Always make sure that there are at least
4 inches (10 cm) between the front pas
senger's knees and the lower part of the
instrument panel.
- Each passenger must always sit on a seat
of their own and properly fasten and
wear the safety belt belonging to that
seat.
- Before driving, always adjust the front
passenger seat and head restraint prop
erly.
- Always keep your feet on the floor in front of the seat. Never rest them on the seat, instrument panel, out of the win
dow, etc. The airbag system and safety
belt will not be able to protect you prop
erly and can even increase the risk of in
jury in a crash .
- Never drive with the backrest reclined or
tilted far back! The farther the backrests
are tilted back, the greater the risk of in
jury due to incorrect positioning of the
safety belt and improper seating posi
tion.
- Children must always ride in child seats
~ page 177. Special precautions apply
when installing a child seat on the front
passenger seat
~ page 153.
Proper seating positions for passengers
in rear seats
Rear seat passengers must sit upright with
both feet on the floor consistent with their
physical size and be properly restrained
whenever the vehicle is in use.
To reduce the risk of injury caused by an incor
rect seating position in the event of a sudden
braking maneuver or an accident, your pas
sengers on the rear bench seat must always
observe the following:
.., Adjust the head restraint so the upper edge
is as even as possible with the top of your
head. If that is not possible , try to adjust
the head restraint so that it is as close to
this position as possible~
page 139 .
.., Keep both feet flat in the footwell in front of
the rear seat.
.., Fasten and wear safety belts properly
~ page 148 .
.., Make sure that children are always properly
restrained in a child restraint that is appro
priate for their size and age~
page 177.
.&, WARNING ,.__
Passengers who are improperly seated on
the rear seat can be seriously injured in a
crash.
- Each passenger must always sit on a seat
of their own and properly fasten and
wear the safety belt belonging to that seat .
- Safety belts only
offer maximum protec
tion when the safety belts are properly positioned on the body and securely
latched . By not sitting upright, a rear
seat passenger increases the risk of per
sonal injury from improperly positioned
safety belts!
- Always adjust the head restraint properly
so that it can give maximum protection.