engine oil AUDI TT 2013 Owner´s Manual
[x] Cancel search | Manufacturer: AUDI, Model Year: 2013, Model line: TT, Model: AUDI TT 2013Pages: 262, PDF Size: 65.91 MB
Page 184 of 262
182 Checking and filling
Engine compartment
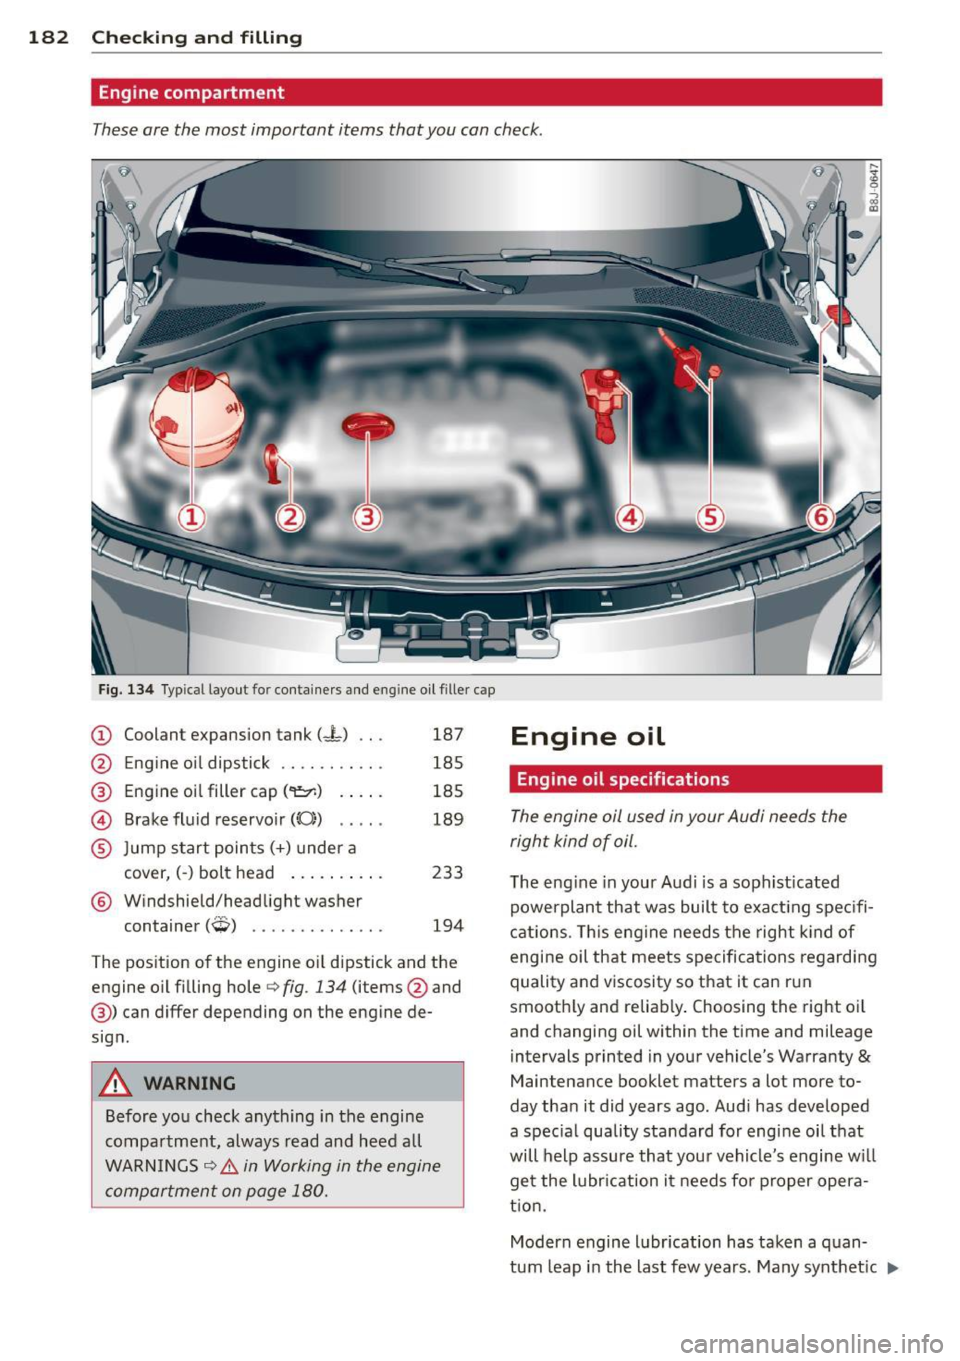
These are the most important items that you can check .
•
Fig. 134 Typ ica l layout for containers and eng ine oil filler cap
CD Coolant expansion tank (-L) .. .
'2' E . 'l d. . k \61 ngIne 0 1 1pst1c .......... .
@ Engine oil filler cap ('1:::r.) .. .. .
@ Brake fluid reservoir((();) .. .. .
® Jump start points(+) under a
cover, (-) bolt head .... ... .. .
® Windshield/headlight washer
t . (
;;p, ) con ainer ,-!,, •••.•••.•.•••.
187
185
185
189
233
194
The pos ition of the engine o il dipstick and the
engine o il fi lling hole
r::> fig. 134 (items @and
@) can differ depending on the engine de
sign .
A WARNING
Before you check anything in the engine
compartment, always read and heed all
WARN INGS
c::> .& in Working in the engine
compartment on page 180.
Engine oil
Engine oil specifications
The engine oil used in your Audi needs the
right kind of oil.
T he eng ine in your Aud i is a soph ist icated
powerplant that was built to exact ing spec ifi
cat ions . T his engine needs the right kind of
engine oil that meets specifications regard ing
quality and viscosity so that it can run
smooth ly and reliably . Choosing the right o il
and changing oil within the time and mileage
i ntervals printed in your vehicle's Warranty
&
Maintenance booklet matters a lot more to
day tha n it did years ago. Audi has developed
a spec ia l quality standard for engine oil that
will help assure that you r vehicle's engine w ill
get the lubr ication it needs fo r proper opera
t ion.
Modern engine l ubr ication has taken a q uan
tum leap in the last few years. Many synthet ic
1J.
Page 185 of 262
oils available today provide better engine lu
brication that can outlast traditional petrole
um-based oils, making them a smart choice
for use throughout the life of your Audi.
Whether you use synthetic or petroleumbased engine oil, the oil that you use must
conform to Audi's oil quality standard
VW 502 00 to help keep your vehicle's engine running smoothly and help prevent the for
mation of harmful deposits, sometimes called
" sludge," that over t ime can lead to expensive
repairs .
At the time of printing, engine oils available in the U .S . and Canada that meet the exacting
specifications of Audi oil standard VW 502 00
are synthetic engine oils . This does not mean,
however, that every synthetic engine oil will
meet Audi oil standard VW 502 00 . So always
be sure that you use an approved oil.
To help prevent the formation of harmful de posits use only oil with the following specifi
cations printed on the oil container :
Audi oil standard VW S02 00
Oil container labels may carry the specifica
tion singly or in combination with other desig
nations and oil quality standards .
Viscosity
Engine oils are graded according to their vis
cosity . The proper viscosity grade oil for your
engine depends on climactic or seasonal con
ditions where you drive. You can use oil with a
viscosity grade of SA E SW40 across all tem
perature ranges for normal driving conditions.
However, if engine oil viscosity grade SAE
SW40 is not available, you can also use viscos
ity grade SAE SW-30 or SAE OW-40 as long as
it meets Audi oil quali ty standard VW 502 00
specifications .
Because engine oil that meets the Audi oil
standard may not be available everywhere
when you need it, we strongly recommend
that you always carry with you an extra quart (liter) of oil that expressly conforms to the
Checking and filling 183
VW 502 00 specification, in case you have to
top
off the oil while on the road.
Only if the level of the oil is at or below the
minimum mark on the oil dipstick - and no oil
that expressly conforms to Audi oil standard
VW 502 00 specifications is available - may
you top
off with a high quality engine oil, pref
erably synthetic-based, that meets ACEA A3
or API SM specifications, but even then, only
in viscosity grades SA E SW-40, SA E 5W -30, or
SAE OW-40. However, during the entire time
between oil change intervals, never top
off
with more than a total of 0.5 qt/liter engine
oil that does not conform to Audi oil specifica
tion VW 502 00.
For more information about engine oil that
has been approved for your vehicle, please
contact either your autho rized Audi dealer or
Audi Customer Relations at 1 (800) 822-2834
or visit our web site at www.audiusa .com or
www.audicanada.ca . Here you will also find a
current list of oils (manufacturers, brand
names etc.) that conform to Audi oil standard
vw 502 00.
Changing the engine oil
The engine oil and oil filter must be changed
according to the mileage (kilometers) and
time intervals specified in your vehicle's War
ranty
& Maintenance booklet. Do not exceed
these intervals -harmful deposits from old
engine oil can reduce engine performance and
can lead to expensive engine repairs.
Changing the oil at the recommended inter
vals is so very important because the lubricat
ing properties of oil decrease gradually during
normal vehicle use. If you are not sure when
you have your oil changed, ask your author
ized Audi Serv ice Adv isor.
Under some circumstances the engine oil
should even be changed more frequently. Change oil more often if you drive mostly
short distances, operate the vehicle in dusty
areas or mostly under stop-and-go traffic con
ditions, or when you use your vehicle where
temperatures stay below freezing point for
long periods.
•
•
Page 186 of 262
184 Checking and filling
Detergent additives in the o il will make fresh
oil look dark after the engine has been run
n ing for a short time . This is norma l and is not
a reason to change the oil more often than recommended.
D am ag e o r m alfun ction s due to lack of
m ainten ance
It is essent ial that yo u change your oil at the
recommended intervals using only engine oil
that complies with Audi oi l standard
VW 502 00 . Your Lim ited New Vehicle War
ranty does not cover damage or malfunctions
due to failure to follow recommended mainte
nance and use requ irements as set forth in
the Audi Owner's Manual and Warranty
&
M aintenance book let . Your dea ler will have to
deny warranty coverage un less you p resen t to
the dea ler proof in the form of Servi ce or Re
pa ir Orde rs that all schedu led maintenance
was performed in a timely manner.
Engine oil consumption
The engine in your vehicle depends on an ade
quate amount of oil to lubricate and cool all
of its moving ports.
I n o rder to prov ide effective lubr ication and
cooling of internal engine components, a ll in
ternal comb ustion engines consume a certain
amount of oil. Oi l consumption varies from
engine to engine and may change significantly
over the life of the eng ine . Typically, eng ines
with a specif ied break-in per iod (see
c::;, page 159) consume more oil during the
break-in per iod than they consume after oil
consumption has stabilized .
Under normal conditions, the rate of oil con
sumpt io n depends on the quality and viscosity
of the oil, the RPM (revolutions per m inute) at
which the engine is operated, the ambient
temperature and road cond it io ns. Furthe r fac
tors are the amo unt of o il d ilution from wate r
condensation or fuel residue and the ox ida
tion level of the oi l. As any engine is subject to
wear as mileage bui lds up, the oil consump
tion may increase over t ime until replacement
of worn components may become necessary. Wi
th a ll these variab les coming into p lay, no
standard rate of oil consumption can be es
tab lished or spec ified. There is no alte rnative
to regular and frequent check ing of the o il lev
el, see
Note .
If the yellow engine oil leve l warning symbo l
in the instr ument cluster
II lights up, you
sho uld check the oil leve l as soon as possib le
with the oil dipstick c::;, page 185. Top off the
o il at your earliest conven ience
c::;, page 185 .
A WARNING
-Before you chec k anything in the eng ine
compartment, a lways read and heed a ll
WAR NINGS
c::;, .& in Working in the engine
comportment on page 180.
CI) Note
D riving with an insufficient o il level is like
l y to cause sever e damage to the engine.
(D Tips
- The oil pressure warn ing display. is
not an indicator of the oil level. Do not
re ly on it . Instead, check the oil level in
your engine at regular intervals, pr ef
erably ea ch time you refu el, and alway s
before going on a long trip.
- If you have the impression yo ur engine
cons umes excessive amoun ts of oil, we
recommend that you consult your Aud i
dealer to have the cause of your concern
properly diagnosed. Keep in mind that
the accurate meas urement of o il con
sumption requ ires great care and may
take some t ime . Your Audi dea ler has in
struct ions about how to measure oil con
sumption acc urately.
Page 187 of 262
Checking the engine oil level
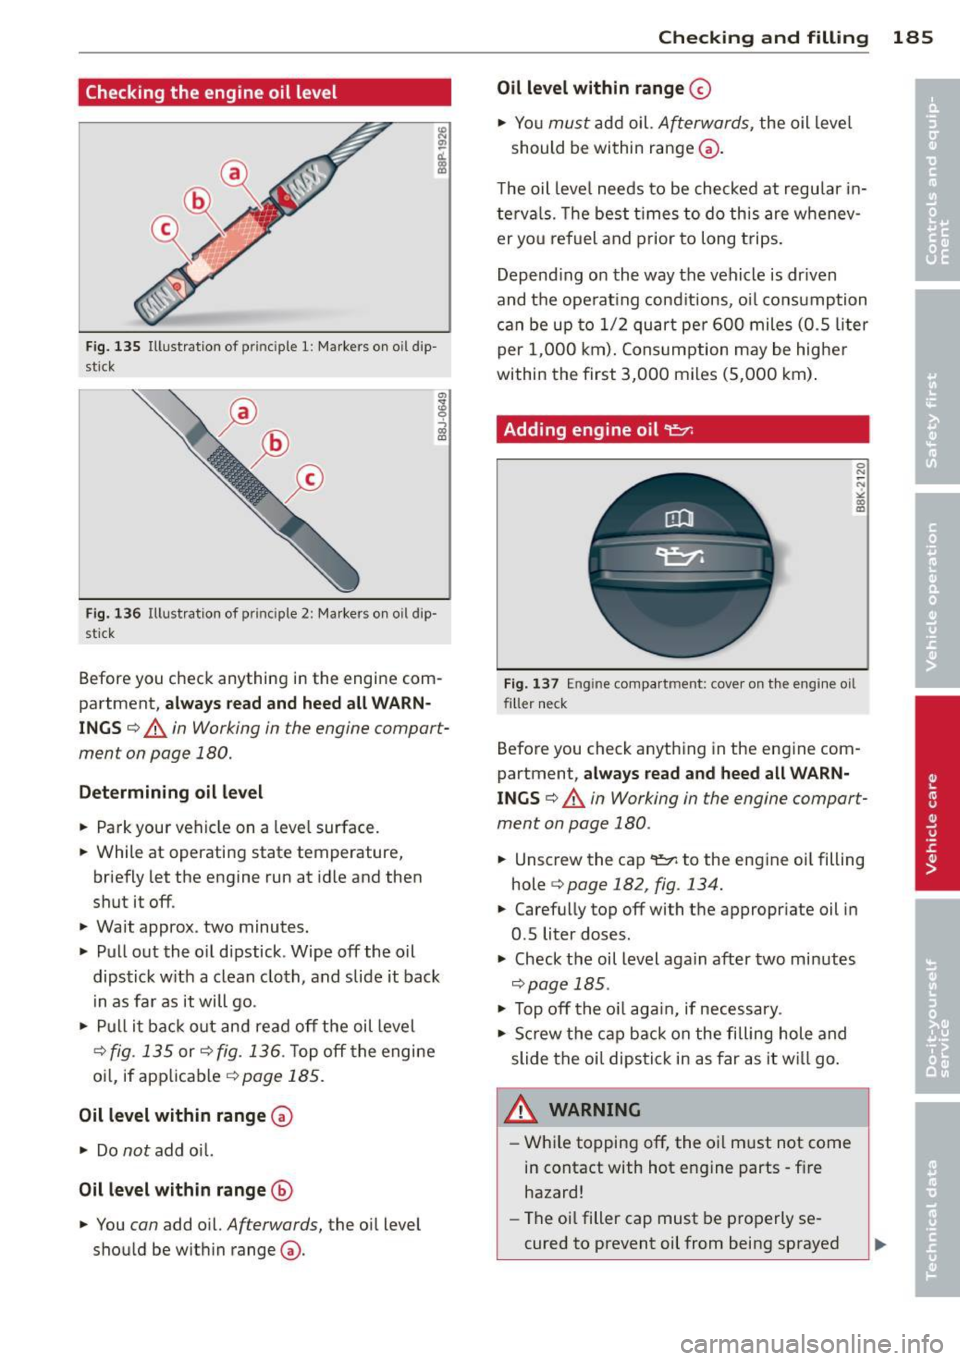
Fig . 135 Illust rat ion of principle 1: Ma rkers on o il dip
st ick
F ig . 13 6 Illust rat io n of principle 2: Markers o n oil dip·
st ic k
Before you check anything in the engi ne com
partment,
always read and heed all WARN
INGS ¢ A in Working in the engine compart
ment on page 180.
Determining oil level
• Park your vehicle on a leve l surface.
• While at operating state temperature,
briefly let the engine run at idle and then
shut it off.
• Wait approx . two minutes.
• Pull out the o il dipstick . Wipe off the oil
dipstick w ith a clean cloth, and slide it back
i n as far as it will go .
• Pull it back o ut and read off the oil level
¢ fig. 135 or ¢ fig. 136 . Top off the engine
oi l, if app licable ¢
page 185.
Oil level within range~
• Do not add o il.
Oil level with in range @
• You can add o il. Afterwards, the o il level
shou ld be w ith in range @.
Checking and filling 185
Oil level within range 0
• Yo u must add oil. Afterwards, the oil leve l
should be wi thin range @.
T he oil leve l needs to be checked at regu lar in
terva ls. The best t imes to do th is are w henev
er yo u ref uel and prior to long t rips.
Depend ing on the way the vehicle is dr iven
and the ope rat ing cond it ions, oi l consumption
can be up to 1/ 2 quart per 6 00 miles (0. 5 lite r
per 1,000 km) . Cons umption m ay be highe r
within the first 3,000 miles (5,000 km) .
Adding engine oil ci::,,.
0 N ;.
>< (D m
Fig. 137 Engine compa rtment: cover on the engi ne oil
filler neck
Before you check anyth ing in the engine com
partment,
alw ays read and heed all WARN
INGS ¢ A in Working in the engine compart
ment on page 180 .
• Unsc rew the cap 'l::r. to the engine oi l filling
hole
¢ page 182, fig. 134.
• Carefully top off with the appropriate oil in
0.5 liter doses.
• Check the oil level aga in after two minutes
¢ page 185.
• Top off the oil aga in, if necessary .
• Scr ew the c ap back on the filling hole and
slide the oi l dipsti ck in as far as it w ill go.
A WARNING ,...__
-Wh ile topping off, the o il m ust not come
in contact with hot e ngine parts -fir e
hazard!
- The oi l filler cap must be pro perly se
cured to prevent oil from being sprayed
Page 188 of 262
186 Checking and filling
on the hot engine and exhaust system
when the engine is running -fire hazard!
- If your skin has come in contact with the
engine oil, you must subsequently
cleanse it thoroughly .
(D Note
- The oil level must not be above range 0
-danger of converter or engine damage!
Contact an authorized Audi dealer to
draw off oil, if necessary.
- Audi does not recommend the use of oil
additives. They may damage the engine
and adversely affect your New Vehicle
Warranty.
@ For the sake of the environment
- Under no circumstances can the oil come
in contact with the sewage network or
the soil.
- Observe and follow legal regulations
when disposing of empty oil containers.
Changing the engine oil
We recommend that have your oil changed by
an authori zed Audi dealer or a qualified serv
ice station .
Before you check anything in the engine com
partment,
always read and heed all WARN·
INGS
¢ & in Working in the engine compart
ment on page 180 .
The engine oil must be changed according to
the intervals specified in your Warranty &
Maintenance booklet. This is very important
because the lubricating properties of oil di
minish gradually during normal vehicle use .
Under some circumstances the engine oil
should be changed more frequently . Change
oil more often if you drive mostly short dis
tances , operate the vehicle in dusty areas or
under predominantly stop-and-go traffic con
ditions, or have your vehicle where tempera
tures remain below freezing for extended pe riods. Detergent
additives in the oil will make fresh
oil look dark after the engine has been run
ning for a short time. This is normal and is not
a reason to change the oil more often than
recommended.
Because of the problem of proper disposal,
along with the special tools and necessary ex
pertise required, we strongly recommend that
you have your oil changed by an authorized
Audi dealer or a qualified service station .
If you choose to change your oil yourself,
please note the following important informa
tion:
A WARNING
=
To reduce the risk of personal injury if you
must change the engine oil in your vehicle
yourself:
- Wear eye protection.
- To reduce the risk of burns from hot en-
gine oil, let the engine cool down to the
touch.
- When removing the oil drain plug with
your fingers, stay as far away as possible. Always keep your forearm parallel to the
ground to help prevent hot oil from run
ning down your arm.
- Drain the oil into a container designed
for this purpose, one large enough to
hold at least the total amount of oil in
your engine.
- Engine oil is poisonous. Keep it well out
of the reach of children.
- Continuous contact with used engine oil
is harmful to your skin. Always protect
your skin by washing oil off thoroughly
with soap and water.
(D Note
Never mix oil additives with your engine
oil. These additives can damage your en
gine and adversely affect your Audi Limit
ed New Vehicle Warranty.
Page 189 of 262
@ For the sake of the environment
- Before changing your oil, first make sure
you know where you can properly dispose of the used oil.
- Always dispose of used engine oil proper
l y. Do not dump it on garden soi l, wood
ed areas, into open streams or down
sewage drains.
- Recycle used engine oil by taking it to a
used engine oil collection facility in your
area, or contact a service station.
Engine cooling system
Coolant
The engine coolant performs two functions: it
keeps the engine from overheating and it pro
tects the engine from freezing in the winter.
The cooling system is sea led and generally re
qu ires little at tention.
The cooling system has been filled at the fac
tory with a permanent coolant which does not n eed to be changed. The coolant consists of a
mixture of wa ter and the man ufacturer's g ly
col-based coolan t addi tive Gl3 ant ifree ze
with ant icorrosion add itives (50% for USA
models; 60% for Canadian models) . This mix
ture both assures the necessary frost protec
tion and protects metal components in the
engine's cooling system from corrosion and
scaling. It also raises the boiling po int of the
coolant.
Do not reduce the concentration of the coo l
ant in the summer by adding plain water.
The
proportion of coolant add itive must be at
lea st 50°/4 but not more than 60°/4
to ma in
tain antifreeze protection and cooling efficien cy. If the coolant frost pro tect io n is too low,
the coolant cou ld freeze and dam age the veh i
cle heating and eng ine cooling system.
For year-round driving, antifreeze is added at
the facto ry for temperatures down to:
- -31°F( -35°C)USA
- -40 °F ( -40 °C) Canada.
Checkin g and fillin g 187
A WARNING
Before you c heck anything in the engine
compartment, always read and heed all
W ARNI NGS~ &.
in Working in the engine
comportment on page 180.
(D Note
- Before winter sets in, have the coolant
checked to see if the coolant additive in
your v ehicle is sufficient to meet the cli
mate conditions. This is especia lly impo r
t an t if you live in a region where t he win
t er is ex treme ly cold. If ne cessary, in
cr ease t he p ro portion of coo lant add itive
to 60%.
- Whe n adding cool ant additive to yo ur
c ooling sys tem, remember:
- We recommend us ing on ly coolant ad
d itive Gl2++ or Gl3 (check the labe l)
for your veh icle. This coolant additive is
ava ilable at autho rized Aud i dea le rs.
Othe r types of antifree ze can sig nifi
cantly reduce cor ros io n protec tion. The
res ulting co rrosion can cause a loss of
coolant an d serio us en gine damage.
- Do not add any type of rad iator le ak seal
ant to yo ur vehicle 's eng ine coolant .
Adding radiator repair flu id may adverse
ly affect the function and performance of
your cooling system and co uld resu lt in
damage not covered by you r New Ve hicle
Limited War ranty.
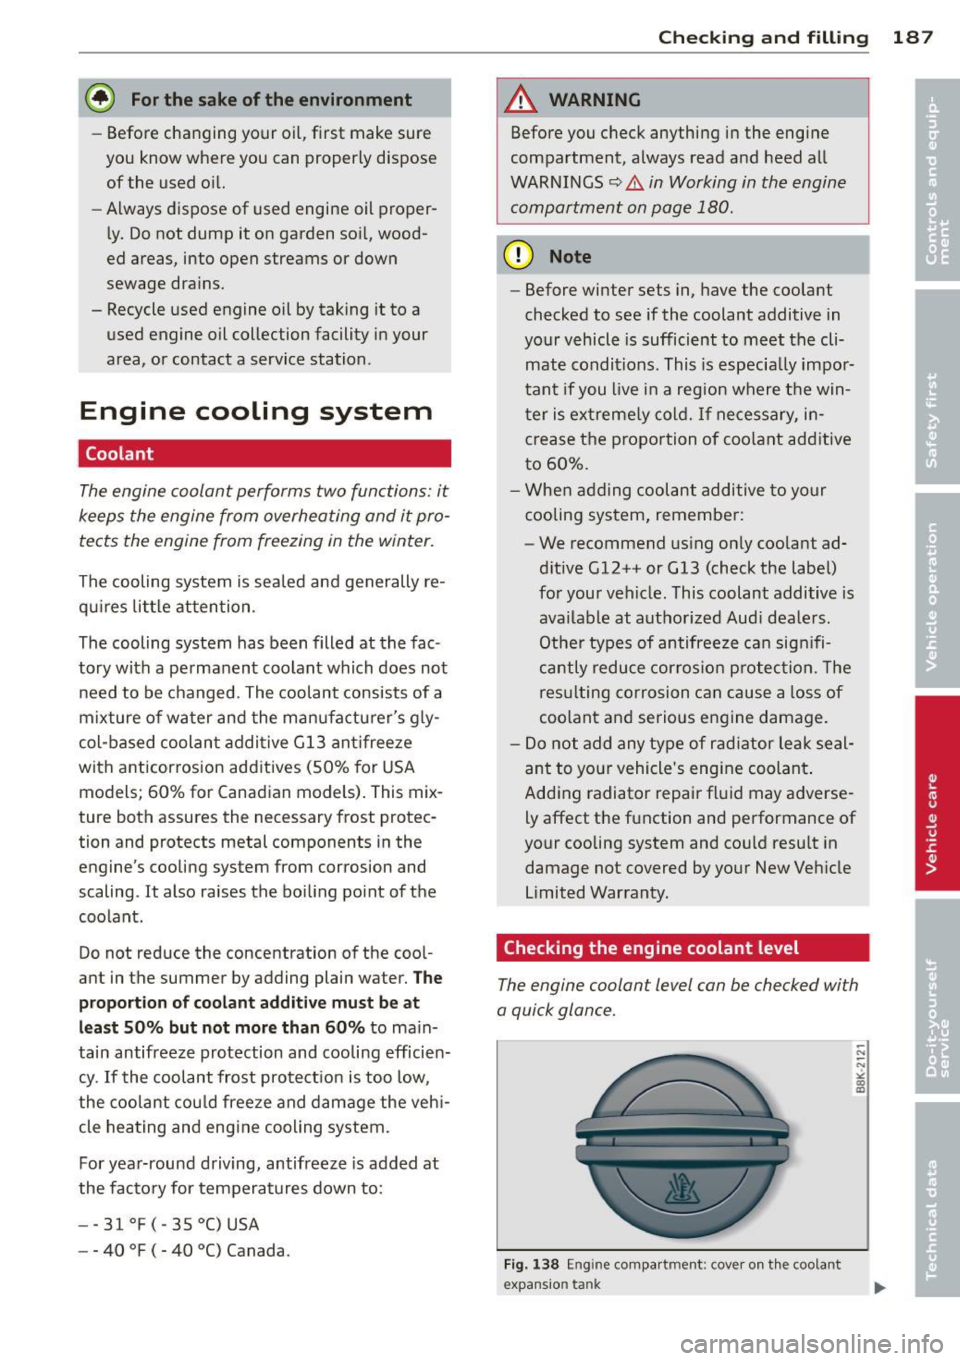
Checking the engine coolant level
The engine coolant level con be checked with
a quick glance.
Fig. 138 Eng ine compa rtment : cove r on t he coola nt
expansio n tank
Page 190 of 262
188 Checking and filling
Before you check anything in the engine com
partment,
alwa ys r ea d and heed all WARN
INGS ¢ A in Working in the engine compart
ment on page 180.
• Park your vehicle on a level surface.
• Switch the ignition off.
• Read the coolant level at the coolant expan
s ion tank ¢
page 182, fig . 134. With a cold
engine, it must be above the "min" mark .
With a hot engine, it ca n be a little above
the indicated range .
The location of the coolant expans ion tank
can be seen in the engine compartment illus
tration
¢ page 182.
To obtain an accurate read ing, the engine
must be switched off.
The expansion tank in yo ur vehicle is equipped
with an e lectric coolant level sensor .
When the coo lant level is too low, the warning
light in the A uto- Check System ¢
page 16 will
illuminate until yo u add coo lant and the level
has been restored to normal. Even though
there is an electric coo lant level sensor, we
still recommend you check the coolant leve l
from time to time .
Coolant loss
Coolant loss may indicate a leak in the cooling
system . In the event of coolant loss, the cool
ing system should be inspected immediately
by your author ized Audi dealer. It is not
enough merely to add coolant .
In a
sealed system, losses can occur only if
the boiling point of the coolant is exceeded as
a result of overheat ing.
(D Note
Do not add any type of radiator lea k seal
ant to your vehicle's eng ine coolant. Add
ing radiator repair f luid may adversely af
fect the function and performance of your
cooling system and could res ult in damage
not covered by your New Vehicle Limited
Warranty.
Adding coolant
Be very careful when adding engine coolant.
Before you check anyth ing in the engine com
partment,
always read and heed all WARN
INGS ¢ A in Working in the engine compart
ment on page 180 .
• Turn off the engine.
• Let the engine cool down.
• Place a thick rag over t he coo lant expansion
tank
¢ page 187, fig . 138 a nd carefully
tw ist the cap counter-clockwise ¢&_ .
• Add coo la nt.
• Twis t the cap on aga in
t ightly.
Replacement engine coolant must conform to
exact spec ificat ions ¢
page 18 7, Coolant.
Even in a n emerge ncy, if coolant add i-
t ive G1 2++, G12+ or G12 is not ava ilable , do
not use a d iffe ren t addit ive. Use plain water
instead unti l you can get the cor rect additive
and can restore the correct ratio . This sho uld
be done as soon as possible .
If you have los t a considerab le amount o f
coolant , then you sho uld add cold ant ifreeze
and co ld wate r on ly w hen the engine is cold.
Alw ays use
new engine coo la nt whe n refilling .
Do not fill coola nt above the "MAX" mark. Ex
cess coola nt wi ll be fo rced o ut through the
pressure relief valve in t he cap w hen the en
gine becomes hot.
,&. WARNING ~ -
- T he cooling system is under pressure and
can get very hot. Reduce the risk of
scalding from hot coolant by followi ng
these steps.
- T urn off the engine and allow it to coo l
down.
- Protect yo ur face, hands and arms from
escaping fluid and steam by covering
the cap w ith a large, t hick rag.
- T urn the cap s lowly a nd ve ry carefully
in a counter-clo ckwise direction while
applying light, downward pres sure on
the top of the cap.
Page 231 of 262
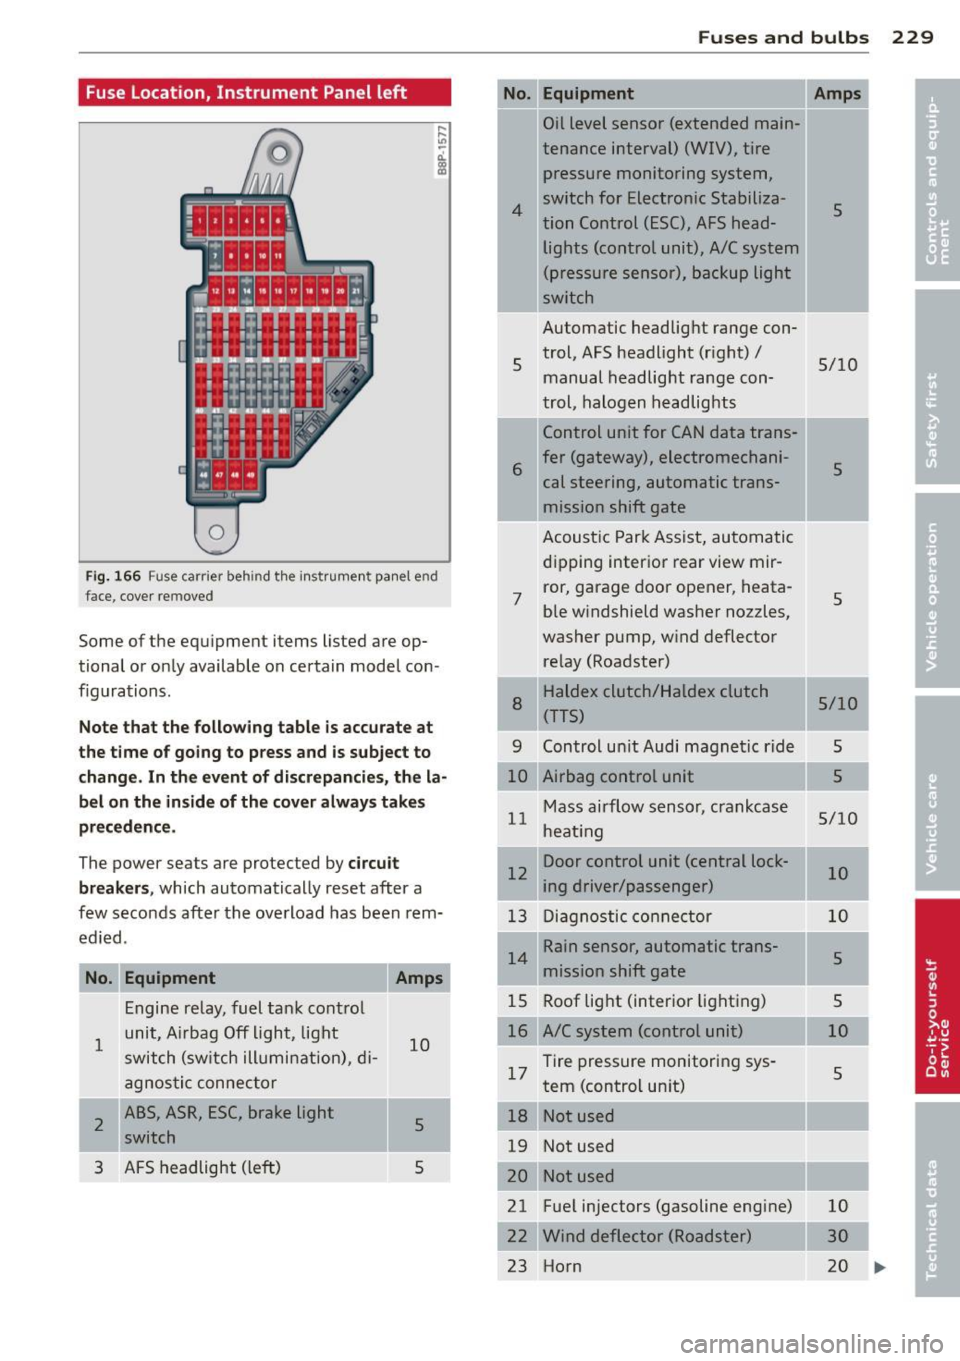
Fuse Location, Instrument Panel left
0
Fig. 166 Fu se ca rrier behin d th e in strum en t pane l end
fa ce, cover re move d
Some of the equipmen t items lis ted a re op
tional or only available on certain model con
f igurations.
N ote th at the foll ow ing table is ac curate at
the t ime of go in g to press and is subje ct to
c hang e. In t he event of d iscr epan cies, the la
b el on the in side of th e cove r alw ay s take s
precedence .
The power sea ts are pro te ct ed by circu it
break ers,
which automatically reset after a
few seconds after the overload has been rem
ed ied .
No. Equipment
1
2
3
Engine relay, fuel tank contro l
unit, A irbag Off light , light
switch (sw itch illumi nation), di -
agnosti c connector
ABS, ASR, ESC, brake light switch
AFS headlight (le ft)
Amps
10
5
5
Fu se s and bulb s 229
No.
4
5
Equipment
Oil level sensor (extended main-
tenance interval) (WIV), tire
pressure monitoring system,
switch for Electronic Stabiliza-
tion Control (ESC), AFS head-lights (control unit), A/C system
(pressure sensor), backup light
switch
Automatic headlight range con trol, AFS headlight (right) /
manual headlight range con
trol, halogen headlights
Control unit for CAN data trans-
6 fer (gateway), electromechani cal steering, automatic trans
mission shift gate
7 Acoust
ic Park Assist, automatic
dipping interior rear view mir-
ror, garage door opener, heata
ble windshield washer nozzles,
washer pump, w ind deflector
re lay (Roadster)
--r-HaldeX clutch/Haldex clutch
(TTS)
8
Amps
5
5/10
5
5
5/10
9 Control un it Audi magnetic ride 5
----10 Airbag control unit 5
Mass airflow sensor, crankcase
11 heat ing
Door control unit (central lock-
12 ing driver/passenger)
13 Diagnostic conne ctor
Rain sensor, automatic trans-
14 mission shift gate
15 Roof light (inter ior lighting)
16 A/C system (control unit)
17 Tire pressure monitoring sys
tem (control un it)
--~-18 Not used
19 Not used 5/10
10
10
5
5
10
5
I
I
I
20 -------21 Fuel injectors (gasoline engine) 10
22 Wind deflecto r (Roadster) 30
23 Horn 20
IIJ>,
Page 232 of 262
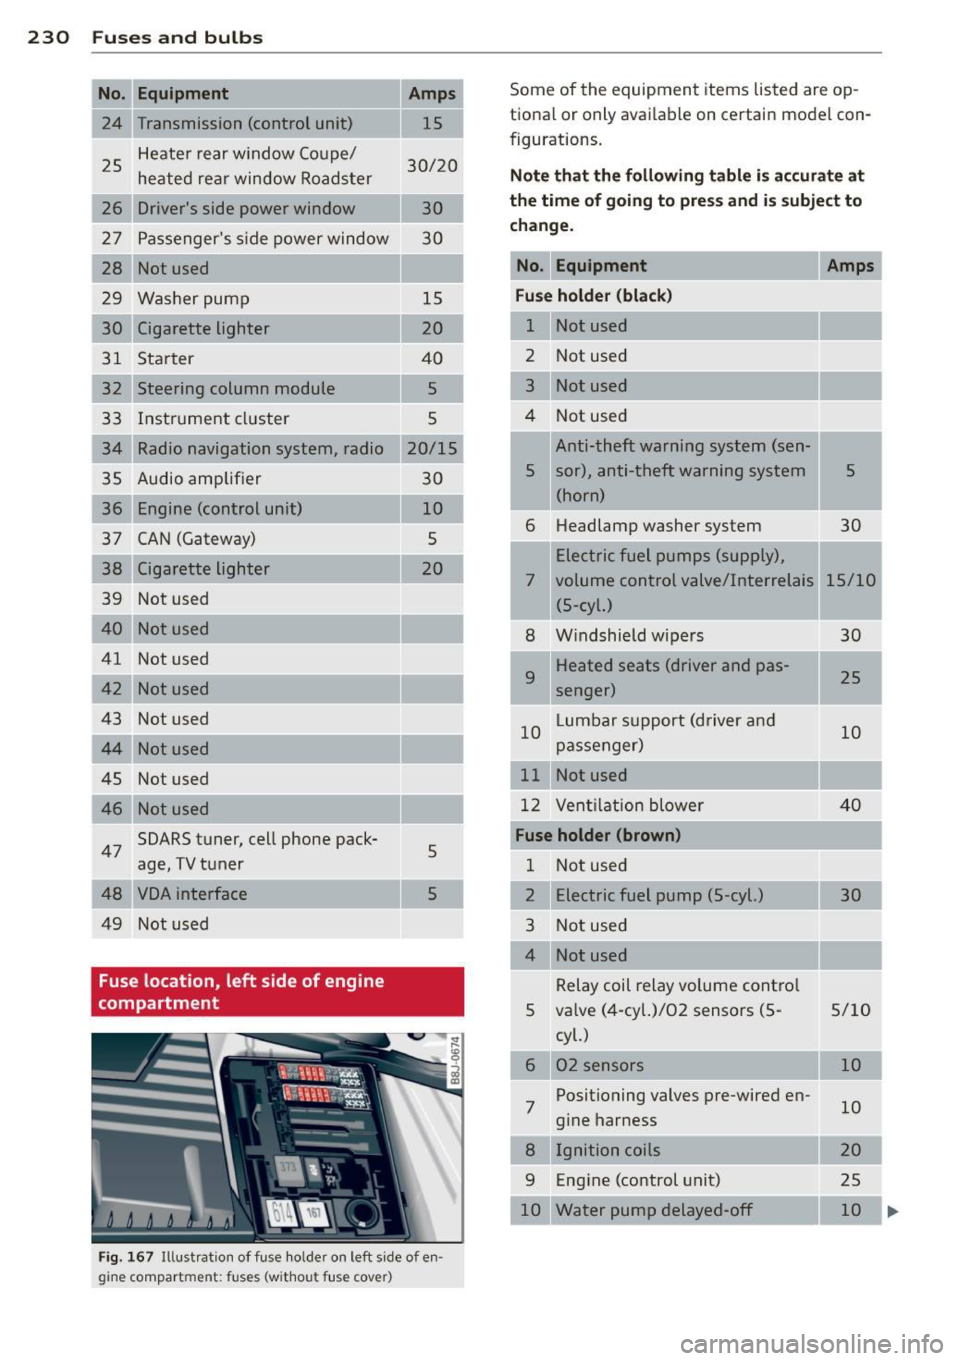
230 Fuses and bulbs
-No. Equipment
24 Transmission (control unit)
25 Heater rear
window Coupe/
heated rear window Roadster
26 Driver's side power window
27 Passenger's side power window
28 Not used
29 Washer pump
30 Cigarette lighter
31 Starter
32 Steering column module
33 Instrument cluster
34 Radio navigation system, radio
35 Audio amplifier
36 Engine (control unit)
37 CAN (Gateway)
38 Cigarette lighter
39 Not used
40
------------4 l Not used
42
43 Not used
44
45 Not used
46
47 SOARS tuner, cell phone pack-
age, TV tuner
48
49 Not used
Fuse location, left side of engine
compartment Amps
15
30/20
30
30
-15
20
40 5
5
20/15
30
10 5
20
-
-
5
5
Fig. 167 Illust ration of fuse holder on left side of en·
gine compartment: fuses (without fuse cover)
Some of the equipment items listed are op-
t ional or only available on certain model con-
figurations.
Note that the following table is accurate at
the time of going to press and is subject to
change.
No. Equipment Amps
Fuse holder (black)
1 Not used
-2 Not used
3 Not used
4 Not used
Anti-theft warning system (sen-
'
5 sor), anti-theft warning system 5
(horn)
6 Headlamp
washer system
30
Electric fuel pumps (supply),
7 volume control valve/Interrelais 15/10 (5-cyl.)
8 Windshield wipers
30
9 Heated seats (driver and pas-
25
senger)
10 Lumbar
support (driver and
10
passenger)
11 Not used
12 Ventilation blower 40
Fuse holder (brown)
1 Not used
2 Electric fuel pump (5-cyl.) 30
3 Not used
Relay coil relay volume control
5 valve (4-cyl.)/02 sensors (5- 5/10
7 cyl.)
02 sensors
Positioning valves pre-wired en
gine harness
Ignition coils
9 Engine (control unit)
10 Water pump delayed-off 10
10
20
25 10 ..,_.
Page 239 of 262
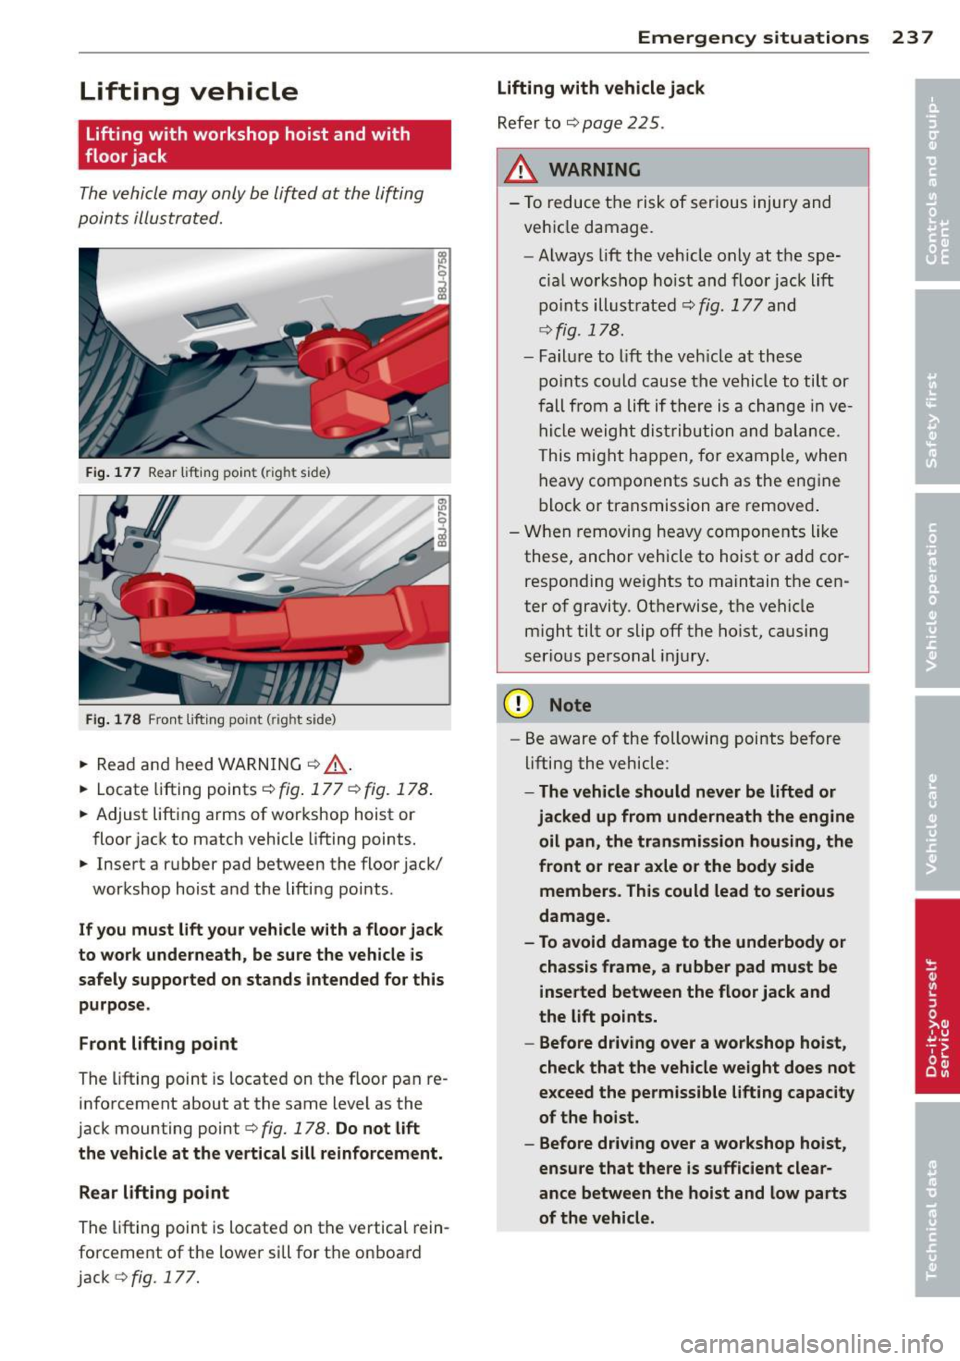
Lifting vehicle
lifting with workshop hoist and with
floor jack
The vehicle may only be lift ed at the lifting
poin ts illustra ted.
F ig. 177 Rear lift ing point (r ig ht side)
Fi g. 178 Front lift ing po int frig h t side)
• Rea d and h eed WARN ING c:::> A-
• Locate lifting points c:::> fi g. 177 c:::> fig. 178 .
• Adjust lift ing arms o f wor kshop hoist or
f loor jac k to match vehicle lifting points.
• Inse rt a r ubber pad between the floor jac k/
workshop hoist a nd the lifti ng points.
If you must lift your vehicle with a floor jack
to work underneath, be sure the vehicle is safely supported on stands intended for this
purpose.
Front lifting point
The lifting point is locate d on the f loor pan re
info rcement about at the same level as the
jack mounting point
c:::> fig. 178. Do not lift
the vehicle at the vertical sill reinforcement .
Rear lifting point
The lifting poi nt is locate d on t he vertical rein
forcement of the lower sill for t he on boa rd
jack
c:::> fig. 177.
Emergency situations 237
lifting with vehicle jack
Re fer to c:::> page 225 .
_&. WARNING
-To re duce t he risk of ser ious injury an d
ve hicl e damage.
- Alwa ys lift the veh icl e only at the spe
c ial w orkshop hoist and floor jack lift
p oin ts ill ust rated
c:::> fig. 177 and
c:::> fig. 178 .
-Fa il u re to Lift th e ve hicl e at th ese
p o ints co uld cau se the ve hi cle to til t or
f all from a lift if th ere i s a cha nge in ve
h icl e weigh t distr ibu tion and balan ce.
This mi ght h app en, fo r ex am ple, whe n
h eavy co mpon ent s such as the eng ine
b lock o r transmission are remove d.
- Wh en removin g hea vy componen ts li ke
these, anchor vehicle to h oist or ad d cor
respo nding wei ghts to ma intain t he ce n
ter of gravity. Ot herwis e, th e ve hicle
might tilt or slip off the ho ist, caus ing
serio us pe rso nal i nju ry.
CI) Note
-Be aware of the following points before
lifting the vehicle:
- The vehicle should never be lifted or
jacked up from underneath the engine
oil pan, the transmission housing, the
front or rear axle or the body side
members. This could lead to seriou s
damage.
- To avoid damage to the underbody or
chassis frame, a rubber pad must be inserted between the floor jack and
the lift points.
- Before driving over a workshop hoist ,
check that the vehicle weight does not
exceed the permissible lifting capacity
of the hoist.
- Before driving over a workshop hoist ,
ensure that there is sufficient clear
ance between the hoist and low parts
of the vehicle.
-