AUDI TT COUPE 2016 Owner's Manual
Manufacturer: AUDI, Model Year: 2016, Model line: TT COUPE, Model: AUDI TT COUPE 2016Pages: 322, PDF Size: 52.86 MB
Page 21 of 322
Downloaded from www.Manualslib.com manuals search engine ..... N
G: CX)
.....
"' U"I
.....
"' .....
Driver information system
Overview
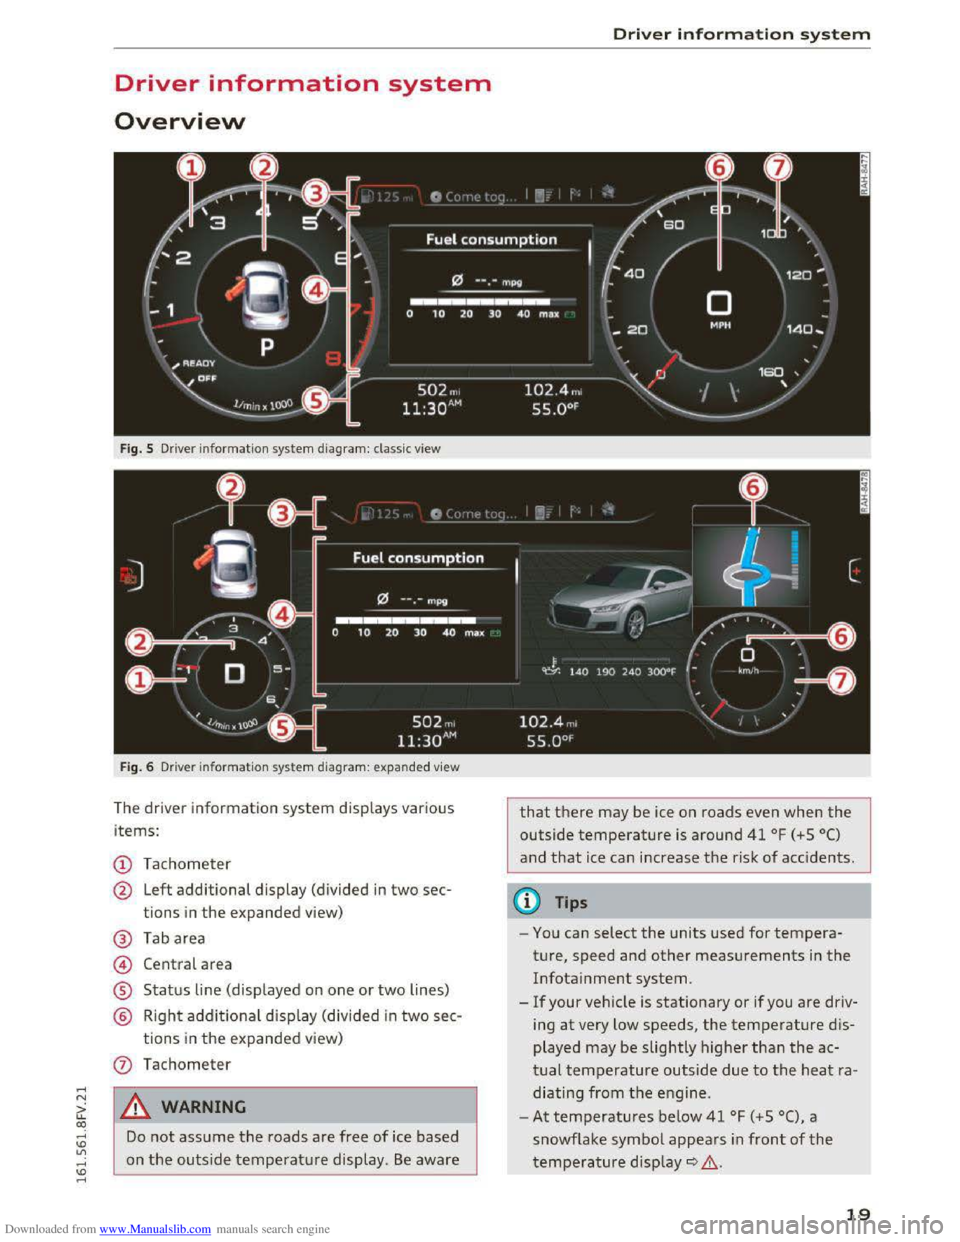
Fig. S Driver information system diagram: classic view
Fig. 6 Dri
ver in formation system diagram : expanded view
The driver information system displays various
items:
(!) Tachometer
@ Left additional display (divided in two sec-
tions in
the expanded view)
@ Tab area
@ Central area
® Status line (displayed on one or two lines)
@ Right additional display (divided in two sec-
tions in the expanded view)
Do not assume the roads are free of ice based
on
the outside temperature display. Be aware
Driver information system
that there may be ice on roads even when the
outside temperature is around 41 °F (+ S 0()
and that ice can increase the risk of accidents.
(0 Tips
-You can select the units used for tempera
ture, speed and other measurements in
the
Infotainment system.
-
If your vehicle is stationary or if you are driv
ing
at very low speeds, the temperature dis
played may
be slightly higherthan the ac
tual temperature outside due to the heat ra
diating
from the engine .
-
At temperatures below 41 °F (+S 0(), a
snowflake symbol appears in
front of the
temperature display~.&.
19
Page 22 of 322
Downloaded from www.Manualslib.com manuals search engine Driver information system
Multifunction steering
wheel plus
Operating
Apples to: vehicles with multifunction steering wheel plus
The Multifunction steering wheel plus* hos 14
buttons. You con use them to operate the driver
information
system and the MMI functions,
change the volume and switch the voice recogni
tion system* on and off.
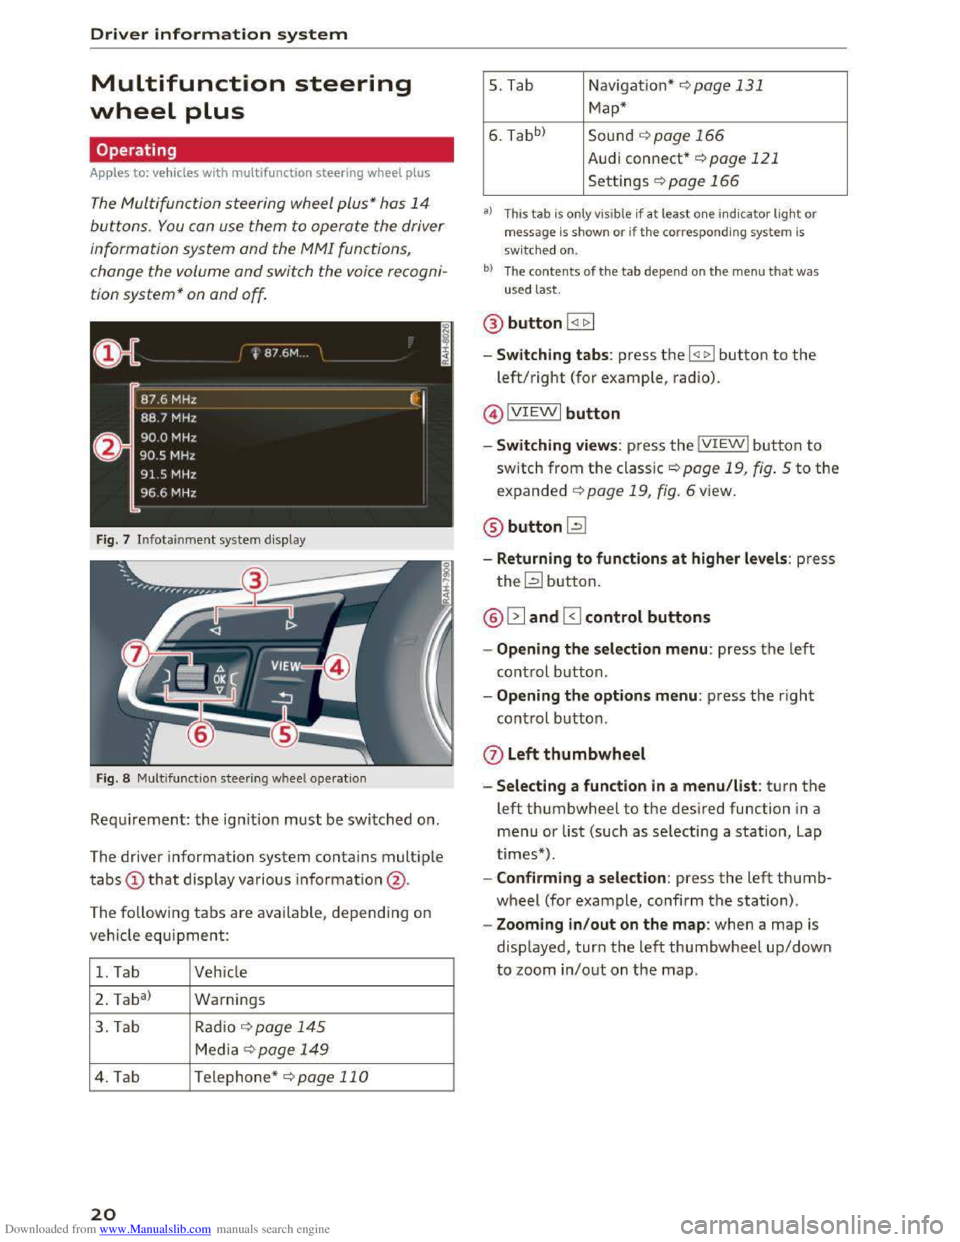
Fig. 7 Infotainment system display
Fig. 8 Multifunction
steering wheel operation
Requ irement: the ignition must be switched on.
The driver information
system contains multiple
tabs CD that display various information @.
The
following tabs are available, depend ing on
vehicle
equipment:
1. Tab Vehicle
2 . Ta
ba)
Warnings
3. Tab
Rad io¢ page 145
Media~ page 149
4. Tab Telephone* ¢page 110
20
5. Tab Navigation*¢ page 131
Map*
6. Tabb >
Sound ¢page 166
Audi connect* ¢page 121
Settings ¢page 166
a) This tab is only visible if at least o ne indicator light or
message is shown or if the correspon ding system is
sw i
tched on.
bl The contents of the tab depen d on the men u that was
used last.
® button I <11> I
- Switching tabs: press the I
left/right (for example, radio).
@IVIEWI button
-Switching views: press the IVIEWI button to
switch from the classic¢ page 19, fig. 5 to the
expanded ¢ page 19, fig. 6 view.
® buttonl2J
-Returning to functions at higher levels: press
the~ button.
@ 12] and 0 control buttons
-Opening the selection menu: press the left
control button.
-Opening the options menu: press the right
control button.
Q) Left thumbwheel
-Selecting a function in a menu/list: turn the
left thumbwheel to the desired function in a
menu or list (such as selecting a station, Lap
times*) .
-
Confirming a selection: press the left thumb
wheel (for example, confirm the station).
-Zooming in/out on the map: when a map is
displayed, turn the left thumbwheel up/down
to zoom in/out on the map.
Page 23 of 322
Downloaded from www.Manualslib.com manuals search engine ..... N
G: CX)
.....
"' U"I
.....
"' .....
Control buttons
Applies to: vehicles with multifu nction steering wheel plus
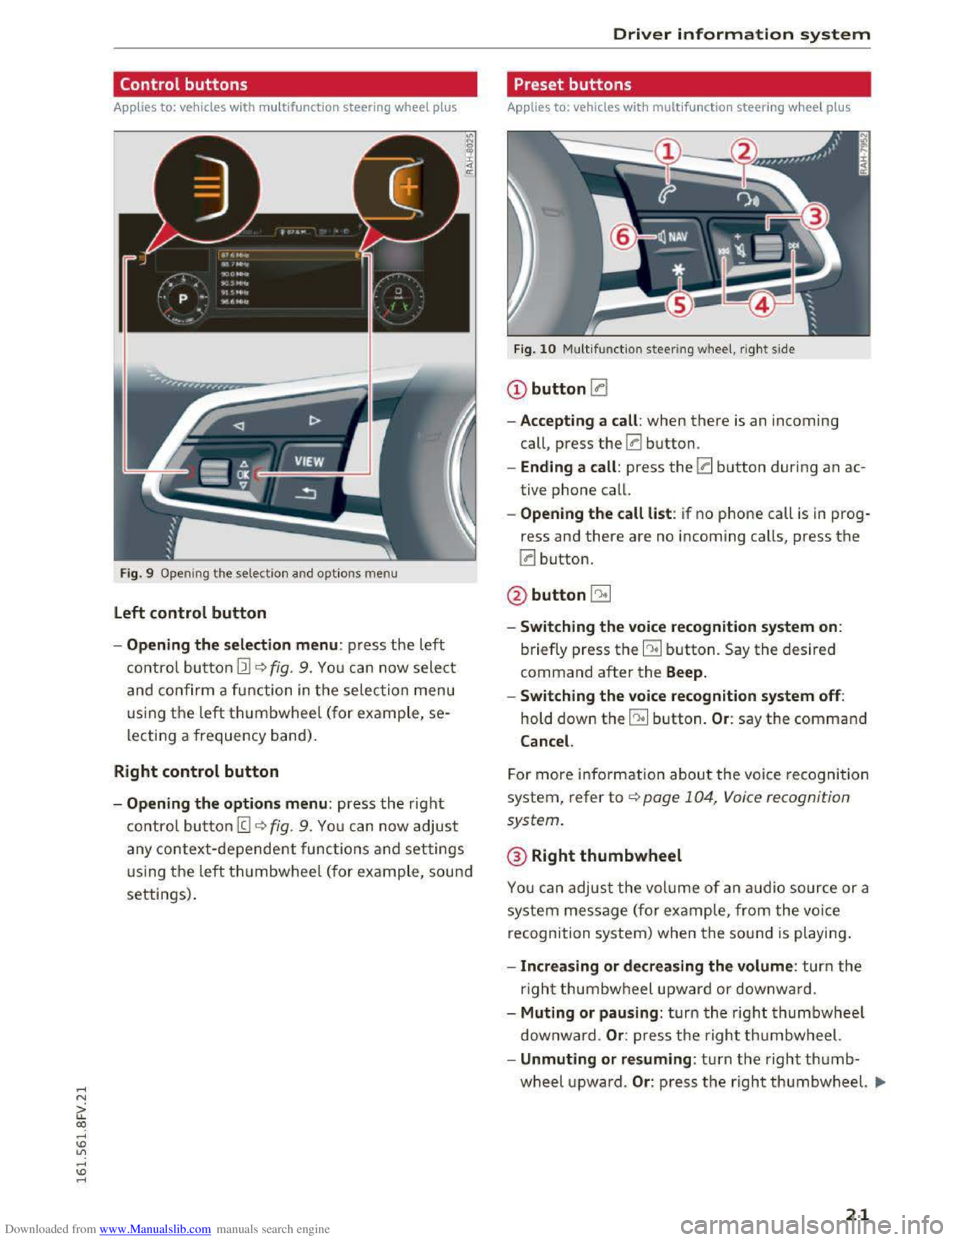
F ig . 9
Open ing th e selectio n and optio ns menu
Left control button
- Opening the selection menu : press the left
co ntrol bu tton Ill~ fig. 9. You can now select
and co nfirm a fu nction in the selection menu
using th e left thumbwheel (for ex ample, se
lecting a frequency band) .
Right control button
-Opening the options menu: press the right
co ntrol bu tton (g ~fig. 9. You ca n now adjust
any context-dependent functions and settings
u sing th e left thumbwheel (for ex ample, sou nd
settings).
Driver information system
Preset buttons
Applies to: vehicles with multifunction steering wheel plus
Fig. 10 Multifun ctio n steering wheel, rig ht s ide
CD button !:a
-Accepting a call : when there is an incoming
call,
press the 0 button.
- Ending a call : press the 0 button during an ac
tive
phone call.
- Opening the call list: if no phone call is in prog
ress and there are no incoming calls, press the
0 button.
@button5l
-Switching the voice recognition system on:
briefly press the EE! button. Say the desired
command after the Beep.
- Switching
the voice recognition system off:
hold down the EE! button. Or: say the command
Cancel.
For more info rm ation about the voice recogni tion
system, refe r to ~page 104, Voice recognition
system.
®Right thumbwheel
You can adjus t the volume of an audio source or a
system message (for ex am ple, from the voice
recognition
system) when t he sou nd is playin g.
-Increasing or decreasing the volume : turn the
righ t thumbwheel upward or d ownward .
- Muting or pausing : turn th e right thumbwheel
downw ard .
Or: press the righ t thumbwheel.
-Unmuting or resuming : turn the right thumb
wheel upwa rd. Or: p ress th e righ t thumbwheel. .,..
21
Page 24 of 322
Downloaded from www.Manualslib.com manuals search engine Driver information system
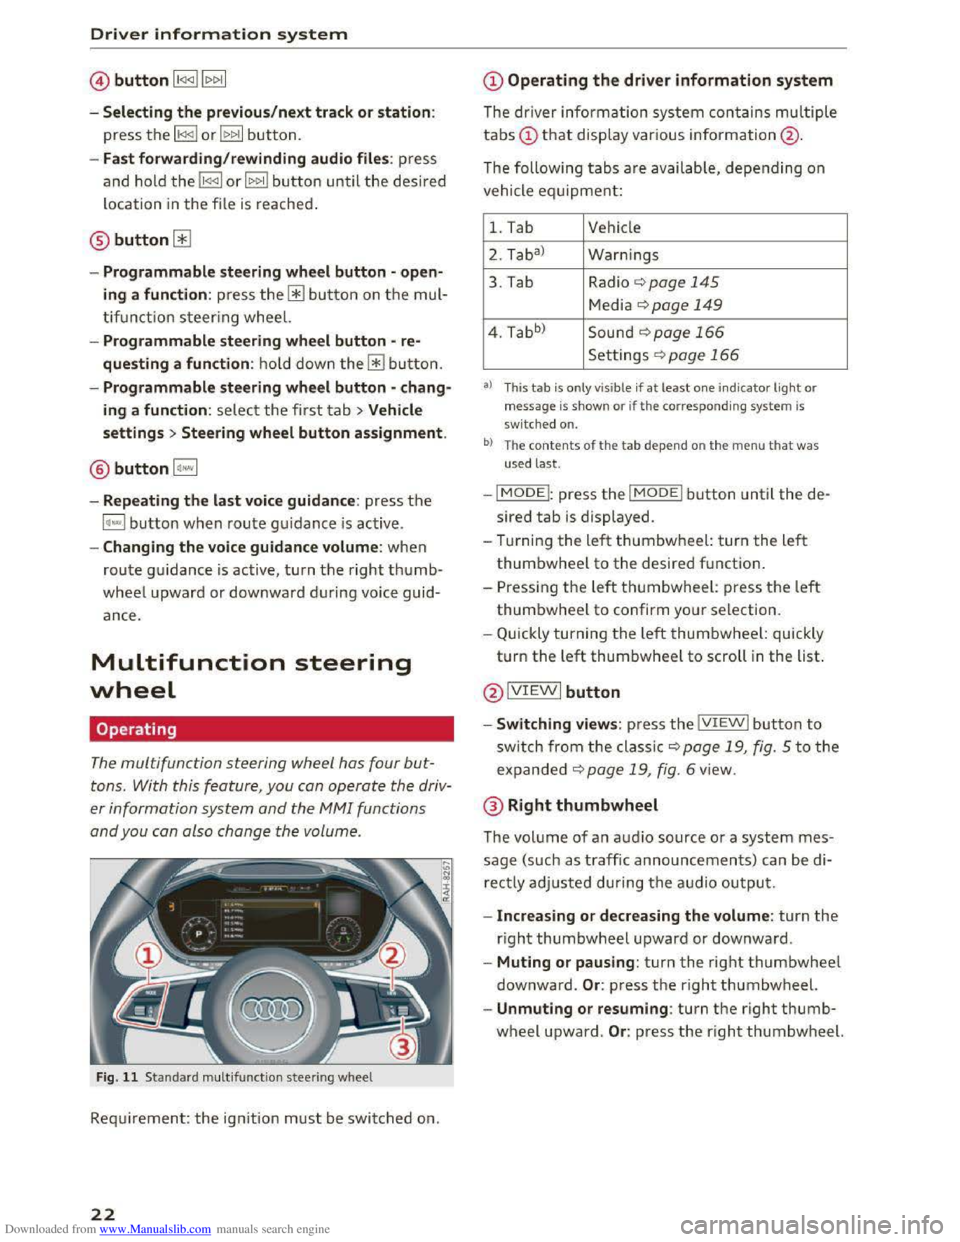
©button l1<1<1l l1>1>1I
- Selecting the previous/next track or station :
press the ll
- Fast forwarding/rewinding audio files: press
and ho ld the li
loca tion
in the file is reached.
@button0
-Programmable steering wheel button -open
ing a function : press the@ button on th e mul
ti fu nct i
on steering wheel.
- Programmable steering wheel button -re
questing a function : hold dow n the@button.
- Programmable steering wheel button -chang
ing a function : select the first tab >Vehicle
settings > Steering wheel button assignment .
® button l~·"I
-Repeating the last voice guidance : press th e
l~""I button w hen route guidance is active .
-Changing the voice guidance volume: when
route guidance is active, turn the right thumb
wheel upward or dow nward during voice guid
ance.
Multifunction steering
wheel
Operating
The multifunction steering wheel has four but
tons. With this feature , you can operate the driv
er information system and the M MI functions
and you can also change the volume .
Fig . 11 Standard multifu nction steering wheel
Requirement: the ign ition must be switched on.
22
@Operating the driver information system
The driver information system contains multiple
tabs(!) t h a t display various information@ .
The following t
abs are availab le, depending on
vehicle equipment:
1. Tab Vehicle
2. Taba )
W
arnings
3. Tab Radio 9page 145
Media ¢page 149
4. Tabb )
Sound ¢page 166
Settings r=.>page 166
a) This tab is only v is ible if at least o ne indicator ligh t or
message is show n or if th e c orresponding sys te m is
sw i
tched on.
b ) The co ntents of th e t ab depe nd on th e men u t hat was
u sed l
ast.
-IMODEI: press the I MODEi button until the de
sired tab is displayed.
- Tur ning
the left thumbwheel: turn the le ft
thumbwheel to the desired f unctio n.
-
Pressi ng the left t humbwh eel: press th e left
thumbwheel to confirm your selection.
- Q uick ly turning t he left thumbwheel: quickly
t u rn
the left thumbwheel to scroll in the list.
@ IVIEWI button
-Switching views: press the IVIEWI button to
sw itch from the cla ssic 9 page 19, fig. 5 to the
expanded 9 page 1 9, fig. 6 view .
@Right thumbwheel
The volume of an audi o source or a system mes
sage (such as traffic announcements) can be di
rectly adjusted during th e audio outpu t.
- Increasing or decreasing the volume : turn the
right thumbwheel upward or downwa rd .
- Muting or pausing: turn the right thumbwheel
downward. Or : press the right thum bwheel.
-Unmuting or resuming : turn the right thumb
wheel upward. Or: press the right thumbwh eel.
Page 25 of 322
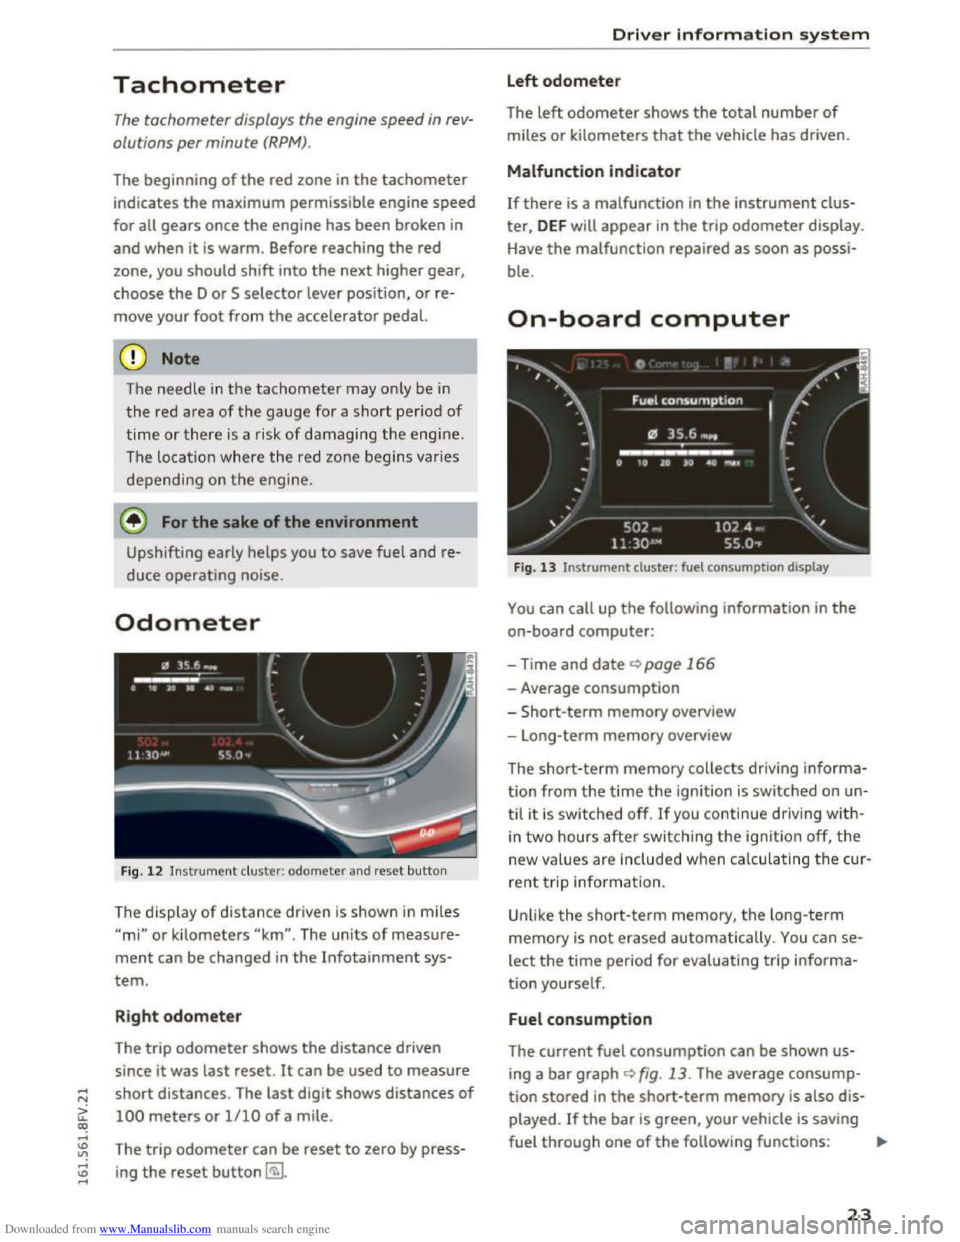
Downloaded from www.Manualslib.com manuals search engine Tachometer
The tachometer displays the engine speed in re v
olutions per minute (RPM).
The beginning
of the red zone in the tachometer
indicates
the maximum permissible engine speed
for all gears once the engine has been broken in
and when
it is warm . Before reaching the red
zone,
you should shift into the next higher gear,
choose
the D or S selector lever position, or re
move your foot from the accelerator pedal.
CD Note
The needle in th e tachometer m ay only be in
the re d area of th e gau ge for a short period of
time or there is a risk of d am aging the engine .
The loc ation wh ere th e red zone begins varies
d ep end in g o n
the engi ne.
@) For the sake of the environment
Upshifting early helps you to save fuel and re
duce operating noise.
Odometer
Fig. 12 Instrument c luster: odometer and reset button
The display of distance driven is shown in mile s
"mi" or kilometers "km". The units of meas ure
ment can be changed in the Infotainment sys
tem.
Right odometer
The trip odometer shows the distance driven
since it was last reset .
It can be used to measure
short distances . The last digit shows distances
of
100 meters or 1/10 of a mile.
The
tri p odometer can be reset to zero by press
ing the reset button~-
Driver information system
Left odometer
The left odometer shows the total number of
miles or kilometers that the vehicle has driven.
Malfunction indicator
If there is a malfunction in the instrument clus
ter, DEF will appear in the trip odometer display.
H
ave the malfunction repaired as soon as possi
ble.
On-board computer
Fig. 13 Instrument duster: fuel consumpt ion display
You can call up the following information in the
on-board computer:
-Time and date ~page 166
-Average consumption
- S
hort-term memory overview
- Long-term memory overview
The
short-ter m memory collects driving in forma
tion from the time the ignition is switched on un
til it is swi tched off. If you continue driving with
in two hours after switching the ignition off, the
n ew values are included when calculating the cur
re nt t rip information.
Unlike the short-term memory, the long-term
memory
is not erased automatically. You can se
lect the time period for evaluating tr ip i nforma
tion yourself.
Fuel consumption
The current fuel consumption can be shown us
ing a bar graph <:!)fig. 13. The average consump
tion stored in the short-term memory is also dis
played. If the bar is green, your vehicle is saving
fuel through one of the following fu nctions: ..,_
23
Page 26 of 322
Downloaded from www.Manualslib.com manuals search engine Driver information system
-Recuperation : electrical energy can be stored in
the battery when the vehicle is coasting or driv
i ng
downhill. The bar will move toward t:::l.
@ Tips
- The da te, time of day and time and date for
mat can be set in the Infotainment system.
- I f the vehicle battery is disconnected, all
memory va lues are erased.
24
Page 27 of 322
Downloaded from www.Manualslib.com manuals search engine ..... N
G: CX)
..... I.Cl U"I
..... I.Cl .....
Opening and closing
Central locking
Description
You can lock and unlock the veh icle centrally. You
have the following options:
-Remote control key<=> page 2 7,
-
Sensors in the door handles*<=> page 28,
- Lock cylinder on the driver's door<=> page 30,
or
-Central locking switch inside<=> page 29.
Auto Lock
The Auto Lock function locks all doors and the
luggage compartment lid once the speed has ex
ceeded approximately 9 mph (lS km/h).
The vehicle can be unlocked if the opening func
tion in the central locking system switch is used
or one of the door handles is pulled. The Auto
Lock function can be switched on and off in the
Infotainment system<=> page 29.
Additionally, in the event of a crash with airbag
deployment the doors are automatically un
locked to allow access to the vehicle.
Selective unlocking
The doors and luggage compartment lid will lock
when they close. You can set in the Infotainment
system whether only the driver's door or the en
tire vehicle should be unlocked when unlock ing
<=>page29.
Turn signals
When you unlock the vehicle, the turn signals
f l
ash twice. When you lock the vehicle, the turn
signals flash once. If the blinking continues, one
of the doors or the luggage compartment lid is
not closed or the ignition is sti ll switched on.
Unintentionally locking yourself out
In the following cases there safeguards to pre
vent you locking your remote master key in the
vehicle:
-
If the driver's door is open, the veh icle cannot
be locked by pressing the !ml button on the re-
Opening and closing
mote control key or touching the locking sen
sor* on a door.
-When locking using the Im] button in the central
locking switch, the vehicle will not lock if a door
is open <=>page 29.
-On veh icles with a convenience key*, the lug
gage compartment lid unlocks again after clos
ing if
the most recently used key is in the lug
gage compartment. The emergency flashers
blink four times.
Do not lock your vehicle with the remote control
key or convenience key* until all doors and the
luggage compartment lid are closed. In this way
you avoid locking
yourself out accidentally.
@Tips
-Do not leave valuables unattended in the ve
hicle. A locked vehicle is not a safe!
-The LED in the driver's door rail blinks when
you lock the vehicle. If the LED lights up for
approximately 30 seconds after locking,
there is a malfunction in the central locking
system. Have the problem corrected by an
authorized Audi dealer or authorized Audi
Service Facility.
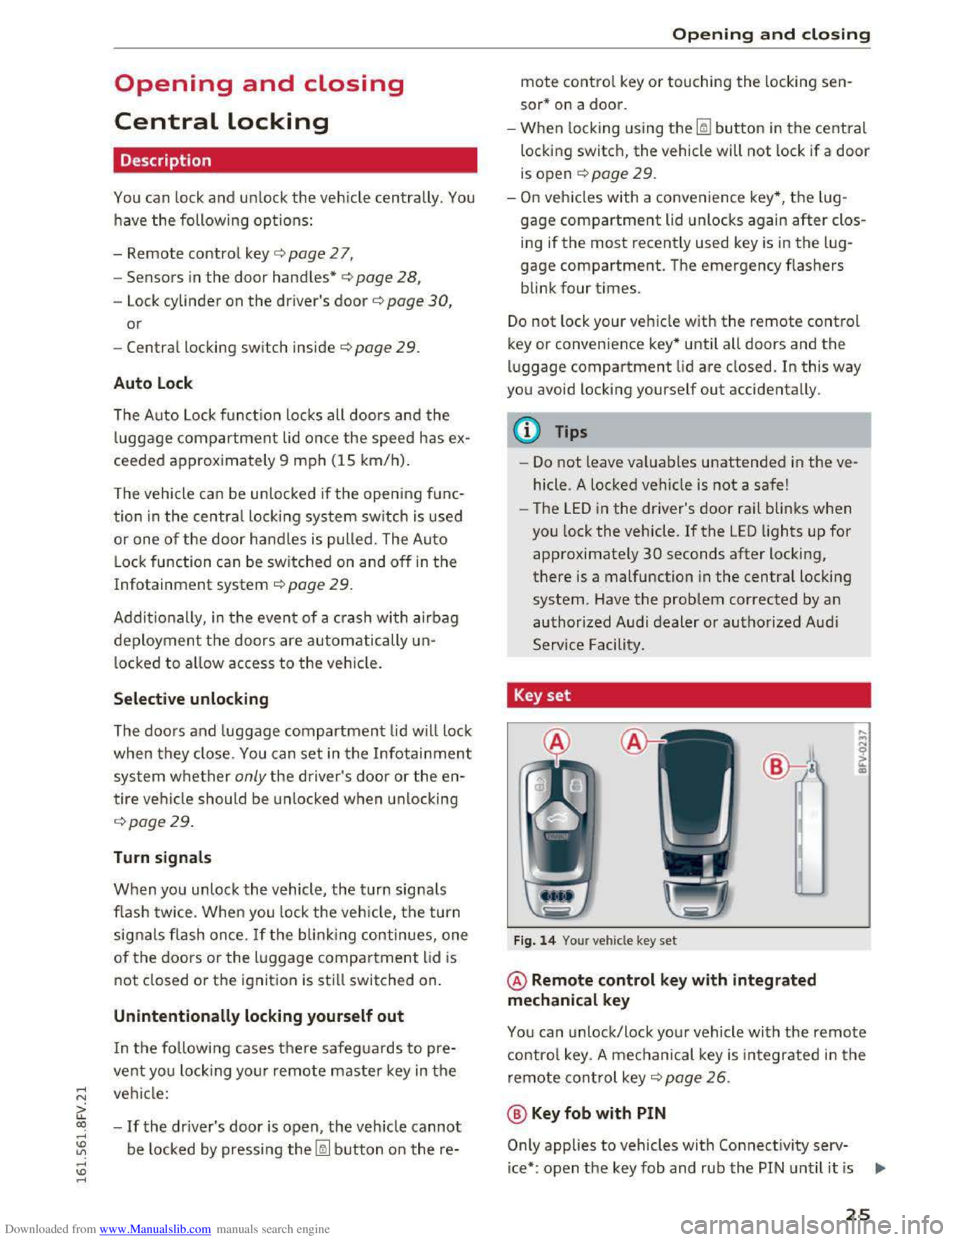
Key set
Fig. 14 Your vehicle key set
@ Remote control key with integrated
mechanical key
You can unlock/lock your vehicle with the remote
control key . A mechanical key is integrated in the
remote control key ¢ page 26.
@ Key fob with PIN
Only applies to vehicles with Connectivity serv-
ice* :
open the key fob and rub the PIN until it is ..,.
25
Page 28 of 322
Downloaded from www.Manualslib.com manuals search engine Opening and closing
visible . You can activate the Connectivity service*
on your vehicle using this PIN code.
Replacing a ke y
If a key is lost, see an authorized Audi dealer or
authorized Audi Service Facility. Have this key de
activa ted. It is important to bri ng all keys wit h
you .
If a key is lost, you should report it to your
insurance company.
Numb er of keys
You can check the number of keys assigned to
your veh icle in the Infotainment system. To do
this, select: the I MENU I button > Vehi cle > left
control button > Service & checks > Vehicle in·
fo rma tion. This way, you can make sure that you
have
all the keys when purchasing a used vehicle.
Electron ic immobilizer
The immobilizer preven ts unauthorized use of
the vehicle.
Unde r certain circumstances, the vehicle may not
be able to start if there is a key from a different
veh icle manufacturer on the key chain.
Data in the master key
When driving, service and maintenance-relevant
data is continuously stored on your remote con
trol key. Your Audi service advisor can read out
this data and tell you about the work your vehi cle
needs. This applies also to vehicles with a con
ven i
ence key*.
Personal comfort settings
If two people use one vehicle , it is recommended
that each person always uses "their own " master
key. When the ignition is turned off or when the
veh icle is locked, personal convenience settings
for the following systems are stored and as
signed to the remote master key.
-
Climate control system
-Parking aid*
- Active
lane assist*
- Si
de assist*
- Drive
select
26
The stored settings are automatically recalled
when you unlock the vehicle, open the doors or
turn on the ignition .
_&WARNING
Always take the vehicle key with you when
leav ing the vehicle, even for a short period of
time. This applies particularly when children
remai n in the vehicle . Otherwise the children
could
start the engine or operate e lectrical
equipment such as power w indows .
@Tips
-1
The operation of the remote control key can
be
temporarily d isrupted by interference from
transmitters in the vic in ity of the vehicle
working
in the same frequency range (e.g. a
cell
phone, rad io equipment). Always check if
your vehicle is locked!
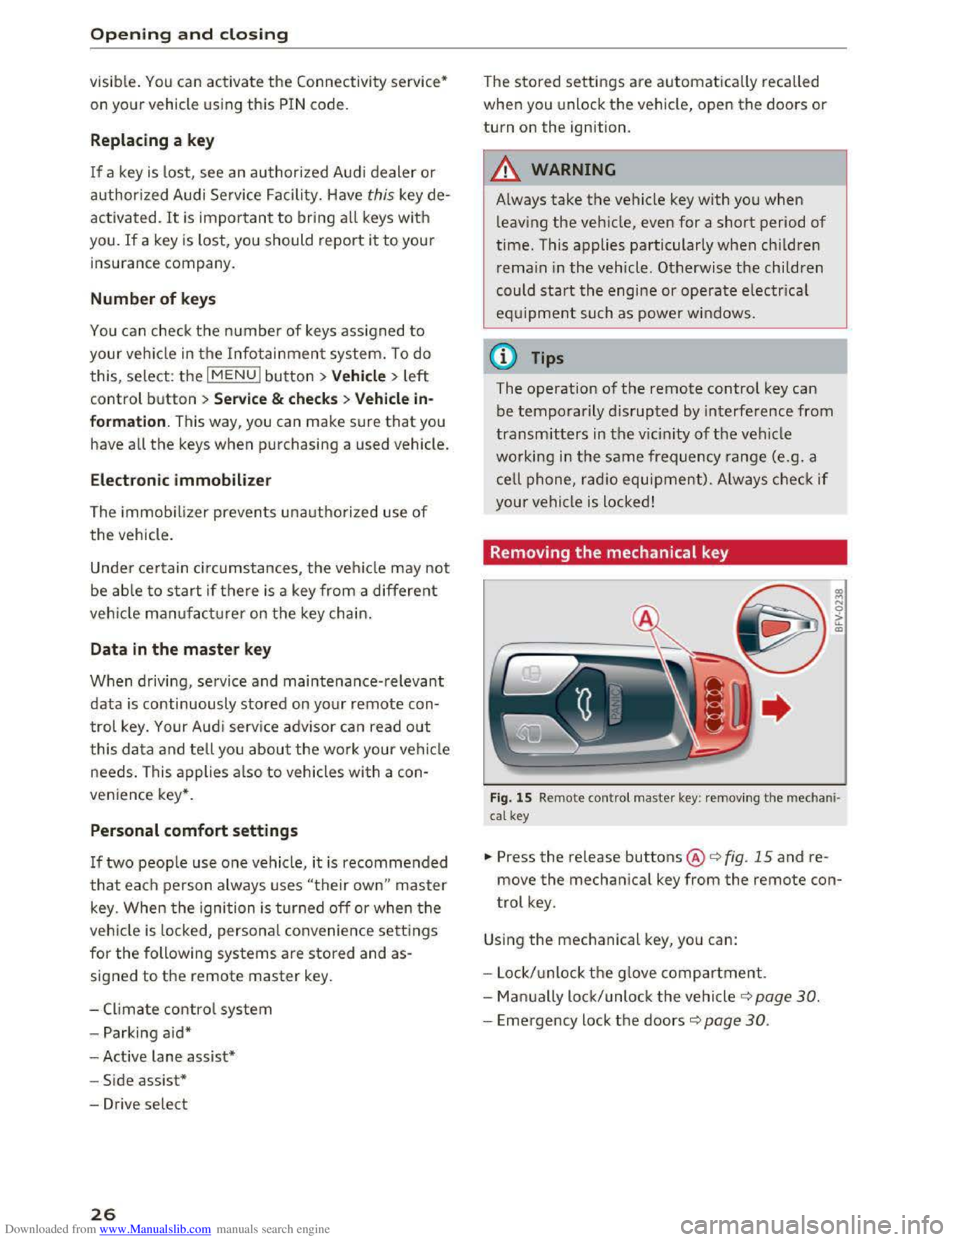
Removing the mechanical key
Fig. 15 Remote contro l master key : remov ing the m ec ha ni·
cal key
.,,. Press the release buttons@<=> fig. 15 and re
move the mechanical key from the remote con
trol key.
Using the mechanical key, you can:
- Lock/ unlock th e g love
compartment.
- Man ually lock/unlock
the vehicle ¢ page 30.
-Emergency lock the doors c::> page 30.
Page 29 of 322
Downloaded from www.Manualslib.com manuals search engine ..... N
G: CX)
.....
"' U"I
LED and batteries in the remote control key
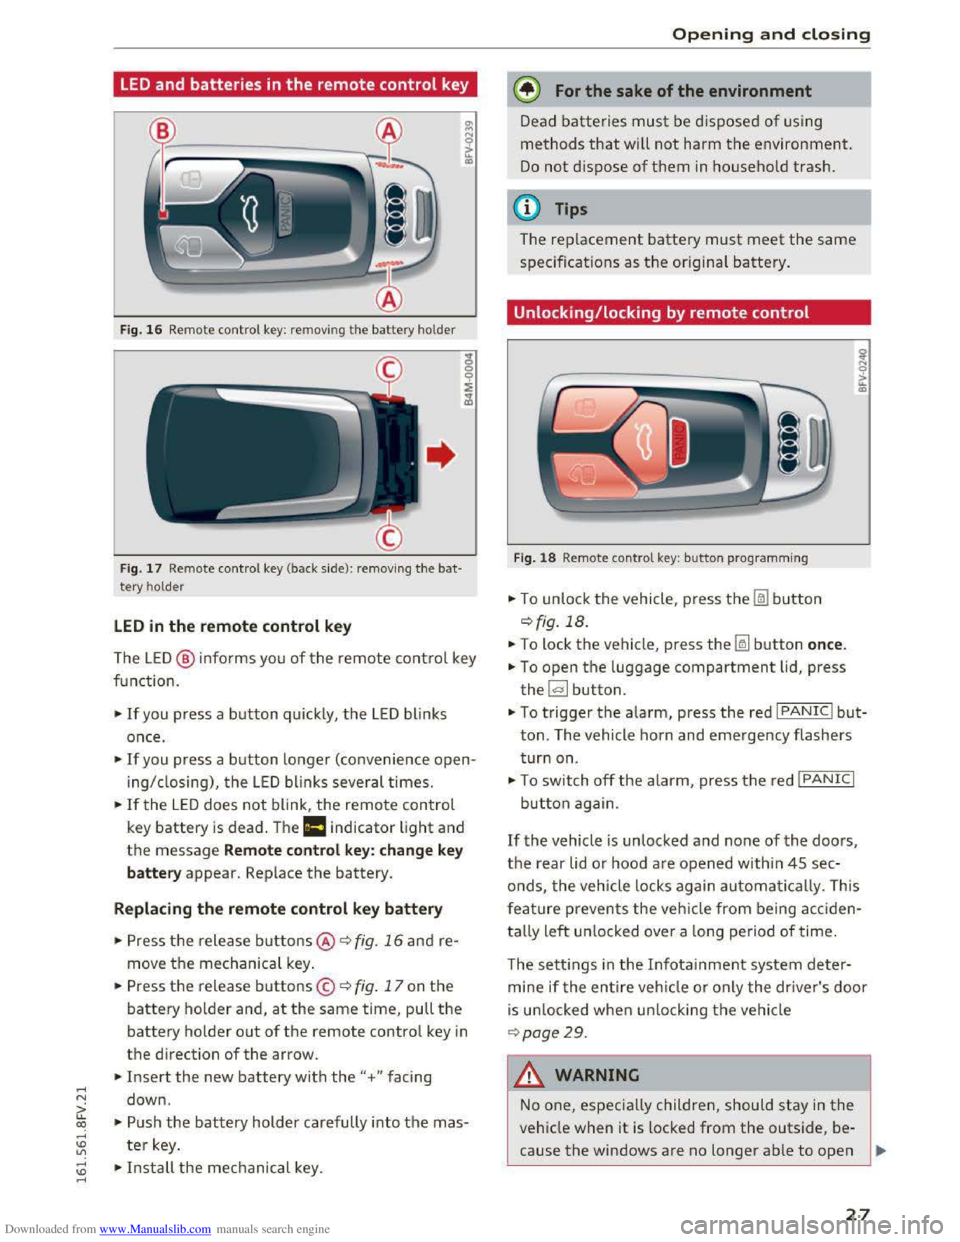
Fig. 16 Rem ote contro l key: rem ov ing the battery hol der
Fig. 17 Remote control key (back side ): remov ing the ba t
tery ho lder
LED in the remote control key
The LE D @ info rms you of the remote control key
function.
•If you press a button quick ly, the LED blinks
once .
• If you press a button longer (convenience open
ing/ closing), the LED blinks several times.
•If the LED does not blink, the remote control
key battery is dead . The Ill indicator light and
the message Remote control key: change key
battery appear. Replace the battery.
Replacing the remote control key battery
• Press the release buttons@ ¢ fig. 16 and re
move the mechanical key.
.. Press the release buttons© ¢ fig. 17 on the
battery holder and, at the same time, pull the
battery holder out of the remote contro l key in
the direction of the arrow .
.. Insert the new battery with the"+ " facing
down .
.. Push the battery holder carefully into the mas
ter key.
~ •Install the mechanical key . .....
Opening and closing
@) For the sake of the environment
Dead batteries must be disposed of using
methods that will not harm the environment.
Do not dispose of them in household trash.
@Tips
The replacement battery must meet the same
specificat ions as th e origina l battery.
Unlocking/locking by remote control
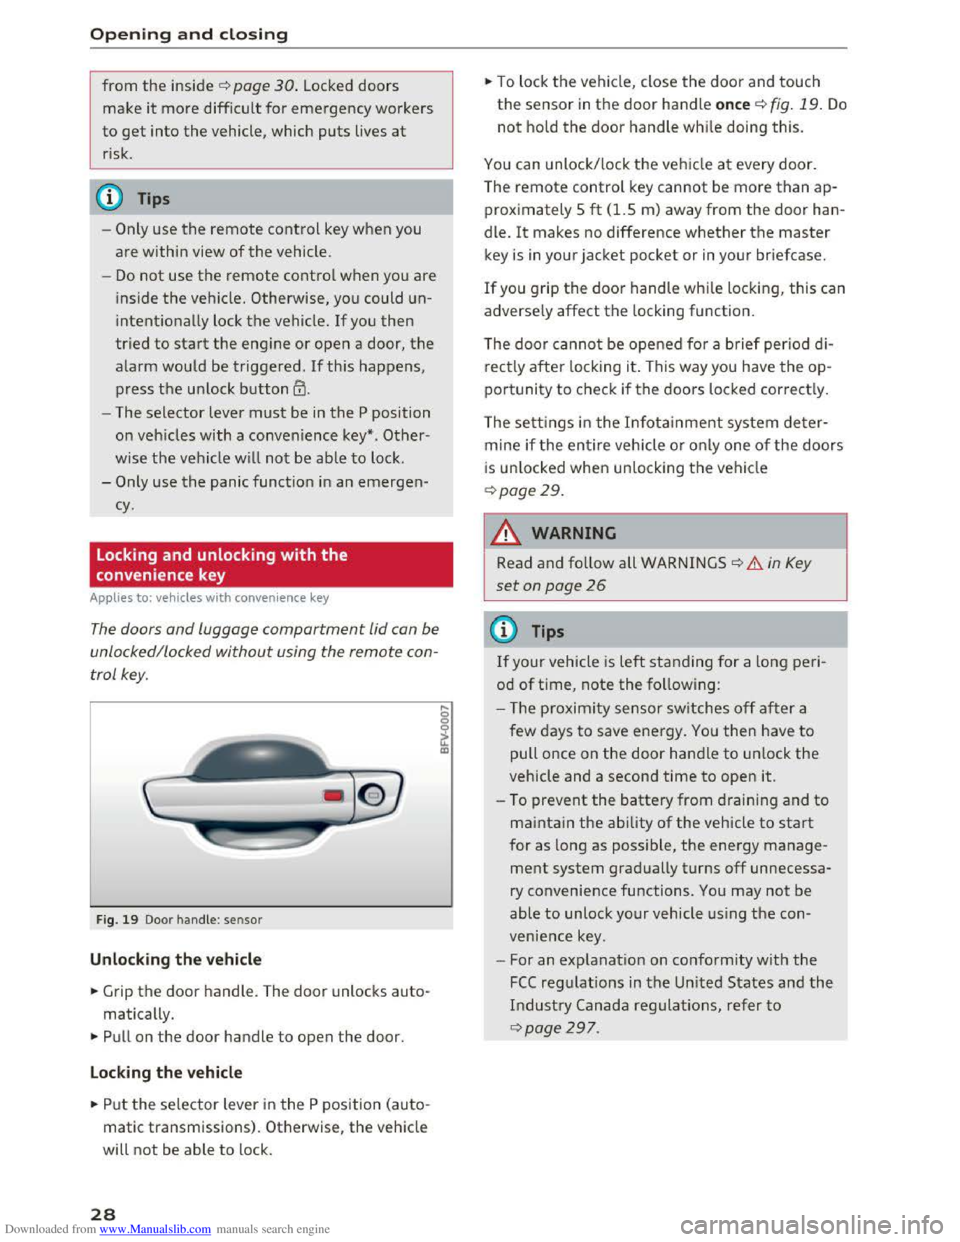
Fig. 18 Remote contro l key : button programming
.. To unlock the vehicle , press the Im button
¢ fig. 18.
.. To lock the vehicle, press the~ button once.
.. To open the luggage compartment lid, press
the~ button .
.. To trigger the alarm, press the red I PANIC I but
ton. The vehicle horn and emergency flashers
turn on.
•To switch off the alarm, press the red I PANIC I
button again .
If the vehicle is unlocked and none of the doors,
the rear lid or hood are opened within 45 sec
onds,
the veh icle locks again automatically. This
f
eature prevents the vehicle from being acciden
tally
left un locked over a long period of time.
T
he setti ngs in the Infota inment system deter
mine if the entire vehicle or only the driver's door
is un locked when un locking the vehicle
¢page 29.
A WARNING
--1
No one, especially children, should stay in the
vehicle when it is locked from the outside, be
cause the windows are no longer able to open
27
Page 30 of 322
Downloaded from www.Manualslib.com manuals search engine Opening and closing
from the inside 9 page 30. Locke d doors
ma ke it more difficu lt for emergency workers
to
get into the vehicle, which puts lives at
risk .
(D Tips
-Only use the remote control key when you
are within view
of the vehicle.
-
Do not use the remote control when you are
i nside
the vehicle. Otherwise, you could un
intentionally lock the vehicle. If you then
tried
to start the eng ine or open a door, the
alarm would be triggered. If this happens,
press
the u nlock button 0 .
- The selector lever must be in the P position
on veh icles with a convenience
key*. Other
wise the ve hicle will not be able to lock .
-
Only use the panic functio n in an emergen
cy.
Locking and unlocking with the
convenience key
Appl ies to: vehi cles with conve nience key
The doors and luggage compartment lid can be
unlocked/locked without using
the remote con
trol key.
Fig. 19 Door handle: sensor
Unloc king the vehicle
... Grip the door handle. The door unlocks auto
matically.
.,. Pull on the door handle to open the door.
Locking the ve hicle
... Put the selector lever in the P position (auto
matic transmissions) . Otherwise,
the vehicle
will not be able to lock .
28
... To lock the vehicle, close the door and touch
the sensor in the door handle once 9 fig. 19. Do
not hold the door handle while doing this.
You can unlock/ lock th e veh icle at every door.
The remote control
key cannot be more than ap
proximately 5
ft (1.5 m) away from the door han
dle.
It makes no difference whether the master
key is in your jacket pocket or in your briefcase.
If you grip the door handle
while locking, this can
adverse ly affect
the locking function.
The door canno t be opened for a b rief period d
i
rectly after locking it. This way you have the op
po rtunity to check if
the doors locked correct ly .
The
setti ngs in the I n fotainment system deter
mine if the entire veh icle or o n
ly one of the doors
i s
unl ocked when unlocking th e vehicle
9page29.
A WARNING
Read and follow all WARNINGS 9 & in Key
set on page 26
(!) Tips
If your vehicle is left standing for a lo ng peri
od
of t ime, note the following:
- T he proxim ity sensor switches off a
fter a
few days to save ener
gy. You then have to
pull once on
the door handle to unlock the
vehicle and a second time to open it.
- To prevent
the battery from draining and to
maintain the ability of the vehicle to start
for as long as poss ible, the energy manage
ment system gradually turns off unnecessa
ry convenience functions . You may not be
able
to unlock your vehicle using the con
venience key.
-
For an explanat io n on conform ity with the
FCC reg ulations in the United States and the
Industry Canada regulatio ns, refer to
9page 297 .
-