AUDI TT COUPE 2016 Workshop Manual
Manufacturer: AUDI, Model Year: 2016, Model line: TT COUPE, Model: AUDI TT COUPE 2016Pages: 322, PDF Size: 52.86 MB
Page 51 of 322
Downloaded from www.Manualslib.com manuals search engine Roof rack
The roof rack must only be secured in the posi
tioning
bolt area.
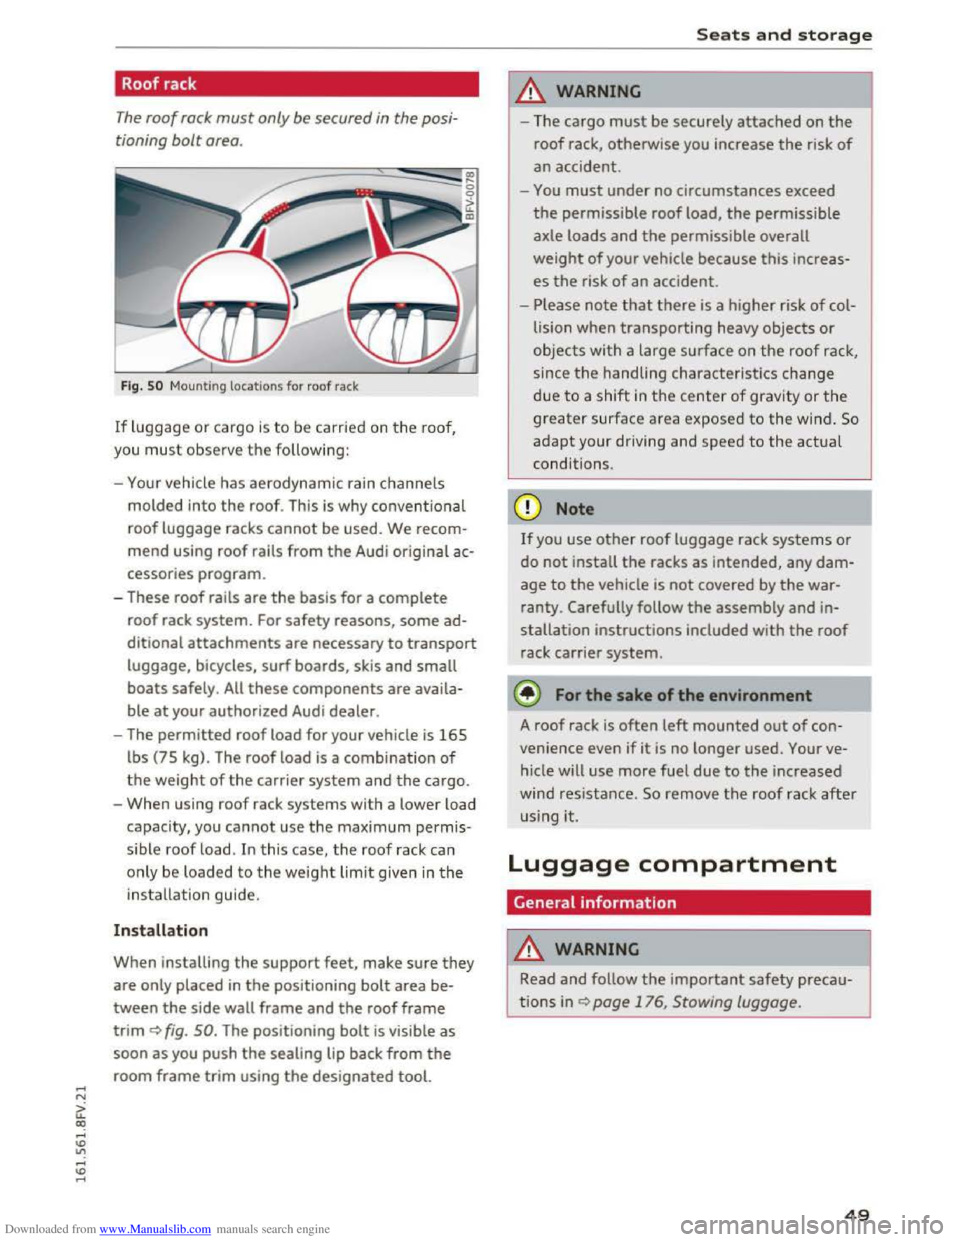
Fig. 5 0 Mounting locations for roof rack
If luggage or cargo is to be carried on the roo f,
you
must observe the following:
- Your vehicle
has aerodynamic rain channels
molded into the roof. This is why conventional
roof luggage racks cannot be used. We recom
mend using roof rails from the Audi original ac
cessories
program.
- These roof rails are the basis for a complete
roof rack system. For safety reasons, some ad
ditional attachments are necessary to transport
luggage, bicycles, surf boards, skis and small
boats safely. All these components are availa
ble at your authorized Audi dealer.
-The permitted roof load for your vehicle is 165
lbs (75 kg). The roof load is a combination of
the weight of the carrier system and the cargo.
-
When using roof rack systems with a lower load
capacity, you cannot use the maximum permis
s ible
roof load. In this case, the roof rack can
only be
loaded to the weight limit give n in the
installation guide.
Installation
When installing the support feet, make sure they
are only placed in the positioning bolt area be
tween the side wall frame and the roof frame
trim ~fig. 50. The positioning bolt is visible as
soon as you push the sealing lip back from the
room frame trim using the designated tool.
Seats and storage
A WARNING
iu=
-The cargo must be securely attached on the
roof rack, otherwise you increase the risk of
an accident.
-
You must under no circumstances exceed
the permissible roof load, the permissible
axle
loads and the permissible overall
weight of your vehicle because this increas
es the risk of an accident.
-
Please note that there is a higher risk of col
lision
when transporting heavy objects or
objects with a large surface on the roof rack,
since the handling characteristics
change
due to a shift in the center of gravity or the
g reater surface area exposed to the wind. So
adapt your driving and speed to the actual
conditions.
If you use other roof luggage rack systems or
do not install the racks as intended, any dam
age to the vehicle is not covered by the war
ranty. Carefully follow the assembly and in
stallation instructions included with the roof
rack carrier system.
¢!/) For the sake of the environment
A
roof rack is often left mounted out of con
venience even if
it is no longer used. Your ve
hicle will use
more fuel due to the increased
wind
resistance. So remove the roof rack after
us ing it.
Luggage compartment
General information
A WARNING
1---
Read and follow the important safety precau-
tions in ~page 176, Stowing luggage.
49
Page 52 of 322
Downloaded from www.Manualslib.com manuals search engine Seats and storage
Luggage compartment cover
The luggage compartment cover blocks the view
into
the luggage compartment.
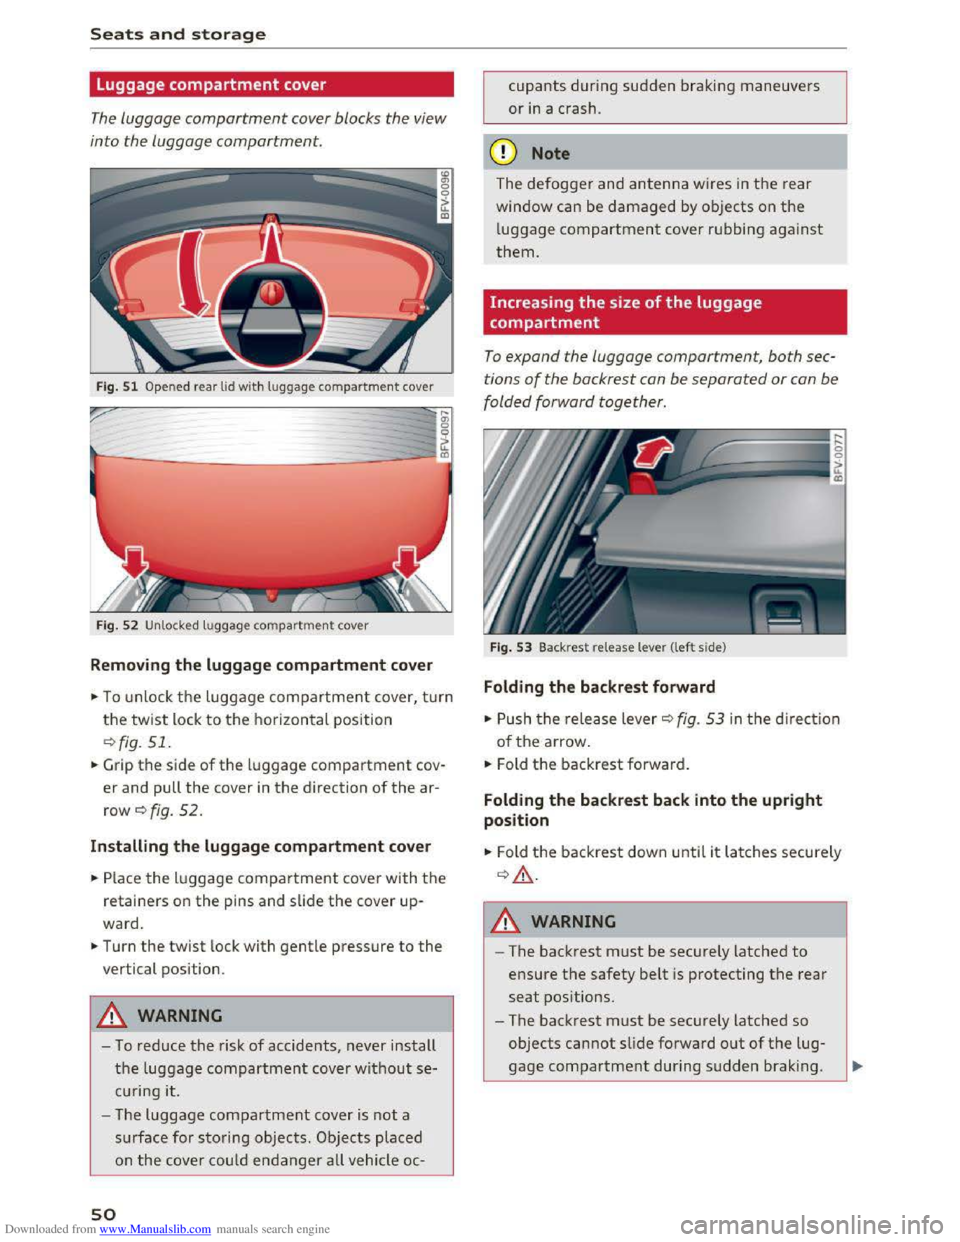
Fig . 51 Ope ned rear lid wit h luggage compartment cover
,... I
~
ir-------~-__.~1
Fig . 52 Unlocked luggage compartment c over
Removing the luggage compartment cover
.. To unlock the luggage compartment cover, turn
the twist lock to the horizontal position
¢fig. 51.
.. Grip the side of the luggage compartment cov
er and pull the cover in the direction of the ar
row¢ fig. 52.
Installing
the l uggage c ompartm ent cove r
.. Place the luggage compa rtment cover with the
retainers on the pins and slide the cover up
ward .
.. Turn the twist lock with gentle pressure to the
vertical position .
..&. WARNING
-To reduce the risk of accidents, never install
the luggage compartment cover without se
curing it.
- The
luggage compartment cover is not a
surface for storing objects. Objects placed
on
the cover c ou ld endanger a ll vehicle oc-
50
cupants during sudden braking maneuvers
or in a crash .
CD Note
The defogger and antenna wires in the rear
window can be damaged by objects on the
luggage compartment cover rubbing against
them.
Increasing the size of the luggage
compartment
To expand the luggage compartment, both sec
tions
of the backrest can be separated or can be
folded forward together .
Fig. 53 Backrest release lever (left side)
Fold ing the backrest forward
.. Push the release lever ¢ fig. 53 in the direction
of the a rrow .
.. Fold the backrest forward .
Folding the backrest back into the upright
position
.. Fold the backrest down until it latches securely
~& .
..&. WARNING
-The backrest must be securely latched to
ensure the safety belt is protecting the rear
seat pos itions .
- The
backrest must be securely latched so
objects
cannot slide forward out of the lug
gage compartment during sudden braking .
Page 53 of 322
Downloaded from www.Manualslib.com manuals search engine ..... N
G: CX)
.....
"' U"I
.....
"' .....
CD Note
Make sure the safety belt is not pinched in the
backrest lock and damaged when the rear
seat backrest if folded back.
Lowering the cargo floor
In exceptional situations, the cargo floor con be
lowered.
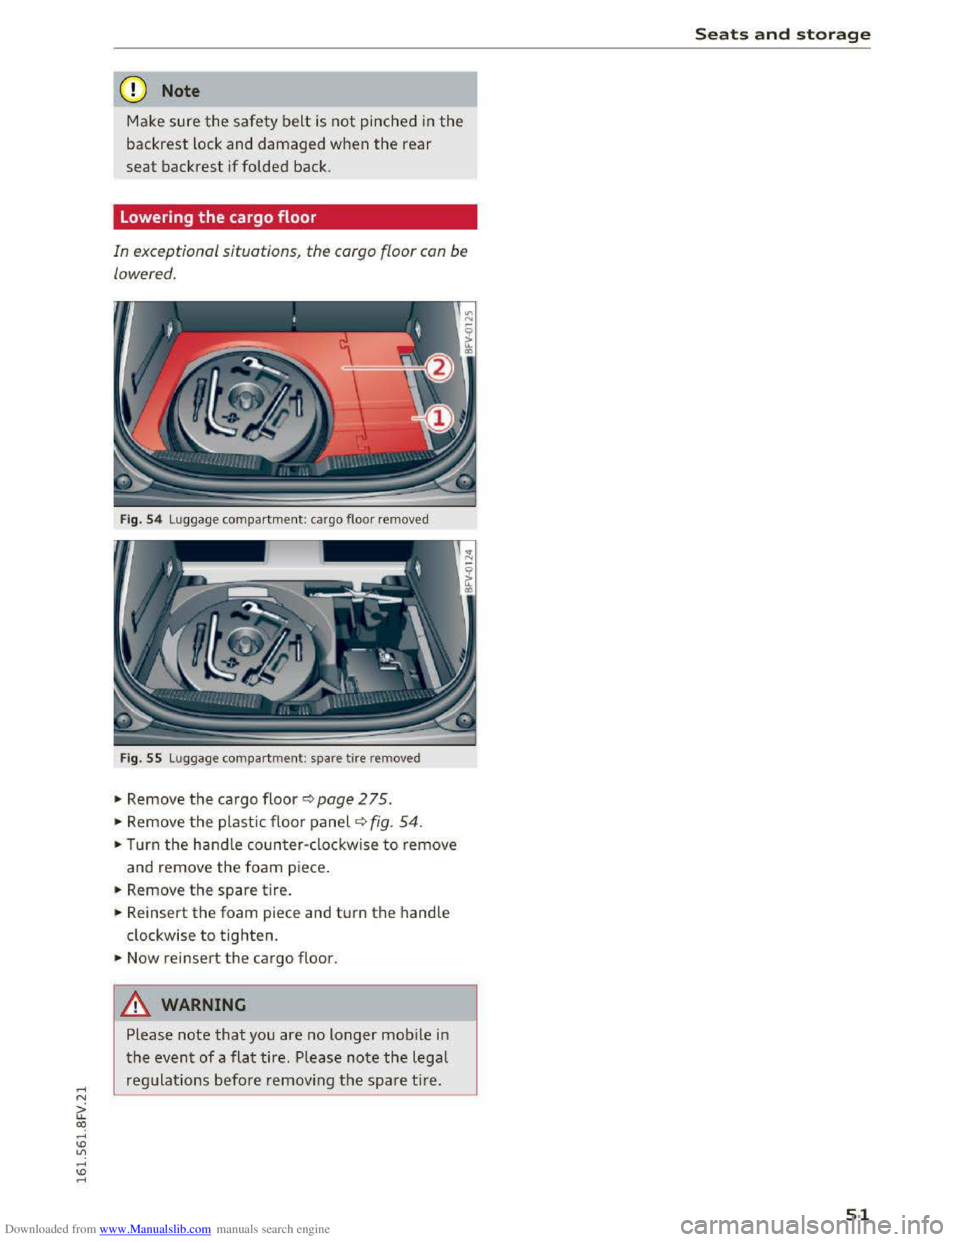
Fig. 54 Luggage compartment: cargo floor removed
Fig.
55 Luggage compartment: spare tire removed
"'Remove the cargo floor <>page 275.
"'Remove the plastic floor panel ~fig. 54.
"'Turn the handle counter-clockwise to remove
and remove
the foam piece.
"'Remove the spare tire.
"'Reinsert the foam piece and turn the handle
clockwise to tighten.
"' Now reinsert the cargo floor.
A WARNING
Please note that you are no longer mobile in
the event of a flat tire. Please note the legal
regulations before removing
the spare tire .
Seats and storage
51
Page 54 of 322
Downloaded from www.Manualslib.com manuals search engine Warm and cold
Warm and cold
Climate control system
Description
The climate control system warms, cools and
adds humidity to the air in the vehicle interior. It
functions most effectively when the windows are
closed. If there is a build-up of heat inside the ve
hicle, ventilation can help to speed up the cooling
process.
Pollutant filter
The pollutant filter removes pollutants such as
dust and pollen from the air .
Key recogniti on
Certain settings are automatically stored and as
signed to t h e remote control key being used.
.&. WARNING
Poor visibility can lead to accidents.
-For safer driving, keep all windows free of
ice, snow and fog.
- Become familiar
as quickly as possible with
the correct use and function of the climate
control system, especially with the defrost
ing and defogging function.
-
When the temperature is below freezing,
only use the windshield washer system after
the windshield has been warmed by the cli
mate control system. The washer flu id could
freeze on the windshield and impair visibili
ty.
CD Note
-If you suspect that the climate control sys
tem is damaged, sw itch the system off to
52
prevent further damage and have it checked
by an
authorized Audi dealer or authorized
Audi Service Facility.
- Repairs
to the Audi climate control system
require special technical knowledge and
special tools. See an authorized Audi dealer
or authorized Audi Service Facility.
® For the sake of the environment
Reducing the amount of fuel used also re
duces the amount of pollutants that enter the
air.
('!) Tips
-To prevent interference with the heating
and cooling output a nd to prevent the win
dows from fogging over, the air intake in
front of the windshield must be free of ice,
snow or leaves.
-
Condensation from the cooling system can
drip
and form a puddle of water under the
veh icle. This is normal and does not mean
there is a leak.
- The
energy management system may switch
the seat heating* or rear window defroster
off temporarily. These systems are available
again as soon as the energy balance has
been restored.
-The flows through the vents under the rear
window. Make sure the openings are not
covered when placing clothing on the lug
gage compartment cover.
Page 55 of 322
Downloaded from www.Manualslib.com manuals search engine ..... N
G: CX)
.....
"' U"I
.....
"' .....
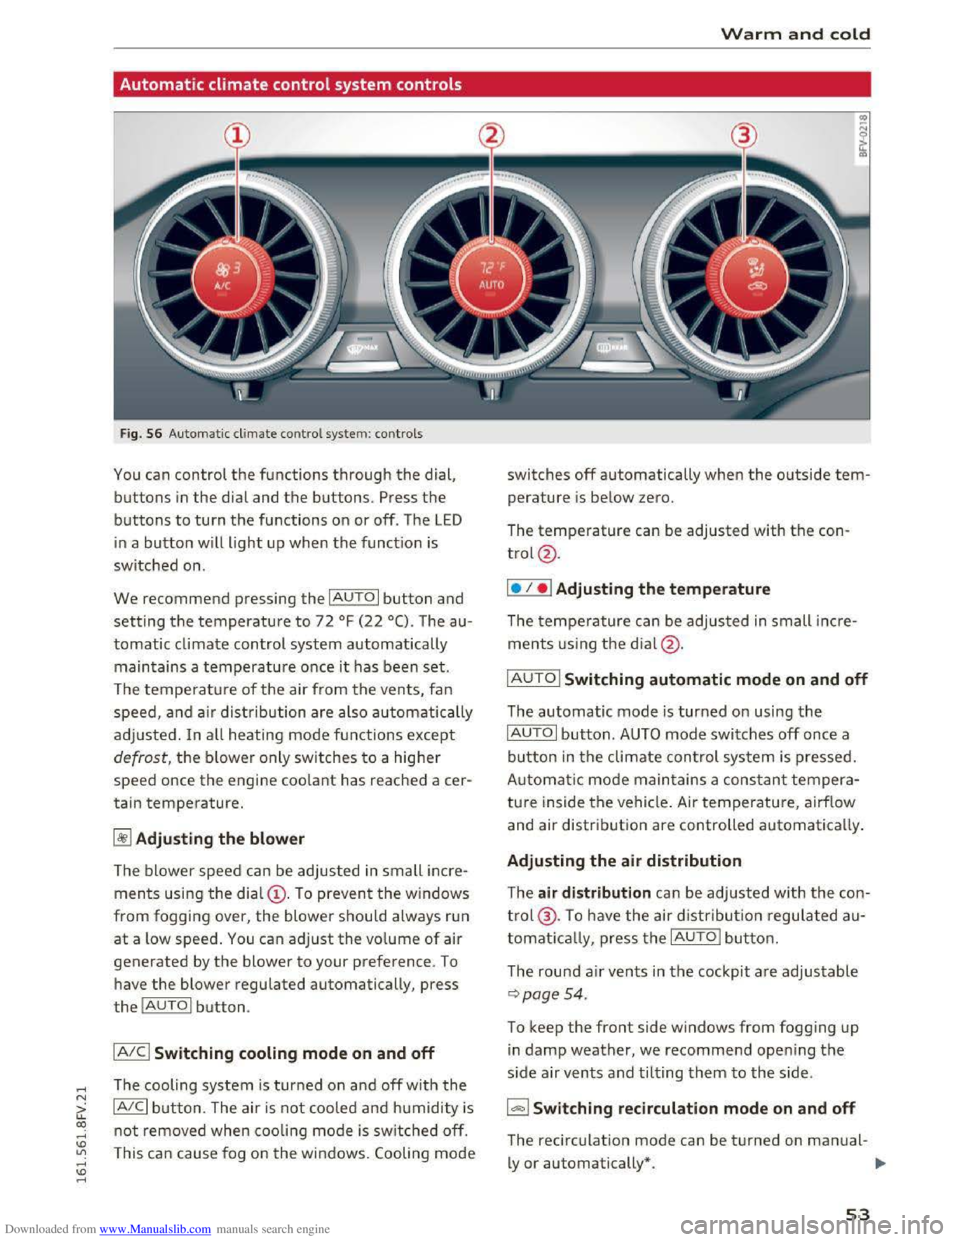
Automatic climate control system controls
Fig. 56 Automatic climate control system: controls
You can control the functions through the dial,
buttons in the dial and the buttons. Press the
buttons to turn the functions on or off. The LED
in a button will light u p when the function is
switched on.
We recommend pressing the IAUT O I button and
setting the temperature to 72 °F (22 °(). The au
tomatic climate control system automatically
maintains a temperature once it has been set.
The temperature of the air from the ven ts, fan
speed, and a ir distr ibution are also automatically
ad justed. In a ll heating mode functions except
defrost, the blower only switches to a higher
speed once the engine coo lant has reached a cer
tain temperature.
~Adjusting the blow er
The blower speed can be adjusted in small inc re
ments using the dia l@ . To prevent the windows
from fogging over, the blower should always run
at a low speed. You can adjust the vo lume of air
generated by the blower to your preference. To
have the blower regulated automatically, press
the IAUTOI button.
IA!CI Switching cooling mode on and off
The cooling system is turned on and off with the
IA!CI button. The air is not coo led and humidity is
not removed when cooling mode is sw itched off.
This
can cause fog on the windows. Cooling mode
Warm and cold
switches off automatically when the outside tem
perature is bel ow zero.
The
temperature can be adjusted with the con
trol@.
I• I • I Adjusting the temperature
The temperature can be adjusted in small incre
ments u sing the d ial@ .
IAUTO I Switching automatic mode on and off
The automatic mode is turned on using the
IAUTOI button. AUTO mode switches off once a
button in the climate con trol system is pressed.
Automatic mode main tains a constant tempera
ture inside the vehicle . Air temperature, airflow
and air distri b ution are controlled automaticall y .
Adjusting the air distribution
The air distr ibution ca n be adjusted w ith the con
trol@ . To have the air distribution regulated au
tomatically, press the IAUTOI button.
The round air vents in the cockpit are adjustable
~page 54.
To keep the front side windows from fogging up
in damp weather, we recommend opening the
s ide a ir vents and ti lting them to the side .
1- 1 Switching recirculation mode on and off
The recirculation mode can be turned on manual-
ly or automatically* . ..,,.
53
Page 56 of 322
Downloaded from www.Manualslib.com manuals search engine Warm and cold
-Switching manua l recirculation mode on and
off: press ld<>I
-A utomatic* recircu lation mode: auto rec ircula
tion needs to be activated in the Infotainment
system. Select in the Infotainment system:
IMENUI button> Vehicle > left control button
>Vehicle settings > Air condit ioning > Auto re
circul ation . The air quality sensor that is de
s i
gned for diesel and gasoline exhaust auto
matically switches the recircu lation mode on or
off depending on the level of pollutant s in the
o utside air.
In recirculation mode, the a ir inside the vehicle is
circulated
and filtered. This prevents the u nfil
tered a ir outside the vehicle from entering the
ve hicl e interio r. We recommend switching recir
cula tion mode on when driv ing thr o ugh a tunnel
or when sitting in traffic<::>.&..
Recirc ulation mode is switched off by pressing
the 1- 1 button o r IAUTOI orlw MAXI.
I@ M AX I Switching defrost on and off
The windshield and side windows are defrosted
or cleared of condensation as quickly as possible.
The
optimum amoun t of a ir flows mainly out of
the vents under the windshield . Rec irculatio n
mode switches off. The temperature is contr olled
automatically.
The IAUTOI button switches the defroster off.
IO!il R EARI Switching the rear window defogger
on and
off
If the rear window defogger is activated when
the ign ition is switched on, the battery manage
ment determ ines based on the ba ttery c harge if
it is possible t o t urn on . Othe rwise, the rear win
dow defogger functions with the engine run ning
and switches off automatically after approxi
mately 10 -20 mi nutes, depending on the out
side temperature.
To preven t
the rear window defogger from
switching off automatically, press and hold the
lliill REARI button for more than 2 seconds. This re
mains stored up to approximately lS minutes af
ter turning off the ignition.
54
A WARNING
You should not use the recirc ulation mode for
an extended period since no fresh air i s drawn
in . With the air-conditioning switched off, the
windows can fog up, which inc reases the risk
of an accident.
Adjusting
the air vents
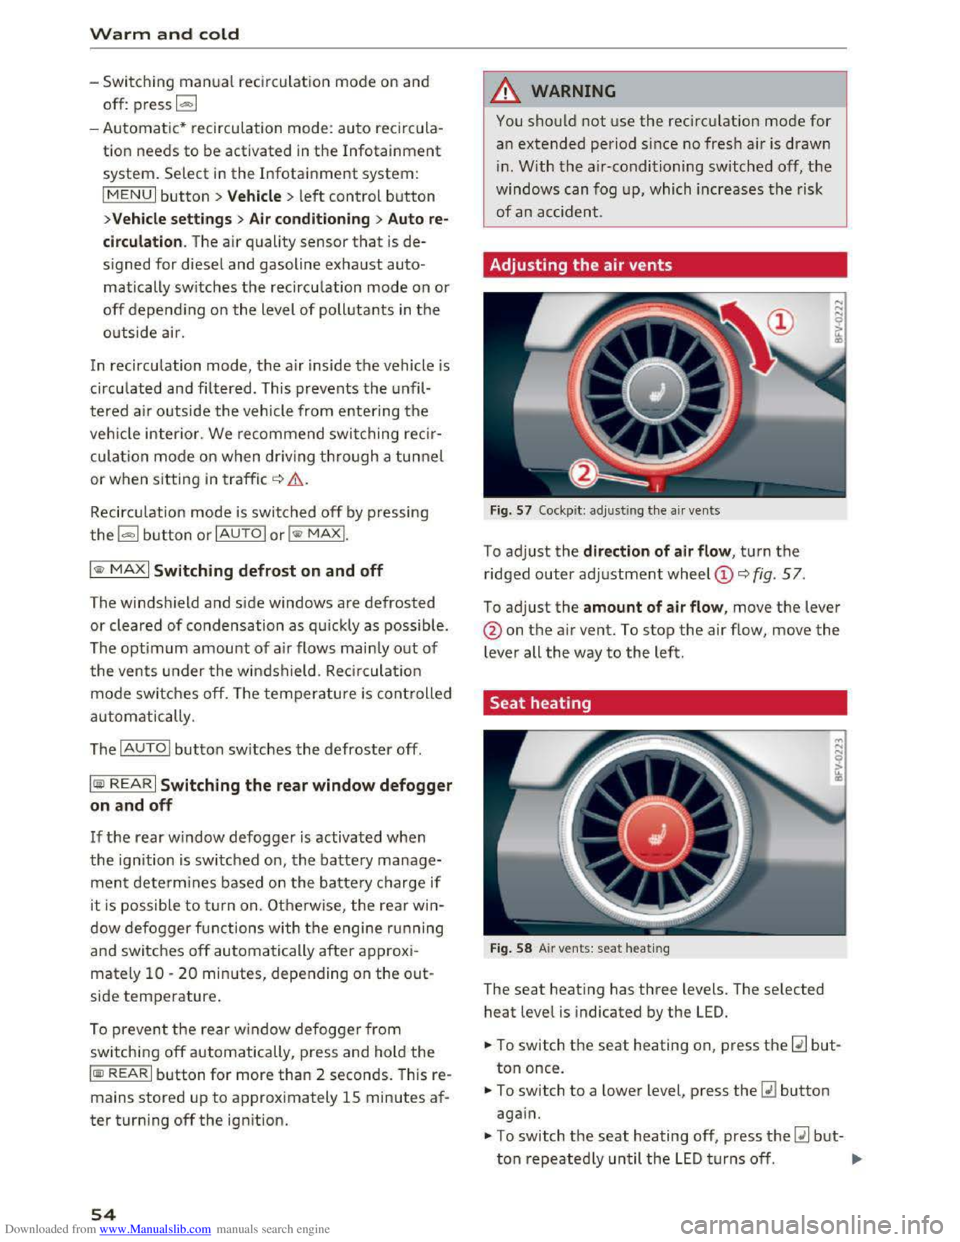
Fig. 57 Cockpit: adj ust ing the air vents
To adjust the direction of air flow , turn the
ridged outer adjustment wheel©<::> fig. 57.
To adjust the amount of air flow, move the lever
@on the air vent. To stop the air flow, move the
lever all the way to the left.
Seat heating
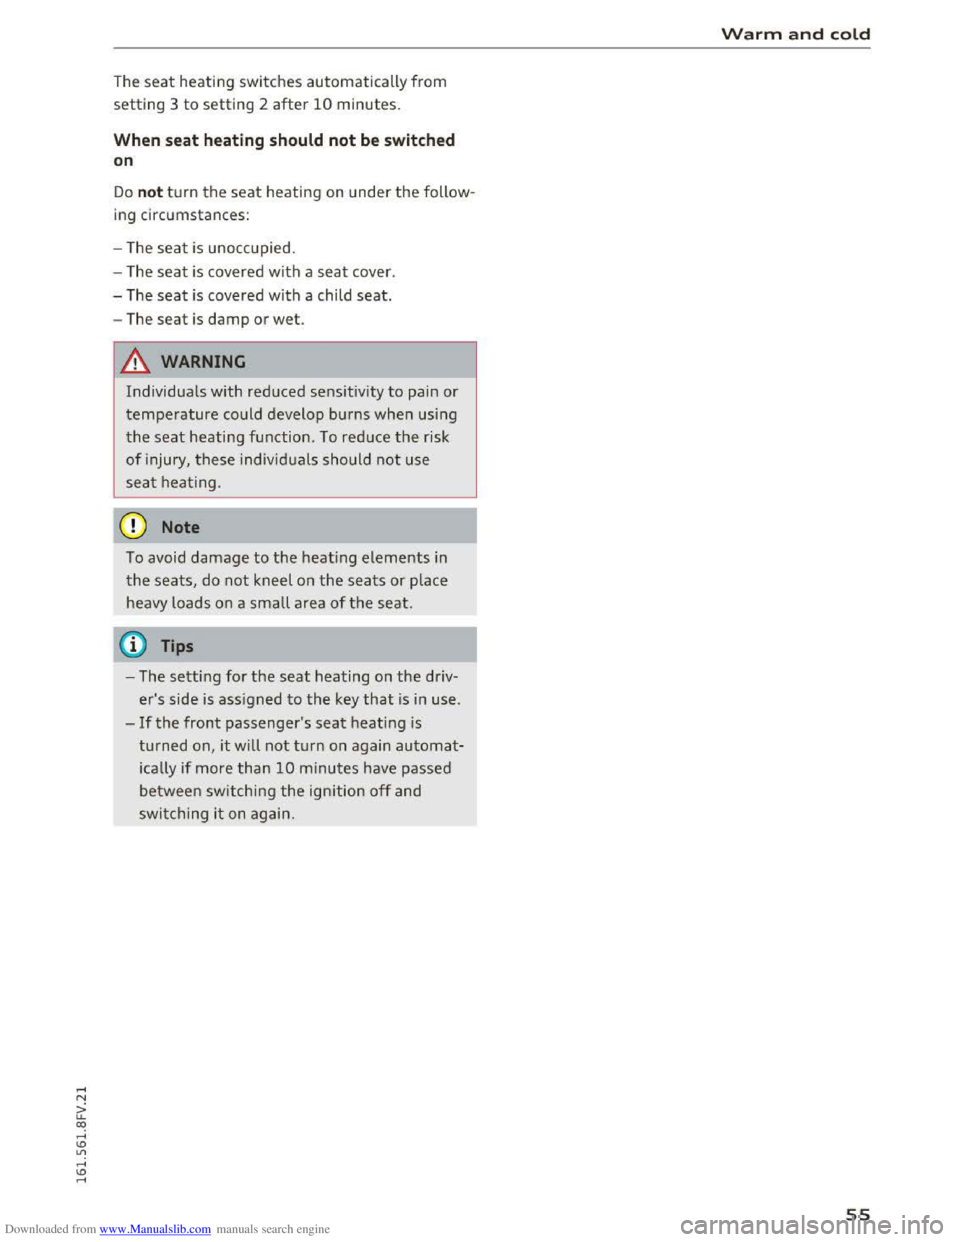
Fig. 58 Air vents: seat heating
The seat heati ng has three levels. The selected
heat level is indicated by the LED.
... To switch the seat heating on, press the~ but
ton once.
... To switch to a lower level, press the~ button
again.
.,. To switch the seat heating off, press the~ but-
ton repeatedly until the LED t u rn s off. .,..
Page 57 of 322
Downloaded from www.Manualslib.com manuals search engine The seat heating switches automatically from
setting 3 to setting 2 after 10 minutes.
When seat heating should not be switch ed
o n
Do not turn the seat heating on under the follow
ing
circumstances:
- The seat is unocc upied.
- The
seat is covered with a seat cover.
- The
seat is covered with a child seat.
- The seat is damp or wet.
A WARNING
Individuals with reduced sensitivity to pain or
temperature could develop burns when using
the seat heating function. To reduce the risk
of injury, these individuals should not use
seat heating.
6) Note
To avoid damage to the heating elements in
the seats, do not kneel on the seats or place
heavy loads on a smal l area of the seat.
@ Tips
- The setting for the seat heating on the driv
er's side is assigned to the key that is in use.
-If the front passenger's seat heati ng is
turned on, i t will not turn on again automat
ically if more than 10 minutes have passed
between sw itching the ign ition off and
switching it on again.
Warm and cold
55
Page 58 of 322
Downloaded from www.Manualslib.com manuals search engine Driving
Driving
General information
New engine
The engine needs to be run-in during the first
1,000 mi (1,500 km).
For the first 600 mi (1,000 km):
... Do not use full throttle.
... Do not drive at engine speeds that are more
than 2/3 of the maximum permitted RPM.
... Avoid high engine speeds.
From 600 to 1,000 mi (1 ,000 to 1,500 km):
... Speeds can gradually be increased to the maxi
mum permissible road or engine speed.
During and after break-in period
... Do not rev th e engine u p to high speeds when it
is cold. This
applies whether the transmission is
in N
(Neutral) or in gear.
After the break-in period
... Do not exceed maximum engine speed under
any cir cu
mstances .
... Upshift into th e nex t higher gear before reach
ing th e red
area at th e end of the tachometer
sea le r=:> page 8 .
During the firs t few hours of drivi ng, the engine's
interna l fric tion is higher than later when a ll th e
moving parts have been broken in . How well this
break-in process is done depends to a considera
ble extent on the way the vehicle is driven during
the first 1,000 mi (1,500 km).
@Note
Extremely high engine speeds are automati
cally reduced. However, these rpm limits are
programmed for an engine well r un -in, not a
new engine.
@ For the sake of the environment
Do not drive with unnecessarily high engine
speeds -upshi fting early saves fuel, reduces
noise and protects the environment.
56
·New tires
If your veh icle is runni ng on new tires, d rive par
t icula rly careful for the first 350 m i (500 km) af
ter fitting.
.&. WARNING
-New tires tend to be slippery and must a lso
be "broken-in". Be sure to remember this dur
ing the first 350 m i (500 km). Brake gently .
Avoid following closely behind other vehicles
or other situations that might req uire sudden,
hard braking.
Avoid damaging the vehicle
When you are driv ing on poor roads, or over
cu r
bs, steep ramps, etc., make certain that l ow
l y i
ng parts such as sp oile rs and exhaust system
parts do not bottom out and get damaged.
This is especially true for veh icles with low-s lu ng
c h
assis (sports chassis) * and fully loaded
vehicles .
Driving through water on roads
Note th e following to avo id vehicl e damage when
driv ing thro ugh water, for example on flooded
roads:
- The wat
er must not be any higher than the bot
t
om of the vehicle body.
-
Do not dri ve faster than walking speed.
_&. WARNING
Af te r driving through water or mu d, the brak
ing e
ffect can be reduced due to moisture on
the brake d iscs and brake pads. A few careful
b rake applications should dry off the bra kes.
@Note
Vehicle components such as the engi ne,
transmission, su s pension o r electrica l system
can be severely damaged by driving through
water. ..,.
Page 59 of 322
Downloaded from www.Manualslib.com manuals search engine @ Tips
-Determine the depth before driving through
water.
-Do not stop the vehicle, drive in reverse or
switch the engine off when driving through
water.
- Keep in mind that oncoming vehicles may
create waves that raise the water level and
make it too deep for your vehicle to drive
through safely.
- Avoid driving
through salt water (corrosion).
Economical and environmentally-friendly
driving
The amount of fuel consumption, the envi ron
mental impact and the wear to the engine,
b rakes and tires depends mostly on yo ur driving
style. Wit h
an anticipatory and economic driv ing
style, fu
el consumption can be reduced by ap
proximately 10-lSo/o. The following tips will help
you conserve the environment and your money at
the same time.
Anticip atory driv ing
A veh icle uses the most fuel when a ccele rating.
When you drive with anticipation, you do not
need to brake as often and thus acce lerate less.
When possible, let your vehicle coast with a gea r
engaged -for example, when you notice that the
next traffic light is red.
Avoid full acceleration
You should rarely travel at the maximum vehicle
speed. High speeds cause a disproportionately
high increase in fuel consumption, emissions and
traffic noise. Slower driving saves fuel.
Reduce idling time
It pays off to stop the engine, for example when
at railroad crossings or traffic lights with longer
red lights. Stopping the engine for 30-40 sec
onds already saves more fuel than the amount of
extra fuel needed to restart the engine.
It takes a very long time in idle to warm the en
gine up to operating temperature. Wear and
emissions are especially high in the warm-up
Driving
phase. Therefore, you should begin driving im
mediately after starting the engine. Avoid high
RPMs while doing this.
Service regularly
By servic ing you r vehicle regularly, you can help
to reduce fuel consumption before you even start
to drive . The maintenance condition of your vehi
cle not only affects traffic safety and long-term
val ue b ut also impacts fuel co nsumptio n.
A poorly serviced engine can lead to fuel con
sumption that is 10% higher than normal.
Also check the oil level when refueling. The oil
con sumpti on
depends largely on the engine load
and speed. It is no rmal for the oil consumption
of a new engine to reach its lowest point only af
ter a certain amount of use. Therefore, the oil
consumption can only be properly judged after
approximately 3,000 mi (5,000 km) have been
driven.
Avoi d short trip s
The engine and exhaust cleaning system must
reach their optimal operating tempera tu re to ef
fectively reduce consumption and emissions.
A cold engine consumes a disproportionately
high
amount of f u el. The engine is at operating
temperature and consumption has normalized
only after approximately four kilometers.
Q) Note
Do not leave engine idling unattended after
starting. If warning lights should come on to
indicate improper operation, they would go
unheeded. Extended idling also produces
heat, which could result in overheating or
other damage to the vehicle or other proper
ty.
CD Note
-Have your vehicle maintained properly and
in accordance with the service recommenda
tions in your Warranty & M ain tenance book-
let. Lac k of proper mai ntenance as well as
improper use of th e vehi cle w il l impair the
function of the emission control system and
cou ld lead to damage. .,..
57
Page 60 of 322
Downloaded from www.Manualslib.com manuals search engine Driving
-Do not alter or remove any component of
the Emission Control System unless ap
proved by the manufacturer.
-Do not alter or remove any device, such as
heat shields, switches, ignition wires,
valves, which
are designed to protect your
vehicle's Emission
Control System and other
important vehicle components.
(D Tips
The consumption estimates as published by
ENVIRONMENTAL PROTECTION AGENCY
(EPA) and Transport Canada may not corre
spond to your actual consumption on the
road, which will vary depending upon vehicle
load
and speed, road and weather conditions,
trip length, etc.
Steering
Adjusting the steering wheel position
The steering wheel position is fully adjustable up
and down and forward and back.
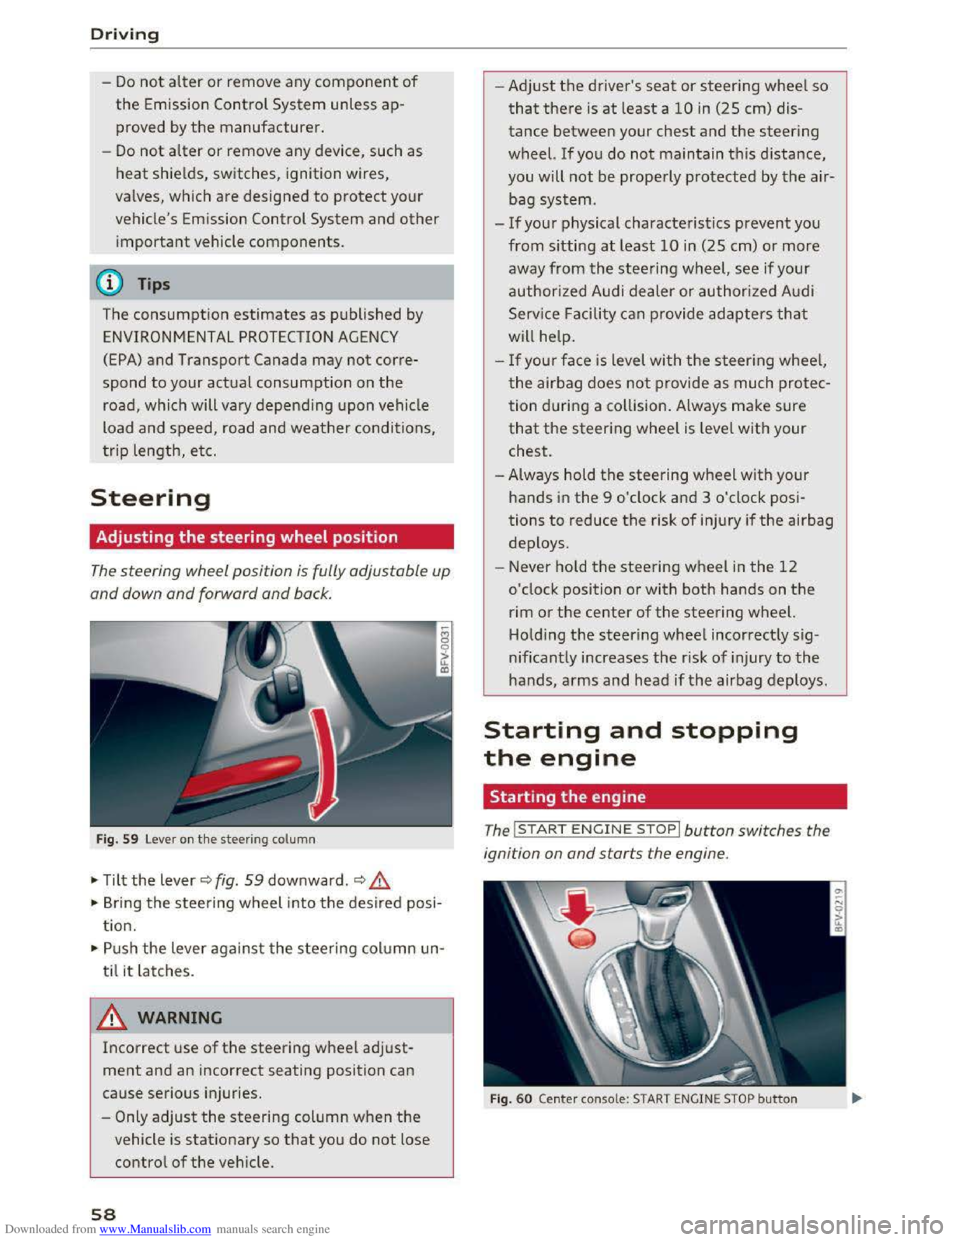
Fig. 59 Lever on the steering column
•Tilt the lever~ fig. 59 downward.~&,
• Bring the steering wheel into the desired posi
tion.
•Push the lever against the steering column un
til
it latches.
A WARNING
Incorrect use of the steering wheel adjust
ment and an incorrect seating position can
cause serious injuries.
-
Only adjust the steering column when the
vehicle is stationary so that you do not lose
control of the vehicle.
58
-1
-Adjust the driver's seat or steering wheel so
that there is at least a 10 in (25 cm) dis
tance between your chest and the steering
wheel. If you do not maintain this distance,
you will not be properly protected by the air
bag system.
-If your physical characteristics prevent you
from
sitting at least 10 in (25 cm) or more
away from the steering wheel, see if your
authorized Audi dealer or authorized Audi
Service Facility
can provide adapters that
will help.
-
If your face is level with the steering wheel,
the airbag does not provide as much protec
tion during a collision. Always make sure
that the steering wheel is level with your
chest.
-Always hold the steering wheel with your
hands in the 9 o'clock and 3 o'clock posi
tions to reduce the risk of injury ifthe airbag
deploys.
- Never hold
the steering wheel in the 12
o'clock position or with both hands on the
rim or the center of the steering wheel.
Holding
the steering wheel incorrectly sig
nificantly
increases the risk of injury to the
hands, arms and head if the airbag deploys.
Starting and stopping
the engine
Starting the engine
The I ST ART ENGINE STOP I button switches the
ignition on and starts the engine.
Fig. 60 Center conso le: START ENGINE STOP button