ad blue AUDI TT COUPE 2016 Owners Manual
[x] Cancel search | Manufacturer: AUDI, Model Year: 2016, Model line: TT COUPE, Model: AUDI TT COUPE 2016Pages: 322, PDF Size: 52.86 MB
Page 86 of 322
Downloaded from www.Manualslib.com manuals search engine Parking systems
Swit c hing on
.. Shift into reverse, or
.. Press the PIJ/A button in the center console
¢fig. 81. A short confirmation tone sounds and
the LED in the button turns on.
Switching off
.. Drive faster than 6 mph (10 km/h), or
.. Press the P'#A button, or
.. switch the ignition off.
Segments in the visual display
The segments in front of and behind the vehicle
(veh i
cles with parking system p lus*) r::!;> fig. 82
he lp you to determine the distance between yo ur
ve hicle
and an obstacle. The red lines mark the
expected direction of travel according to the
steering angle. A white segment indicates an
identified
obstacle that is outside of the vehicle's
path. Red segments show identi fied obstacles
that are in your vehicle's path. As your vehicle
comes closer to the obstacle, the segments move
closer to the vehicle. The collision area has been
reached when the next to last segment is d is
played. Obstacles i n the collision area, in cl ud ing
those outside of the ve hicle's path, are shown in
red.
Do no t continue driving forward or in reverse
r::!;> .&. in General information on page 82, ¢0) in
General information on
page 82!
Rearview camera
Introduction
Applies to: vehicles with rearview camera
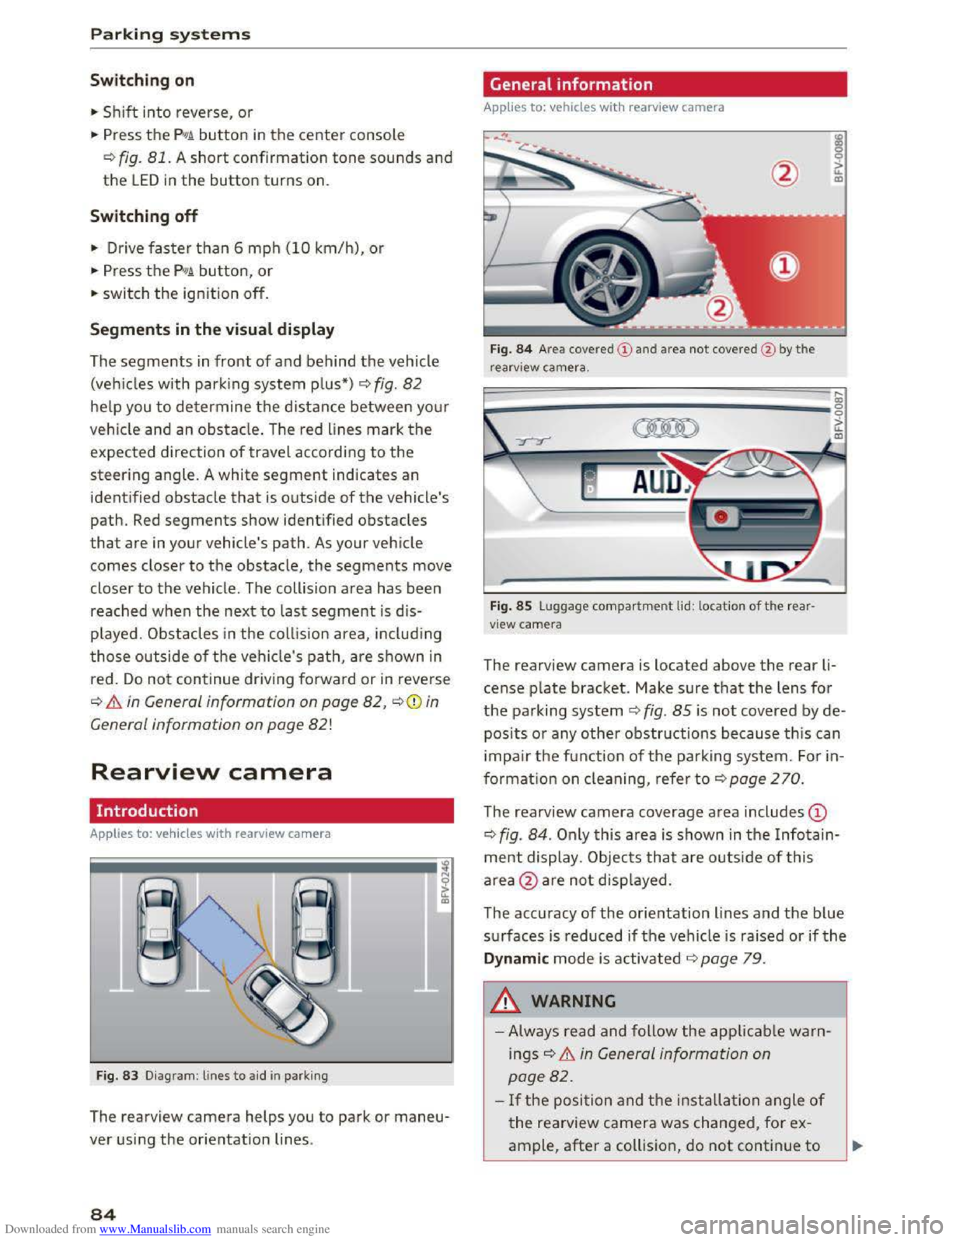
Fig . 83 D iagram: lines to aid in parking
The rearview camera helps you to park or maneu
ver using the orientation lines .
84
General information
Applies to: vehicles with rearv iew camera
Fig. 84 Area cove red
r earv iew camera.
Fig . 85 Luggage compartment lid: location of the rear
view camera
The rearview camera is located above the rear li
cense plate bracket. Make sur e that the lens for
the parking system ¢fig. 85 is no t covered by de
posits or any other obstructions because this can
i
mpair the f u nction of the pa rking system. F o r in
formatio n on cleaning, refer to r::!;> poge 2 70.
The rearview camera coverage area includes ©
¢fig. 84. Only this area is shown in the Infotain
ment display . Objects that a re o utside of this
area @are not disp layed.
The accuracy
of the orientation lines and the blue
surfaces is reduced ifthe vehicle is raised or ifthe
Dynamic mode is activated r=;,page 7 9 .
.&_ WARNING
- Always read and follow the applicable war n
ings r::!;> & in General information on
page 82.
- If the posi tion and the installa tion angle of
the rearview camera was changed, for ex
ample, after a coll ision, do not continue to
Page 88 of 322
Downloaded from www.Manualslib.com manuals search engine Parking systems
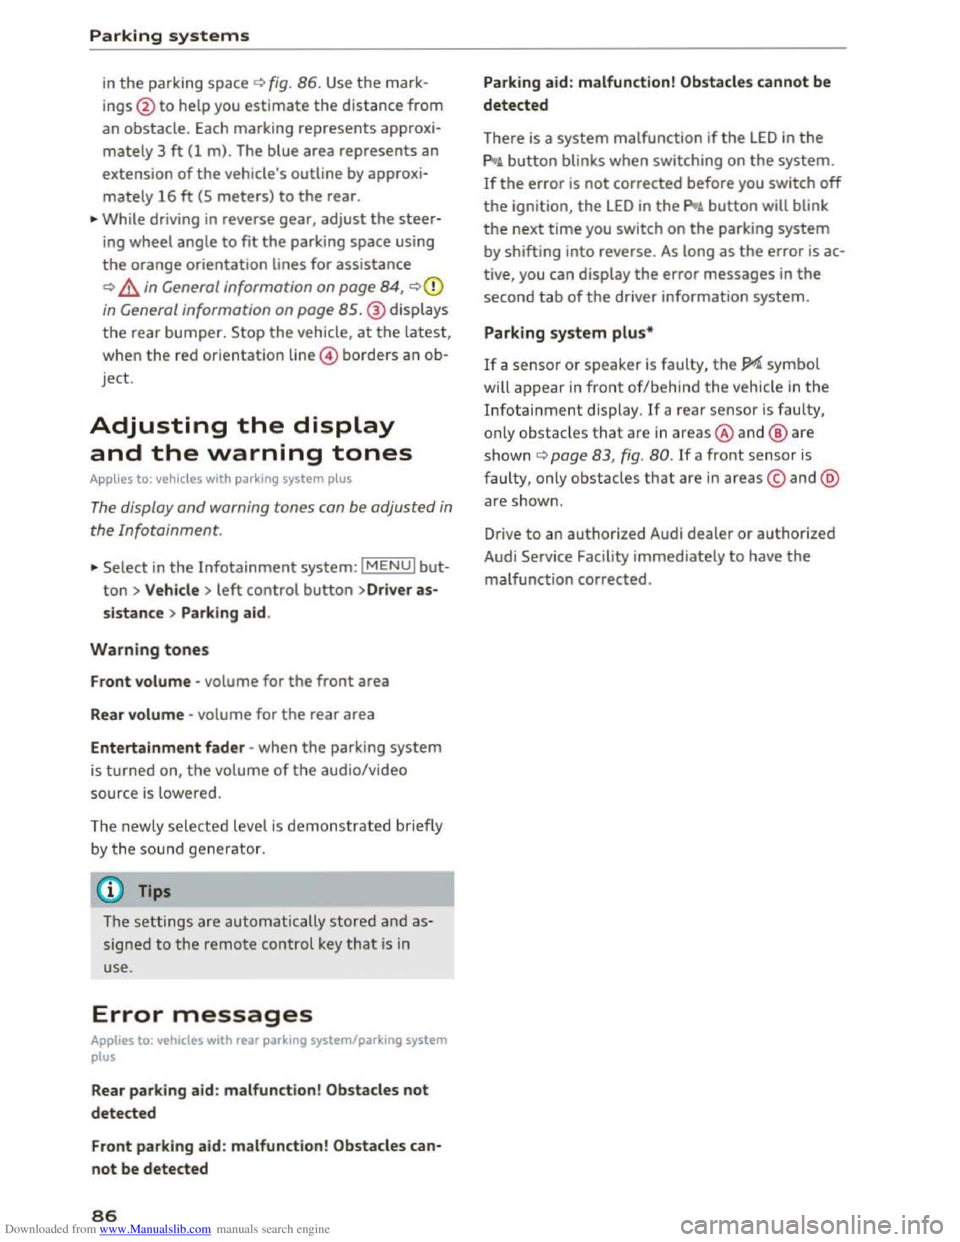
in the parking space c) fig. 86. Use the mark
ings @
to help you estimate th e distance from
an obstacle. Each marking represents approxi
mately 3 ft (1 m) . The blue area represents an
extension of the vehicle's outline by approxi
mately 16 ft (5 meters) to the rear.
.,.. While driving in reverse gear, adjust the steer
ing wheel angle to fit the parking space using
the orange orientation lines for assistance
c) .&. in General information on page 84, c)(i)
in General information on page 85.@ displays
the rear bumper. Stop the vehicle, at the latest,
when
the red orientation line @ borders an ob
j ect.
Adjusting the display
and the warning tones
A pp lies to: vehicles with park ing system plus
The display and warning tones can be adjusted in
the Infotainment.
.,.. Select in the Infotainment system: IMENUI but
ton > Vehicle > left control button >Dr iver as
sistance > Parking aid.
Warning tones
Front volume -volume for the front area
Rear volume -volume for the rear area
Entertainment fader -when the parking system
is turned on, the volume of the aud io/video
source
is l owered.
The newly selected level is demonstrated briefly
b y the sou nd
generator.
(}) Tips
The settings are automatically stored a nd as
signed to the remote control key that is in
use.
Error messages
Applies to: vehicles with rear parking system/parking system
plus
Rear parking aid : malfunction! Obstacles not
detected
Front parking aid : malfunction! Obstacles can
not be detected
86
Parking aid: malfunction! Obstacles cannot be
detected
There is a system malfunction if the LED in the
pg~ button blinks when switching on the system.
If the error is not corrected before you switch off
the ignition, the LED in the pg~ button will blink
the next time you switch on the parking system
by shifting into reverse . As long as the error is ac
tive, you can display
the error messages in the
second tab of the driver information system.
Parking system plus*
If a sensor or speaker is faulty, the JM symbol
will
appear in front of/behind the vehicle in the
Infotainment display. If a rear sensor is faulty,
o nl y o
bstacles that a re in areas@and@ are
s h own c) page 83, fig. 80. If a front sensor is
faulty, only obstacles that are in areas© and @
ar e show n.
Drive
to an authorized Audi dealer or authorized
Audi Service Facility immediately
to have the
malfunction corrected.
Page 103 of 322
Downloaded from www.Manualslib.com manuals search engine ..... N
G: CX)
.....
"' U"I
.....
"' .....
Multi Media Interface
Menus and symbols
I~ :c
'~
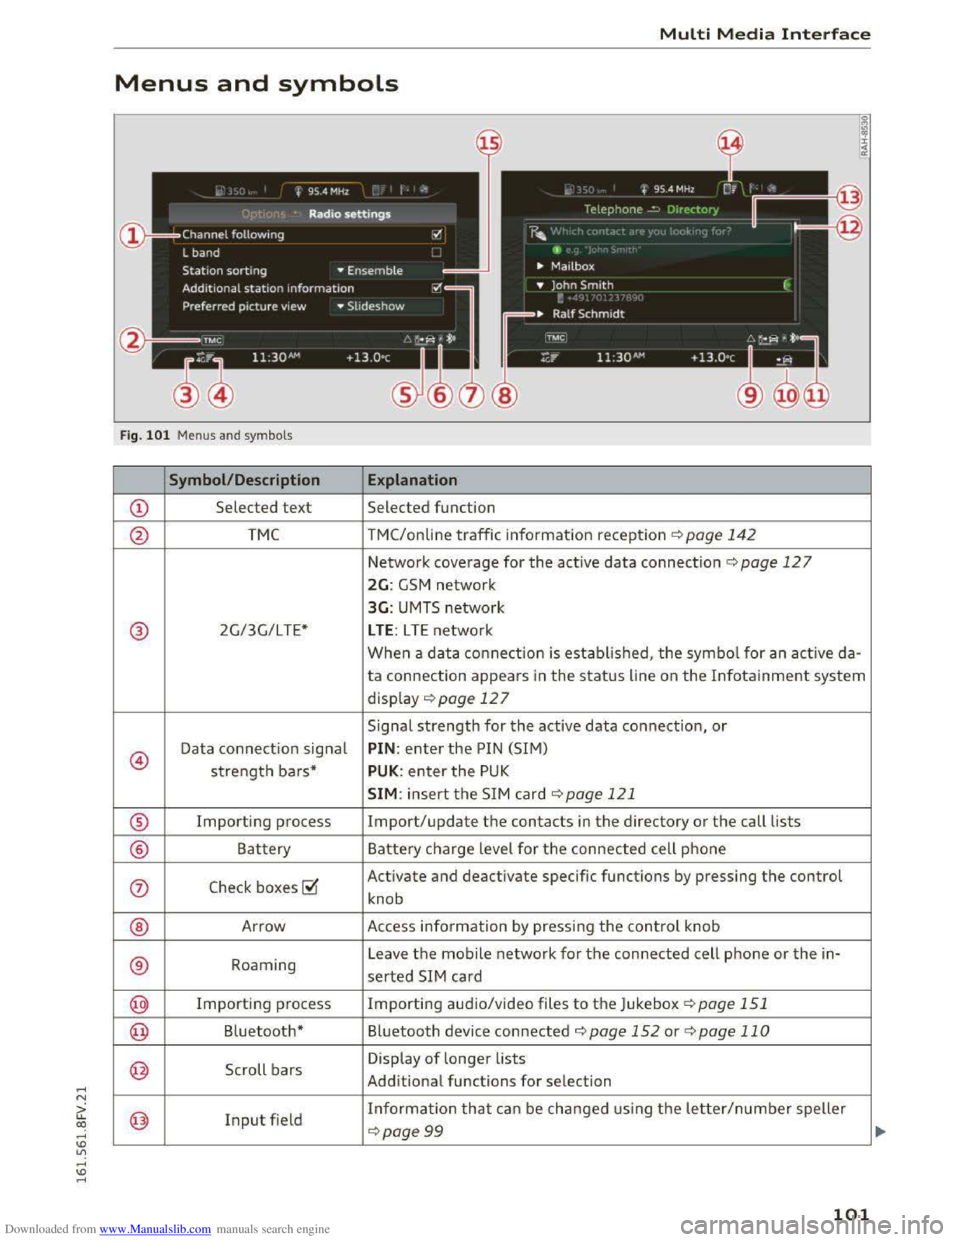
Fig. 101 Menus and symbols
Symbol/Description Explanation
CD Selected text Selected function
@ TMC TMC/online traffic information reception ¢page 142
Network coverage for the active data connection¢ page 127
2G: GSM network
3G: UMTS network
® 2G/3G/LTE* LTE: LTE network
When a data connection is established, the symbol for an active da-
ta connection appears in the status line on the Infotainment system
display ¢ page 12 7
Signal
strength for the active data connection, or
@
Data connection signal PIN: enter the PIN (SIM)
strength bars* PUK: enter the PUK
SIM: insert the SIM card~ page 121
® Importing process Import/update the contacts in the directory or the call lists
® Battery Battery charge level for the connected cell phone
(j) Check boxes ~
Activate and deactivate specific functions by pressing the control
knob
® Arrow Access information by pressing the control knob
® Roaming Leave the mobile network for the connected cell phone or the in-
serted SIM card
@ Importing process Importing audio/video files to the Juk
ebox ¢page 151
@ Bluetooth* Bluetooth device connected¢ page 152 or¢ page 110
@ Scroll bars
Display of longer lists
Additional
functions for selection
@ Input field Information that can be changed using the letter/number speller
~page 99
101
Page 105 of 322
Downloaded from www.Manualslib.com manuals search engine • Telephone
• Audi connect
• Navigation
• Directory
• Radio
•Media
· Sound
•
Help
• Help Speech dialog system
• Help Telephone
• Help Audi connect
• Help Navigation
• Help Map
• Help Radio
·Help Media
TEbEP:HONE
• Enter number
•Delete number I correc tion
• Directory
• Call (XY)
·business I private I land line I mobile
NAVIG:ATI0N
• N avigate to CXYl
·Business address I Private address
• Start I cancel route guidance
· Directory
• Last destinations
• N avigation favorites
· Drive
home
• Enter address
• Enter country I town I street I state
• Exclude routt I Exclude route for (XY) km Im
·Map
• Day map I Night map
Voice recognition system
• Favorites
• Call (XY)
• Enter number
• Redial
• Read new text message
• Navigate to (XY)
• Enter address/destination
• Onhne destinations
• Cancel route guidance
·Map
• Line (XY)
• Next page I previous page
• Cancel
•
No. l meant ()(Y)
• Correction
• Call
lost
• Redial
• Call mailbox
• Enter PIN I delete PIN
•
Telephone favorites
• Exclude next route section I Exclude
nex t
street
• Route list
• Calculate alternative routes
· Online destinations
• Special destination
• 20 driving position map/ 20 north position map/ 30 map I Destination map I Overview map
• Audi connect
• Travel information I Parking Information
•
Fuel prices
·Weather
RADIO
• Radio presets
• Last stations
•FM
• FM I AM I SIRIUS XM
• Station (XY) I Frequency (XY)
• T raffic announcement on I off
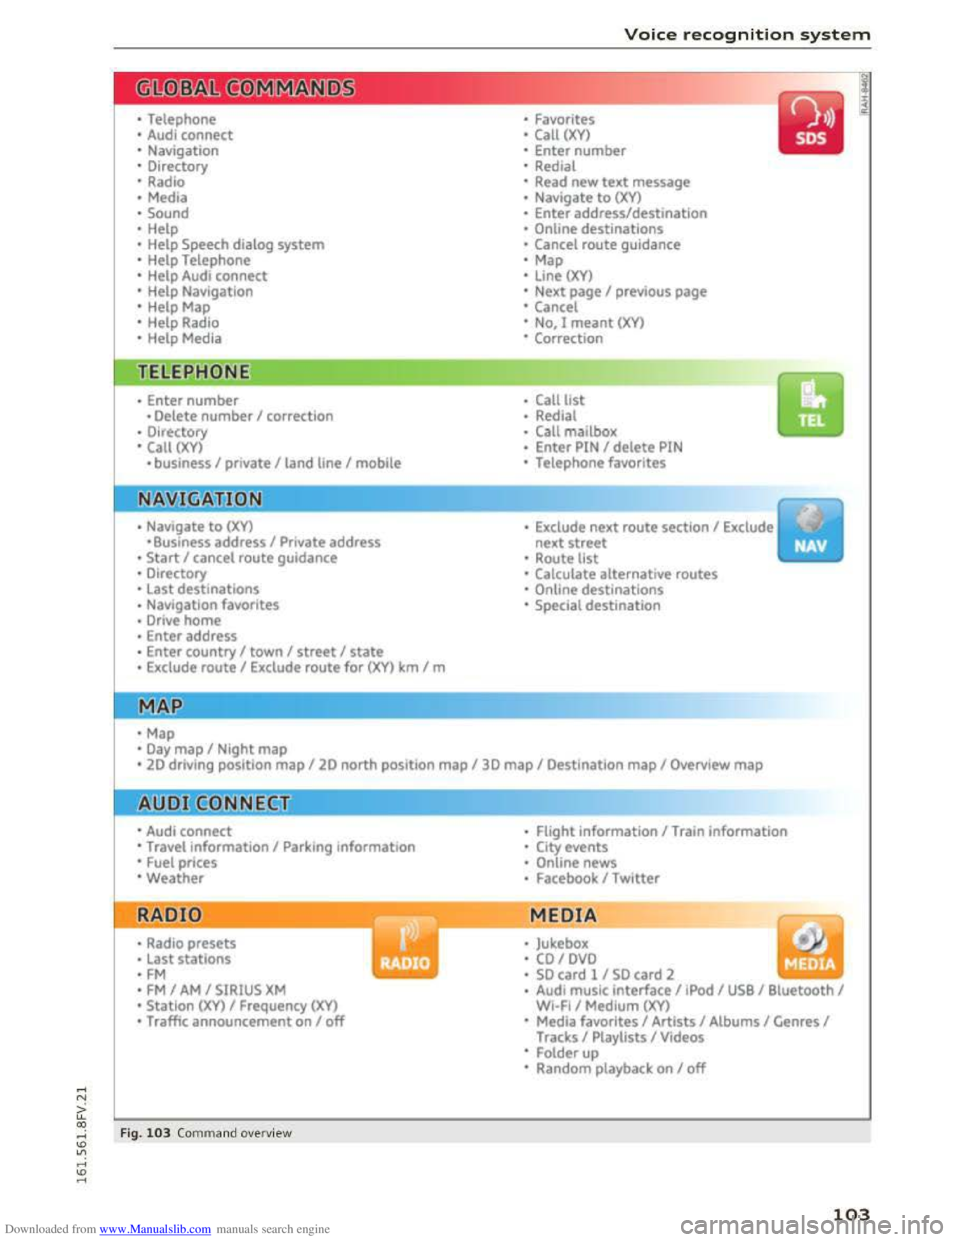
Fig. 103 Comm and ove rvie w
• Flight Information I Train information
• City events
• Online news
• Facebook I Twl tter
MEDIA
y • Jukebox
• CO I DVD
• SO card l / SD card 2
· Audi music interface I !Pod I USB I Bluetooth I
WI-Fi I Medium (XV)
• Media favorites I Artists I Albums I Genres I
Tracks I Playlists I Videos
• Folder up
· Random playback on I off
103
Page 108 of 322
Downloaded from www.Manualslib.com manuals search engine Voice recognition system
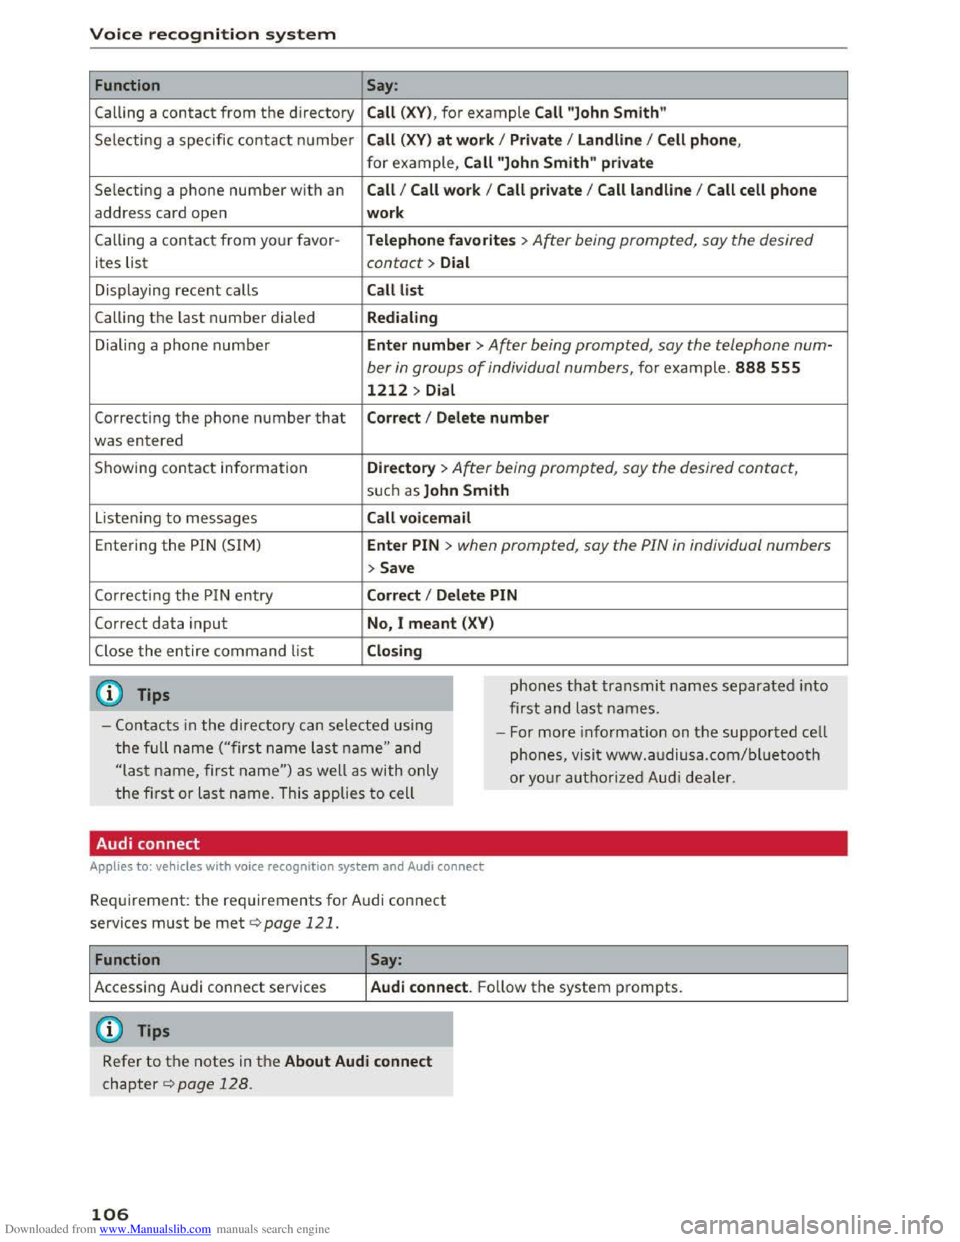
Function
Calling a contact from the directory
Selecting a specific
contact number
Selecting a
phone number with an
address card open
Calling a contact from your favor -
ites list
Displaying
recent calls
Calling the last number dialed
Dialing a
phone number
Correcting the phone number that
was entered
Showing contact information
Listening to messages
Entering the PIN (SIM)
Corre cti ng the P IN entry
Correct data input
Close the entire command list
@ Tips
Say:
Call (XV), for example Call "John Smith"
Call
(XV) at work I Private I Land line I Cell phone,
for example, Call "John Smith" private
Call I Call work I Call private I Call land line I Call cell phone
work
Teleph o
ne favorites >After being prompted, say the desired
contact > Dial
Call list
Redialing
Enter
number > After being prompted, say the telephone num-
ber in groups of individual numbers, for example. 888 555
1212 > Dial
Correct I Delete number
Directory > After being prompted, say the desired contact,
su ch as John Smith
Call voic email
Ente r PIN > when prompted, say the PIN in individual numbers
>Save
Corr ect I Dele te PIN
No, I
meant (XV)
Clo sing
phones that transmit names separated into
first and last names.
-Contacts in the dire ctory can selected using
the full name ("first name last name" and
"las t name, first name") as well as with only
the first or last name. This applies to cell -
For
more information on the supported cell
phones, visit www.a udiusa.com/bluetooth
or yo ur authorized Audi dealer .
Audi connect
Applies to: vehicles with voice recognition system and Audi connect
Requirement: the requirements for Audi connect
services must be met c::>page 121.
Function Say:
Accessing Audi connect services Audi connect. F o llow the system prompts.
(D Tips
Refer to the notes in the About Audi connect
chapter c::> page 128.
106
Page 111 of 322
Downloaded from www.Manualslib.com manuals search engine Voice recognition system
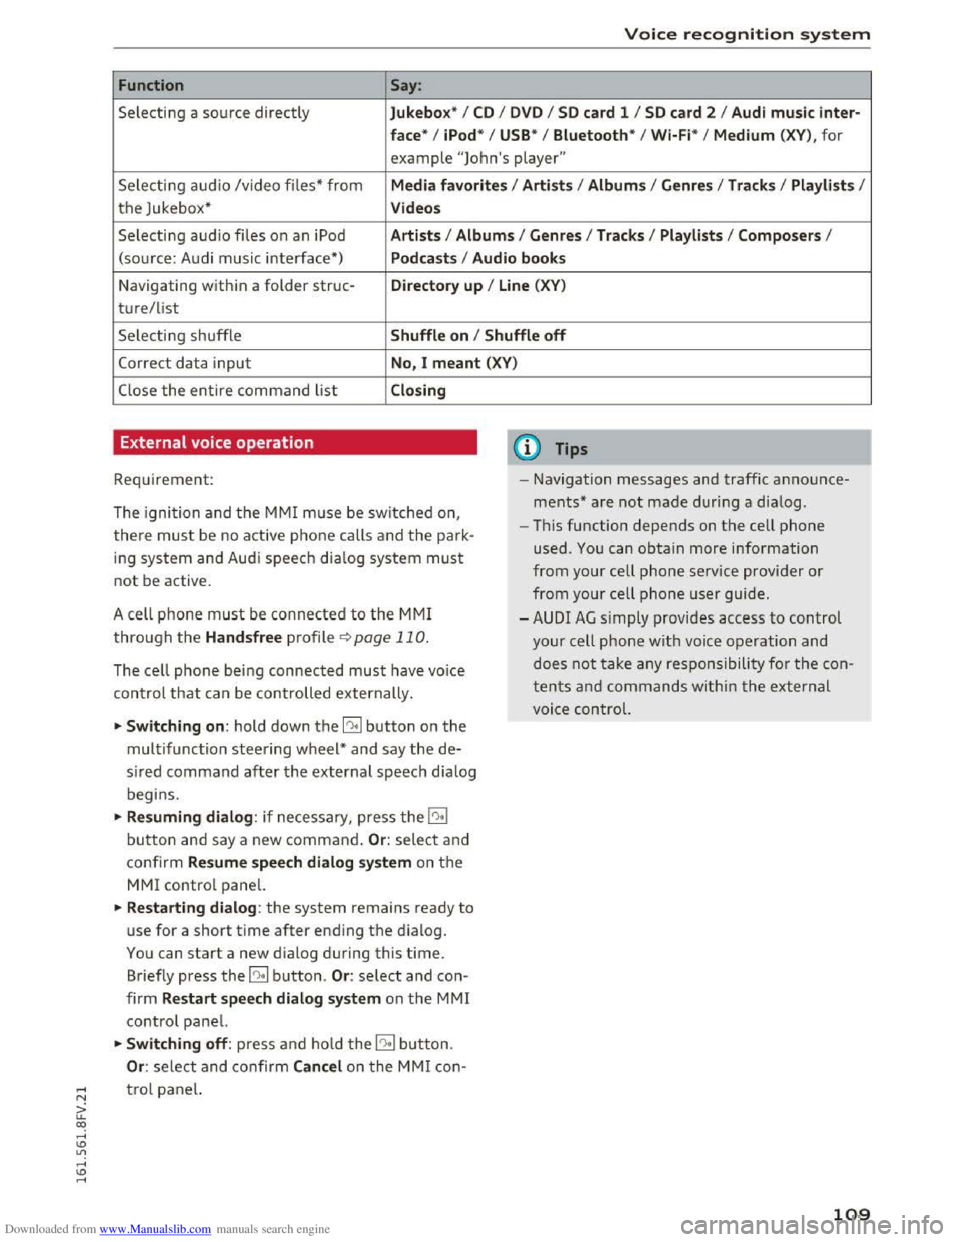
Function Say:
Selecting a source directly Jukebo x* I CD I D V D I SD card 1 I S D card 2 I Aud i mu sic inter-
face *
I iPod * I USB* I Bluetooth * I Wi-Fi* I Medium (XV), for
example "Jolhn's player"
Selecting audio /video files* from Media favo rite s I Artists I Album s I Genres I Tracks I Playli st s I
the Jukebox* Videos
Selecting audio files on an iPod A rt ists I Albums I Genre s I Tracks I Playlists I Compos ers I
(sou rce: Audi music interface*) Podcast s I Audio books
Navigating within a folder struc-Di rectory up I Line (XV)
t u re/list
Selecting shuffle Shuffle on I Shuffle off
Correct data input No, I meant (XV)
Close the entire command list Closing
External voice operation
Requirement:
The ignition and the MMI m use be switched on,
there must be no active phone calls and the park
ing system and Audi speech dia log system must
not be active .
A cell
phone must be connected to the MMI
through the Handsfree profile¢ page 110.
The cell phone bei ng connected must have voice
con trol that can be controlled externally.
~Switching on : hold down the 12!:1 button on the
multifunction steering wheel* and say the de
sired command after the external speech d ia log
begi ns.
~Resuming dialog : if necessary, press the l"l•I
button and say a new command. Or : select and
confirm Resum e speech dialog system on the
MMI control panel.
~Restarting dialog: the system remains ready to
use for a short time after ending the d ialog.
You can start a new dialog during this time.
Briefly press the 12!:1 button. Or: select and con
firm Restart speech dialog syste m on the MMI
control panel.
~Switching off: press and ho ld the 12!:1 b utton.
Or : select and confirm Cancel o n the MMI con-
(D Tips
- Navigation messages and traffic announce
ments* are not made duri ng a dialog.
-Th is function depends on the cell phone
used. You can obtain more information
from your cell phone ser vice provider or
from your cell phone user guide.
-AUDI AG simply provides access to control
your cell phone with voice operation and
does not take any responsibility for the con
t
ent s and commands within the external
voi ce control.
~ t ro l panel.
a: co ,....,
Page 112 of 322
Downloaded from www.Manualslib.com manuals search engine Telephone
Telephone
Introduction
Applies to: vehicles with telephone
To make calls through the MMI system, you must
connect your phone to the MMI with Bluetooth.
After connecting
your phone to the MM with
Bluetooth, you can use the telephone functions
conveniently
through the MMI.
Handsfree
After you have connected your cell phone to the
MMI via Bluetooth, you can use the handsfree
system and operate telephone functions through
your MMI. Phone calls are transmitted thro ug h
the antenna on your cell phone.
A WARNING
-Medical experts warn that cell phones can
interfere with the function of pacemakers.
Always maintain a minimum distance of 20
centimeters between the cell phone anten
na and the pacemaker.
-
Do not carry the cell phone in a pocket di
rectly over the pacemaker when the phone
is switched on.
- Switch
the cell phone off immediately if
you
suspect it may be interfering with the
pacemaker.
-Do not use the voice recognition system
¢page 104 in emergencies because your
voice may change in stressful situations. It
may take longer to dial the number or the
system may not be able to dial it at all. Dial
the emergency number manually.
- Switch
your cell phone off in areas where
there is a risk of an exp losion. These loca
tions are not always clearly marked. This
may include gas stations, fuel and chemical
storage facilities or transport vehicles, or lo
cations where fuel vapors (such as propane
or gasoline vapor in vehicles or buildings),
chemicals
or large quantities of dust parti
cles (such as flour, sawdust or metal) may
be present in the air. This also applies to all
other locations where you would normally
turn your vehicle engine off.
110
-
-The demands of traffic require your full at
tention. Read and follow the guidelines pro
vided in¢ page 95, Traffic safety informa
tion.
(D Tips
The Bluetooth connection range is limited to
inside the vehicle. It can also be affected by
local conditions
and interference with other
devices.
- Check
with your cell phone service provider
or the database for mobile devices at
www.audiusa.com/bluetooth to learn which
Bluetooth connections and functions are
supported on your cell phone.
Connecting a telephone
Connecting a cell phone using Bluetooth
Applies to: vehicles with telephone
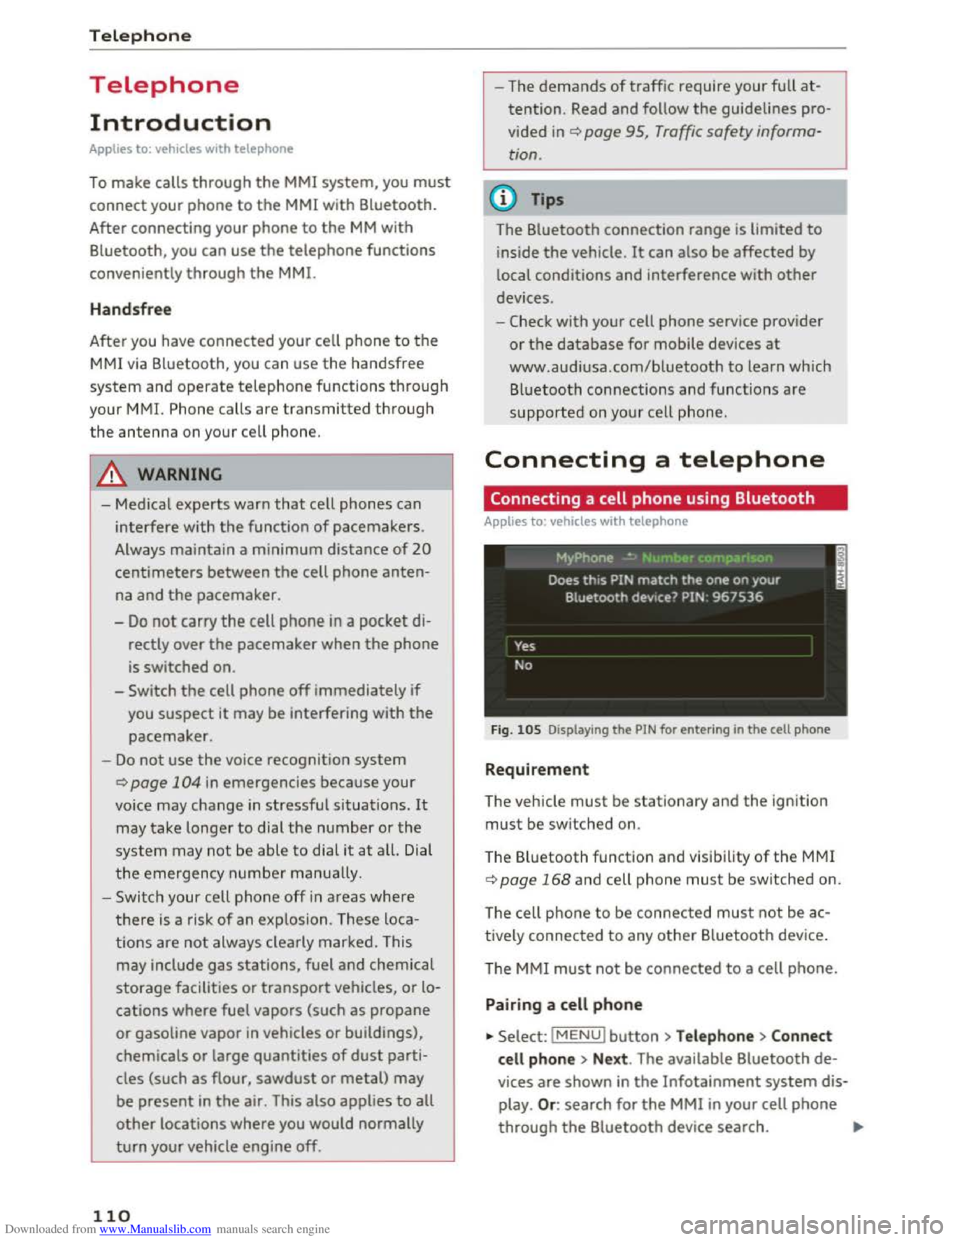
Fig. 105 Displaying the PIN for entering in the cell phone
Requirement
The vehicle must be stationary and the ignition
must be switched on.
The Bluetooth
function and visibility of the MMI
¢page 168 and cell phone must be switched on.
The cell ph
one to be connected must not be ac
tively connected to any other Bluetooth device.
T he
MMI must not be connected to a cell phone.
Pairing a cell phone
... Select: IMENUI button >Telephone> Connect
cell phone > Next . The available Bluetooth de
vices are shown in the Infotainment system dis
play. Or: search for the MMI in your cell phone
through the Bluetooth device search. ""'
Page 113 of 322
Downloaded from www.Manualslib.com manuals search engine ..... N
G: CX)
.....
"' U"I
.....
"' .....
.,.. Select and confirm the desired cell phone from
the list of displayed Bluetooth devices.
.. The MMI generates a PIN for the connection
setup ¢fig. 105.
.. Select and confirm Y es.
.. Enter the PIN for connecting on your cell
phone. Or: when the PIN is displayed on your
ce ll phone, confirm the PIN on your cell phone
and in the MMI. The time allowed for entering
the PIN is lim ited to approximately 30 seconds.
Pay attention to any additional system prompts
displayed on your cell phone, for example if the
system should connect automatically in the fu
ture. Depending on the cell phone, you may have
to confirm downloading the d irectory separately.
After connecting successfully
After connecting successfully, a short message
with information about the connected profiles
will appear. You can also cha nge the profile later
by selecting I MENU I > Settings> left control but
ton > MMI s ettings > Connection man ager
¢ page 168.
In addition, the cell phone contacts are a utomat
ic a lly loaded in the MMI directory. This process
can take several minutes, depending on the num
ber of contacts.
@ Tips
- Making phone calls through the MMI is only
possib le using a
Bluetooth profile (Hands
free ).
-You can apply additional settings to con
nected cell phones u s ing the connection
manager ¢ page 167.
-You only have to pair your dev ice one time.
Bluetooth devices that are already pa ired
automatically connect to the MMI when
they are within range and t h e ignition is
switched on.
- Authorizing
the MMI connection in your cell
phone will make automatic connection pos
s ible.
- Seve r
al cell phones can be paired to the
MM!, but only one cell phone can be actively
connected .
T elepho ne
- A B luetooth device that is already paired
with the MMI will be disconnected if anoth
er device is paired.
-
When leaving the veh icle, the Bluetooth
connection to the cell phone will automati
cally disconnect.
- You can obtain more information from your
cell phone service provider or from your ce ll
phone user guide. For information on using
the telephone, v isit www.aud iusa.com/blue
tooth or your authorized Audi dealer.
Using the Audi phone box
Applies to: vehicles with Audi phone box
Using the Audi phone box, you can call using the
external vehicle antenna and charge your cell
phone using a
USB adapter. Using the external
antenna helps when there is low signal strength
and also provides better reception quality.
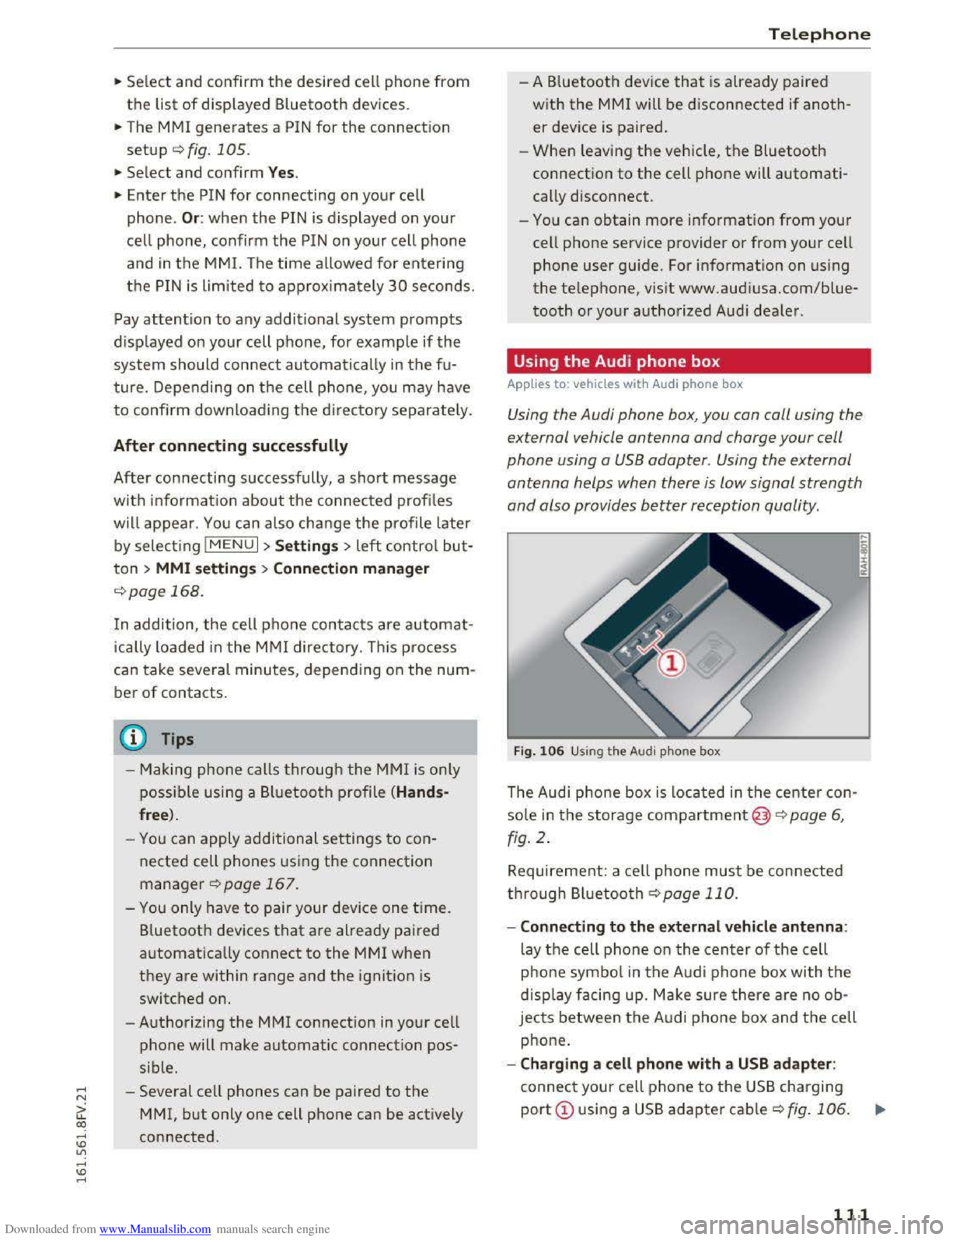
Fig. 106 Using t h e A udi p h one box
The Audi phone box is located in the center con
sole in the storage compartment@)¢ page 6,
fig . 2 .
Requirement: a cell phone must be connected
through Bluetooth ¢ page 110.
- Connecting to the ext ernal vehicl e antenna :
lay the cell phone on the center of the cell
p ho ne
symbol in the Audi phone box with th e
displa y facing up. Make sure there are no ob
jects between the A udi phone box and th e cell
phone.
-Charging a cell phone with a USB ada pter :
connect your cell phone to the USB charging
port CD using a USB adapter cable c:;, fig. 106.
...
I
111
Page 115 of 322
Downloaded from www.Manualslib.com manuals search engine ...... N
G'. CX)
..... ID VI ..... ID .....
.,. Select: I MENU I button >Telephone> left con
trol button.
Call list
Requirement: a phone number must be stored in
the call list.
Select and confirm the desired telephone num
ber from the recent calls list.
Call list symbols Q fig. 108:
@ Missed calls
@ Dialed numbers
@ Accepted calls
Favorites
Requirement: a phone number or contact must
be stored as a favorite ¢ page 114.
Select and confi rm a favorite in the favorites list.
Directory
Select and confirm a phone number from the di
rectory
Q page 117.
Enter number
- Entering a phone number as a sequence of
numbers: enter a phone number using the
number speller Q fig. 109.
- Entering the phone number as a sequence of
letters: select and confirm IABCI above the
number speller. Enter a sequence of letters us
ing
the letter speller, for example AUDISER
VICE.
- Dialing a phone number: select and confirm 4"".
Or: push the control knob down. Select and
confirm
OK.
- Deleting individual characters: select and con
firm
the speller to
and confirm Clear input field .
Tone
sequences (DTMF) can be entered directly
into
the speller during a phone call.
Telephone
Accepting/ending a call
Applies to: vehicles with telephone
-Accepting a call : select and confirm Accept
call.
-
Ignoring a call : select and confirm Ignore call.
-
Muting the active call: select and confirm
Mute.
- Ending a
call/canceling the dialing: press the
control knob (End call).
Answering
an additional call : if there is an in
coming call while
another call is active, you can
select Accept call to put the exis ting call on hold
and
answer the i ncoming call. If you selec t Ig
nore call, the incom ing call will be ignored.
Caller information: the name, phone number or
Unknown appears in the Infotainment system
display depending on if the ca lle r has been stored
in the directory and if the phone number has
been transmitted. A picture may also be dis
play ed,
depending on whether you have assigned
a picture to a
contact in your directory and if it
was transferred to your MMI. You can find out if
your cell
phone supports this function from your
cell
phone network provider, your cell phone
owner's manual or at www.audisua.com/blue
tooth.
(!') Tips
The radio or media playback is muted during a
phone call.
During a phone call
Applies to: vehicles with telepho ne
Requirement: there must be a call in progress.
... Press the right control button.
The follow ing options are possible during a call
depending on the cell phone being used and the
type of connection:
- Making
an additional call: select: Find contact
> Call list/Directory /Favorites > Entry in list.
-Accepting an incoming call when there is an
active call and a call on hold: select Replace .
The active call
is replaced with the incoming
call.
113
Page 117 of 322
Downloaded from www.Manualslib.com manuals search engine A cell phone with an active Bluetooth MAP (Mes
sage Access Profile) must be connected to the
MMI ¢page 110.
.,. Select: I MENU I button >Telephone > left con
trol button >Text message (cell phone) .
In box
All received text messages are displayed .
Sent text messages
All sent text messages are displayed.
Outbox
All text messages to be sent are displayed.
@ Tips
-Please note that you may have to activate
the receiving and sending of text messages
depending on the SIM card being used (for
example, when using a Multi-SIM). You can
obtain more information from your cell
phone service provider or from your cell
phone user guide.
-For more information on the supported cell
phones, vis it www.audiusa.com/bluetooth
or your authorized Audi dealer.
Writing a text message
Applies to: vehicles with automatic phone function or cell
phones with a Bluetooth Message Access Profile
.,. Select: I MENU I button >Telephone > left con
trol button> Text message (cell phone) > In
box > right control button.
Writing a text message
Select and confirm the desired template from
the list. Enter a recipient. Select and confirm
Send .
Replying*
Select and confi rm the desired template from
the list. Select and confirm Send.
Telephone
Message options
Applies to: vehicles with automatic phone function or cell
phones with a Bluetooth Message Access Profile
.,. Select: I M ENUI button> Telephone > left con
trol button> Text message (cell phone) > In
box/Sent text messages /Outbox > r ight con
trol button.
The following
options may be available, depend
ing on the selected menu.
Replying*
A reply can be sent for the selected message in
the lnbox .
Forward
The selected text message can be forwarded to a
different recipient.
Send again*
The selected text message can be resent.
Delete this text message*
The selected text message can be deleted.
Connection manager
See¢ page 167, Connection manager.
Telephone settings
See¢ page 119, Telephone settings.
(j) Tips
Messages that are deleted in the MM! are also
deleted in the cell phone automatically.
E-mail*
Applies to: cell phones with Bluetooth Message Access Profile
Depending on the type of cell phone used, you
con receive and
send e-mails through the MMI.
Requirement: message access (MAP -Message
Access Profile) must be activated in the Blue
tooth settings on your cell phone. You can find
out in your cell phone owner's manual if your cell
phone supports this function .
.,. Select: I M ENUI button> Telephone > left con-
trol button> E-mail (cell phone). ..,.
115