check engine AUDI TT ROADSTER 2011 User Guide
[x] Cancel search | Manufacturer: AUDI, Model Year: 2011, Model line: TT ROADSTER, Model: AUDI TT ROADSTER 2011Pages: 260, PDF Size: 64.11 MB
Page 34 of 260

32 Driver information system
Engine oil level OK
If th e . symbol st arts flashin g ag ain eve n
though the engine oil leve l checks O K on the
dip stick,
do not start driving again and do
not let the engine run at idle .
Instead, con
tact your author ized Audi dealer for assis
tance.
@ Tips
- The engine oil pressure symbol. is
not an indicator for a low engine oil lev
el. Do not rely on it. Instead , check the
oil level in your engine at regular inter
vals, preferably each time you refuel,
and always before going on a long trip.
- The yellow oil level warning indication
II requires oil refill or workshop serv
ice without delay. Do not wait until the
red oil pressure warning symbol.
starts to flash before you respond to
the low oil level warning
II . By then,
your engine may already have suffered
serious damage.
fl) Fuel supply too low
When the (i1 symbo l ill uminates, this means
there are about 2.6 gallons (10 liters) of fue l
left i n the fuel tank . Time to ref uel!
r::;, page 17 5 .
If the symbol lights up, even when t he re is
ample fuel in the tank, and the text
Tank sys
tem malfunction! Please contact workshop
a ppears in the d isplay, there is a fault in the
sys tem. Contact a qualified wor ksh op to have
the fau lt rectified.
'l=:11 , Checking the engine oil level
II! Please add max . 1 qt of engine oil!
If th e II sy mbo l comes o n, add 1 quart( ! li
ter) of o il at t he nex t oppor tunity
<::;,page 183.
1) - : USA mod els onl y
~ Checking the engine oil level
W hen the Ill symbol illum ina tes, check t he
engi ne oil leve l as soon as po ssibl e
r::;, page 183 . Top off t he oil at your ear liest
oppo rtunity
<::;, page 183 .
~.,., Engine oil sensor defective
If the II symbol illum inates, contact yo ur
autho rized Aud i dea le r and have the oil senso r
i nspected .
{0) Worn brake pads
&J Brake pads!
If the warning light i lluminates, immed iate ly
contact your a uthori zed Audi d ealer or quali
fied works hop to have all b rake pads i nspect
ed. On USA mode ls t he war ning ligh t
&J
comes on together w ith the warning light
1111 . Bot h set s of bra ke pads o n an ax le
mu st al ways be re place d at th e same time.
A WARNING
Driving w ith bad bra kes ca n ca use a colli
sion and ser io us perso nal in jury.
- If th e warni ng light
&J an d th e warn ing
lig ht
11111> with t he mess age Brake
pads!
comes o n in the ins trum en t cluste r
d isp lay, immediate ly co ntact you r au
th orized A udi dealer or qualif ied work
shop to have all b rake pads checked or
re placed if nec essary.
0 /8 Speed warning 1
If the [i (USA models)l [i) (Canada mode ls)
symbol illum ina tes, this m ea ns you a re d riv
i ng fas ter than t he set vehicle speed . S low
down!
r::;, page 26.
-
Page 35 of 260
![AUDI TT ROADSTER 2011 User Guide 0/0, Speed warning 2
If the ti] (USA models)l [i] (Canada models)
symbol illuminates, this means you have dr iv
en faster than the second set vehicle speed.
Slowdown!
¢page 26.
~[ AUDI TT ROADSTER 2011 User Guide 0/0, Speed warning 2
If the ti] (USA models)l [i] (Canada models)
symbol illuminates, this means you have dr iv
en faster than the second set vehicle speed.
Slowdown!
¢page 26.
~[](/img/6/57666/w960_57666-34.png)
0/0, Speed warning 2
If the ti] (USA models)l [i] (Canada models)
symbol illuminates, this means you have dr iv
en faster than the second set vehicle speed.
Slowdown!
¢page 26.
~[) Headlight range control defective
Appl ie s to veh icles: w ith dynamic hea dli ght range a djust
m ent
If the II ill uminates, the dynamic headlight
range control is no longer working properly.
Have the system checked and repaired at your
authorized Audi dealer.
! ?) Engine speed limitation
A pp lies to veh icles: with e ngine spee d limitat io n
(Pl Do not exceed max. engine speed of XXXX
rpm
The II! symbol illuminates when there is an
engine control malfunction. The indicator
light ~ in the instrument cluster also illumi
nates . The engine speed is limited to the
speed displayed in the driver information sys
tem . Keep in mind that the eng ine speed will
not exceed the va lue disp layed in the driver in
fo rmation system , fo r example when down
shifting.
Please go to an authorized Aud i dealer or oth
er qualified workshop to have the malfunction
r epaired.
O Windshield washer fluid level too low
If the (-J '>ymbol illuminates, add windshield
washer fluid to the washer system
¢page 192.
D Battery voltage low
If the (•i symbol illuminates, contact your au
thor iz ed Audi dealer and have the following
components inspected:
- drive be lt
- battery charge
Driver information system 33
Also see if the generator warning/indicator
light illuminates
¢page 16.
® Defective light bulb warning
The defective light bulb warning tells you
when o vehicle light bulb hos become defec
tive.
If a defective bulb has been detected by the
system or a light bulb burns out, the
II sym
bo l with a message appears in the display to
te ll you which bulb is burnt out and where it is
located. For example :
Rear left turn signal
After S seconds, the message disappears. If
you want to recall the message into the dis
play, p ress the CHECK button
¢page 10,
fig . 3 @ .
The re are three reasons why the defective
bulb message would appear in the disp lay:
- The light bulb has burnt out¢
page 230 .
-The fuse is "blown" ¢ page 22 7, Replacing
fuses .
-The wire connect ion to the light bulb is de-
fective.
Have the bulb replaced or the connection re
paired by your authorized Audi Service depart
ment .
.&, WARNING
-Light bulbs are pressurized and could ex
plode wh ile they are being changed caus
ing serious pe rsonal injury.
- Work with due care when handling the
high-voltage sect ion of gas discharge
(xenon) lamps. Failing to do so could re
sult in death or serious injury!
BRAKE LIGHT!< ®> Brake light defective
In case of a malfunction or component fail-
ur e, the symbo l (USA models)/
l1J (Canada models) can appear. The follow
ing electrical components should be checked,
repaired or replaced, as necessary:
Page 37 of 260
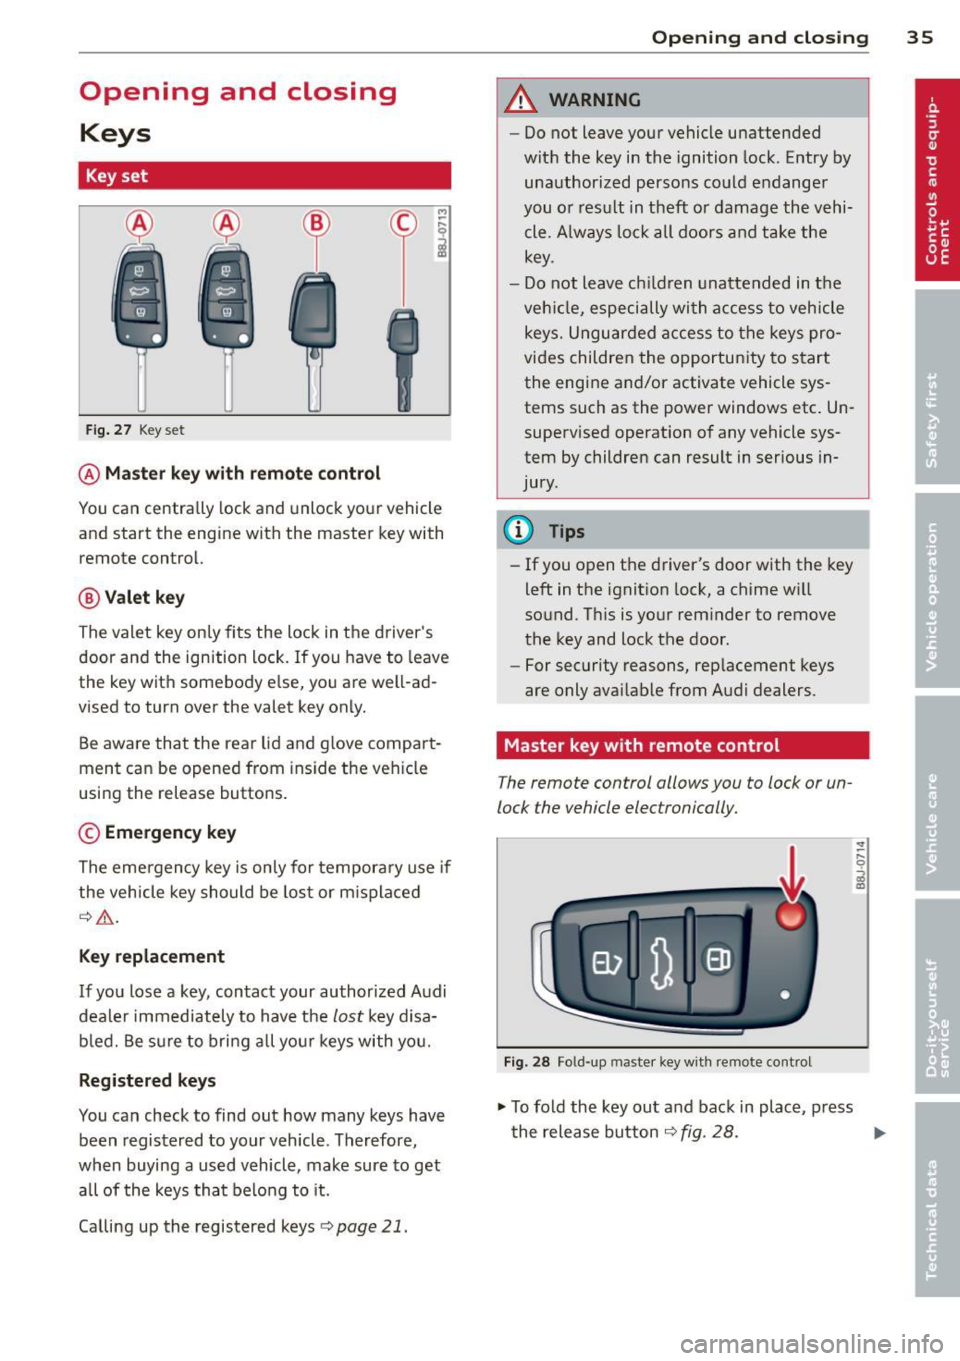
Opening and closing Keys
Key set
Fig. 27 Key set
@Master key with remote control
M
-~
il
You can centrally lock and unlock your vehicle
and start the engine with the master key with
remote control.
@ Valet key
The valet key only fits the lock in the d river's
door and the ignition lock. If you have to leave
the key with somebody e lse, yo u are well -ad
vised to turn over the valet key only.
Be aware that the rear lid and g love compa rt
ment can be opened from ins ide the vehicle
using the release buttons .
© Emergency key
The emergency key is only for temporary use if
the vehicle key should be lost or m isplaced
¢ .&,.
Key replacement
If you lose a key, contact your authorized Audi
dealer immediately to have the
lost key d isa
bled. Be sure to bring all your keys with you.
Registered keys
You can check to find out how many keys have
been registered to your veh icle . Therefore,
when buying a used vehicle, make sure to get all of the keys that belong to it.
Calling up the registered keys¢
page 21.
Opening and closing 35
A WARNING
-Do not leave your vehicle unattended
with the key in the ignition lock. Entry by
unauthorized persons could endanger
you o r result in theft or damage the vehi
cle. A lways lock all doors and take the
key.
- Do not leave ch ildren unattended in the
veh icle, especially with a ccess to vehicle
keys. Unguarded access to the keys pro
vides children the opportunity to start
the engine and/or activate vehicle sys
tems such as the power windows etc . Un
supervised operation of any vehicle sys
tem by children can result in serious in
jury.
(0 Tips
- If you open the driver's door with the key
left in the ignit ion lock, a chime w ill
sound. Th is is your reminder to remove
the key and lock the door .
- For security reasons, rep lacement keys
are only avai lable from Audi dealers.
Master key with remote control
The remote control allows you to lock or un
lock the vehicle electronically.
Fig. 28 Fo ld-up mas ter key with remote contro l
.,. To fold the key out and back in place, press
the release button ¢
fig. 28. ..,.
Page 45 of 260
- engine compartment
-lu ggage compar tment
- doors
- ignition
When the system is activated, the alarm will
be triggered if one of the doors, the engine
h ood or the rear lid are opened, or if the ign i
tion is turned on.
The anti-theft alarm system wi ll also go off
when the battery is disconnected.
You can a lso trigger the alarm by pressing the
PANIC button on your remote-control key.
This will alert other peop le in case of emer
gency. Press the
PANIC button again to turn
off the alarm .
How is the anti-theft alarm switched off
when triggered?
The alarm system is switched off when you
unlock the vehicle using the remote-control
key or when the ignition is sw itched on . The
a larm w ill also switch itse lf off when it comes
to the end of its cycle.
Emergency flasher
The emergency flasher will blink briefly when
the doors, engine hood and rear lid are prop
erly closed .
If the emergency flashers do not blink, check
the doors, engine hood and rear lid to make
sure they are properly closed. If you close a
door, the hood or the rear lid with the ant i
theft alarm switched on, the emergency flash
e rs will bli nk only after you have closed the
door or lid .
@ Tips
-For the anti-theft alarm system to func
tion properly, make sure all vehicle doors
and windows are closed before leaving
the vehicle .
- When you open the vehicle from the
driver's door using the key, the centra l
l ocking switch will work only after you
have switched on the ignition.
Opening and closing 43
Power windows
Controls
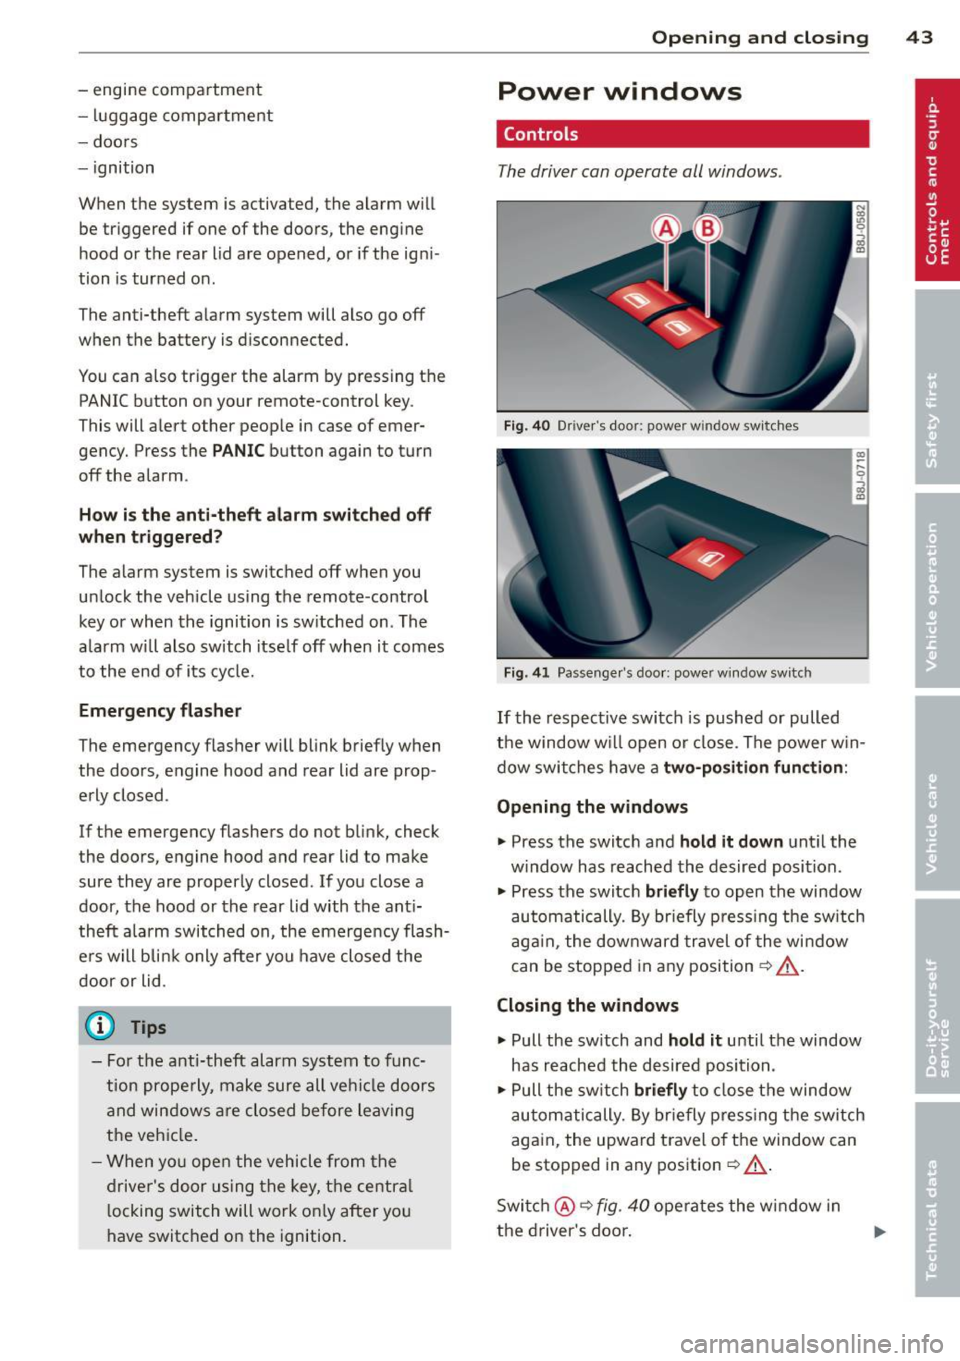
The driver can operate all windows .
Fig. 40 Driver's door: power w indow switches
Fig. 41 Passenger's door: power window switch
If the respective switch is pushed or pulled
the window w ill open or close. The power win
dow switches have a
two-position function :
Opening the windows
.,. Press the switch and hold it down unt il the
w indow has reached the desired position.
.. Press the switch
briefly to open the window
automatically. By briefly pressing the switch
again , the downward travel of the window
can be stopped in any position¢ _&..
Closing the windows
.,. Pull the sw itch and hold it until the window
has reached the desired position.
.,. Pull the switch
briefly to close the window
automatically. By briefly pressing the switch
again, the upward travel of the window can
be stopped in any position
~ _&. .
Switch @¢
fig. 40 operates the window in
the driver's door.
Page 46 of 260
44 Opening and clo sing
Switch @ operates the window in the front
passenger's door .
.&_ WARNING
-Do not leave children unattended in the
vehicle, especially with access to vehicle
keys . Unsupervised use of the keys can
result in starting of t he engine and use
of vehicle systems such as power win
dows , etc. which cou ld result in serio us
mJury .
- Remember -you can still open or close
the power w indows for about ten m i
nu te s after the ignition is sw itche d off.
Only whe n eit her of the fron t doo rs a re
opened are the power windows sw itched
off.
- B e care ful when closing the windows .
C heck to see that no one is in the way, or
serious injury could result!
- Always remove the ignition key whenever
yo u leave yo ur vehicle.
- If you lock you r vehicle from the ou ts ide,
no one, especially children, sho uld re
main in the vehicle .
- Do not stick any thing on the windows o r
the windshie ld that may interfere with
the driver 's fie ld of vision .
(!} Tips
-When the doors a re opened, the w in
dows are a utomat ically lowered 10 mm.
- The w indows can still be ope ned and
closed for abou t ten m in utes after the
i gnition has been turned off. The power
win dows are not sh ut off until one of the
front doors is opened.
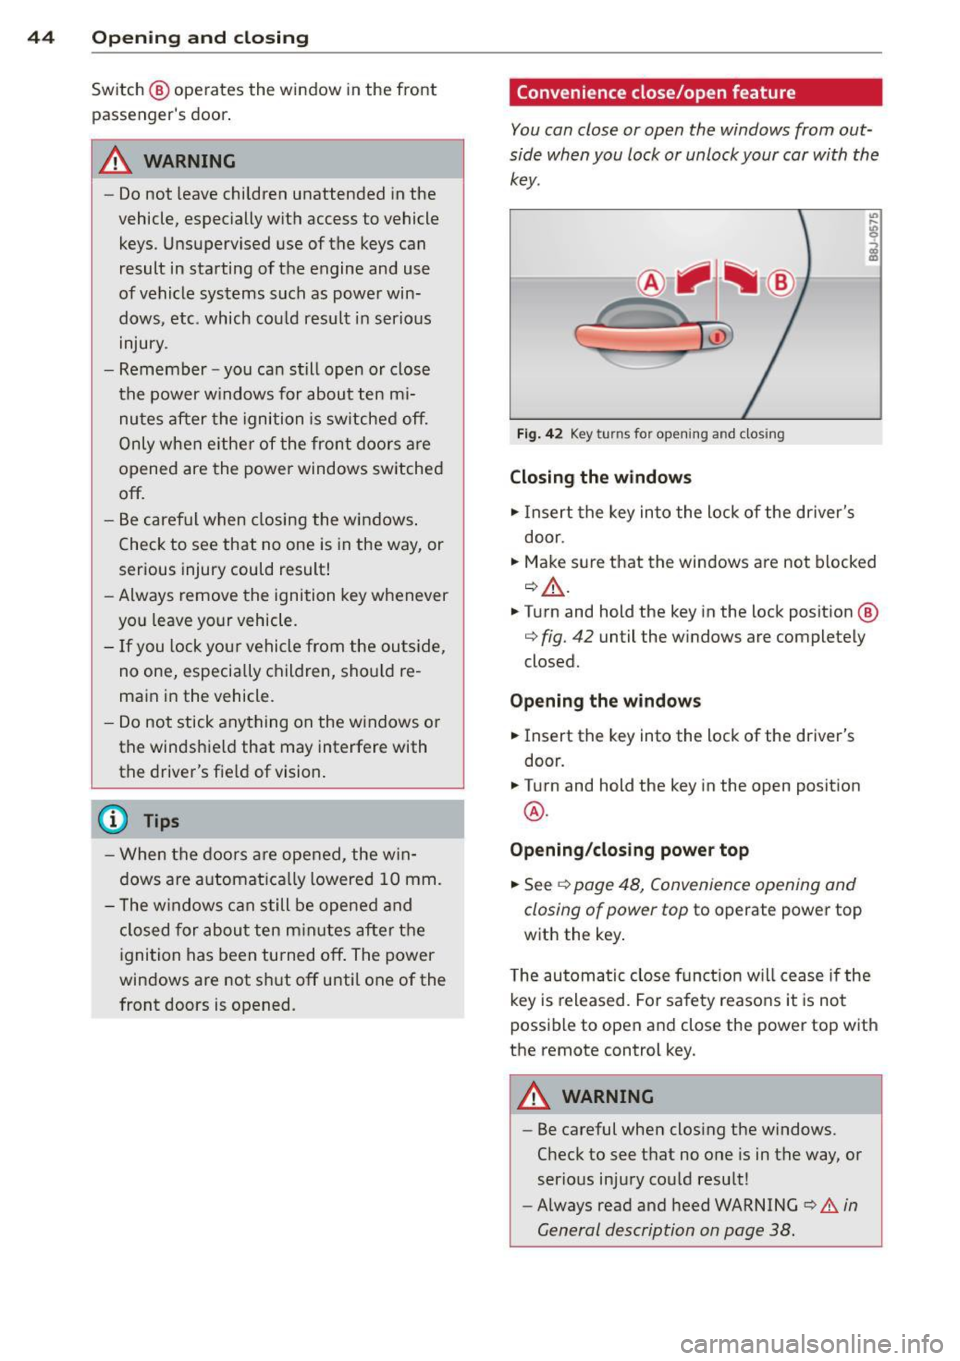
Convenience close/open feature
You can close or open the windows from out
side when you lock or unlock your car with the
key.
r
F ig. 4 2 Key turns fo r op enin g an d clos ing
Closing the windows
.,. Insert the key in to the lock of the driver's
door.
.,. Make s ure that the windows a re not blocked
~.&. .
.,. Turn and hold the key in the lock position @
q fig. 42 until the windows are completely
closed.
Opening the window s
.,. Insert the key into the lock of the driver's
door.
.,. Turn and hold the key in the open posit ion
@ .
Opening /closing power top
.,. See ¢ page 48, Convenience opening and
closing of power top
to operate power top
with the key .
T he automatic close function w ill cease if the
k ey is released . Fo r sa fe ty reaso ns it is no t
possible to open and close the power top with
the remote control key .
.&_ WARNING
-
-
- Be careful when clos ing the windows.
Check to
see t h at no one is in the way, or
serio us inju ry co uld resu lt!
- Always read and heed WARNING
~.&. in
General description on page 38 .
Page 64 of 260
62 Clear vis ion
- Make sure the washer fl uid reservoir in
the engine compartment is topped
off
before going on a long trip . Look up
c:> page 192 for checking and fi lling the
washer container.
- The w ipers only operate w ith the hood
completely closed.
Headlight washer system
App lies to vehicles: with hea dlig ht washer system
The headlight washer system cleans the
headlights.
.. Operate the winds hield wiper/washer sys
tem
c:> page 60, fig. 68 ® with the head
li ghts turned on by holding the lever for lon
ger than one second.
The washer jets extend forward o ut of the
front bumper driven by water pressure to
spray the front headlights with water.
You shou ld inspect the headlights regularly
(for example when refue ling) and clean
off
any solid dirt or insects from the lenses .
To ensure the system works properly in winter,
keep the washer jets free of snow and remove
any ice using a de-icing spray.
Service position
It is only possible to change wiper blades if
you move the wiper arms to the service posi
tion
I n o rder to use the windsh ie ld w ipers, the
front lid must be comp letely closed
Moving wiper blades to the service
position
.. When there is a ris k of frost, ma ke s ure that
the wiper b lades are not frozen to the wind
shield .
.. Switch the ignition on .
.. Move the wiper lever to pos ition
0
c:> page 60, fig. 68 .
.. Press the I Reset I button until the Display
type menu appears in the Driver Informa
t ion System display . ..
Using the rocker switch and the
I R ese t I but
ton, se lect the Set > Wipe rs > Front > Se rv
ice po sition on function . The w indshield
w iper arms move to the service posit ion.
Mo ving wip er blades to pa rk position
.. Make certain that the w iper arms are ly ing
against the windshield .
.. Switch the ignition on and move the wipe r
lever from pos ition O
to 4 c:> page 60,
fig. 68.
The w iper arms will move back to
the park position.
@ Note
Never drive your veh icle when the wind
sh ield wiper arms are in the service posi
tion and pulled away from the winds hield.
When you d rive faster than 4 mph (6 km/
h), the wiper a rms automatically return to
the pa rk position and cou ld cause paint
d amage to the front l id!
@ Tips
= Yo u can also tur n on the se rvice posit ion,
for example, if yo u want to p rotect the
w indshield from icing by us ing a cover.
- The service posit ion moves to
off a uto
matically whe n you ope ra te the w ind
shield wiper lever, o r speed exceeds
4 mph (6 km/h) .
Page 82 of 260
80 On the road
On the road
Steering
Adjusting the steering wheel column
The steering wheel position can be continu
ously adjusted in height and distance .
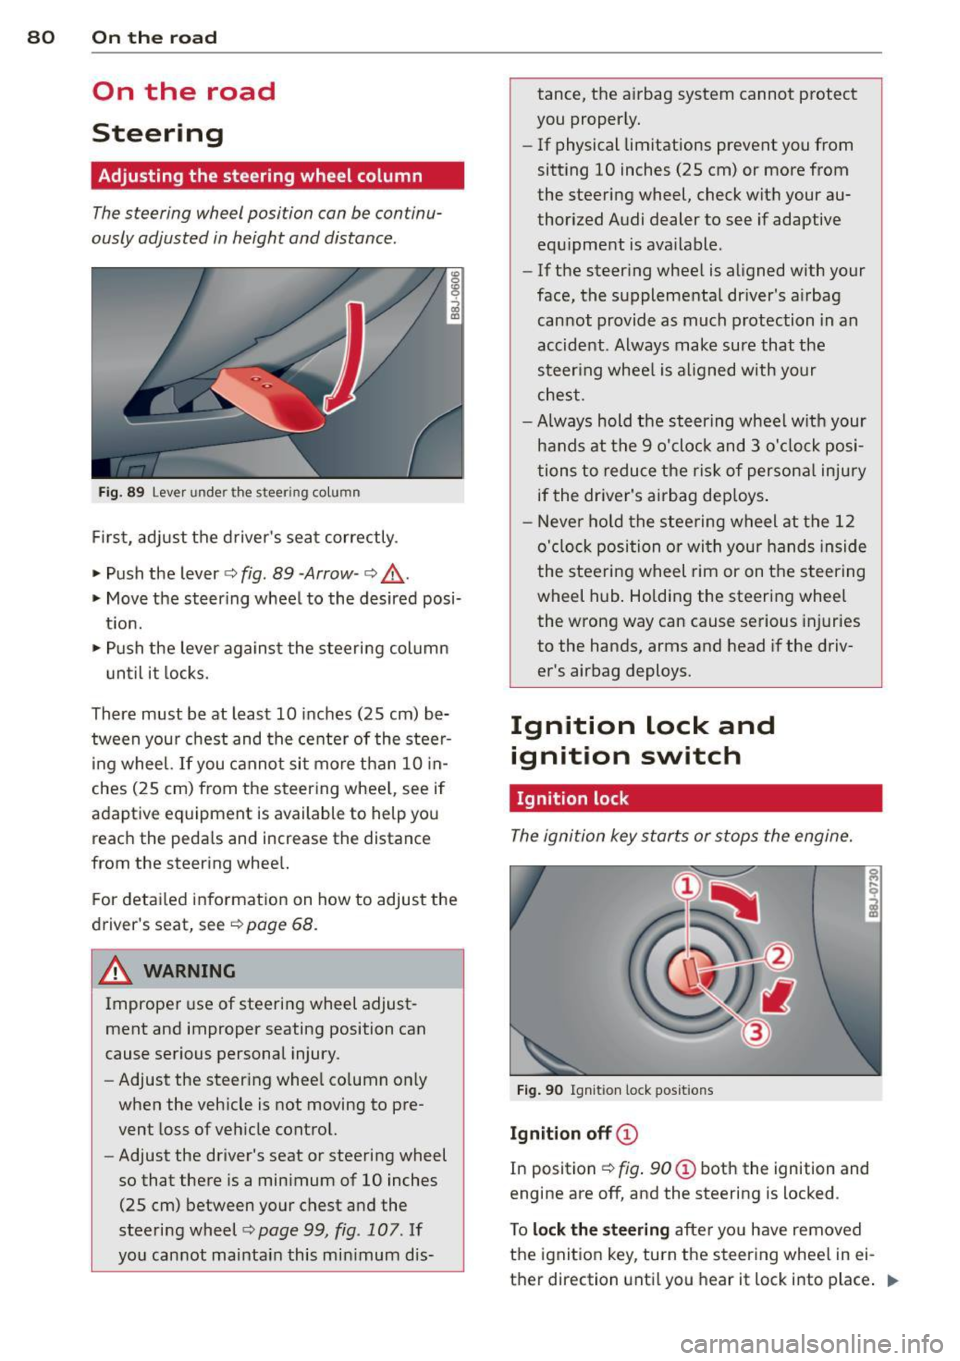
Fig. 89 Lever under the steer ing co lu m n
First, adjust the driver's seat correctly .
• Push the lever
c::> fig . 89 -Arrow -c::> ,&.
• Move the steer ing wheel to the desired posi
t ion.
• Push the lever against the steering column
until it locks.
There must be at least 10 inches (25 cm) be
tween your chest and the center of the steer
i ng wheel. If you cannot sit more than 10 in
ches (25 cm) from the steering whee l, see if
adaptive equipment is available to help you reach the pedals and increase the distance
from the steering whee l.
F or detai led information on how to adjust the
driver's seat, see
c::> page 68.
A WARNING
Improper use of steeri ng wheel adjust
ment and improper seating position can
cause serious personal injury.
- Adjust the steer ing whee l co lumn on ly
when the vehicle is not moving to pre
vent loss of veh icle control.
- Adjust the driver's seat or steering wheel
so that there is a minimum of 10 inches
(25 cm) between your chest and the
steering wheel
¢ page 99 , fig. 107. If
yo u cannot maintain this min imum dis- tance, the airbag system cannot protect
you proper ly.
- If physical limitations prevent you from
sitting 10 inches (25 cm) or more from
the steering wheel, check with your au
thorized Audi dealer to see if adaptive equ ipment is ava ilable .
- If the steer ing wheel is aligned with your
face, the supplementa l driver's a irbag
cannot provide as much protection in an
accident . Always make sure that the
steer ing wheel is aligned with your
chest.
- Always hold the steering wheel w ith your
hands at the 9 o'clock and 3 o'clock posi
tions to reduce the risk of persona l injury
if the driver's airbag dep loys .
- Never hold the stee ring wheel at the 12
o'clock position or with your hands inside
the steeri ng wheel rim or on the steering
wheel hub . Holding the steering wheel
the wrong way can cause serious injuries
to the hands, arms and head if the driv
er's airbag deploys.
Ignition lock and
ignition switch
Ignition lock
The ignition key starts or stops the engine.
Fig . 90 Ign iti on lock pos it ions
Igniti on off ©
In pos ition c::> fig . 90 @ both the ignition and
engine are off , and the steering is locked .
T o
loc k th e steering after you have removed
the ignition key, turn the steering whee l in ei
ther direction until you hear it lock into place .
1)),-
Page 158 of 260
156 Intelligent technology
If starting capability is jeopa rdized due to en
ergy consumption, a message appears in the
driver information disp lay.
You have to start the engine to charge the
battery.
With the engine running
A lthough electrical energy is generated when
the vehicle is being driven, the battery can be
come discharged. This happens most ly when
little energy is being generated and a great
deal consumed and the battery's state o f
charge is not optima l.
To bring the energy balance back into equili
brium, consumers which require especially
l arge amounts of energy are temporarily cut
back or switched off. Heating systems in par
ticular require a great dea l of energy. If you
notice, for example, that the heated seats* or
the heated rear window are not heating, they
have been temporar ily cut back or switched
off. These systems will be ava ilable again as
soon as the energy balance has been restored.
You will also notice that engine idle speed has been increased slightly . This is normal and not
a cause for concern . By increas ing engine idle
speed the add itiona l energy required is gener
ated and the battery is charged.
Driver notification in the instrument
cluster display
If battery power drops into the range where it
can limit the ability of the engine to start, th is
is shown in the instrument cluster display
with the following driver message:
(•) Low battery charge : battery will be
charged while driving
This notification reminds you that the starting
capability of the engine may be limited. As
soon as you start driving again, the battery
will be recharged and the notification will go
out.
Driver notification appears and goes out
again
If this driver notification appears after the ig
nition is turned on or whi le driving and it goes
out again after a while, the battery has been
adequately recharged.
Driver notification appears and does not
go out again
If this driver notif ication appears after the ig
nition is turned on or while driving and does
not go out again, the battery 's state of charge
is not in the optimal range. Starting ability is
restricted . Have the battery checked as soon
as possible by an autho rized Aud i dea le r o r
qualified wo rkshop.
Page 160 of 260
158 Driving and en vi ro nm ent
Avoid damaging the
vehicle
When you are driving on poor roads, or over
curbs, steep ramps, etc ., make certain that
low-lying parts such as spoilers and exhaust
system parts do not bottom out and get dam
aged.
This is especially true for vehicles with low
slung chassis (sports chassis) and fully loaded
vehicles .
Driving through water
on roads
Note the following to avoid vehicle damage
when driving through water, for example on
flooded roads:
- T he water must not be any highe r tha n the
bottom of the vehicle body.
- Do not d rive faster than wa lking speed.
_& WARNING
After d riving through wate r, m ud, slush,
etc., the brakes may be slow to take effect
because o f wet brake rotors and pads . Dry
the brakes first by braking carefully to re
store the full braking effect.
(]) Note
Vehicle components such as the engine,
transmiss ion, suspension or electrical sys
tem can be severely damaged by driving
through water.
- Check the depth of the water before driv
ing through it.
- Do not stop the veh icle, drive in reverse
or switch the engine
off when driving
through water.
- Keep in mind that oncoming vehicles may create waves that raise the water
level and make it too deep for your vehi
cle to drive through safely.
- Avoid driving thro ugh salt water because
it can ca use corrosion.
-
Catalytic converter
It is very important that your emission con
trol system (catalytic converter) is function
ing properly to ensure that your vehicle is run
ning in an environmentally sound manner.
.. Always use lead-free gasoline ¢ page 17 4,
Fuel supply .
.. Never run the tank down all the way to emp
ty.
.. Never put too much motor o il in your eng ine
r::;> page 183, Adding engine oil~-
.. Never try to p ush- or tow-sta rt your vehicle.
The catalytic converter is an efficient "clean
up" dev ice built into the exhaust system of
t h e vehicle. The cata lytic conve rter bu rns
many of the pollutants in the exha ust gas be
f ore they are re leased into the atmosphere.
T he exclusive use of unleaded fuel is critically
impor tant for the life of the catalyt ic convert
er and prope r funct ion ing of the engine.
A WARNING
- Do not park or operate the vehicle in
areas where the hot exha ust system may
come in contact with dry grass, brush,
fue l spill or other material wh ich can
cause a fire.
- Do not app ly additiona l undercoating or
rustproofing on or near the exhaust
manifold, exhaust pipes, catalytic con
verter or heat sh ields. Dur ing driv ing, the
substance used fo r undercoating could
overheat and cause a fire.
(D Note
- Be aware that just one tank filling with
leaded fuel will already ser iously de-
grade the performance of the catalytic
converter .
- Do not exceed the correct engine oil level
¢page 183.
-Do not drive until the fuel tank becomes
completely empty . The engine could mis-
fire. Unburned fuel could also get into ..,.
Page 162 of 260
160 Driving and en vi ro nment
Reducing unnecessary idling
Even when your car is just idling it burns up
fuel .
.,. Shut the engine off when you are not dr iving
the vehicle.
.,. Do not warm up the vehicle by letting the
engine run at idle .
It makes sense to shut
off the engine in traffic
jams, when waiting for trains to pass at ra il
road crossings, or at traff ic l ights that have
l ong wa its on red . Turning the engine
off fo r
just 30-40 seconds saves more fue l than is
burned starting the eng ine again .
It takes a long time for the engine to warm up
fu lly when it is running at idle . However , wear
and nox ious em issions are especially high
when the engine is warming up. So you should
drive away as soon as you start the engine and
avoid running at high RPMs whi le the engine
is sti ll warming up.
(D Note
Do not leave engine idling unattended af
ter starting . If warning lights should come
on to indicate imp roper operation, they
wou ld go unheeded. Extended idling also
produces heat, which cou ld result in over
heating or other damage to the vehicle or
other property .
Regular maintenance
A badly tuned engine unnecessarily wastes a
lot of fuel .
... Have your vehicle serv iced at regular inter-
vals.
By having your vehicle regularly serviced by an
Audi dea ler helps to ensure that it runs prop
erly and economica lly. The cond it ion of yo ur
vehicle not only affects its safety and ability to
hold its value, it also affects fuel consump
tion .
Check you r oil ea ch time you fill you r tank. T
he amount o f oi l used is re lated to engine
load and speed.
It i s normal fo r the oil consump tion of a new
engine to reach its lowest value after a certa in
mileage has been d riven.
You must drive your veh icle about 3,000 m iles
(S,000 kilometres) before yo u can properly
assess oil consumpt ion.
T his also app lies to fue l consumption and en
gine o utput.
(D Note
- Have your veh icle ma inta ined properly
and in acco rdance with the service rec
ommendations in your Wa rranty
& Main
t enance boo klet . Lack of p roper ma inte
nance as well as improper use of the ve
hicle will impair the function of the
emission contro l system and cou ld lead
to damage.
- Do not alter or remove any component of
the Emission Control System unless ap
proved
by the manufacturer.
- Do not alter or remove any device, such
as heat sh ie lds, switches, ign it ion w ires,
valves, which are designed to protect
your vehicle's Emission Control System and other important vehicle compo
nents.
Fewer short trips
Fuel consumption will always be relatively
high on short trips .
.,. Try to avoid driv ing short distances w ith a
cold engine .
T he engine and cata lytic converter have to
reach their opt imal operat ing temperature to
reduce fuel consumption and nox ious emis
s ions effectively .
- Ju st after starting, a cold engine in a mid
size car burns the fue l at a poor rate of 6-8
m iles per gallon (30-40 l/l00km). Half a
m ile down the road , the mileage improves
to 12 MPG (20 l/100 km). It w ill take the
ll>