AUDI TT ROADSTER 2014 Owners Manual
Manufacturer: AUDI, Model Year: 2014, Model line: TT ROADSTER, Model: AUDI TT ROADSTER 2014Pages: 244, PDF Size: 60.87 MB
Page 221 of 244
instructions of the jumper cable
manufacturer. If in doubt, call for road
service.
- Jumper cables must be long enough so
that the vehicles do not touch.
- When connecting jumper cables, make
sure that they cannot get ca ught in any
moving parts in the eng ine compart
ment.
- Before you check anything in the engine
compartment, always read and heed all
WARNINGS
Q page 165, Working in the
engine compartment.
(D Note
Improper hook-up of jumper cables can ru
in the generator.
-Always connect POSITIVE(+) to POSI TIVE(+), and NEGATIVE( -) to NEGATIVE
( - ) ground post of the battery manager
control unit.
- Check that all screw plugs on the battery
cells are screwed in firmly . If not, tighten
plugs prior to connecting clamp on nega
tive battery terminal.
- Please note t hat the procedure for con
nect ing a jumper cable as described
above applies spec ifically to the case of
your vehicle be ing j ump started. When
you are giv ing a jump start to anothe r ve
hi cle, do
not connect the negat ive (-) ca
ble to the negative(- ) terminal on the
discharged battery ©- Instead, securely
connect the negative (-) cable to either a
solid metal component that is firmly bo lted to the engine block or to the en
gine block itself. If the battery that is be
i ng charged does not vent to the outside,
es caping ba tte ry gas cou ld ig nite and ex
plo de!
Em erg en cy si tuation s 219
Emergency towing
with commercial tow
truck
General hints
Your Audi requires special handling for tow
ing.
T he following information is to be used by
commercial tow truck operators who know
how to operate their equipment safely.
- Never tow your Audi , towing will cause
damage t o the engine a nd transmi ssion.
- Never wrap th e safet y chain s or winch ca
ble s ar ound the brak e lin es.
- To preven t unne cess ary dam age, your Aud i
mu st be transported with a car carrier
(flatbed truck ).
- To load th e vehi cle on to the fl at bed , use
the towing lo op found in the vehicle to o ls
and attach to the front o r rear anchorage
Q poge 220 and Qpoge 221.
A WARNING
A veh icle being towed is not safe for pas
sengers. Never allow anyone to ride in a
vehicle be ing towed, for any reason.
-
•
•
Page 222 of 244
220 Emergency situations
Front towing loop (Version A)
Do not install the front towing loop until it is
needed.
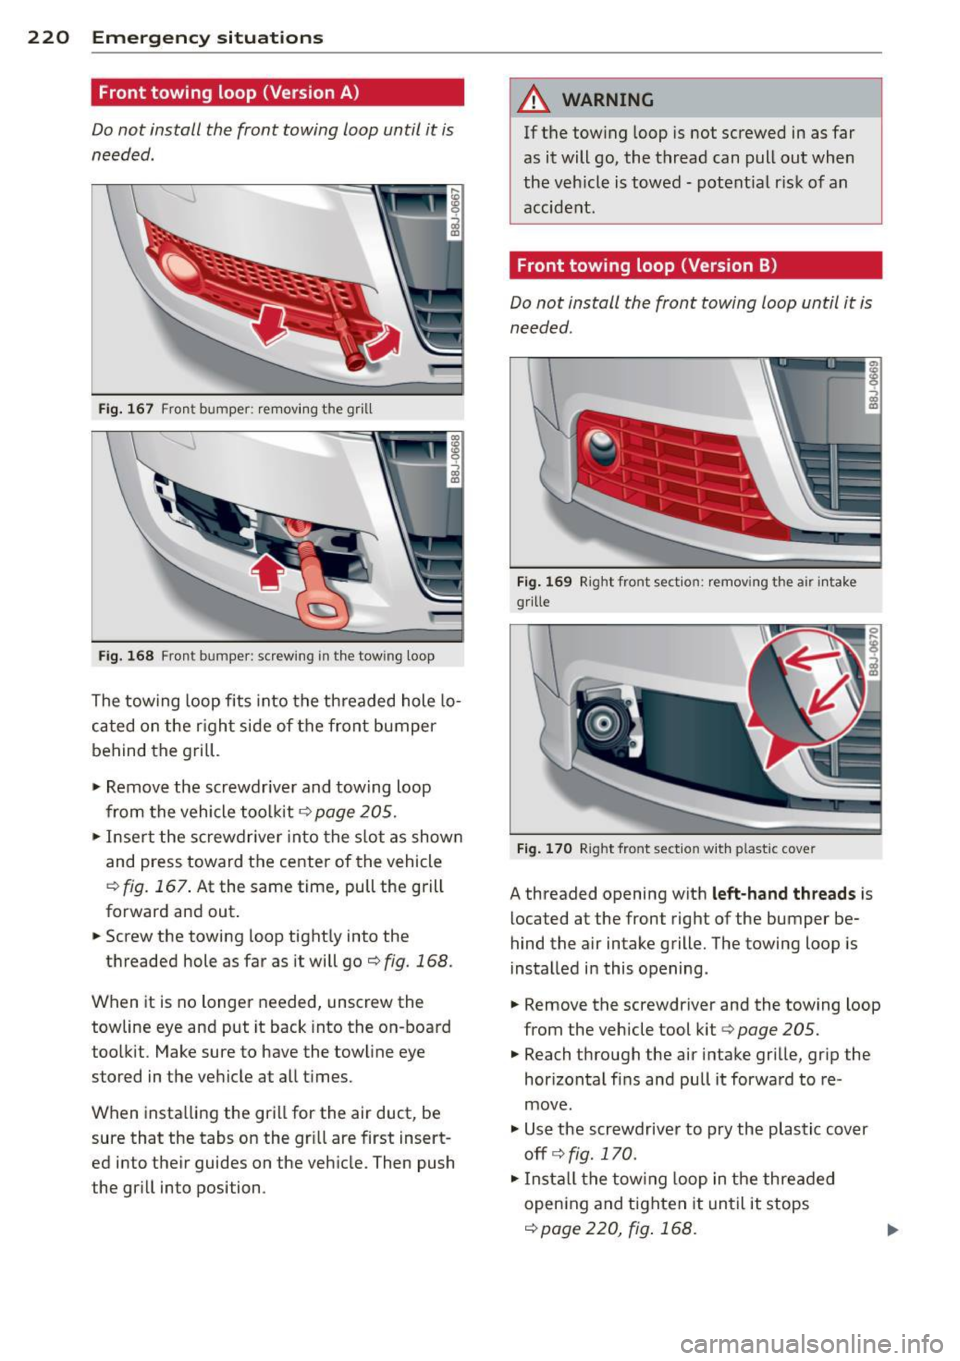
Fig. 1 67 Fro nt bumper : rem ov ing t he grill
Fi g. 16 8 Fron t bumper: screw ing in the tow ing loop
The towing loop fi ts into the th readed hole lo
c at ed on the r igh t si de of the fron t bumper
behind the g rill .
... Remove the screwdrive r and tow ing loop
from the vehicle tool kit
~ page 205 .
... Inse rt the screw driver into the s lot as show n
and press toward the ce nte r of the vehicle
¢
fig. 167 . At the same time, pull the grill
forward and out .
.,. Screw the towing loop tight ly into the
t h readed hole as far as it will go¢
fig. 168.
When it is no longer needed, unscrew the
towline eye and put it back into the on -board
too lkit . Make sure to have the towline eye
stored in the vehicle at a ll times.
When insta lling the gri ll for the air duct, be
sure that the tabs on the gr ill are first insert
ed into the ir guides on the veh icle. Then push
the gr ill into position .
A WARNING
-
If the towing lo op is not screwed in as far
as it will go, the t hread can pull out when
the veh icle is towed - potent ia l risk of an
accident.
Front towing loop (Version B)
Do not install the front towing loop until it is
needed .
Fig. 169 Right fro nt sect io n : r em ov ing the air in take
g ri lle
Fi g. 170 Rig ht fro nt sect io n w it h plastic cove r
A threaded opening with left-hand threads is
located at the front right of the bumper be
hind the air intake grille. The towing loop is
insta lled i n this opening .
.,. Remove the screwdriver and the towing loop
from the vehicle tool kit¢
page 205 .
... Reach through the air intake grille, grip the
hor izontal fi ns and pull it forward to re
move.
... Use the screwdrive r to pry the plastic cov er
off ¢
fig. 170.
... In stall th e tow ing loop in the threade d
open ing and tighten it un til it stops
¢ page 220, fig . 168 . .,..
Page 223 of 244
Remove the towing loop when you are done
using it and place it back in the vehicle tool
kit. A lways keep the tow ing loop in the vehi
cle.
When insta lling the air intake grille, insert the
tabs on the grille in the mounts on the vehicle
first . Then press the gri lle in to secure it.
A WARNING
If the towing loop is not tightened until it
stops when installing, the threads may be
pulled out when tow ing the veh icle and
that could cause an accident.
Rear towing loop
Do not install the rear towing loop until it is
needed.
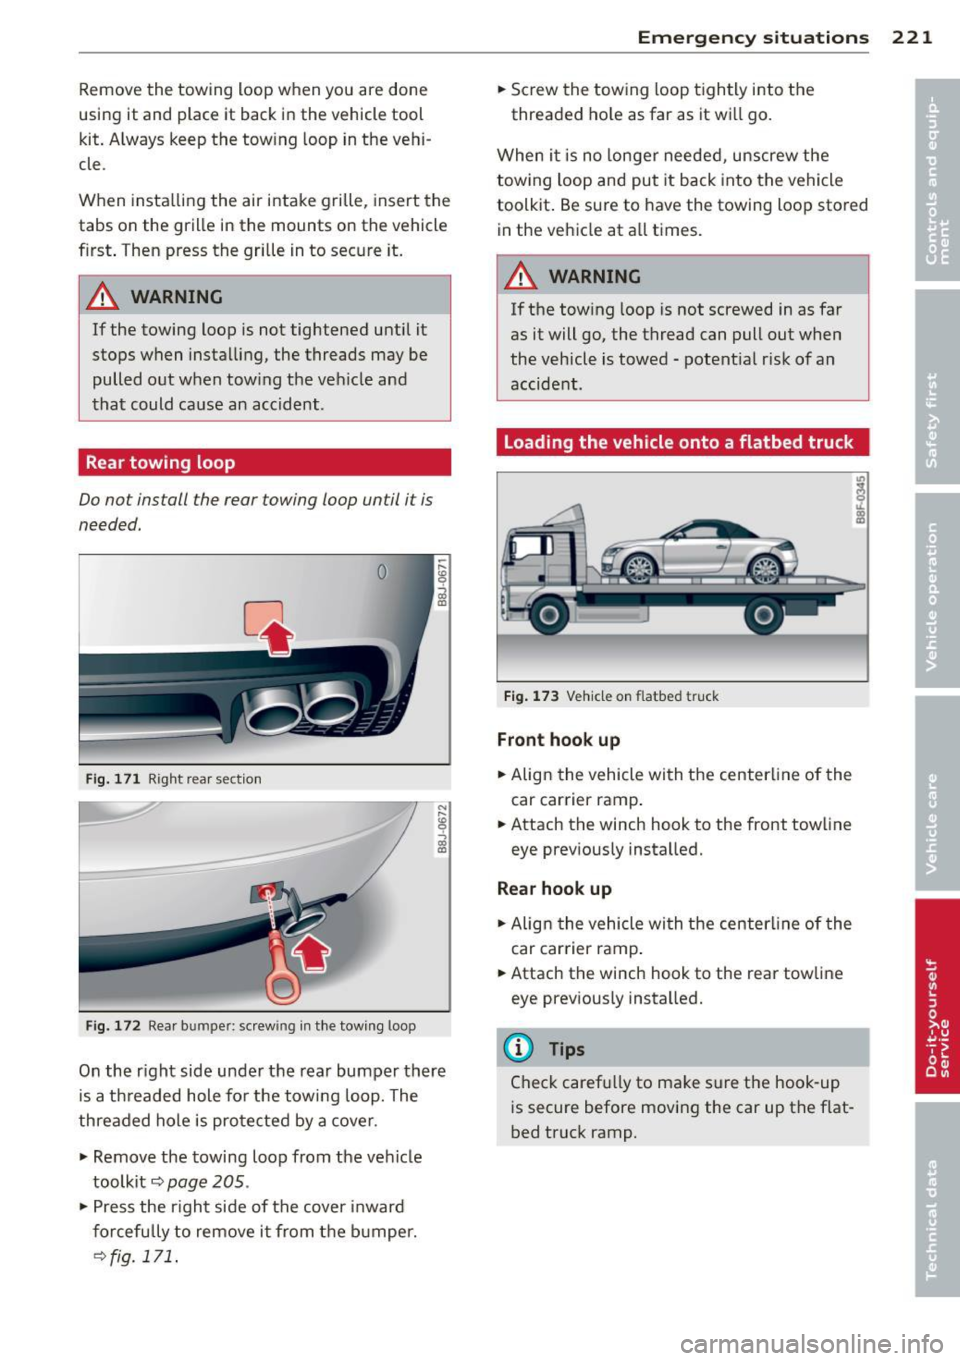
Fig. 171 Right rea r sect ion
Fi g. 17 2 Rear bumper: screwing in t he tow ing loop
On the r ight side under the rear bumper there
i s a t hreaded hole for the tow ing loop. The
threaded hole is pro tected by a cover.
"' Remove the towing loop from the vehicle
toolkit~
page 205 .
"'Press the right side of the cover i nward
f orcefully to remove it from the b umper.
¢fig. 171.
Emergenc y situ ation s 221
"'Screw the towing loop t ightly into the
threaded ho le as far as it wi ll go.
When it is no longe r needed, unscrew the
towing loop and put it back into the vehicle
toolkit . Be sure to have the towing loop sto red
in the vehicle at all times.
A WARNING
If t he tow ing loop is not screwed in as far
as it will go, the thread can pull out when
the vehicle is towed -potent ia l risk of an
accident.
loading the vehicle onto a flatbed truck
Fi g. 17 3 Vehicle on flatbed truck
Front hook up
"'Align the vehicle wi th the centerline of the
car carrier ramp.
"' Attach the winch hook to the front towline
eye prev iously insta lled.
Rear hook up
"' Alig n the vehicle wi th the center line of the
car car rier ramp .
"' Attach the winch hook to the rear tow line
eye previously insta lled.
(D Tips
Check caref ully to ma ke s ure the hook-up
i s secure before moving the car up the flat
bed truck ramp.
Page 224 of 244
222 Emergency situations
Lifting vehicle
Lifting with workshop hoist and with
floor jack
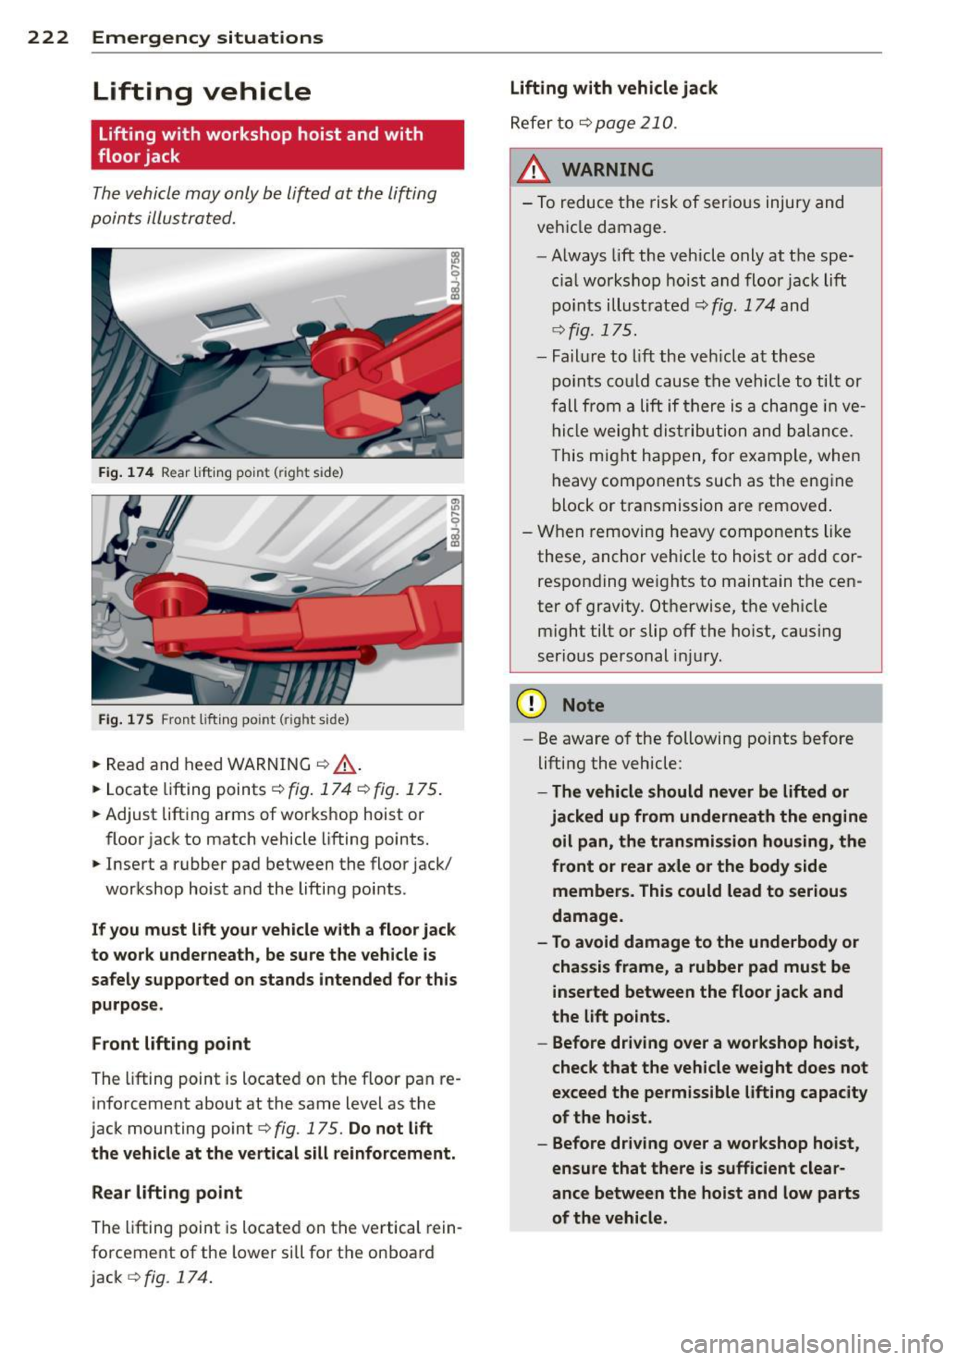
The vehicle may only be lif ted at the lifting
points illustra ted.
F ig. 174 Rear lift in g poin t (ri gh t side)
Fi g. 1 75 Fro nt lift in g po int (r ig ht s ide)
• Read and heed WARNI NG ¢,& .
• Locate lifting points
r=> fig . 174 r=> fig . 1 75 .
• Adjust lift ing arms of wor ks h op hoist or
floor jack to match vehicle lifting points.
• In se rt a rubber pad between the floor jack/
workshop hoist and the lifti ng po ints.
If you must lift your vehicle with a floor jack
to work underneath, be sure the vehicle is safely supported on stands intended for this
purpose.
Front lifting point
The lifting point is locate d on t he floor pan re
info rcement about at the same level as the
jac k mounting point
r=> fig. 175. Do not lift
the vehicle at the vertical sill reinforcement.
Rear lifting point
The lifting point is locate d on t he vertical rein
forceme nt of the lower s ill for t he on boa rd
j ac k
t:!>fig . 174.
Lifting with vehicle jack
Refer to r=>page 210.
/n.. WARNING
-To re duce the risk of ser ious injury and
ve hicl e damage .
- Always lift th e ve hicle o nly at t he spe
c ia l works hop hoist and floor jac k lift
p o ints illust rated
t:!> fig . 17 4 and
r=> fig. 175.
- Fa il u re to lift th e veh icle at th ese
p oi nts co ul d cau se the vehicle to tilt or
f a ll from a li ft if th ere is a ch an ge in ve
h icl e weig ht distr ib utio n an d ba lan ce.
T his mi ght happ en, for ex ample, when
h eavy com ponent s such as the engine
b lock o r tra nsmissi on are remove d.
- Wh en removin g heavy c ompone nts like
these , anch or vehicle to hoist or ad d co r
respon ding we ights to maintain t he cen
ter of gravity. Ot herwise , th e ve hicle
might tilt or slip off the ho ist, causing
serio us pe rsonal injury.
(D Note
-Be aware o f the followin g points bef ore
liftin g the vehicle:
- The vehicle should never be lifted or
jacked up from underneath the engine
oil pan, the transmission housing, the
front or rear axle or the body side members. This could lead to seriou s
damage.
- To avoid damage to the underbody or
chassis frame, a rubber pad must be inserted between the floor jack and
the lift points.
- Before driving over a workshop hoist,
check that the vehicle weight does not
exceed the permissible lifting capacity
of the hoist .
- Before driving over a workshop hoist,
ensure that there is sufficient clear
ance between the hoist and low parts
of the vehicle.
-
Page 225 of 244
Technical Data
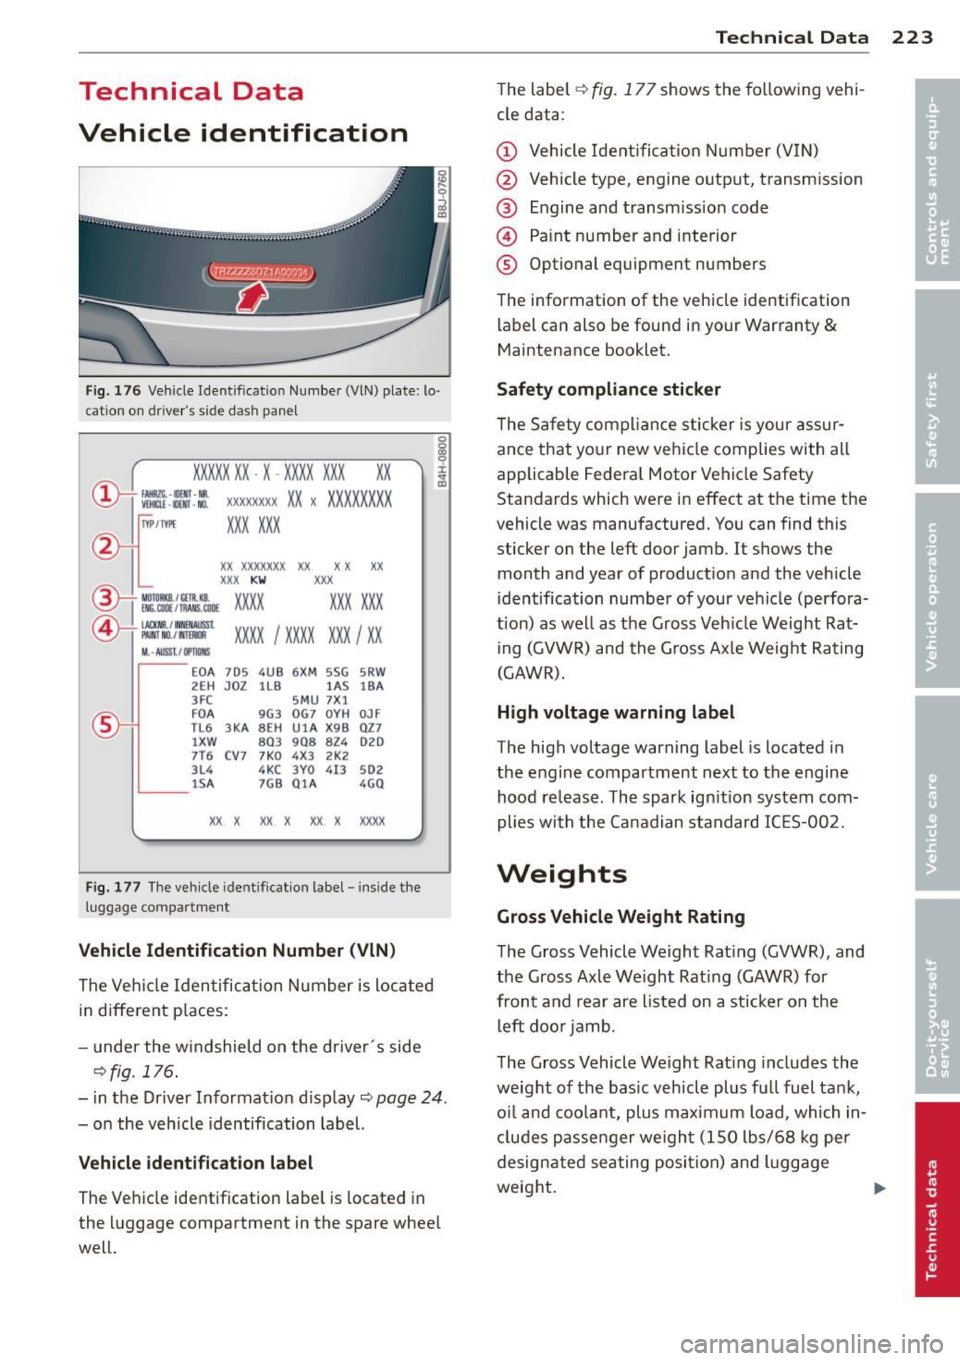
Vehicle identification
F ig. 176 Veh ide Identificat ion Numbe r (VlN) plate: lo ·
c ation on d river 's s ide das h pane l
XXXXX XX · X -XXXX XXX
~ fAllftlli. -llllll · NR. ~ W!ru -llllll -NO.
xx
XXXX XXXX XX X XXXXXXXX
XXX XXX
IYP /TYPE
XX XXXXXXX XX X X XX
XXX KW XXX
®i ~W.::·f :l~~ XXXX XXX XXX
©+ ::rw= xxxx I xxxx XXX I xx
M. · AUSSt I IJ'IIDIIS
~--
EOA 7D 5 4UB 6XM SSG SRW
2E H JOZ 1LB lA S 1BA
3FC SMU 7X l
FD A 9G3 OG7 OYH OJF
TL6 3 KA 8EH UlA X98 027
lXW 803 908 824 D2D
7T6 CV7 7KO 4X3 2K2
3L4 4KC 3YO 413 502
1S A 7GB 01A 4GO
XX. X XX X XX X XXXX
Fig.
177 T he vehicle identification label - inside the
luggage co mpartment
Veh icle Id entifica tion Numb er (VlN )
The Veh icle Iden tifica tion Number is located
in different p laces :
- under the w indshield on the driver 's side
~fig. 176.
- i n the Driver Informat ion d isp lay i=;, page 24 .
- on the vehicle identification label.
Vehicle identific ation lab el
The Vehicle identification label is located in
the luggage compartment in the spare whee l
well.
Te chni cal Data 22 3
The label ~ fig. 177 shows the fo llowing vehi
cle data :
(D Vehicle Ident ifi cat ion Number (V IN)
@ Vehicle type , engine output, transmission
@ Engine and transm ission code
@ Pa int number and interior
® Optional equipment numbers
The information of the vehicle identification label can also be found in your Warranty
&
Maintenance booklet.
Saf ety complian ce sticker
The Sa fety compliance sticker is your assur
ance that your new vehicle complies with all
applicable Federa l Motor Vehicle Safety
Standards which were in effect at the time the
vehicle was manufactured. You can find this
sticker on the left door jamb .
It shows the
month and year of product ion and the vehicle
identification number of your vehicle (perfora
t ion) as well as the Gross Veh icle Weight Rat·
ing (GVWR) and the Gross Ax le Weight Rating
(GAWR).
H igh volt age warning label
The high voltage warning label is located in
the engine compartment next to the engine
hood re lease. The spar k ign ition system com
plies wi th the Canadian standard IC ES-002.
Weights
Gross Vehicle Weight Rating
The Gross Vehicle Weight Rat ing (GVWR), and
the Gross Axle Weight Rating (GAWR) for
front and rear are listed on a sticker on the
left door j amb.
The Gross Vehicle Weight Rat ing includes the
weight of the bas ic vehicle plus fu ll fuel tank,
o il and coo lant, plus maximum load , which in
cludes passe nger we igh t (1 50 lbs/68 kg pe r
designated sea ting position) and luggage
weight.
II>
Page 226 of 244
224 Technical Dat a
Gross Ax le Weight R atin g
The Gross Axle Weight Rating is the maximum
l oad that can be applied at each axle of the
vehicle
c::> &. .
Vehicle capacity weight
The vehicle capac ity we ight (max. load) is list
ed eithe r on the dr iver's side B-pillar or inside
the fuel filler flap.
A WARNING
-
- The actual Gross Axle Weight Rat ing at
the front and rear axles sho uld not ex
ceed the perm iss ible weights, and their
combination must not exceed the Gross
Vehicle Weight Rat ing.
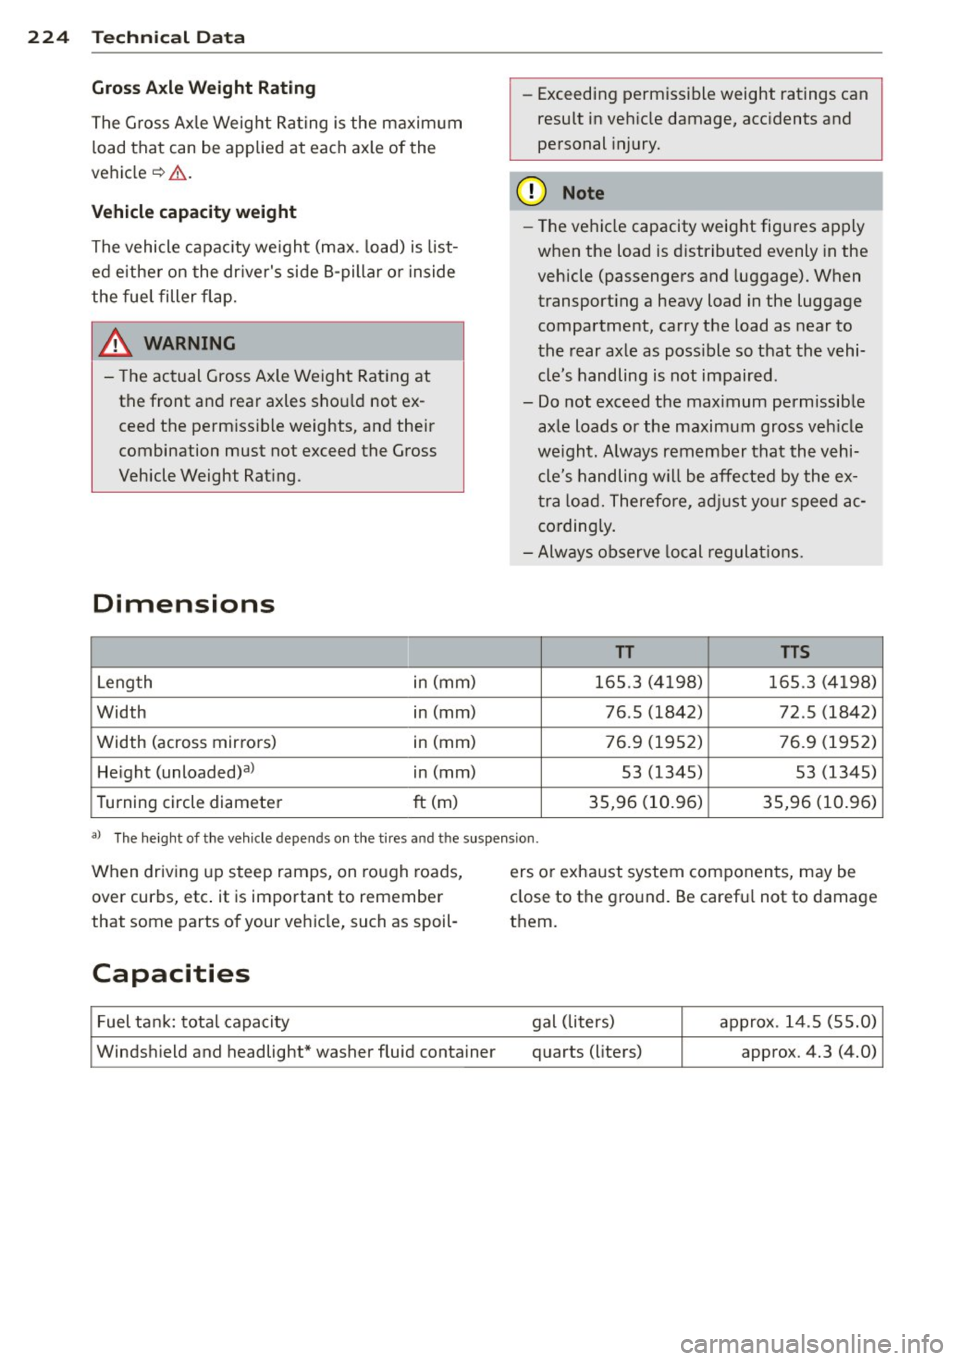
Dimensions
Leng th in (mm)
Width in (mm)
Width (across mir rors) in (mm)
He ight (unloaded)a) in (mm)
T urning circle diameter
ft (m) -
Exceeding permissible weight ratings can
result in vehicle damage, accidents and
personal injury.
(D Note
- The vehicle capacity weig ht figu res apply
when the load is distributed evenly in the
vehicle (passengers and luggage). When
transport ing a heavy load in the luggage
compartment, carry the load as near to
the rear axle as poss ible so that the vehi
cle's handling is not impaired.
- Do not exceed the maximum permissib le
axle loads or the maximum gross veh icle
we ight. Always remember that the vehi
cle's handling w il l be affected by the ex
t ra load. Therefo re, ad just your speed ac
cordingly.
- Always observe local regulat ions.
TT TIS
165.3 (4198) 165.3 (4 198)
76.5 (1842) 72 .5 (1842)
76.9 (1952) 76.9 (1952)
53 (1345) 53 (1345)
35,96 (10.96) 35,96 (10.96)
a) The height of the veh icle depends on the tires and the suspension.
When driv ing up steep ramps, on rough roads,
over curbs, etc. it is important to remember
that some parts of your vehicle, such as spoil-
Capacities
Fuel ta nk: total capacity
Windsh ield and headlight* washer fluid container ers
or exha ust system componen ts, may be
close to the ground. Be carefu l not to damage
them.
gal ( liters)
approx. 14.5 (55.0)
quarts (liters) approx. 4.3 (4.0)
Page 227 of 244
Technical Dat a 225
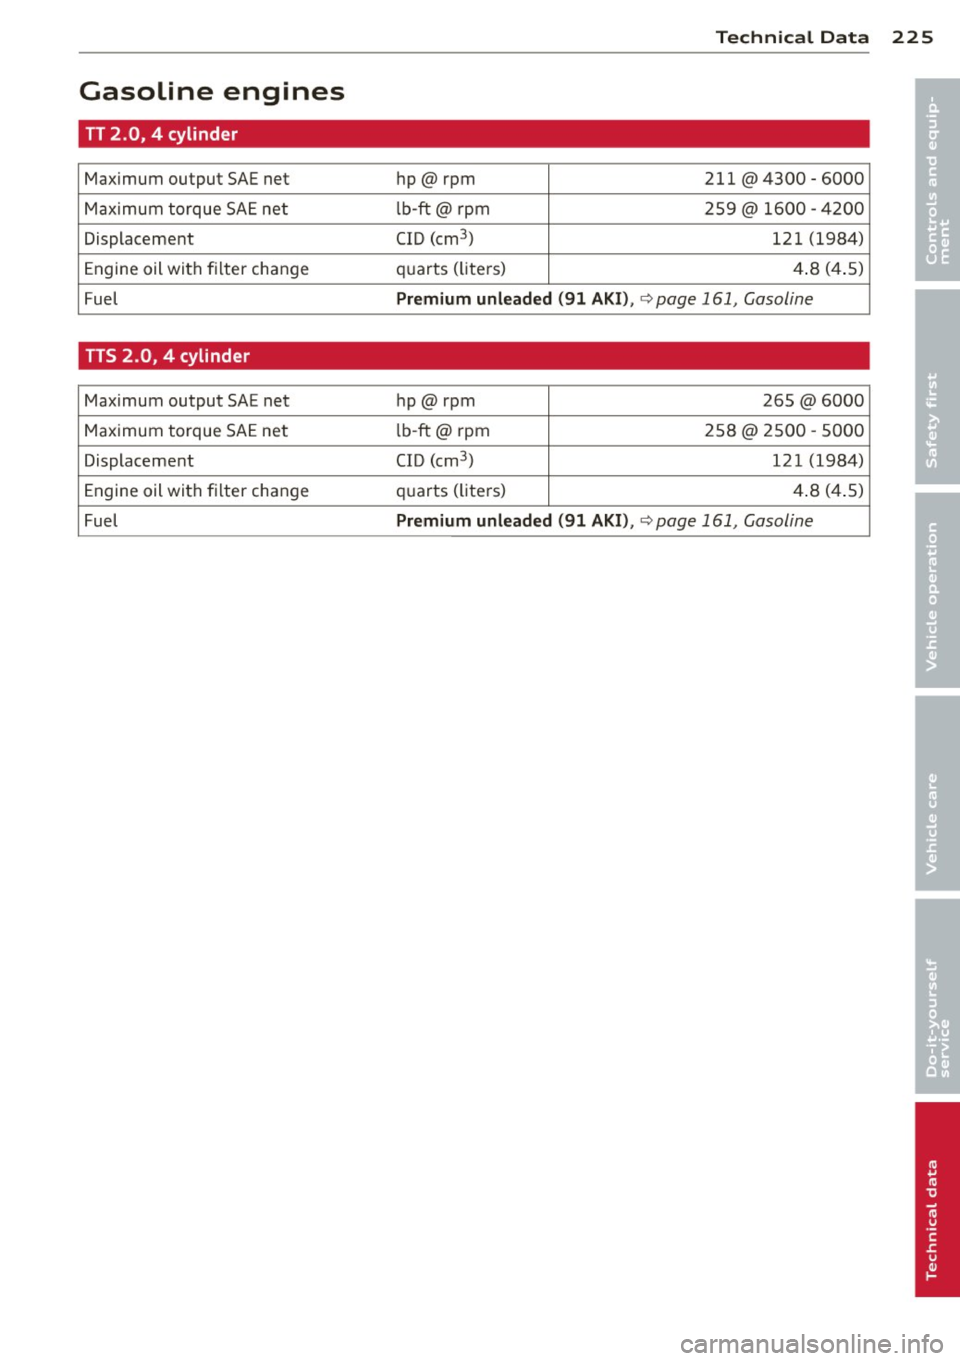
Gasoline engines
•
TT 2.0, 4 cylinder •
Maximum output SAE net hp@rpm 211 @4300 - 6000
Maximum torque SAE net lb-ft@ rpm 259@ 1600 - 4200
Displacement CID (cm
3
) 121 (1984)
Engine oil with f ilter change q
uarts (liters) 4.8 (4 .5)
Fuel
Prem ium unleaded (91 AKI) , ¢page 161, Gasoline
TTS 2.0, 4 cylinder
Maximum output SAE net hp@rpm 265 @6000
Maximum torque SAE net l
b -ft@ rpm 258@ 2500 -5000
Displacement CID (cm
3
) 121 (1984)
Engine oil with filter change q
uarts (li ters) 4.8 (4 .5)
Fuel
Premium unleaded (91 AKI) , ¢page 161, Gasoline
Page 228 of 244
226 Consumer Information
Consumer Information
Warranty coverages
You r Audi is covered by the following war
ranties:
- New Vehicle Limited Warranty
- Limited Warranty Against Corrosion Perfo-
ration
- Emissions Control System Warranty
- Emissions Performance Warranty
- California Emissions Control Warranty (USA
vehicles only)
- California Emissions Performance Warranty
(USA vehicles only)
Detailed information regarding your warran
ties can be found in your
Warranty & Mainte
nance booklet .
Operating your vehicle
outside the U.S.A. or
Canada
Government regu lations in the United States
and Canada require that automobiles meet
specific emission regulations and safety
standards. Therefore, veh icles built for the
U.S.A . and Canada differ from vehicles sold in
other countries .
If you p lan to take your vehicle outside the
continental limits of the United States or Can
ada, there is the possibility that:
- unleaded fuels for vehicles with cata lytic
converter may not be available;
- fuel may have a considerably lowe r octane
rating. Improper fuel may cause engine
damage ;
- service may be inadequate due to lack of
proper service facilities, tools or testing
equipment ;
- replacement pa rts may not be readily availa
ble.
- Navigation systems for vehicles built for the
U.S.A. and Canada will not necessar ily work
in Europe, and may not work in other coun
tries outside of North America.
(D Note
Audi cannot be responsible for mechanical
damage that could result from inadequate
fuel, service or parts availability.
Audi Service Repair Manuals and Literature
Audi Official Factory Service Manuals and Lit
erature are published as soon as possible after
model introduction. Service Manuals and liter
ature are available to order from the Audi
T echnical Literature Ordering Center at:
www.audi.techliterature.com
Maintenance
General
Your vehicle has been designed to help keep
maintenance requirements to a minimum.
However, a certain amount of regular mainte
nance is still necessary to assure your vehicle's
s afety, economy and rel iability. For detailed
vehicle maintenance consult your Warranty &
Maintenance booklet.
Under difficult operating conditions, for ex
ample at extremely low outside temperatures,
i n very dusty regions , etc., some service work
should be performed between the intervals
specified. This applies particularly to:
- oil changes, and
- cleaning or replacing the air filter.
@ For the sake of the environment
By regu larly maintaining your vehicle, you
help make sure that emission standards
are maintained, thus minimizing adverse
effects on the environment .
' Important considerations for you and
your vehicle
T he increasing use of electron ics , soph isticat
ed fuel injection and emission control sys
tems, and the generally increasing technica l
complexity of today's automobiles, have
liJJ,
Page 229 of 244
steadily reduced the scope of maintenance
and repairs which can be carried o ut by vehicle
owners.
Also, safe ty and en vironment al con
cerns p lace very strict limits on the nature of
repairs and adjustments to engine and trans
miss io n parts which an owner can perform .
Maintenance, adjustments and repa irs usua lly
require special tools, testing dev ices and oth
er equipment availab le to specially trained
workshop personne l in order to assure proper
pe rformance, reliab ility and safety of the vehi
cle and its many systems .
Improper ma intenance, adjustments and re
pa irs can impair the operation and reliability
of your vehicle and even void your vehicle war
ranty. Therefore, p roof of servic ing in accord
ance w ith the maintenance schedule may be a
condition for upholding a poss ible war ran ty
claim made within the warranty period .
Above all, operational safety can be adversely
affected, creating unnecessary risks for you
and your passengers .
If in doubt about any serv icing, have it done
by your authorized Audi dealer or any othe r
p roperly equipped and q ualified works hop .
We strong ly urge you to give yo ur auth o rized
Aud i dea ler the opportuni ty to perform all
schedu led maintenance and necessary repairs .
Your dea ler has the facilities, original parts
and tra ined spec ialists to keep your vehicle
running properly.
Performing limit ed ma inten anc e yourself
The fo llow ing pages describe a limited num
ber of proced ures which can be pe rformed on
your vehicle with ordina ry too ls, should the
need arise and trained personnel be unavaila
ble. Before performing any of these proce
dures, always t horoughly read a ll of the app li
cable text and carefully follow the instruc
tions given . Always rigorously obse rve the
WARNINGS provided.
Befo re you check anything in the engine
c ompartm ent, a lway s re ad and heed all
WARN INGS ~
A and ~ A in Working in the
engine compartment on page 165.
Con sumer In formation 22 7
_& WARNING
- Ser ious personal injury may occur as a re
sult of improperly performed mainte
nance, ad justments or repa irs .
- Always be extremely careful when work
ing on the vehicle . Always follow com
monly accep ted safety pract ices and gen
era l common sense. Never r is k personal
inju ry.
- Do not attempt any of the maintenance,
checks or repairs descr ibed o n the fol
lowing pages if you are not fully fam ilia r
with these or othe r procedures with re
spect to the vehi cle, or are uncertain how
to p roceed .
- Do not do any work without the proper
too ls and equipment. Have the necessa ry
wo rk done by your authorized A udi deal
er or another proper ly equipped and
qualified wor kshop.
- The engine compartment of any motor
veh icle is a potentially hazardous area.
Never reach into t he area around or
touch the rad iator fan. It is temperature
contro lled and can switch on suddenly -
even when the engine is off and the igni
tion key has been removed. The rad iator
f a n switches on a utomat ica lly when the
coo lant reaches a certain tempera ture
an d will continue to run until the coo lant
tem perature drops .
- Always remove the ign ition key before
anyone gets under the vehicle.
- Always support your veh icle with safety
stands i f it is necessary to work under
neath the vehicle. The jack s upplied with
the vehicle is not adequate for this pur
pose and cou ld collapse causing serio us
personal injury.
- I f you must work underneath the vehicle
with the wheels on t he ground, a lways
make sure the vehicle is on leve l ground,
that the wheels a re a lways securely
blocked a nd that the engine cannot be
started. •
•
Page 230 of 244
228 Con sum er Inf ormation
-Always make sure the transmission se
lector lever is in "P" (Park position) and
the hand brake is firmly applied.
@ For the sake of the environment
- Changing the engine settings wi ll ad
versely affect em iss ion levels . This is det
rimental to the environment and increas
es fuel consumption .
- Always observe environmental regula
tions when dispos ing of old engine oil,
used brake fluid, dirty engine coolant,
spent batteries or worn out tires.
- Undeployed airbag modules and preten
s ioners might be classified as Perchlo
rate Material -spec ial handling may ap
ply, see www .dtsc.ca .gov/hazardous
waste/perch lorate . When the veh icle or
parts of the restrai nt system in cl uding
airbag modules safety bel ts with preten
s ioners are scrapped, all applicable laws
and regulations must be observed. Your
a uthorized Aud i dea ler is familiar w ith
these requirements and we recommend
that you have your dealer perform this
serv ice for you .
Additional accessories,
modifications and
parts replacement
Additional accessories and parts
replacement
Always consult an authorized Audi dealer be
fore purchasing accessories .
Your vehicle incorporates the latest safety de
sign features ensuring a high standard of
ac
tive and passive safety .
T his safety could be compromised by non -ap
proved changes to the veh icle. For this reason ,
if parts have to be replaced , please observe
the following points when installing addition
a l accessories:
Approved Audi accessor ies and genuine Audi
parts are ava ilable from a uthorized Aud i dea l
e rs. These dea
lers a lso have the necessary facili
ties, tools and trained specialists to install the
parts and accessories proper ly .
A WARNING
=
Using the wrong spare parts or using non-
approved accessories can cause damage to
the veh icle and ser ious perso na l injury .
- Use on ly accessories express ly approved
by Audi and genuine Audi spare parts
- These parts and accessories have been
specia lly designed to be used on your ve
h icle .
- Never install accessor ies such as tele
phone crad les or beverage ho lders on a ir
bag covers or within the airbag deploy
ment zones . Do ing so will increase the
risk of injury if a irbags are triggered in an
accident!
- Before you check anything in the engine
compa rtment, always read and heed a ll
WARNINGS
i=;, page 165 .
(D Note
-If items other than genu ine Audi spare
parts, add-on equipment and accessory
items are used o r if repair wo rk is not
performed accord ing to specified meth
ods, this can resu lt in seve re damage to
your vehicle's engine and body (such as
corrosion) and adversely affect yo ur vehi
cle's warranty.
- The innovat ive a luminium concept of
your Audi TT means that all servicing, re pairs or other work on the vehicle body
must be carr ied out exclusive ly by an
Audi workshop.
- If emergency repairs must be performed
elsewhere, have the veh icle examined by
an authorized Audi dealership as soon as
poss ible .
- The manufac turer cannot be held liable
for damage wh ich occurs due to failure
to comply with these stipulations .