reset AUDI TT ROADSTER 2016 Owners Manual
[x] Cancel search | Manufacturer: AUDI, Model Year: 2016, Model line: TT ROADSTER, Model: AUDI TT ROADSTER 2016Pages: 306, PDF Size: 31.82 MB
Page 6 of 306
Downloaded from www.Manualslib.com manuals search engine Table
of Contents
Audi smartphone interface . . . . . . 210
Setting up.......................... 210
How to use . . . . . . . . . . . . . . . . . . . . . . . . . 211
Troubleshooting..................... 211
System settings .................. 212
Setting the time and date . . . . . . . . . . . . .
212
MMI settings . . . . . . . . . . . . . . . . . . . . . . .
212
Connection manager . . . . . . . . . . . . . . . . .
213
System update . . . . . . . . . . . . . . . . . . . . . .
216
On-board Handbook.................. 216
Sound settings . . . . . . . . . . . . . . . . . . . . . .
217
Volume settings ..................... 217
Restarting the MMI system (Reset) . . . . . 218
Notes on software licences 218
Safety ............................ 220
Safe driving . . . . . . . . . . . . . . . . . . . . . . 220
General notes . . . . . . . . . . . . . . . . . . . . . . .
220
Correct sitting positions . . . . . . . . . . . . . . 221
Child seats . . . . . . . . . . . . . . . . . . . . . . . . .
223
Securing a child seat . . . . . . . . . . . . . . . . .
225
Pedal area . . . . . . . . . . . . . . . . . . . . . . . . . . 226
Stowing luggage safely . . . . . . . . . . . . . . .
227
Pedestrian protection system . . . . . . . . . . 228
Seat belts . . . . . . . . . . . . . . . . . . . . . . . .
230
Why is it so important to use seat belts? . 230
Forces acting in a collision . . . . . . . . . . . . .
231
How to wear seat belts properly . . . . . . . .
232
Belt tensioners . . . . . . . . . . . . . . . . . . . . . .
234
Airbag system . . . . . . . . . . . . . . . . . . . . 235
Description of airbag system . . . . . . . . . . .
235
Front airbags . . . . . . . . . . . . . . . . . . . . . . .
236
Side airbags . . . . . . . . . . . . . . . . . . . . . . . .
239
Service and care . . . . . . . . . . . . . . . . . . 241
Checking and topping up fluids . 241
Fuel . . . . . . . . . . . . . . . . . . . . . . . . . . . . . . . 241
Filling the tank . . . . . . . . . . . . . . . . . . . . . . 242
Emission control systems . . . . . . . . . . . . . 244
Engine compartment . . . . . . . . . . . . . . . . . 244
Engine oil . . . . . . . . . . . . . . . . . . . . . . . . . .
247
Cooling system . . . . . . . . . . . . . . . . . . . . . .
249
Brake fluid . . . . . . . . . . . . . . . . . . . . . . . . .
250
Battery . . . . . . . . . . . . . . . . . . . . . . . . . . . .
250
4 Windscreen
washer . . . . . . . . . . . . . . . . . .
252
Service interval display . . . . . . . . . . . . . . .
252
Wheels ........................... 254
Tyres and rims . . . . . . . . . . . . . . . . . . . . . .
254
Tyre pressure loss indicator . . . . . . . . . . . . 258
Tyre pressure monitoring system . . . . . . .
260
Care of vehicle and cleaning . . . . .
263
General notes . . . . . . . . . . . . . . . . . . . . . . .
263
Washing the vehicle . . . . . . . . . . . . . . . . . .
263
Notes on cleaning and care . . . . . . . . . . . . 264
Taking the vehicle out of service . . . . . . . . 268
Self-help . . . . . . . . . . . . . . . . . . . . . . . . .
269
Mobility . . . . . . . . . . . . . . . . . . . . . . . . . . 269
General notes . . . . . . . . . . . . . . . . . . . . . . .
269
Equipment . . . . . . . . . . . . . . . . . . . . . . . . .
269
Tyre repair kit . . . . . . . . . . . . . . . . . . . . . . .
270
Changing a wheel . . . . . . . . . . . . . . . . . . . .
272
Spare wheel . . . . . . . . . . . . . . . . . . . . . . . .
276
Jump-starting . . . . . . . . . . . . . . . . . . . . . . .
277
Tow-starting / towing away. . . . . . . . . . . . 278
Fuses and bulbs . . . . . . . . . . . . . . . . . .
282
Fuses.............................. 282
Bulbs.............................. 284
Accessories and technical data . . 285
Accessories and modifications
to the vehicle . . . . . . . . . . . . . . . . . . . . . 285
Accessories, replacement parts and
repairs . . . . . . . . . . . . . . . . . . . . . . . . . . . . 285
Modifications . . . . . . . . . . . . . . . . . . . . . . . 285
Radio transmitters and business
equipment . . . . . . . . . . . . . . . . . . . . . . . . . 286
Technical data . . . . . . . . . . . . . . . . . . . . 287
Vehicle identification
data . . . . . . . . . . . . . 287
Explanation of technical data . . . . . . . . . . 287
Dimensions . . . . . . . . . . . . . . . . . . . . . . . . . 288
Capacities . . . . . . . . . . . . . . . . . . . . . . . . . . 288
Weights . . . . . . . . . . . . . . . . . . . . . . . . . . .
288
Engine data . . . . . . . . . . . . . . . . . . . . . . . .
289
Index ............................. 290
Page 12 of 306
Downloaded from www.Manualslib.com manuals search engine Instruments
and warning/indicator Lamps
Instruments and warning/indicator Lamps
Instruments Audi virtual cockpit (instrument cluster)
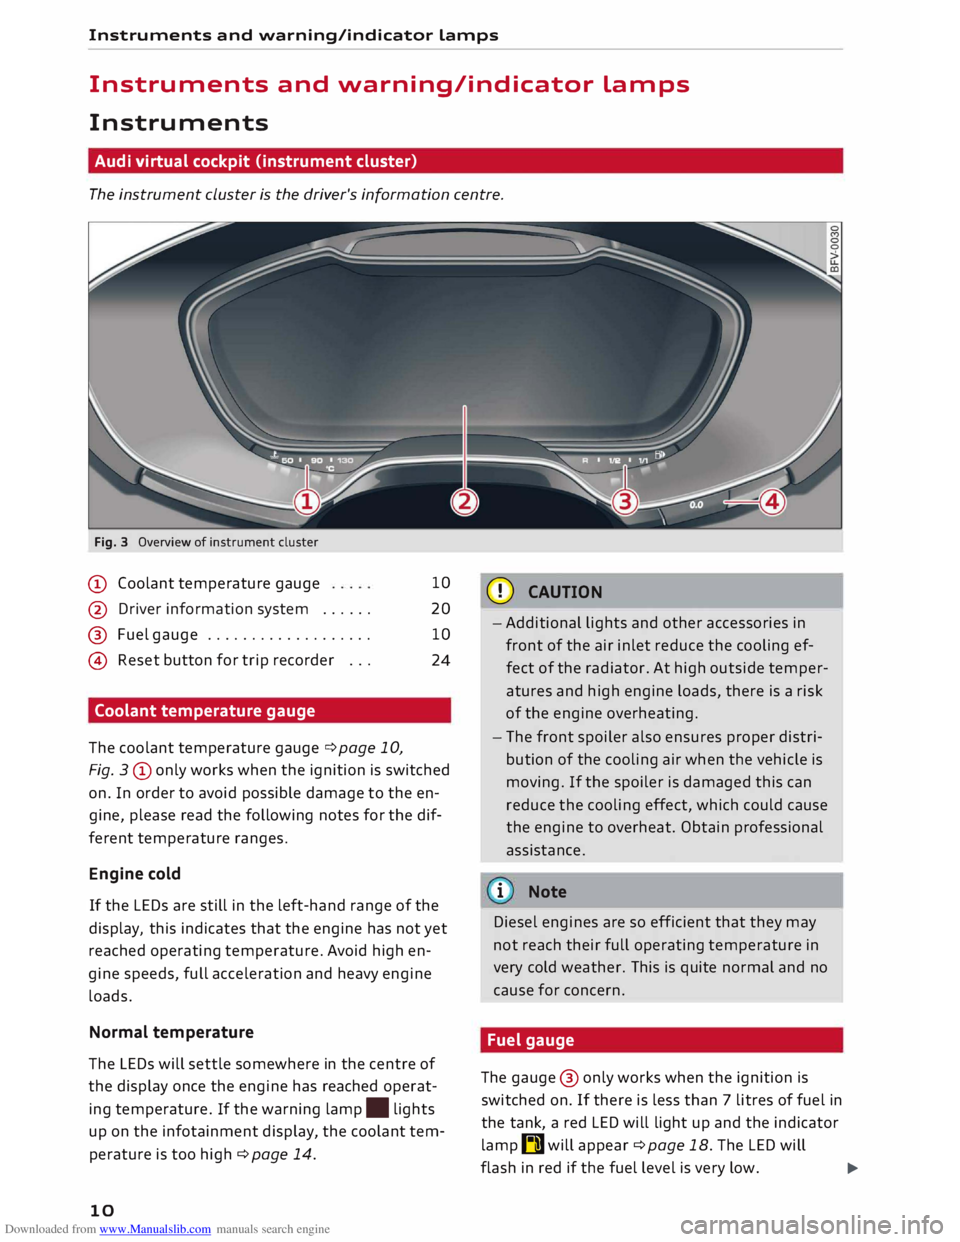
The instrument cluster is the driver's information centre.
Fig. 3 Overview of instrument cluster
(D Coolant temperature gauge 10
@ Driver information system . . . . . . 20
@ Fuel gauge . . . . . . . . . . . . . . . . . . . 10
@ Reset button for trip recorder . . .
24
Coolant temperature gauge
The coolant temperature gauger=> page 10,
Fig. 3@ only works when the ignition is switched
on. In order to avoid possible damage to the en
gine, please read the following notes for the dif
ferent temperature ranges.
Engine cold
If the LEDs are still in the left-hand range of the
display, this indicates that the engine has not yet
reached operating temperature. Avoid high en
gine speeds, full acceleration and heavy engine
loads.
Normal temperature
The LEDs will settle somewhere in the centre of
the display once the engine has reached operat
ing temperature. If the warning lamp. lights
up on the infotainment display, the coolant tem
perature is too high r=> page 14.
10 CD
CAUTION
-Additional lights and other accessories in
front of the air inlet reduce the cooling ef
fect of the radiator. At high outside temper
atures and high engine loads, there is a risk
of the engine overheating.
- The front spoiler also ensures proper distri
bution of the cooling air when the vehicle is
moving. If the spoiler is damaged this can
reduce the cooling effect, which could cause
the engine to overheat. Obtain professional
assista nee.
i Note
Diesel engines are so efficient that they may
not reach their full operating temperature in
very cold weather. This is quite normal and no
cause for concern.
Fuel gauge
The gauge @only works when the ignition is
switched on. If there is less than 7 litres of fuel in
the tank, a red LED will light up and the indicator
lamp I]] will appear r=> page 18. The LED will
flash in red if the fuel level is very low.
�
Page 26 of 306
Downloaded from www.Manualslib.com manuals search engine Driver
information system
The equipment installed on your vehicle deter
mines which of the following tabs are available:
1st tab
Car ¢page 25
2nd taba)
Warnings
3rd tab Radio
¢ page 185
Media ¢ page 191
4th tabb)
Sound ¢page 212
Settings ¢page 212
a) This tab is only visible if one or more warning/indicator
lamps or driver messages are displayed or if the relevant
system is switched on.
b) The tab contents depend on which menu you used last.
- To switch between tabs: Press the
I MOD
E
! but
ton on the multi-function steering wheel until
the desired tab is displayed.
- To select a function in a menu/list: Scroll the
left thumbwheel on the multi-function steering
wheel to the desired function.
- To confirm the selection: Press the left thumb
wheel on the multi-function steering wheel to
confirm your selection.
- To scroll within the lists: Scroll the left thumb
wheel on the multi-function steering wheel
rapidly to scroll within the lists.
@!VIEW! button
- To change views: Press the !VIE
W! button to
switch from the classic view¢ page 20, Fig. 4
to the extended view¢ page 20, Fig. 5.
@ Right thumbwheel
You can adjust the volume of an audio source or
system message (e.g. during a traffic announce
ment) directly while it is being played.
- Volume up/down: Scroll the right thumbwheel
up/down.
- Mute/pause: Scroll the right thumbwheel
down. Or: Press the right thumbwheel.
- Unmute/resume: Scroll the right thumbwheel
upwards. Or: Press the right thumbwheel.
24 Rev
counter
The rev counter indicates the number of engine
revolutions per minute.
The start of the red zone on the dial indicates the
maximum engine speed which may be used brief
ly in all gears when the engine is warm and after
it has been run in properly. However, it is advisa
ble to change up a gear or move the selector lev
er to D/S (or lift your foot off the accelerator) be
fore the needle reaches the red zone.
Shift light display in the rev counter
Applies to: vehicles with Audi virtual cockpit and shift light
display
The shift light display is only visible in the sport
view* ¢ page 25 when shifting gears in tiptron
ic mode. Green, yellow and red zones are dis
played in the high-rev area of the dial. The entire
rev counter flashes in red at engine speeds near
the limit. Remember to shift to the next gear in
good time.
CD CAUTION
The rev counter needle must only ever briefly
go into the red zone on the scale; otherwise
there is a risk of engine damage. The start of
the red zone on the dial is different for some
engine versions.
@ For the sake of the environment
Changing up a gear early will help you to save
fuel and minimise engine noise.
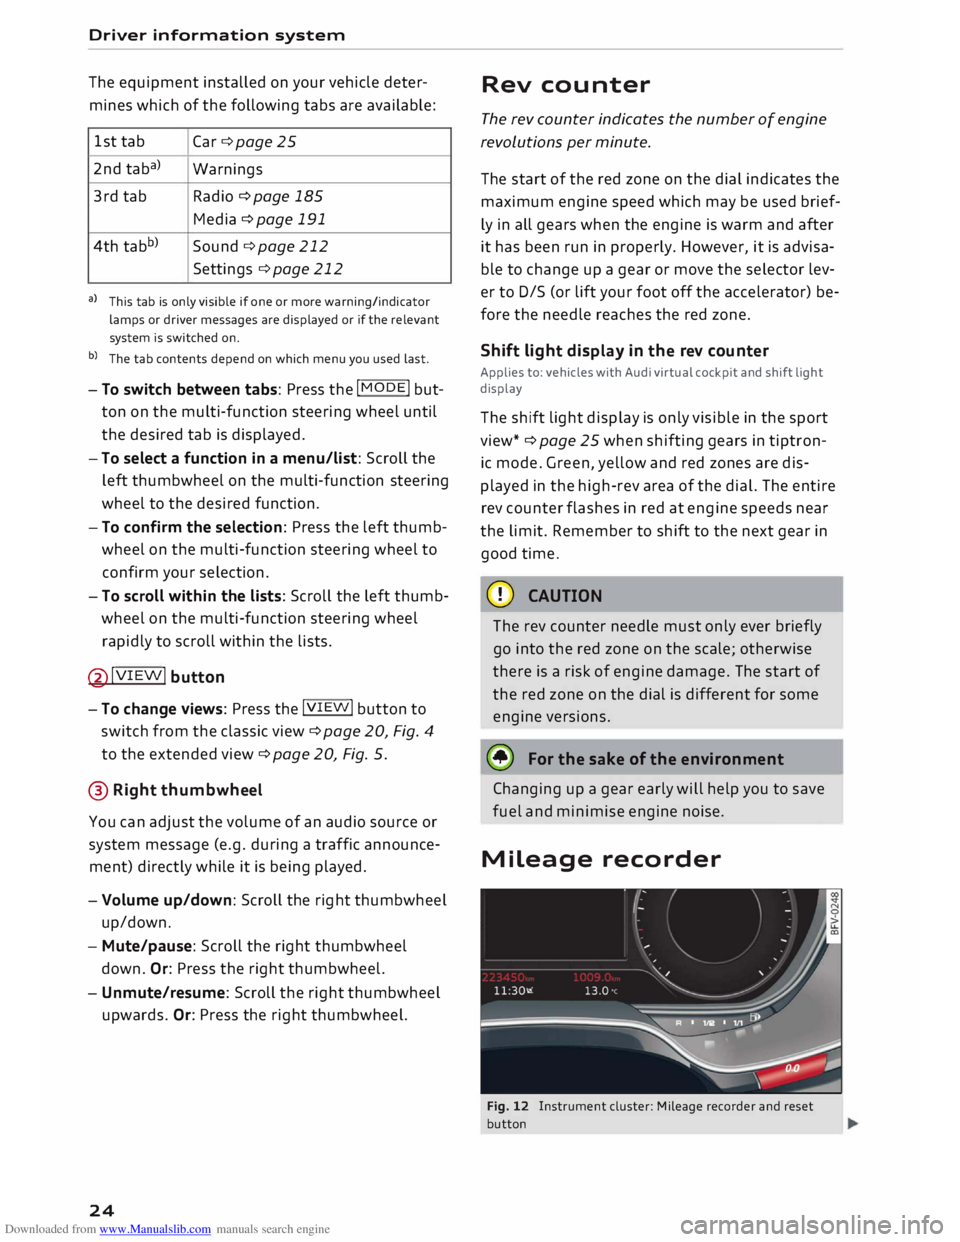
Mileage recorder
Fig. 12 Instrument cluster: Mileage recorder and reset
button
Page 27 of 306
Downloaded from www.Manualslib.com manuals search engine 0
N
,.....
N
....
0
,.....
Vl
CX) Trip
recorder/odometer
The trip recorder shows the distance that has
been travelled since it was last reset. It is used to
measure individual journeys.
The trip recorder can be reset to zero by pressing
the reset button lo.al ¢Fig. 12.
The odometer records the vehicle's total mileage.
Fault display
If there is a fault in the instruments, the letters
DEF appear in the trip recorder display. Have the
fault rectified as soon as possible.
On-board computer
You can call up the following information se
quentially on the on-board computer ¢ page 20,
Fig. 4@ :
-Time & date ¢page 212
-Average consumption
- Fuel range
- Single journey memory summary
- Total journey memory summary
The single journey memory processes the infor
mation on a journey from the time the ignition is
Sport view Driver
information system
switched on until it is switched off. If the journey
is resumed within two hours after the ignition is
switched off, the new figures are automatically
included in the calculation.
Unlike the single journey memory, the total jour
ney memory is not erased automatically. In this
way, you can determine the period for which you
wish the on-board computer to supply driving in
formation.
Fuel consumption
The current fuel consumption can be shown in a
bar display. The average fuel consumption from
the single journey memory can also be displayed.
If the bar turns green, your vehicle is saving fuel
using one of the following functions:
- Recuperation: Electrical energy can be stored in
the vehicle battery (recuperation) if the vehicle
is travelling downhill or coasting in gear (over
run). In this case, the bar will move towards the
t:::3 symbol.
- Coasting mode* ¢ page 82.
@ Note
The date, time and display format can be
changed via the infotainment system.
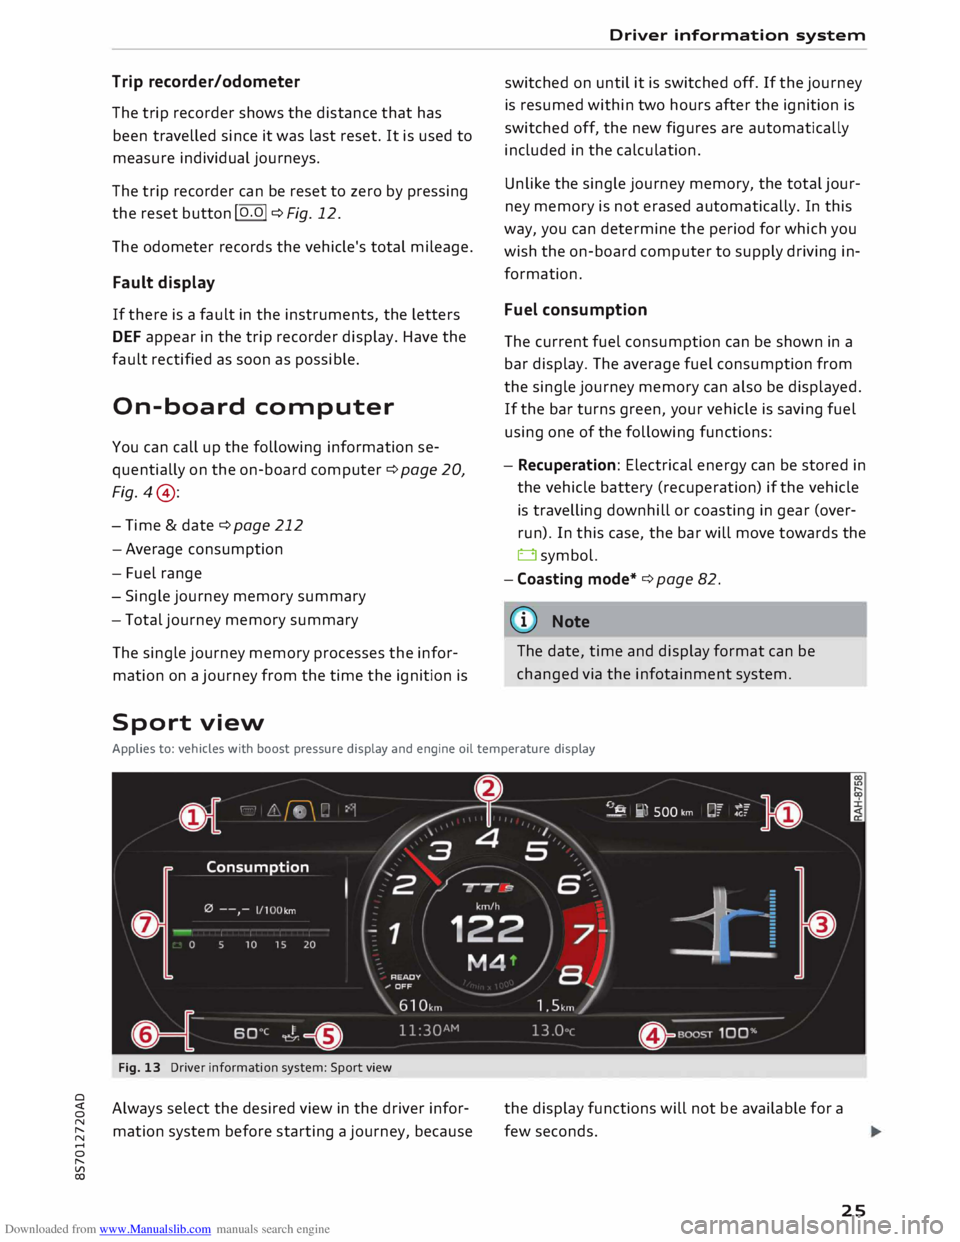
Applies to: vehicles with boost pressure display and engine oil temperature display
Fig. 13 Driver information system: Sport view
Always select the desired view in the driver infor
mation system before starting a journey, because the
display functions will not be available for a
few seconds.
25
Page 88 of 306
Downloaded from www.Manualslib.com manuals search engine Driver
assist systems
Driver assist systems
Speed warning function
Applies to: vehicles with speed warning function
The speed warning function can help you keep
below a pre-set maximum speed. It can be set,
changed and deleted on the infotainment sys
tem.
The speed warning function will warn you if the
vehicle exceeds the pre-set maximum speed. The
system gives an audible warning signal if the set
speed is exceeded by a small amount. At the
same time, an indicator lamp� and a message
will appear on the instrument cluster display.
The indicator lamp [9] and the message will dis
appear when the road speed drops below the set
value.
You are recommended to store this speed limit
warning if you wish to be reminded of a particu
lar speed limit. This could be when driving in
countries with general speed limits, or if you
need to keep below a particular speed when win
ter tyres are fitted, etc.
Setting speed limit warning
... Select the following on the infotainment sys
tem: I MENU
I button > Car > left control button
> Driver assist> Speed warning > manual.
(i) Note
- Please bear in mind that, even with the
speed warning function, it is still important
to keep a check on the car's speed with the
speedometer and to observe the statutory
speed limits.
- On vehicles for some markets, the speed
warning function warns you when you reach
a speed of 120 km/h. This speed limit warn
ing is preset at the factory.
86 Cruise
control system
Switching on
Applies to: vehicles with cruise control system
The cruise control system allows you to drive at a
constant speed of 20 km/h or higher.
0
f
� 0
Fig. 88 Control lever for cruise control system
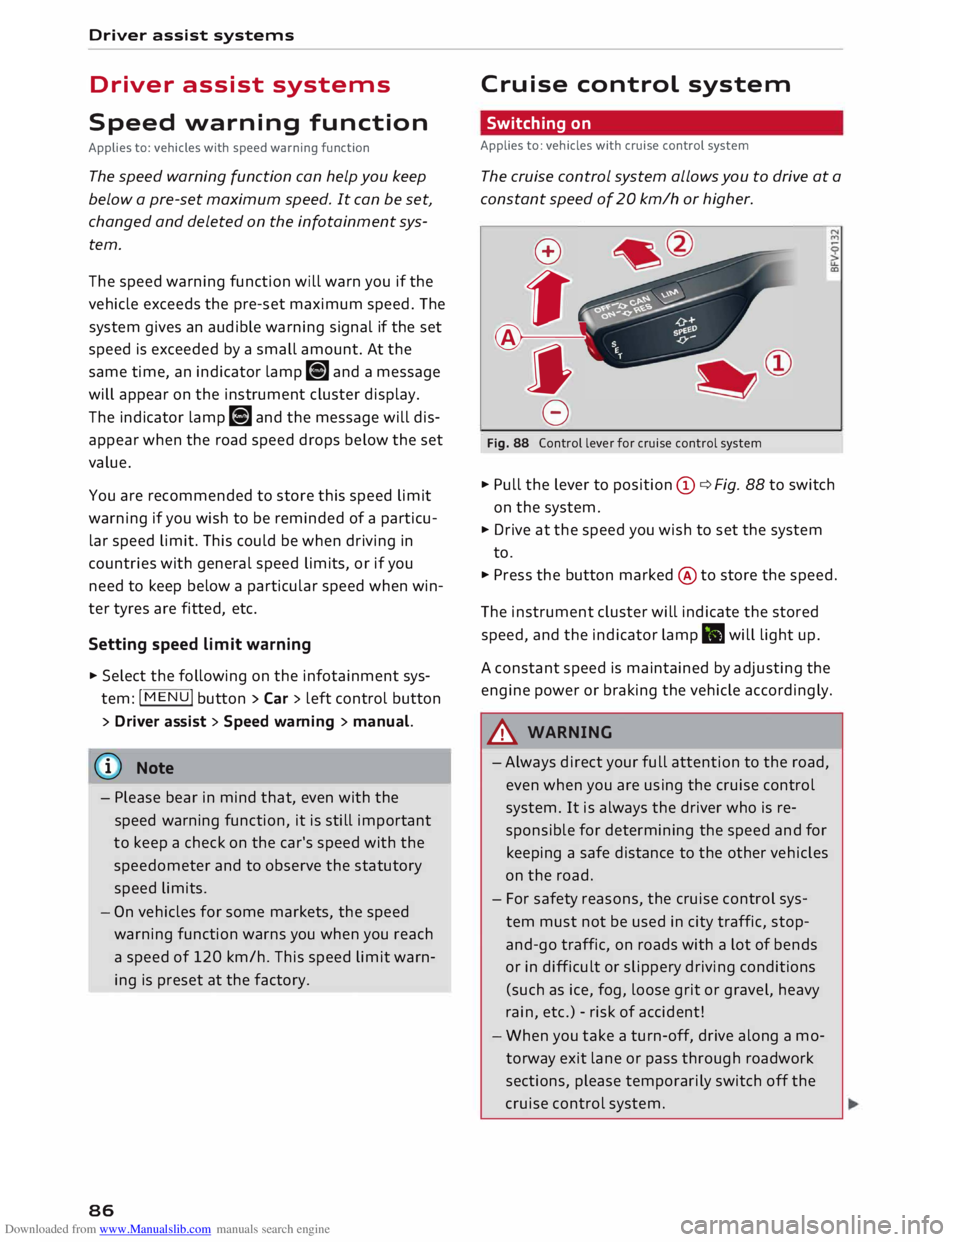
... Pull the lever to position (D ¢ Fig. 88 to switch
on the system.
... Drive at the speed you wish to set the system
to.
... Press the button marked @to store the speed.
The instrument cluster will indicate the stored
speed, and the indicator lamp .. will light up.
A constant speed is maintained by adjusting the
engine power or braking the vehicle accordingly.
A WARNING
- Always direct your full attention to the road,
even when you are using the cruise control
system. It is always the driver who is re
sponsible for determining the speed and for
keeping a safe distance to the other vehicles
on the road.
- For safety reasons, the cruise control sys
tem must not be used in city traffic, stop
and-go traffic, on roads with a lot of bends
or in difficult or slippery driving conditions
(such as ice, fog, loose grit or gravel, heavy
rain, etc.) -risk of accident!
- When you take a turn-off, drive along a mo
torway exit lane or pass through roadwork
sections, please temporarily switch off the
cruise control system.
Page 98 of 306
![AUDI TT ROADSTER 2016 Owners Manual Downloaded from www.Manualslib.com manuals search engine Driver
assist systems
CD Last
recorded lap time
@ Symbols:
-[i]: Start time
-•: Worst lap time
-•: Best lap time
- �: Spl AUDI TT ROADSTER 2016 Owners Manual Downloaded from www.Manualslib.com manuals search engine Driver
assist systems
CD Last
recorded lap time
@ Symbols:
-[i]: Start time
-•: Worst lap time
-•: Best lap time
- �: Spl](/img/6/57670/w960_57670-97.png)
Downloaded from www.Manualslib.com manuals search engine Driver
assist systems
CD Last
recorded lap time
@ Symbols:
-[i]: Start time
-•: Worst lap time
-•: Best lap time
- �: Split time
-m: Pause
® Current
lap time
@ Menu:
- Start lap 1 by driving off (start lap)
- Start by driving off (start lap)
- New lap (start another lap)
- Split time (lap sector time)
- Pause (interrupt lap timer)
- Cancel lap
- Reset timer (zero all lap times)
Evaluating lap times and resetting the lap
timer
Applies to: vehicles with lap timer
You can use the Lop timer to evaluate the fast
est, slowest and overage lop times.
Fig. 99 Instrument cluster: Lap timer
After you have evaluated the lap times, you can
resume the existing session or start a new ses
sion (i.e. start again with lap 1).
.,. Select the following on the infotainment sys
tem: I MEN
U I button > Car > left control button
> Lap statistics. The fastest lap"+", the slow
est lap"-" and the average time "0" will appear
in the display. To show the individual lap times,
scroll the thumbwheel @ up/down .
.,. Press the thumbwheel @to resume the exist
ing session.
.,. To reset the lap timer and clear the lap times,
press the left control button on the multi-func-
96 tion
steering wheel. Then scroll the thumb
wheel @to select the desired setting with the
cursor (red frame). Press the thumbwheel@ to
confirm your selection.
.,. To restart the lap timer and record new laps,
press the thumbwheel @.
.,. To exit the lap timer, press the I
MEN U
I button.
Explanation of evaluation in c> Fig. 99:
CD Total
number of laps
@ II:
Best lap time
® .:
Worst lap time
@ f§j:
Average lap time
(@ Note
- Recorded lap times cannot be deleted indi
vidually from the overall results.
- The data recorded in the lap timer remain
stored after the ignition is switched off.
Sport displays
Applies to: vehicles with Audi virtual cockpit and sport dis
plays
The sport displays include the G meter, the en
gine data and the tyre pressure display. You can
call up the sport displays in the central area or in
the additional display in the driver information
system.
Calling up the sport displays in the central
area
.,. Call up the first tab (on-board computer) using
the I <1 t>I button on the multi-function steering
wheel.
.,. Select the following on the multi-function
steering wheel: left control button > Sport dis
p lays .
.,. Scroll the left thumbwheel 0 c> page 21 on the
multi-function steering wheel until the desired
sport display appears in the instrument cluster.
Calling up the sport displays in the
additional display
.,. On
the multi-function steering wheel, select
right control button > Additional display .
.,. Select the desired additional display.
..,.
Page 99 of 306
Downloaded from www.Manualslib.com manuals search engine 0
N
,.....
N
......
0
,.....
Vl
CX) G
meter
The G meter shows the Lateral and Longitudinal
forces generated. The maximum values meas
ured are stored and displayed when the vehicle is
stationary.
� To reset the stored values, select the following
on the multi-function steering wheel: right con
trol button > Reset values.
Engine data
The engine data display shows the current power
and torque Levels.
Tyre pressure display
The tyre pressure display shows the current infla
tion pressures and temperature. Also refer to
¢ page 260, Tyre pressure monitoring system.
Audi side assist (Lane
change assist feature)
Description
Applies to: vehicles with Audi side assist
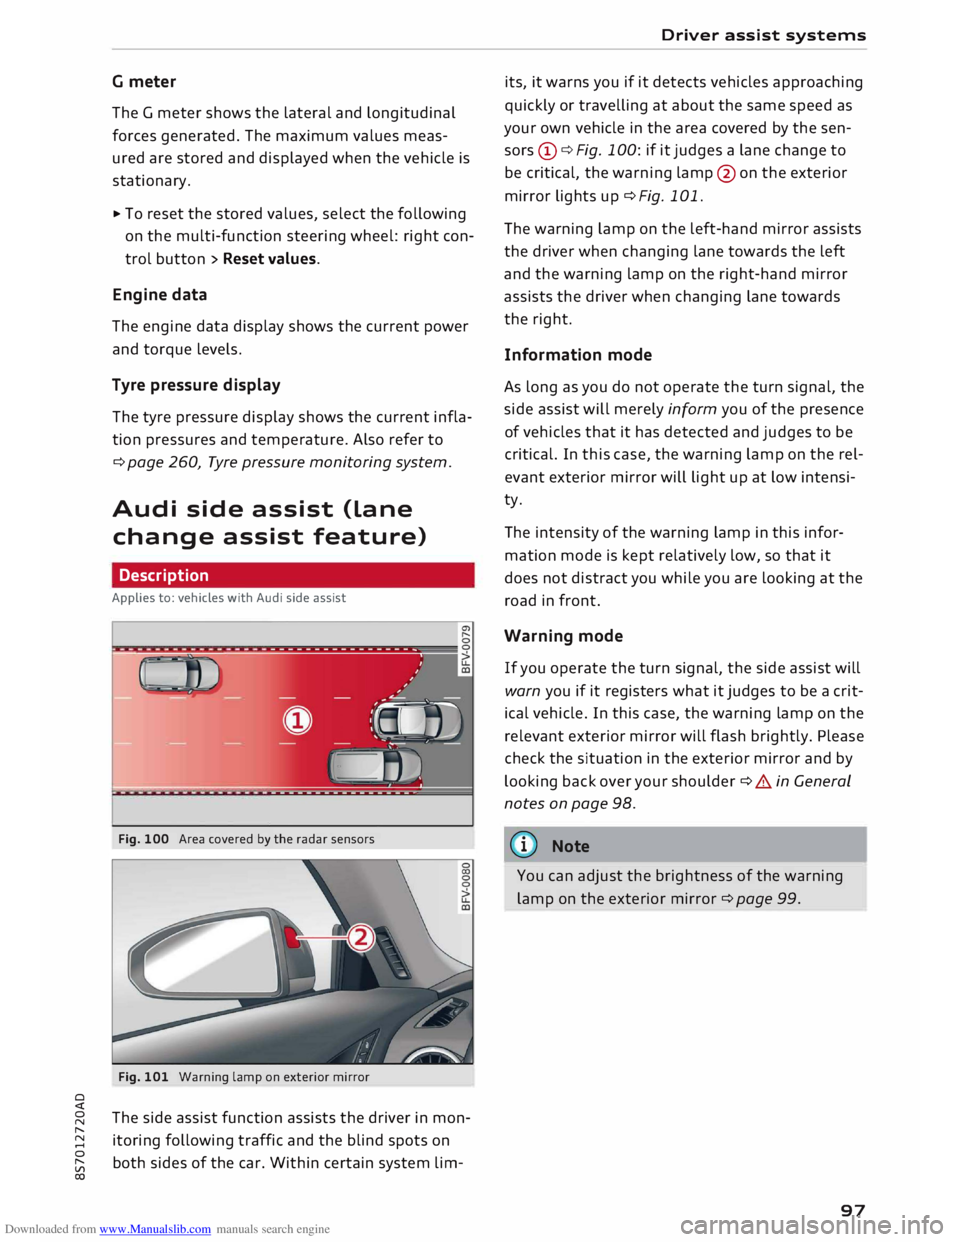
Fig. 100 Area covered by the radar sensors
Fig. 101 Warning lamp on exterior mirror
The side assist function assists the driver in mon
itoring following traffic and the blind spots on
both sides of the car. Within certain system Lim- Driver
assist systems
its, it warns you if it detects vehicles approaching
quickly or travelling at about the same speed as
your own vehicle in the area covered by the sen
sors (!)¢ Fig. 100: if it judges a Lane change to
be critical, the warning Lamp@on the exterior
mirror Lights up¢ Fig. 101.
The warning Lamp on the Left-hand mirror assists
the driver when changing Lane towards the Left
and the warning Lamp on the right-hand mirror
assists the driver when changing Lane towards
the right.
Information mode
As Long as you do not operate the turn signal, the
side assist will merely inform you of the presence
of vehicles that it has detected and judges to be
critical. In this case, the warning Lamp on the rel
evant exterior mirror will Light up at Low intensi
ty.
The intensity of the warning Lamp in this infor
mation mode is kept relatively Low, so that it
does not distract you while you are Looking at the
road in front.
Warning mode
If you operate the turn signal, the side assist will
warn you if it registers what it judges to be a crit
ical vehicle. In this case, the warning Lamp on the
relevant exterior mirror will flash brightly. Please
check the situation in the exterior mirror and by
Looking back over your shoulder¢ A in General
notes on page 98.
((1)) Note
You can adjust the brightness of the warning
Lamp on the exterior mirror¢ page 99.
97
Page 158 of 306
Downloaded from www.Manualslib.com manuals search engine Telephone
use of data services. There may be restrictions
when making and receiving calls.
If you select the telephone mode Automatic or
Telephony optimised, there may be network re
strictions if you try to use Audi connect services*
and make telephone calls at the same time.
Ring tone and volume settings 1
>
You can switch the MMI ring tone on or off using
the Mute telephone function. Ring tones are
played when you select the function Ring tone.
Select an entry from the list and confirm it. For
the settings Ring tone volume/Message volume,
see ¢ page 217. You can adjust the Microphone
input level during an active phone call using the
rotary pushbutton.
Network settings*
Refer to¢ page 215, Network settings*.
Serial number (IMEi)*
The serial number of the telephone module in
stalled in the MMI system is displayed.
Sw itch on telephone/Switch off telephone
Applies to: vehicles with car telephone kit
The car telephone will be turned "on" automati
cally when the ignition is switched on, as long as
it was not switched off separately the last time it
was used.
((!)} Note
- You can bond several mobile phones to the
MMI system; however only two* connec
tions are active at a time.
- All bonded Bluetooth devices can be deleted
by resetting the Bluetooth function to the
factory settings ¢ page 213.
- If you select the telephone mode Automatic
or Telephony optimised, there may be net
work restrictions if you try to use Audi con
nect services* and make telephone calls at
the same time.
l l
Depends on the connected mobile phone
156 Further
options
Applies to: vehicles with telephone
.,. Select: I MENU
I button >Telephone > right con-
trol button.
Connection manager
Refer to¢ page 213.
Bluetooth settings
Refer to¢ page 215.
Online settings*
Refer to¢ page 215.
Wi-Fi settings
Refer to¢ page 165, Wi-Fi hotspot.
Data connection settings*
Refer to ¢ page 166, Configuring the data con
nection.
Directory settings
Applies to: vehicles with telephone
.,. Select: I MENU
I button >Telephone > left con
trol button > Directory > right control button>
Directory settings.
Memory capacity
The Memory capacity of the directory will be dis
played.
You can manage up to 17,000 contacts with the
MMI's directory. Up to 4,000 contacts can be loa
ded from your mobile phone into each directory,
and up to 1,000 contacts can be imported from a
storage device.
Sort order
You can sort the contacts in your directory alpha
betically according to their surname or first
name.
Import contacts
Refer to¢ page 154, Importing/exporting con
tacts.
Page 169 of 306
Downloaded from www.Manualslib.com manuals search engine severed
automatically when data packets are no
longer required.
The following options are available:
Connection setup
- with request: A data connection will only be es
tablished on request.
- without request: A data connection will be es
tablished automatically for the use of Audi con
nect services.
- never: A data connection will not be establish
ed. It is then not possible to call up Audi con
nect services.
When a data connection has been established, a
symbol indicating the type of connection and the
signal strength will appear in the status line of
the infotainment display®/@ ¢ page 130,
Fig. 137.
You can cancel an active data connection manual
ly by setting the Connec tion setup option to nev
er.
Data roaming
The Data roaming function is deactivated when
the vehicle leaves the factory. Data roaming
must be activated (�) before you can use a data
connection abroad. This setting is saved for the
current SIM card/the mobile phone currently
connected.
Audi connect (MMI)
With this function, you can allow or deny the use
of Audi connect services if the connection is set
to no request or if requested.
Connection settings
Depending on the SIM card used, the connection
may be configured automatically. However, these
settings can be changed. For more information,
contact your service provider.
-APN: The system access point depends on your
mobile network service provider and is assigned
automatically.
� -
User name: The user name for your on line pro-
� file is assigned by your mobile network service
,.....
� provider.
0
,.....
Vl
CX) Audi
connect
- Password: The password for your on line profile
is assigned by your mobile network service pro
vider.
To store changed connection settings: Press the
I BACK!
button.
Reset configuration
An online profile is created and configured auto
matically. The Connection settings you have
changed manually are reset to the default set
tings.
@ Note
- According to the factory settings, the data
connection will be interrupted initially when
you travel abroad to protect you from unex
pected roaming charges. If you want to use
Audi connect services abroad, you must first
activate the Data roaming option.
- For more information on roaming charges,
contact your service provider.
- Further information can be found on the In
ternet at www.audi.com.
Notes on Audi connect
Audi connect services
Applies to: vehicles with Audi connect
{(D) Note
- Audi connect services are only available with
an existing mobile phone contract (or one
set up separately) and if you are in an area
with mobile phone network coverage. De
pending on your mobile phone tariff, you
may be charged for receiving data packets
on line, especially if you are using the sys
tem abroad. Because of the high level of da
ta usage, we strongly recommend using an
unlimited data plan.
- The mobile phone standard LTE* is not
available for use in all countries. For further
information, please consult an Audi dealer
or your mobile network service provider.
- In order to use Audi connect services, you
will need a mini SIM card with a data op
tion; to use LTE*, the SIM card will also
need to have an LTE data option.
167
Page 193 of 306

Downloaded from www.Manualslib.com manuals search engine Media
Introduction
The MMI system includes various media drives
and provides various options for connecting devi
ces. For example, you can play audio/video* files
from the jukebox or connect a mobile device to
the Audi music interface* and operate it via the
MMI.
Notes General
Media and format limitations: The MMI system
(including the SD card reader and the connection
for the USB mass storage device*) has been tes
ted for use with many of the products and media
currently available on the market. However,
there may be some devices/media and audio/vid
eo* files that are not supported or cannot be
played, or the functionality may be limited under
certain circumstances.
Digital rights management: Please note that
copyright law applies to audio/video files.
The MMI media drives do not support ORM-pro
tected files; these files are marked with the sym
bol rn.
Data storage: Never store important data on SD
cards, the jukebox*, CDs/DVDs or mobile devices.
AUDI AG shall not accept any liability whatsoever
for the loss of files and media.
Loading times: The more files, folders or play
lists are stored on a storage device, the longer it
will take to load the audio files/video* files. We
recommend using a storage device which con
tains only audio/video* files. If you want to re
duce the time it takes to load the audio/video*
files, you can create subfolders (e.g. for an artist
or album). The loading time will be extended ad
ditionally if you are importing data.
Metadata: Metadata stored on audio files (e.g.
artists, tracks, album covers) will be displayed
� automatically
when the files are played. If this
� information is not stored on the relevant medi-
8 um,
the MMI system will use the database of
"
Vl Media
metadata from Gracenote. Nevertheless, meta
data may not be displayed in some cases.
Restricted performance: If you experience re
stricted performance, reset the Media settings
to the factory defaults ¢page 213.
If you experience restricted performance from
the Jukebox*, reset it to the factory settings
¢page 213.
For information on the characteristics of the sup
ported media and file formats, please refer to
¢page 206 onwards.
CD CAUTION
Please always observe the information ¢(Din
Wi-Fi hotspot on page 166.
CD/DVD mode
CD/DVD and format limitations: In view of the
variety of CDs/DVDs and the difference in memo
ry capacities, the functionality may be restricted
in the case of some storage devices. Under cer
tain circumstances, audio CDs/video DVDs that
are copy-protected or CDs/DVDs that do not com
ply with the standard audio format, and multi
session CDs cannot be played at all, or the func
tionality may be limited. We recommend always
finalising the burning process when creating
multisession CDs. Multisession is not supported
for DVDs.
Handling CDs/DVDs, the CD drive or the DVD
drive: To ensure perfect, high-quality playback
and avoid scanning errors or damage to the me
dia drive, always store CDs/DVDs in a suitable
case and do not expose them to direct sunlight.
Do not use:
- Damaged, dirty or scratched CDs/DVDs
- Single CDs/DVDs (diameter 8 cm)
- Non-circular CDs/DVDs (shape CDs)
- CDs/DVDs with stickers
- Protective rings
- Cleaning discs
Thermal cut-out: In the case of unusually hot or
cold outside temperatures, it is possible that CD/
DVD playback will temporarily not be possible. A
IJll,,
191