change time AUDI TT ROADSTER 2017 Owners Manual
[x] Cancel search | Manufacturer: AUDI, Model Year: 2017, Model line: TT ROADSTER, Model: AUDI TT ROADSTER 2017Pages: 314, PDF Size: 76.54 MB
Page 17 of 314
co
co
Safety system
If them indicator light turns on or blinks, there
is a malfunction in a safety system.
Drive to an authorized Audi dealer or authorized
Audi Service Facility immediately to have the
malfunction corrected.
_& WARNING
-
Have the safety systems inspected immedi
ately. Otherwise, there is a risk that the sys
tems may not activate during a collision,
which increases the risk of serious injury or death.
c±::, Engine control
If the II indicator light turns on if there is a mal
function in the engine control.
Drive slowly to an authorized Audi dealer or au
thori zed Audi Service Facility to have the engine
checked.
C Malfunction indicator lamp (MIL)
The malfunction indicator lamp (MIL) is part of
the On Board Diagnostic system (OBD II) . The
¢..ij symbol turns on when the ignition is switched
on and turns off again once the engine is started
and running at a steady idle speed. This indicates
that the MIL is functioning correctly.
The indicator light turns on if there is a malfunc
tion in the engine electronics. See an authorized
Audi dealer or authorized Audi Service Facility to
have the malfunction corrected.
For additional information, see¢
page 17.
!?) Engine speed limitation
Appl ies to: vehicles with engine speed li m itation
(ii Maximum engine speed: XXXX rpm
The engine speed is automatically limited to the
speed displayed in the driver information system .
This protects the engine from overheating.
;:::: The engine speed limitation deactivates once the
" ~ engine is no longer in the critical temperature 0
" "' c:o
Instruments and indicator lights
range and you have released the accelerator ped
al once.
If the engine speed limitation was activated by
an engine control malfunction, the
II indicator
light also turns on. Make sure the engine speed
does not go above the speed displayed, for exam
ple when downshifting. Drive to an authorized
Audi dealer or authorized Audi Service Facility im
mediately to have the malfunction corrected.
~ Engine oil level (min.)
Ill Please check oil level
You may continue driving for the time being.
Check the engine oil level as soon as possible
<=> page 237.
-If the engine oil level is too low, add engine oil
¢page 239.
-If the engine oil level is correct and the indica
tor light still turns on, drive at low engine
speed to an authorized Audi dealer or author
ized Audi Service Facility .
"'' Engine oil sensor
• Oil level system: malfunction! Please con
tact Service
The sensor to check the engine oil level has
failed . Drive to an authorized Audi dealer or au
thorized Audi Service Facility immediately to have
the malfunction corrected .
• Oil level sensor: oil change necessary. Please
contact Service
The engine oil level is too high.
Drive to an authorized Audi dealer or authorized
Audi Service Facility immediately to have the
malfunction corrected.
(D Note
Refer to the description in the Owner's Man
ual ¢
page 239, Checking the engine oil level
and adding engine oil.
15
Page 22 of 314
Driver information system
Multifunction steering
wheel plus
Operating
Apples to: vehicles with multifunctio n steering wheel plus
The Multifunction steering wheel plus* hos 14
buttons. You con use them to operate the driver
information system and the MMI functions,
change the volume and switch the voice recogni
tion system* on and off.
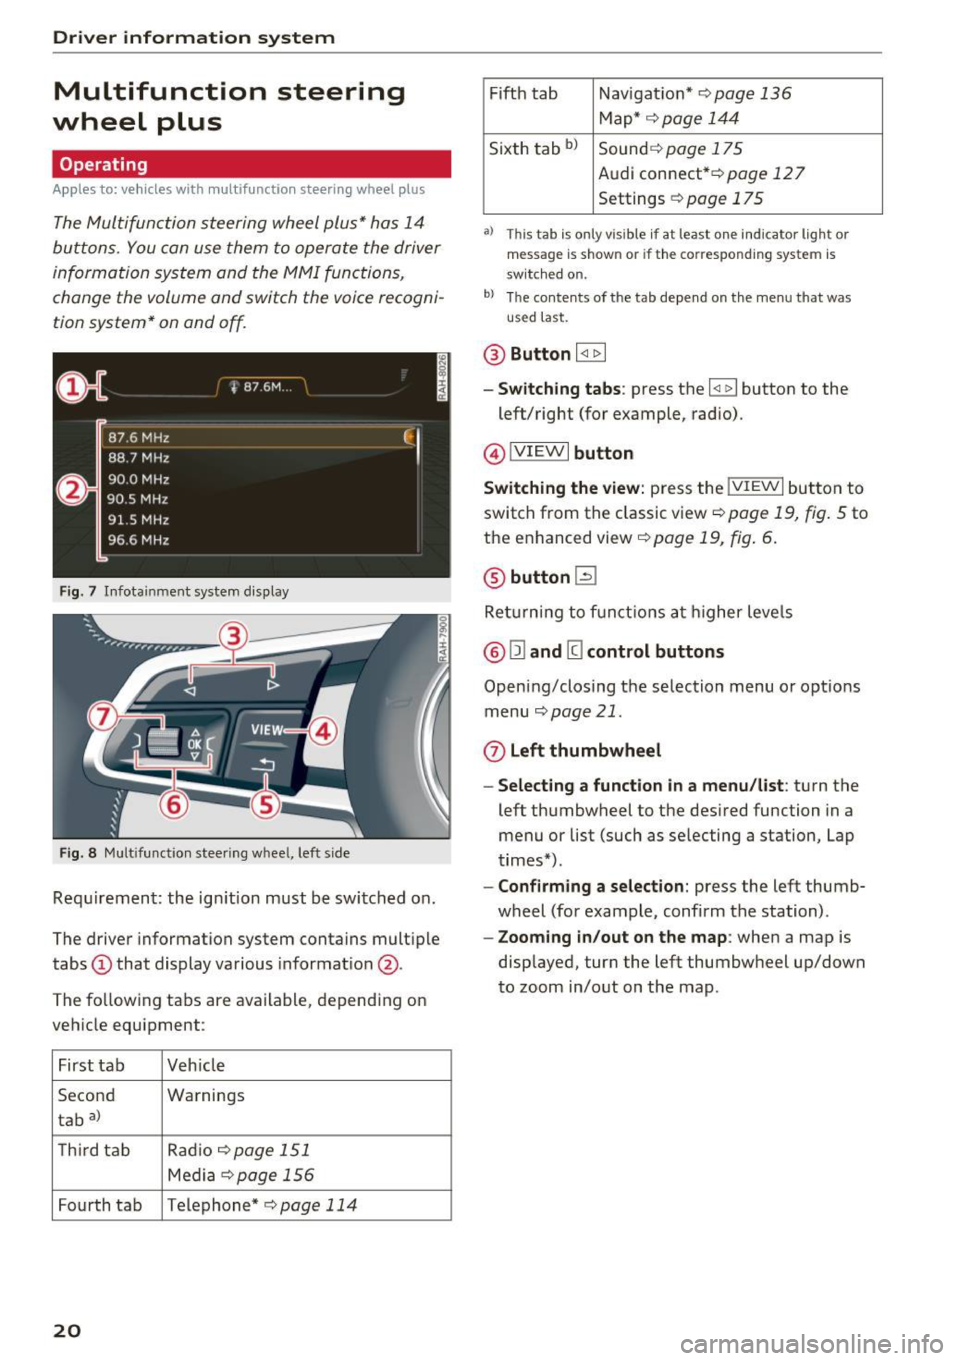
F ig. 7 Infotainment system display
Fig. 8 Mult ifunction steering wheel, left side
Requirement: the ign ition must be switched on .
The driver information system contains multiple
tabs
(D that display various informat ion @.
The fo llowing tabs are available, depending on
vehicle equipment :
First tab Veh icle
Second Warnings
tab
a)
T h ird tab Rad
io c:>page 151
Media c:> page 156
Fourth tab Telephone* c:> page 114
20
Fifth tab Navigat ion* c:> page 136
Map * c:> page 144
Sixth tab bl Sound c:> page 175
Audi connect* c:>page 127
Settings c:> page 175
a) This tab is only visible if at least o ne indicator lig ht or
message is shown or if the correspond ing system is
sw itc hed on.
bl Th e contents of the tab depend on the menu that was
u se d last.
® Button I <1 1> I
- Switching tabs: press the I
left/right (for example, radio).
@!VIEWI button
Switching the view: press the !VIEWI button to
switch from the classic view
c:> page 19, fig. 5 to
the enhanced view c:>
page 19, fig. 6.
@ button l2J
Returning to f unctions at higher levels
® l1l and III control buttons
Opening/closing the selection menu o r options
menu
c:>poge 21.
0 Left thumbwheel
-Selecting a function in a menu/list: turn the
left thumbwheel to the desired function in a
menu or list (such as selecting a station, Lap
times*) .
-Confirming a selection: press the left thumb
wheel (for example, confirm the station) .
-Zooming in/out on the map : when a map is
displayed, turn the left thumbwheel up/down
to zoom in/out on the map.
Page 34 of 314
Opening and closing
the equipment. Peop le can be injured or prop
erty can be damaged if struck when closing.
(D Tips
- For secu rity reasons, we recommend that
you clear the programmed buttons before
selling the vehicle.
- For additional information about Homelink,
v is it
www .homelink .com.
- For the Declaration of Conformity with the
provisions from the FCC in the United States
and Industry Canada, see¢
page 296 .
Operation
Applies to: ve hicles w ith garage doo r opener (Homeli nk)
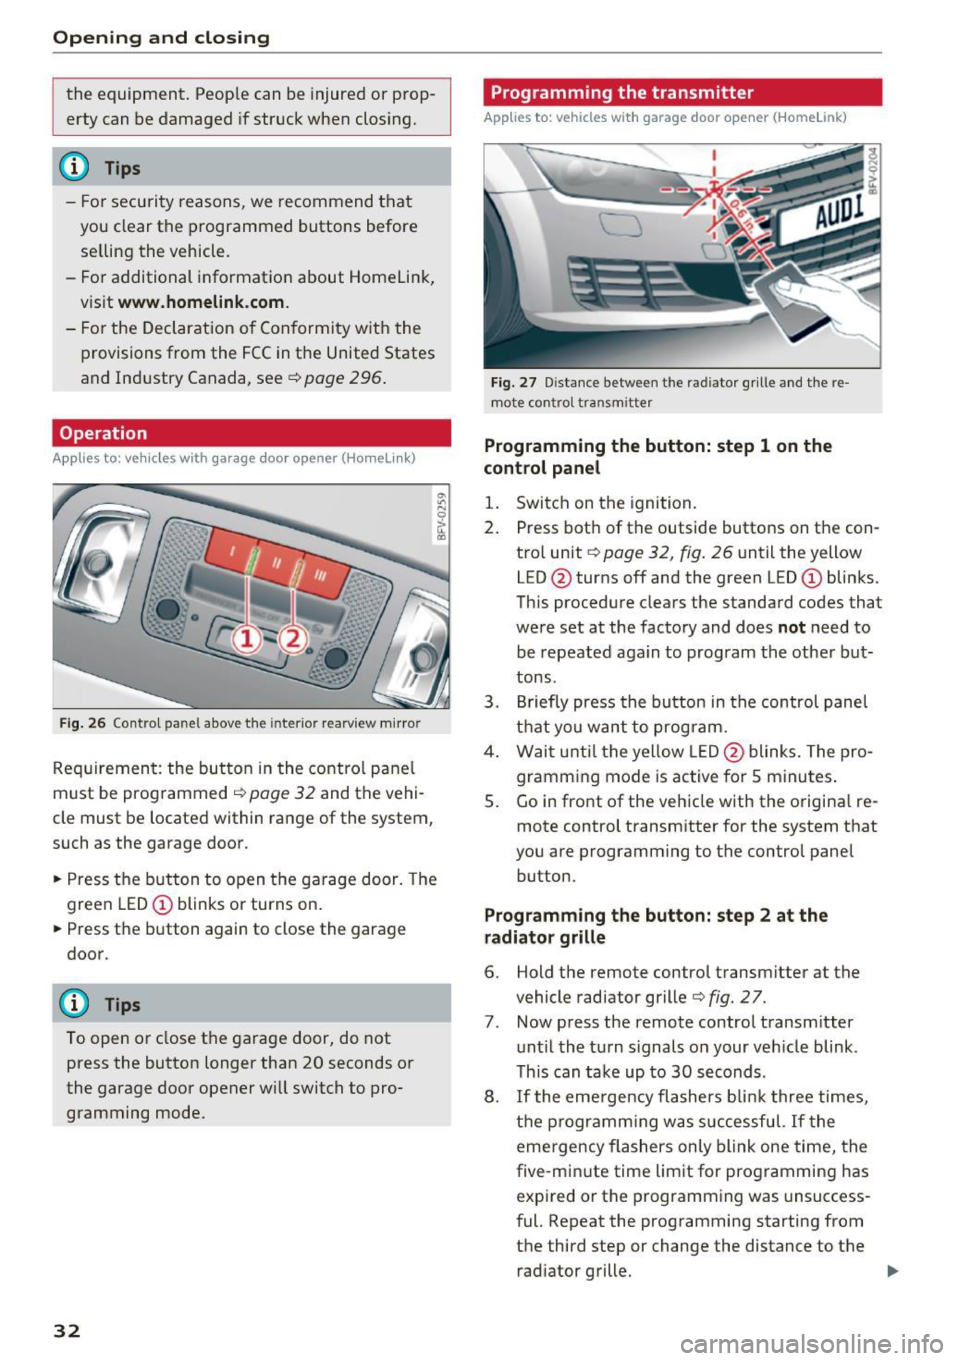
Fig. 26 Contro l pa nel above the inter io r rearview mirror
Requirement: the but ton in the control panel
m ust be programmed
i:!> page 32 and the vehi
cle must be located within range of the system,
such as the garage door .
.. Press the button to open the garage door. The
green LED
CD blinks or turns on.
.. Press the button again to close the garage
door.
(D} Tips
To open or close the garage door, do not
press the button longer than 20 seconds or
the garage door opener w ill switch to pro
gramming mode.
32
Programming the transmitter
App lies to : vehicles wit h garage door o pener (Horne link)
Fig. 27 D istance between the rad iator g rille and the re
mote contro l transm itter
Programming the button: step 1 on the
control panel
1. Switch on the ignition.
2. Press both of the outside buttons on the con
trol unit ¢
page 32, fig. 26 until the yellow
LED @turns off and the green LED
CD blinks.
This procedure clears the standard codes that
were set at the factory and does
not need to
be repeated again to program the other but
tons.
3. Briefly press the button in the control panel
that you want to program.
4. Wait until the yellow LED@blinks. The pro
gramming mode is active for S minutes.
5. Go in front of the vehicle w ith the origina l re
mote control transmitter for the system that
you are programming to the control panel button .
Programming the button: step 2 at the
radiator grille
6. Hold the remote control transmitter at the
vehicle radiator grille¢
fig. 27.
7 . Now press the remote control transm itter
until the turn signals on your veh icle blink .
This can take up to 30 seconds .
8. If the eme rgency flashers blink three times,
the programming was successful. If the
emergency flashers only blink one time, the
five -min ute time limit for programming has
expired or the programming was unsuccess
ful. Repeat the programming starting from
the third step or change the distance to the radiator grille.
Page 41 of 314
CD
CD
.... N
" N ...... 0
" V, co
Lights and Vision
Exterior Lighting
Switching lights on and off
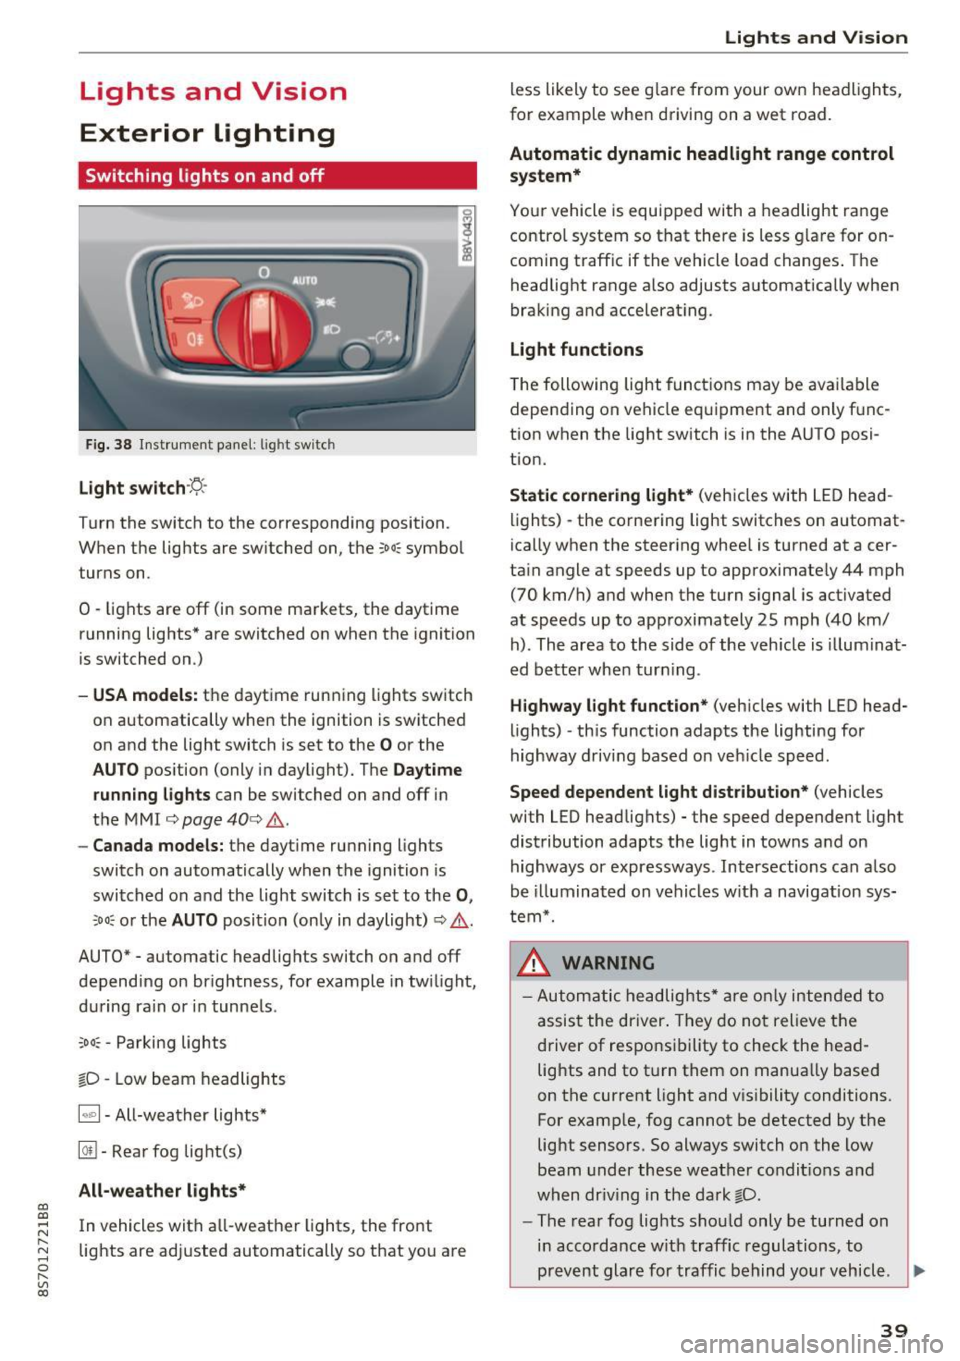
Fig. 38 Instrument panel: l ig ht switc h
Light switch ·:<'>'.·
Turn the switch to the corresponding position.
When the lights are switched on, the
;oo: symbol
turns on.
0 · lights are off (in some markets, the daytime
running lights* are switched on when the ignition
is switched on.)
-USA model s: the daytime running lights sw itch
on automatically when the ignition is switched
on and the light switch is set to the
O or the
AUTO pos ition (only in daylight). The D aytime
runn ing lights
can be switched on and off i n
the MMI
¢ page 40 ¢ &.
- Canada models: the dayt ime running lights
switch on automatically when the ignition is
switched on and the light switch is set to the
0 ,
;oo: or the AUTO posit ion (only in daylight) ¢ & .
AUTO* - automatic headlig hts switch on and off
depending on brightness, for example in tw ilight,
during ra in or in tunne ls .
~oo: -Parking lights
gD -Low beam headlights
IQ., 1-All-weather lights*
@il -Rear fog lig ht(s)
All-weather light s*
In vehicles with all-weather lights, the front
lights are adjusted automatically so that yo u are
Lights and V ision
less likely to see g lare from your own headlights,
for example when driving on a wet road.
Automatic dynamic headlight range control
system*
Your vehicle is equipped with a headlight range
contro l system so that there is less g lare for on
coming traff ic if the vehicle load changes . The
headlight range also adjusts automatically when
braking and accelerat ing .
Light function s
The following light funct ions may be avai lable
depending on vehicle eq uipment and only f unc
tion when the lig ht switch is in the AUTO posi
tion.
Static cornering light * (vehicles with LED head
li ghts) - the cornering light switches on automat
ica lly when the steer ing whee l is turned at acer
ta in angle at speeds up to approximate ly 44 mph
(70 km/h) and when the turn signal is activated
at speeds up to approximately 25 mph (40 km/
h) . The area to the side of the veh icle is illumina t
ed bette r when turn ing .
Highway l ight function * (vehicles with LED head
lights) -th is function adapts the lighting for
highway driving based o n veh icle speed.
Speed dependent light distribution* (vehicles
with LED headlights) - the speed dependent l ight
distribution adapts the lig ht in towns a nd on
highways or expressways . Intersections can a lso
be illuminated on vehicles w ith a navigation sys
tem*.
_& WARNING
- Autom atic headlights * are only inten ded to
a ssis t the driver . They do no t relieve t he
d river of respo nsibility to check the head
lig hts and to t urn them on manua lly based
on the current light and v is ibility conditions.
For example, fog cannot be detected by the
light sensors . So always switch on the low
beam under these weather condit ions a nd
when dr iv ing in the da rk
gD .
-The rear fog lights shou ld only be turned on
i n acco rdanc e w ith traffic regulations, to
prevent glare for traffic behind yo ur v ehicl e.
~
39
Page 43 of 314
CD
CD
.... N
" N .... 0 r--. V, co
Canada models: this function cannot be switched
off . They activate automatically each time the ig
n ition is switched on . This menu item is shown
with a "gray background".
Coming home, Leaving home
The coming home function illuminates the area
outside the vehicle when you turn the ignition off
and open the driver's door. To switch on the func
tion, se lect
Entry/exit lighting.
The leaving home illumi nates the area outs ide
the vehicle when you unlock the vehicle . To
switch on the function, select
Entry/exit light
ing .
The coming home and leaving home funct ions
only operate when it is dark and the light switch
is in the
AUTO position.
Emergency flasher
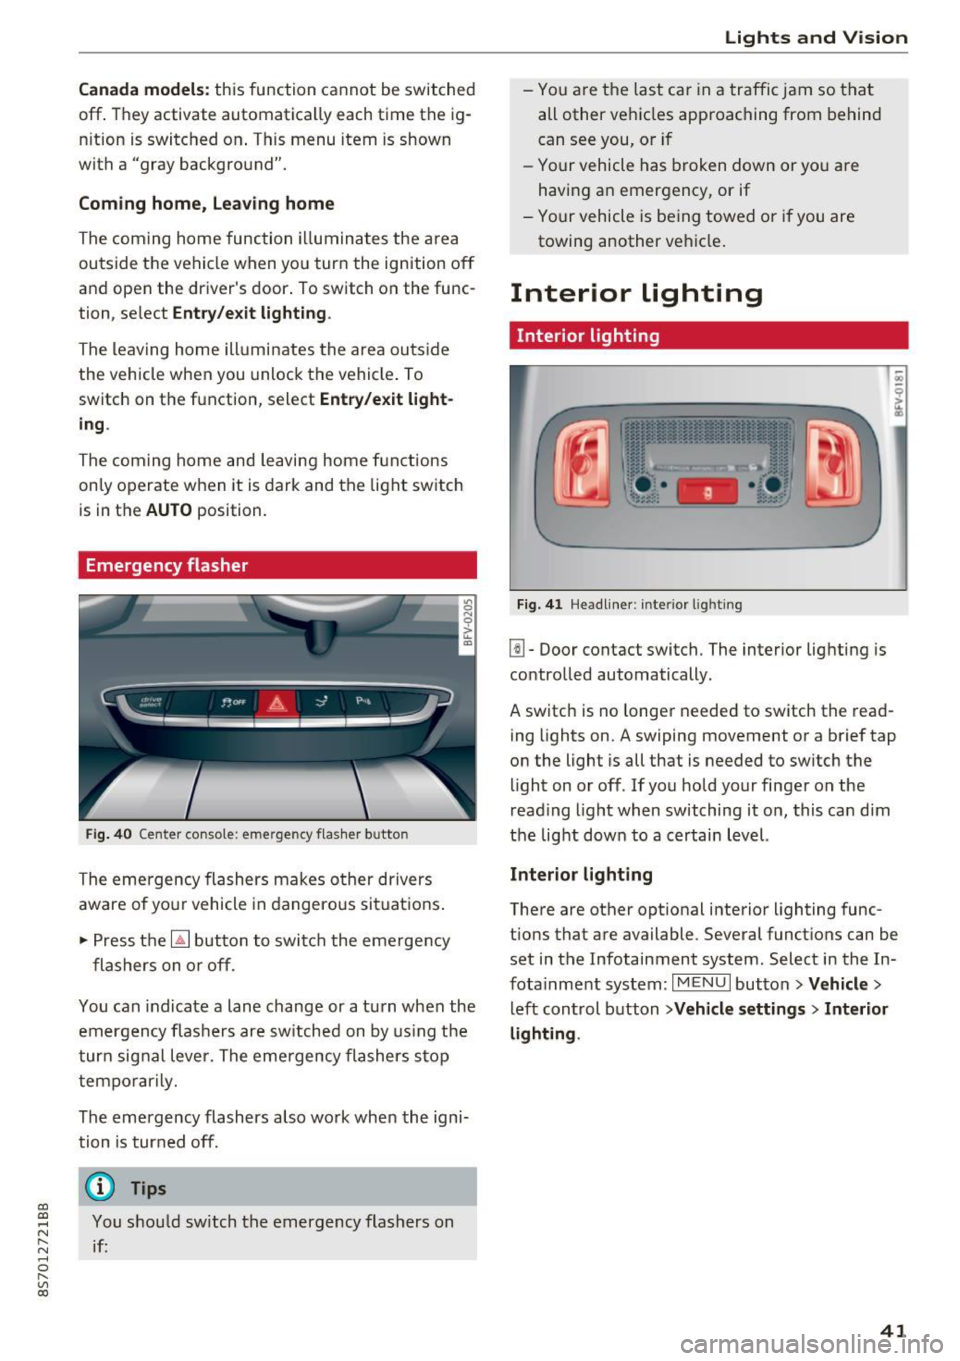
Fig. 40 Center conso le: emergency f las her button
The emergency flashers makes other drivers
aware of yo ur vehicle in dangerous situations .
.. Press the
[!J button to switch the emergency
flashers on or off.
You can indicate a lane change or a turn when the
emergency flas hers are switched on by using the
turn signal lever. The eme rgency flashers s top
temporarily.
The emergency flashers also wo rk when the igni
tion is turned off.
(D} Tips
You should sw itch the emergency flashers on
if:
Lights and V ision
-You are the last ca r in a traffic jam so that
all other vehicles approaching from behind
can see you, or i f
- Your vehicle has broken down or yo u are
having an emergency, or if
- Your vehicle is be ing towed o r if you are
towing another vehicle .
Interior lighting
Interior lighting
Fig. 41 Headliner: interior lighti ng
[!l-Door contact switch. The interior lighting is
controlled automatically.
A switch is no longer needed to switch the read
ing lights on.
A swiping movement or a brief tap
on the light is all that is needed to switch the
light on or off. If you hold your finger on the
read ing light when switching it on, this can d im
the light down to a certain level.
Interior lighting
There are other opt ional interior lighting func
tions that are available . Several functions can be
set in the Infotainment system. Select in the In
fotainment system:
I MENU I button> Vehicle>
left control button >Vehicle settings > Interior
lighting .
41
Page 74 of 314
Ass is t
Assist
Electronic speed Limiter
Your v ehicle may be factory equipped with tires
that are rated for a maximum speed of 130 mph (210 km/h). This is less than the maximum sp eed
of your vehicle . To reduce the risk of sudden tire
failure and loss of control if the vehicle is operat ed at excessive speeds, your vehicle also has an
electronic speed limiter . The electronic speed
lim iter prevents your vehicle from going faster
than the t ire speed rating. For mo re information
~ page 253.
If the engine control unit receives faulty vehicle
road speed s ignals , the Malfunction Indicator
L amp (MIL)
¢..ffi will illumina te . If this occurs,
con tact the nearest au thorized A ud i dealer for
assistance.
_& WARNING
Always observe the posted speed limits and
adjust you r speed to suit prevailing road, traf
fic and weather conditions. Never drive your
vehicle faster than the maximum speed rating
of the tires installed .
Speed warning system
Applies to: vehicles with speed warning system
The speed warning system helps you to stay be
low a specified maximum speed that can be set,
changed or deleted in the Infotainment system . -
The speed warning system warns you if you are
exceeding the maximum speed that you have set
.
A warni ng tone will sound as soon as you r speed
exceeds the sto red value s lightly . The
(OJ (USA
models)
I [OJ (Canada models) indicator light
and a message appear i n the ins trumen t cluster
d isp lay a t the same time. Th@
Hll (USA models)/
[O](Canada models) i ndicator light and the mes
sage turn off when the vehicle speed drops be low
the stored maximum speed.
Se tting a threshold is rec om mended if you would
like to be reminded when yo u reach a certa in
maximum speed . Situations where you may want
to do so include driving in a country w it h a ge ne r-
72
al speed limit or if there is a spec ified maximum
speed for winter tires.
Setting the warning threshold
.,. Select in the Infotainment system: IM ENU ! but
t on
> Vehicle > left con trol b utton > Driver as
sistance > Speed warning > Manu al.
a) Tips
Regar dless of the speed warning sys tem, you
sh ould alw ays mon itor your spee d using the
speedometer and tnake s ure yo u are fo llow ing
the lega l speed limit.
Cruise control system
Switching on
Applies to: vehicles with cruise control system
The cruise control sys tem makes it possible to
drive at a constant speed starting at 15 mph (20kmlh) .
0
f
~
0
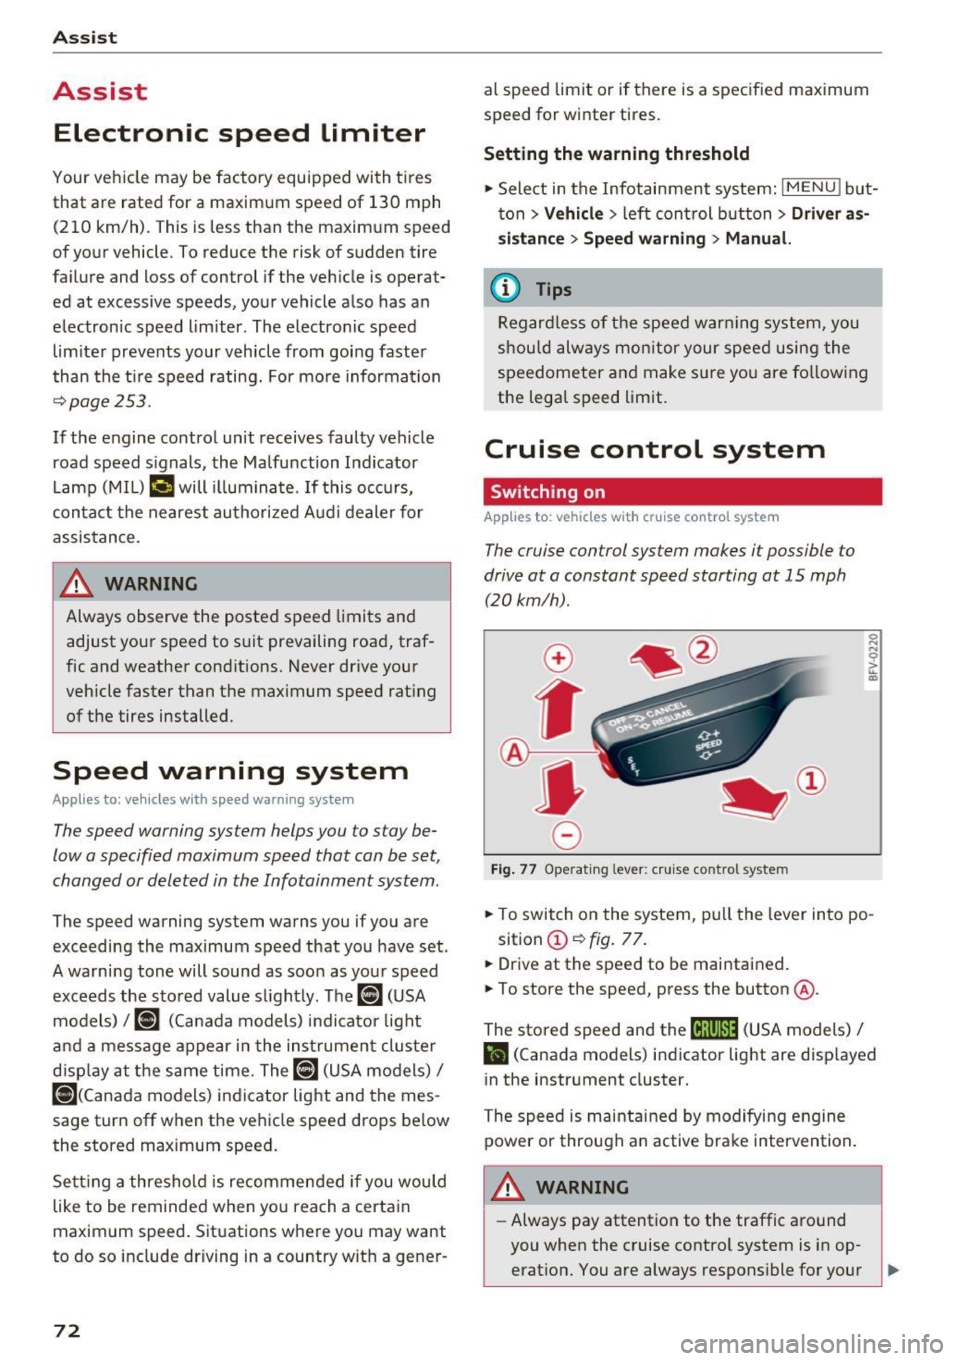
Fig. 7 7 Operat ing lever: c ruise co ntro l sy ste m
.,. To switch on the system, pu ll the lever in to po -
sition @~
fig. 77 .
.,. Drive at th e speed to be maintained.
.,. To store the speed, press the button @.
The stored speed and the
M;\1)~1j (USA models) /
l'I (Canada models) indicator light are disp layed
in the instrument cluster.
The speed is maintained by modifying engine power or through a n active brake intervention.
_& WARNING
- Always pay attention to the traffic around
you when the cruise contro l system is in op
erat ion. You are always respons ible for your ,...
Page 76 of 314
Ass is t
& WARNING
You should only resume the stored speed if it
is not too high for existing traffic conditions.
Otherwise you can increase the r isk of an acci
dent .
Audi active Lane assist
Description
Appl ie s to: ve hicles w ith Audi ac tive lane assis t
Active lane assist detects lane marker lines with
in the limits of the system using a camera in the
windshield. If you are approaching a detected
lane marker line and it appears likely that you
will leave the lane, the system will warn you with
correct ive steering. You can override th is steer ing
at any time . If you pass over a line, the steer ing
wheel will v ibrate l ightly. In order for this warn
ing vibration to occur, it must first be sw itched
on in the Infotainment system. Active lane assist
is ready for operation when the lane marker line
is detected on at least one side of the vehicle.
The system is designed for driving on express
ways and highways and so it only activates at
speeds above approximately 40 mph (65 km/h) (depending on the market).
Applies to vehicles w ith side assist* : if you act i
vate a turn signal when active lane assist is ready
and it classifies a lane change as critical because
of vehicles traveling alongside you or approach
ing you, there w ill be noticeable corrective steer
ing shortly before you leave the lane. This will at
tempt to keep your vehicle in the lane.
Applies to vehicles without side assist* : the sys
tem does not warn when it is ready if you activate
the turn signal before crossing the lane marker line . In this case, it assumes that you are chang
ing lanes intentionally .
& WARNING
-The system wa rns the driver that the veh icle
is leav ing the lane using co rrective s teer ing.
1 ) The co rrect ive stee ring fun ctio n is not ava ilabl e in all mar
ket s.
74
The driver is always responsible for keeping
the vehicle within the lane.
- The system can assist the driver in keeping
the vehicle in the lane, but it does not drive
by itself. A lways keep your hands on the
steer ing wheel.
- Corrective steering may not occur in certain situations, such as during heavy braking.
- There may be cases where the camera does
not recognize all lane marker lines. Correc
tive steering can only take place on the s ide
of the vehicle where lane marker lines are
detected .
- Other road structures or objects could poss i
bly be identified un intent ionally as lane
marker lines . As a result, corrective steering
may be unexpected o r may not occ ur.
- The camera view can be restricted, for ex
ample by vehicles driving ahead or by ra in,
snow, heavy spray light shin ing into the
camera or by dirt o n the window. This can
result in active lane assist not detecting the
lane marker lines or detecting them incor
rectly.
- In certain s ituations where visibility is low,
the vehicle may switch internally from "ear
ly" to "late" steering cor rection
ll.
- Unde r certain cond itions such as r uts in the
road, an inclined roadway or crosswinds, the
corrective steer ing alone may not be enough
to keep the vehicle in the m iddle of the lane.
- For safety reasons, active lane assist must
not be used when there are poor road and/
or weather conditions such as slippery
roads, fog, gravel, heavy rain, snow and the potential for hydroplaning . Using active lane
assist under these cond it ions may increase
the risk of a crash.
Page 80 of 314
Ass is t
are indicated by the time they enter your "blind
spot", at the latest .
@Vehicles you are passing
If you slowly pass a veh icle that side assist has
detected (the d ifference in speed be twee n the
veh icle and your veh icle is less t han 9 mph (15
km/h)), the d isplay in the exterior mirror turns
on as soon as the vehicle enters your blind spot .
The display will not tu rn o n if you quick ly pass a
veh icle tha t side assist has detected (the differ
ence in speed is greate r than 9 mph ( 15 km/h)).
Functional limitations
The rada r senso rs a re designed to detect the left
and right adjacen t lanes when the road lanes a re
the normal wid th . In some s ituat ions, the d isplay
in the exter ior mirror may tur n on even tho ugh
there is no vehicle located in the area that is criti
cal for a lane change. For example:
- If the lanes a re nar row o r if yo ur are dr iving on
the edge of your lane. If this is the case, the system may have detected the vehicle in anoth
er lane t hat is
not adjacent to your current lane.
- If you are dr iv ing t hrough a curve. Side assis t
may react to a vehicle that is one lane over
from the adjacent lane.
- If side assist reacts to other objects (such as high or displaced guard rails) .
- In poor weather condit ions . The side assis t
functions are limited.
Do not cove r the radar sensors¢
fig. 84 w ith
s tick ers, deposits, bicycle whee ls o r othe r ob
jects, beca use they w ill impa ir the f unction . For
information on cleaning, see¢
page 266.
A WARNING
-Always pay attention to traffic and to the
area aro und your vehicle. Side assist cannot
rep lace a dr iver's attention. The drive r alone
is a lways responsible for lane changes and
similar driving maneuvers.
- In some situat io ns, the system may not
function or its funct ion may be limited . For
example:
78
-
- If vehicles are app roaching or being left
behind very q uickly. The disp lay may not
turn on in time.
- In poor weathe r cond it ions such as heavy
r ain, snow or heavy mist.
- On very wide lanes, in tight curves, or if
the re is a r ise in the road surface. Veh icles
i n the adjacent lane may not be detected
because they are outside of the sensor
r ange.
- Aud i side assist can not detect all ve hicles
under all conditions, which can inc rease the
r is k of acciden ts.
- Please note that s ide ass ist only d isp lays ap
proach ing vehicles or veh icles in your blind
spot if your veh icle is traveling a t least
19 mph (30 km/h).
- In ce rtain s ituations, t he sys tem may not
wo rk or its funct ion may be limited. For ex
ample:
- The disp lay may not turn on at the r ight
time if vehicles are approaching or pass ing
very quickly.
- In poor weathe r con ditions, such as heavy
r ain, snow or fog.
- In very wide lanes, in tight c urves o r whe n
the re are slopes in the roadway, vehicles
i n the ne ighboring lanes may not be de
tected because they a re outside of the
senso r range.
(D Note
The sensors can be d isplaced by impacts or
damage to the bumper, wheel housing and underbody. This can impair the system. Have
an authorized Audi dealer or author ized Audi
Service Fac ility check the ir f unct io n.
(D Tips
- If the w indow glass i n the dr iver's door or
front passenger's door has been tinted, the display in t he exterior mirro r may be inco r
rect.
- For an ex planat ion on co nfo rm ity w ith the
FCC reg ulations in the Un ited States and the
In dust ry Can ada regulat io ns, see
¢page 296.
Page 81 of 314
co
co
.... N
" N .... 0
" "' c:o
Switching on and off
Applies to: vehicles with Audi side assist
The system ca n be switched on/off in the Info
t a in men t system.
"' Select in the Info tainment sys tem:
iM ENUI but
ton
> Vehicle > left contro l butto n >Driver as
sistan ce > Audi side assist
If the system is activated, the displays in the ex
ter io r mir rors wi ll turn o n briefly when the ig ni
tion is sw itched on.
Adjusting the display brightness
Applies to: vehicles with Audi side assist
The display brightness can be adjusted in the In
fotainm ent system.
"' Se lect in the Infotainment system: i MENU I but
ton
> Vehicle > left contro l butto n >Driver as
sistance > Audi side assist
The display b rightness ad justs automat ica lly to
the br ightness of the s urrou ndings, both in the
in fo rmat ion and in the warning stage . In very
da rk or ve ry br igh t sur ro u ndings, the a utomat ic
ad ju st men t will se t th e d isp lay to the mini mum
or maxim um level. In s uch cases , you m ay no tice
no change w hen adjus ting t he br ightness, o r th e
change may on ly be no tic eable o nce the su r
ro undings change .
A dju st the br ightn ess to a level where the d isp lay
i n the inform ation stage wi ll no t di srupt your
v iew ahead. If you change the brightness, the dis
p lay in the exter ior mir ror will briefly show the
b rightness level i n the information stage . The
b rightness of the warning stage is linked to the
b rightness in t he info rmat ion stage and is ad just
ed along w ith the information stage .
- Side assist is not active wh ile you are ma k
i ng the ad justment.
- Your settings are automatically stored and ass igned to the remote cont rol key being
used.
Assist
Messages
Applies to: vehicles with Audi side assist
I f the s ide ass is t swi tches off automat ically, a
mess age app ear s in t he In fota in men t sys tem dis
play.
@j Audi side assist: currently unavailable.
Sensor vision restricted due to surroundings.
See owner 's manual
The radar sensors ' v is ion is affected. Do not cover
the a rea in front of the sensors with bike whee ls,
stickers, dirt or other objects. Clean the area in
front of the sensors, if necessary
q page 77,
fig. 84.
@j Audi side a ssist: currently unavailable.
See owner's manual
S ide assist cannot be switched on at this time be
ca use there is a ma lfu nction ( for example, the
battery c harge leve l may be too low) .
@j Audi side assist: malfunction! Please
contact Service
The system cannot guarantee that it will detect
vehicles cor rect ly and it has switc hed off. The
senso rs have been move d or are fa ulty. Have the
syste m chec ked by an au tho riz ed Au di deale r or
a uthor iz e d Au di S ervice Faci lity s oon.
Audi drive select (drive
settings)
Introduction
Applies to: vehicles with Audi drive select
Dr ive select ma kes it possib le to e xper ience dif
fere nt types of ve hicl e sett ings in one ve hicle.
T he driver can sele ct from th ree mo des,
Comfort ,
Auto
and Dynamic , using the r.~;\,1 bu tton in the
center console o r by using the Infotainment sys
tem. This allows you to switch between a sporty
and a comfo rtable driv ing mode, fo r example. In
t h e
Individual mode, the sett ings can be ad just
ed to yo ur persona l pre ferences . This makes it
poss ible to com bine settings such as a sporty en-
gine sett ing wi th light s teer ing. .,._
79
Page 96 of 314
Intelligent Technology
greater than the amount being generated in or
der to maintain an optimal vehicle battery charge
level.
(D Tips
- Energy management cannot overcome the laws of physics. Note that the charge level
and length of the vehicle battery life are
limited.
- When the starting ability is jeopardized, the
(•j indicator light turns on¢ page 13.
What you should know
Maintaining the starting ability is the highest
priority.
A lot of stress is placed on the vehicle battery
when driving short distances, during city driving,
and at cold times of the year. A lot of energy is
used but little is generated. It is also critical
when the engine is not running but electrical
equipment is switched on. In this case, energy is used but none is generated .
In situations like this, energy management will
actively regulate the distribution of energy.
Long periods without use
If you do not drive your vehicle for several days or
weeks, electrical equipment is gradually scaled
back or switched off. This reduces energy use and
ensures the vehicle will be able to start after long
periods of time. Some convenience functions
such as opening with the remote control key may not be available . These convenience functions
will be available again once you switch the igni tion on and start the engine.
With the engine switched off
The vehicle battery will drain if you use Infotain ment functions such as listening to the radio
while the engine is switched off .
If the vehicle's ability to start may be impaired by
the energy use, a message will appear in the In
fotainment system display. The message indi cates that the system will switch off automatically soon .
If you would like to continue using the
functions, you must start the engine.
94
With the engine running
Although e lectrical energy is generated while
driving , the vehicle battery can drain . This can
happen if little energy is generated but much is
used, and the charge level of the vehicle battery
is not optimal.
To restore the balance of energy , components
that require large amounts of energy are tempo
rarily scaled back or switched off. Heating sys
tems in particular require a great deal of energy.
If you notice, for example, that the seat heating*
or rear window defroster is not working, then it has been temporarily reduced or switched off .
These systems are available again as soon as the energy supply has been restored.
In addition, you may notice that the idle speed
has slightly increased . That is normal and no
cause for concern . By increasing the idling speed ,
the additional required energy will be generated
and the vehicle battery will be charged.
Information about data
recorded by vehicle
control modules
Your vehicle is not equipped with a crash data re
corder . This device is installed by some vehicle
manufacturers to record data about crashes so
that it can be analyzed later. Crash data record
ers are also called "Event Data Recorders (EDR)".
In some legal jurisdictions, it is not permitted to
access or download data recorded by pre-instal
led crash data recorders in order to evaluate a
crash without clear consent of the vehicle owner.
Your vehicle is not equipped with a crash data re
corder. However it does contain a variety of elec
tronic control modules for various vehicle sys
tems such as engine function, exhaust treatment
or airbags and safety belts.
These electronic control modules record vehicle
data during normal driving for diagnosis and re
pair purposes. The recording capability of the
electronic control modules is limited to data only
- no sound is recorded. If the control module de
tects a system malfunction or other change in
status, a very limited amount of data is recorded .,,.