heating AUDI TT ROADSTER 2017 Owners Manual
[x] Cancel search | Manufacturer: AUDI, Model Year: 2017, Model line: TT ROADSTER, Model: AUDI TT ROADSTER 2017Pages: 314, PDF Size: 76.54 MB
Page 9 of 314
co
co
.... N
" N .... 0
" "' c:o
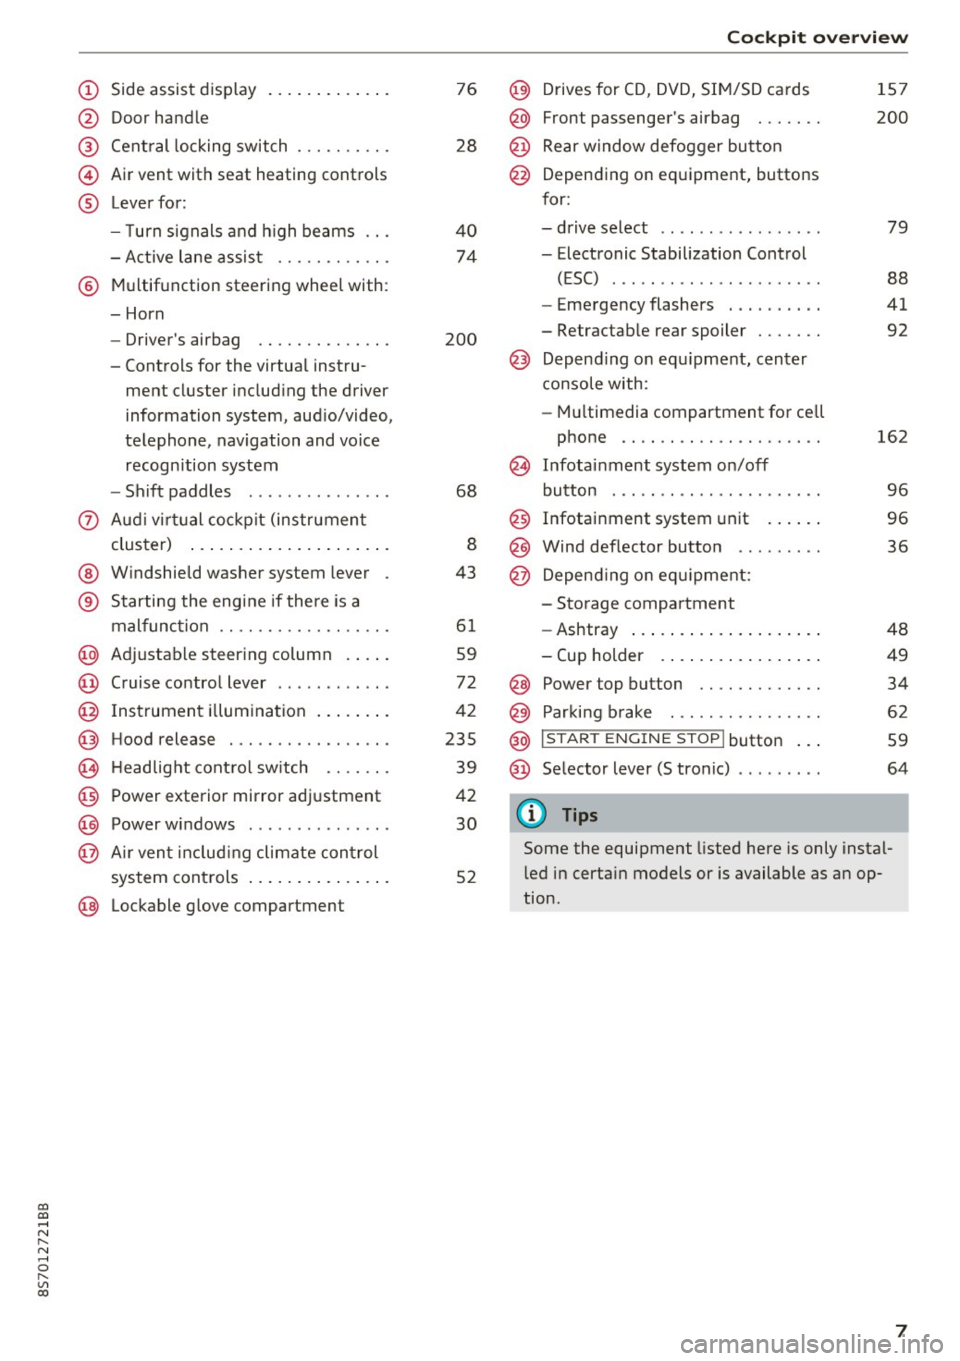
(!) Side assist display ..... ... .. .. .
@ Door handle
®
©
®
Cent ral locking switch
Air vent with seat heating controls
Lever for:
- T urn s ignals and h igh beams .. .
- Active lane assis t ......... .. .
® Multifunction steering wheel with :
- Horn
- Driver's ai rbag .. ......... .. .
- Controls for the virtual instru-
ment cluster includ ing the driver
information system, aud io/video,
telephone, navigation and voice
recogn ition system
- Shift paddles . .... ..... ... . .
0 Aud i v ir tu al co ckpit (instrument
cluster) ... .... .. .... ... .. .. .
@ W indshield washer system lever
® S tarting the engi ne if the re is a
mal func tion .. ........... .. .. .
@ Adjustab le st eering column . ... .
@ Cruise co ntrol lever .. ..... ... . .
@ Ins trument i llum ination ... .. .. .
@ Hood release . .... ......... .. .
0 H eadlight cont rol sw itch .... .. .
@ Power exterior mirror adjustment
@ Power windows . .... ..... ... . .
@ A ir ven t incl uding climate con trol
system controls ... .... ... .. .. .
@ Lockable g love compartment
76
28
40
74
200
68
8
43
6 1
59
72
42
235
39
42
30
52
Coc kpit o ve rv iew
@) Drives for CD, DVD, SI M/SD cards
@ Front passenger's ai rbag ...... .
@ Rear window defogger bu tton
@ Depending on equipment, buttons
for:
- drive select .. .. ............ .
- Electronic Stabilization Control
(ESC) ..... .. .. ............ .
- Emergency flashers . ...... .. .
- Retractab le rear spoiler ...... .
@ Depend ing on equ ipment , center
co nsole with:
- Mu ltimedia compartment for cell
phone .... .. .............. .
~ Infotai nment system on/off
button . .. .. .. .. ............ .
@ Infotainment system unit ... .. .
@ Wind deflector button ........ .
@ Depending o n eq uipment:
- Storage compartment
- Ashtray ... .. ... .. .. ..... .. .
- Cup holder .. ... .. .. ..... .. .
@ Power top button ............ .
@ Parking b rake . .. ............ .
@ I S TAR T ENGINE ST OP I butto n ...
@ Selector lever (S tronic)
@ Tips
1S7
200
79
88
41
92
162
9 6
96
36
48
49
34
62
59
64
Some the equipment listed here is only instal
l ed in certa in models or is available as an op
tion.
7
Page 10 of 314
Instrumen ts and ind icator ligh ts
Instruments and indicator Lights
Instruments
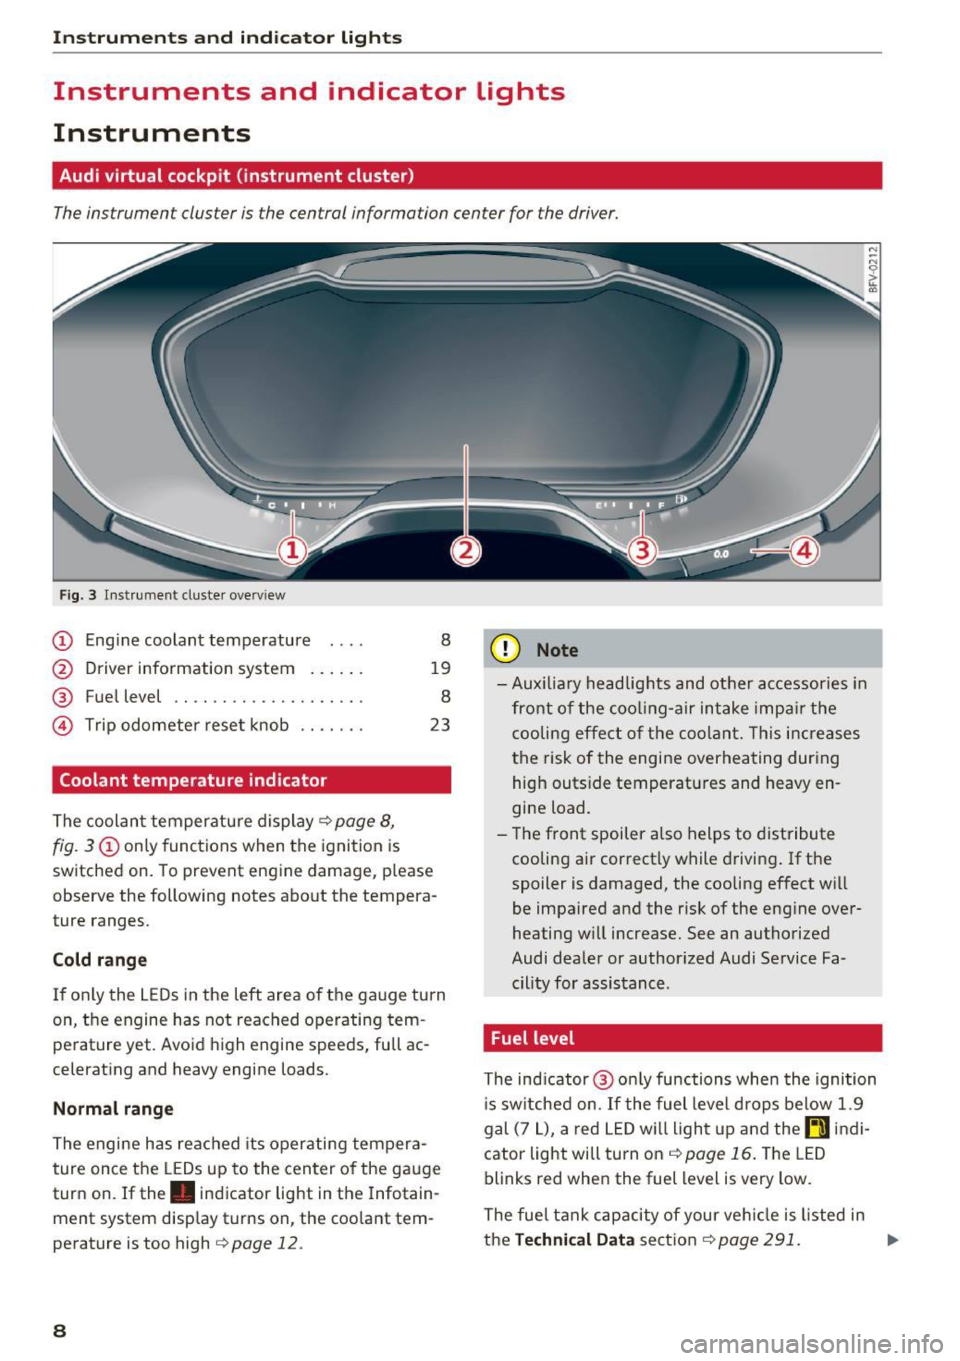
Audi virtual cockpit (instrument cluster)
The instrument cluster is the central information center for the driver.
Fig. 3 Instrume nt cluster overv iew
(D Eng ine coolant temperature 8
@ Driver information system . . . . . . 19
® Fuel level . . . . . . . . . . . . . . . . . . . . 8
@ Trip odometer reset knob . . . . . . . 23
Coolant temperature indicator
The coolan t temperature display c:> page 8,
fig. 3
(D only functions when the ignition is
switched on. To prevent engine damage, p lease
observe the following notes about the tempera
ture ranges.
Cold rang e
If o nly the L EDs in the left area of the gauge turn
on, the engine has not reached operating tem
perature yet. Avoid high engine speeds, full ac
celerating and heavy engine loads .
Normal range
The engine has reached its operating tempera
ture once the LEDs up to the center of the gauge
turn on . If the . indicator light in the Infotain
ment system display turns on, the coolant tem
perature is too high
c:> page 12.
8
(D Note
-Aux iliary head lights and other accessories in
front of the coo ling-a ir intake impa ir the
cooling effect o f the coolant. This increases
the risk of the engine overheating during high outside temperatures and heavy en
gine load.
- T he front spoiler a lso helps to distribute
cooling air correctly while driving . If the
spoiler is damaged, the cooling effect will
be impaired and the risk of the eng ine over
heating w ill increase. See an authorized
Audi dealer or author ized Audi Service Fa
cility for assistance .
Fuel level
The indicator @ only func tions when the ignition
i s sw itched on. If the fuel level drops below 1.9
gal (7
L), a red LED wi ll light up and the rD indi
cator light will turn on
c:> page 16 . The LED
blinks red when the fuel level is very low.
The fuel tank capacity of your veh icle is listed in
the
Techni cal Dat a sectio n c:> page 291. ..,_
Page 11 of 314
co
co
.... N
" N .... 0
" "' c:o
(D Note
Never drive until the tank is completely emp
ty. The irregular supply of fuel that results
from that can cause engine misfires . Uncom
busted fuel will then enter the exhaust sys
tem. This can cause overheating and damage
to the catalytic converter .
Indicator lights
Description
The indicator lights in the instrument cluster
blink or turn on. They indicate functions or mal
functions.
With some indicator lights, messages may appear and warning signals may sound. The indica
tor lights and messages in the display can be cov
ered by other displays. To show them again, se lect the tab for the indicator lights and messages
using the multifunction steering wheel
c;, page 19. If there are several malfunct ions,
you can display them one at a time using the
thumbwheel.
Some ind icator lights in the display can display in
several colors .
Overview
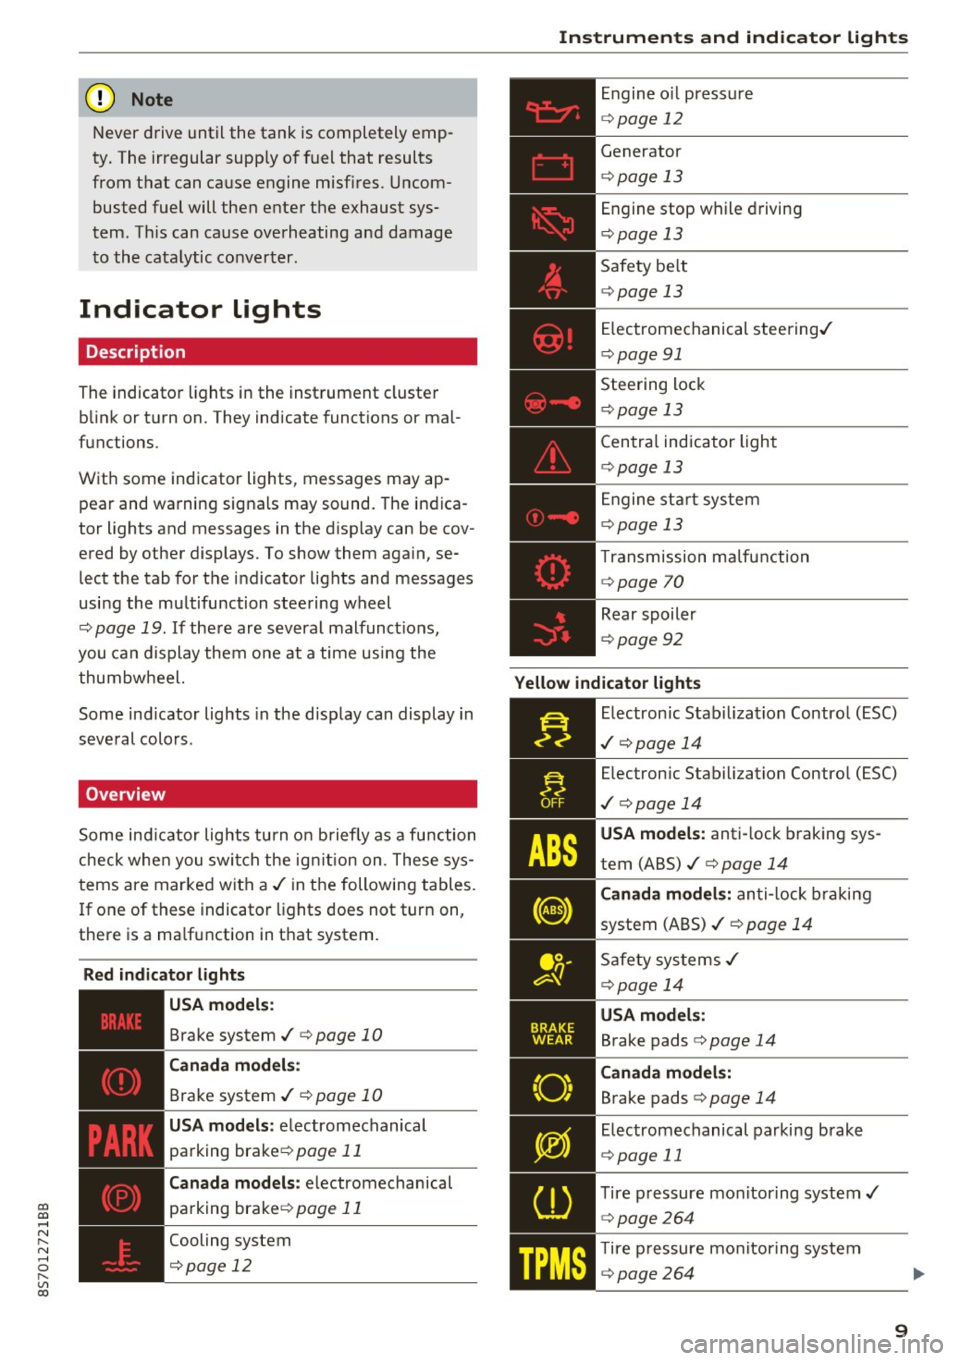
Some indicator lights turn on briefly as a function
check whe n you switch the ign ition on . These sys
tems are marked with a
,I in the following tables.
If one of these indicator lights does not turn on,
there is a ma lfunction in that system.
Red indicator lights
---------------
US A models :
Brake system ./ c;, page 10
Canada models:
Brake system ./ c;, page 10
USA models : electromechanical
parking brake¢
page 11
Canada models: electromechanical
parking brake¢
page 11
Cooling system
<=>page 12
Instruments and indicator lights
Engine oil pressure
c;,page 12
Generator
¢page 13
Engine stop while driving
¢page 13
Safety be lt
c;, page 13
Electromechanical steering./
c;,page 91
Steering lock
¢page 13
Central indicator light
c;,page 13
Engine start system
c;,page 13
Transmission malfunction
c;, page 70
Rear spoiler
c;,page 92
Yellow indicator lights
Electronic Stabilization Contro l (ESC)
,I c;, page 14
Electronic Stabilization Control (ESC)
./ c;, page 14
USA models: anti-lock braking sys
tem (ABS)./
c;, page 14
Canada models: anti-lock braking
system (ABS) ./
c;, page 14
Safety systems ,I
c;,page 14
USA models:
Brake pads c;, page 14
Canada models:
Brake pads c;, page 14
Electromechanical parking brake
c;,page 11
Tire pressure monitoring system../
c>page264
Tire pressure monitoring system
<=>page 264
9
Page 17 of 314
co
co
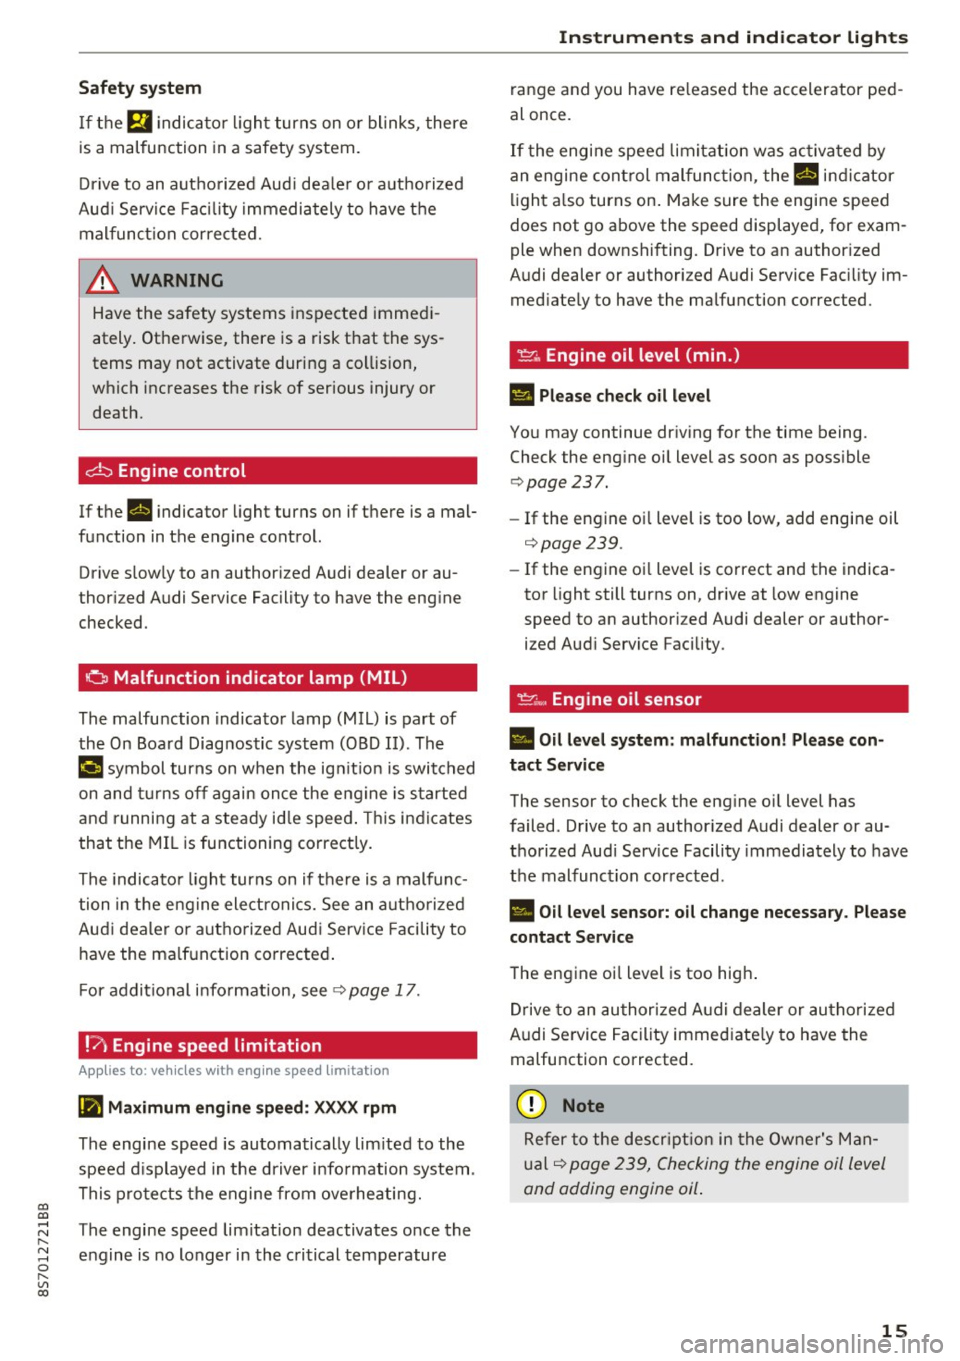
Safety system
If them indicator light turns on or blinks, there
is a malfunction in a safety system.
Drive to an authorized Audi dealer or authorized
Audi Service Facility immediately to have the
malfunction corrected.
_& WARNING
-
Have the safety systems inspected immedi
ately. Otherwise, there is a risk that the sys
tems may not activate during a collision,
which increases the risk of serious injury or death.
c±::, Engine control
If the II indicator light turns on if there is a mal
function in the engine control.
Drive slowly to an authorized Audi dealer or au
thori zed Audi Service Facility to have the engine
checked.
C Malfunction indicator lamp (MIL)
The malfunction indicator lamp (MIL) is part of
the On Board Diagnostic system (OBD II) . The
¢..ij symbol turns on when the ignition is switched
on and turns off again once the engine is started
and running at a steady idle speed. This indicates
that the MIL is functioning correctly.
The indicator light turns on if there is a malfunc
tion in the engine electronics. See an authorized
Audi dealer or authorized Audi Service Facility to
have the malfunction corrected.
For additional information, see¢
page 17.
!?) Engine speed limitation
Appl ies to: vehicles with engine speed li m itation
(ii Maximum engine speed: XXXX rpm
The engine speed is automatically limited to the
speed displayed in the driver information system .
This protects the engine from overheating.
;:::: The engine speed limitation deactivates once the
" ~ engine is no longer in the critical temperature 0
" "' c:o
Instruments and indicator lights
range and you have released the accelerator ped
al once.
If the engine speed limitation was activated by
an engine control malfunction, the
II indicator
light also turns on. Make sure the engine speed
does not go above the speed displayed, for exam
ple when downshifting. Drive to an authorized
Audi dealer or authorized Audi Service Facility im
mediately to have the malfunction corrected.
~ Engine oil level (min.)
Ill Please check oil level
You may continue driving for the time being.
Check the engine oil level as soon as possible
<=> page 237.
-If the engine oil level is too low, add engine oil
¢page 239.
-If the engine oil level is correct and the indica
tor light still turns on, drive at low engine
speed to an authorized Audi dealer or author
ized Audi Service Facility .
"'' Engine oil sensor
• Oil level system: malfunction! Please con
tact Service
The sensor to check the engine oil level has
failed . Drive to an authorized Audi dealer or au
thorized Audi Service Facility immediately to have
the malfunction corrected .
• Oil level sensor: oil change necessary. Please
contact Service
The engine oil level is too high.
Drive to an authorized Audi dealer or authorized
Audi Service Facility immediately to have the
malfunction corrected.
(D Note
Refer to the description in the Owner's Man
ual ¢
page 239, Checking the engine oil level
and adding engine oil.
15
Page 54 of 314
Warm and cold
Warm and cold
Climate control system
Description
The climate control system warms, cools and re moves humidity from the air in the vehicle interi
or. It functions most effectively when the w in
dows are closed .
If there is a build-up of heat in
side the vehicle , ventilation can help to speed up
the cooling process.
Pollutant filter
The po llutant filter removes pollutants such as
dust and pollen from the a ir.
Key recognit ion
Certain settings are automatically stored and as
signed to the remote control key be ing used .
.&_ WARNING
Poor visibility can lead to accidents.
- For safer driving, keep all windows free of
ice, snow and fog.
- Become familiar as quickly as possible with
the correct use and function of the cl imate
contro l system, especially w ith the defrost
ing and defogging function.
- Whe n the temperature is below freez ing,
on ly use the windsh ield washer system after
the windsh ie ld has been warmed by the cli
mate contro l system . T he washer fluid cou ld
freeze o n the windshield and impair visibili
ty .
(D Note
-If yo u suspect that the climate control sys
tem is damaged, switch the sys tem off to
52
prevent further damage and have it checked
by an authorized Audi dea ler or authorized
Audi Service Facility .
- Repairs to the Audi climate control system
require special technical knowledge and
special tools. See an authori zed Aud i dea ler
or authori zed Aud i Service Facility.
@) For the sa ke of the environment
Reducing the amo unt of fuel used also re
duces the amount of pollutants that enter the
a ir .
(D Tips
- To prevent interference with the heating
and cooling output and to prevent the win
dows from fogging over, the a ir intake in
front of the windshie ld m ust be free of ice ,
snow or leaves .
- Condensation from the cooling system can
dr ip and form a pudd le of water under t he
vehicle . This is norma l and does not mean
there is a lea k.
- The energy management system may sw itch
the seat heating* or rear window defroster
off tempora rily . These systems a re available
aga in as soo n as the energy supp ly has been
restore d.
- Th e flows throug h the vents under the rea r
window. Make su re t he openings are no t
c overed when plac ing clothing on the lug
gage compa rtment cove r.
Page 55 of 314
CD
CD
.... N
" N ...... 0 r--. V, co
Automatic climate control system controls
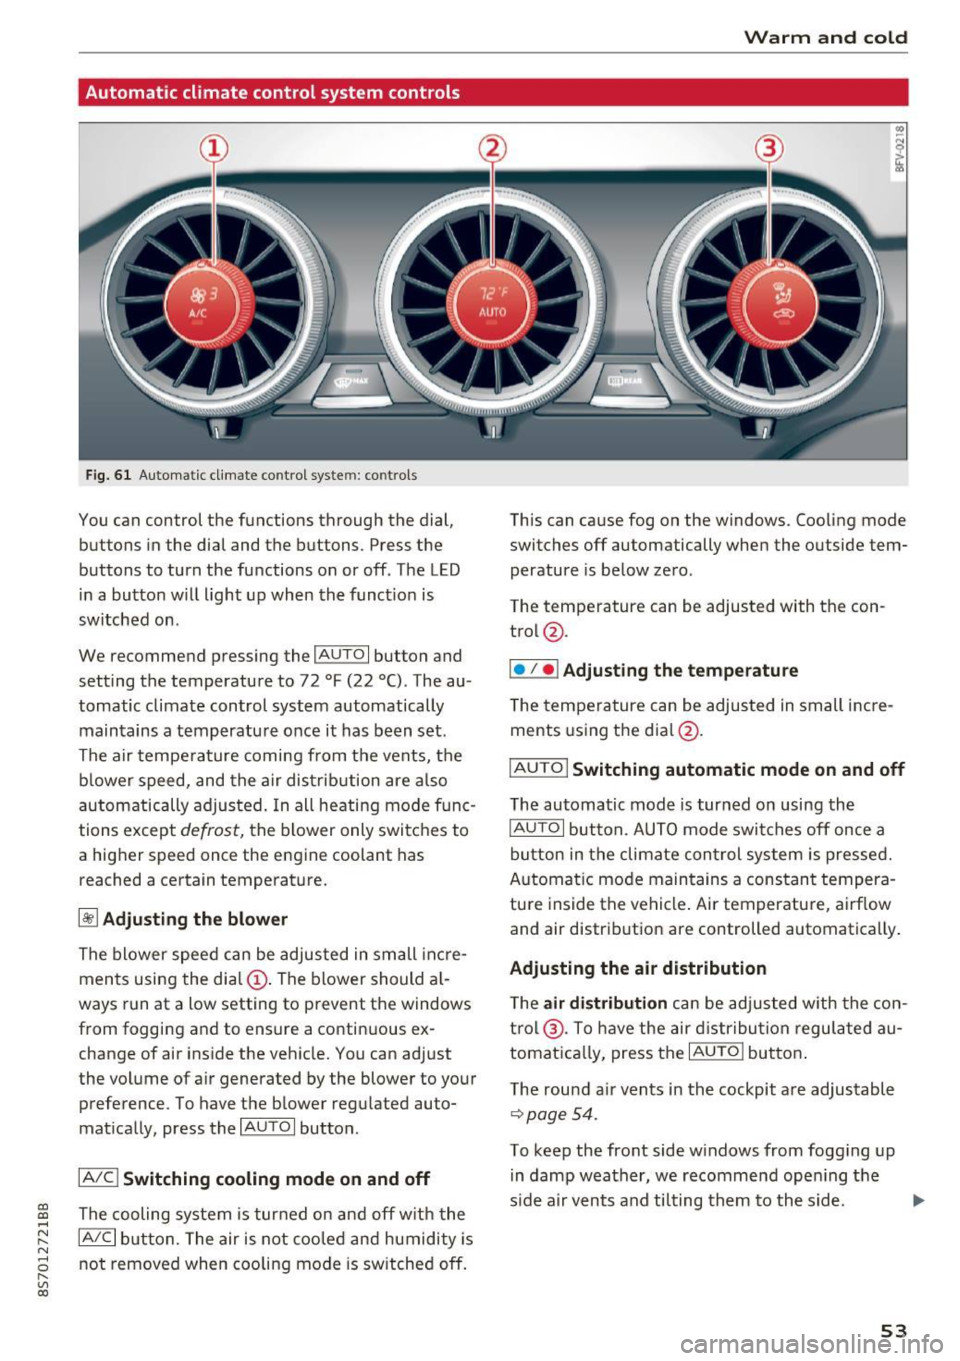
Fig. 61 Automatic climate control syste m: controls
You can control the functions through the dial,
buttons in the dial and the buttons. Press the
buttons to turn the functions on or off . The LED
in a button w ill light up when the funct ion is
switched on .
We recommend pressing the
IAUTOI button and
setting the temperature to 72 °F (22 °C). The au
tomatic climate control system automatically
maintains a temperature once it has been set .
The air tempe rature coming from the vents, the
b lower speed, and the air distribution are also
automatically adjusted. In all heating mode f unc
tions except
defrost, the b lower only switches to
a higher speed once the engine coolant has
reached a certain temperature.
~ Adjusting the blow er
The blower speed can be adjusted in small inc re
ments using the dia l
(D. The blower should a l
ways run at a low setting to prevent the windows
from fogging and to ensure a continuous ex
change of air inside the vehicle. You can adjust
the volume of air generated by the blower to your
preference. To have the blower regulated auto
mat ically, press the
IAU TOI button .
IA/Cj Switching cooling mode on and off
The cooling system is tur ned on and off w ith the
IA/C l button. The air is not cooled and humidity is
not removed when coo ling mode is sw itched off.
Warm and cold
This can cause fog on the windows. Cooling mode
switches off automatically when the outside tem
perature is be low zero .
The temperature can be adjusted with the con
trol @.
I• I • I Adjusting the temperature
T he tempe rature can be adjusted in small i ncre
ments using the dial@.
IAUTO I Switching automatic mode on and off
The automatic mode is turned on using the
IAUTOI button. AUTO mode switches off once a
button in the climate con trol system is pressed.
Automat ic mode maintains a cons tant tempera
tu re inside the vehicle . Air temperature, airf low
and air distribution are controlled automatically .
Adjusting the air distribution
The air distrib ution can be adjusted w ith the con
t rol @ . To have the air d istr ibution regulated au
tomat ica lly, press the
IAUTOI butto n.
T he rou nd a ir ven ts in the cockpit a re adjustable
~page 54.
To keep the front side w indows from fogging up
in damp weather, we recommend ope ning t he
s ide a ir vents and ti lting them to the side.
53
Page 56 of 314
Warm and cold
1- 1 Switching recirculation mode on and off
The recirculation mode can be turned on manual
ly or automat ically*.
- Switching manual recirculation mode on and
off: press
1- 1
- Automat ic* recirculation mode: auto rec ircula
tion needs to be activated in the Infotainmen t
system. Select in the Infotainment system:
IMENUI button> Vehicle> left control button
>Vehicle settings> Air conditioning > Auto re
circulation .
The air quality sensor that is de
signed for diese l and gasoline exhaust auto
matically sw itches the recirculation mode on or
off depend ing on the level of pollutants in the
outside air.
In recirculation mode, the air inside the vehicle is
circu lated and filtered. This prevents the unfil
tered a ir outside the vehicle from entering the
veh icle inter ior . We recommend switching recir
culation mode on when dr iv ing through a tunnel
or when s itting in traffic
q Le,..
Recirculation mode is switched off by pressing
the ~ button or
I AU TO I or ,..., MAX L
I@ MAX I Switching defrost on and off
The windshield and s ide windows are defrosted
or cleared of condensation as quickly as possible.
The optimum amount of air flows mainly out of the vents under the windshield. Recirculation
mode switches off . The temperature is controlled
automatically .
The
IAUTOI button switches the defroster off.
IQiil REAR ! Switching the rear window defogger
on and off
If the rear w indow defogger is activated when
the ignition is switched on, the battery manage
ment determines based on the battery charge if
it is possible to turn on. Ot he rwise, the rear win
dow defogger functions with the engine running
and switches off automatically after approxi
mately 10 - 20 minutes, depending on the out
side temperature.
To prevent the rear w indow defogger from
sw itching off automatically, press and hold the
I@ REARI button for more than two seconds. This
54
remains stored up to approximately 15 minutes
after turning off the ignition.
A WARNING
You should not use the recirculation mode for
an extended period since no fresh air is drawn
in. With the air-conditioning switched off, t he
windows can fog up, which increases the risk
of an acc ident.
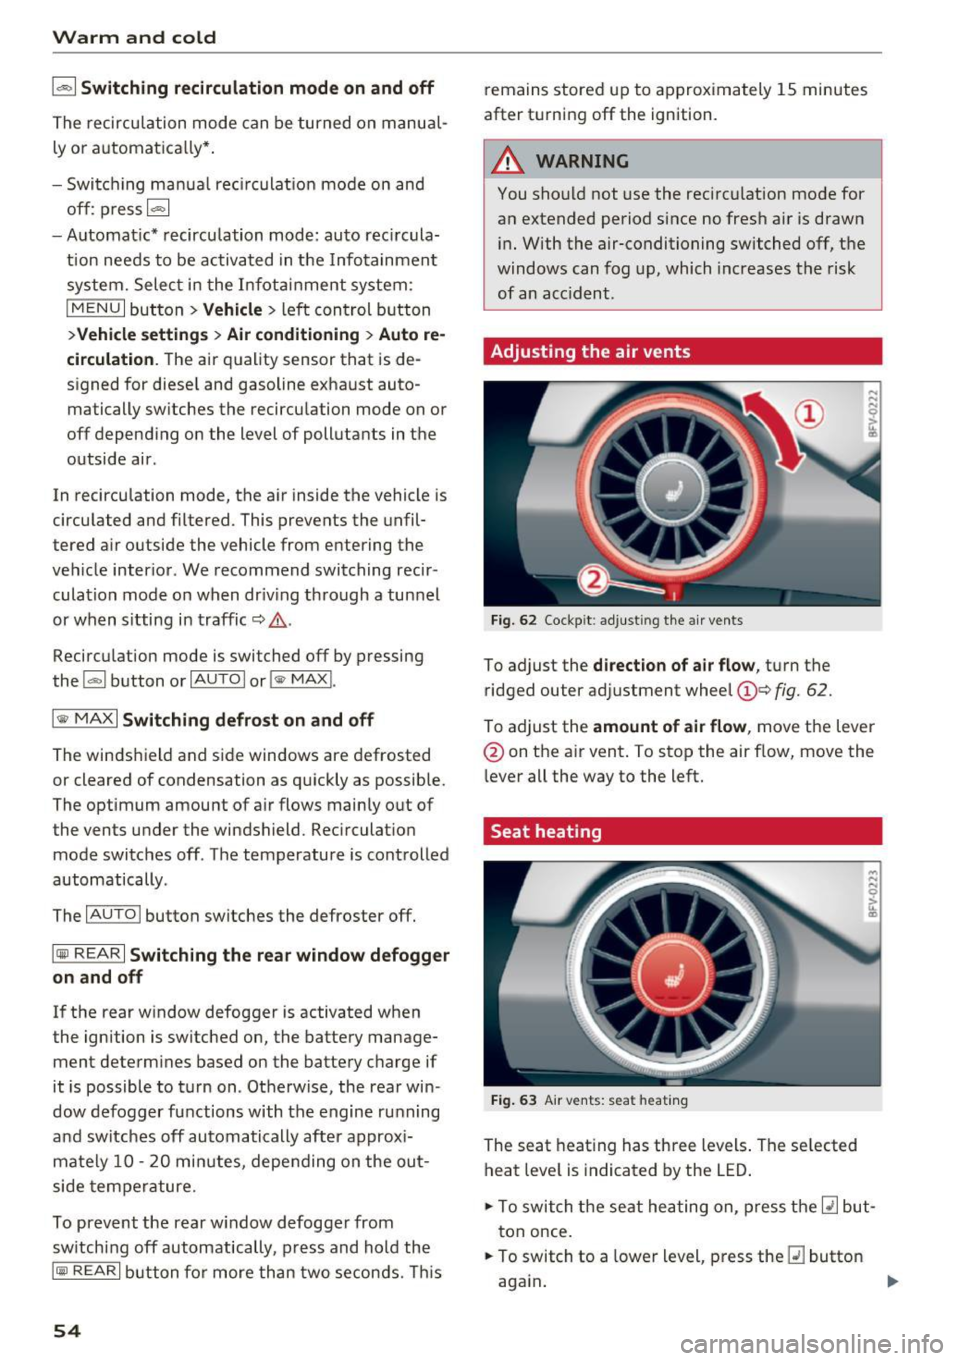
Adjusting the air vents
Fig. 62 Cockpit: adju sting the a ir vents
To adjust the direction of air flow, turn the
ridged outer adjustment wheel
©Q fig. 62.
To ad just the amount of air flow , move the lever
@ on the air vent . To stop the air flow, move the
l ever all the way to the left.
Seat heating
Fig. 63 Air vents: seat heat ing
The seat heating has three levels. The selected
heat level is indicated by the LED .
.. To switch the seat heating on, press the
Q] but
ton once.
.. To switch to a lower level, press the
Q] button
again .
Ill>
Page 57 of 314
CD
CD
.... N
" N ...... 0
" V, co
.. To switch the seat heat ing off, press the~ but -
ton repeatedly unti l the LED turns off.
The seat heating switches automatically from sett ing 3 to setting 2 after 10 minutes .
When seat heating sh ould not be switched
on
Do n ot tur n the seat heating on under the follow
i n g circumstances:
- The seat is unoccupied .
- The seat is covered w ith a seat cover.
- The seat is covered with a child seat.
- The seat is damp or wet.
A WARNING
Individua ls with reduced sensitiv ity to pain or
temperature could develop burns when using
the seat heating function. To reduce the risk
of injury, these individuals should not use
seat heat ing.
(D Note
To avoid damage to the heating elements in
the seats, do not kneel on the seats or place
heavy loads o n a sma ll area of the seat.
@ Tips
- The setting for the seat heating on the driv
er's side is ass igned to the key that is in use.
- If the front passenger's seat heating is
turned on, it w ill not turn on again automat
i cally if more than 10 m inutes have passed
between sw itching the ign ition off and
switching it on again.
Warm and cold
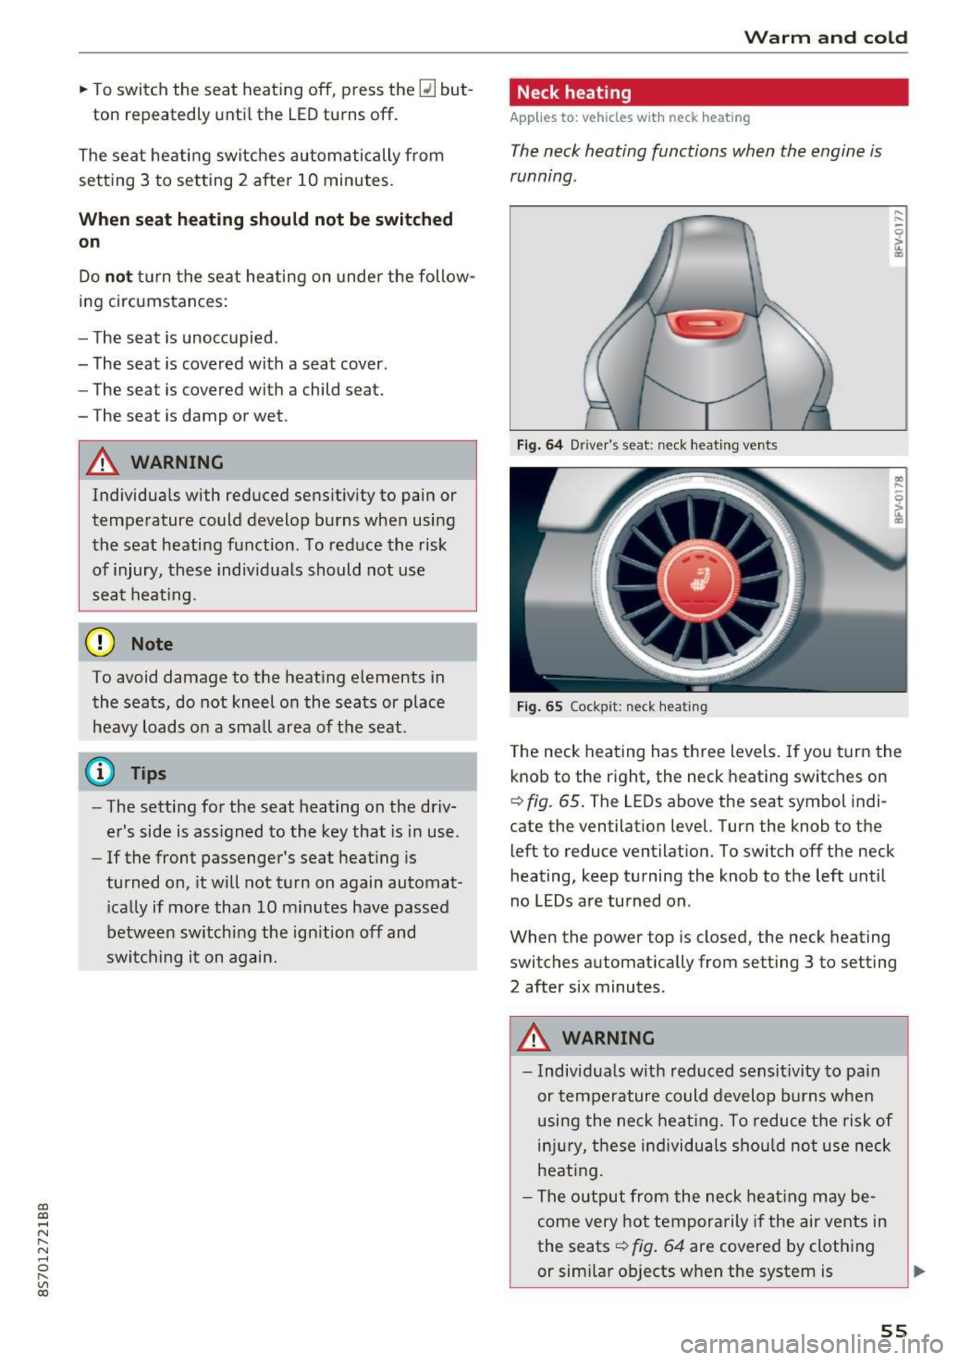
Neck heating
Applies to: vehicles with neck heating
The neck heating functions when the engine is
running .
Fig . 64 Driver 's seat : neclc heating vents
Fi g. 65 Cockp it: neck hea ting
T he neck heating has three levels . If you turn the
knob to the right, the neck heating switches on
Q fig. 65. The LEDs above the seat symbol indi
cate the ventilation level. Turn the knob to the
left to reduce ventilat ion. To switch off the neck
heating, keep turning the knob to the left until
no LEDs are turned on.
When the power top is closed, the neck heating
switches automat ically from setting 3 to setting
2 after six minutes.
A WARNING
- Individuals w ith reduced sensit ivity to pa in
or temperature could develop burns when
using the neck heat ing. To reduce the risk of
i njur y, these individuals sho uld not use neck
heati ng.
- The output from the neck heating may be
come very hot temporarily if the air vents in
the seats
Q fig . 64 are covered by clothing
or sim ilar ob jects when the system is
~
55
Page 60 of 314
Driving
Avoid full acc ele ra tion
You sho uld rare ly travel at the maximum vehicle
speed . High speeds cause a disp roportionately
high increase in fuel consumption, emissions and
traffic noise . Slower driving saves fuel.
Reduce idling time
It pays off to stop the engi ne, for examp le when
at rai lro ad crossings or tr affic lights with longer
red lights . Stopping the engine for 30 -40 sec
onds already saves more fuel than the amount of
extra fuel needed to resta rt the engine.
It t akes a very long time in idle to wa rm the en
g ine up to operating tempe ra ture . Wear and
emissions are especially high in the warm-up
p hase . Therefore, yo u should begin driving im
mediately after starting the engine. Avoid high
RPMs while do ing th is.
Have ma intenanc e performed r egularly
By having maintenance performed regular ly on
your vehicle, yo u can help to reduce f uel con
sumpt ion before you even start to dr ive. The
maintenance condition of your vehicle not only
affects traffic safety and long-term value but a l
so impacts
fuel consumpt ion .
A poorly maintained engine can lead to fuel con
sumpt ion that is 10% higher than normal.
A lso check the
oil le vel when refueling . The o il
consumption
depends large ly on the engine load
and speed. It is normal for the oil consumpt ion
of a new eng ine to reach its lowest point only af
ter a certain amount of use. Therefore, the oil
consumption can o nly be properly judged after
approx imately 3,000 m i (S,000 km) have been
d riven.
Avoid short trips
The engine and exhaust cleaning system must
reach the ir opt imal
operating temperature to ef
fectively red uce consumption and em iss ions.
A co ld engine uses a disproportionately h igh
amount of fuel. The engine reaches operating
temperature and consumpt io n normalizes only
afte r approximately
four kilometers.
58
(D Note
Do not leave engine idling unattended after
starting. If warning lights sho uld come on to
i ndicate imprope r operation, they would go
unheeded. Extended idling also produces
h eat, which could result in overheating or
other damage to the vehicle o r other proper
ty.
(D Note
- Have your ve hicle ma intained properly and
in accordance with the service recommenda
t ions i n your Warranty
& M aintenance book
let. La ck of prope r mai nte na nce as we ll as
imp roper use o f the ve hicle will impa ir the
func tion of the emission cont ro l sys tem and
cou ld lead to damage.
- Do not alte r or remove any compone nt of
the Emission Contro l System unless ap
proved by the man ufacturer.
- Do not alte r or remove any dev ice, such as
heat shields, switches, ig nition w ires,
valves, which are designed to protect your
vehicle's Emission Contro l System and other
important veh icle components.
(D Tips
The cons umption estimates as publishe d by
ENVIRONMENTAL PROTECTION AGENCY
(EPA) and Transport Canada may not corre
spond to your actual consumption on the r oad, which wi ll vary depending upon vehicle
l oad and speed, road a nd wea ther conditions,
tr ip length, etc.
Page 75 of 314
co
co
.... N
" N .... 0
" "' c:o
speed and the distance between your vehi
cle and other vehicles.
- For safety reasons, cruise control should not
be used in the city, in stop-and-go traffic, on
winding roads and when road conditions are
poor (such as ice, fog, gravel, heavy rain and
hydroplaning), because this increases the
risk of a n accident.
- Switch the cruise control off temporarily
when driving in turning lanes, highway exits
or in construction zones.
- Please note that unconsciously "resting"
your foot on the accelerator pedal prevents
the cruise control from braking. This is be
cause pressing the accelerator pedal over
rides the cruise control system.
- If a brake system malfunction such as over
heating occurs when the cruise control sys
tem is switched on, the braking function in
the system may be switched off . The rest of
the cruise control system functions remain
active as long as the
@;\1)~14 (USA models) I
ill (Canada models) indicator light is on.
@ Tips
The brake lights turn on when the brakes are
app lied automatica lly.
Changing speed
Applies to: veh icles with c ruise control system
.. To increase/decrease the speed in increments,
briefly
tap the lever toward 010 Q page 72,
fig. 77 up/down to the first level.
.. To increase or decrease the speed in incre
ments,
tap the lever toward 010 Q page 72,
fig. 77 up/down to the second level.
.. To increase or decrease the speed quickly ,
hold
the leve r in the 0 / 0 direction until the de
sired speed is reached .
Overriding the speed
Applies to: veh icles with c ruise control system
You can press the accelerator pedal down to in
crease your speed, for example if you want to
pass someone. The speed you set earlier wi ll re-
Assist
sume as soon as you release the acce lerator ped
al.
However, if you are exceeding the stored speed
by a considerable amount for a long time, the
cruise contro l system will temporarily switch off.
The
(ff;ji )~i4 (USA mode ls) Iii (Canada mode ls) in
dicator light in the instrument cluster turns off
and the stored speed is maintained.
Preselecting the speed
Applies to : vehicles with cruise control system
You can pre-select your desired speed when the
vehicle is stationary.
.. Switch on the ignition.
.. Pull the lever into position (!)
Q page 72,
fig. 77.
.. To increase or decrease the speed, tap the lever
toward
0 10 .
This function makes it possible, for example, to
save the speed you want before driving on the
highway . Once you are on the expressway, acti
vate the cruise control system by pulling the lev
er into position (!).
Switching off
Applies to: vehicles with cruise control system
Temporary deactivation
.. Press the brake pedal, or
.. Press the lever toward@(not locked into
place)
Q page 72, fig. 77.
Switching off completely
.. Press the lever into position @(clicked into
place), or
.. Switch the ignit ion off .
The speed you stored will be maintained if the cruise control has been switched off temporarily .
To resume the stored speed, release the brake or
clutch pedal and pull the lever to position (!).
Switching the ignition off will erase the stored
speed .
73