homelink AUDI TT ROADSTER 2018 Owners Manual
[x] Cancel search | Manufacturer: AUDI, Model Year: 2018, Model line: TT ROADSTER, Model: AUDI TT ROADSTER 2018Pages: 310, PDF Size: 46.95 MB
Page 32 of 310

Opening and clo sin g
Correcting power w indow malfunctions
You can reactivate the one-touch up/down func
tion if it malfunctions .
.. Pull the power window sw itch up unt il the win
dow is completely raised.
.. Release the sw itch and pull it up again for at
least one second .
Garage door opener
(Homelink)
Description
Applies to: vehicles with garage door opener (Homelink)
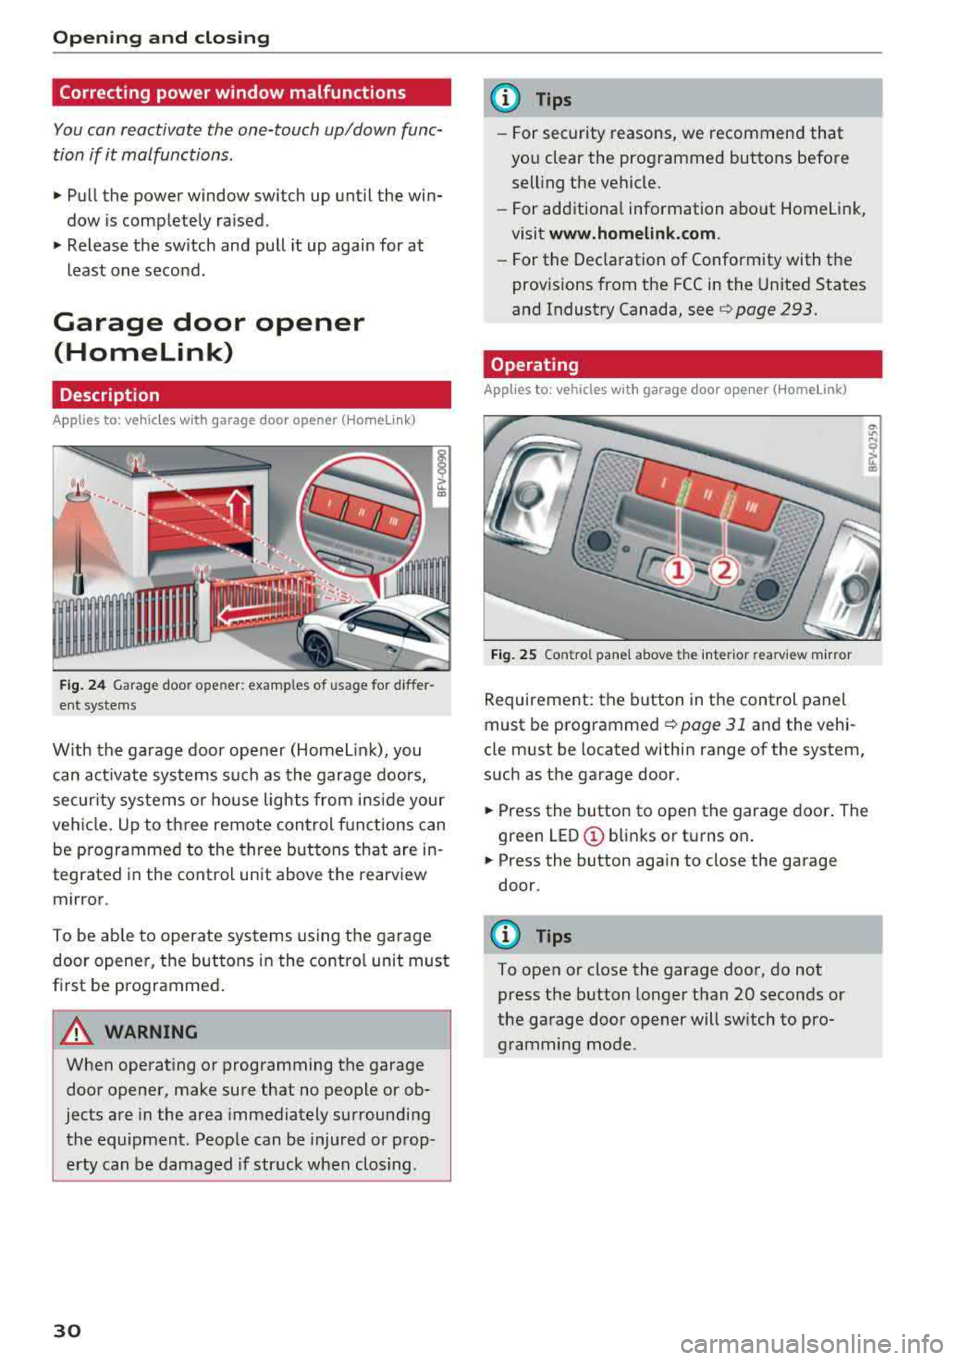
Fig . 24 Garage door ope ner: exa mples o f usage fo r differ
ent systems
W ith the garage door opener (Homelin k), you
can activate systems such as the garage doors,
secur ity systems o r house lights from inside your
veh icle. Up to three remote control f unctions can
be programmed to the three buttons that are in
tegrated in the control unit above the rearview
mirror .
To be ab le to operate systems using the garage
door opener, the buttons in the contro l unit must
first be programmed .
A WARNING
When operating or programming the garage
door opener, make sure that no people or ob
jects are in the area immediately surrounding
the equipment . Peop le can be injured or prop
erty can be damaged if str uck when closing .
30
@ Tips
-For security rea.sons, we recommend that
you clear the programmed buttons before
selling the vehicle .
- For additiona l information about Homelink,
visit
www.homeli nk.com .
-For the Dec laration of Conformity with the
prov isions from the FCC in the United States
and Industry Canada, see
c;, page 293.
Operating
App lies to : vehicles with garage door opener (Homelink)
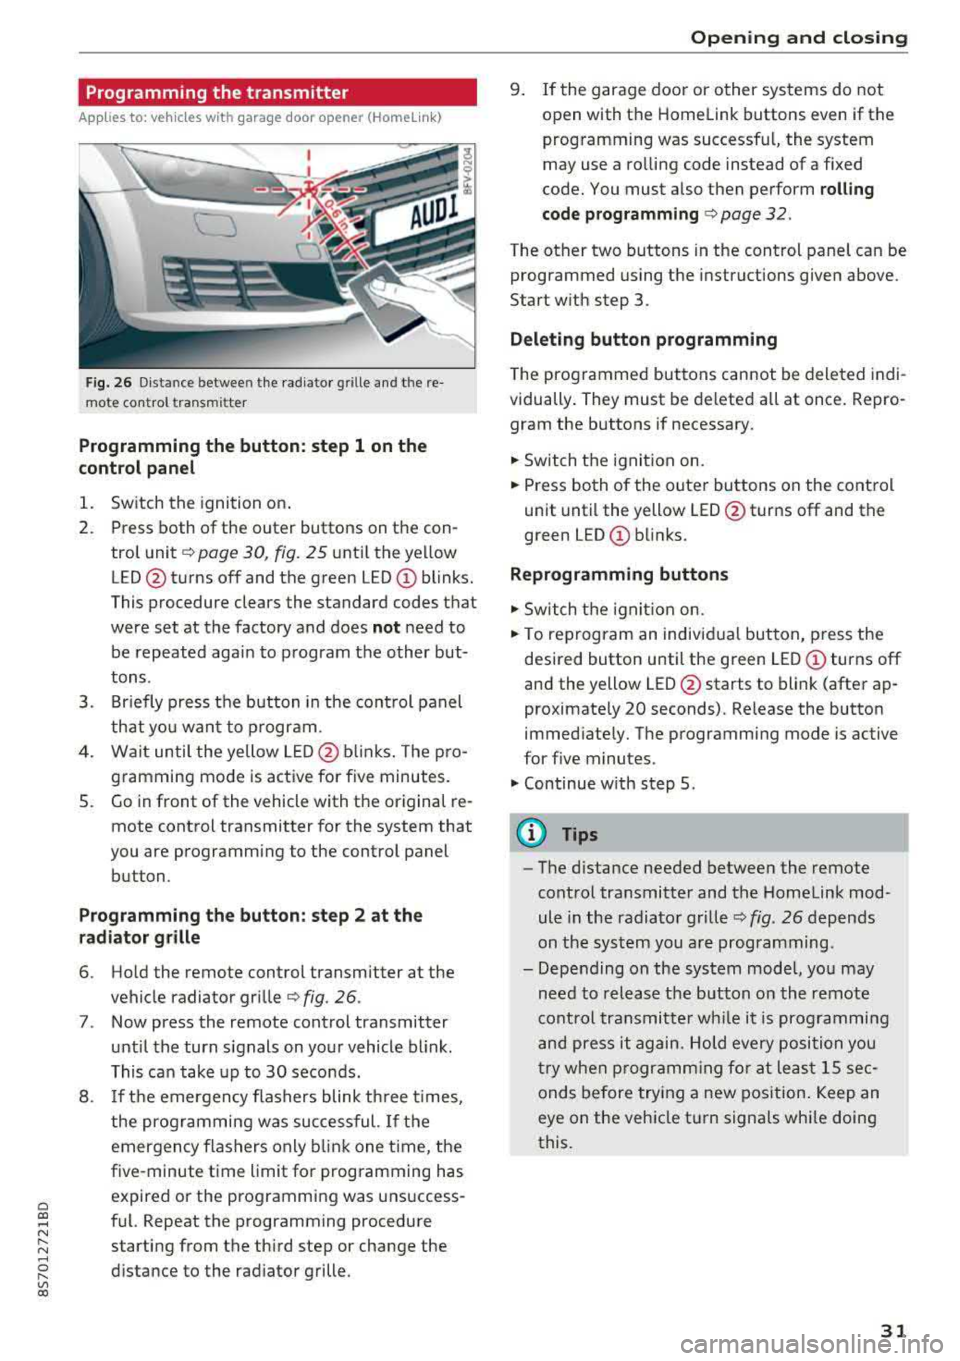
F ig . 25 Co ntro l pane l above t he inter ior rea rv iew mirror
Requirement: the button in the control panel
must be
programmed ¢ page 31 and the vehi
cle must be located within range of the system,
such as the garage door.
.. Press the button to open the garage door . The
green
LED © blinks or turns on .
.. Press the button aga in to close the garage
door.
(D Tips
To open or close the garage door, do not
press the button longer than 20 seconds or
the garage door opener will switch to pro gramming mode.
Page 33 of 310

Cl co ..... N ,....
N ...... 0 ,....
Vl co
Programming the transmitter
Applies to: vehicles with garage door opener (Homelink)
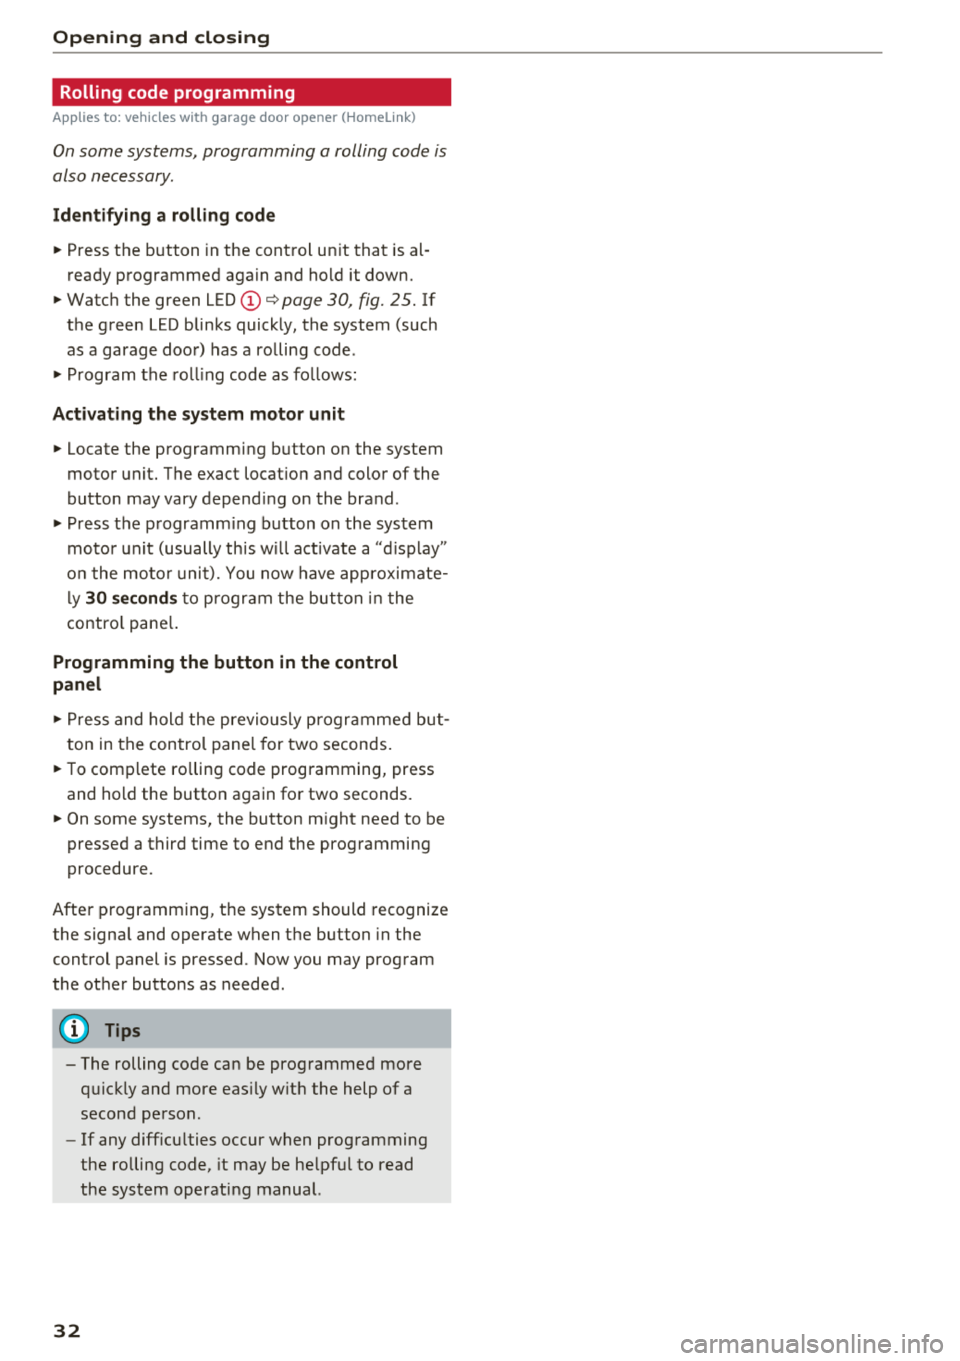
Fig. 26 Distance betwee n the radia tor grille and t he re
mote control transmitter
Programming the button: step 1 on the
control panel
1. Switch the ignition on.
2. Press both of the outer buttons on the con
trol unit
c:, page 30, fig. 25 unt il the yellow
LED @turns off and the green
LED (!) blinks.
This procedure clears the standard codes that
were set at the factory and does
not need to
be repeated again to program the other but
tons .
3. Briefly press the button in the control panel
that you want to program.
4. Wait until the yellow LED@blinks. The pro
gramming mode is active for five minutes.
S. Go in front of the vehicle with the original re
mote control transmitter for the system that
you are programming to the control panel button.
Programming the button: step 2 at the
radiator grille
6. Hold the remote control transmitter at the
vehicle radiator grille
¢fig . 26 .
7. Now press the remote control transmitter
until the turn signals on your vehicle blink.
This can take up to 30 seconds.
8 . If the emergency flashers blink three times,
the programming was successful. If the
emergency flashers only blink one time, the
five-minute time limit for programming has
expired or the programming was unsuccess
ful. Repeat the programming procedure
starting from the third step or change the
distance to the radiator grille .
Opening and closing
9. If the garage door or other systems do not
open with the Home link buttons even if the
programming was successful, the system
may use a ro lling code instead of a fixed
code. You must also then perform
rolling
code programming
c:, page 32 .
The other two buttons in the control panel can be
programmed using the instructions given above.
Start with step 3.
Deleting button programming
The programmed buttons cannot be deleted indi
vidually. They must be deleted all at once. Repro
gram the buttons if necessary.
"' Switch the ignit ion on.
"' Press both of the outer buttons on the control
unit until the yellow LED@turns off and the
green LED
0) blinks.
Reprogramming buttons
"' Switch the ignit ion on.
"'To reprogram an individual button, press the
desired button until the green LED
0) turns off
and the yellow LED@starts to blink (after ap
proximately 20 seconds). Release the button immediately. The programming mode is active
for f ive minutes.
"'Continue w ith step 5 .
(D Tips
-The d istance needed between the remote
control transmitter and the Homelink mod
ule in the radiator grille
c:, fig. 26 depends
on the system you are programming.
- Depending on the system model, you may need to release the button on the remote
cont rol transmitter while it is programming
and press it again. Hold every position you
try when programming for at least 15 sec
onds before trying a new position. Keep an
eye on the vehicle turn signals while doing
this.
31
Page 34 of 310

Opening and clo sing
Rolling code programming
Applies to: vehicles with garage door opener (Homelink)
On some systems, programming a rolling code is
also necessary.
Id enti fying a roll in g cod e
~ Press the button in the control un it that is al
ready programmed again and hold it down.
~ Watch the green LED (D ¢ page 30, fig. 25. If
the green LED blinks quickly, the system (such as a garage door) has a rolling code .
~ Program the rolling code as fo llows:
Acti vating the s ystem motor unit
~ Locate the programming button on the system
motor unit. The exact locat ion and color of the
button may vary depend ing on the brand .
~ Press the programm ing button on the system
motor un it (usually th is wi ll act ivate a "d isplay"
o n the moto r unit). You now have approximate
ly
30 s econds to program the button in the
contro l pane l.
Programming the button in the control
pan el
~ Press and hold the previously programmed but
ton in the control pane l for two seconds.
~ T o comp lete ro lling code programming, press
and hold the button again for two seconds .
~ On some systems, the button might need to be
pressed a third time to end the programming
procedure.
After programming, the system should recognize
the signal and operate when the button in the
control panel is pressed. Now you may program
the other buttons as needed.
(D Tips
- The rolling code can be programmed more quick ly and more eas ily w ith the help of a
second person.
- If any diff icu lties occur when programming
the rolling code, it may be helpful to read
the system operating manual.
32
Page 300 of 310

Index
Engine Coolant . . . . . . . . . . . . . . . . . . . . . . . . . . . .
239
Starting . . . . . . . . . . . . . . . . . . . . . . . . . 58, 59
Starting with jumper cables . . . . . . . . . . . 283
Stopping . . . . . . . . . . . . . . . . . . . . . . . . . . . . 59
Engine compartment
Opening/closing the hood . . . . . . . . . . . . .
235
Overview . . . . . . . . . . . . . . . . . . . . . . . . . . . 236
Safety precautions . . . . . . . . . . . . . . . . . . . 233
Engine control ( indicator light) . . . . . . . . . . . 14
Engine oil
Adding . . . . . . . . . . . . . . . . . . . . . . . . . . . .
236
Changing . . . . . . . . . . . . . . . . . . . . . . . . . . 238
Checking oil level . . . . . . . . . . . . . . . . . . . . 236
Consumption . . . . . . . . . . . . . . . . . . . . . . . 236
Indicator light . . . . . . . . . . . . . . . . . . . . 12, 15
Engine speed limitation (indicator light) . . . 15
Entering characters/numbers (speller) . . . . . 99
Entering letters (speller) . . . . . . . . . . . . . . . . 99
Environment
Proper disposal of drained engine oil ... .
Unleaded gasoline .................. .
E xterior lighting
Exterior mirrors
238
229
38
Adjusting . . . . . . . . . . . . . . . . . . . . . . . . . . . 41
Dimming ....... ................ ..... 42
Heating . . . . . . . . . . . . . . . . . . . . . . . . . . . . . 41
External voice operation......... .... .. . 110
F
Factory default settings (MMI) 174
Fader(sound) .. .. ............. .... .. . 177
Fa sten ing
Booster seats . . . . . . . . . . . . . . . . . . . . . . .
223
Convertible child safety seats . . . . . . . . . . 222
Infant seats . . . . . . . . . . . . . . . . . . . . . . . . 221
Fast forward ing/rew inding (audio/video
file) . . . . . . . . . . . . . . . . . . . . . . . . . . . . . . . .
162
Fast forwarding (audio/video file) . . . . . . . . 162
Fast route
Favorites Media 141
165
Navigation . . . . . . . . . . . . . . . . . . . . . . . . . 136
Telephone.......................... 116
Federal Communications Commission (FCC) 293
Fi le formats (media drives) . . . . . . . . . . . . . 168
298
Floor mats . . . . . . . . . . . . . . . . . . . . . . . . . . . 183
Fog lights/rear fog light(s) . . . . . . . . . . . . . . 38
Foot pedals . . . . . . . . . . . . . . . . . . . . . . . . . . 182
Footwell lighting . . . . . . . . . . . . . . . . . . . . . . 40
For the sake of the environment
Environmentally-friendly driving . . . . . . . .
56
Fueling . . . . . . . . . . . . . . . . . . . . . . . . . . . . 230
Leaks..... .... .. .. .. ............. .. 234
Free text search . . . . . . . . . . . . . . . . . . . . . . 101
Media . . . . . . . . . . . . . . . . . . . . . . . . . . . . . 164
Navigation . . . . . . . . . . . . . . . . . . . . . . . . . 135
Radio . . . . . . . . . . . . . . . . . . . . . . . . . . . . . 150
Telephone. . . . . . . . . . . . . . . . . . . . . . . . . . 120
Freeze protection
Coolant . . . . . . . . . . . . . . . . . . . . . . . . . . . .
239
Frequency band ..... .. ........... 149, 151
Front airbags
Description . . . . . . . . . . . . . . . . . . . . . . . . .
198
How they work . . . . . . . . . . . . . . . . . . . . . . 203
Frontal collisions and the laws of physics . . 188
Front seats
Adjusting . . . . . . . . . . . . . . . . . . . . . . . . . .
181
Child restraints in the front seat . . . . . . . . 195
also refer to Seats . . . . . . . . . . . . . . . . . . . . 46
Fuel . . . . . . . . . . . . . . . . . . . . . . . . . . . . . . . .
229
Additives. . . . . . . . . . . . . . . . . . . . . . . . . . . 229
Blended gasoline . . . . . . . . . . . . . . . . . . . . 229
Current fuel consumption . . . . . . . . . . . . . . 21
Fuel gauge . . . . . . . . . . . . . . . . . . . . . . . . . . . 8
Fuel tank capacity . . . . . . . . . . . . . . . . . . .
288
Gasoline additives . . . . . . . . . . . . . . . . . . . 230
Indicator light . . . . . . . . . . . . . . . . . . . . . . . 15
Saving fuel . . . . . . . . . . . . . . . . . . . . . . . 56 , 78
Fueling
Fuel filler door emergency release . . . . . .
232
Fuel gauge . . . . . . . . . . . . . . . . . . . . . . . . . . . 8
Fuel tank capacity . . . . . . . . . . . . . . . . . . .
288
Opening the fuel filler door . . . . . . . . . . . . 230
With reserve canister (emergency fueling) 232
Fuses
Assignment . . . . . . . . . . . . . . . . . . . . . . . .
281
Replacing . . . . . . . . . . . . . . . . . . . . . . . . . . 280
G
Garage door opener (Homelink) . . . . . . . . . . 30
Garment hooks . . . . . . . . . . . . . . . . . . . . . . . . 49