Code 21 BMW 328i 1998 E36 Service Manual
[x] Cancel search | Manufacturer: BMW, Model Year: 1998, Model line: 328i, Model: BMW 328i 1998 E36Pages: 759
Page 213 of 759
GENERAL
..
.
......
.
.
.
.....
.
...
.
.
.
.
.
.
.
.
200-1
Manual
Transmission
.
.
.....
.
.
.
.'
.
.
.
.
.
.
.
.
200-1
Automatic
Transmission
.........
.
.
.
.
.
.
.
.
200-1
Transmission
ID
Codes
..........
.
.
.
.
.
.
.
.
200-2
GENERAL
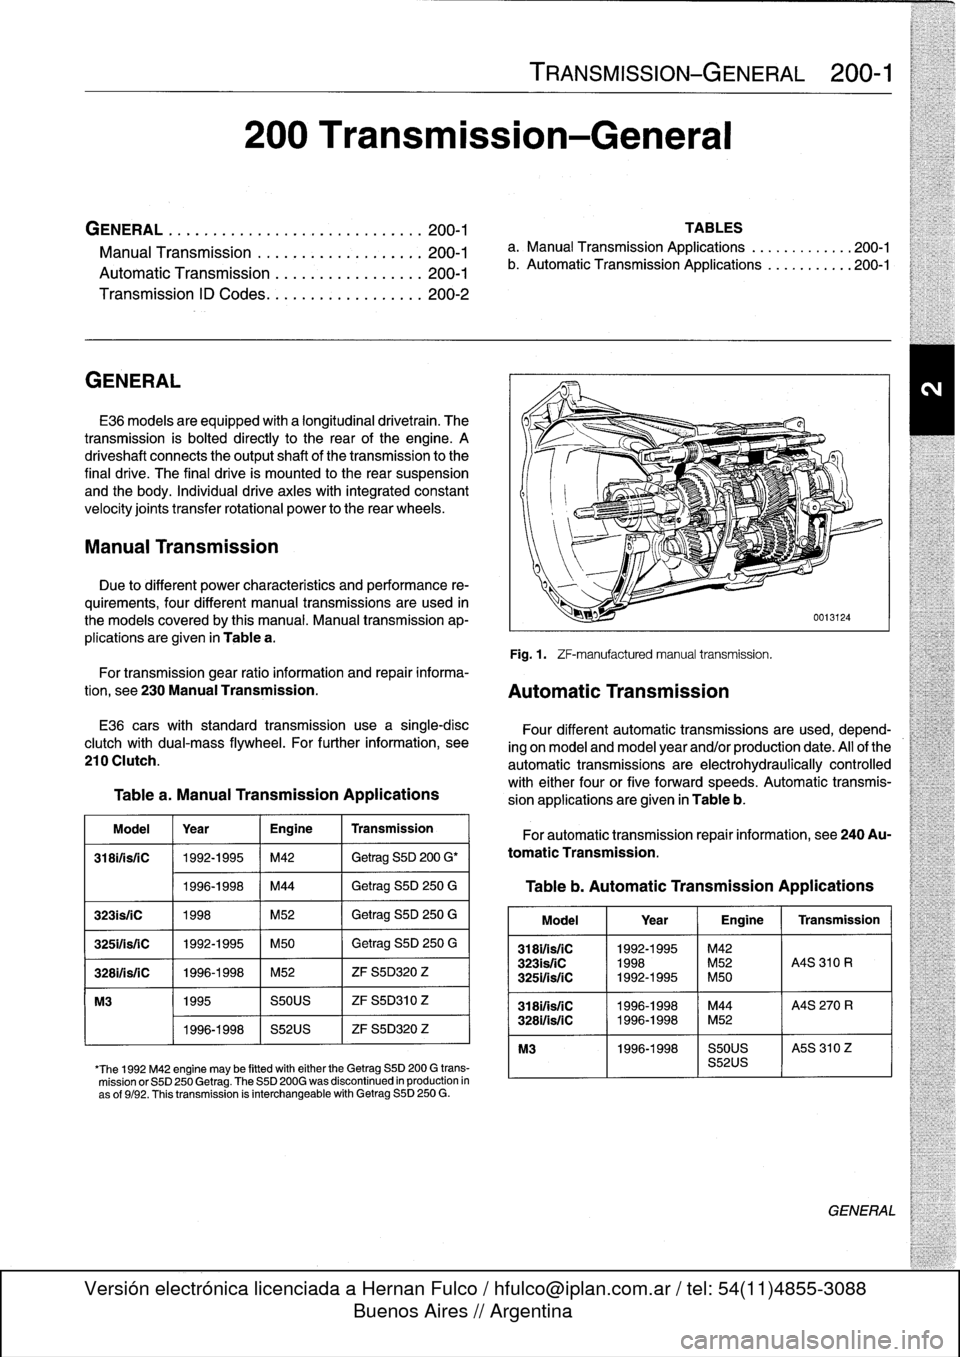
E36
models
areequipped
with
a
longitudinal
drivetrain
.
The
transmission
is
bolted
directly
to
the
rear
of
the
engine
.
A
driveshaft
connects
the
output
shaft
of
thetransmission
to
the
final
drive
.
The
final
drive
is
mounted
lo
the
rear
suspension
and
the
body
.
Individual
drive
axles
with
integrated
constant
velocity
joints
transfer
rotational
power
to
the
rear
wheels
.
Manual
Transmission
Due
to
different
power
characteristics
and
performance
re-
quirements,
four
different
manual
transmissions
are
used
in
the
models
coveredby
this
manual
.
Manual
transmission
ap-
plications
are
given
in
Table
a
.
TRANSMISSION-GENERAL
200-1
200
Transmission-General
TABLES
a
.
Manual
Transmission
Applications
..
...........
200-1
b
.
Automatic
Transmission
Applications
...........
200-1
Fig
.
1
.
ZF-manufacturedmanual
transmission
.
For
transmission
gear
ratio
information
and
repair
informa-
tion,
see
230
Manual
Transmission
.
Automatic
Transmission
E36
carswith
standard
transmission
use
a
single-disc
clutch
with
dual-mass
flywheel
.
For
further
information,
see
210
Clutch
.
Table
a
.
Manual
Transmission
Applications
Model
Year
Engine
Transmission
318ifisfC
1992-1995
M42
Getrag
S5D
200
G'
1996-1998
M44
Getrag
S5D
250
G
323is/iC
1998
M52
Getrag
S5D
250
G
325ifsriC
1992-1995
M50
Getrag
S5D
250
G
3281/isfC
1996-1998
M52
ZF
S5D320
Z
M3
1995
S50US
ZF
S5D310
Z
1996-1998
S52US
ZF
S5D320
Z
'The
1992
M42
engine
may
be
fitted
witheither
the
Getrag
SSD
200
G
trans-
mission
or
S5D
250
Getrag
.
The
S5D
200G
was
discontinued
in
production
in
as
of
9/92
.
Thistransmission
is
interchangeable
with
Getrag
S5D
250
G
.
Four
different
automatic
transmissions
are
used,
depend-
ing
on
model
and
model
year
and/or
production
date
.
All
of
the
automatic
transmissions
are
electrohydraulically
controlled
with
either
four
or
five
forward
speeds
.
Automatic
transmis-
sion
applications
are
given
in
Table
b
.
For
automatic
transmission
repair
information,
see
240Au-
tomatic
Transmission
.
Table
b
.
Automatic
Transmission
Applications
Model
1
Year
1
Engine
1
Transmission
318i1is/1C
1992-1995
~
M42
323isfiC
1998
M52
A4S
310
R
3251/is/1C
1992-1995
M50
3181/isfC
11996-1998
M44
A4S
270
R
328i/is/1C
1996-1998
M52
M3
1996-1998
S50US
I
A5S
310
Z
S52US
GENERAL
Page 214 of 759
200-2
TRANSMISSION-GENERAL
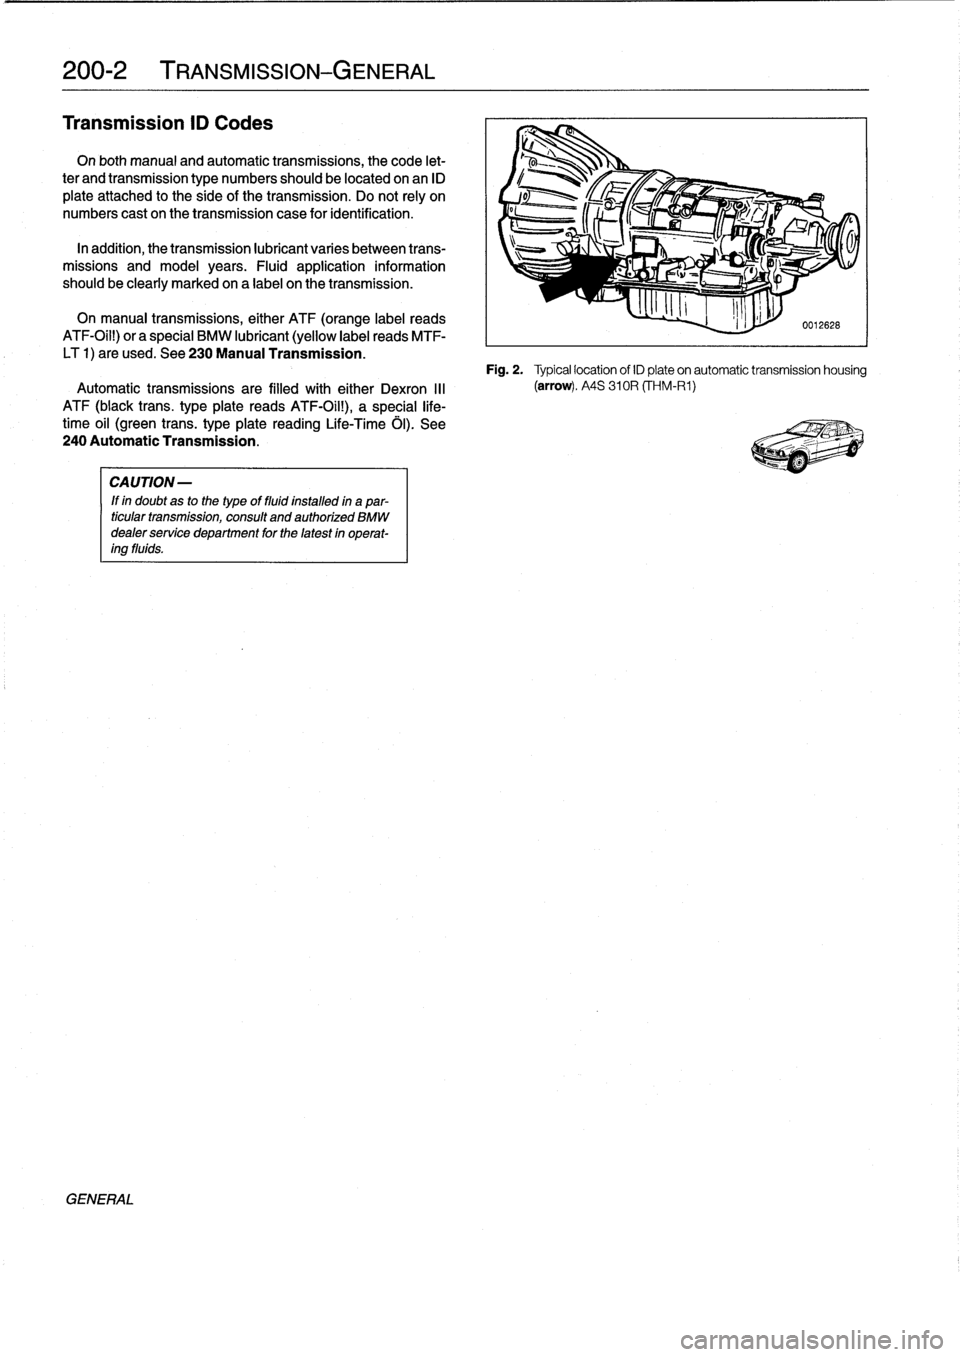
Transmission
ID
Codes
On
both
manual
and
automatic
transmissions,
the
code
let-
ter
and
transmission
type
numbers
should
be
located
onan
ID
plate
attached
to
the
síde
of
thetransmission
.
Do
not
rely
on
numbers
cast
on
the
transmission
case
for
identification
.
In
addition,
thetransmission
lubricant
varies
between
trans-
missions
and
model
years
.
Fluid
application
information
should
be
clearly
marked
on
a
label
on
thetransmission
.
On
manual
transmissions,
either
ATF
(orange
label
reads
ATF-Oil!)
or
a
special
BMW
lubricant
(yellow
label
reads
MTF-
LT
1)
are
used
.
See
230Manual
Transmission
.
Automatic
transmissions
are
filled
with
either
Dexron
III
ATF
(black
trans
.
type
plate
reads
ATF-Oil!),
a
special
ffe-
time
oil
(green
trans
.
type
plate
reading
Life-Time
ó1)
.
See
240AutomaticTransmission
.
GENERAL
CAUTION-
lf
in
doubtas
to
the
typeof
fluid
installed
in
a
par-
ticular
transmission,
consult
and
authorized
BMW
dealer
service
department
for
the
latest
in
operat-
ing
fluids
.
Fig
.
2
.
Typical
location
of
IDpíate
on
automatic
transmission
housing
(arrow)
.
A4S
310R
(THM-R1)
Page 221 of 759
230
Manual
Transmission
MANUAL
TRANSMISSION
230-1
GENERAL
...
.
............
.
.......
.
.
.
.
230-1
Output
shaft
sea¡,
replacing
(transmission
installed)
....
.
.....
.
.....
.230-4
TRANSMISSION
FLUID
SERVICE
.
.
.
.
.
.
.230-1
Inputshaft
sea¡,
replacing
Transmission
fluid
leve¡,
checking
...
.
...
.
.
230-2
(transmission
removed)
.
.
.
.
...
.
.
.
.....
.
230-5
Transmission
fluid,
replacing
.........
.
.
.
.
230-2
TRANSMISSION
REMOVAL
AND
TRANSMISSION
SERVICE
.
.
.....
.
.
.
.
.
.
230-2
INSTALLATION
.
.
.
.
.
.
.....
.
.
.
.
.
.
.
.....
.
230-5
Back-up
light
switch,
replacing
.
.
.
...
.
.
.
.
.
.
230-2
Transmission,
removing
and
installing
...
.
.
.
.
230-6
_
Selector
shaft
sea¡,
replacing
(transmission
installed)
.
.
.
.
.
.
.
.
.
.
.
...
.
.
230-3
TAB
a
.
Manual
Transmission
Gear
Ratios
.
.
.
.........
.230-1
GENERAL
TRANSMISSION
FLUID
SERVICE
This
repair
group
covers
external
transmission
service,
in-
The
manual
transmissions
installed
in
the
E36
models
are
cluding
removal
and
installation
of
thetransmission
unit
.
Inter-
normally
filled
with
automatic
transmission
fluid
(ATF),
al-
nal
transmission
repair
is
not
covered
.
Special
press
tools
and
though
alternative
lubricants
may
have
beenused
from
the
procedures
are
required
to
disassemble
and
service
the
inter-
factory,
depending
on
transmission
type
and
model
year
.
For
nal
geartrain
.
example,
transmissions
fitted
to
the
M3
models
are
normally
filled
with
a
"lifetime"
manual
transmission
fluid
(BMW
MTF
Manual
transmissions
used
are
based
on
engine
applica-
LT-1)
and
do
not
require
periodic
fluid
changes
.
tion
.
Consult
200
Transmission-General
for
transmission
application
information
.
Table
a
lists
gear
ratio
specifications
.
NOTE-
The
transmission
lubricant
type
can
be
found
ona
label
NOTE-
on
the
sideof
the
transmission
.
Consult
an
authorized
Do
not
rely
on
forged
casting
numbers
for
transmission
BMW
dealer
for
altemate
fluid
use
and
the
most-up-to-
code
identification
.
date
information
regarding
transmission
operating
fluids
.
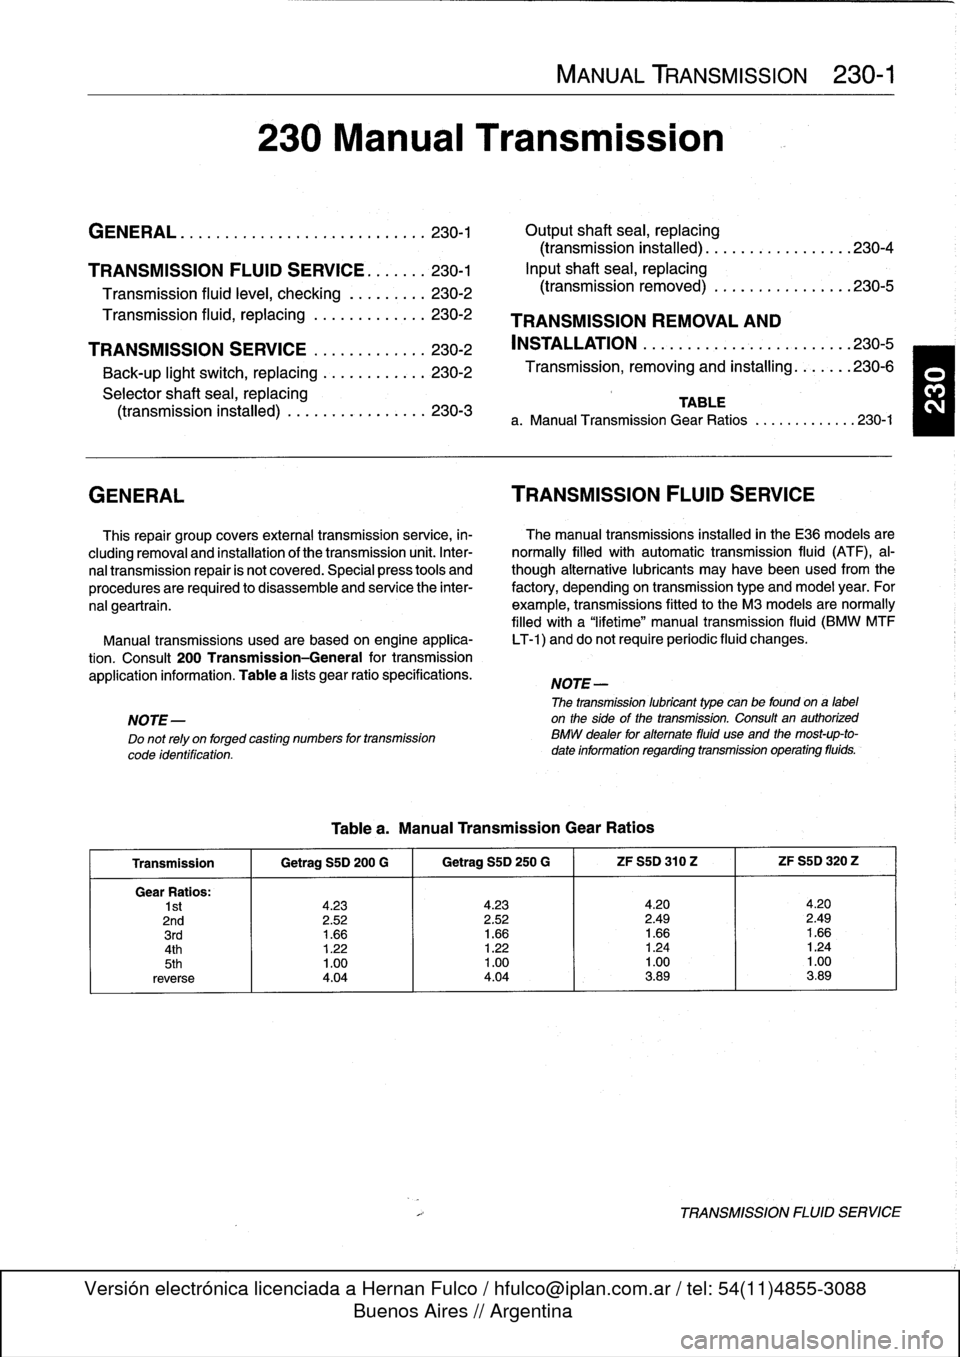
Tablea
.
Manual
Transmission
Gear
Ratios
Transmission
1
Getrag
S5D
200
G
1
Getrag
SSD
250
G
1
ZF
S5D
310
Z
1
ZF
S5D
320
Z
Gear
Ratios
:
1st
4
.23
4
.23
4
.20
4
.20
2nd
2
.52
2
.52
2
.49
2
.49
3rd
1
.66
1
.66
1
.66
1
.664th
1
.22
1
.22
1
.24
1
.24
5th
1
.00
1
.00
1
.00
1
.00
reverse
4
.04
4
.04
3
.89
3
.89
TRANSMISSION
FLUID
SERVICE
Page 229 of 759
AUTOMATIC
TRANSMISSION
240-1
240
Automatic
Transmission
GENERAL
.....
.
.
.
.
.
.
.
.
.
.
.
.
.
.........
.
240-1
TRANSMISSION
REMOVAL
AND
INSTALLATION
..................
.
.
.
.
.240-4
TRANSMISSION
SERVICE
.
.
.
.
.
.......
.
240-1
Transmission,
removing
and
installing
....
.
.
.240-4
ATF
leve¡,
checking
..
.
.
.
.
.
.
.
.
.
..........
240-1
ATF,
draining
and
filling
.
.
.
.
.
.
.
..........
240-2
TABLE
a
.
Automatic
Transmission
Gear
Ratios
.......
..
.
.
240-1
GENERAL
TRANSMISSION
SERVICE
lo
Automatic
transmissions
are
identified
by
code
letters
ATF
leve¡,
checking
foundon
a
data
plate
located
on
the
sideof
thetransmission
case,
behind
the
manual
valve
lever
.
See
200Transmis-
The
automatic
transmissions
installed
in
the
E36
models
sion-General
for
application
information
.
Forgear
ratio
spec-
are
normally
filled
with
Dexron
III
automatic
transmission
fluid
ifications,
see
Table
a
.
(ATF),
although
alternative
fluids
have
been
installed
from
the
factory,
depending
on
transmission
type
and
model
year
.
CAUTION-
Some
transmíssions
are
filled
with
a
special
BMW
"lifetime"
ATF
does
not
circulate
unless
the
engine
is
run-
automatic
transmission
fluid,
which
does
not
require
periodic
ning
.
When
towing
an
automafic
transmission
ve-
fluid
changes
.
hicle,
usea
flat-bed
truck
or
ralse
the
rear
wheels
off
the
ground
.
CAUTION-
Mixing
different
types
of
transmission
fluids
will
The
electronic
transmission
control
module
(TCM)
monitors
lead
to
transmission
failure
.
transmissionoperation
for
faults
and
alerts
the
driver
by
illumi-
nating
the
transmission
fault
indicator
on
the
instrument
pan-
el
.
On-board
diagnostic
codes
stored
in
the
TCM
mustbe
NOTE-
downloaded
and
interpreted
by
trained
technicians
using
spe-
The
transmission
lubricant
instafed
can
be
foundona
cial
BMW
diagnostic
equipment
.
type
plate
on
the
side
of
the
transmission
.
In
addition,
a
sticker
may
be
located
on
the
fluid
sump
indicatingthe
typeof
transmission
lubricant
used
.
Ifin
doubt,
con
NOTE-
sult
an
authorized
BMW
dealer
for
altemate
fluid
use
Internal
repairs
to
the
automatic
transmission
require
and
current
information
regardingtransmission
operat-
special
service
equipment
and
knowledge
.
If
it
is
deter-
ing
fluids
.
mined
thatinterna¡
service
is
required,
consult
en
au-
thorízedBMWdealerabouta
factoryreconditioned
unit
The
transmission
is
not
equipped
with
a
dipstick
.
Checking
or
a
transmission
rebuild
.
the
ATF
leve¡
requires
measuring
and
maintaining
a
specified
ATF
temperature
during
the
checking
procedure
.
The
check-
ing
temperature
is
not
fully
warm
orcold
(the
ATF
sump
should
be
approximately
warm
to
the
touch)
.
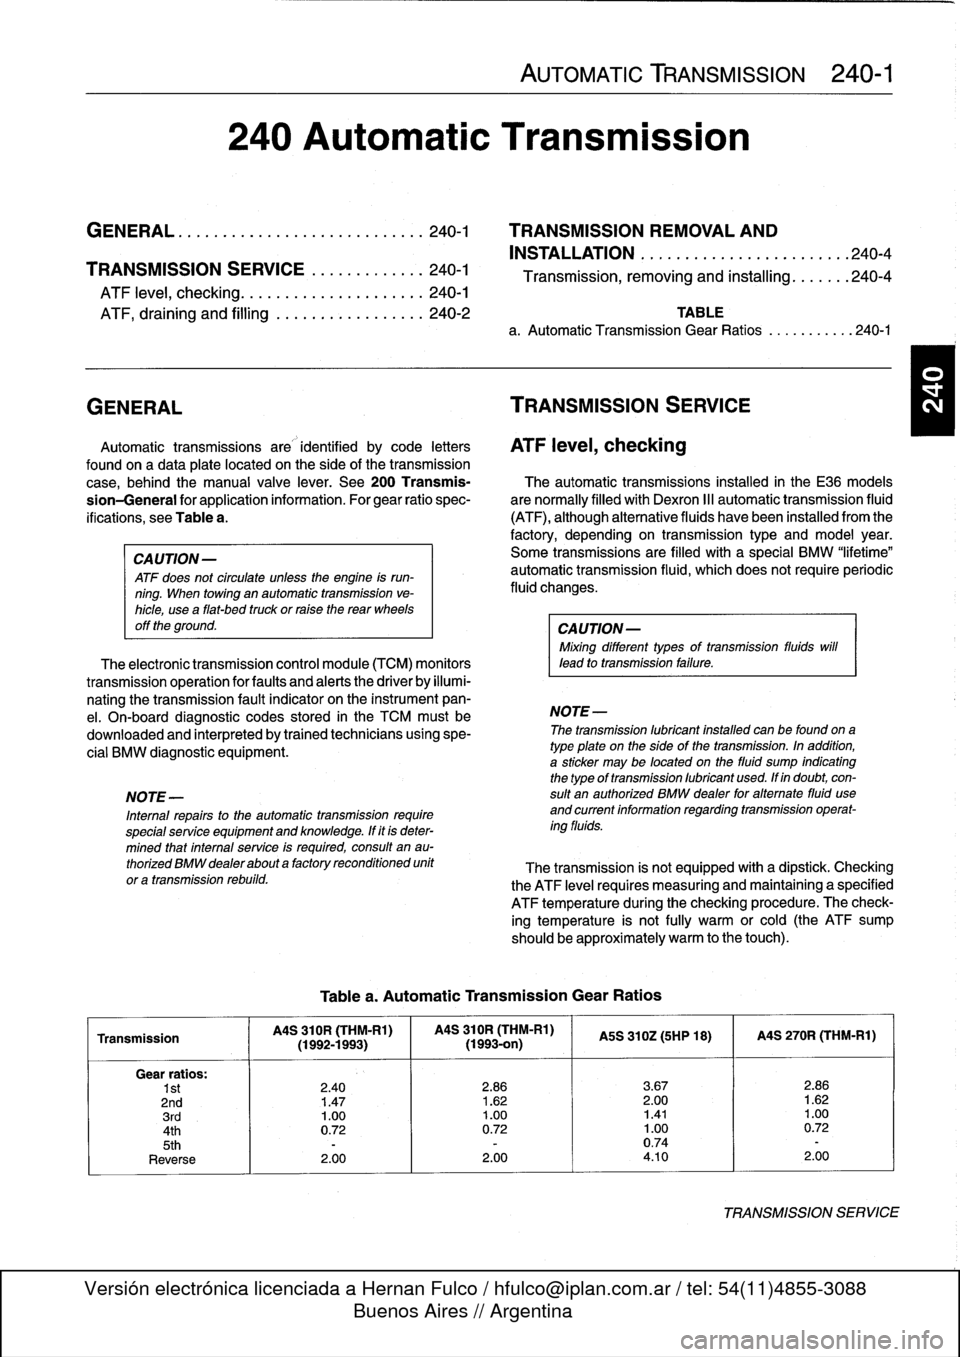
Table
a
.
Automatic
Transmission
Gear
Ratios
Transmission
MS
310R
(THM-R1)
MS
310R
(THM-Rl)
MS
310Z(5HP
18)
I
MS
270R
(THM-R1)
(1992-1993)(1993-on)
Gear
ratios
:
1st
2
.40
2
.86
3
.67
2
.86
2nd
1
.47
1
.62
2
.00
1
.62
3rd
1
.00
1
.00
1.41
1
.00
4th
0
.72
0
.72
1
.00
0
.72
5th
-
-
0
.74
-
Reverse
2
.00
2
.00
4
.10
2
.00
TRANSMISSIONSERVICE
Page 260 of 759
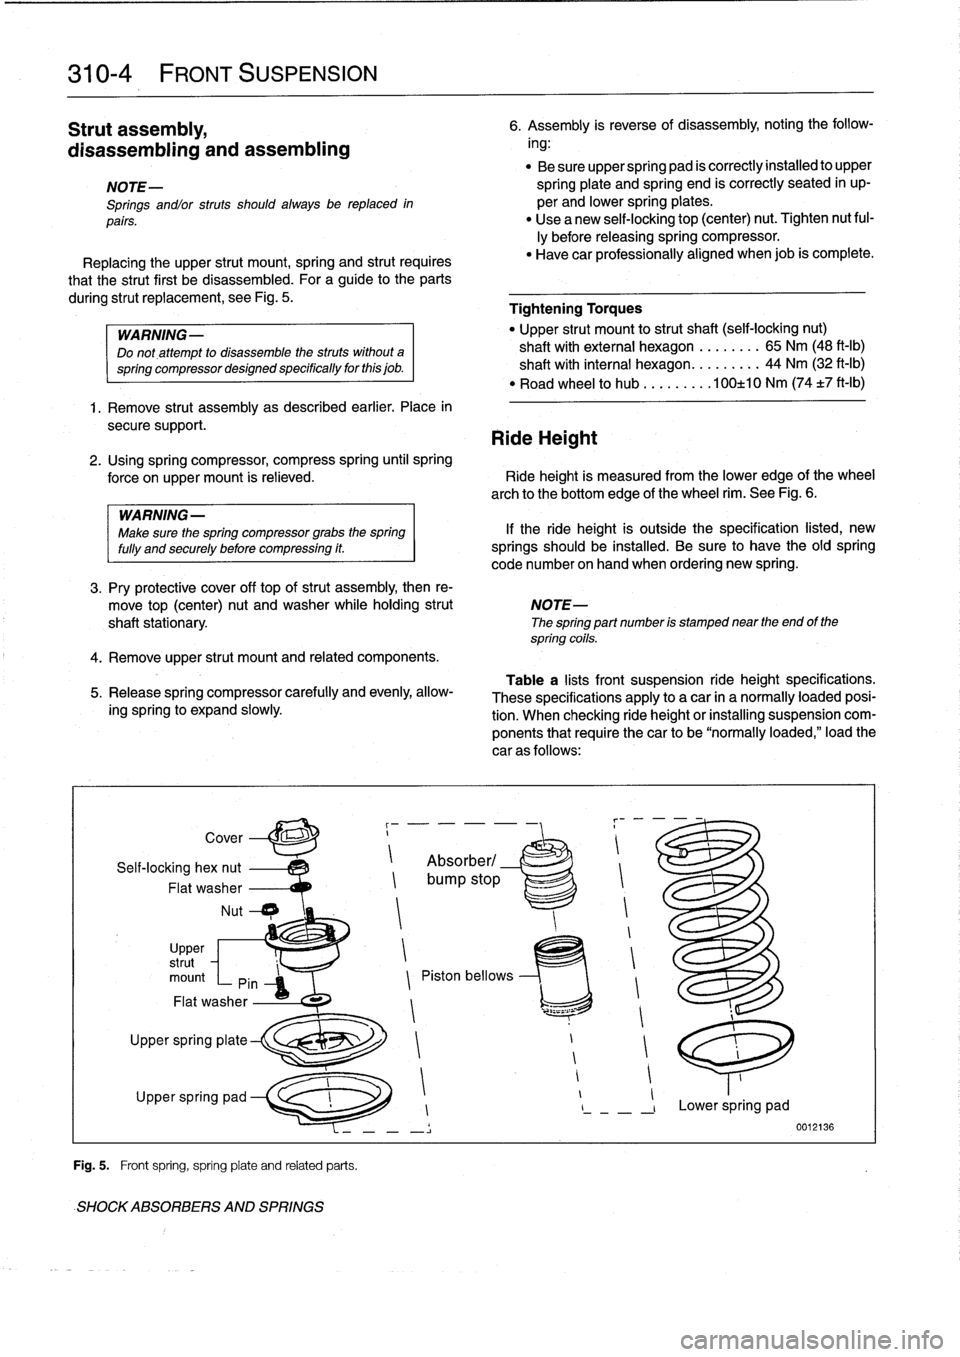
310-
4
FRONT
SUSPENSION
Strut
assembly,
disassembling
and
assembling
-
Be
sure
upper
spring
pad
is
correctly
installed
to
upper
NOTE-
spring
plate
and
spring
end
is
correctly
seated
in
up-
Springs
andlor
struts
should
always
be
replaced
in
per
and
lower
spring
plates
.
pairs
.
"
Use
a
new
self-locking
top
(center)
nut
.
Tighten
nut
fui-
¡y
before
releasing
spring
compressor
.
Replacing
the
upper
strut
mount,
spring
and
strut
requires
"
Have
car
professionally
aligned
when
job
is
complete
.
that
the
strut
first
bedisassembled
.
For
a
guide
to
the
parts
during
strut
replacement,
see
Fig
.
5
.
Tightening
Torques
WARNING-
"
Upper
strut
mount
to
strut
shaft
(seif-locking
nut)
Do
not,attempt
to
disassemble
thestruts
without
a
shaft
with
external
hexagon
......
..
65
Nm
(48
ft-1b)
springcompressordesignedspecificallyforthisjob
.
shaft
with
interna¡
hexagon
.......
..
44
Nm
(32
ft-Ib)
"
Road
wheel
to
hub
........
.100±10
Nm
(74
±7
ft-lb)
1
.
Remove
strut
assembly
as
described
earlier
.
Place
in
secure
support
.
Ride
Height
2
.
Using
spring
compressor,
compress
spring
until
spring
force
onupper
mount
is
relieved
.
Ride
height
is
measured
from
the
lower
edge
of
the
wheel
arch
to
the
bottom
edge
of
the
wheel
rim
.
See
Fig
.
6
.
WARNING
-
Make
sure
the
spring
compressor
grabs
the
spring
lf
the
ride
height
is
outside
the
specification
listed,
new
fully
and
securely
before
compressing
it
.
springs
should
be
installed
.
Be
sure
to
have
theold
spring
code
number
on
hand
when
ordering
new
spring
.
3
.
Pry
protective
cover
off
top
ofstrut
assembly,
then
re-
move
top
(center)
nut
andwasher
whileholding
strut
NOTE-
shaftstationary
The
spring
part
number
is
stamped
near
the
end
of
the
spring
cofls
.
4
.
Remove
upper
strut
mount
and
related
components
.
5
.
Release
spring
compressor
carefully
and
evenly,
allow-
ing
spring
lo
expand
slowly
1
Self-locking
hex
nut
Absorber/
Flat
washer
bump
stop
Nut
Cover
Upper
~
strut
mount
Pin
Z
Piston
bellows
Flat
washer
r
i
t1
~
1
Upper
spring
plate
1
1
1
Upper
spring
pad
I
1
-
,
Lower
spring
pad
-
Í
0012136
Fig
.
5
.
Front
spring,
spring
plate
and
related
parts
.
SHOCKABSORBERS
AND
SPRINGS
6
.
Assembly
is
reverse
of
disassembly,
noting
the
follow-
ing
:
Table
a
lists
front
suspension
ride
height
specifications
.
These
specifications
apply
to
a
car
in
a
normally
loaded
posi-
tion
.
When
checking
ride
height
or
installing
suspension
com-
ponents
that
require
thecar
to
be
"normally
loaded,"load
the
car
as
follows
:
Page 307 of 759
Ambient
temperaturelclock
MÍM
Aa
.Mi}rm
-Mil"
IMua~naa~u~itacar
"
za
.~
Central
Body
Electronics
0013028
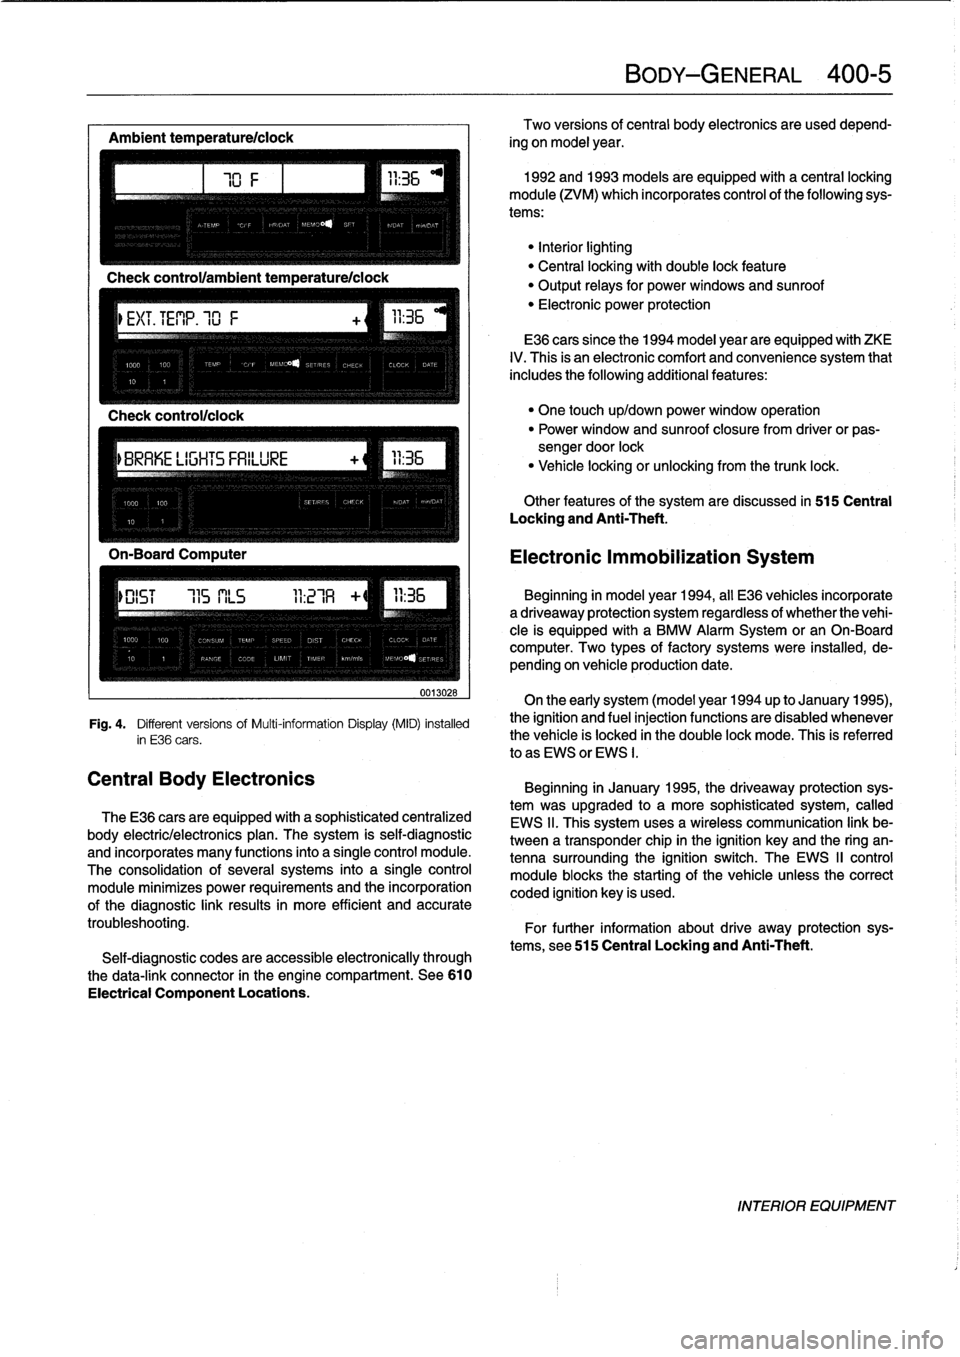
Fig
.
4
.
Different
versionsof
Multi-information
Display(MID)
installed
in
E36
cars
.
The
E36
cars
are
equipped
with
a
sophisticated
centralized
body
electric/electronics
plan
.
The
system
is
self-diagnostic
and
incorporates
many
functions
into
a
single
control
module
.
The
consolidation
of
several
systems
into
a
single
control
module
minimizes
power
requirements
and
the
incorporation
of
the
diagnostic
link
results
in
more
efficient
and
accurate
troubleshooting
.
Self-diagnostic
codes
are
accessible
electronically
through
the
data-link
connector
in
the
engine
compartment
.
See610
Electrical
Component
Locations
.
BODY-GENERAL
400-
5
Two
versions
of
central
body
electronics
are
used
depend-
ing
on
model
year
.
1992
and
1993
models
are
equipped
with
a
central
locking
module
(ZVM)
which
incorporates
control
of
the
following
sys-
tems
:
"Interiorlighting
"
Central
locking
with
double
lock
feature
"
Output
relays
for
powerwindows
and
sunroof
"
Electronic
power
protection
E36
cars
since
the
1994
model
year
are
equipped
with
ZKE
IV
.
This
is
an
electronic
comfort
and
convenience
system
that
includes
the
following
additional
features
:
"
One
touch
up/down
power
window
operation
"
Power
window
and
sunroof
closure
from
driver
or
pas-
sengerdoor
lock
"
Vehicle
locking
or
unlocking
from
the
trunk
lock
.
Other
features
of
the
system
are
discussed
in
515
Central
Locking
and
Anti-Theft
.
Electronic
Immobilization
System
Beginning
in
model
year
1994,
all
E36
vehicles
incorporate
adriveaway
protection
system
regardless
of
whether
the
vehi-
cle
is
equipped
with
a
BMW
Alarm
System
or
an
On-Board
computer
.
Two
types
of
factory
systems
were
installed,
de-
pending
on
vehicle
production
date
.
On
the
early
system
(model
year
1994
up
to
January
1995),
the
ignition
and
fuel
injection
functions
are
disabled
whenever
the
vehicle
is
locked
in
the
double
lock
mode
.
This
is
referred
lo
as
EWS
or
EWS
I
.
Beginning
in
January
1995,
the
driveaway
protection
sys-
tem
was
upgraded
to
a
more
sophisticated
system,
called
EWS
II
.
This
system
uses
a
wireless
communication
link
be-
tween
a
transponder
chip
in
the
ignition
keyand
the
ring
an-
tenna
surrounding
the
ignition
switch
.
The
EWS
II
control
module
blocksthe
starting
of
the
vehicle
unlessthe
correct
coded
ignition
key
is
used
.
For
further
information
about
drive
away
protection
sys-
tems,
see
515
Central
Locking
and
Anti-Theft
.
INTERIOR
EQUIPMENT
Page 333 of 759
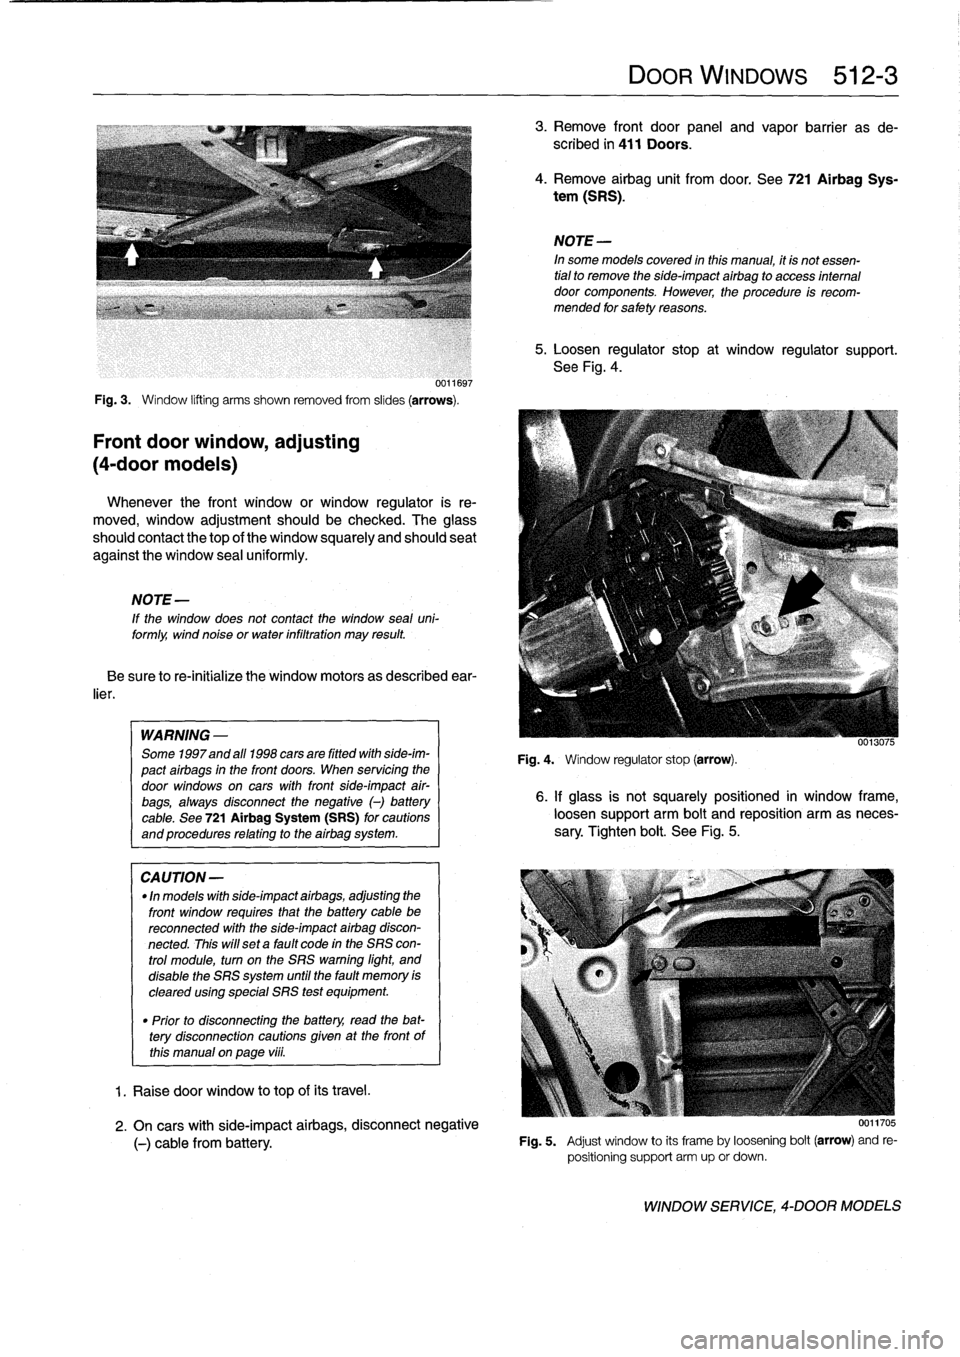
0011697
Fig
.
3
.
Window
lifting
arms
shown
removed
from
slides
(arrows)
.
Front
door
window,
adjusting
(4-door
models)
Whenever
the
front
window
or
window
regulator
is
re-
moved,
window
adjustment
should
be
checked
.
The
glass
should
contact
the
top
of
the
window
squarely
and
should
seat
against
the
window
sea¡
uniformly
.
NOTE
-
If
the
window
does
not
contact
the
window
seal
uni-formly,
wind
noise
or
water
infiltration
may
result
Be
sure
to
re-initialize
the
window
motors
as
described
ear-
lier
.
WARNING
-
Some
1997and
all
1998
cars
are
fitted
wíthside-im-
pact
airbags
in
the
front
doors
.
When
servicing
the
door
windows
on
cars
with
front
side-impact
air-
bags,
always
disconnect
the
negative
()
battery
cable
.
See
721Airbag
System
(SRS)
for
cautions
and
procedures
relating
to
the
airbag
system
.
CA
UTION-
"
In
models
with
side-impact
airbags,
adjusting
the
front
window
requires
that
the
battery
cable
bereconnected
with
the
side-impact
airbag
discon-
nected
.
This
will
set
a
fault
code
in
the
SRS
con-
trol
module,
turn
on
the
SRS
warning
light,
and
disable
the
SRS
system
until
the
fault
memory
is
cleared
using
special
SRS
test
equipment
.
"
Prior
to
disconnectiog
the
battery,
read
the
bat-tery
disconnection
cautions
given
at
the
front
of
this
manual
on
page
viii
.
1
.
Raise
door
window
to
top
of
its
travel
.
DOOR
WINDOWS
512-
3
3
.
Remove
front
door
panel
and
vapor
barrier
as
de-
scribed
in
411
Doors
.
4
.
Remove
airbag
unit
from
door
.
See
721Airbag
Sys-
tem
(SRS)
.
NOTE-
In
some
models
covered
inthis
manual,
it
is
not
essen-
tial
to
remove
the
side-impact
airbag
to
access
interna¡
door
components
.
However,
the
procedure
is
recom-
mended
for
safety
reasons
.
5
.
Loosen
regulator
stop
at
window
regulator
support
.
See
Fig
.
4
.
Fig
.
4
.
Wíndow
regulator
stop
(arrow)
.
0013075
6
.
If
glass
is
not
squarely
positioned
in
window
frame,
loosen
support
arm
bolt
and
reposition
arm
as
neces-
sary
.
Tighten
bolt
.
See
Fig
.
5
.
2
.
On
cars
with
side-impact
airbags,
disconnect
negative
(-)
cable
from
battery
.
Fig
.
5
.
Adjust
window
to
its
frameby
loosening
bolt
(arrow)
and
re-
positioning
support
arm
up
or
down
.
WINDOW
SERVICE,
4-DOOR
MODELS
Page 335 of 759
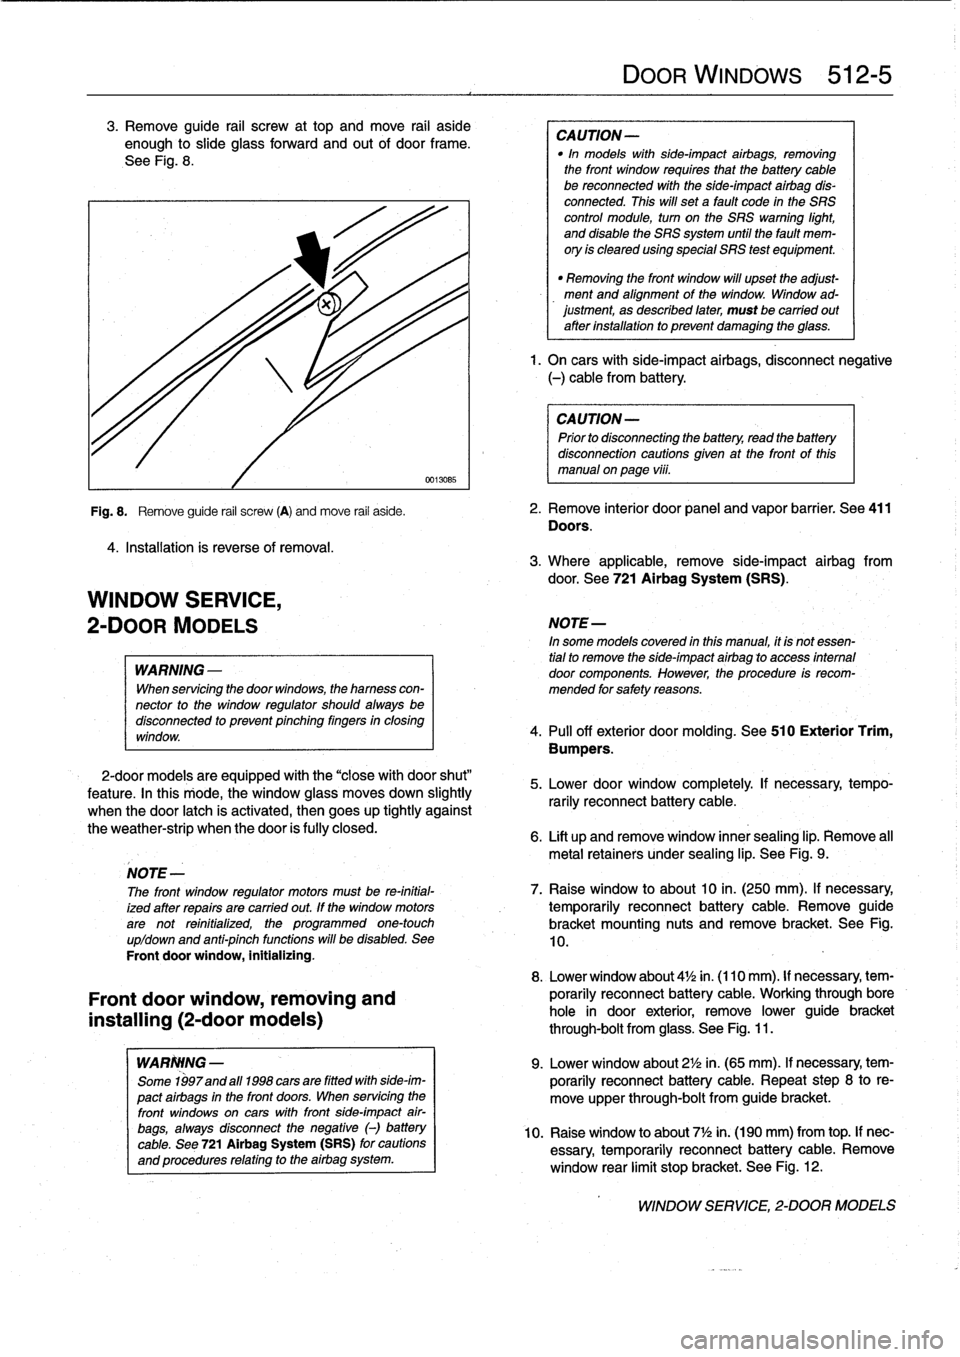
3
.
Remove
guide
rail
screw
at
top
and
move
rail
aside
enough
to
slide
glass
forward
and
out
of
door
frame
.
See
Fig
.
8
.
4
.
Installation
is
reverse
of
removal
.
WINDOW
SERVICE,
2-DOOR
MODELS
WARNING
-
When
servicing
the
door
windows,
the
hamess
con-
nector
to
the
window
regulator
shouldalwaysbe
disconnectod
to
prevent
pinching
fingers
in
closing
window
.
2-door
models
are
equipped
with
the
"close
with
door
shut"
feature
.
In
this
rriode,
the
window
glass
moves
down
slightly
when
the
door
latch
is
activated,
then
goes
up
tightly
against
the
weather-strip
when
the
door
is
fully
closed
.
Front
door
window,
removing
and
installing
(2-door
models)
WARIWNG
-
Some
1997and
a111998
cars
are
fitted
with
side-im-
pact
airbags
in
the
front
doors
.
When
servicing
the
front
windows
on
cars
with
front
side-impact
air-
bags,
always
disconnect
the
negative
(-)
battery
cable
.
See
721
Airbag
System(SRS)
for
cautions
and
procedures
relating
to
the
airbag
system
.
DOOR
WINDOWs
512-
5
CAUTION-
"In
models
with
side-impact
airbags,
removing
the
front
window
requires
fhat
the
battery
cable
be
reconnected
with
the
side-impact
airbag
dis-
connected
.
This
will
set
a
fault
code
in
the
SRS
control
module,
turn
on
the
SRS
warning
light,
and
disable
the
SRS
system
until
the
fault
mem-
ory
is
cleared
using
special
SRS
test
equipment
.
"
Removing
the
front
window
will
upset
the
adjust-
ment
and
alignment
of
the
window
.
Window
ad-justment,
as
described
later,
must
be
carried
out
after
installation
to
prevent
damaging
the
glass
.
1.
On
carswith
side-impact
airbags,
disconnect
negative
(-)
cable
from
battery
.
CAUTION-
Prior
to
disconnectiog
the
battery,
read
the
battery
disconnection
cautions
given
at
the
front
of
this
manual
on
page
viii
.
Fig
.
8
.
Remove
guide
rail
screw
(A)
and
move
rail
aside
.
2
.
Remove
interior
door
panel
and
vapor
barrier
.
See
411
Doors
.
3
.
Where
applicable,
remove
side-impact
airbag
from
door
.
See
721
Airbag
System
(SRS)
.
NOTE-
In
some
models
covered
in
this
manual,
it
is
notessen-
tial
to
remove
the
side-impact
airbag
lo
access
intemal
door
components
.
However,
the
procedure
is
recom-
mended
for
safety
reasons
.
4
.
Pull
off
exterior
doormolding
.
See
510
Exterior
Trim,
Bumpers
.
5
.
Lower
door
window
completely
If
necessary,
tempo-
rarily
reconnect
battery
cable
.
6
.
Lift
up
and
remove
window
innersealing
lip
.
Remove
all
metal
retainers
under
sealing
lip
.
See
Fig
.
9
.
NOTE
-
The
front
window
regulator
motors
must
be
re-initial-
7
.
Raise
window
to
about10
in
.
(250
mm)
.
If
necessary,
ized
after
repairs
are
carried
out
.
If
the
window
motors
temporarily
reconnect
battery
cable
.
Remove
guide
arenot
reinitialized,
the
programmed
one-touch
bracket
mounting
nuts
and
remove
bracket
.
See
Fig
.
up/down
and
anti-pinch
functions
will
be
disabled
.
See
10,
Front
doorwindow,
initializing
.
8
.
Lower
window
about
4'/2
in
.
(110mm)
.
If
necessary,
tem-
porarily
reconnect
batterycable
.
Working
through
bore
hole
in
door
exterior,
remove
lower
guide
bracket
through-bolt
from
glass
.
See
Fig
.
11
.
9
.
Lower
window
about
2'/2
in
.
(65
mm)
.
If
necessary,
tem-
porarily
reconnect
battery
cable
.
Repeat
step
8
to
re-
move
upper
through-bolt
from
guide
bracket
.
10
.
Raise
window
to
about
7
1
/2in
.
(190
mm)
from
top
.
If
nec-
essary,
temporarily
reconnect
batterycable
.
Remove
window
rear
limit
stop
bracket
.
See
Fig
.
12
.
WINDOW
SERVICE,
2-DOOR
MODELS
Page 337 of 759
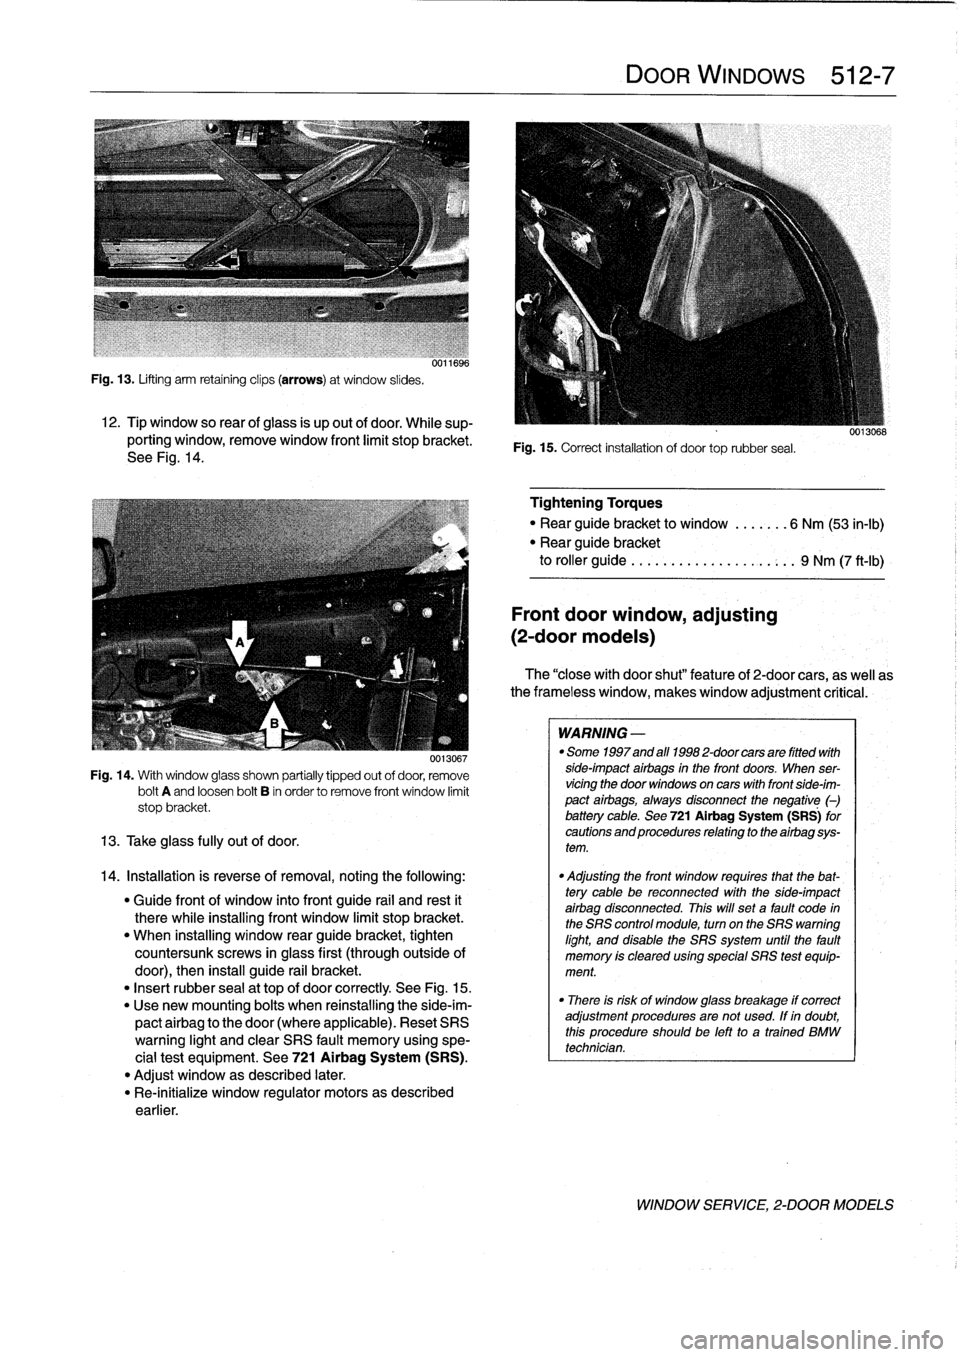
Fig
.
13
.
Lifting
arm
retaining
clips
(arrows)
at
window
slides
.
12
.
Tip
window
so
rear
ofglass
is
up
out
of
door
.
While
sup-
porting
window,
remove
window
front
limit
stopbracket
.
See
Fig
.
14
.
0013067
Fig
.
14
.
With
window
glass
shown
partially
tipped
out
of
door,
remove
bolt
A
and
loosen
bolt
B
in
order
to
remove
front
window
limit
stop
bracket
.
13
.
Take
glass
fully
out
of
door
.
14
.
Installation
is
reverse
of
removal,notingthe
following
:
"
Guide
front
of
window
into
front
guide
rail
and
rest
it
therewhile
installing
front
window
limit
stop
bracket
.
"
When
installing
window
rear
guide
bracket,
tighten
countersunk
screws
in
glass
first
(throughoutside
of
door),
then
install
guide
rail
bracket
.
"
Insert
rubber
sea¡
at
top
of
door
correctly
See
Fig
.
15
.
"
Use
new
mounting
bolts
when
reinstalling
the
side-im-
pactairbag
to
the
door
(where
applicable)
.
Reset
SRS
warning
light
and
clear
SRS
fault
memory
using
spe-
cial
test
equipment
.
See
721
Airbag
System
(SRS)
.
"
Adjust
window
as
described
later
.
"
Re-inítialize
window
regulator
motors
as
described
earlier
.
DOOR
WINDOWS
512-
7
Fig
.
15
.
Correct
installation
of
door
toprubber
seal
.
Tightening
Torques
"
Rear
guide
bracket
to
window
.......
6
Nm
(53
in-lb)
"
Rear
guide
bracket
to
roller
guide
..
.
...
...............
9
Nm
(7
ft-Ib)
Front
door
window,
adjusting
(2-door
modeis)
The
"closewith
door
shut"
feature
of
2-door
cars,
as
well
as
the
frameless
window,
makeswindow
adjustment
critical
:
WARNING
-
"
Some
1997
and
afl
1998
2-door
cars
are
fitted
with
side-impact
airbags
in
the
front
doors
.
When
ser-
vicingthe
door
windows
on
cars
with
front
side-im-
pact
airbags,
always
disconnect
the
negative
(-)
battery
cable
.
See
721Airbag
System
(SRS)
for
cautions
and
procedures
relating
to
the
airbag
sys-
tem
.
"
Adjusting
the
front
window
requires
that
the
bat-
tery
cable
be
reconnected
with
the
side-impact
airbag
disconnected
.
This
will
set
a
fault
code
in
the
SRS
control
module,
turn
on
the
SRS
warning
light,
and
disable
the
SRS
system
until
the
fault
memory
is
cleared
using
special
SRS
test
equip-
ment
.
"
There
is
risk
of
window
glass
breakage
if
correct
adjustment
proceduresare
not
used
.
If
in
doubt,
this
procedureshouldbe
left
to
a
trained
BMW
technician
.
WINDOW
SERVICE,
2-DOOR
MODELS
Page 351 of 759
![BMW 328i 1998 E36 Service Manual
Front
door
handle,
removing
and
installing
1
.
Closedoor
window
completely
.
2
.
Remove
front
door
panel
and
vapor
barrier
asde-
scribed
in
411
Doors
.
WARNING
-
Some
1997
and
al]
1998
cars
are
f BMW 328i 1998 E36 Service Manual
Front
door
handle,
removing
and
installing
1
.
Closedoor
window
completely
.
2
.
Remove
front
door
panel
and
vapor
barrier
asde-
scribed
in
411
Doors
.
WARNING
-
Some
1997
and
al]
1998
cars
are
f](/img/1/2800/w960_2800-350.png)
Front
door
handle,
removing
and
installing
1
.
Closedoor
window
completely
.
2
.
Remove
front
door
panel
and
vapor
barrier
asde-
scribed
in
411
Doors
.
WARNING
-
Some
1997
and
al]
1998
cars
are
fitted
with
side-im-
pact
airbags
in
the
front
doors
.
When
servicing
the
door
handles
on
cars
with
front
side-impact
airbags,
always
disconnect
the
negative
(-)
battery
terminal
.
See
721
Airbag
System
(SRS)
for
cautions
and
pro-
cedures
relatíng
to
the
airbag
system
.
3
.
On
carswíth
side-impact
airbags,
disconnect
negative
(-)
cable
from
battery,
then
remove
airbag
module
.
CAUTION-
Prior
to
disconnecting
the
battery,
read
the
battery
disconnection
cautions
given
at
the
front
of
thís
manual
onpage
vi¡¡
.
NOTE-
In
some
models
covered
inthis
manual,
it
is
not
essen-
tial
to
remove
the
side-impact
airbag
to
access
internal
door
components
.
However,
the
procedure
is
recom-
mended
for
safety
reasons
.
4
.
Remove
door
lock
as
described
earlier
.
5
.
Remove
window
as
described
in
512
Door
Windows
.
CA
UTION-
On
models
with
side-impact
airbags,
removinglin-
stalling
the
front
window
requires
that
the
battery
cable
bereconnected
wíth
the
side-impact
airbag
disconnected
.
This
will
seta
fault
code
in
the
SRS
control
module,
turn
on
the
SRS
warning
light,
and
disable
the
SRS
system
until
the
fault
memo-
ry
is
cleared
usíng
special
SRS
test
equipment
.
6
.
Pry
out
access
plug
in
end
of
door
.
Use
screwdriver
through
access
hole
to
slide
exteriortrim
locking
plate
into
released
position
.
See
Fig
.
5
.
Remove
doorhandle
exterior
trim
piece
.
7
.
Working
inside
door,
remove
locking
clip
for
doorhan-
dle
retaining
pin
and
push
pin
out
.
8
.
Working
inside
door,
disconnect
electrical
harness
con-
nector
at
door
handle
.
Twist
plastic
connector
bracket
to
remove
from
door
handle
.
CENTRAL
LOCKING
AND
ANTI-THEFT
515-
3
0011681
Fig
.
5
.
Insert
screwdriver
into
access
hole
and
push
lockingplate
forward
(arrow)
to
release
exterior
handle
trim
.
uu11682
Fig
.
6
.
Door
handle
retaining
pin(A)
and
lock
collar
nut
(B)
.
Door
handle
trim
shown
removed
.
10
.
Remove
door
handle
fromdoor
by
angling
out
of
door
cavity
.
Removed
door
handle
assembly
is
shown
in
Fig
.
7
.
0012684
Fig
.
7
.
Door
handle
harnessconnector
(A)
;
retaining
pin
Iocking
clip
9
.
Working
at
door
exterior,
remove
handle
collar
nut
(B)
;
exterior
trim
Iocking
plate
(C)
.
Handleassembly
shown
re-
while
supporting
handle
.
See
Fig
.
6
.
moved
from
door
.
DOOR
HANDLES
AND
LOCKS