ECO BMW 330XI IDRIVE SEDAN 2005 User Guide
[x] Cancel search | Manufacturer: BMW, Model Year: 2005, Model line: 330XI IDRIVE SEDAN, Model: BMW 330XI IDRIVE SEDAN 2005Pages: 223, PDF Size: 7.49 MB
Page 36 of 223
Controls
35Reference
At a glance
Driving tips
Communications
Navigation
Entertainment
Mobility
>If the indicator lamp flashes after unlocking
until the remote control is inserted in the
ignition, but for no longer than approx.
5 minutes: your vehicle has been disturbed
while you were away.
Tilt alarm sensor and interior motion
sensor
Tilt alarm sensor
The tilt of the vehicle is monitored. The alarm
system reacts, e.g. to attempts to steal a wheel
or tow the vehicle.
Interior motion sensor
In order for the interior motion sensor to func-
tion properly, the windows and glass sunroof
must be completely closed.
Avoiding unintentional alarms
The tilt alarm sensor and interior motion sensor
may be switched off at the same time. This pre-
vents unintentional alarms, e.g. in the following
situations:
>In duplex garages
>When transporting on car-carrying trains
>When animals are to remain in the vehicle
Switching off tilt alarm sensor and
interior motion sensor
Press the button on the remote control
twice in a row.
The indicator lamp comes on for approx. two
seconds, then begins to flash steadily. The tilt
alarm sensor and the interior motion sensor are
switched off until the next time the vehicle is
unlocked and subsequently locked again.
Windows
To prevent injuries, exercise care when
closing the windows and keep them in
your field of vision until they are shut.
When leaving the car, take the remote control
out of the ignition lock and close the doors, oth-erwise children could operate the power win-
dows and possibly injure themselves.<
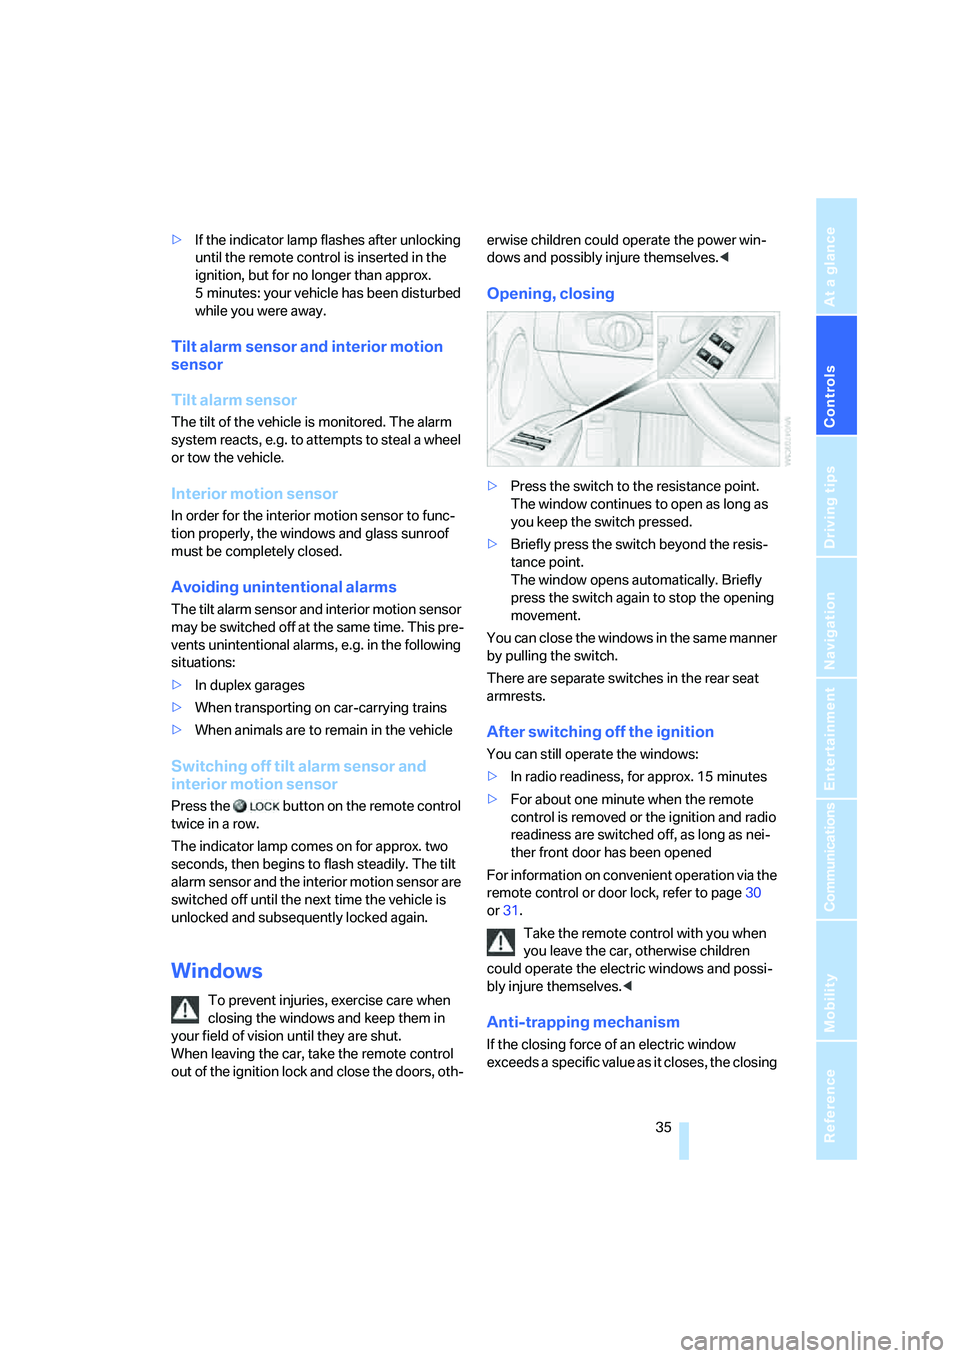
Opening, closing
>Press the switch to the resistance point.
The window continues to open as long as
you keep the switch pressed.
>Briefly press the switch beyond the resis-
tance point.
The window opens automatically. Briefly
press the switch again to stop the opening
movement.
You can close the windows in the same manner
by pulling the switch.
There are separate switches in the rear seat
armrests.
After switching off the ignition
You can still operate the windows:
>In radio readiness, for approx. 15 minutes
>For about one minute when the remote
control is removed or the ignition and radio
readiness are switched off, as long as nei-
ther front door has been opened
For information on convenient operation via the
remote control or door lock, refer to page30
or31.
Take the remote control with you when
you leave the car, otherwise children
could operate the electric windows and possi-
bly injure themselves.<
Anti-trapping mechanism
If the closing force of an electric window
exceeds a specific value as it closes, the closing
Page 37 of 223
Opening and closing
36 action is interrupted immediately and the win-
dow reopens slightly.
Despite the anti-trapping mechanism
inspect the window's travel path prior to
closing it, as the safety system might fail to
detect certain kinds of obstructions, such as
thin objects, and the window would continue
closing.
Pulling the switch beyond the resistance point
and holding it limits the response of the anti-
trapping mechanism. In this case, if the closing
force exceeds a defined threshold, the window
will only open a few fractions of an inch/a few
millimeters.
If the switch is pulled past the resistance point
again within approx. 4 seconds, the anti-trap-
ping mechanism will be deactivated.<
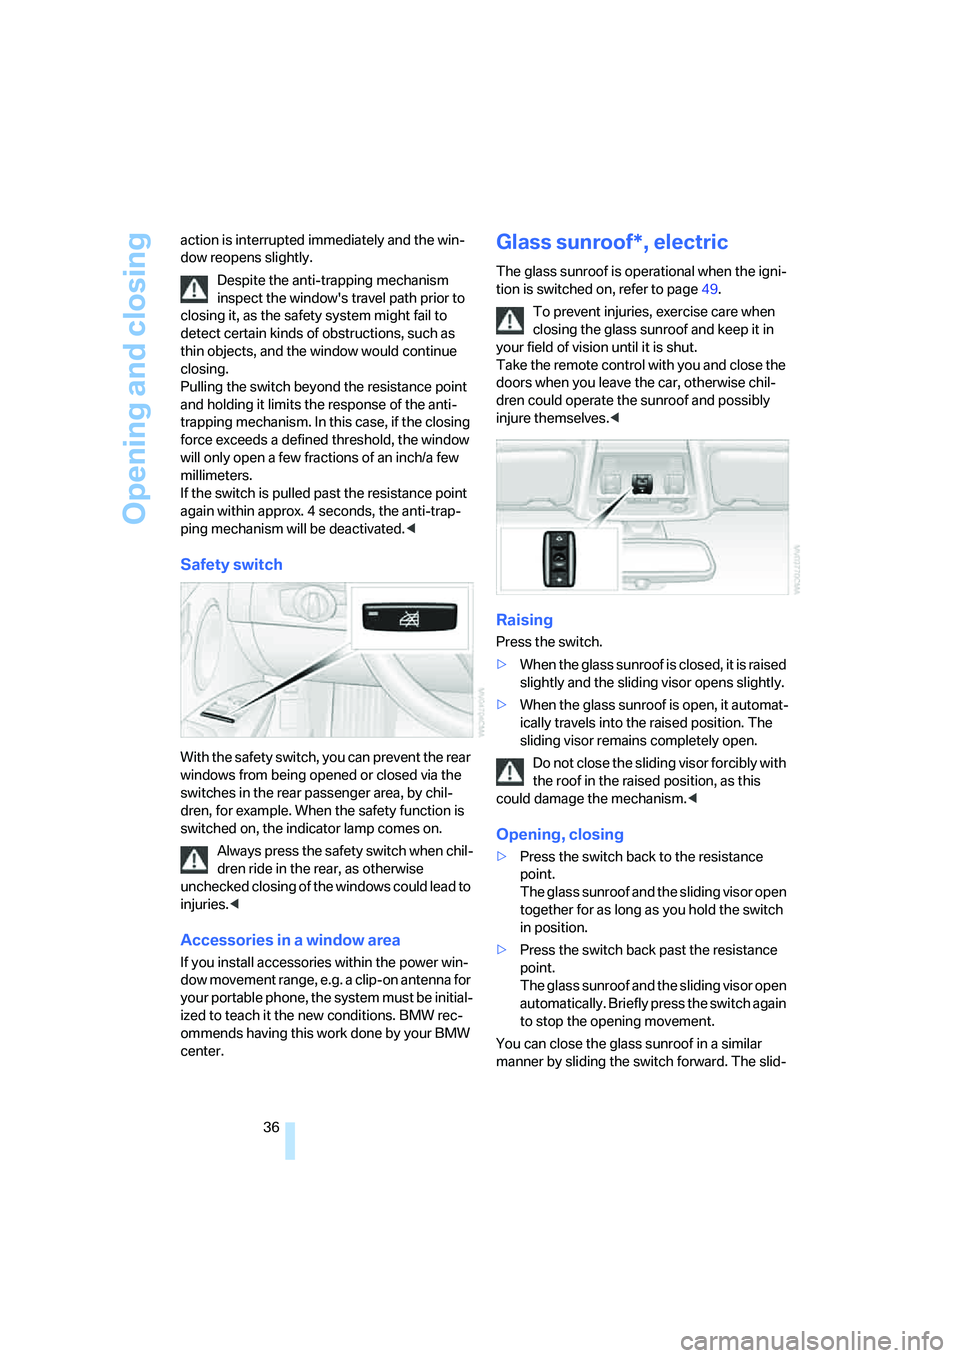
Safety switch
With the safety switch, you can prevent the rear
windows from being opened or closed via the
switches in the rear passenger area, by chil-
dren, for example. When the safety function is
switched on, the indicator lamp comes on.
Always press the safety switch when chil-
dren ride in the rear, as otherwise
unchecked closing of the windows could lead to
injuries.<
Accessories in a window area
If you install accessories within the power win-
dow movement range, e.g. a clip-on antenna for
your portable phone, the system must be initial-
ized to teach it the new conditions. BMW rec-
ommends having this work done by your BMW
center.
Glass sunroof*, electric
The glass sunroof is operational when the igni-
tion is switched on, refer to page49.
To prevent injuries, exercise care when
closing the glass sunroof and keep it in
your field of vision until it is shut.
Take the remote control with you and close the
doors when you leave the car, otherwise chil-
dren could operate the sunroof and possibly
injure themselves.<
Raising
Press the switch.
>When the glass sunroof is closed, it is raised
slightly and the sliding visor opens slightly.
>When the glass sunroof is open, it automat-
ically travels into the raised position. The
sliding visor remains completely open.
Do not close the sliding visor forcibly with
the roof in the raised position, as this
could damage the mechanism.<
Opening, closing
>Press the switch back to the resistance
point.
The glass sunroof and the sliding visor open
together for as long as you hold the switch
in position.
>Press the switch back past the resistance
point.
The glass sunroof and the sliding visor open
automatically. Briefly press the switch again
to stop the opening movement.
You can close the glass sunroof in a similar
manner by sliding the switch forward. The slid-
Page 38 of 223

Controls
37Reference
At a glance
Driving tips
Communications
Navigation
Entertainment
Mobility
ing visor remains open and must be closed by
hand.
For information on convenient operation via the
remote control or door lock, refer to page30
or31.
Anti-trapping mechanism
If the glass sunroof encounters an obstruction
during closing from approximately the middle of
the opening in the roof, or during closing from
the raised position, the closing movement is
interrupted and the glass sunroof is opened
again slightly.
Despite the anti-trapping mechanism
check and clear the sunroof's travel path
prior to closing it, as the safety system might fail
to detect certain kinds of obstructions, such as
very thin objects, and the sunroof would con-
tinue closing.
Pressing the switch beyond the resistance
point and holding it there deactivates the anti-
trapping mechanism.<
Following interruptions in electrical
power supply
After a power failure, there is a possibility that
the glass sunroof can only be raised. The sys-
tem must be initialized. BMW recommends
having this work done by your BMW center.
Manually opening and closing
In the event of an electrical malfunction, you can
move the glass sunroof manually:
1.Unclip the front of the cover for the interior
lamps using the screwdriver from the
onboard tool kit, refer to page187.2.Insert the screwdriver into the openings on
each side to press the clips.
3.Remove the cover panel.
4.Insert the Allen wrench supplied with the
onboard tool kit, refer to page187, into the
opening provided. Turn the glass sunroof in
the desired direction.
5.Reattach the cover for the interior lamps
and install the cover panel.
Page 39 of 223

Adjustments
38
Adjustments
Sitting safely
The ideal sitting position can make a vital con-
tribution to relaxed, fatigue-free driving. In con-
junction with the safety belts, the head
restraints and the airbags, the seated position
has a major influence on your safety in the event
of an accident. To ensure that the safety sys-
tems operate with optimal efficiency, we
strongly urge you to observe the instructions
contained in the following section.
For additional information on transporting chil-
dren safely, refer to page46.
Airbags
Always maintain an adequate distance
between yourself and the airbags. Always
grip the steering wheel on the rim, with your
hands in the 3 o'clock and 9 o'clock positions,
to minimize the risk of injury to the hands or
arms in the event of the airbag being triggered
off.
No one and nothing is to come between the air-
bags and the seat occupant.
Do not use the cover of the front airbag on the
front passenger side as a storage area. Make
sure that the front passenger is sitting correctly
and does not rest feet or legs on the instrument
panel, otherwise leg injuries can occur if the
front airbag is triggered. Never let an occu-
pant's head rest near or on a side airbag
because the inflating airbag could cause a seri-
ous or fatal injury.<
Even if you adhere to all the instructions, inju-
ries resulting from contact with airbags cannot
be fully excluded, depending on the circum-
stances. The ignition and inflation noise may
provoke a mild hearing loss in extremely sensi-
tive individuals. This effect is usually only tem-
porary.
For airbag locations and additional information
on airbags, refer to page82.
Head restraint
A correctly adjusted head restraint reduces the
risk of neck injury in the event of an accident.
Adjust the head restraint in such a way
that its center is at approx. ear level. Oth-
erwise, there is a risk of injury should an acci-
dent occur.<
Safety belt
Before every drive, make sure that all occupants
wear their safety belts. Airbags complement the
safety belt as an additional safety device, but
they do not represent a substitute.
At all times, occupants should sit upright
and be properly restrained: infants and
small children in appropriate child-restraint sys-
tems; larger children and adults using the safety
belts. Never allow more than one person to
wear a single safety belt. Never allow infants or
small children to ride in a passenger's lap.
Expectant mothers should also wear the safety
belt, making sure that the strap in the pelvic
a r e a i s w e l l d o w n o n t h e h i p s a n d d o e s n o t p r e s s
against the abdominal region of the body.
Do not route the belt across your neck, or run it
across sharp edges. Be sure that the belt does
not become caught or jammed. The safety belt
should not be twisted and must be positioned
firmly over the pelvis and shoulder, as close to
the body as possible. It should not pass over
hard or fragile objects, otherwise the belt in the
pelvic area could slide over the hips in the event
of a head-on collision and injure the lower abdo-
men. Avoid wearing bulky clothing and regularly
pull the belt in the upper-body area taut, other-
wise its restraining effect could be impaired.<
Safety belts, refer to page43.
Page 47 of 223

Transporting children safely
46
Transporting children safely
The right place for children
Do not leave children unattended in the
vehicle, as they could otherwise endan-
ger themselves and/or other persons by open-
ing the doors, for example.<
As a general rule, the front passenger's seat
and outer rear seats are suitable for installing
universal child-restraint systems for all age
groups, provided that they have been approved
for the age group in question.
Children always in the rear
Accident research shows that the safest place
for children in a vehicle is in the rear seat.
Older children should be tightly secured with a
safety belt, after they have outgrown a booster
seat that is appropriate for their age, height and
weight.
If your BMW is equipped with rear side
airbags, do not allow children to lean
towards the door trim, as serious injuries could
occur if the side airbags are deployed and chil-
dren are too close to the airbags.<
Deactivating rear seat side airbags
Labels in the rear door opening should indicate
the status of your rear seat side airbags. If you
are uncertain of their status, or wish to have the
airbags activated or deactivated, please contact
your BMW center.
Child-restraint system in the rear
Children under the age of 13 or smaller
than 5 ft/150 cm may only be transported
in suitable child-restraint systems on one of the
outer rear seats; otherwise, there is an
increased risk of injury in the event of an acci-
dent.<
Younger children should be secured in an
appropriate child-restraint system that has
been first properly secured to the vehicle.All rear seating positions in your vehicle meet
the recommendations of SAE J1819, an indus-
try-recommended practice for securing child-
restraint systems in motor vehicles.
Exception for front passenger seat
Should it be necessary to use a child-
restraint system on the front passenger
seat, the front passenger airbags must be deac-
tivated. Otherwise, a child traveling on that seat
will be at considerable risk of injury if the airbags
are triggered off, even with a child-restraint sys-
tem. Your vehicle is equipped with an airbag
supplemental restraint system for the front pas-
senger. Because the backrest on any rearward-
facing child-restraint system – of the kind
designed for infants under 1 year and 20 Ibs./
9 kg – would be within the airbag's deployment
range, you should never mount such a system
in the front passenger seat, since the impact of
the airbag against the child restraint's backrest
could lead to serious or fatal injuries.<
For more information on automatic deactivation
of the front passenger airbags refer to page83.
Seat height
Before installing a universal child-restraint sys-
tem, move the front passenger's seat up as far
as it will go to ensure that the safety belt will be
ideally positioned. Do not change the seat
height afterward.
Backrest width
The backrest width of the front passen-
ger's seat must be adjusted to its widest
setting.<
1.After unlocking the vehicle, sit down on the
front passenger seat and close the door.
2.Adjust the backrest width to its widest set-
ting, refer to page40.
3.Install the child seat.
Page 48 of 223

Controls
47Reference
At a glance
Driving tips
Communications
Navigation
Entertainment
Mobility
Installing child-restraint
systems
Before installing any child-restraint system or
child seat, read the following:
Observe the child-restraint system man-
ufacturer's instructions for installation
and use. Otherwise the degree of protection
may be reduced. After an accident, have all
parts of the child-restraint system and of the
relevant vehicle safety belt system checked and
replaced if necessary. Have this work done only
at your BMW center or at a workshop that works
according to BMW repair procedures with cor-
respondingly trained personnel.<
Commercially-available child-restraint systems
are designed to be secured with a lap belt or
with the lap belt portion of a combination lap/
shoulder belt. Improperly or inadequately
installed restraint systems can increase the risk
of injury to children. Always read and follow the
instructions that come with the system.
Child seat security
All of the rear belt retractors and the front pas-
senger safety belt can be locked for mounting
and securing child-restraint systems.
Information regarding this is located near the
buckle latch of each safety belt.
To lock the safety belt
Pull the entire length of the belt from the belt
retractor. Allow the reel to retract the belt
somewhat and engage the buckle, then tighten
the belt against the child-restraint system. The
retraction mechanism is now locked.
To unlock the safety belt
Release the buckle, remove the child-restraint
system and allow the belt retractor to reel the
belt completely in.
Child-restraint system with tether
strap
If you use a child-restraint system with a tether
strap, three additional tether anchorage points
have been provided, refer to the arrows in the
illustration. Depending on the location selected
for seating in the rear passenger area, attach
the tether strap to the corresponding anchor-
age point to secure the child-restraint system,
as shown in the illustration below.
Placement of the tether strap
Outer sitting positions:
Lift the head restraint and pass the tether strap
between the head restraint and the seat back. It
is recommended to readjust the head restraint
into the lowest possible position.
Center sitting position:
Push the center head restraint upward. Guide
the tether strap between the head restraint and
the rear seat back. The tether strap must be
between the anchorages of the head restraint.
Page 56 of 223

Controls
55Reference
At a glance
Driving tips
Communications
Navigation
Entertainment
Mobility
Washer fluid
Washer fluid antifreeze is flammable.
Always keep it well away from sparks and
open flames, and store it in tightly closed con-
tainers well out of the reach of children. Comply
with the instructions on the container.<
Washer fluid reservoir
Fill with water and, if required, with a washer
antifreeze, according to manufacturer's recom-
mendations.
Mix the water and antifreeze before filling
the washer fluid reservoir to make sure
the correct concentration is maintained.<
Capacity
Approx. 6.3 US quarts/6 liters.
Cruise control*
The concept
Cruise control is available for use at speeds of
approx. 20 mph or 30 km/h. The car then mem-
orizes and maintains the speed that you specify
using the lever on the steering column. In order
to maintain the specified speed, the system brakes the vehicle when the engine braking
effect is insufficient on downhill gradients.
Do not use cruise control when driving
conditions are unfavorable for driving at a
constant speed. Otherwise you could lose con-
trol of the vehicle and cause an accident as a
result. Unfavorable driving conditions include,
for example, winding roads, heavy traffic or a
poor road surface, e.g. snow, rain, ice or loose
material.<
Manual transmission
You can shift gears while cruise control is acti-
vated. An indicator lamp notifies you that you
should shift gears when you drive for an
extended period at very high or very low engine
speeds, or the system is deactivated.
One lever for all functions
1Storing and maintaining speed or accelerat-
ing
2Storing and maintaining speed or deceler-
ating
3Deactivating cruise control
4Resuming a speed stored beforehand
Maintaining current speed
Tap the lever, arrow 1, or pull it briefly, arrow 2.
The car's current speed is stored and main-
tained. It is displayed in the speedometer and
briefly in the instrument cluster.
On uphill gradients, it may prove impossible to
maintain the set speed if current engine power
output is insufficient. If the engine braking
effect is insufficient on downhill slopes, the sys-
tem will brake the vehicle slightly.
Page 58 of 223

Controls
57Reference
At a glance
Driving tips
Communications
Navigation
Entertainment
Mobility
Displays in the instrument cluster
1Stored speed
2Selected speed is displayed briefly
If --- mph or --- km/h temporarily appears
in the instrument cluster display, it is pos-
sible that the system prerequisites for operation
are currently not met.
Calling up Check Control messages, refer to
page74.<
Malfunction
The warning lamp comes on when
the system has failed. A message
appears on the Control Display. You
can find more information starting on page73.
Active cruise control*
The concept
With active cruise control, you can select a
desired speed which is not only automatically
maintained when driving on open roadways, but
also varied to maintain a selected distance set-
ting as slower traffic is encountered.
Active cruise control is a technological advance
over the familiar cruise control and is a welcome
relief from the constant adjustment of speed
that can accompany driving in traffic on free-
ways or other high-speed thoroughfares. Espe-
cially on longer trips, the system can reduce
fatigue and tension, while increasing your
enjoyment of driving. Please use it safely and
responsibly.
Within the limits of its capability, the system
automatically adapts the car's speed to that of a
slower vehicle in front of you. You can specify the distance to be maintained from the vehicle
in front in four stages. For safety reasons, the
distance is speed-dependent. Based on your
selected distance setting, the system automat-
ically decreases the throttle setting and lightly
applies the brakes if necessary. The vehicle
brake lamps will automatically illuminate to sig-
nal a following driver to take action. In addition,
it may be necessary for the vehicle or the driver
to downshift, depending on the kind of trans-
mission your vehicle is equipped with, to main-
tain the distance setting selected. If the vehicle
ahead speeds up or when the lane ahead
becomes clear, your vehicle will accelerate to
the speed you have selected by increasing the
throttle setting and shifting gears automatically
or by the driver as needed. Your selected speed
will be held when driving downhill, too.
Since this active cruise control system is a new
technology and operates differently from con-
ventional cruise control systems which you may
be accustomed to, you are strongly urged to
read all of the pages relating to this system
before use. Pay special attention to the System
limitations section beginning on page61.<
Braking sensation
The system's automatic brake operation results
in a braking sensation that is slightly different
from what you feel when you brake the vehicle
yourself in a similar situation. Possible noises
during automatic deceleration are normal.
Manual transmission
You can shift gears while cruise control is acti-
vated. An indicator lamp notifies you that you
should shift gears when you drive for an
extended period at very high or very low engine
speeds, or the system is deactivated.
Range of applications
The minimum desired speed is 20 mph or
30 km/h, and the maximum speed is 110 mph
or 180 km/h.
As with conventional cruise control sys-
tems, active cruise control in no way
diminishes or substitutes for the driver’s own
Page 61 of 223
Driving
60 >When you deactivate the Dynamic Stability
Control DSC
>When DSC or ABS is intervening
>When the system does not recognize any
objects for a longer period of time, e.g. on
infrequently traveled roads without a shoul-
der or guard rails, or if the radar sensor is
covered with dirt, refer to page61
>When you actuate the handbrake while driv-
ing
When the system is deactivated, you
must brake the vehicle yourself and/or
maneuver as necessary, otherwise there is a
risk of accident.<
Warning lamp
The warning lamp comes on when
active cruise control has been auto-
matically deactivated due to one of
the following factors: you are driving under a
speed of 20 mph or 30 km/h, the handbrake is
applied, or DSC is intervening. A message
appears on the Control Display.
Resuming stored desired speed and
distance
Press button 4.
The stored speed and distance are regained
and maintained.
In the following instances, the stored speed is
deleted and can no longer be resumed:
>When driving control systems are interven-
ing
>In cars with manual transmission: when you
shift gears very slowly or engage neutral
gear
>In cars with automatic transmission: when
you engage selector lever position N
>When the ignition is switched off
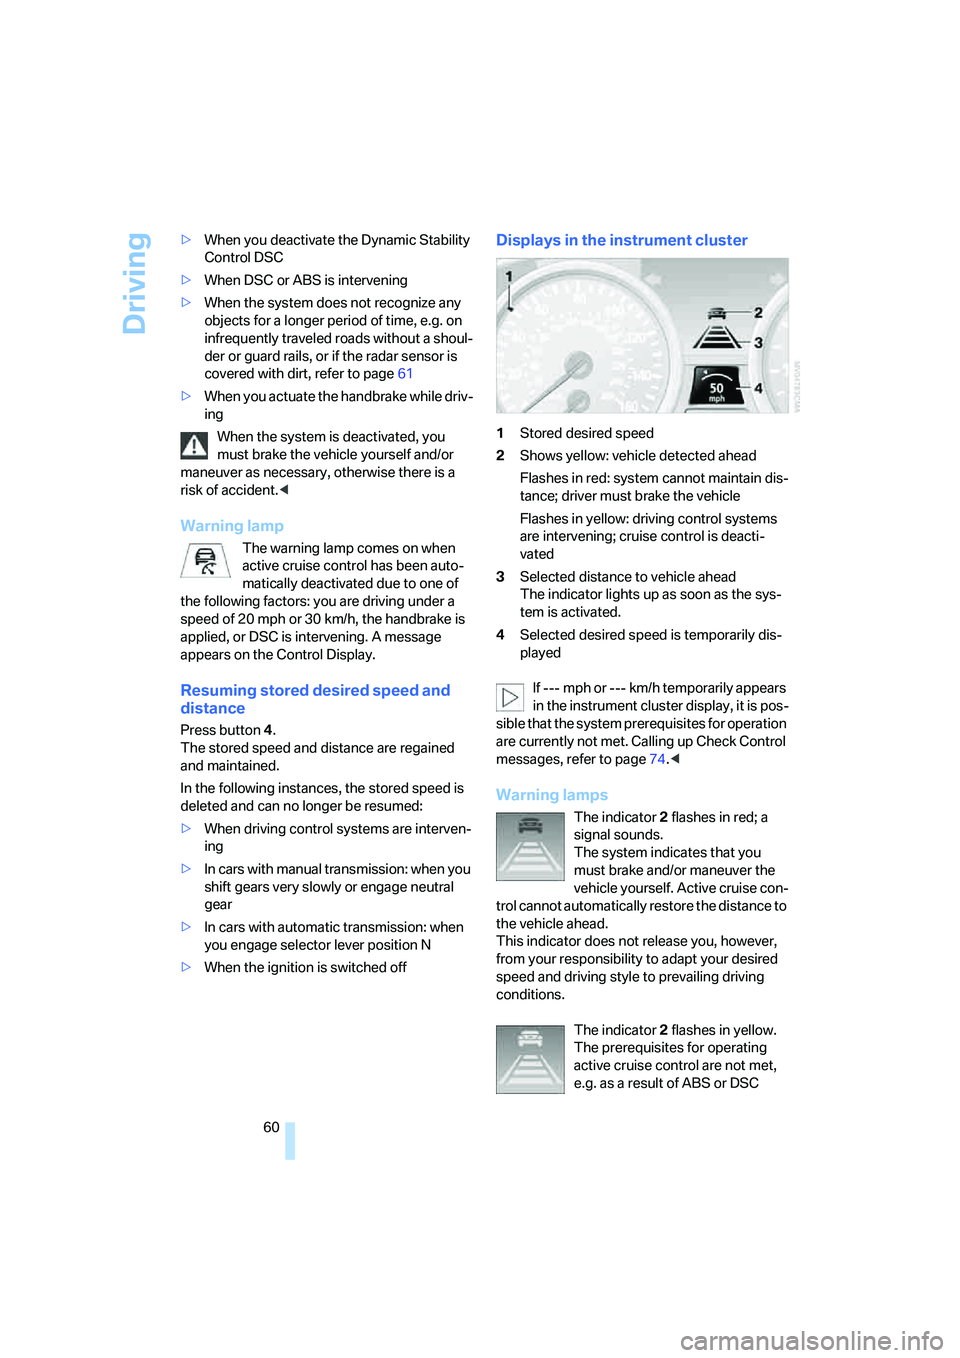
Displays in the instrument cluster
1Stored desired speed
2Shows yellow: vehicle detected ahead
Flashes in red: system cannot maintain dis-
tance; driver must brake the vehicle
Flashes in yellow: driving control systems
are intervening; cruise control is deacti-
vated
3Selected distance to vehicle ahead
The indicator lights up as soon as the sys-
tem is activated.
4Selected desired speed is temporarily dis-
played
If --- mph or --- km/h temporarily appears
in the instrument cluster display, it is pos-
sible that the system prerequisites for operation
are currently not met. Calling up Check Control
messages, refer to page74.<
Warning lamps
The indicator2 flashes in red; a
signal sounds.
The system indicates that you
must brake and/or maneuver the
vehicle yourself. Active cruise con-
trol cannot automatically restore the distance to
the vehicle ahead.
This indicator does not release you, however,
from your responsibility to adapt your desired
speed and driving style to prevailing driving
conditions.
The indicator 2 flashes in yellow.
The prerequisites for operating
active cruise control are not met,
e.g. as a result of ABS or DSC
Page 62 of 223

Controls
61Reference
At a glance
Driving tips
Communications
Navigation
Entertainment
Mobility
interventions. Active cruise control is deacti-
vated. You can reactivate the system, if desired,
by tapping or pulling the lever when road and
traffic conditions permit this. It is not possible to
resume a stored speed.
Radar sensor
The sensor's ability to detect vehicles ahead
may be restricted as a result of heavy rain, dirt, snow or ice. If necessary, clean the radar sensor
located in the front bumper, see arrow. Be sure
t o u s e p a r t i c ul a r c a r e w h e n r e m o v i n g a n y l a y e r s
of snow or ice from the sensor.
When the radar sensor is not properly posi-
tioned, active cruise control cannot be activated
at all.
Malfunction
The warning lamp comes on when
the system has failed. A message
appears on the Control Display. You
can find more information starting on page73.
System limitations
Always remember that the range and abil-
ity of the system does have physical limi-
tations. It will not apply the brakes or decelerate
your vehicle when there is a slow-moving vehi-
cle, stopped vehicle or stationary object ahead
of you, as for example, at a traffic light or a
parked vehicle. Also, the system does not react
to oncoming traffic, pedestrians or other types
of potential traffic such as a rider on horseback.
It is also possible that the system may not
detect smaller moving objects such as motor-
cycles or bicycles. Be especially alert when
encountering any of these situations as the sys-
tem will neither automatically brake, nor provide
a warning to you. Also, be aware that every
decrease in the distance setting allows your
vehicle to come closer to a vehicle in front of you and requires a heightened amount of alert-
ness.<
Active cruise control is not and must not
be used as a collision avoidance/warning
system.<
If while your vehicle is actively following a vehi-
cle in front of you and the vehicle ahead speeds
up or the lane ahead becomes clear, then your
vehicle will accelerate to the speed you have
selected. Be aware that changing to a clear,
unobstructed lane will also result in your vehicle
accelerating.
Be certain to deactivate the system when
you pull into an exit lane for a highway off-
ramp.<
Also, vehicles traveling in a staggered manner
on a highway may cause a delay in the system's