rear BMW 525i 1997 E39 Workshop Manual
[x] Cancel search | Manufacturer: BMW, Model Year: 1997, Model line: 525i, Model: BMW 525i 1997 E39Pages: 1002
Page 3 of 1002

Downloaded from www.Manualslib.com manuals search engine
YOU are now in Volume I
I
Foreword ................... .. ........................................................................\
.......... v
Index
........................ .. ................................................................ rear of manual
General, 001 General Warnings and Cautions 002 Vehicle Identification and VIN Decoder
Maintenance OiO 020 Maintenance
Engine
100 Engine-General 110 Engine Removal and Installation
113 Cylinder Head Removal and
Installation
116 Cyiinder Head and Valvetrain 117 Camshaft Timing Chain
119 Lubrication System
200 Transmission-General
2 Transmission 210 clutch 230 ManualTransmission
I20 Ignition System
121 Battery, Starter, Alternator
130 Fuel Injection
160 Fuel Tank and Fuel Pump 170 Radiator and Cooling System
180 Exhaust System
240 Automatic Transmission
250 Gearshift Linkage 260 Driveshaft
Suspension, 300 Suspension, Steering and 330 Rear Suspension
Brakes-General 331 Final Drive
Steering and No Front Suspension 340 Brakes
320 Steering and Wheel Alignment
400 Body-General
410 Fenders, Engine Hood 411 Doors
412 Trunk Lid, Tailgate
510 Exterior Trim, Bumpers 512 Door Windows
Equipment 513 Interior Trim
7
Equipment and 720 seat Belts
Accessories 721 Airbag System (SRS)
OBD On-Board Diagnostics
. ............ ..
515 Central Lociting and
Anti-Theft
520 Seats 540 Sunroof
.................................................................... Foreword .............................. .. v
Index ................... .. ................................................................ rear of manual
Electrical
6 system
600 Electrical System-General 620 Instruments
610 Electrical Comoonent Locations 630 Liohts
611 wipers and washers 612 Switches eati in^ and Air Conditioning
Radio
. ........... ........ .........................
Electrical Wiring Diagrams
Page 15 of 1002
Downloaded from www.Manualslib.com manuals search engine
General
Much of the necessary maintenance and minor repairthat an
automobile will need can be done with ordinary tools. Below
you'll find important information on how to work safely, a dis-
cussion of what tools will be needed and how to use them.
Safety
Although an automobile presents many hazards, common
sense and good equipment can help ensure safety. Many ac-
cidents happen because of carelessness. Pay attention and
stick to the safety rules in this manual.
Lifting the car
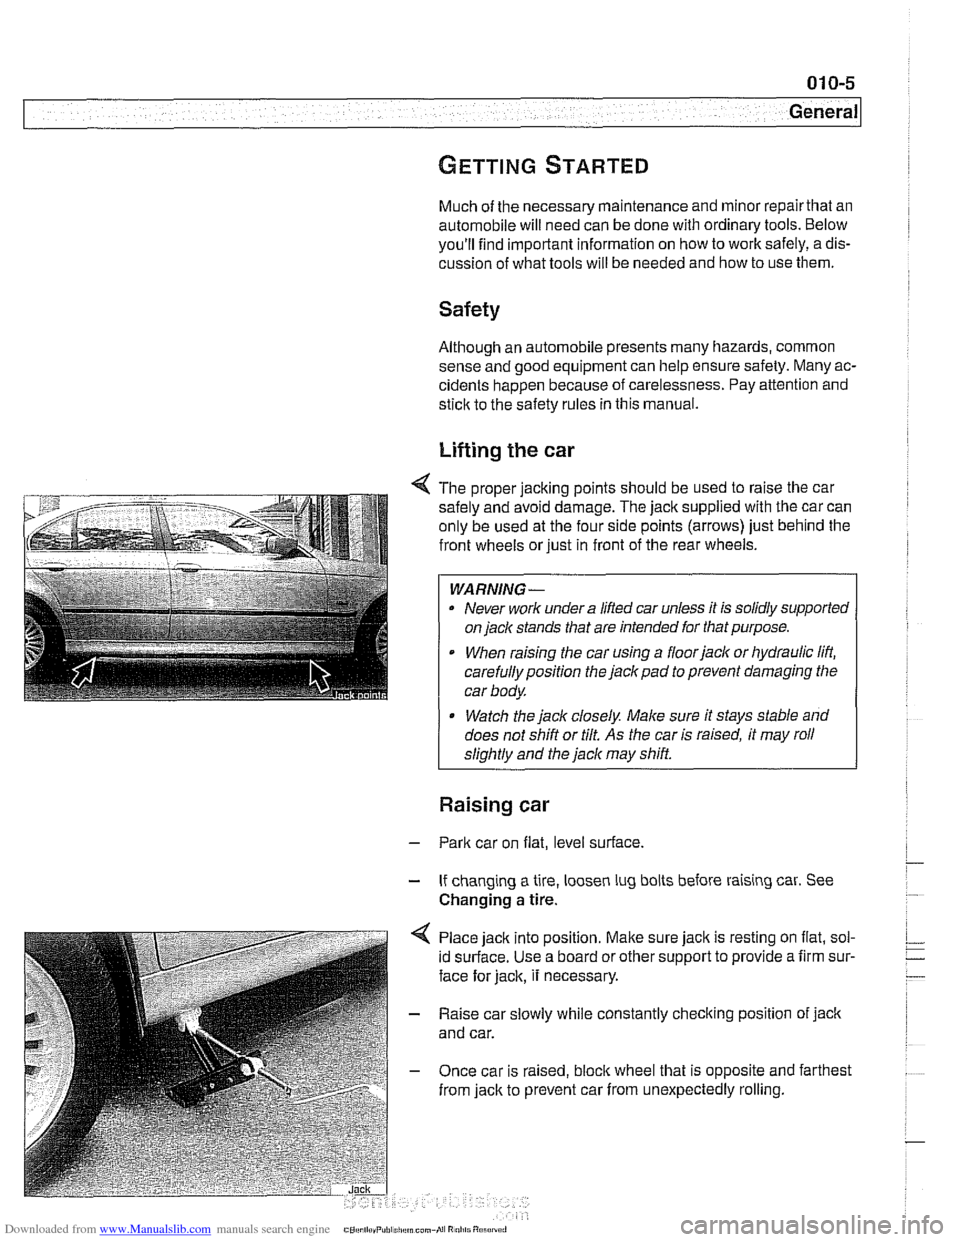
4 The proper jacking points should be used to raise the car
safely and avoid damage. The
jack supplied with the car can
only be used at the four side points (arrows) just behind the
front wheels or just in front of the rear wheels.
WARNING-
. Never work under a lifted car unless it is solidly supported
on
jack stands that are intended for that purpose.
When raising the car using a floorjack or hydraulic lift,
carefully position the jack pad to prevent damaging the
car body.
* Watch the jack closely. Male sure it stays stable and
does not shift or tilt.
As the car is raised, it may roll
sliahtlv and the
jack mav shift.
Raising car
- Park car on flat, level surface.
- If changing a tire, loosen lug bolts before raising car. See
Changing
a tire.
Place jack into position.
Malte sure jack is resting on flat, sol-
id surface. Use a board or other support to provide a firm sur-
face for jack, it necessary.
- Raise car slowly while constantly checking position of jack
and car.
- Once car is raised, bloclc wheel that is opposite and farthest
from jack to prevent car from unexpectedly rolling.
Page 30 of 1002
Downloaded from www.Manualslib.com manuals search engine
01 0-20
General
more information on the Check Engine Light and the on-
board diagnostic system.
Towing
The cars covered by this manual should be towed with a tow
truck using wheel lift or flat bed equipment. Do not tow the car
on all four wheels except
forvery short distances to move it to
a safe place.
CA U JION-
Do not tow with sling-type equipment The front spoilers and
b~m~er covers may sustain damage.
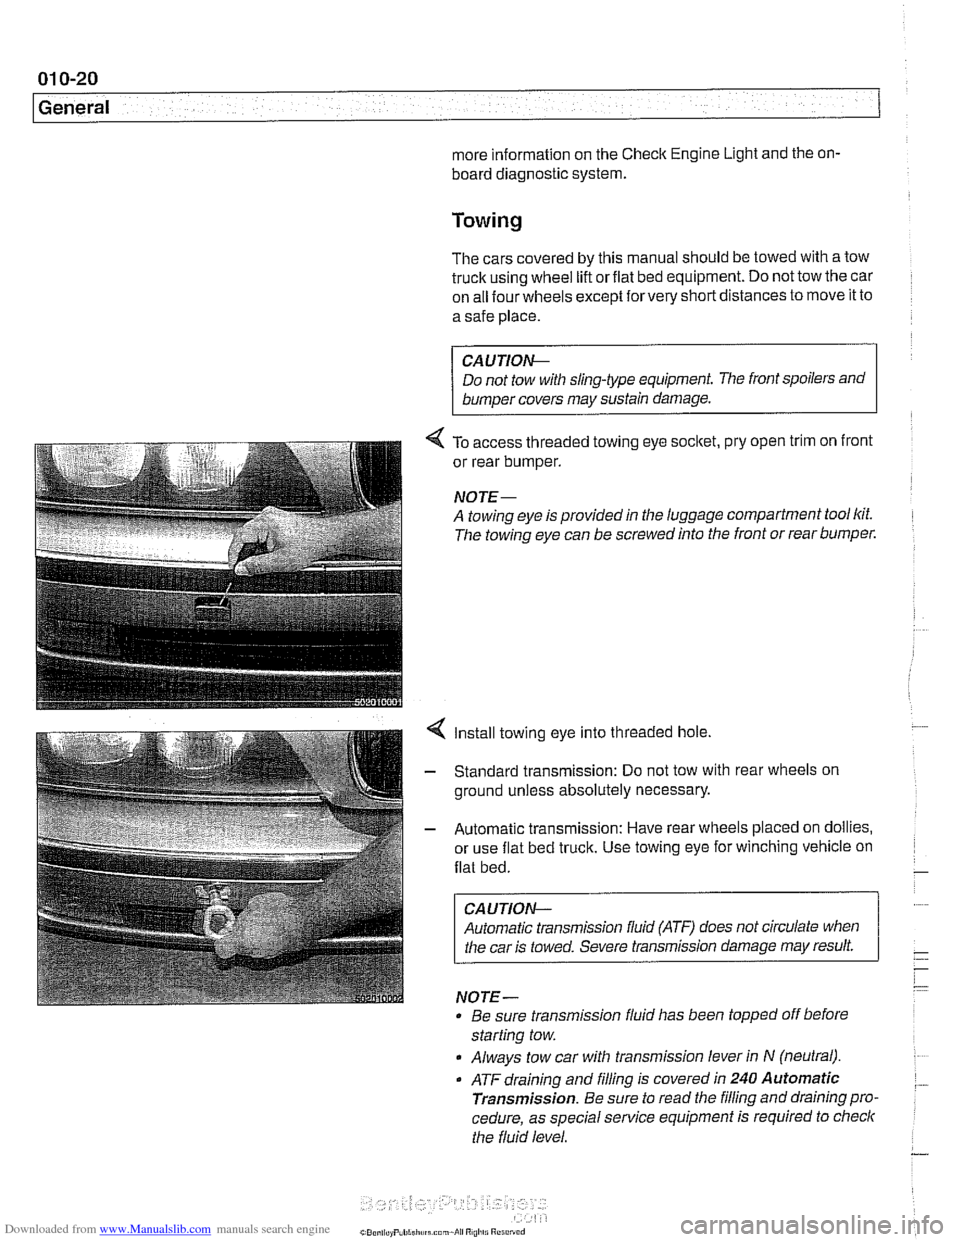
4 To access threaded towing eye socltet, pry open trim on front
or rear bumper.
NOJE-
A towing eye is provided in the luggage compartment tool lcit.
The towing eye can be screwed into the front or rear bumper.
4 Install towing eye into threaded hole.
- Standard transmission: Do not tow with rear wheels on
ground unless absolutely necessary.
- Automatic transmission: Have rear wheels placed on dollies,
or use flat bed truck. Use towing eye for winching vehicle on
flat bed.
CAUTION-
Automatic transmission fluid (ATF) does not circulate when
I the car is towed. Severe transmission damage may result.
NOTE-
Be sure transrnission fluid has been topped off before
starting tow.
Always tow car with transrnission lever in
N (neutral).
. ATF draining and filling is covered in 240 Automatic
Transmission.
Be sure to read the filling and draining pro.
cedure, as special service equipment is required to
checlc
the fluid level.
Page 33 of 1002
Downloaded from www.Manualslib.com manuals search engine
020 Maintenance
General ........................... .02 0.2
Special tools ........................ .02 0.2
Service Interval Indicator (Sll) ........... .02 0.3
Service Interval Indicator (Sll), resetting ... .02 0.3
Inspection I, Inspection 11 ............... .02 0.5
Maintenance Tables ................ .02 0.6
Fluid and Lubricant Specifications .. .02 0.9
Fluids and lubricants ................. .02 0.10
Engine Oil Service ................ .02 0.1 I
Engine oil. checking level ............. .02 0.12
Engine oil and filter. changing .......... .02 0-13
Engine Compartment Maintenance . .02 0.14
Accelerator and linkage ............... .02 0.14
Air filter. replacing ................... .02 0.1 4
Cooling system service ............... .02 0.15
Engine drive belt service .............. .02 0.16
Idlespeed .......................... 020-19
Catalytic converter and oxygen sensors .. .02 0.19
Power steering fluid, checking level ..... .02 0.20
Spark plugs ........................ .02 0.20
Spark plugs, replacing ................ .02 0.21
Interior ventilation microfilter, replacing ... .02 0.22
Other Mechanical Maintenance ..... .02 0.22
Battery, checking. cleaning. and replacing .02 0-22
Brake fluid. replacing ................. .02 0-24
Brake pad 1 rotor wear. checking ........ .02 0.24
Brake system, inspecting ............. .02 0.25
Parking brake. checking ............... 020-25
Clutch fluid. checking ................. 020-26
Differential oil level. checking ........... 020-26
Drive axle joint (CV joint) boots. inspecting 020-27
Exhaust system. inspecting ............ 020-27
Fuel filter. replacing .................. 020-27
Fuel tank and fuel lines. inspecting ...... 020-28
Suspension. front. inspecting ........... 020-29
Suspension. rear. inspecting ........... 020-29
Tires. checking inflation pressure ........ 020-29
Tires. rotating ....................... 020-29
Transmission service. automatic ........ 020-29
Transmission service. manual .......... 020-30
Transmission fluid. checking and filling
(manual transmission)
................ 020-30
Wheels. aligning ..................... 020-30
Body and Interior Maintenance ..... 020-31
Body and hinges. lubricating ........... 020-31
Exterior washing ..................... 020-31
Interior care ........................ 020-31
Leather upholstery and trim ............ 020-31
Polishing ........................... 020-32
Seat belts .......................... 020-32
Special cleaning ..................... 020-32
Washing chassis ..................... 020-32
Waxing ............................ 020-32
Windshield wiper blade maintenance ..... 020-33
Page 38 of 1002
Downloaded from www.Manualslib.com manuals search engine
Maintenance
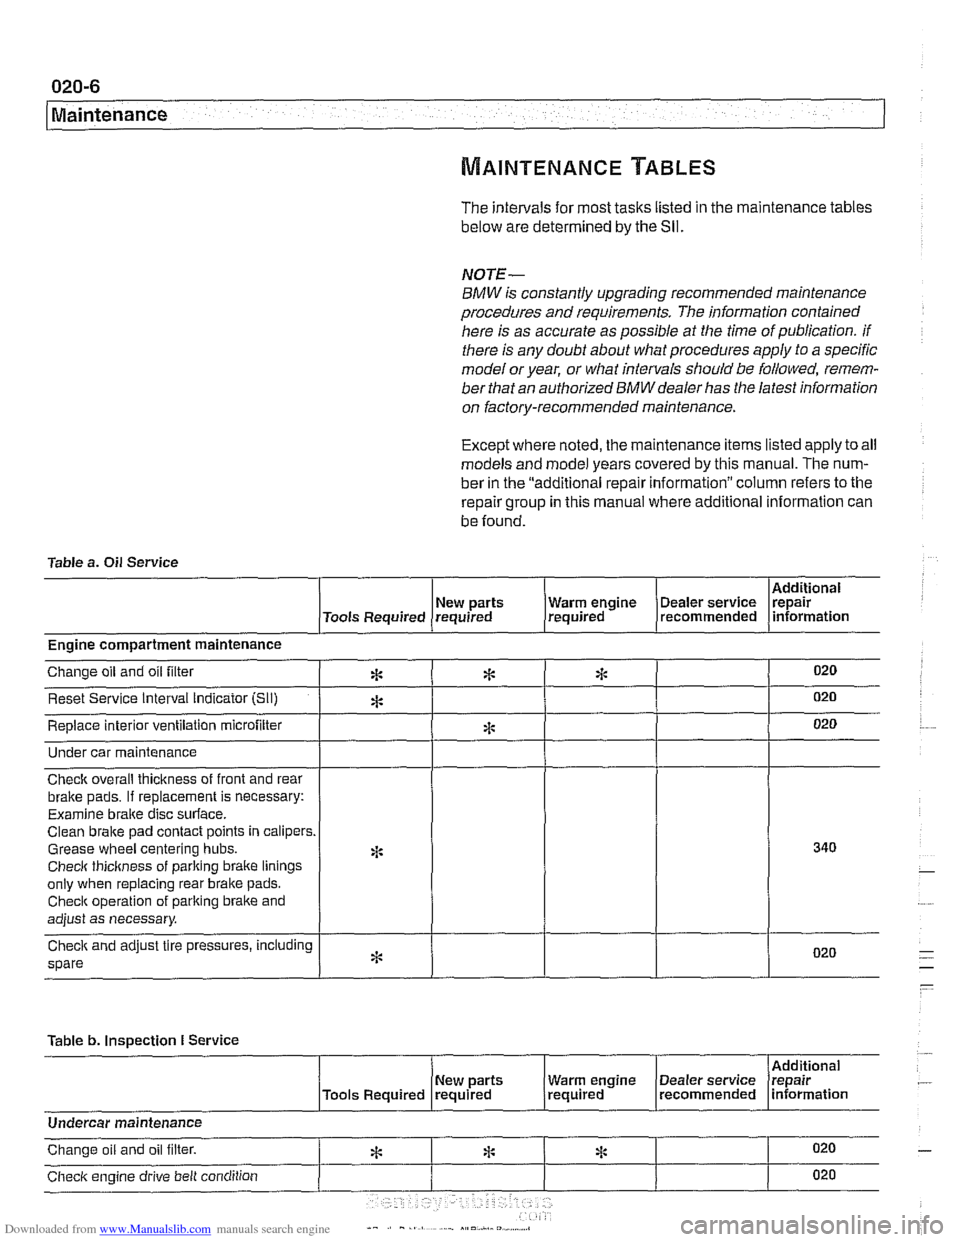
The intervals for most tasks listed in the maintenance tables
below are determined by the Sll.
NOTE-
BMW is constantly upgrading recommended maintenance
procedures and requirements.
The information contained
here is as accurate as possible at the time of publication. if
there is any doubt about what procedures apply to a specific
model or year, or what intervals should be followed, remem-
ber that an authorized
BMW dealer has the latest information
on factory-recommended maintenance.
Except where noted, the maintenance items listed apply to all
models and model years covered by this manual. The num-
ber in the "additional repair information" column refers to the
repair group in this manual where additional information can
be found.
Table a.
Oil Service
I I I I I Additional
( New parts (Tools Required requrred
Under car maintenance
1 I I I I
I I - I I
Engine compartment maintenance
Check overall thickness of front and rear
bralte pads.
If replacement is necessary:
Examine
braite disc surface.
Clean brake pad contact points in calipers.
Grease wheel centering hubs.
Checlc thickness of parking braite linings
only when replacing rear brake pads.
Checlc operation of parking brake and
adjust as necessary.
spare
Table b.
Inspection I Service
I 1 I I [Additional
020
020
020
New parts Warm engrne Dealer service Irepair , /Tools Required (required (required . (recommended lnformatlon
Change oil and oil filter
Reset Service Interval indicator [Sli)
Replace interior ventilation microfilter
*
A
*
*
*
I I I I I
Undercar maintenance
Checlc engine drive belt condition 020
ri: * Change oil and oil filter. 020 *
Page 39 of 1002
Downloaded from www.Manualslib.com manuals search engine
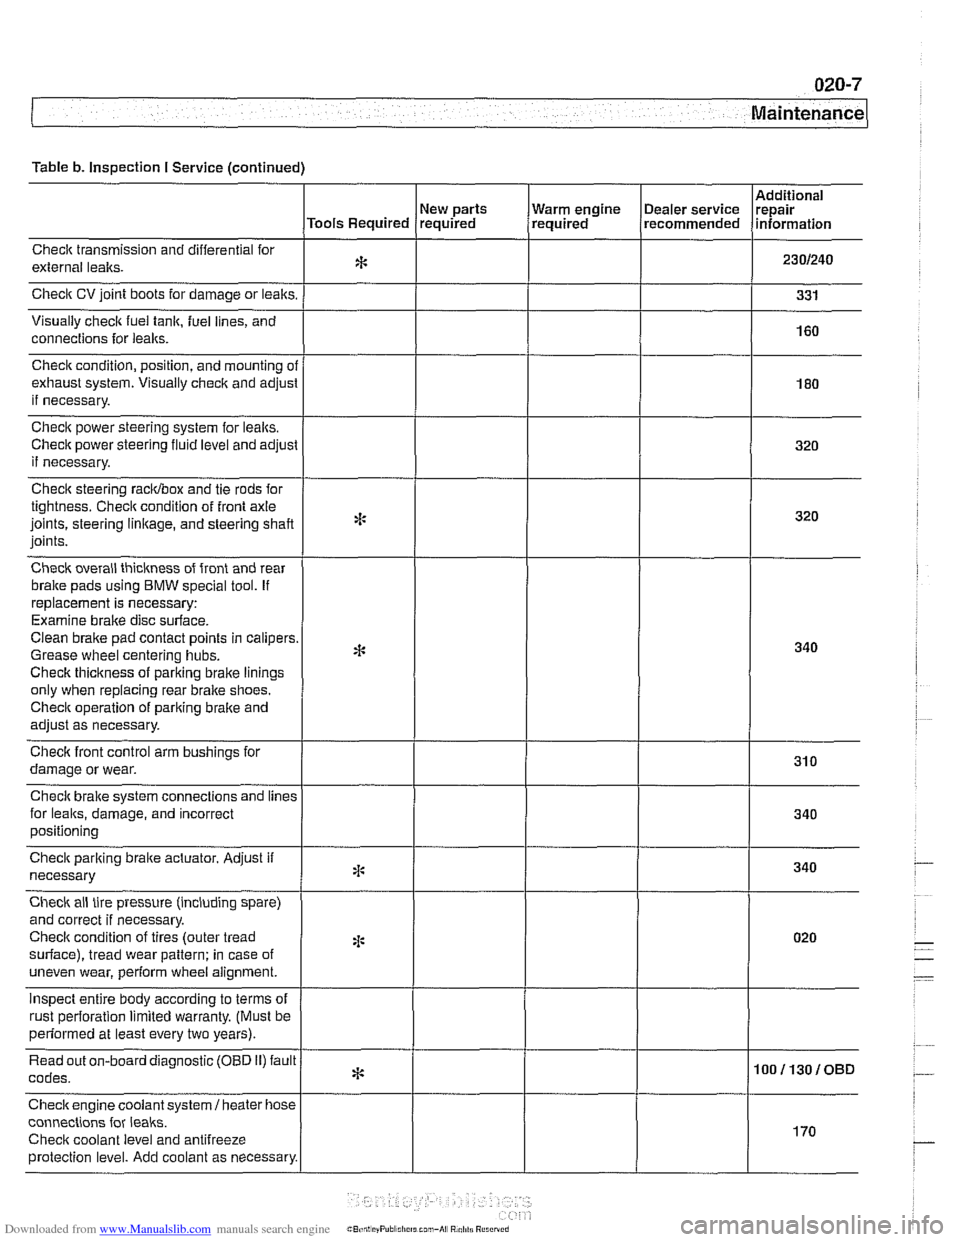
Table b. Inspection I Service (continued)
Checlt transmission and differential for
external lealts.
Check CV joint boots for damage or leaks.
Visually
check fuel tank, fuel lines, and
connections for
leaks.
New parts
Tools Required required
Check condition, position, and mounting
ol
exhaust system. Visually check and adjusl
if necessary.
Check power steering system for lealts.
Check power steering
fluid level and adjust
if necessary.
Check steering racidbox and tie rods for
tightness. Checit condition of front axle
joints, steering
linkage, and steering shaft
joints.
Check overall thickness of front and rear
bralte pads using
BMW special tool. If
replacement is necessary:
Examine brake disc surface.
Clean brake pad contact points in calipers
Grease wheel centering hubs.
Checlt thickness of parking brake linings
only when replacing rear brake shoes.
Checit operation of pariting brake and
adjust as necessary.
Checlt front control arm bushings for
damage or wear.
Check brake system connections and
lines
for leaks, damage, and incorrect
positioning Warm
engine
(~ealer service Irepair , required recommended lnformat~on
Check parking braite actuator. Adjust if
necessary
Check ail tire pressure (including spare)
and correct if necessary.
Checlt condition of tires (outer tread
surface), tread wear pattern: in case of
uneven wear, perform wheel alignment.
inspect entire body according to terms of
rust oerforation limited warrantv. (Must be
*:
4:
2 ~ perfdrmed at least every two years). I
Read out on-board diagnostic (OBD 11) fault
codes.
Checkengine coolant
system1 heater hose
connections for
leaks.
Checit coolant level and antifreeze
protection level. Add coolant as necessary.
* 100113010BD
I
170
Page 58 of 1002
Downloaded from www.Manualslib.com manuals search engine
020-26
Maintenance
NOTE-
The parking brake may lose some of its effectiveness if it is
not used frequently This is due to corrosion build-up on the
parking brake drum. To remove corrosion, apply the parking
brake just until it begins to grip, then pull the lever up one
more stop (click). Drive the car approximately 400 meters
(1,300
ft.) and release the brake. To recheck the adjustment
of the parking brake see
340 Brakes.
Clutch fluid, checking
In cars equipped with manual transmission and clutch, the hy-
draulic clutch and the brake system share the same reservoir
and the same bralte fluid. Clutch fluid level and brake fluid lev-
el are checked at the same time.
NOTE-
* See 340 Brakes for more information.
See
210 Clutch for information on the clutch and the
hydraulic clutch operating system.
Differential oil level, checking
The E39 differential is filled with lifetime oil that ordinarily
does not need to be changed.
BMW recommends using only
a specially formulated synthetic gear oil
(SAF-XO) that is
available through an authorized
BM\N dealer parts depart-
ment. For additional information on this lubricant and any
other lubricants that may be compatible, contact an
authorized
BMW dealer service department.
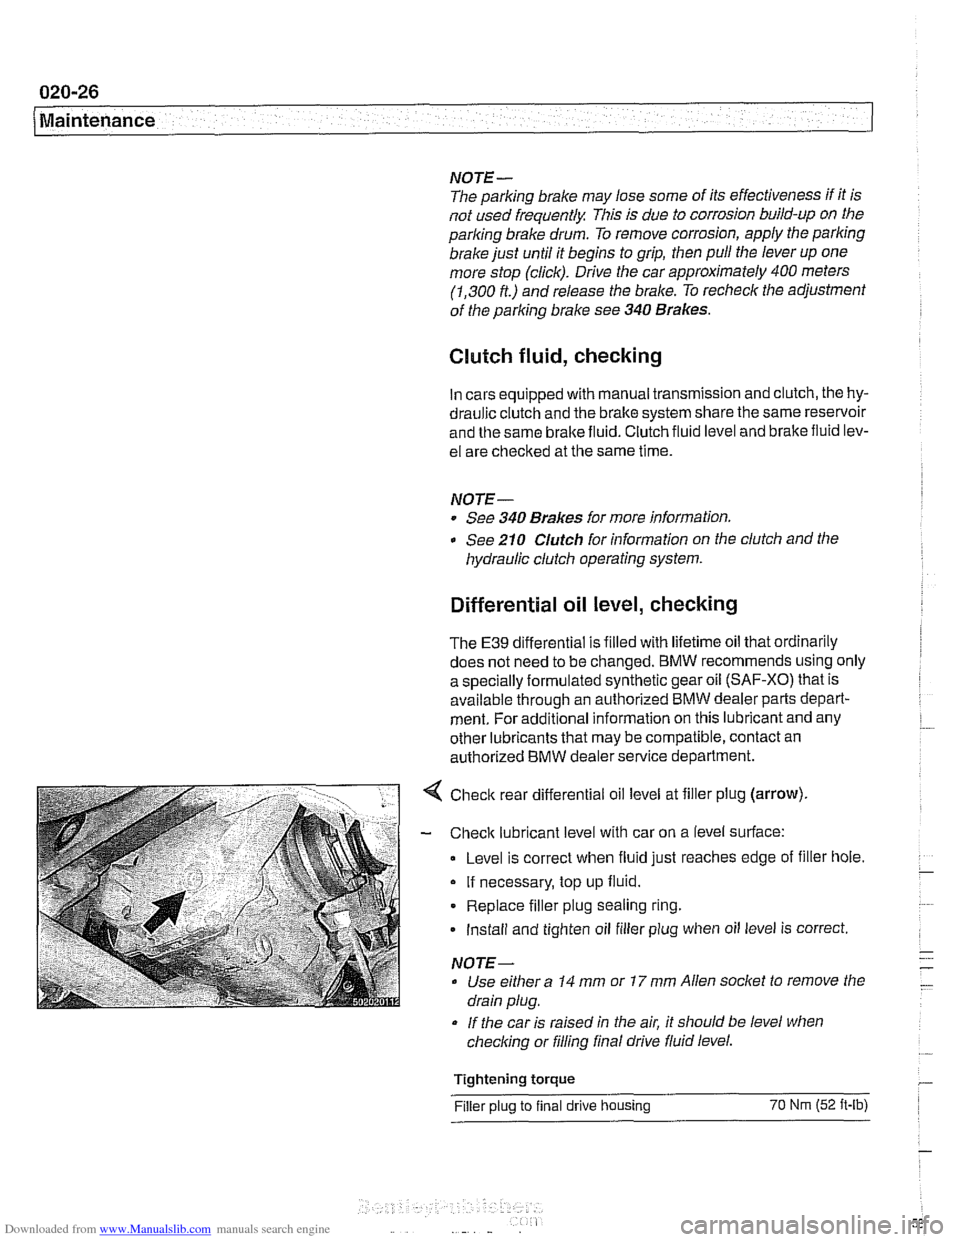
< Check rear differential oil level at filler plug (arrow).
- Check lubricant level with car on a level surface:
Level is correct when fluid just reaches edge of filler hole.
If necessary, top up fluid.
Replace filler plug sealing ring.
Install and tighten oil filler plug when oil level is correct.
NOTE-
Use either a 14 mm or 17 mm Allen socket to remove the
drain plug.
If the car is raised in the air, it should be level when
checking or filling final drive fluid level.
Tightening torque
Filler plug to final drive housing 70 Nrn (52 it-lb)
Page 61 of 1002
Downloaded from www.Manualslib.com manuals search engine
Maintenance
Suspension, front, inspecting
Inspection of the front suspension and steering includes a
check of all moving parts
forwear and excessive play. Inspect
ball joint and tie-rod rubber seals and boots for cracks
ortears
that could allow the entry of dirt, water, and other
contaminants. See
310 Front Suspension.
Suspension, rear, inspecting
Differential and rear drive axle service consists of checking
and changing the gear oil, inspecting for leaks, and checking
the drive axle
CV joint boots for damage.
The areas where
lealts are most likely to occurare around the
drive shaft and drive axle mounting flanges. For more infor-
mation on identifying oil leaks and theircauses, see
330 Rear
Suspension and
331 Final Drive.
Tires, checking inflation pressure
Correct tire pressures are important to handling and stability,
fuel economy, and tire wear. Tire pressures change with tem-
perature. Pressures should be
checked oRen during season-
al temperature changes. Correct inflation pressures can be
found on the driver's door pillar and in the owner's manual.
Note that tire pressures should be higher when the car is
more heavily loaded.
WARNING-
Do not inflate any tire to a pressure higher than the tire's max-
imum inflation pressure listedon the sidewall. Use care when
adding air to warm tires. Warm tire pressures can increase as
much as
4 psi (0.3 bar) over their coldpressures.
Tires, rotating
BMW does not recommend tire rotation. Due to the car's sus-
pension design, the front tires begin to wear first at the outer
shoulder and the reartires begin to wearfirst at the middle of
the tread or inner shoulder. Rotating the tires may adversely
affect road handling and tire grip.
Transmission service, automatic
The automatic transmissions installed in E39 models are
filled with special automatic transmission fluid. The transmis-
sion lubricant type can be found on the "type-plate" on the
side of the transmission. The recommended lubricants are
listed earlier in this repair group. See Fluids and lubricants.
If in doubt, consult an authorized BMW dealer for alternate
Page 62 of 1002
Downloaded from www.Manualslib.com manuals search engine
020-30
Maintenance
fluid use and the most-up-to-date information regarding
transmission operating fluids.
The automatic transmission is not equipped with a dipstick.
Therefore, checking the ATF level is an involved procedure
which includes measuring and maintaining a specified ATF
temperature during the checking procedure.
For more complete
ATF service information, including
checking
ATF level and ATF filter replacement procedures,
see
240 Automatic Transmission.
Transmission service, manual
Manual transmission service consists of inspecting for leaks
and checking the fluid. Evidence of transmission leaks is
like-
ly to be seen around the driveshaft mounting flange and at the
bottom of the bellhousing.
NOTE-
For more information on identifying oil
leaks and their
causes, see 230 Manual Transmission and210 Clutch.
Transmission fluid, checking and filling
(manual transmission)
Tne manual transmss'on inslalleo 'n rne E39 models s f;lled
with a special liierime iluid (ivlTF-LT-I). oi. ordinarily
does
not need to be changed.
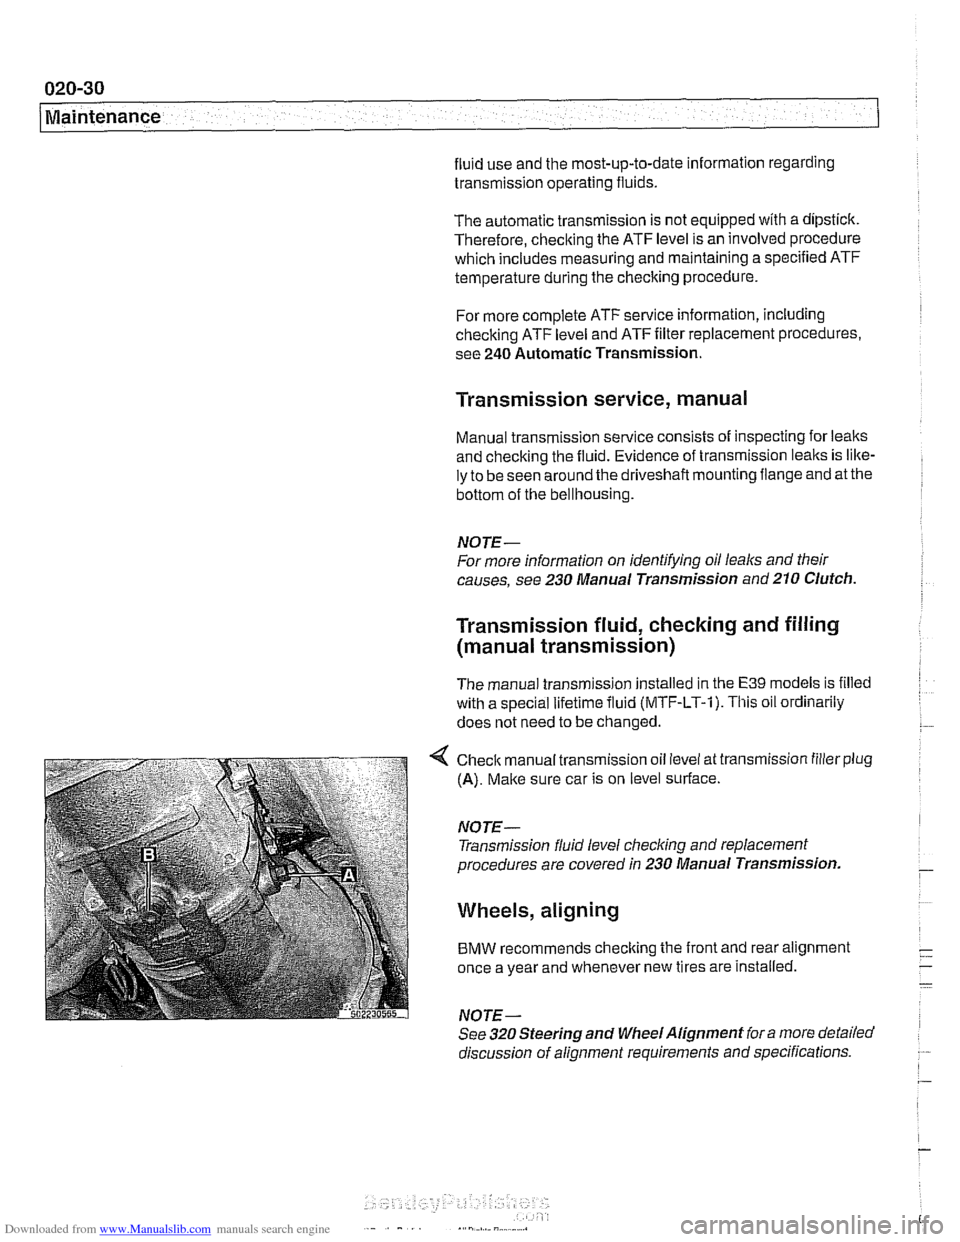
< Check manual transmission oil level at transmission filler plug
(A). Make sure car is on level surface.
NOTE- Transmission fluid level
checking and replacement
procedures are covered in 230 Manual Transmission.
Wheels, aligning
BMW recommends checking the front and rear alignment
once a year and whenever new tires are installed.
NOTE-
See 320 Steering and Wheel Alignment for a more detailed
discussion of alignment requirements and specifications.
Page 72 of 1002
Downloaded from www.Manualslib.com manuals search engine
100-6
( Engine-General
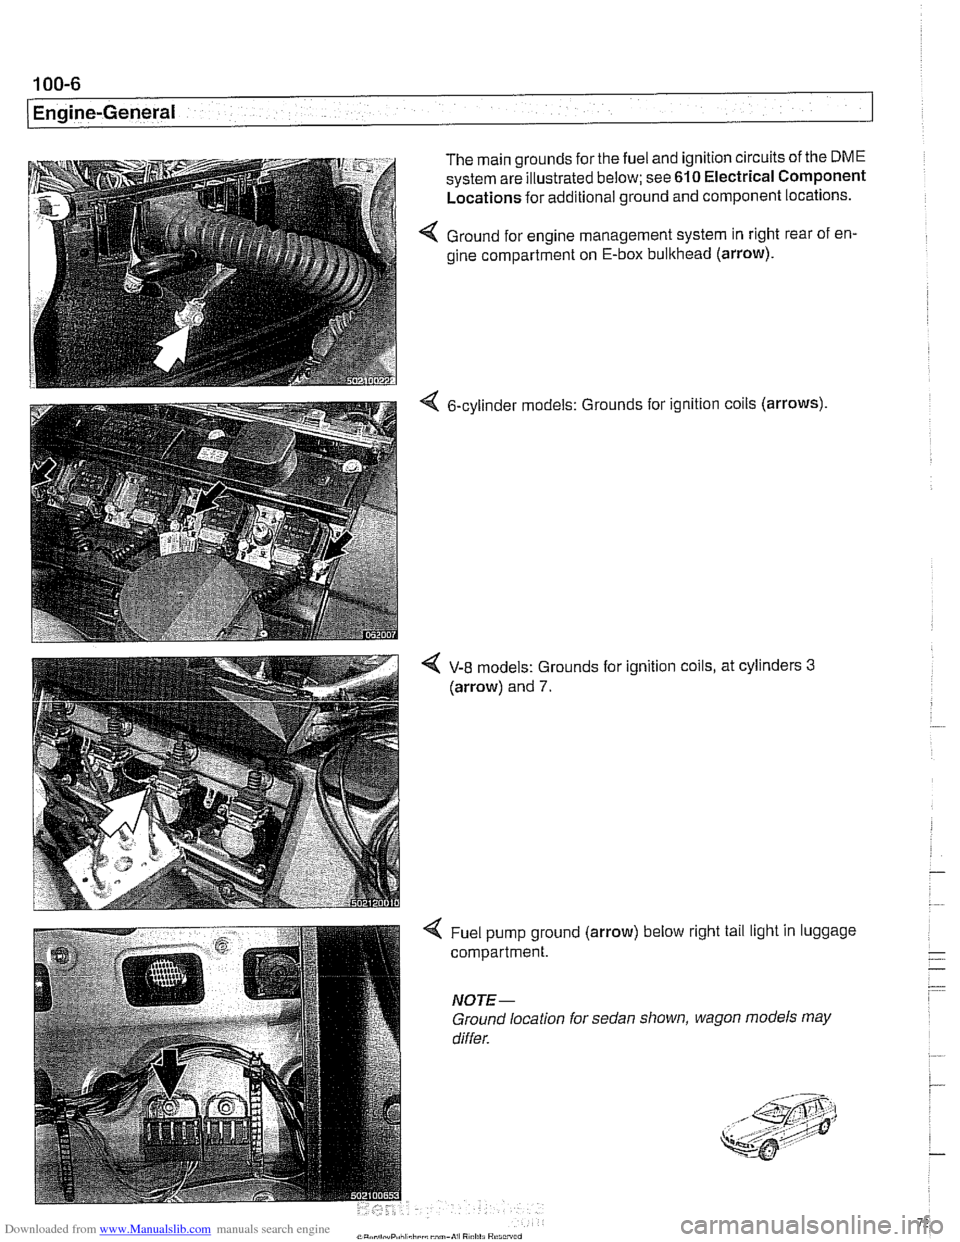
The main grounds for the fuel and ignition circuits of the DME
system are illustrated below; see 610 Electrical Component
Locations for additional ground and component locations.
4 Ground for engine management system in right rear of en-
gine compartment on E-box bulkhead (arrow).
6-cylinder models: Grounds
for ignition coils (arrows)
4 V-8 models: Grounds for ignition coils, at cylinders 3
(arrow) and 7.
4 Fuel pump ground (arrow) below right tail light in luggage
compartment.
NOTE-
Ground location for sedan shown, wagon models may
differ.