sensor BMW 525i 2000 E39 Workshop Manual
[x] Cancel search | Manufacturer: BMW, Model Year: 2000, Model line: 525i, Model: BMW 525i 2000 E39Pages: 1002
Page 775 of 1002
Downloaded from www.Manualslib.com manuals search engine
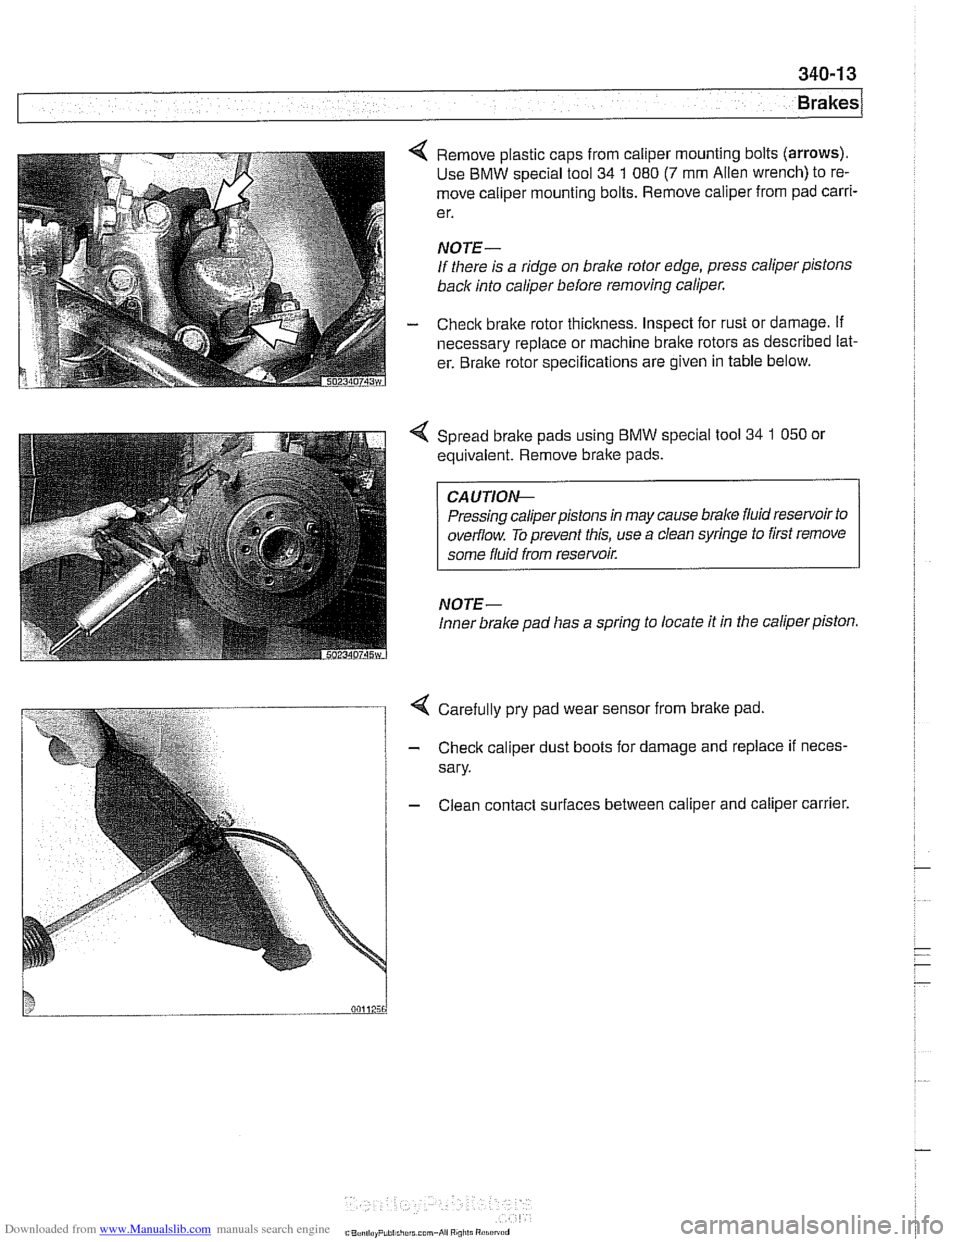
4 Remove plastic caps from caliper mounting bolts (arrows).
Use BMW special tool 34 1 080 (7 mm Alien wrench) to re-
move caliper mounting bolts. Remove caliper from pad
carri-
e r.
NOTE-
If there is a ridge on brake rotor edge, press caliper pistons
back into caliper before removing caliper.
- Check brake rotor thickness. Inspect for rust or damage. if
necessary replace or machine brake rotors as described lat-
er. Bralte rotor specifications are given in table below.
Spread bralte pads using BMW special tool
34 1 050 or
equivalent. Remove brake pads.
CA UTIOG
Pressing caliperpistons in may cause brake fluid reservoir to
overflow. To prevent this, use a clean syringe to first remove
some fluid from reservoir.
NOTE-
Inner brake pad lias a spring to locate it in the caliper piston.
4 Carefully pry pad wear sensor from brake pad
- Check caliper dust boots for damage and replace if neces-
sary.
- Clean contact surfaces between caliper and caliper carrier.
C"..., I,.. P,hi..,,,.r.. mm-*ii Ai"i,li "1.i"~"d
Page 776 of 1002
Downloaded from www.Manualslib.com manuals search engine
340-1 4
Brakes
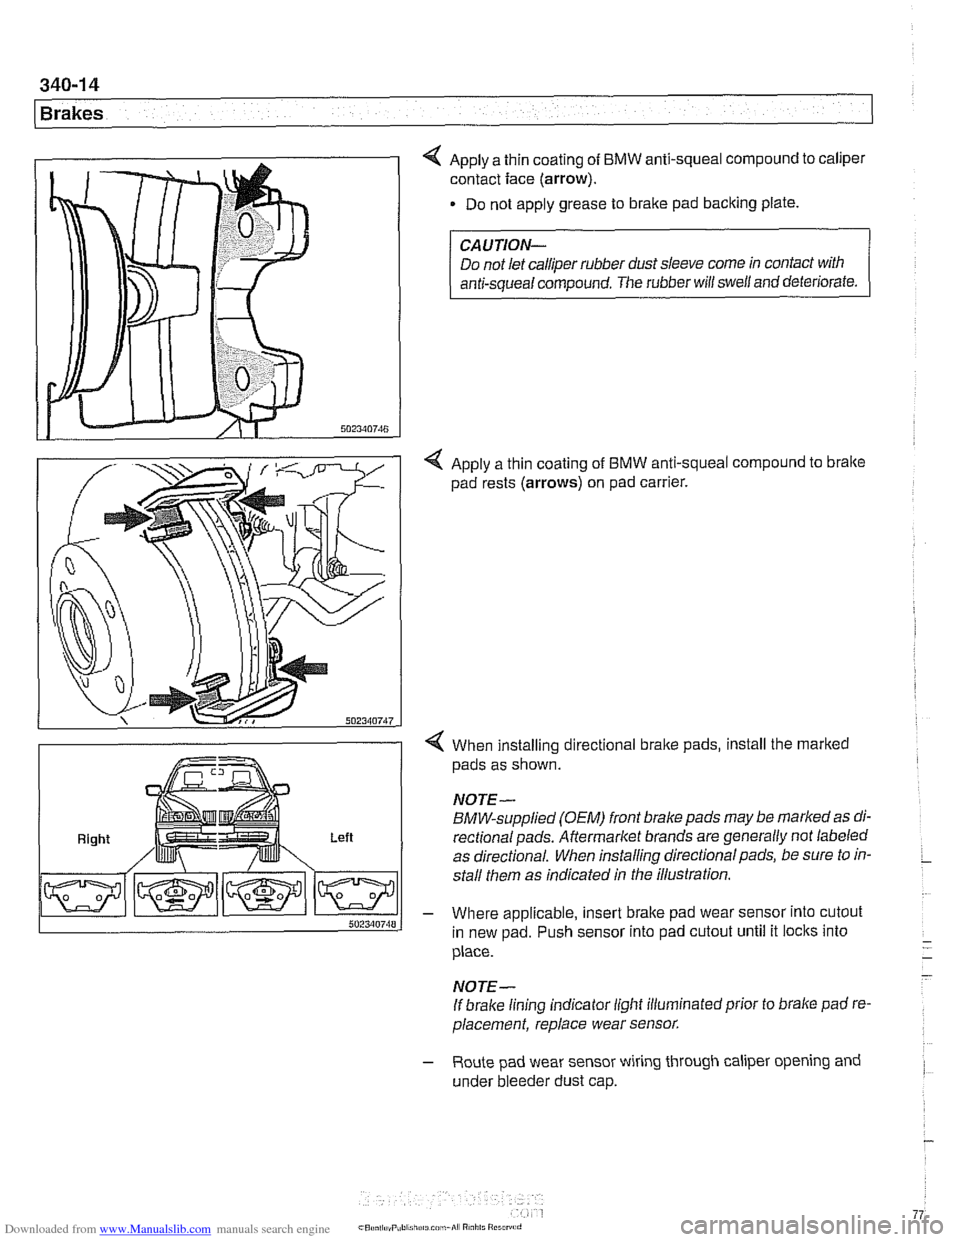
4 Apply a thin coating of BMW anti-squeal compound to caliper
contact face
(arrow).
Do not apply grease to brake pad backing plate.
Right Left
CAUTION-
Do not let calliper rubber dust sleeve come in contact with
anti-squeal compound. The rubber will swell and deteriorate.
4 Apply a thin coating of BMW anti-squeal compound to bralte
pad rests (arrows) on pad carrier.
4 When installing directional brake pads, install the marked
pads as shown.
NOTE-
BMW-supplied (OEM) front brake pads may be marked as di-
rectionalpads. Aftermarket brands are generally not labeled
as directional. When installing directional pads, be sure to in-
stall them as indicated in the illustration.
- Where applicable, insert brake pad wear sensor into cutout
in new pad. Push sensor into pad cutout until it locks into
place.
- -
- NOTE-
If brake lining indicator light illuminatedprior to brake pad re-
placement, replace wear sensor.
- Route pad wear sensor wiring through caliper opening and
under bleeder dust cap.
Page 779 of 1002
Downloaded from www.Manualslib.com manuals search engine
Brakes
Master cylinder, removing and installing
CAUTlOI\C
Brake fluid is highly corrosive and dangerous to the environ-
ment. Dispose of it properly.
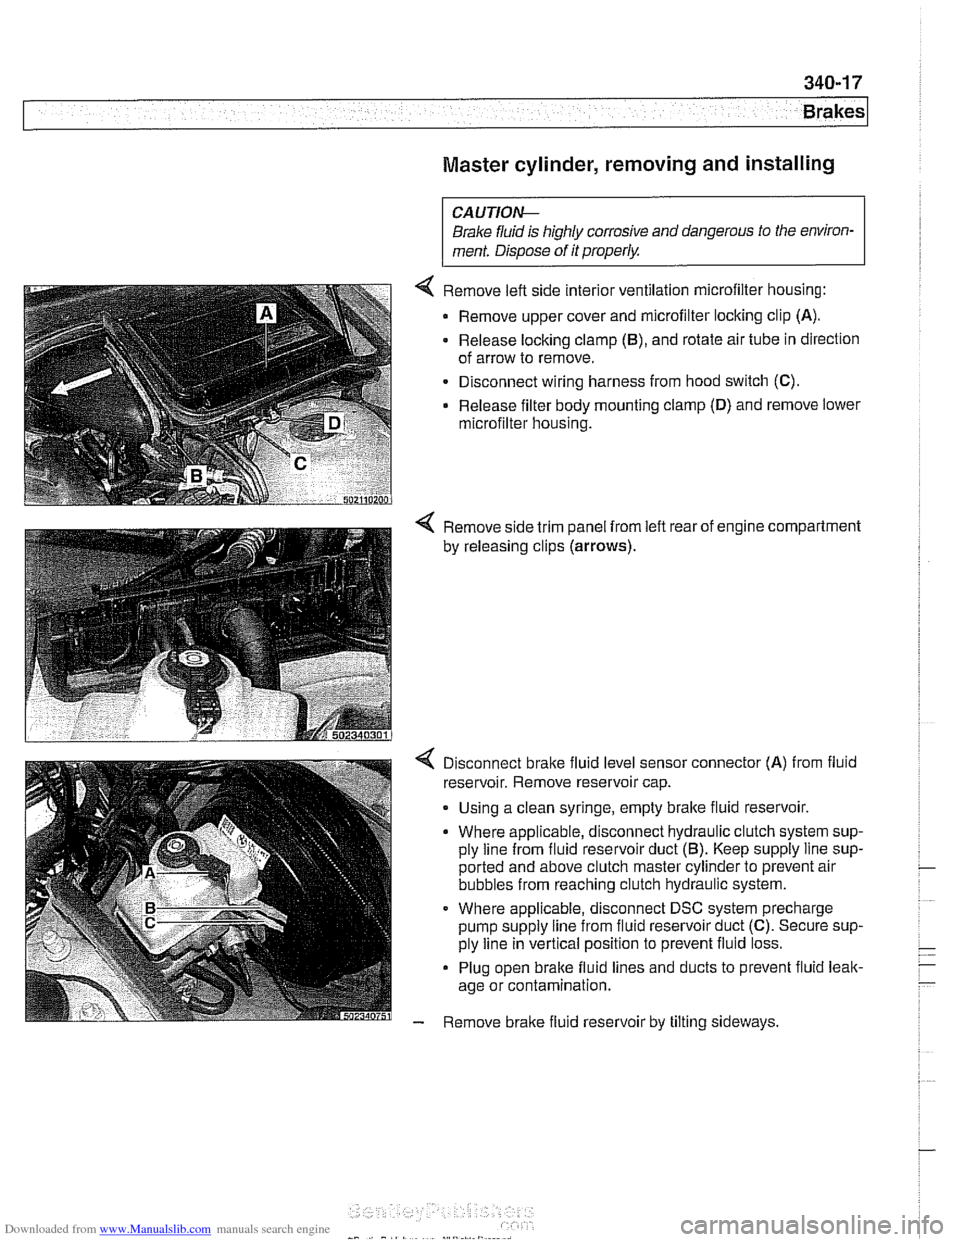
4 Remove left side interior ventilation microfilter housing:
Remove upper cover and microfilter locking clip
(A).
- Release locking clamp (B), and rotate air tube in direction
of arrow to remove.
Disconnect wiring harness from hood switch
(C).
Release filter body mounting clamp (D) and remove lower
microfilter housing.
4 Remove side trim panel from left rear of engine compartment
by releasing clips
(arrows).
4 Disconnect bralte fluid level sensor connector (A) from fluid
reservoir. Remove reservoir cap.
. Using a clean syringe, empty bralte fluid reservoir.
Where applicable, disconnect hydraulic clutch system sup-
ply line from fluid reservoir duct
(5). Keep supply line sup-
ported and above clutch master cylinder to prevent air
bubbles from reaching clutch hydraulic system.
Where applicable, disconnect DSC system precharge
pump supply line from fluid reservoir duct
(C). Secure sup-
ply line in vertical position to prevent fluid loss.
Plug open brake fluid lines and ducts to prevent fluid leak-
age or contamination.
- Remove brake fluid reservoir by tilting sideways.
Page 788 of 1002
Downloaded from www.Manualslib.com manuals search engine
1 Brakes
ABS COMPONENT REPLACEMENT
CA UTIOW-
If the tires on the car are of different makes, the ABS/trac-
tion controlsystem may overreact. Only fit tires of the same
make and treadpattern.
In adverse conditions, such as trying to rock the car out
of deep snow or other soft surface, or when snow
chains are fitted, it is advisable to switch off traction
control and allow
tlie car driveline to operate conven-
tionally.
All E39 vehicles are equipped with
Antilock Braking System
(ABS). Early production models featured ABS with Automatic
Stability Control (ABS
I ASC). Later models came equipped
with ABS and Dynamic Stability Control (ABS
/ DSC). This
manual will refer to these systems as ABS. ASC or DSC will
be specified when necessary.
For ABS system and component descriptions, see
300 Sus-
pension, Steering and Brakes-General.
Wheel speed sensor, replacing
- Raise applicable end of car.
Make sure that the car is firmly supported on
jack stands de-
signed for the purpose. Place
jack stands beneath structural
chassis points. Do not place jack stands under suspension
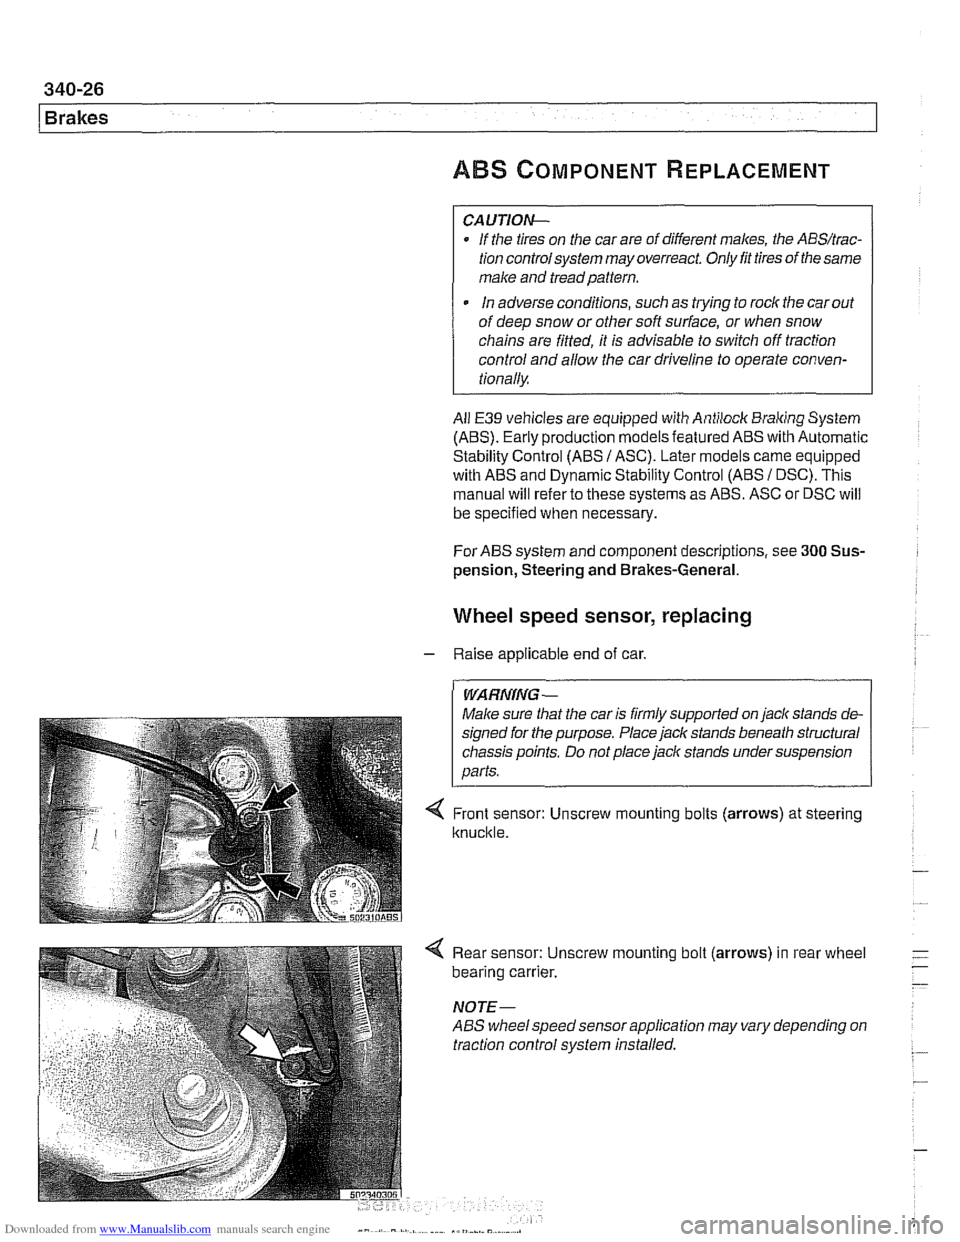
< Front sensor: Unscrew mounting bolts (arrows) at steering
knuckle.
4 Rear sensor: Unscrew mounting bolt (arrows) in rear wheel
bearing carrier.
NOTE-
ABS wheelspeed sensor application may vary depending on
traction control system installed.
Page 789 of 1002
Downloaded from www.Manualslib.com manuals search engine
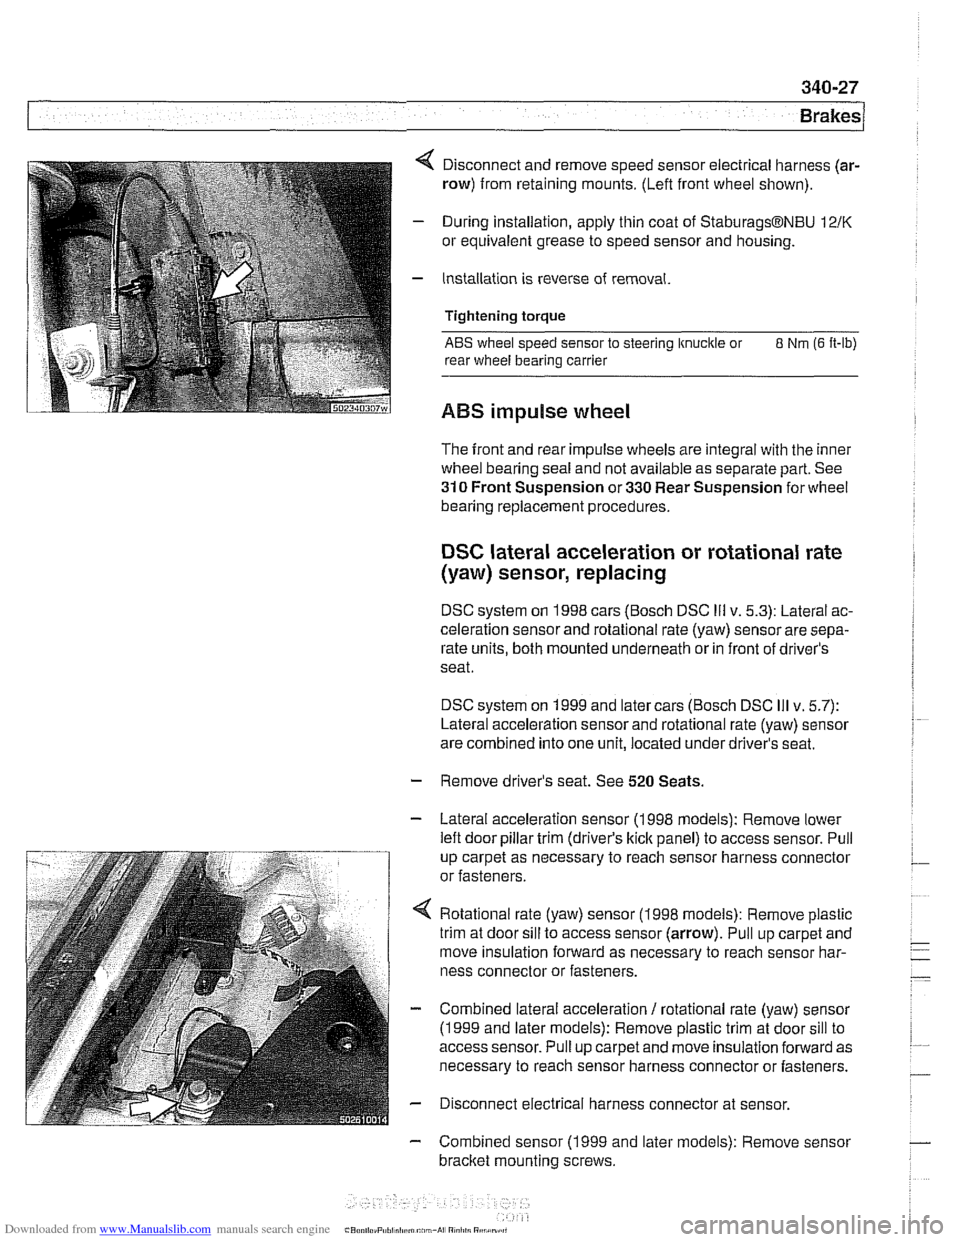
4 Disconnect and remove speed sensor electrical harness (ar-
row) from retaining mounts. (Lefl front wheel shown).
- During installation, apply thin coat of StaburagsBNBU 12/K
or equivalent grease to speed sensor and housing.
- Installation is reverse of removal.
Tightening torque
ABS wheel speed sensor to steering knuckle or 8 Nm (6 It-lb)
rear wheel bearing carrier
ABS impulse wheel
The front and rear impulse wheels are integral with the inner
wheel bearing seal and not available as separate part. See
310 Front Suspension or 330 Rear Suspension for wheel
bearing replacement procedures.
DSC lateral acceleration or rotational rate
(yaw) sensor, replacing
DSC system on 1998 cars (Bosch DSC Ill v. 5.3): Lateral ac-
celeration sensor and rotational rate (yaw) sensor are sepa-
rate units, both mounted underneath or in front of driver's
seat.
DSC system on 1999 and later cars (Bosch DSC
Ill v. 5.7):
Lateral acceleration sensor and rotational rate (yaw) sensor
are combined into one unit, located under driver's seat.
- Remove driver's seat. See 520 Seats.
- Lateral acceleration sensor (1 998 models): Remove lower
lefl door pillar trim (driver's
kick panel) to access sensor. Pull
up carpet as necessary to reach sensor harness connector
or fasteners.
4 Rotational rate (yaw) sensor (1998 models): Remove plastic
trim at door sill to access sensor (arrow). Pull up carpet and
move insulation forward as necessary to reach sensor har-
ness connector or fasteners.
- Combined lateral acceleration / rotational rate (yaw) sensor
(1 999 and later models): Remove plastic trim at door sill to
access sensor. Pull up carpet and move insulation forward as
necessary to reach sensor harness connector or fasteners.
- Disconnect electrical harness connector at sensor.
- Combined sensor (1 999 and later models): Remove sensor
bracket mounting screws.
Page 790 of 1002
Downloaded from www.Manualslib.com manuals search engine
340-28
Brakes
- Remove sensor mounting screws. Lift sensor away from
bracket.
- Installation is reverse of removal.
CAUTION-
Be sure to tighten the DSC acceleration sensor(s) and
mounting bracket, if applicable, to specified torques. The
sensor
is vibration sensitive and subject to cause DSC
malfunctions if installed improperly.
a After replacing the sensor, perform sensor adjustment
using either DIS or
MoDiC under Service Functions
menu.
Tightening
torques
Lateral acceleration I rotational rate sensor 8 Nm (6 R-ib)
to bracket
Sensor bracket to body
8 Nm (6 ft-lb)
DSC steering angle sensor, removing and
installing
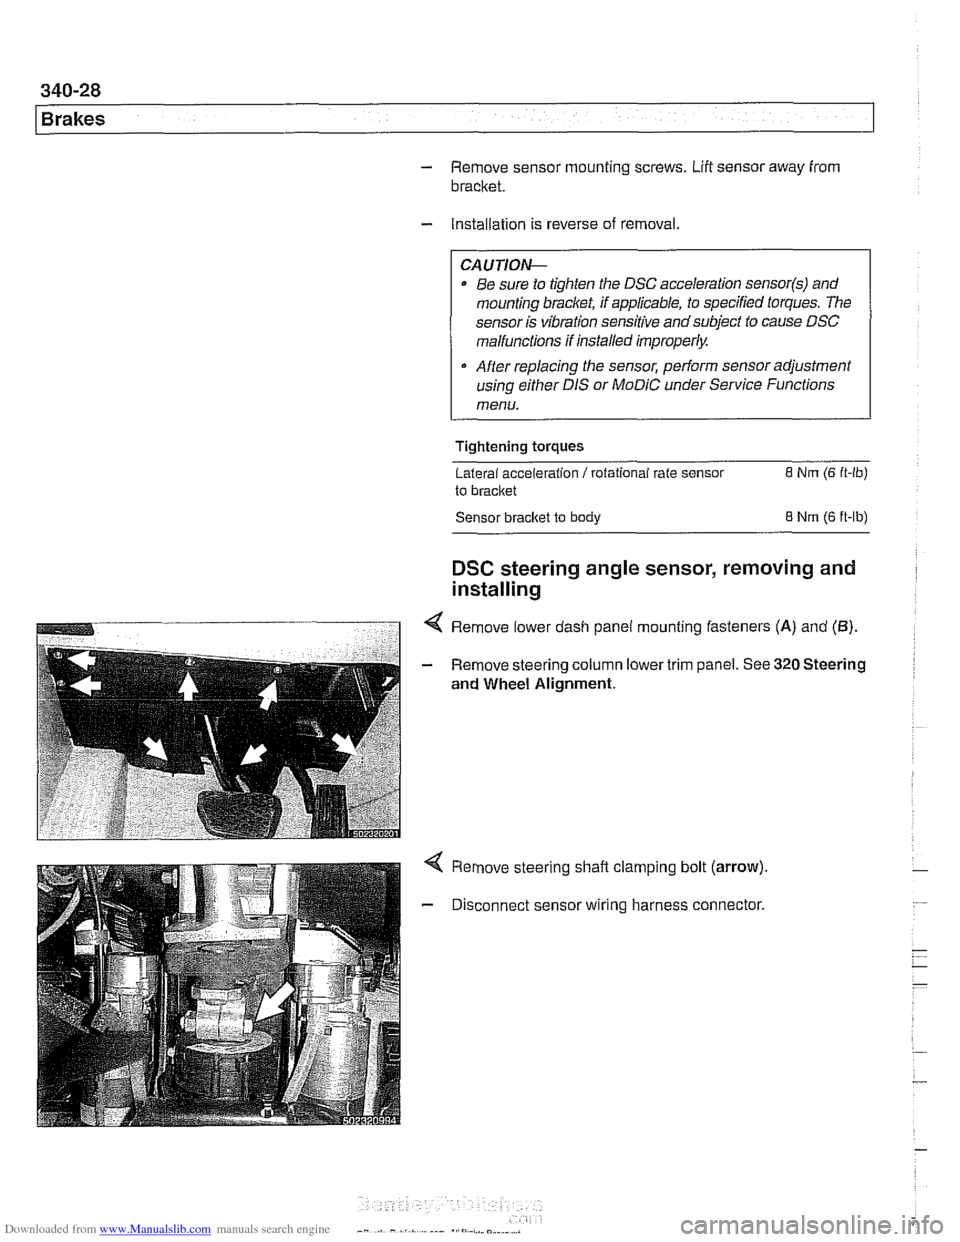
4 Remove lower dash panel mounting fasteners (A) and (5).
- Remove steering column lower trim panel. See 320 Steering
and Wheel Alignment.
Remove steering shaft clamping bolt (arrow).
Disconnect sensor wiring harness connector.
Page 791 of 1002
Downloaded from www.Manualslib.com manuals search engine
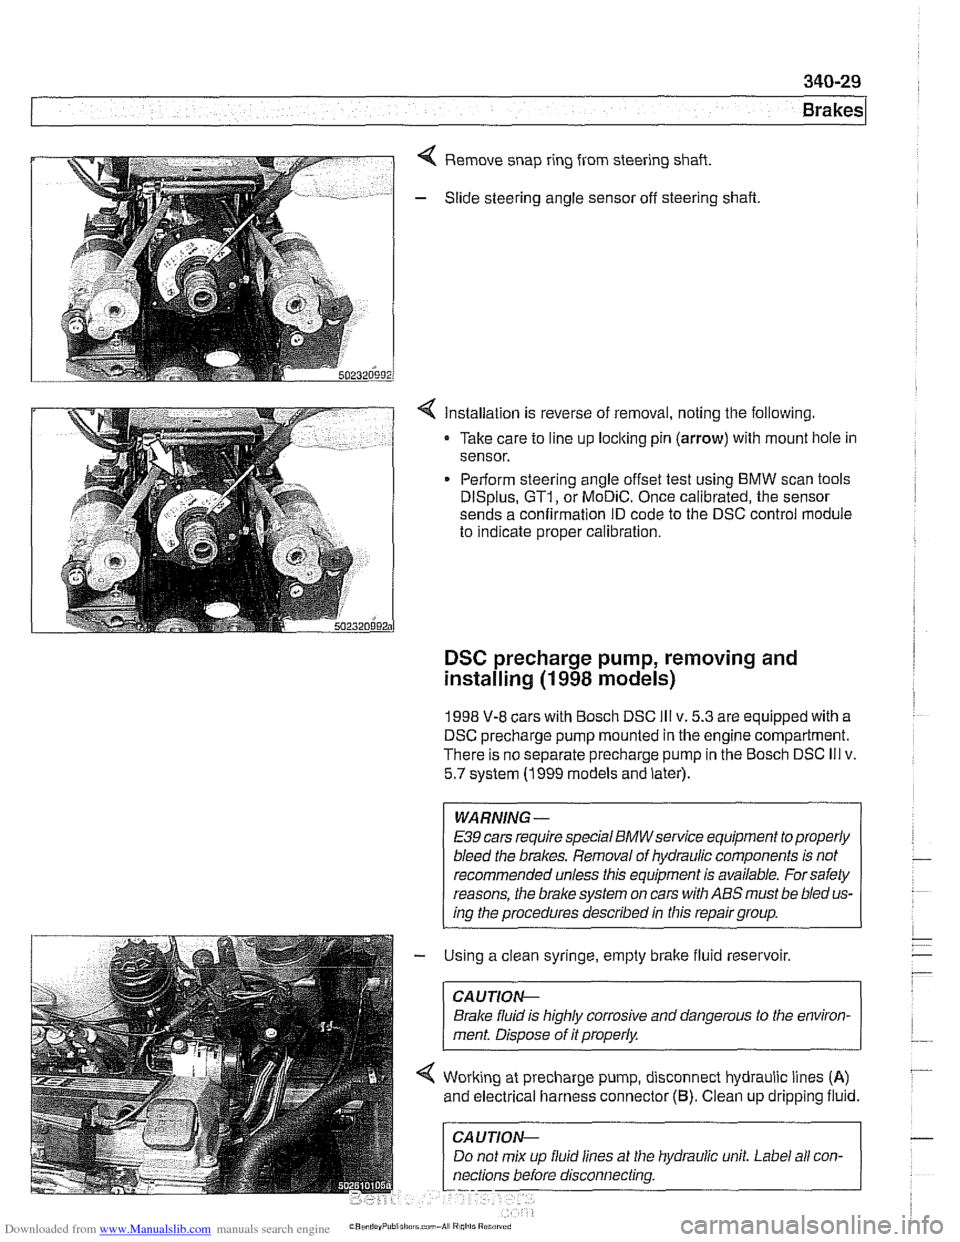
Remove snap ring from steering shaft.
- Slide steering angle sensor off steering shaft
< Installation is reverse of removal, noting the following.
Take care to line up loclting pin
(arrow) with mount hole in
sensor.
Perform steering angle offset test using BMW scan tools
DISplus, GT1, or MoDiC. Once calibrated, the sensor
sends a confirmation ID code to the DSC control module
to indicate proper calibration.
DSC precharge pump, removing and
installing
(1 998 models)
1998 V-8 cars with Bosch DSC Ill v. 5.3 are equipped with a
DSC precharge pump mounted in the engine compartment.
There is no separate precharge pump in the Bosch DSC
Ill v.
5.7 system (1999 models and later).
WARNING-
E39 cars require special BMWservice equipment to properly
bleed the brakes. Removal of hydraulic components is not
recommended unless this equipment is available. For safety
reasons, the
brake system on cars with ABS must be bled us-
ing the procedures described in this repair group.
- Using a clean syringe, empty brake fluid reservoir.
CAUTIOI\C
Brake fluid is highly corrosive and dangerous to the environ-
ment. Disoose of it
orooerlv.
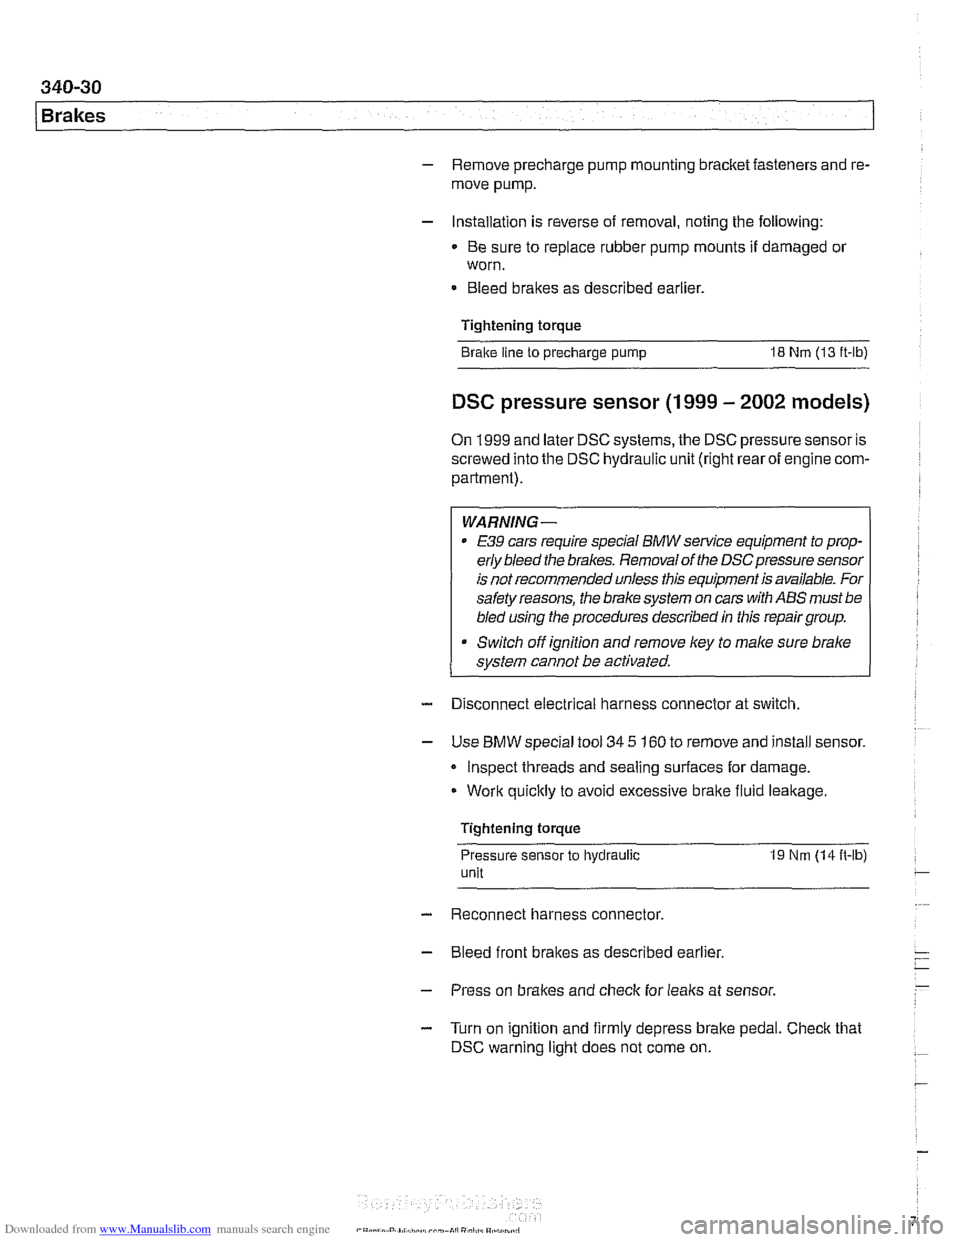
Working at precharge pump, disconnect hydraulic lines (A)
and electrical harness connector (6). Clean up dripping fluid.
hydraulic unit. Label all
con-
Page 792 of 1002
Downloaded from www.Manualslib.com manuals search engine
1 Brakes
- Remove precharge pump mounting bracket fasteners and re-
move pump.
- Installation is reverse of removal, noting the following:
Be sure to replace rubber pump mounts if damaged
01
worn.
Bleed brakes as described earlier.
Tightening torque Brake line
to precharge pump 18 Nrn (13 ft-lb)
DSC pressure sensor (1 999 - 2002 models)
On 1999 and later DSC systems, the DSC pressure sensor is
screwed into the DSC hydraulic unit (right rear of engine com-
partment).
WARNING-
* €39 cars require special BMW service equipment to prop-
erly bleed the brakes. Removal of the
DSCpressure sensor
is not recommended unless this equipment is available. For
safety reasons, the brake system on cars with ABS must be
bled using the procedures described in this repair group.
Switch off ignition and remove
key to male sure brake
system cannot be activated.
- Disconnect electrical harness connector at switch.
- Use BMW special tool 34 5 160 to remove and install sensor.
Inspect threads and sealing surfaces for damage.
* Work quicltly to avoid excessive brake fluid leakage.
Tightening torque
Pressure sensor
to hydraulic 19 Nrn (14ft-lb)
unit
- Reconnect harness connector
- Bleed front brakes as described earlier.
- Press on brakes and check for leaks at sensor.
- Turn on ignition and firmly depress brake pedal. Check that
DSC warning light does not come on.
Page 793 of 1002
Downloaded from www.Manualslib.com manuals search engine
340-31
Brakes
ABS 1 traction electronic control module
(1 997 -1 998 models)
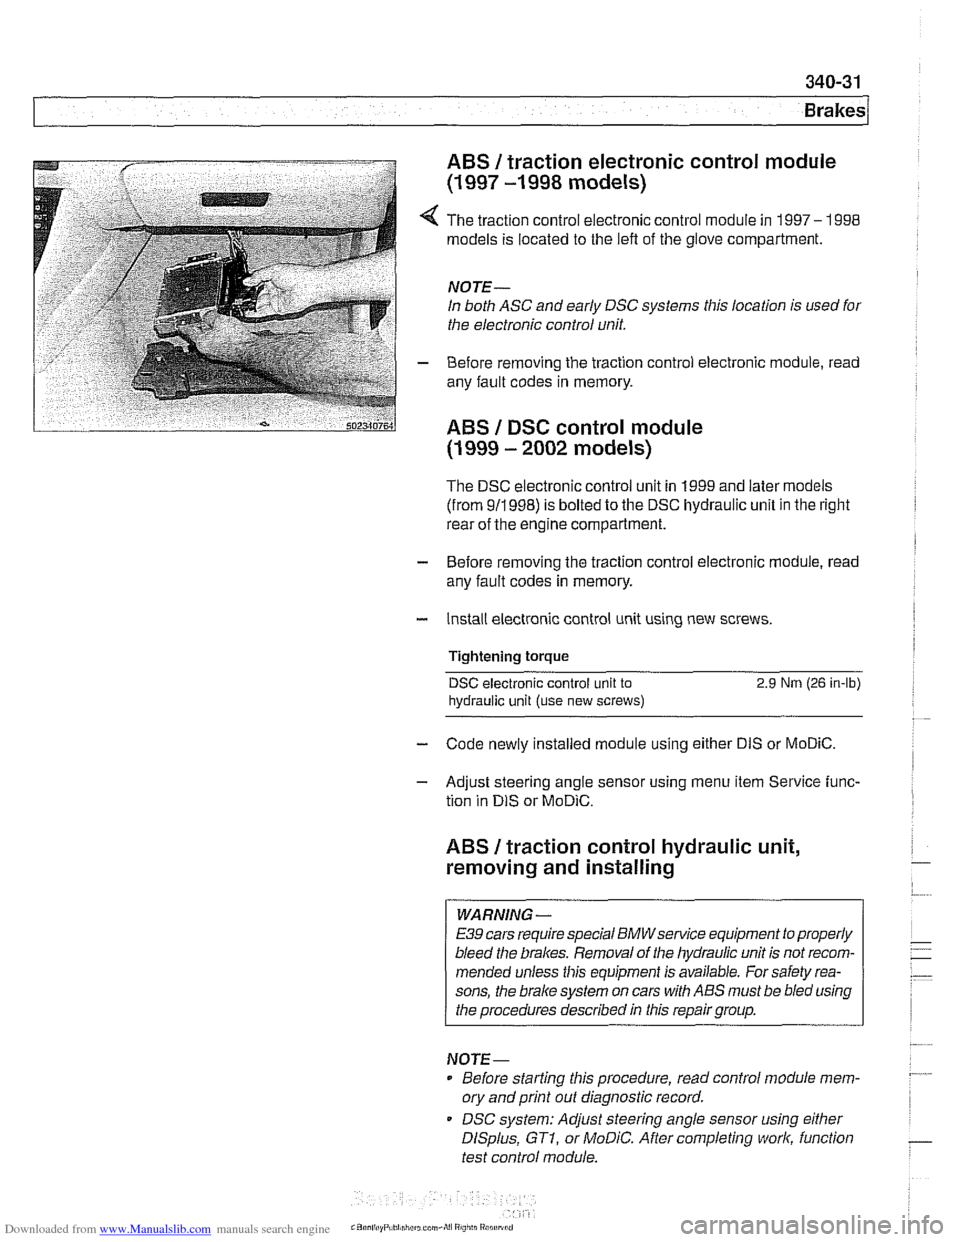
4 The traction control electronic control module in 1997- 1998
models is located to the left of the glove compartment.
NOTE-
In both ASC and early DSC systems this location is used for
the electronic control unit.
- Before removing the traction control electronic module, read
any fault codes in memory.
ABS I DSC control module
(1 999 - 2002 models)
The DSC electronic control unit in 1999 and later models
(from 911998) is bolted to the DSC hydraulic unit in the right
rear of the engine compartment.
- Before removing the traction control electronic module, read
any fault codes in memory.
- Install electronic control unit using new screws.
Tightening torque
DSC electronic control unit to 2.9 Nrn (26 in-lb)
hydraulic
unit (use new screws)
- Code newly installed module using either DIS or MoDiC.
- Adjust steering angle sensor using menu item Service func-
tion in
DIS or MoDiC.
ABS I traction control hydraulic unit,
removing and installing
WARNING -
E39 cars require special BMWsewice equipment to properly
bleed the brakes. Removal of the hydraulic unit is not recom-
mended unless this equipment is available. For safety rea-
sons, the
brake system on cars with ABS must be bled using
the procedures described in this repair group.
NOTE-
Before starting this procedure, read control module mem-
ory and print
out diagnostic record.
DSC system: Adjust steering angle sensor using
either
DISplus, GTI, or MoDiC. After completing work, function
test control module.
Page 794 of 1002
Downloaded from www.Manualslib.com manuals search engine
340-32
Brakes
The procedure for removing the ABS I ASC or ABS I DSC hy-
draulic unit is similar for all models. The unit is located at the
right rear of the engine compartment.
- Using a clean syringe, empty brake fluid reservoir.
CAUTION-
Brake fluid is highly corrosive and dangerous to the environ-
ment. Dispose of it
properiw
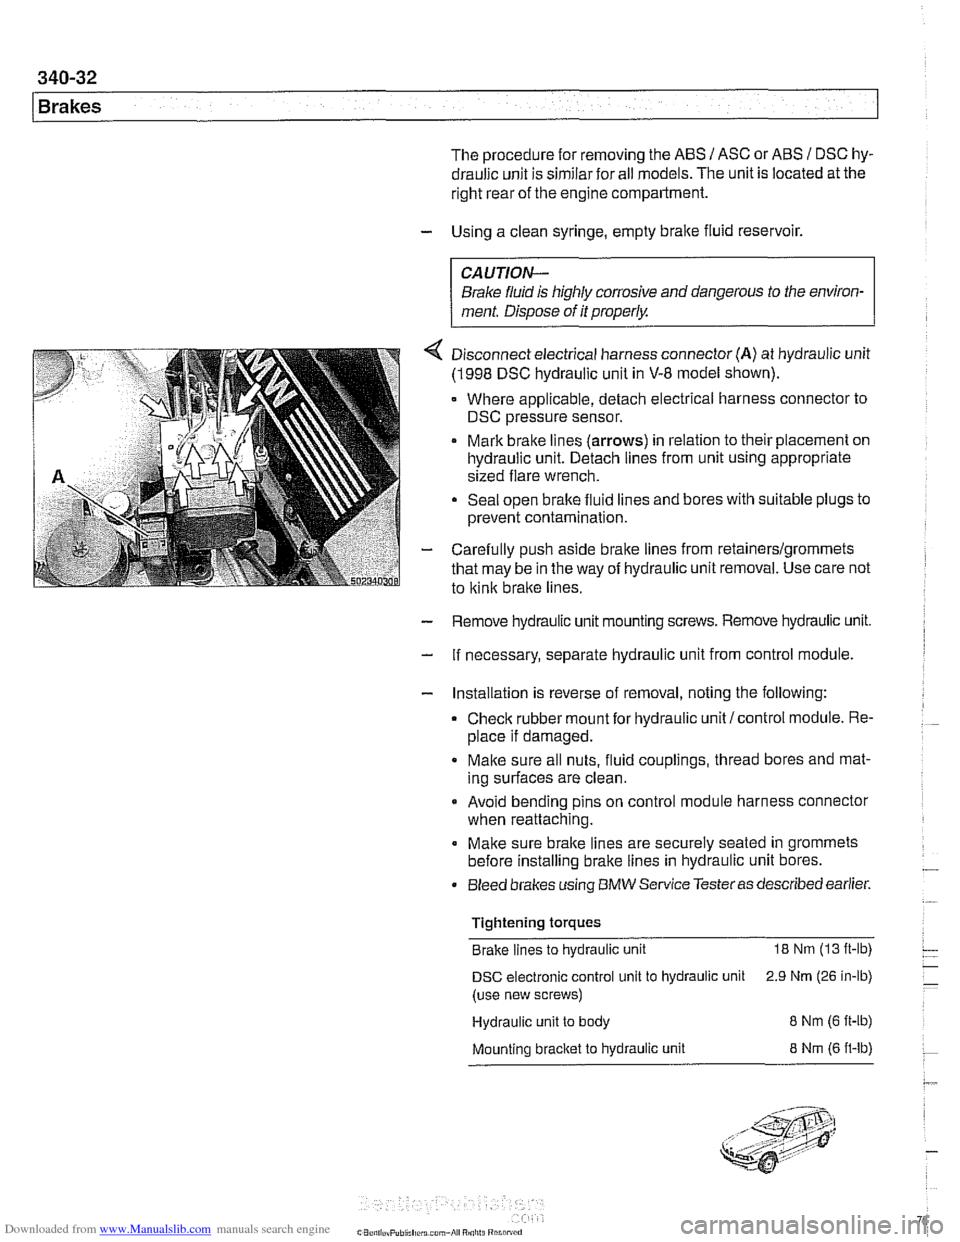
4 Disconnect electrical harness connector (A) at hydraulic unit
(1998 DSC hydraulic unit in V-8 model shown).
Where applicable, detach electrical harness connector to
DSC pressure sensor.
Mark brake lines
(arrows) in relation to their placement on
hydraulic unit. Detach lines from unit using appropriate
sized flare wrench.
Seal open brake fluid lines and bores with suitable plugs to
prevent contamination.
- Carefully push aside brake lines from retainerslgrommets
that may be in the way of hydraulic unit removal. Use care not
to
kink brake lines.
- Remove hydraulic unit mounting screws. Remove hydraulic unit.
- If necessary, separate hydraulic unit from control module.
- Installation is reverse of removal, noting the following:
Check rubber mount for hydraulic unit/control module. Re-
place if damaged.
Make sure all nuts, fluid couplings, thread bores and mat-
ing surfaces are clean.
Avoid bending pins on control module harness connector
when reattaching.
Make sure brake lines are securely seated in grommets
before installing brake lines in hydraulic unit bores.
Bleed brakes using
BMW Service Testeras described earlier.
Tightening torques Brake lines to hydraulic unit
18 Nm (13 ft-lb)
DSC electronic control unit to hydraulic unit 2.9 Nrn (26 in-lb)
(use new screws)
Hydraulic unit to body
8 Nm (6 ft-ib)
Mounting bracket to hydraulic unit 8 Nrn (6 ft-lb)