BMW 528i 1997 E39 Workshop Manual
Manufacturer: BMW, Model Year: 1997, Model line: 528i, Model: BMW 528i 1997 E39Pages: 1002
Page 201 of 1002
Downloaded from www.Manualslib.com manuals search engine
Cylinder Head and Valvetrain
NOTE-
The camshaft bearing caps are coded with a letter and a
number. For example, "A
1" is the first exhaust camshaft
bearing cap
at the front of the engine, and "El "is the intake
camshaft bearing cap at the front of the engine.
-. -
The camshafts are stamped with a code letter - "E for the
intake side and
'X" for the exhaust side.
"E is for Einlap. (German for intake) and 'XA7s for Auspuff.
(German for exhaust).
- Repeat procedure for exhaust camshaft
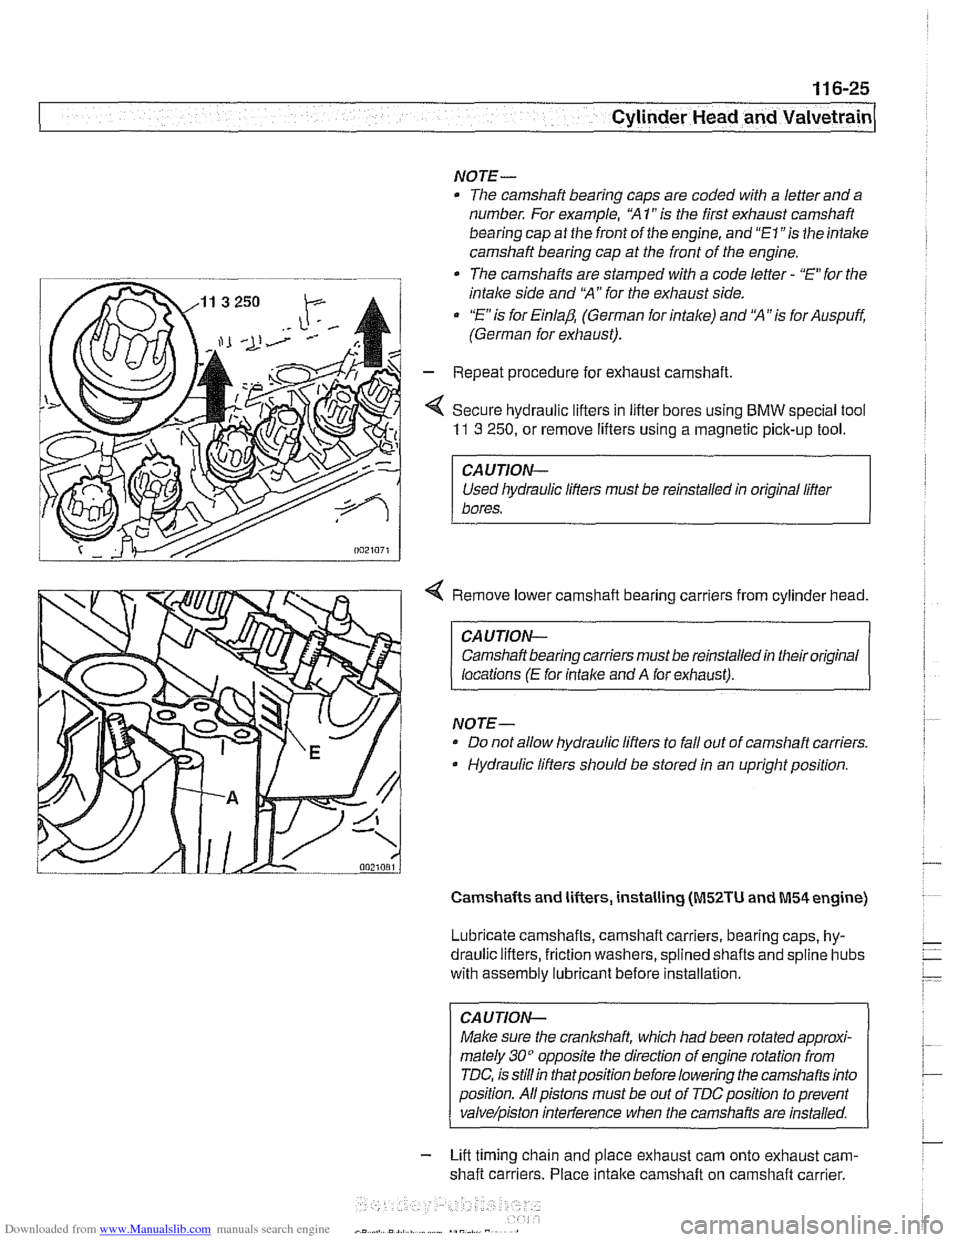
< Secure hydraulic lifters in lifter bores using BMW special tool
11 3 250, or remove lifters using a magnetic pick-up tool.
I CAUTION-
Used liydraulic lifters must be reinstalled in original lifter
1 bores.
4 Remove lower camshaft bearing carriers from cylinder head.
CAUTION- Camshaft bearing carriers must be reinstalled in their original
locations
(E for intalce and A for exhaust).
NOTE- Do not allow hydraulic lifters to fall out of camshaft carriers.
Hydraulic lifters should be stored in an upright position.
Camshafts and lifters, installing (M52TU and M54 engine)
Lubricate camshafts, camshaft carriers, bearing caps, hy-
draulic lifters, friction washers, splined shafts and
spline hubs
with assembly
lubricant before installation.
CAUTION-
Make sure the crankshaft, which had been rotated approxi-
mately
30" opposite the direction of engine rotation from
TDC, is
stillin thatposition before lowering the camshafts into
position. Allpistons must be out of
TDCposition to prevent
valve/piston inteiference when the carnshafis are installed.
- Lift timing chain and place exhaust cam onto exhaust cam-
shaft carriers. Place
intake camshaft on camshaft carrier.
Page 202 of 1002
Downloaded from www.Manualslib.com manuals search engine
11 6-26
I Cylinder Head and Valvetrain
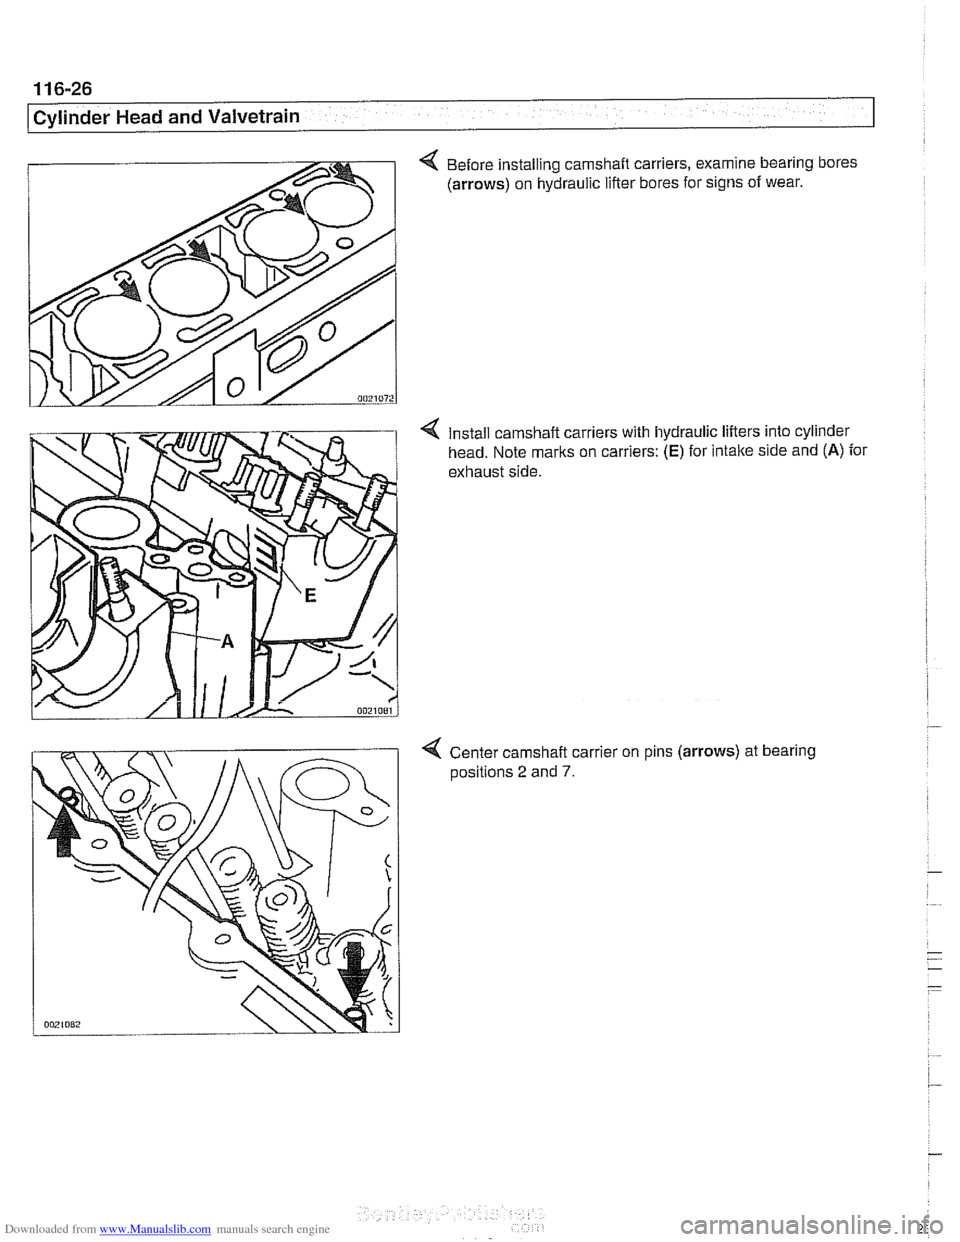
4 Before installing camshaft carriers, examine bearing bores
(arrows) on hydraulic lifter bores for signs of wear.
Install camshaft carriers with hydraulic lifters into cylinder
head. Note marks on carriers:
(E) for intake side and (A) for
exhaust side.
4 Center camshaft carrier on pins (arrows) at bearing
aositions 2 and 7.
Page 203 of 1002
Downloaded from www.Manualslib.com manuals search engine
-- - . .- -,
Cylinder Head and Valvetrain
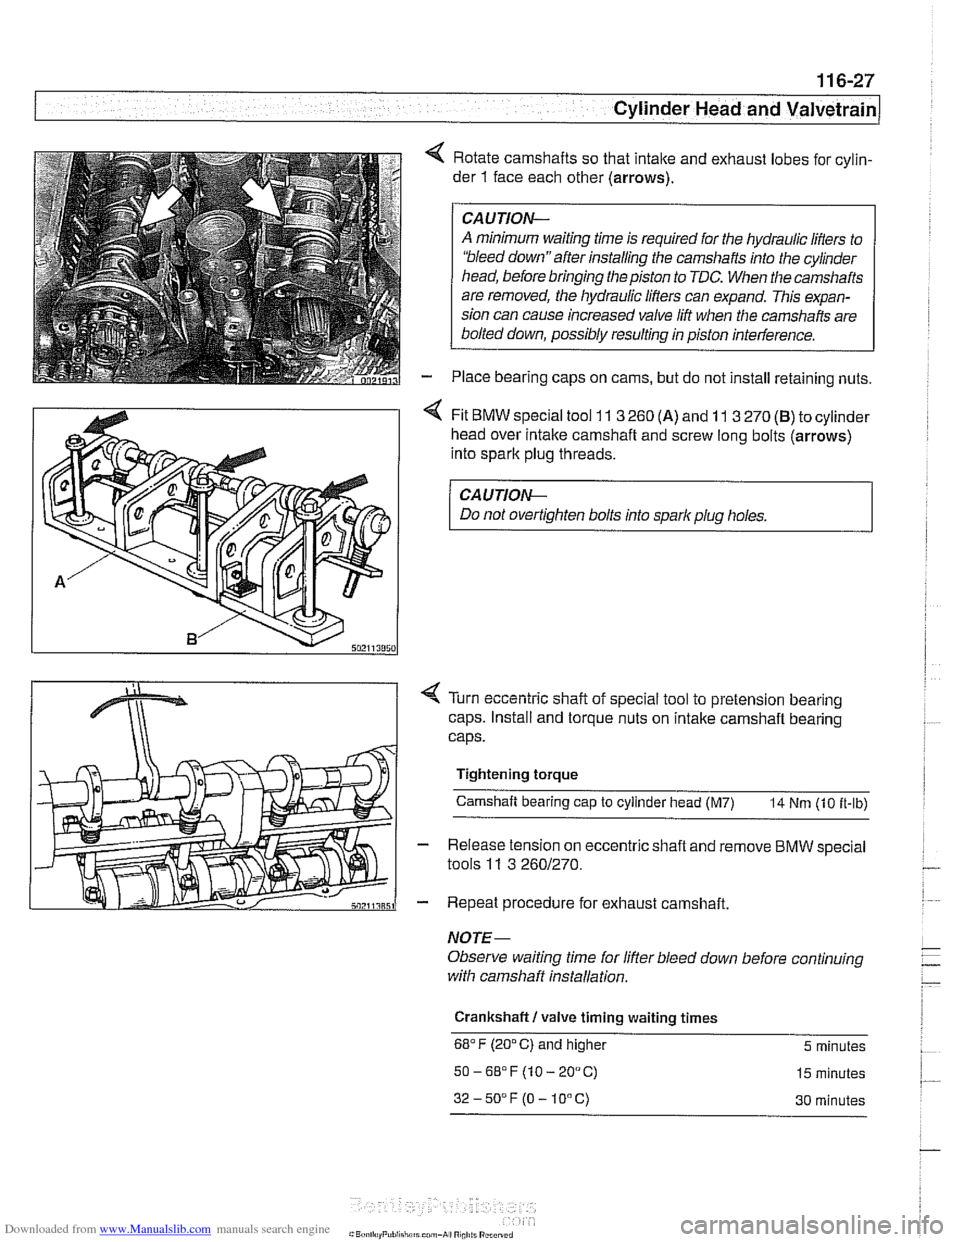
4 Rotate camshafts so that intalte and exhaust lobes for cylin-
der
1 face each other (arrows).
CAUJION-
A minimum waiting time is required for the hydraulic lifters to
'bleed down"after installing the camshafts into the cylinder
head, before bringing the piston to TDC. When the camshafts
are removed, the hydraulic lifters can expand. This expan-
sion can cause increased valve lift when the camshafts are
bolted down, possibly resulting in piston interference.
Place bearing caps on cams, but do not install retaining nuts.
4 Fit BMW special tool 11 3 260 (A) and 11 3 270 (B) to cylinder
head over
intalte camshaft and screw long bolts (arrows)
into spark plug threads.
CA UTION-
Do not overtighten bolts into spark plug holes.
< Turn eccentric shaft of special tool to pretension bearing
caps. Install and torque nuts on intake camshaft bearing
caps.
Tightening torque Camshaft bearing cap
to cylinder head (M7) 14 Nm (10 it-ib)
- Release tension on eccentric shaft and remove BMW special
tools
11 3 2601270.
- Repeat procedure for exhaust camshaft.
NOTE-
Observe waiting time for lifter bleed down before continuing
with camshaff installation.
Crankshaft
I valve timing waiting times
68°F (20°C) and higher 5 minutes
50-6S°F(10-20°C) 15 minutes
32-50DF(O-10°C) 30 minutes
Page 204 of 1002
Downloaded from www.Manualslib.com manuals search engine
11 6-28
Cylinder Head and Valvetrain
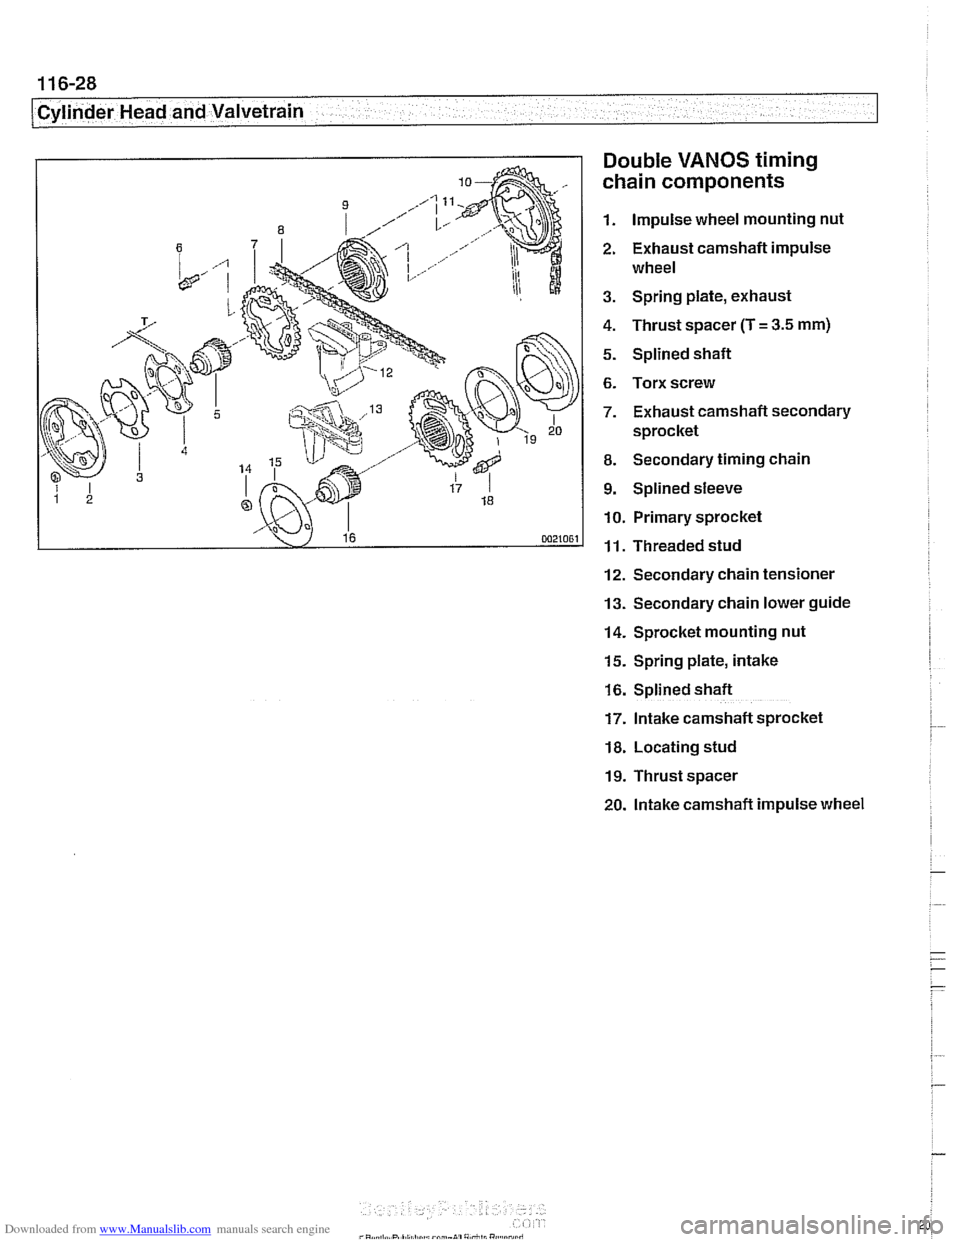
Double
VANOS timing
chain components
1. Impulse wheel mounting nut
2. Exhaust camshaft impulse
wheel
3. Spring plate, exhaust
4. Thrust spacer (T
= 3.5 mm)
5. Splined shaft
6. Torx screw
7. Exhaust camshaft secondary
sprocket
8. Secondary timing chain
9. Splined sleeve
10. Primary sprocket
11. Threaded stud
12. Secondary chain tensioner
13. Secondary chain lower guide
14. Sprocket mounting nut
15. Spring plate, intake
16. Splined shaft
17. Intake camshaft sprocket
18. Locating stud
19. Thrust spacer
20. lntake camshaft impulse wheel
Page 205 of 1002
Downloaded from www.Manualslib.com manuals search engine
--
Cylinder Head and valvetrain1
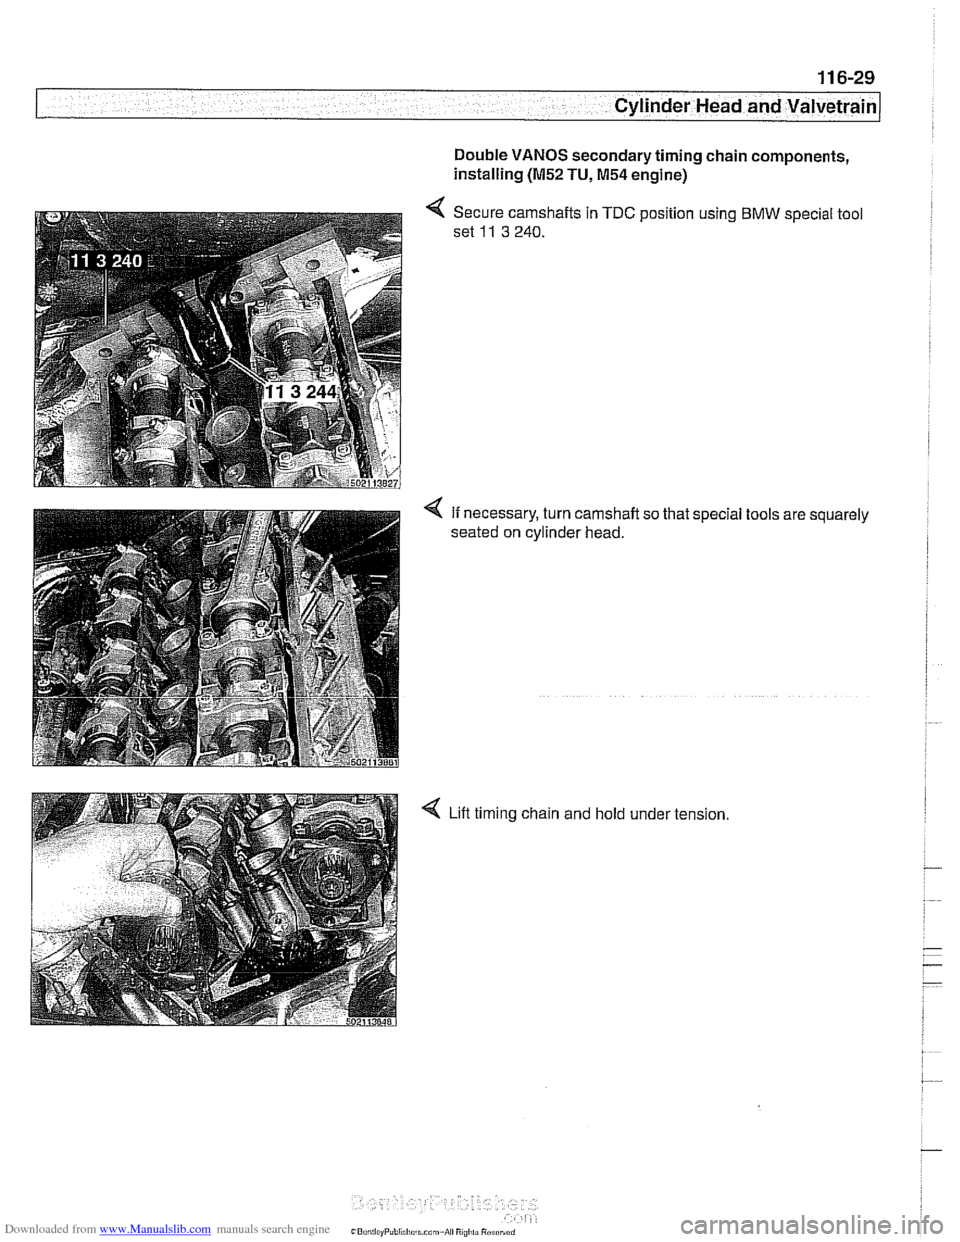
Double VANOS secondary timing chain components,
installing
(M52 TU, M54 engine)
< Secure camshafts in TDC position using BMW special tool
set
11 3 240.
4 If necessary, turn camshaft so that special tools are squarely
seated on cylinder head.
4 Lift timing chain and hold under tension
Page 206 of 1002
Downloaded from www.Manualslib.com manuals search engine
~ ~. --
Cylinder Head and Valvetrain .-
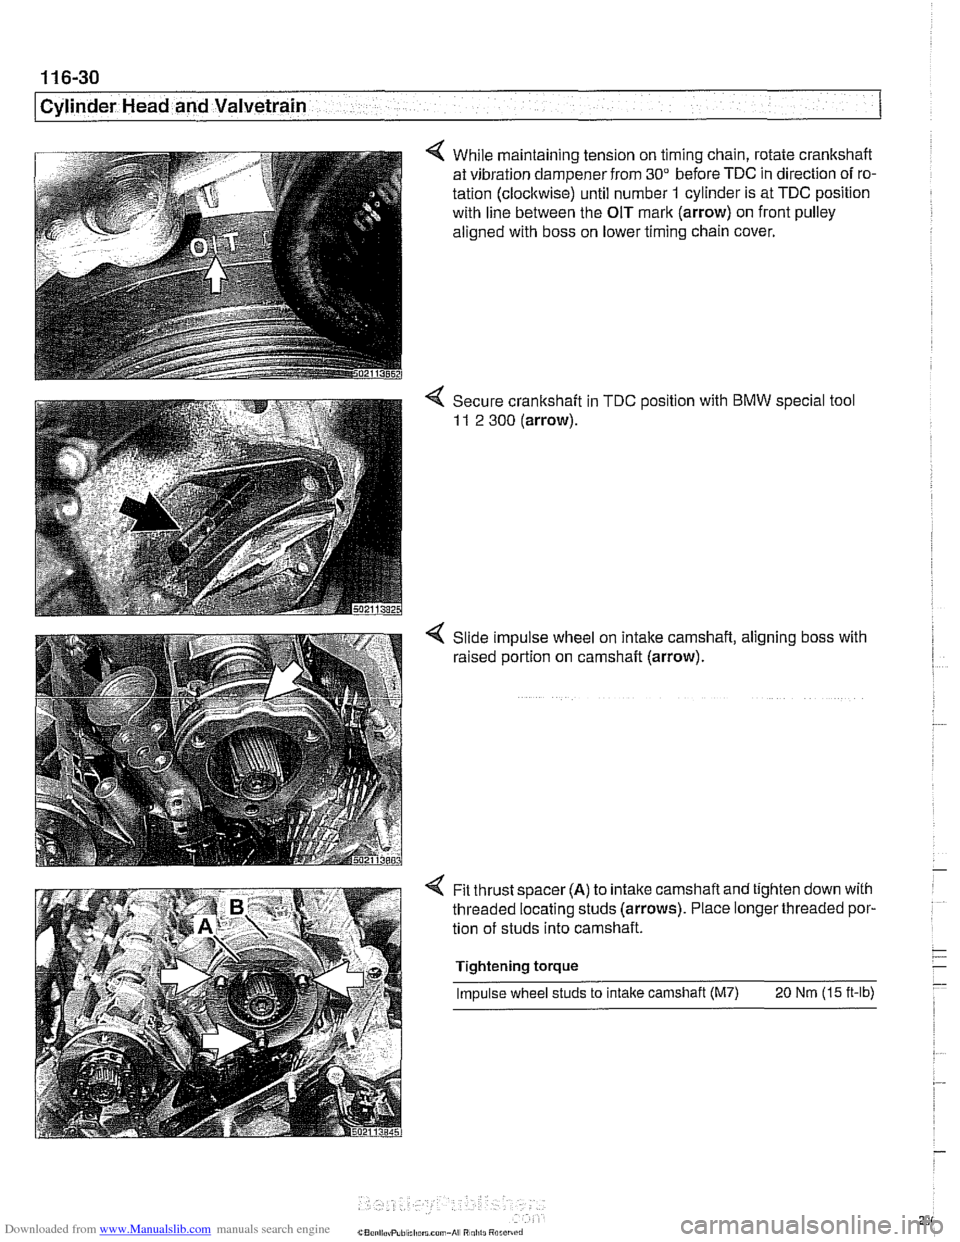
4 While maintaining tension on timing chain, rotate crankshaft
at vibration dampener from
30" before TDC in direction of ro-
tation (clockwise) until number
1 cylinder is at TDC position
with line between the OIT mark (arrow) on front pulley
aligned with boss on lower timing chain cover.
4 Secure crankshaft in TDC position with BMW special tool
11 2 300 (arrow).
Slide impulse wheel on intake camshaft, aligning boss with
raised portion on camshaft (arrow).
Fit thrust spacer
(A) to intalte camshaft and tighten down with
threaded locating studs (arrows). Place longer threaded por-
tion of studs into camshaft.
Tightening torque
Impulse wheel studs to intake camshaft (M7)
20 Nm (15 ft-lb)
Page 207 of 1002
Downloaded from www.Manualslib.com manuals search engine
11 6-31
Cylinder Head and Valvetrain
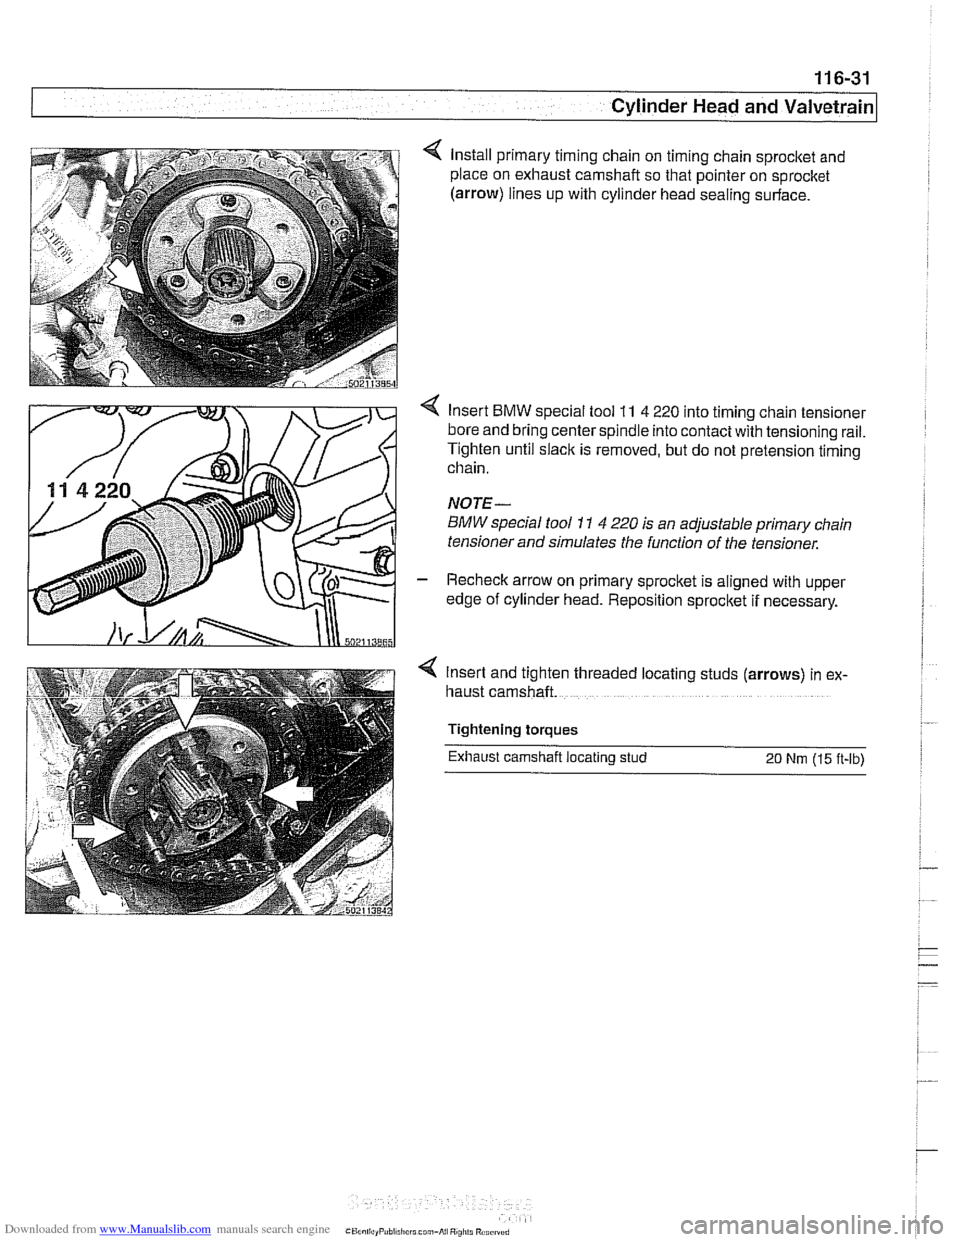
< Install primary timing chain on timing chain sprocket and
place on exhaust camshaft so that pointer on sprocket
(arrow) lines up with cylinder head sealing surface.
4 Insert BMW special tool 11 4 220 into timing chain tensioner
bore and bring center spindle into contact with tensioning rail.
Tighten until slack is removed, but do not pretension timing
chain.
NOTE-
BMW special tool 11 4 220 is an adjustable primary chain
tensioner and simulates the function of the tensioner.
- Recheck arrow on primary sprocket is aligned with upper
edge of cylinder head. Reposition sprocket if necessary.
4 Insert and tighten threaded locat~ng studs (arrows) in ex-
haust camshaft.
Tightening
torques
Exhaust camshaft locating stud 20 Nm (15 ft-lb)
Page 208 of 1002
Downloaded from www.Manualslib.com manuals search engine
11 6-32
Cylinder Head and Valvetrain
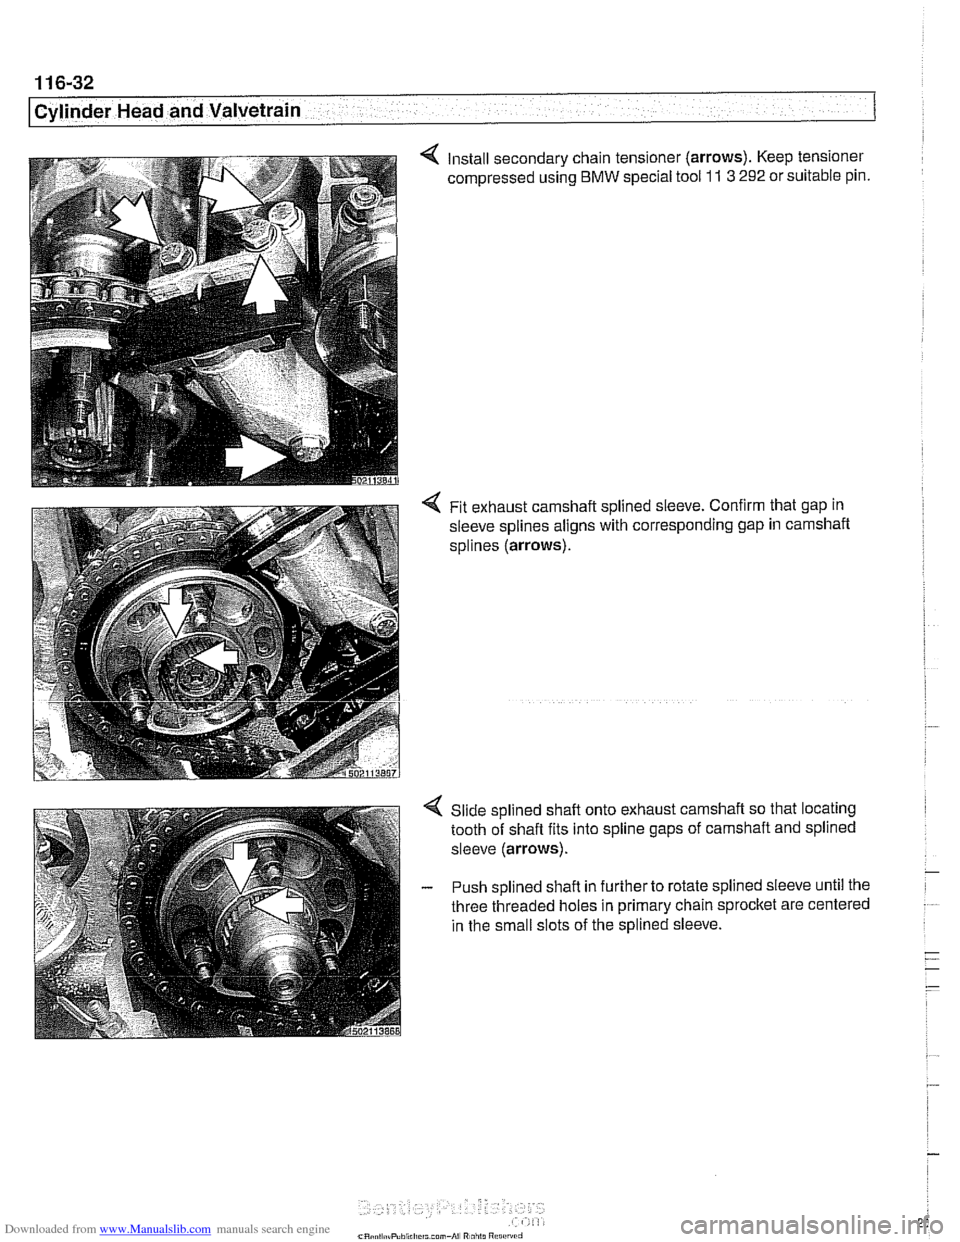
4 Install secondary chain tensioner (arrows). Keep tensioner
compressed using
BMW special tool 11 3 292 or suitable pin.
4 Fit exhaust camshaft splined sleeve. Confirm that gap in
sleeve splines aligns with corresponding gap in carnshaft
splines
(arrows).
Slide splined shaft onto exhaust camshaft so that locating
tooth of shaft fits into spline gaps of camshaft and splined
sleeve
(arrows).
- Push splined shafl in further to rotate splined sleeve until the
three threaded holes in primary chain sprocket are centered
in the small slots of the splined sleeve.
Page 209 of 1002
Downloaded from www.Manualslib.com manuals search engine
Cylinder Head and valvetrain1
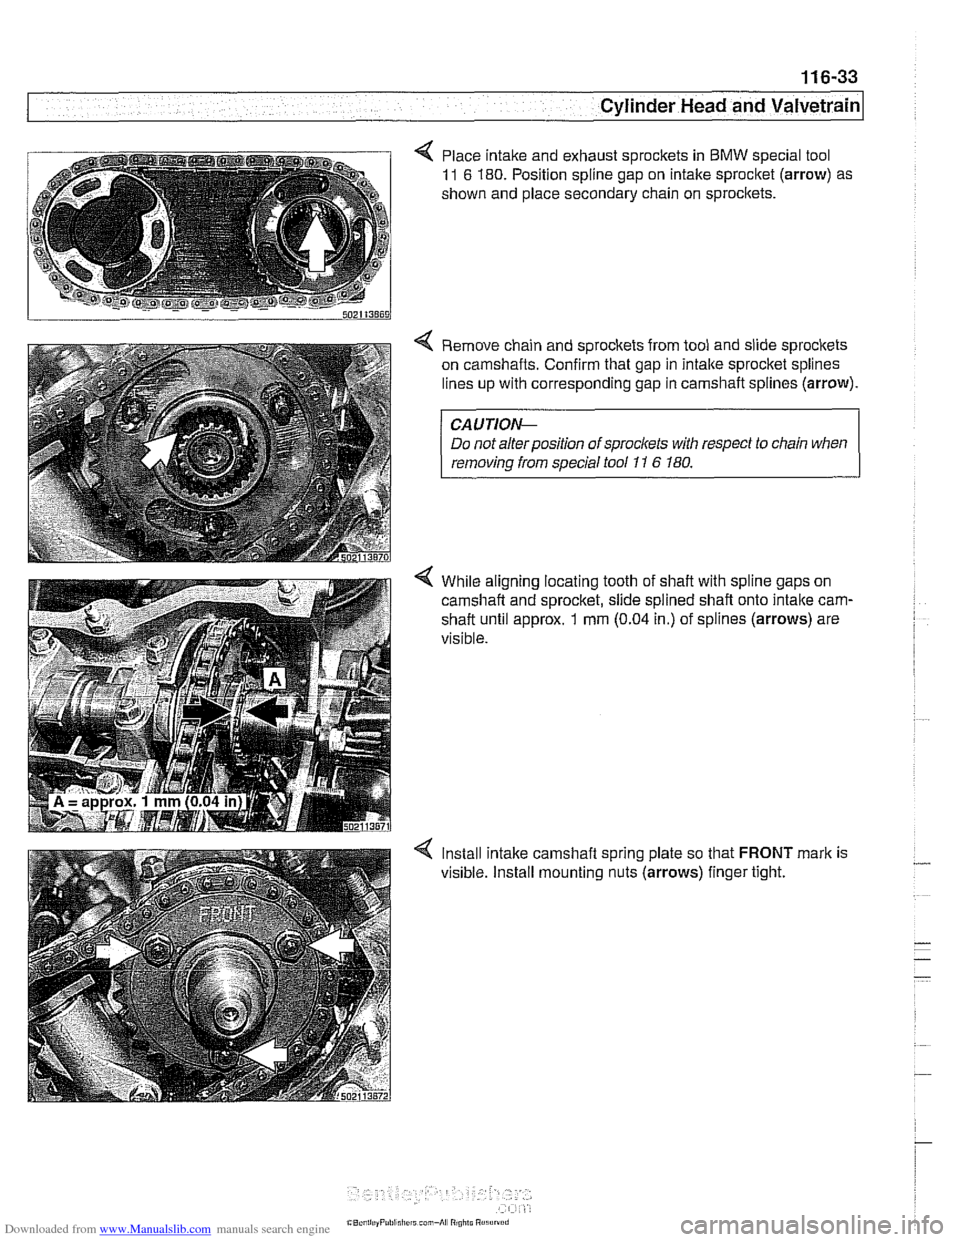
< Place intake and exhaust sprockets in BMW special tool
11 6 180. Position spline gap on intake sprocket (arrow) as
shown and place secondary chain on
sprocitets.
< Remove chain and sprockets from tool and slide sprockets
on camshafts. Confirm that gap in intalte sprocket splines
lines up with corresponding gap in camshaft splines (arrow).
CAUTIOI\C
Do not alter position of sprockets with respect to chain when
removinq from saecial tool 11 6 180.
4 While aligning locating tooth of shaft with spline gaps on
camshaft and sprocket, slide spiined
shaft onto intalte carn-
shaft until approx. 1 mm (0.04 in.) of splines (arrows) are
visible.
4 lnstall intake camshaft spring plate so that FRONT mark is
visible. install mounting nuts (arrows) finger tight.
Page 210 of 1002
Downloaded from www.Manualslib.com manuals search engine
/Cylinder Head and Valvetrain
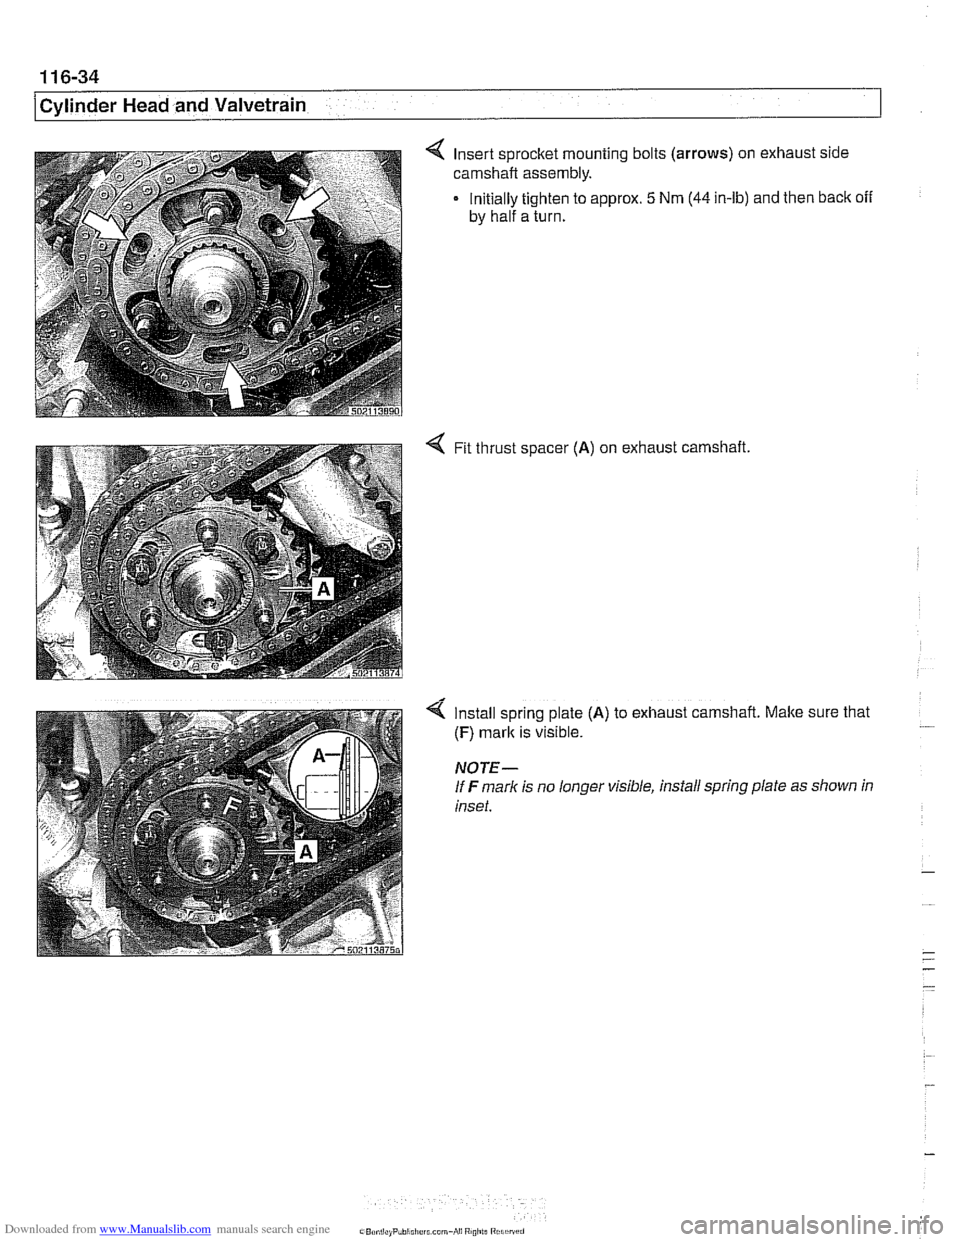
4 Insert sprocket mounting bolts (arrows) on exhaust side
carnshaft assembly.
Initially tighten to approx.
5 Nrn (44 in-lb) and then back off
by half a turn.
4 Fit thrust spacer (A) on exhaust
camshaft.
4 Install spring plate (A) to exhaust camshaft. Make sure that
(F) mark is visible.
NOTE-
If F marlc is no longer visible, install spring plate as shown in
inset.