Engine compartment BMW 528i 1998 E39 Workshop Manual
[x] Cancel search | Manufacturer: BMW, Model Year: 1998, Model line: 528i, Model: BMW 528i 1998 E39Pages: 1002
Page 14 of 1002
Downloaded from www.Manualslib.com manuals search engine
.
General
WARNING-
Never run the engine in tile work area unless it is well-ven-
tilated. The exhaust should be vented to the outside. Car-
bon monoxide (CO) in exhaust kills.
Remove all neckties,
scarfs, loose clothing, or jewelry
when working near a running engine or power tools.
Tuck in shirts. Tie long hair and secure it under a cap.
Severe injury can result from these things being
caugiit
in rotating parts.
Remove rings, watches, and bracelets. Aside from the
dangers of moving parts, metallic jewelry conducts
electricity and may cause shorts, sparks, burns, or
damage to the electricalsystem when accidentally con-
tacting the battery or other electrical terminals.
Disconnect the battery negative
(-) cable whenever
working on or near the fuel system or anything that is
electrically powered. Accidental electrical contact may
damage the electrical system or cause a fire.
Fuelis highly flammable. When working around fuel, do
not
smoke or work near heaters or other fire hazards.
Keep an approved fire extinguisher handy.
The fuel system is designed to retain pressure even
when the ignition is off When worlcing with the
fuelsys-
tem, loosen the fuel lines slowly to allow the residual
pressure to dissipate gradually. Take precautions to
avoid spraying fuel.
. Illuminate the worlc area adequately and safely Use a
portable safety light for worlcing inside or under the car.
A fluorescent type
light is best because it gives off less
heat. If using a light with a normal incandescent bulb,
use rough service bulbs to avoid
breakage. The hot fil-
ament of an accidentally broken bulb can ignite spilled
fuel or oil.
Keep sparks, lighted matches, and any open flame
away from the top of the battery. Hydrogen gas
emitted
by the battery is highly flammable. Any nearby source
of ignition may cause the battery to explode.
Never lay
tools or parts in the engine compartment or
on top of the battery. They may
fallinto confinedspaces
and be difficult to retrieve, become caught in belts or
other rotating parts when the engine is started, or
cause electrical shorts and damage to the electrical
system.
Page 22 of 1002
Downloaded from www.Manualslib.com manuals search engine
01 0-1 2
1 General
Information you need to know
Model
When ordering parts it is important that you know the correct
model designation for your car. Models covered in this E39
manual are the
525i,5281,530i, 540i in Sedan and Station
Wagon body styles.
Model year
This is not necessarily the same as date of manufacture or
date of sale.
A 1999 model may have been manufactured in
late 1998, and perhaps not sold until early 2000. It is still a
1999 model. Model years covered by this manual are 1997 to
2002.
Date of manufacture
This information is necessary when ordering replacement
parts or determining if any of the warranty recalls are applica-
ble to your car. The label on the driver's door below the door
latch will specify the month and year that the car was built.
Vehicle
Identification Number (VIN)
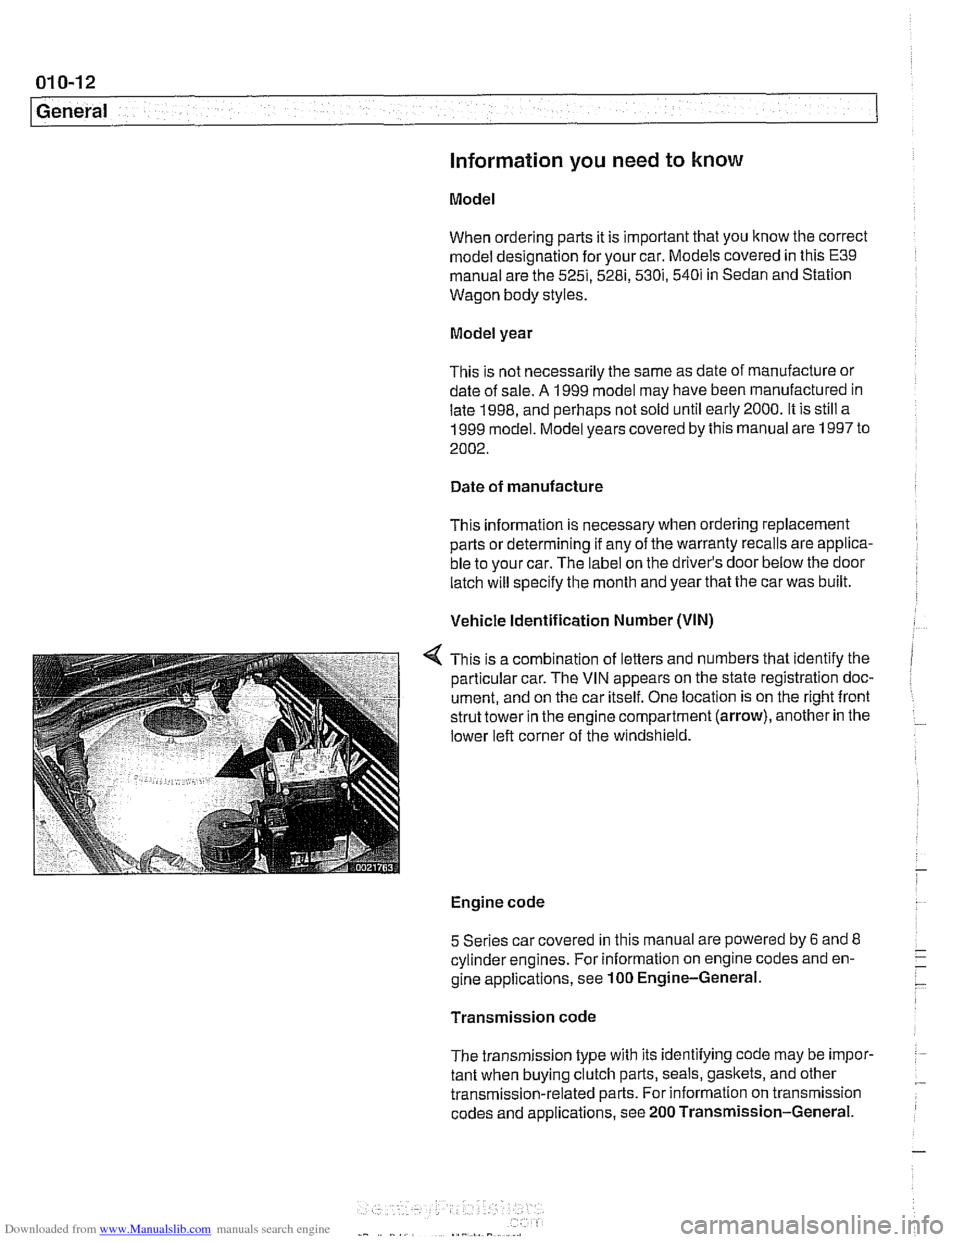
This is a combination of letters and numbers that identify the
particular car. The VIN appears on the state registration doc-
ument, and on the car itself. One location is on the right front
strut tower in the engine compartment (arrow), another in the
lower left corner of the windshield.
Engine code
5 Series car covered in this manual are powered by
6 and 8 - cylinderengines. For information on engine codes and en- -. -
gine applications, see 100 Engine-General. -
Transmission code
The transmission type with its identifying code may be
impor- :
tant when buying clutch parts, seals, gaskets, and other .- transmission-related parts. For information on transmission
codes and applications, see 200 Transmission-General.
Page 30 of 1002
Downloaded from www.Manualslib.com manuals search engine
01 0-20
General
more information on the Check Engine Light and the on-
board diagnostic system.
Towing
The cars covered by this manual should be towed with a tow
truck using wheel lift or flat bed equipment. Do not tow the car
on all four wheels except
forvery short distances to move it to
a safe place.
CA U JION-
Do not tow with sling-type equipment The front spoilers and
b~m~er covers may sustain damage.
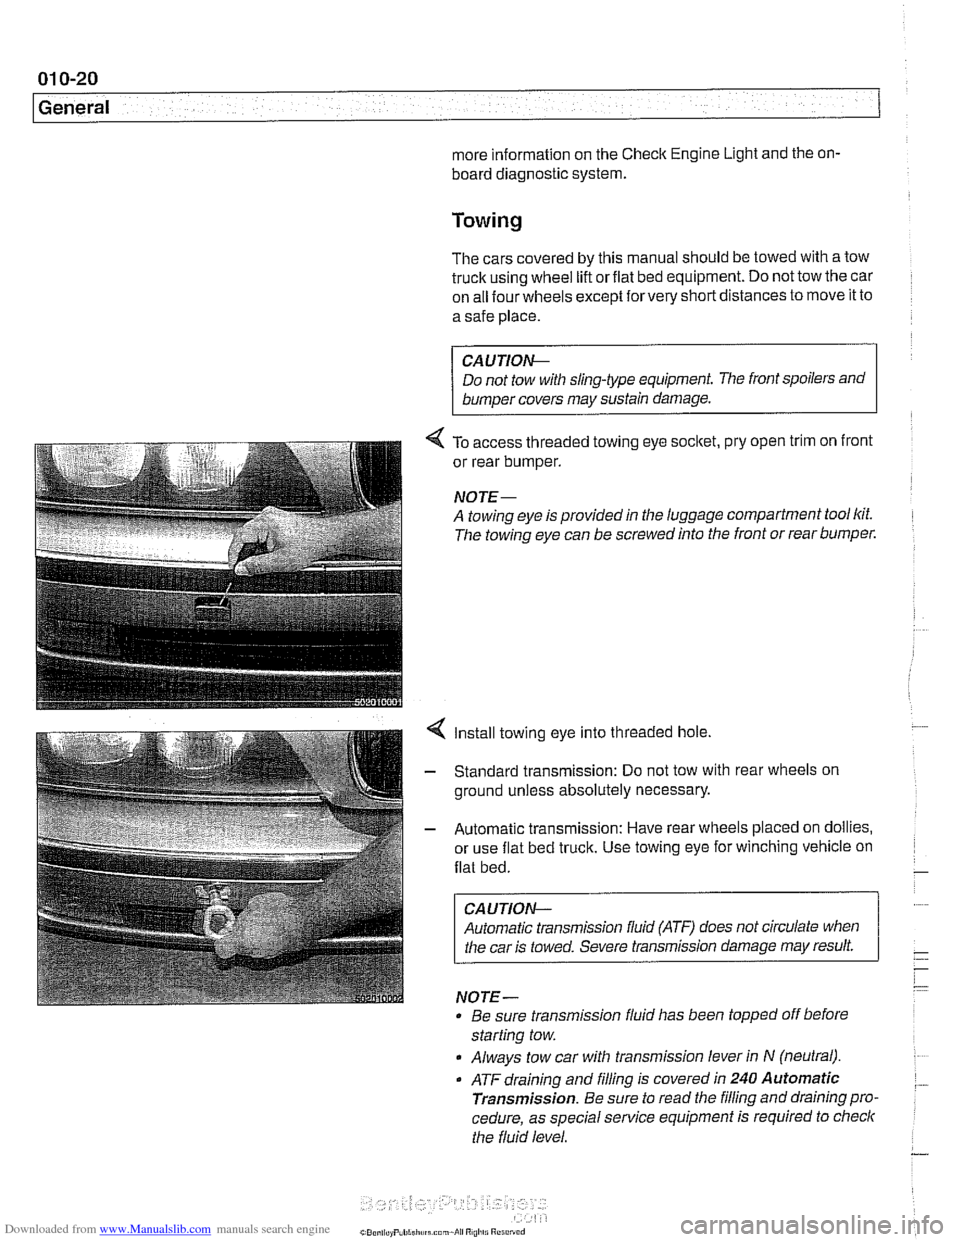
4 To access threaded towing eye socltet, pry open trim on front
or rear bumper.
NOJE-
A towing eye is provided in the luggage compartment tool lcit.
The towing eye can be screwed into the front or rear bumper.
4 Install towing eye into threaded hole.
- Standard transmission: Do not tow with rear wheels on
ground unless absolutely necessary.
- Automatic transmission: Have rear wheels placed on dollies,
or use flat bed truck. Use towing eye for winching vehicle on
flat bed.
CAUTION-
Automatic transmission fluid (ATF) does not circulate when
I the car is towed. Severe transmission damage may result.
NOTE-
Be sure transrnission fluid has been topped off before
starting tow.
Always tow car with transrnission lever in
N (neutral).
. ATF draining and filling is covered in 240 Automatic
Transmission.
Be sure to read the filling and draining pro.
cedure, as special service equipment is required to
checlc
the fluid level.
Page 33 of 1002
Downloaded from www.Manualslib.com manuals search engine
020 Maintenance
General ........................... .02 0.2
Special tools ........................ .02 0.2
Service Interval Indicator (Sll) ........... .02 0.3
Service Interval Indicator (Sll), resetting ... .02 0.3
Inspection I, Inspection 11 ............... .02 0.5
Maintenance Tables ................ .02 0.6
Fluid and Lubricant Specifications .. .02 0.9
Fluids and lubricants ................. .02 0.10
Engine Oil Service ................ .02 0.1 I
Engine oil. checking level ............. .02 0.12
Engine oil and filter. changing .......... .02 0-13
Engine Compartment Maintenance . .02 0.14
Accelerator and linkage ............... .02 0.14
Air filter. replacing ................... .02 0.1 4
Cooling system service ............... .02 0.15
Engine drive belt service .............. .02 0.16
Idlespeed .......................... 020-19
Catalytic converter and oxygen sensors .. .02 0.19
Power steering fluid, checking level ..... .02 0.20
Spark plugs ........................ .02 0.20
Spark plugs, replacing ................ .02 0.21
Interior ventilation microfilter, replacing ... .02 0.22
Other Mechanical Maintenance ..... .02 0.22
Battery, checking. cleaning. and replacing .02 0-22
Brake fluid. replacing ................. .02 0-24
Brake pad 1 rotor wear. checking ........ .02 0.24
Brake system, inspecting ............. .02 0.25
Parking brake. checking ............... 020-25
Clutch fluid. checking ................. 020-26
Differential oil level. checking ........... 020-26
Drive axle joint (CV joint) boots. inspecting 020-27
Exhaust system. inspecting ............ 020-27
Fuel filter. replacing .................. 020-27
Fuel tank and fuel lines. inspecting ...... 020-28
Suspension. front. inspecting ........... 020-29
Suspension. rear. inspecting ........... 020-29
Tires. checking inflation pressure ........ 020-29
Tires. rotating ....................... 020-29
Transmission service. automatic ........ 020-29
Transmission service. manual .......... 020-30
Transmission fluid. checking and filling
(manual transmission)
................ 020-30
Wheels. aligning ..................... 020-30
Body and Interior Maintenance ..... 020-31
Body and hinges. lubricating ........... 020-31
Exterior washing ..................... 020-31
Interior care ........................ 020-31
Leather upholstery and trim ............ 020-31
Polishing ........................... 020-32
Seat belts .......................... 020-32
Special cleaning ..................... 020-32
Washing chassis ..................... 020-32
Waxing ............................ 020-32
Windshield wiper blade maintenance ..... 020-33
Page 36 of 1002
Downloaded from www.Manualslib.com manuals search engine
020-4
Maintenance
1997 to 2000 models
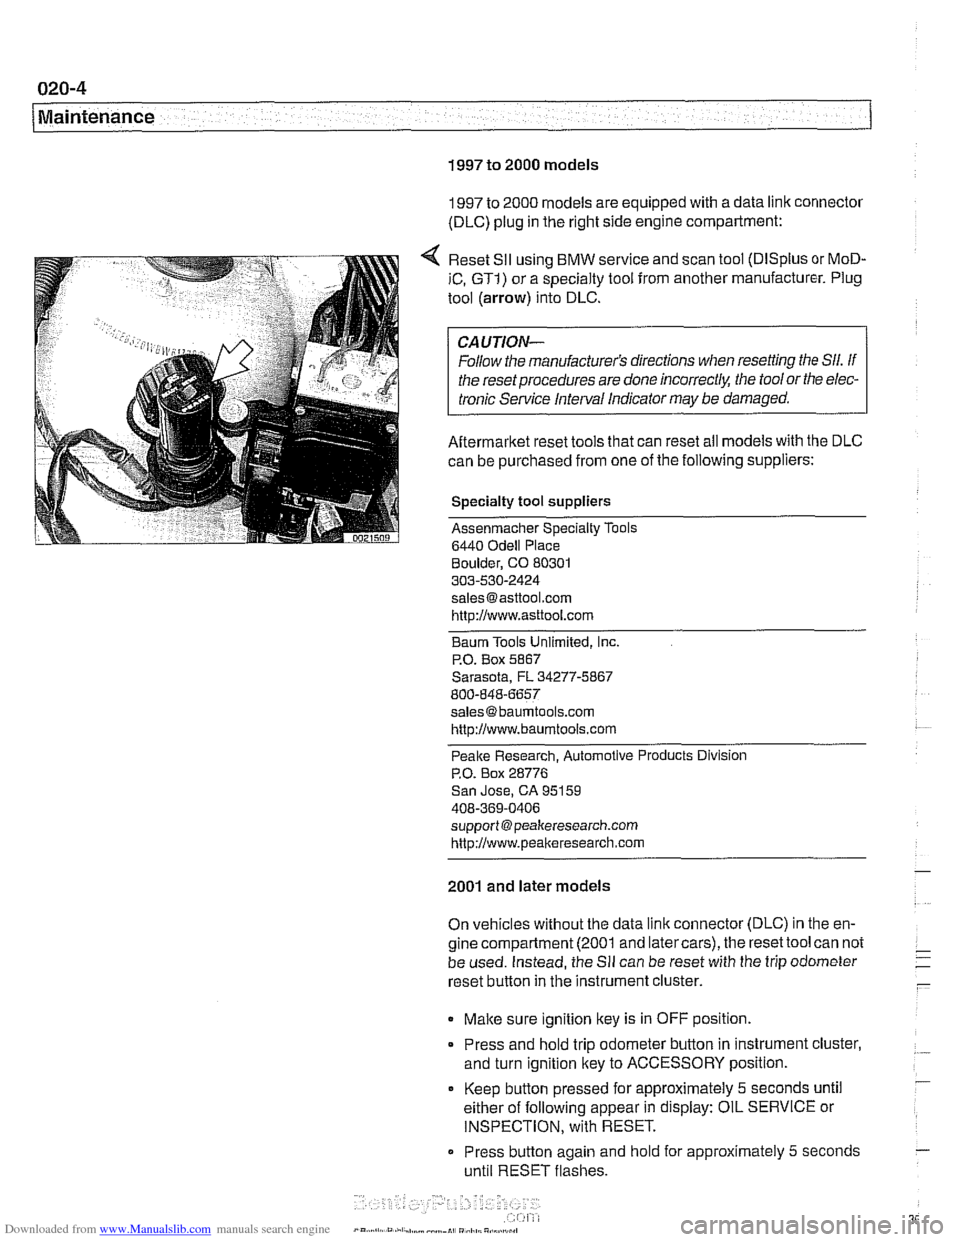
1997 to 2000 models are equipped with a data link connector
(DLC) plug in the right side engine compartment:
Reset
SII using BMW service and scan tool (DISplus or MoD-
iC, GTI) or a specialty tool from another manufacturer. Plug
tool (arrow) into DLC.
CAUTION-
Follow the manufacturer's directions when resetting the Sll. If
the reset procedures are done
incorrect& the tool or the elec-
tronic Service Interval Indicator
may be damaged.
Aftermarket reset tools that can reset all models with the DLC
can be purchased from one of the following suppliers:
Specialty tool suppliers
Assenmacher Specialty Tools
6440
Odell Place
Boulder, CO 80301
303-530-2424
[email protected] http://www.asttool.com
Baum Tools Unlimited,
Inc.
P.O. Box 5867
Sarasota, FL 34277-5867
800-848-6657
[email protected]
http://www.baumtools.com
Peake Research. Automotive Products Division
P.O. Box 28776
San Jose, CA 95159
408-369-0406
support @peakeresearch.com
http://www.peal~eresearch.com
2001 and later models
On vehicles without the data link connector (DLC) in the en-
gine compartment (2001 and latercars), the reset tool can not
be used. Instead, the
Sll can be reset with the trip odometer
reset button in the instrument cluster.
Make sure ignition key is in OFF position.
* Press and hold trip odometer button in instrument cluster,
and turn ignition key to ACCESSORY position.
Keep
button pressed for approximately 5 seconds until
either of following appear in display: OIL SERVICE or
INSPECTION, with RESET.
Press button again and
hold for approximately 5 seconds
until RESET flashes.
Page 38 of 1002
Downloaded from www.Manualslib.com manuals search engine
Maintenance
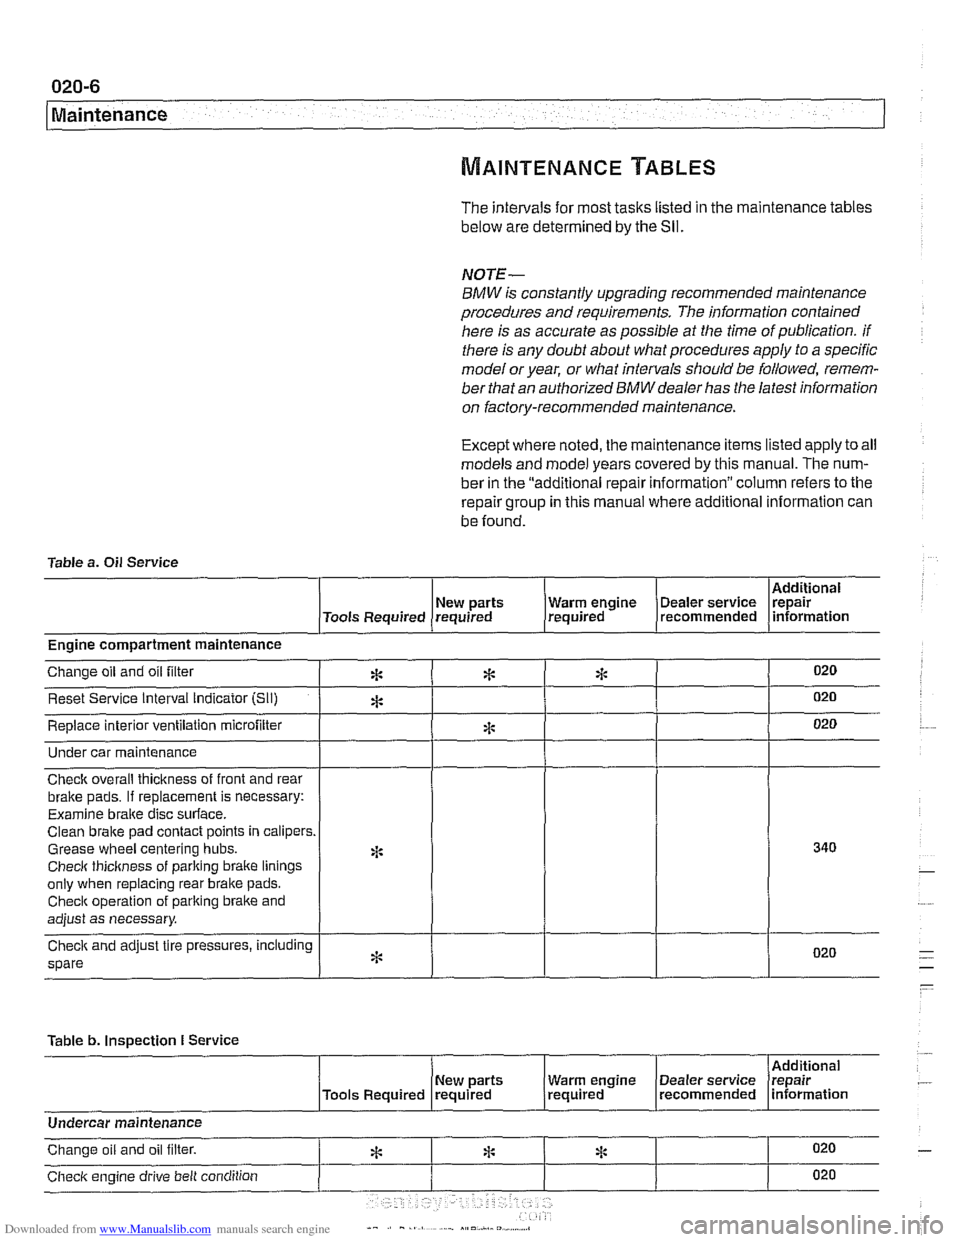
The intervals for most tasks listed in the maintenance tables
below are determined by the Sll.
NOTE-
BMW is constantly upgrading recommended maintenance
procedures and requirements.
The information contained
here is as accurate as possible at the time of publication. if
there is any doubt about what procedures apply to a specific
model or year, or what intervals should be followed, remem-
ber that an authorized
BMW dealer has the latest information
on factory-recommended maintenance.
Except where noted, the maintenance items listed apply to all
models and model years covered by this manual. The num-
ber in the "additional repair information" column refers to the
repair group in this manual where additional information can
be found.
Table a.
Oil Service
I I I I I Additional
( New parts (Tools Required requrred
Under car maintenance
1 I I I I
I I - I I
Engine compartment maintenance
Check overall thickness of front and rear
bralte pads.
If replacement is necessary:
Examine
braite disc surface.
Clean brake pad contact points in calipers.
Grease wheel centering hubs.
Checlc thickness of parking braite linings
only when replacing rear brake pads.
Checlc operation of parking brake and
adjust as necessary.
spare
Table b.
Inspection I Service
I 1 I I [Additional
020
020
020
New parts Warm engrne Dealer service Irepair , /Tools Required (required (required . (recommended lnformatlon
Change oil and oil filter
Reset Service Interval indicator [Sli)
Replace interior ventilation microfilter
*
A
*
*
*
I I I I I
Undercar maintenance
Checlc engine drive belt condition 020
ri: * Change oil and oil filter. 020 *
Page 40 of 1002
Downloaded from www.Manualslib.com manuals search engine
--- -
Maintenance
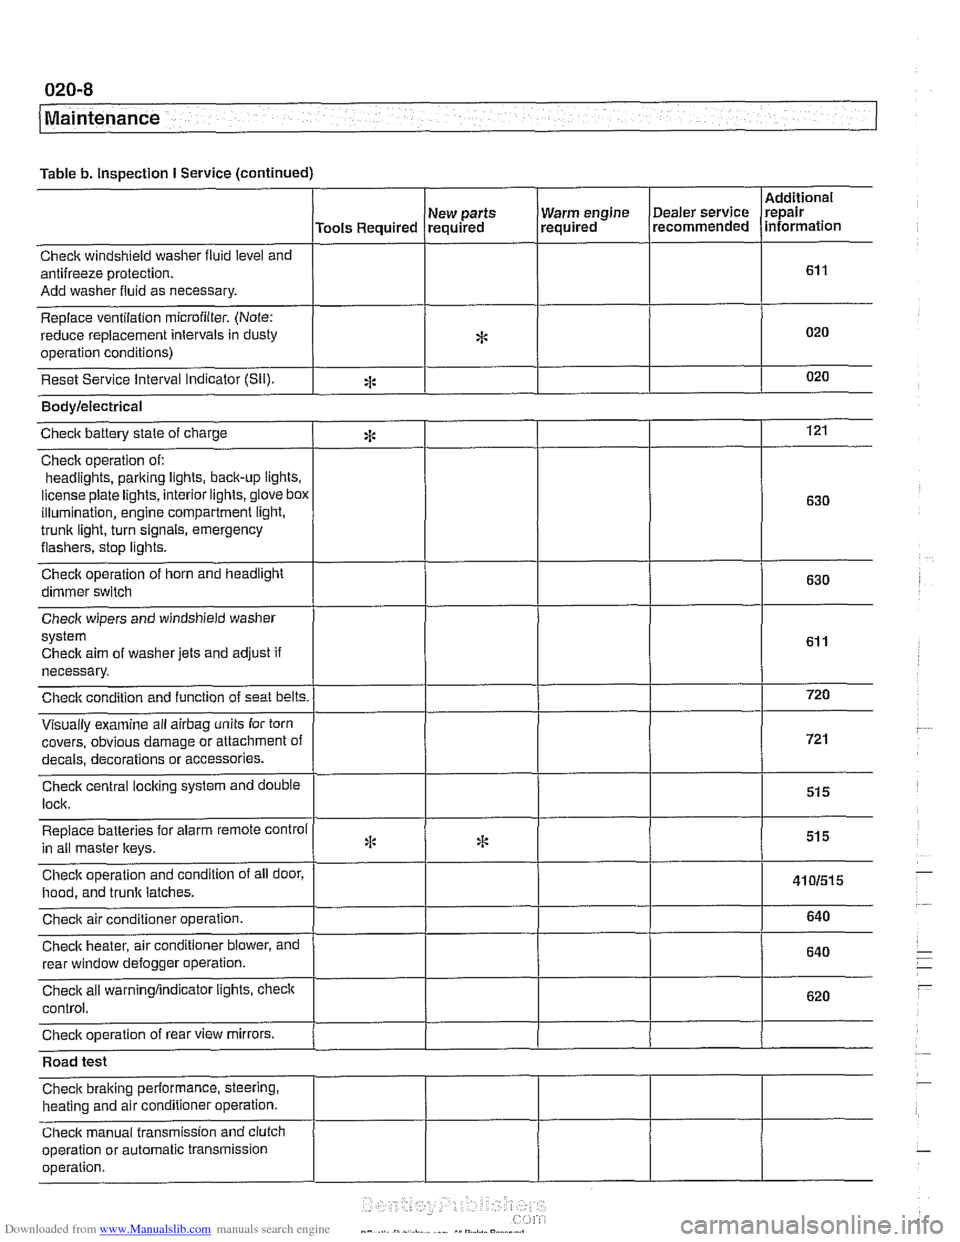
Table b. Inspection I Service (continued)
I I I I
Warm engine Dealer service
required recommended
Check windshield
washer fluid level and
antifreeze protection.
Add washer fluid as necessary.
Replace ventilation
microfilter. (Note:
reduce replacement intervals in dusty
operation conditions)
Reset Service interval Indicator
(Sil).
Additional
repair
information
Tools Required
*
eck aim of washer jets and adjust if
necessary.
covers, obvious damage or attachment o
s or accessories.
Road test
Check braking performance, steering,
heating and air conditioner operation.
Check manual transmission and clutch
operation or automatic transmission
operation. New
parts
required
*
Bodylelectrical
121
630
630
Checic battery state of charge
Check operation of:
headlights,
parking iights, back-up lights.
license plate lights, interior lights,
glove box
illumination, engine compartment light,
trunk light, turn signals, emergency
flashers, stop iights.
Check operation of horn and headlight
dimmer switch
:i:
Page 41 of 1002
Downloaded from www.Manualslib.com manuals search engine
--- -
Maintenance
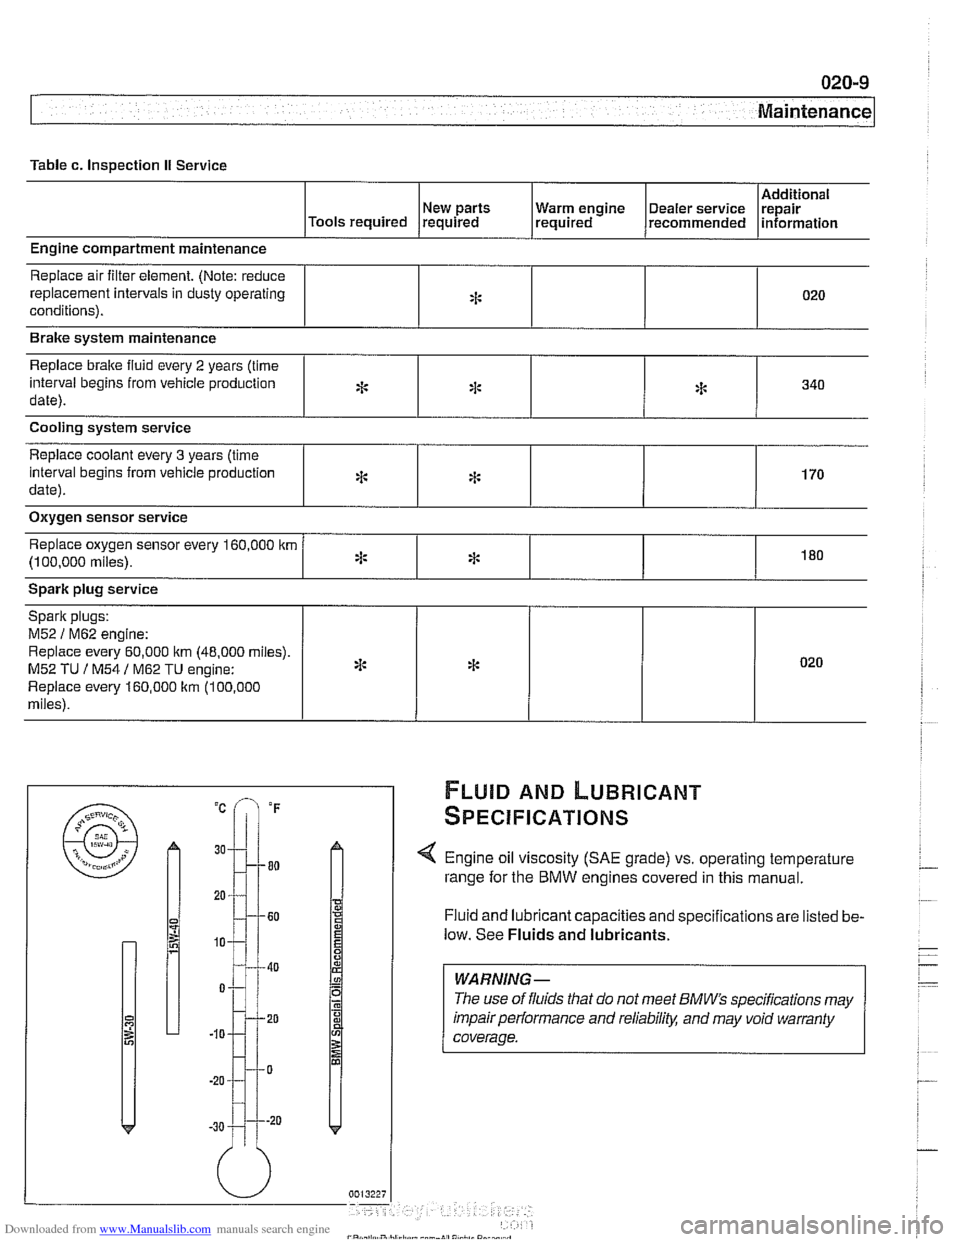
Table c. Inspection II Service
Additional
New parts Warm engine Dealer service repair
Tools required required required recommended information
Engine compartment maintenance
Replace air filter element. (Note: reduce
replacement intervals in dusty operating
conditions).
Replace brake
fluid every 2 years (time
interval begins from vehicle production
date).
Cooling system service
Spark plug service
Brake
system maintenance
:j:
*
Replace coolant every 3 years (time
interval begins from vehicle production
date).
Replace oxygen sensor every 160,000
itm
(1 00,000 miles).
020
FLUID AND LUBRICANT
SPECIFICATIONS
:I:
Oxygen sensor service
*
x:
Spark plugs:
M52
1 M62 engine:
Replace every 60,000 itm (48.000 miles).
M52
TU I M54 1 M62 TU engine:
Replace every 160,000
ltm (100.000
miles).
< Engine oil viscosity (SAE grade) vs. operating temperature
range for the BMW engines covered in this manual.
Fluid and lubricant capacities and specifications are listed be-
low. See
Fluids and lubricants.
:I:
*
*
*
WARNING -
The use of fluids that do not meet BMW" specifications may
impair performance and
reliabilitl: and may void warranty
coverage.
340
170
180
* 020
Page 46 of 1002
Downloaded from www.Manualslib.com manuals search engine
020-1 4
Maintenance
- When oil flow has diminished to an occasional drip, reinstall
drain plug with a new metal sealing washer and torque plug.
Tightening torque Engine oil drain plug to oil pan
25 Nrn (1.8 ft-lb)
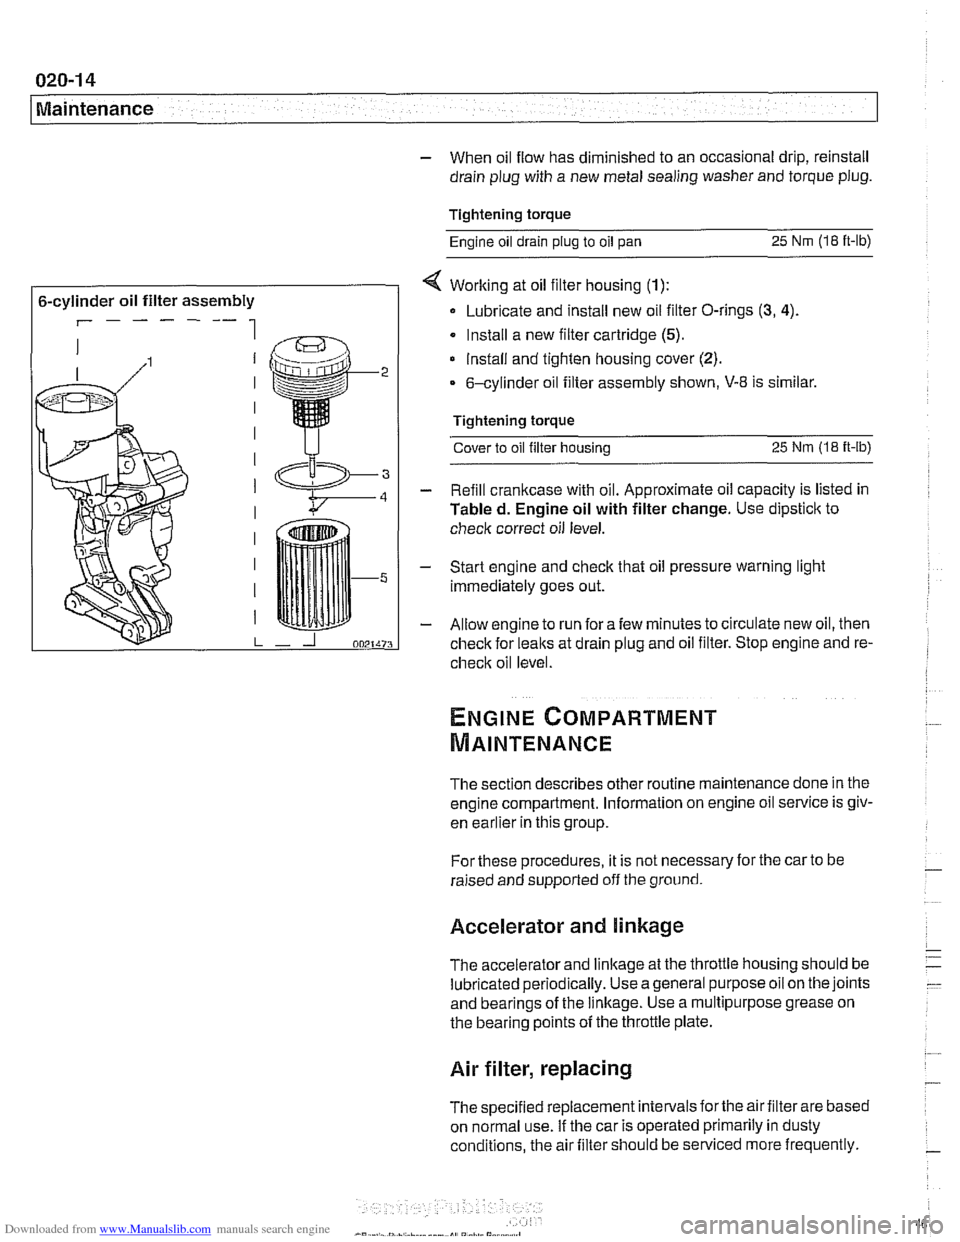
6-cylinder oil filter assembly
r------ 1
< Working at oil filter housing (1):
Lubricate and install new oil filter O-rings (3, 4).
Install a new filter cartridge (5).
lnstall and tighten housing cover (2).
6-cylinder oil filter assembly shown, V-8 is similar.
Tightening torque Cover to oil filter housing
25 Nm (1.8 it-lb)
- Refill crankcase with oil. Approximate oil capacity is listed in
Tabled. Engine oil with filter change. Use dipstick to
check correct oil level.
- Start engine and check that oil pressure warning light
immediately goes out.
- Allow engine to run fora few minutes to circulate new oil, then
check for leaks at drain plug and oil filter. Stop engine and re-
check oil level
The section describes other routine maintenance done in the
engine compartment. Information on engine oil service is
giv-
enkar~ier inthis group.
For these procedures, it is not necessary for the car to be
raised and supported off the ground.
Accelerator and linkage
The accelerator and linkage at the throttle housing should be
lubricated periodically. Use ageneral purposeoil on the joints
and bearings of the linkage. Use a multipurpose grease on
the bearing points of the throttle plate.
Air filter, replacing
The specified replacement intervals forthe air filter are based
on normal use. If the car is operated primarily in dusty
conditions, the air filter should be serviced more frequently.
Page 47 of 1002
Downloaded from www.Manualslib.com manuals search engine
Maintenance
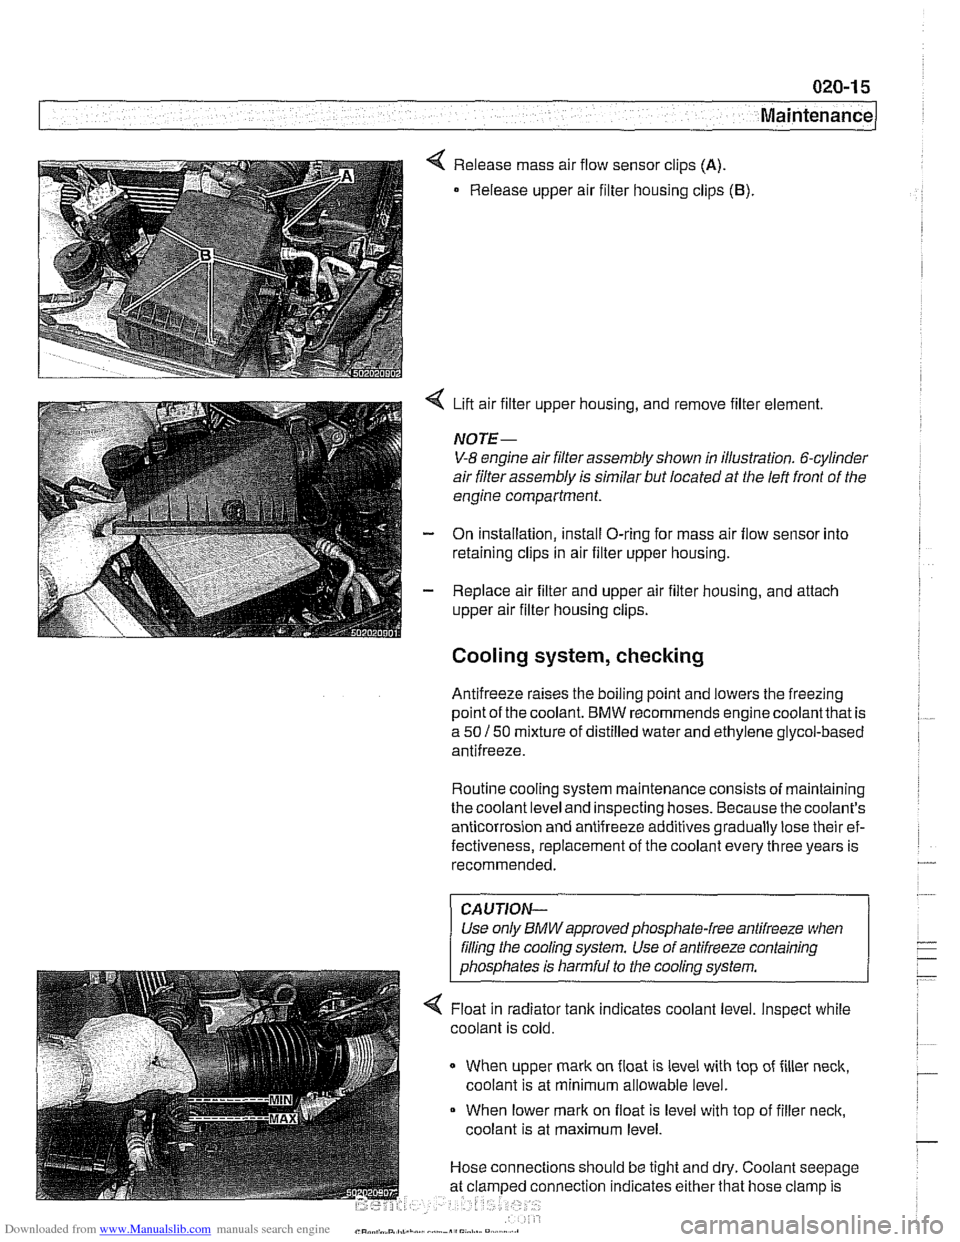
< Release mass air flow sensor clips (A).
Release upper air filter housing clips (B).
4 Lift air filter upper housing, and remove filter element.
NOTE-
V-8 engine air filter assembly shown in illustration. 6-cylinder
air filter assembly is similar but located at the left front of the
engine compartment.
- On installation, install O-ring for mass air flow sensor into
retaining clips in air filter upper housing.
- Replace air filter and upper air filter housing, and attach
upper air filter housing clips.
Cooling system, checking
Antifreeze raises the boiling point and lowers the freezing
~oint of the coolant. BMW recommends enaine coolantthat is
a 50 150 mixture of distilled water and ethGene glycol-based
antifreeze.
Routine cooling system maintenance consists of maintaining
the coolant level and inspecting hoses. Because the coolant's
anticorrosion and antifreeze additives gradually lose their ef-
fectiveness, replacement of the coolant every three years is
recommended.
CAUJION-
Use only BMWapprovedphosphate-free antifreeze when
filing the cooling system. Use of antifreeze containing
phosphates is harmful to the cooling system.
4 Float in radiator tank indicates coolant level. Inspect while
coolant is cold.
When upper mark on float is level with top of filler neck,
coolant is at minimum allowable level.
When lower mark on float is level with top of filler neck,
coolant is at maximum level.
Hose connections should be tight and dry. Coolant seepage
nnection indicates either that hose clamp is