low BMW 740LI SEDAN 2015 Owner's Manual
[x] Cancel search | Manufacturer: BMW, Model Year: 2015, Model line: 740LI SEDAN, Model: BMW 740LI SEDAN 2015Pages: 314, PDF Size: 7.9 MB
Page 56 of 314
The BMW display key supports all functions of
the standard remote control. Beyond that, the
following functions are available.▷Display status of doors and windows.▷Display status of the alarm system.▷With parked-car heating: operate parked-
car heating.
Without parked-car heating: operate
parked-car ventilation.▷Call up range with available fuel.▷Display service information.
Emergency detection of the BMW
display key
The description for the emergency detection
of the remote control, refer to page 55, also
applies for the BMW display key. However, the
locking button should be at the height of the
marking.
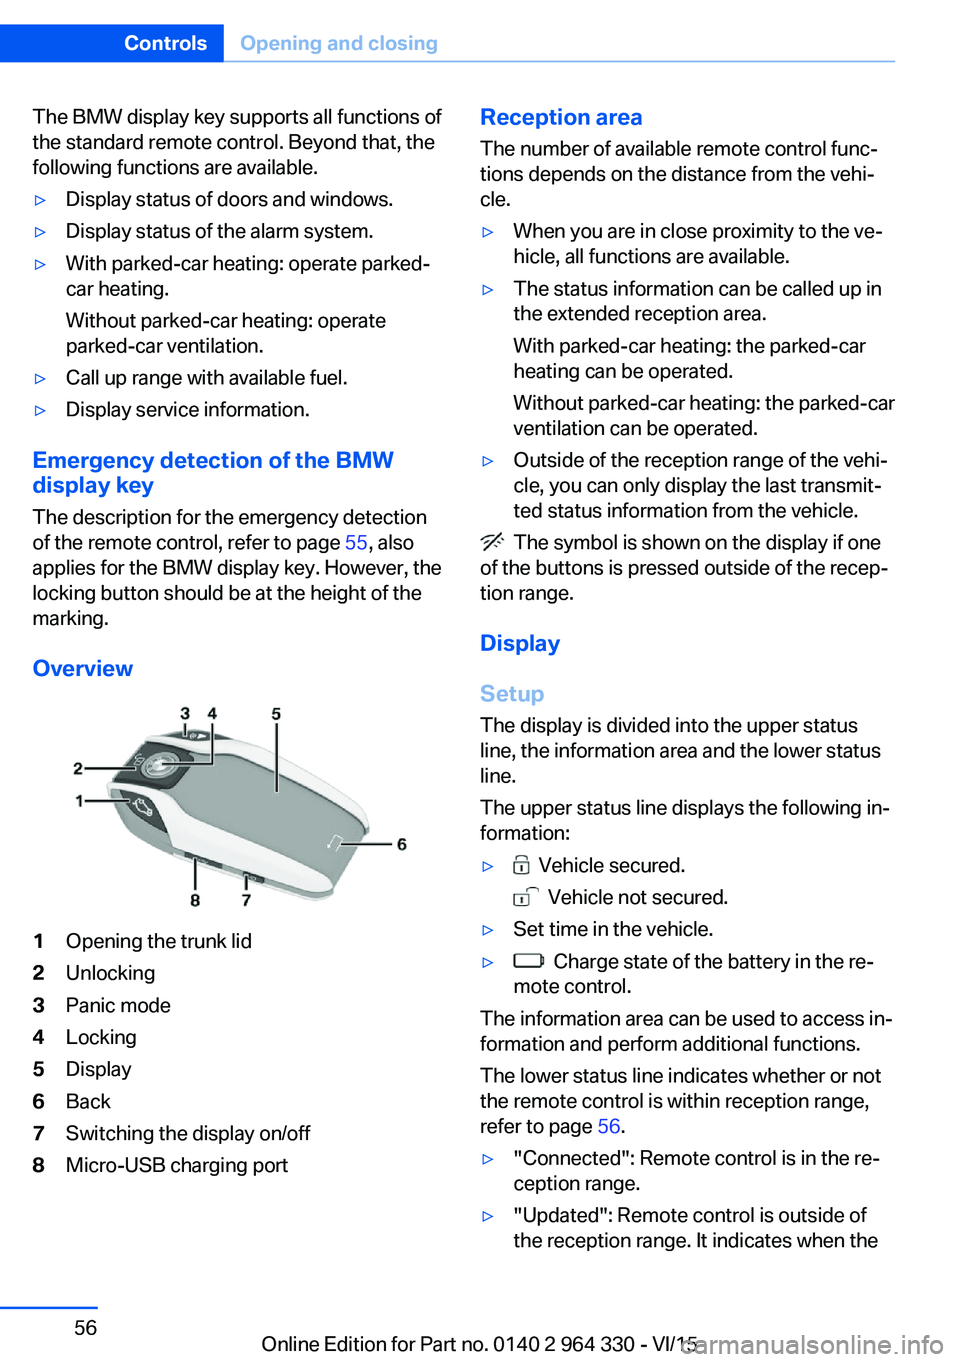
Overview
1Opening the trunk lid2Unlocking3Panic mode4Locking5Display6Back7Switching the display on/off8Micro-USB charging portReception area
The number of available remote control func‐
tions depends on the distance from the vehi‐
cle.▷When you are in close proximity to the ve‐
hicle, all functions are available.▷The status information can be called up in
the extended reception area.
With parked-car heating: the parked-car
heating can be operated.
Without parked-car heating: the parked-car
ventilation can be operated.▷Outside of the reception range of the vehi‐
cle, you can only display the last transmit‐
ted status information from the vehicle.
The symbol is shown on the display if one
of the buttons is pressed outside of the recep‐
tion range.
Display
Setup The display is divided into the upper status
line, the information area and the lower status
line.
The upper status line displays the following in‐
formation:
▷ Vehicle secured.
Vehicle not secured.
▷Set time in the vehicle.▷ Charge state of the battery in the re‐
mote control.
The information area can be used to access in‐
formation and perform additional functions.
The lower status line indicates whether or not
the remote control is within reception range,
refer to page 56.
▷"Connected": Remote control is in the re‐
ception range.▷"Updated": Remote control is outside of
the reception range. It indicates when theSeite 56ControlsOpening and closing56
Online Edition for Part no. 0140 2 964 330 - VI/15
Page 57 of 314
last data transfer from the vehicle took
place.
Controls
If the information area contains more than one
page, then page indicators are shown beneath
the information.
The indicator for the current page has
been filled in.
Swipe to the right or left with a finger to
change between the pages.
If additional information is available on a page,
tap the appropriate symbol.
Touch the arrow symbol beneath the dis‐
play to return to the original page.
Switching the display on/off
The display will go out automatically after a
brief period to conserve battery power.
To hide the display manually, press the button
on the left side of the remote control. Over‐
view, refer to page 56.
Show the display:
1.Press button on the left side of the remote
control.2.Then, swipe with your finger from bottom
to top to unlock the screen lock.
Completely switch off the display to increase
the usable battery life.
1.Press and hold the button on the left side
of the remote control for longer than 4 sec‐
onds.2."OK" tap.
Press button on the left side of the remote
control to switch on the switched-off display.
Operating concept
Depending on the equipment, there are up to
five main menus that provide access to the
sub-menus.
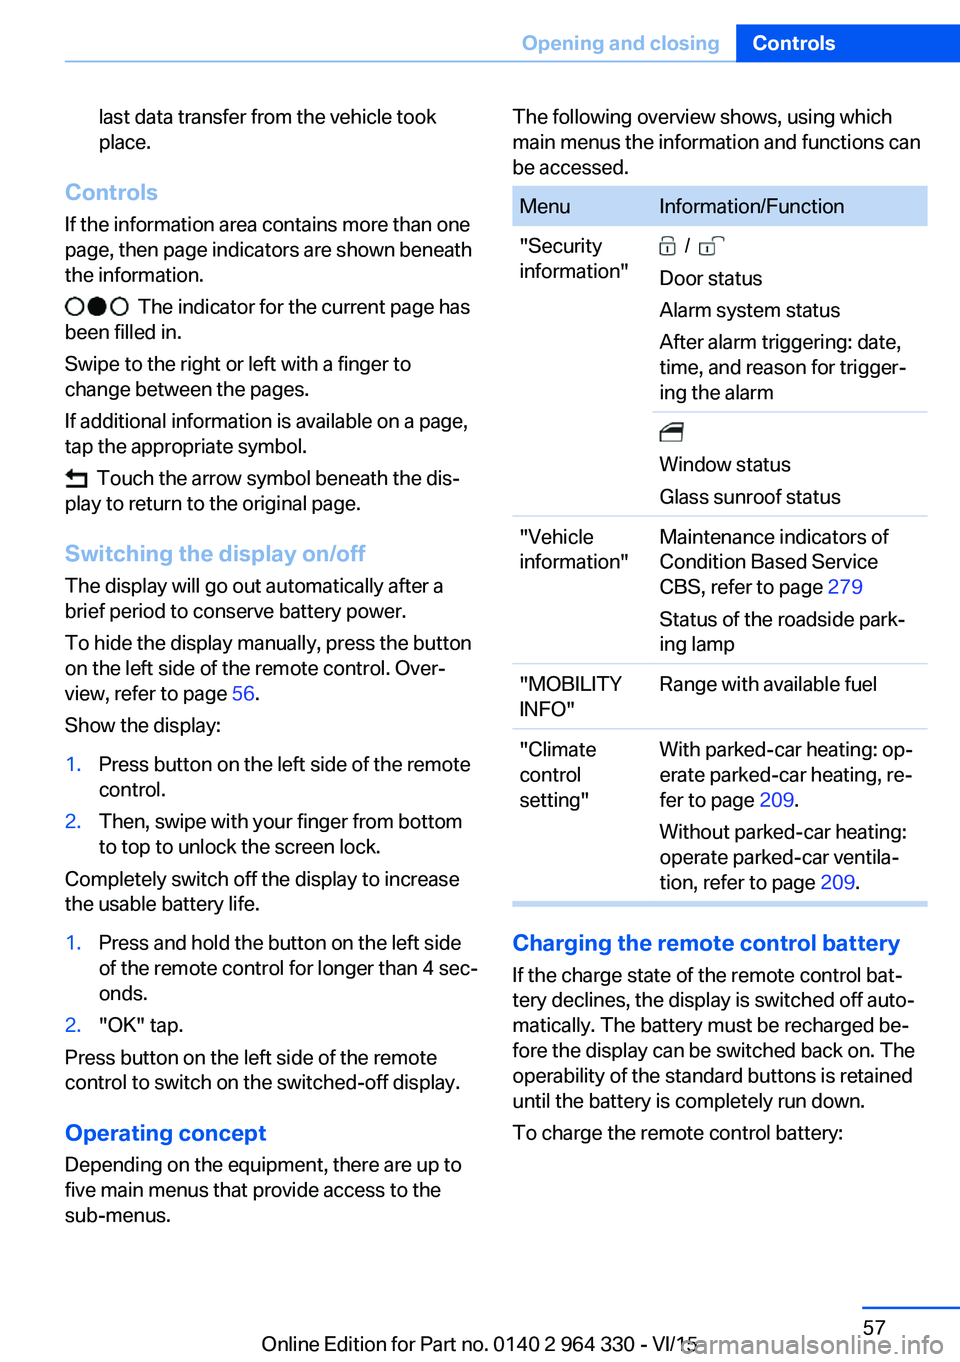
The following overview shows, using which
main menus the information and functions can
be accessed.MenuInformation/Function"Security
information" /
Door status
Alarm system status
After alarm triggering: date,
time, and reason for trigger‐
ing the alarm
Window status
Glass sunroof status"Vehicle
information"Maintenance indicators of
Condition Based Service
CBS, refer to page 279
Status of the roadside park‐
ing lamp"MOBILITY
INFO"Range with available fuel"Climate
control
setting"With parked-car heating: op‐
erate parked-car heating, re‐
fer to page 209.
Without parked-car heating:
operate parked-car ventila‐
tion, refer to page 209.
Charging the remote control battery
If the charge state of the remote control bat‐
tery declines, the display is switched off auto‐
matically. The battery must be recharged be‐
fore the display can be switched back on. The
operability of the standard buttons is retained
until the battery is completely run down.
To charge the remote control battery:
Seite 57Opening and closingControls57
Online Edition for Part no. 0140 2 964 330 - VI/15
Page 58 of 314
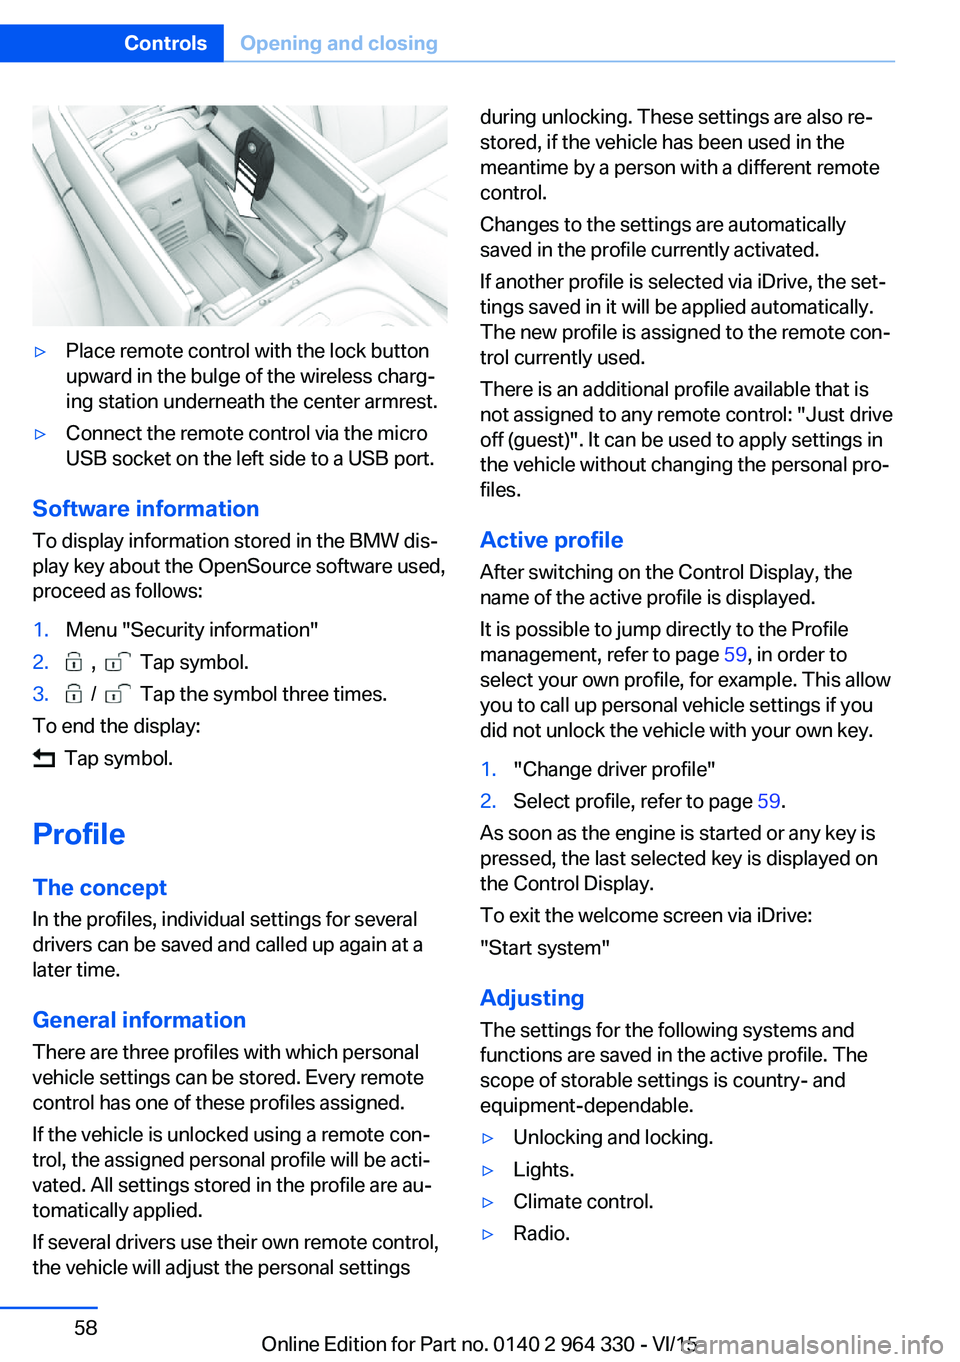
▷Place remote control with the lock button
upward in the bulge of the wireless charg‐
ing station underneath the center armrest.▷Connect the remote control via the micro
USB socket on the left side to a USB port.
Software information
To display information stored in the BMW dis‐
play key about the OpenSource software used,
proceed as follows:
1.Menu "Security information"2. , Tap symbol.3. / Tap the symbol three times.
To end the display:
Tap symbol.
Profile The concept In the profiles, individual settings for several
drivers can be saved and called up again at a
later time.
General information
There are three profiles with which personal
vehicle settings can be stored. Every remote
control has one of these profiles assigned.
If the vehicle is unlocked using a remote con‐
trol, the assigned personal profile will be acti‐
vated. All settings stored in the profile are au‐
tomatically applied.
If several drivers use their own remote control,
the vehicle will adjust the personal settings
during unlocking. These settings are also re‐
stored, if the vehicle has been used in the
meantime by a person with a different remote
control.
Changes to the settings are automatically
saved in the profile currently activated.
If another profile is selected via iDrive, the set‐
tings saved in it will be applied automatically.
The new profile is assigned to the remote con‐
trol currently used.
There is an additional profile available that is
not assigned to any remote control: "Just drive
off (guest)". It can be used to apply settings in
the vehicle without changing the personal pro‐
files.
Active profile
After switching on the Control Display, the
name of the active profile is displayed.
It is possible to jump directly to the Profile
management, refer to page 59, in order to
select your own profile, for example. This allow
you to call up personal vehicle settings if you
did not unlock the vehicle with your own key.1."Change driver profile"2.Select profile, refer to page 59.
As soon as the engine is started or any key is
pressed, the last selected key is displayed on
the Control Display.
To exit the welcome screen via iDrive:
"Start system"
Adjusting The settings for the following systems and
functions are saved in the active profile. The
scope of storable settings is country- and
equipment-dependable.
▷Unlocking and locking.▷Lights.▷Climate control.▷Radio.Seite 58ControlsOpening and closing58
Online Edition for Part no. 0140 2 964 330 - VI/15
Page 60 of 314
Exporting profilesMost settings of the active profile can be ex‐
ported.
This can be helpful for securing and retrieving
personal settings, before delivering the vehicle
to a workshop, e.g. The profiles backed up can
be taken into another vehicle.
The following export options are available:▷Via ConnectedDrive.▷Via USB interface, refer to page 221, to a
USB device.
About iDrive:
1."My Vehicle"2."Driver profiles"
The profile marked with this symbol can
be exported.
3.Select profile.4."Export driver profile"5.▷USB device: "USB device"
Select USB device as needed.▷ConnectedDrive.
Importing profiles
The existing settings of the active profile are
overwritten with the settings of the imported
profile.
About iDrive:
1."My Vehicle"2."Driver profiles"
The profile marked with this symbol can
be overwritten.
3.Select profile.4."Import driver profile"5.Select the medium using which the profile
was exported.▷USB device: "USB device"
Select USB device as needed.▷ConnectedDrive.6.Select profile.Using the remote control
Information WARNING
People or animals in the vehicle can lock
the doors from the inside and lock themselves
in. The vehicle can then not be opened from
the outside. There is risk of injuries. Take the
remote control along so that the vehicle can be
opened from the outside.◀
Unlocking Press button on the remote control.
Depending on the settings, refer to page 67,
the following access points are unlocked:▷Driver's door and fuel filler flap.▷All doors, tailgate, and fuel filler flap.
In addition, the following functions are exe‐
cuted:
▷The settings saved in the profile, refer to
page 58, are applied.▷The interior lights are being switched on,
unless they were manually switched off.
Switching the interior lights on and off
manually, refer to page 133.▷The welcome lamps are switched on, if it is
dark outside, door handle lighting and the
Welcome Light Carpet are also switched
on. These functions must be activated in
the Settings, refer to page 130.
Press the remote control button again to
switch on Welcome Light Carpet for the al‐
ready unlocked vehicle.▷The rear sliding visor is traveled into the
position, where it was prior to locking.▷Anti-theft protection is switched off.▷The alarm system, refer to page 69, is
disarmed.
After opening the driver's door, the vehicle is
ready for operation, refer to page 20.
Seite 60ControlsOpening and closing60
Online Edition for Part no. 0140 2 964 330 - VI/15
Page 62 of 314
Malfunction
Remote control detection by the vehicle can
among others be malfunctioning under the fol‐
lowing circumstances:▷The battery of the remote control is dis‐
charged. Replace the battery, refer to
page 55.▷Interference of the radio connection from
transmission towers or other equipment
with high transmit power.▷Shielding of the remote control due to
metal objects.▷Interference of the radio connection from
mobile phones or other electronic devices
in direct proximity.
Do not transport the remote control together
with metal objects or electronic devices.
In the case of interference, the vehicle can also
be unlocked and locked from the outside with‐
out remote control, refer to page 62.
For US owners only
The transmitter and receiver units comply with
part 15 of the FCC/Federal Communication
Commission regulations. Operation is gov‐
erned by the following:
FCC ID:
▷LX8766S.▷LX8766E.▷LX8CAS.▷LX8CAS2.▷MYTCAS4.
Compliance statement:
This device complies with part 15 of the FCC
Rules. Operation is subject to the following
two conditions:
▷This device may not cause harmful inter‐
ference, and▷this device must accept any interference
received, including interference that may
cause undesired operation.Any unauthorized modifications or changes to
these devices could void the user's authority to
operate this equipment.
Without remote control
From the outside WARNING
For some country-specific variants, un‐
locking from the inside is only possible with
special knowledge.
If people must spend a longer time in the vehi‐
cle while it is very hot or cold outside, there is
risk of injuries or danger to life. Do not lock the
vehicle from the outside when there are people
in it.◀
CAUTION
The door lock is permanently joined with
the door. The door handle can be moved.
When pulling the door handle with the
integrated key inserted, paint or key can be damaged. There is risk of property damage.
Remove the integrated key before pulling the
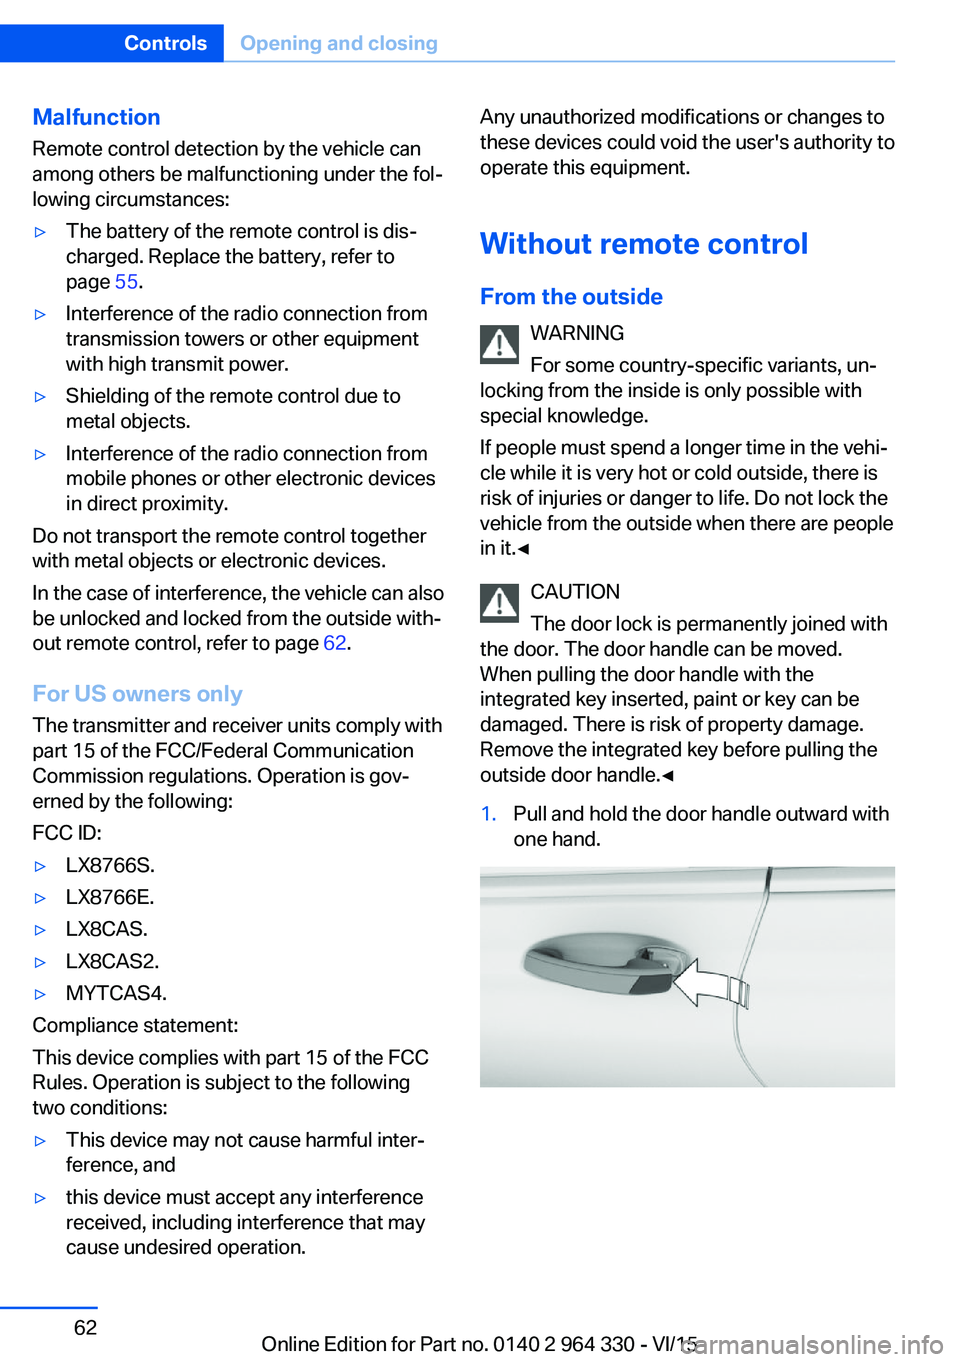
outside door handle.◀1.Pull and hold the door handle outward with
one hand.Seite 62ControlsOpening and closing62
Online Edition for Part no. 0140 2 964 330 - VI/15
Page 65 of 314
Manual operationIn the event of an electrical malfunction, man‐
ually operate the unlocked trunk lid slowly and
smoothly.
WARNING
Body parts can be jammed when operat‐
ing the tailgate. There is risk of injuries. Make
sure that the area of movement of the tailgate
is clear during opening and closing.◀
Locking separately The trunk lid can be locked separately with the
switch in the glove compartment. If the glove
compartment is locked, the trunk lid cannot be
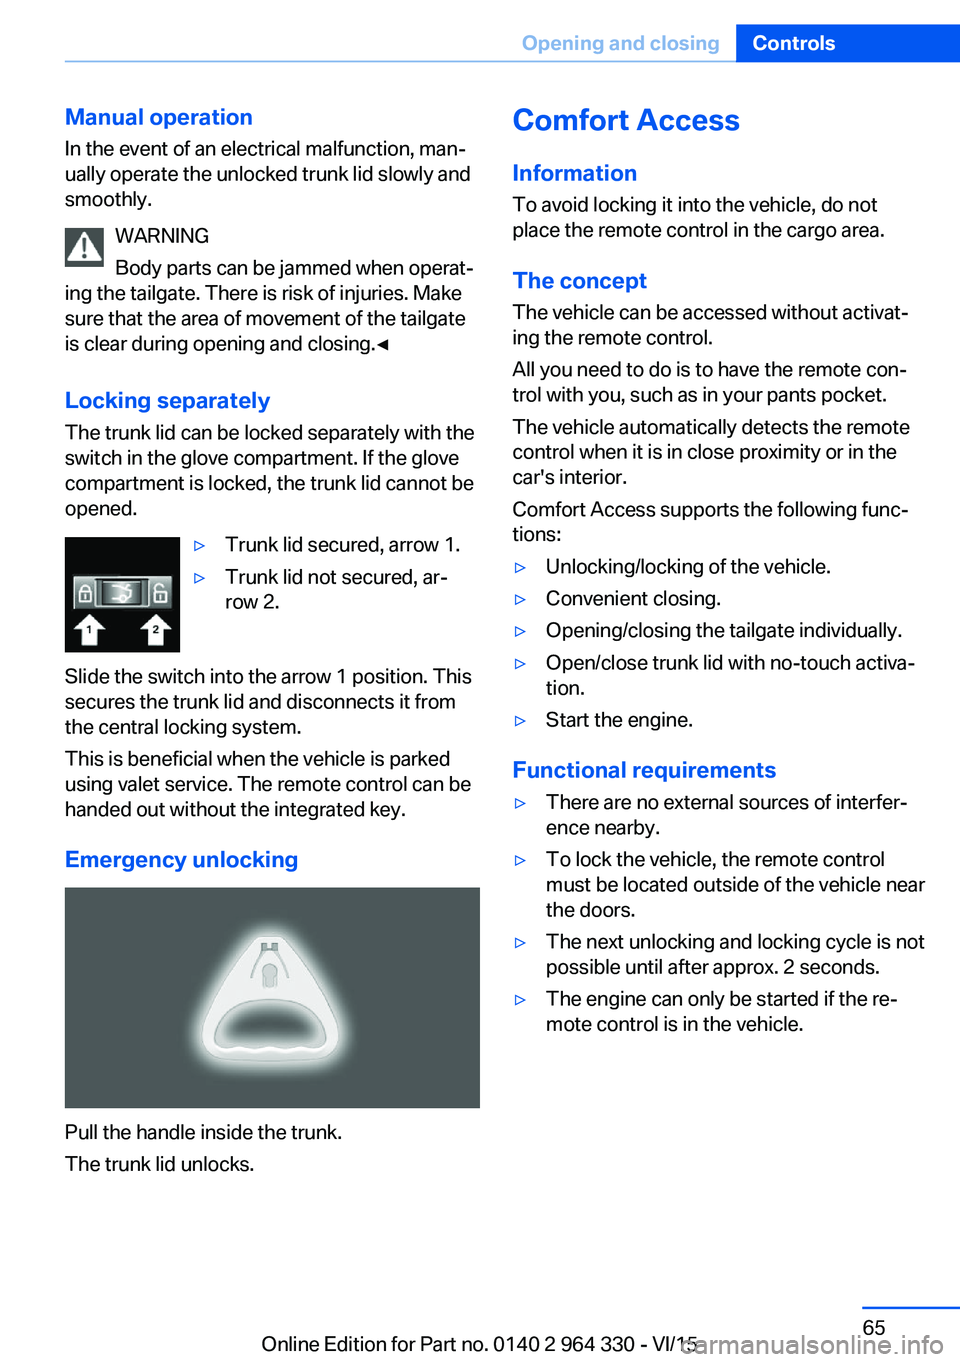
opened.▷Trunk lid secured, arrow 1.▷Trunk lid not secured, ar‐
row 2.
Slide the switch into the arrow 1 position. This
secures the trunk lid and disconnects it from
the central locking system.
This is beneficial when the vehicle is parked
using valet service. The remote control can be
handed out without the integrated key.
Emergency unlocking
Pull the handle inside the trunk.
The trunk lid unlocks.
Comfort Access
Information
To avoid locking it into the vehicle, do not
place the remote control in the cargo area.
The concept
The vehicle can be accessed without activat‐
ing the remote control.
All you need to do is to have the remote con‐ trol with you, such as in your pants pocket.
The vehicle automatically detects the remote
control when it is in close proximity or in the
car's interior.
Comfort Access supports the following func‐
tions:▷Unlocking/locking of the vehicle.▷Convenient closing.▷Opening/closing the tailgate individually.▷Open/close trunk lid with no-touch activa‐
tion.▷Start the engine.
Functional requirements
▷There are no external sources of interfer‐
ence nearby.▷To lock the vehicle, the remote control
must be located outside of the vehicle near
the doors.▷The next unlocking and locking cycle is not
possible until after approx. 2 seconds.▷The engine can only be started if the re‐
mote control is in the vehicle.Seite 65Opening and closingControls65
Online Edition for Part no. 0140 2 964 330 - VI/15
Page 67 of 314
If the remote control is in the sensor area, the
tailgate can be closed or opened inadvertently
by an unconscious or alleged recognized foot
movement.
The sensor range reaches approx. 5 ft/1.50 m
behind the area at the rear of the car.
WARNING
Body parts can be jammed when operat‐
ing the tailgate. There is risk of injuries. Make
sure that the area of movement of the tailgate
is clear during opening and closing.◀
CAUTION
During opening, the trunk lid pivots back
and up. There is risk of property damage. Make
sure that the area of movement of the tailgate
is clear during opening and closing.◀
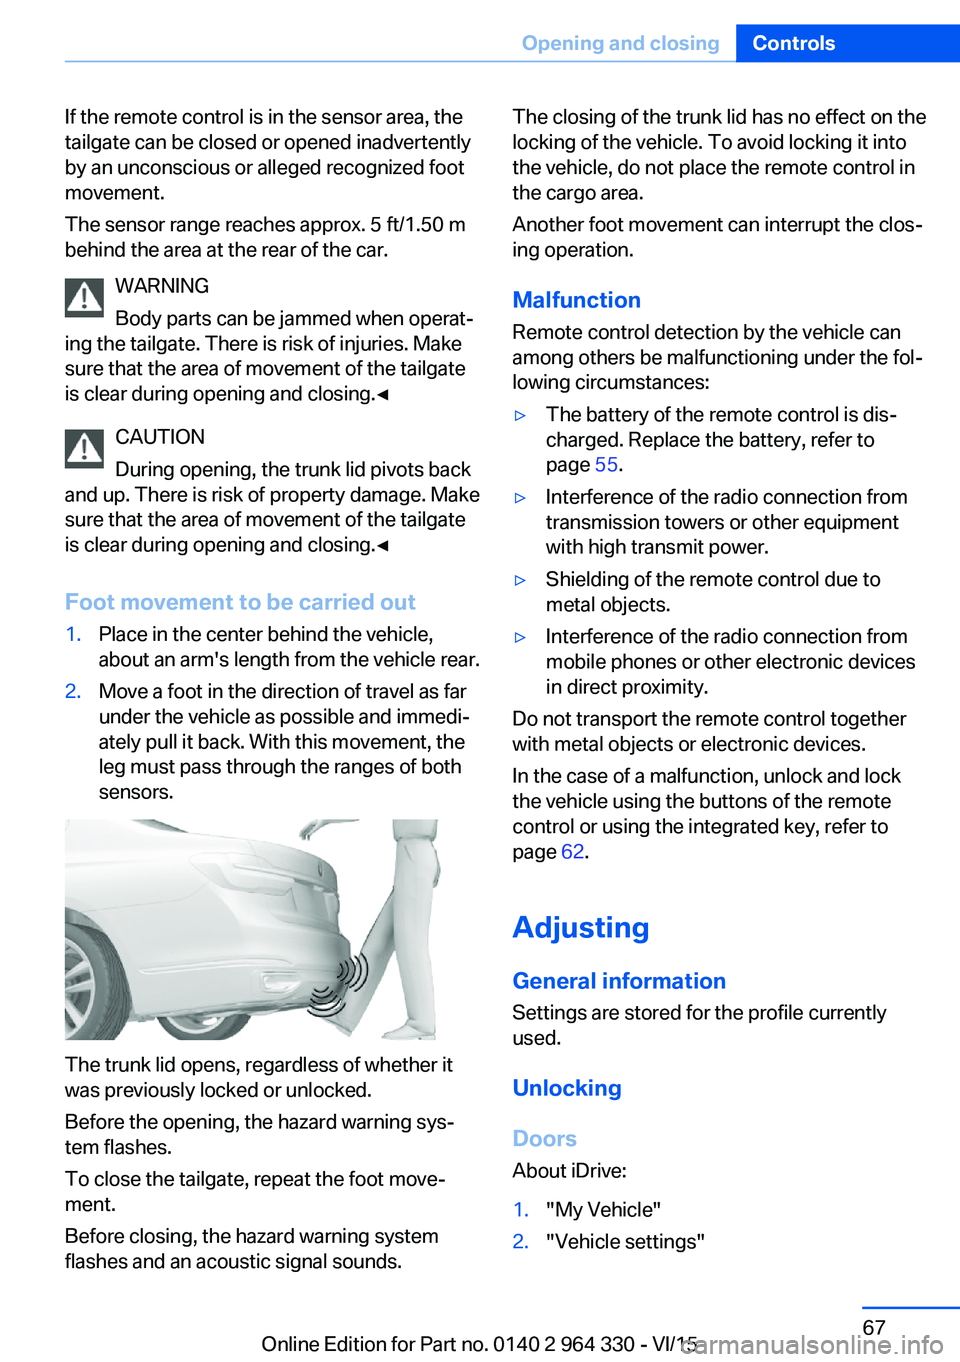
Foot movement to be carried out1.Place in the center behind the vehicle,
about an arm's length from the vehicle rear.2.Move a foot in the direction of travel as far
under the vehicle as possible and immedi‐
ately pull it back. With this movement, the
leg must pass through the ranges of both
sensors.
The trunk lid opens, regardless of whether it
was previously locked or unlocked.
Before the opening, the hazard warning sys‐
tem flashes.
To close the tailgate, repeat the foot move‐
ment.
Before closing, the hazard warning system
flashes and an acoustic signal sounds.
The closing of the trunk lid has no effect on the
locking of the vehicle. To avoid locking it into
the vehicle, do not place the remote control in
the cargo area.
Another foot movement can interrupt the clos‐
ing operation.
Malfunction
Remote control detection by the vehicle can
among others be malfunctioning under the fol‐
lowing circumstances:▷The battery of the remote control is dis‐
charged. Replace the battery, refer to
page 55.▷Interference of the radio connection from
transmission towers or other equipment
with high transmit power.▷Shielding of the remote control due to
metal objects.▷Interference of the radio connection from
mobile phones or other electronic devices
in direct proximity.
Do not transport the remote control together
with metal objects or electronic devices.
In the case of a malfunction, unlock and lock
the vehicle using the buttons of the remote
control or using the integrated key, refer to
page 62.
Adjusting
General information
Settings are stored for the profile currently
used.
Unlocking
Doors About iDrive:
1."My Vehicle"2."Vehicle settings"Seite 67Opening and closingControls67
Online Edition for Part no. 0140 2 964 330 - VI/15
Page 70 of 314
▷The indicator lamp flashes after unlocking
until drive readiness is switched on, but no
longer than approx. 5 minutes:
An alarm has been triggered.
Tilt alarm sensor The tilt of the vehicle is monitored.
The alarm system responds in situations such
as attempts to steal a wheel or when the car is
towed.
Interior motion sensor The windows and glass sunroof must be
closed for the system to function properly.
Avoiding unintentional alarms The tilt alarm sensor and interior motion sen‐
sor can be switched off together, such as in
the following situations:
▷In automatic car washes.▷In duplex garages.▷During transport on trains carrying vehi‐
cles, at sea or on a trailer.▷With animals in the vehicle.
Switching off the tilt alarm sensor and
interior motion sensor
Press the remote control button again
within 10 seconds as soon as the vehicle
is locked.
The indicator lamp lights up for approx. 2 sec‐
onds and then continues to flash.
The tilt alarm sensor and interior motion sen‐
sor are turned off until the vehicle is locked
again.
Switching off the alarm
▷Unlock the vehicle using the remote con‐
trol, if needed, through emergency detec‐
tion of the remote control, refer to page 55.▷With Comfort Access: if you are carrying
the remote control on your person, grasp
the driver side or front passenger side door
handle completely.
Power windows
Information WARNING
Unattended children or animals can
move the vehicle and endanger themselves
and traffic, e.g. with the following actions:
▷Pressing the Start/Stop button.▷Releasing the parking brake.▷Opening and closing of doors or windows.▷Shifting the selector lever into neutral.▷Using vehicle equipment.
There is risk of accidents or injuries. Do not
leave children or animals unattended in the ve‐
hicle. Carry remote control along when exiting
and lock the vehicle.◀
Opening
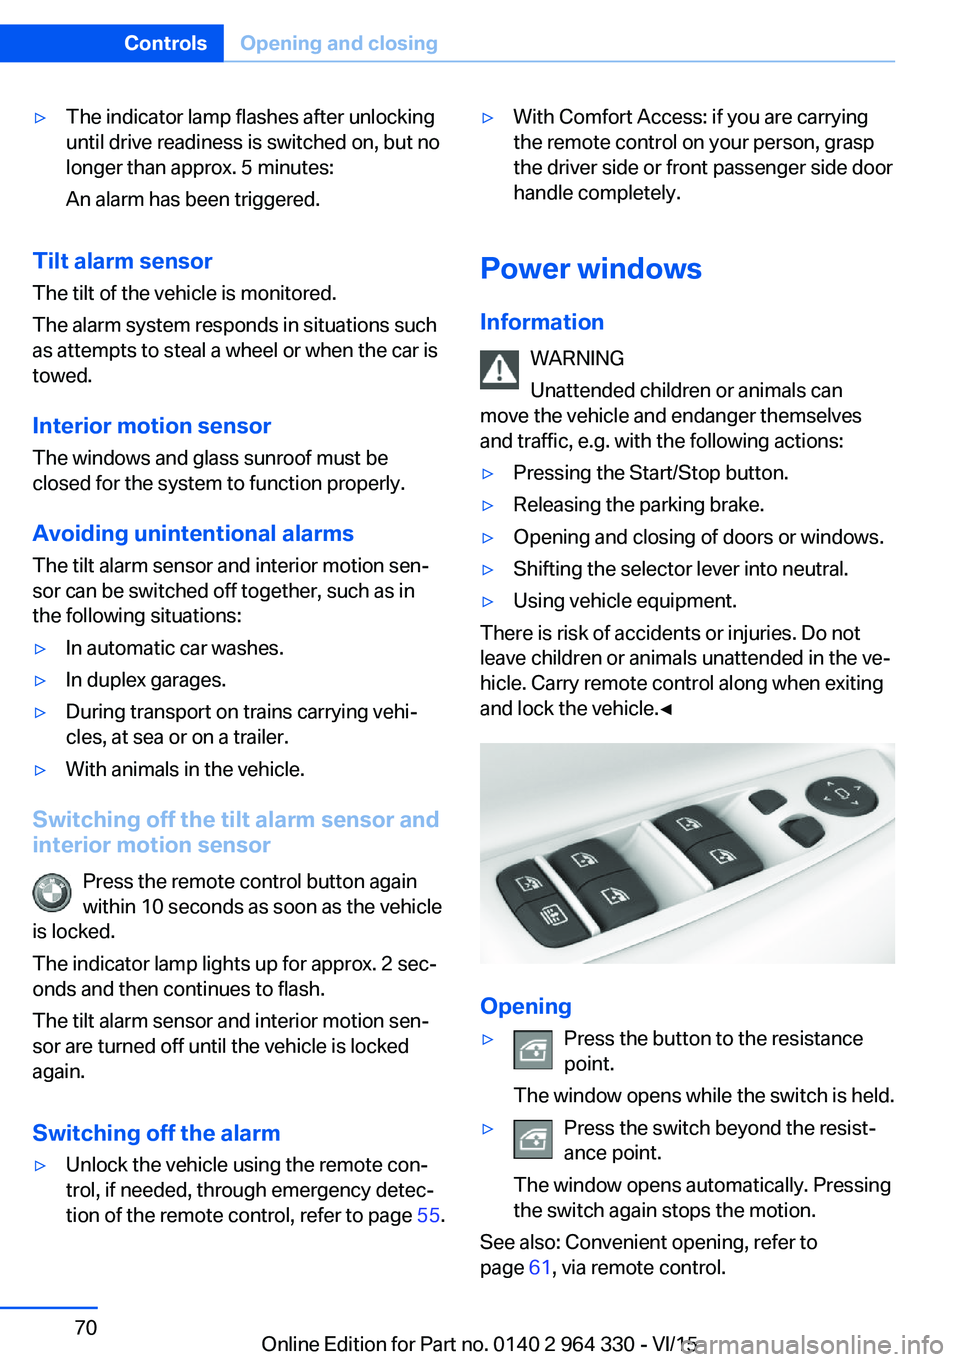
▷Press the button to the resistance
point.
The window opens while the switch is held.▷Press the switch beyond the resist‐
ance point.
The window opens automatically. Pressing
the switch again stops the motion.
See also: Convenient opening, refer to
page 61, via remote control.
Seite 70ControlsOpening and closing70
Online Edition for Part no. 0140 2 964 330 - VI/15
Page 71 of 314
ClosingWARNING
When operating the windows, body parts
and objects can be jammed. There is risk of in‐
juries or risk of property damage. Make sure
that the area of movement of the windows is
clear during opening and closing.◀▷Pull the switch to the resistance
point.
The window closes while the switch is
held.▷Pull the switch beyond the resistance
point.
The window closes automatically. Pulling
again stops the motion.
See also: closing by means of Comfort Access,
refer to page 65.
Pinch protection system WARNING
When operating the windows, body parts
and objects can be jammed. There is risk of in‐
juries or risk of property damage. Make sure
that the area of movement of the windows is
clear during opening and closing.◀
WARNING
Accessories on the windows such as an‐
tennas can impact jam protection. There is risk
of injuries. Do not install accessories in the
area of movement of the windows.◀
If closing force exceeds a specific margin as a
window closes, closing is interrupted.
The window reopens slightly.
Closing without the pinch protection system
WARNING
When operating the windows, body parts
and objects can be jammed. There is risk of in‐
juries or risk of property damage. Make sure
that the area of movement of the windows is
clear during opening and closing.◀
In case of danger from the outside or if ice
might prevent normal closing, proceed as fol‐
lows:1.Pull the switch past the resistance point
and hold it there.
The pinch protection is limited and the
window reopens slightly if the closing force
exceeds a certain margin.2.Pull the switch past the resistance point
again within approx. 4 seconds and hold it
there.
The window closes without jam protection.
Safety switch
The concept With the safety switch for the rear, it is possible
to block particular functions. This makes sense, for example, if children or animals are
carried in the rear.
General information
The following functions can be locked using
the switch:
▷Opening and closing of the rear windows
using the switches in the rear.▷Operation of the roller sunblind in the rear
window using the switches in the rear.▷Operation of the roller sunblinds in the side
windows using the switches in the rear.▷Adjustment of the power rear seats.▷Operation of the rear sliding visor using the
switches in the rear.
Information
WARNING
When operating the windows, body parts
and objects can be jammed. There is risk of in‐
juries or risk of property damage. Make sure
Seite 71Opening and closingControls71
Online Edition for Part no. 0140 2 964 330 - VI/15
Page 72 of 314
that the area of movement of the windows is
clear during opening and closing.◀
In order to prevent uncontrolled closing of the
windows, press the safety switch, e.g. if chil‐
dren or animals are carried in the rear.
Switching on and off Press button.
The LED lights up if the safety func‐
tion is switched on.
Roller sunblinds
General information The safety switch, refer to page 71, in the driv‐
er's door can be used to prevent children, e.g.,
from operating the roller sunblinds using the
switches in the rear.
BMW Touch Command The roller sunblinds can also be operated us‐
ing BMW Touch Command.
Information If you are no longer able to move the roller sun‐
blinds after having activated them consecu‐
tively a number of times, the system is blocked
for a limited time to prevent overheating. Let
the system cool.
The roller sunblinds cannot be moved at low
interior temperatures.Roller sunblind in the rear window
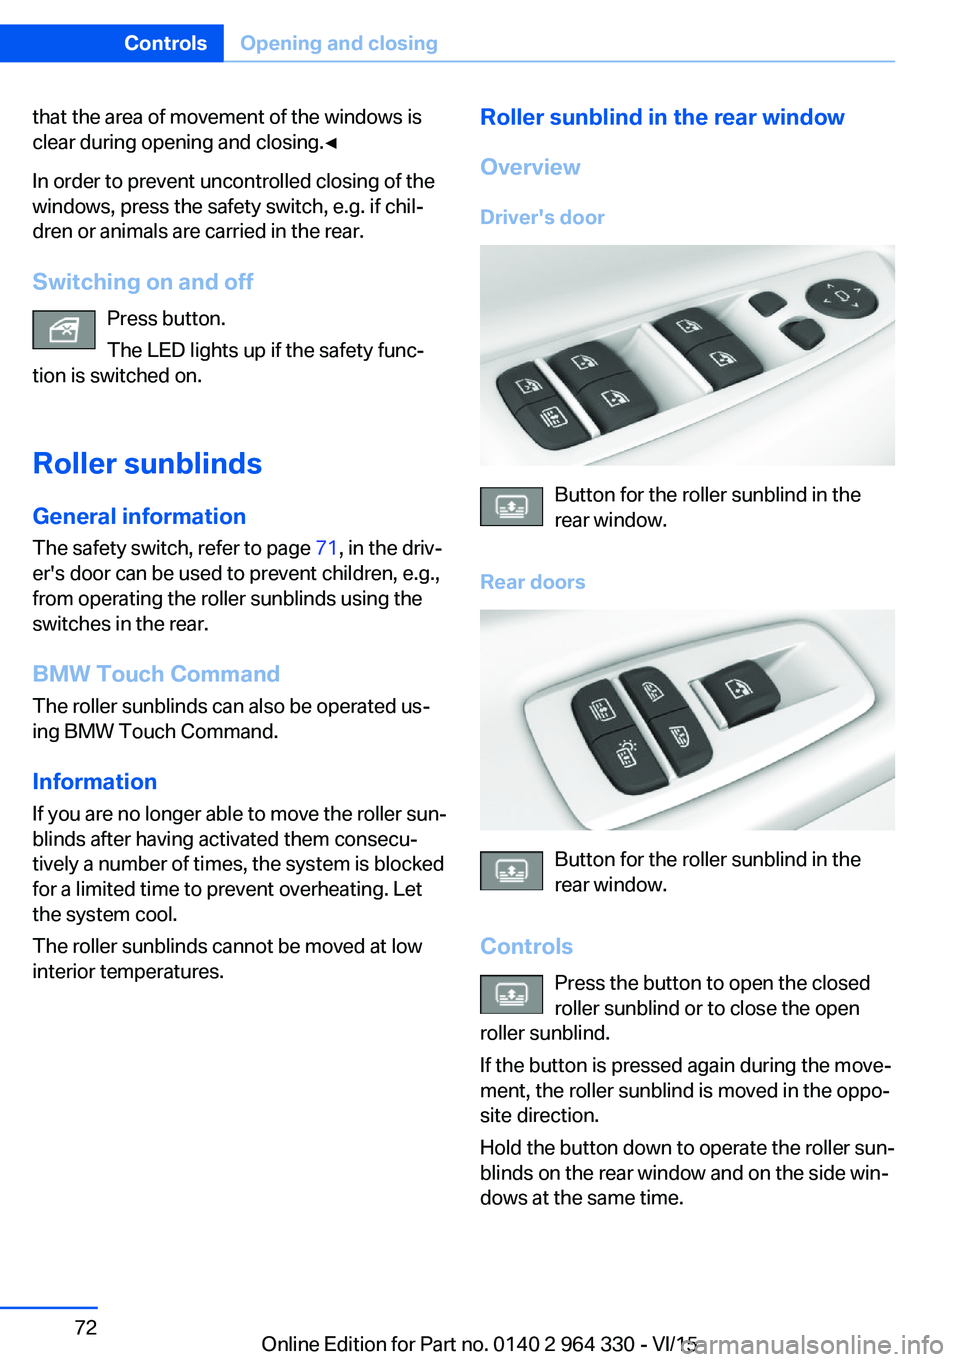
Overview
Driver's door
Button for the roller sunblind in the
rear window.
Rear doors
Button for the roller sunblind in the
rear window.
Controls Press the button to open the closed
roller sunblind or to close the open
roller sunblind.
If the button is pressed again during the move‐
ment, the roller sunblind is moved in the oppo‐
site direction.
Hold the button down to operate the roller sun‐
blinds on the rear window and on the side win‐
dows at the same time.
Seite 72ControlsOpening and closing72
Online Edition for Part no. 0140 2 964 330 - VI/15