BMW M3 1998 E36 Workshop Manual
Manufacturer: BMW, Model Year: 1998, Model line: M3, Model: BMW M3 1998 E36Pages: 759
Page 251 of 759
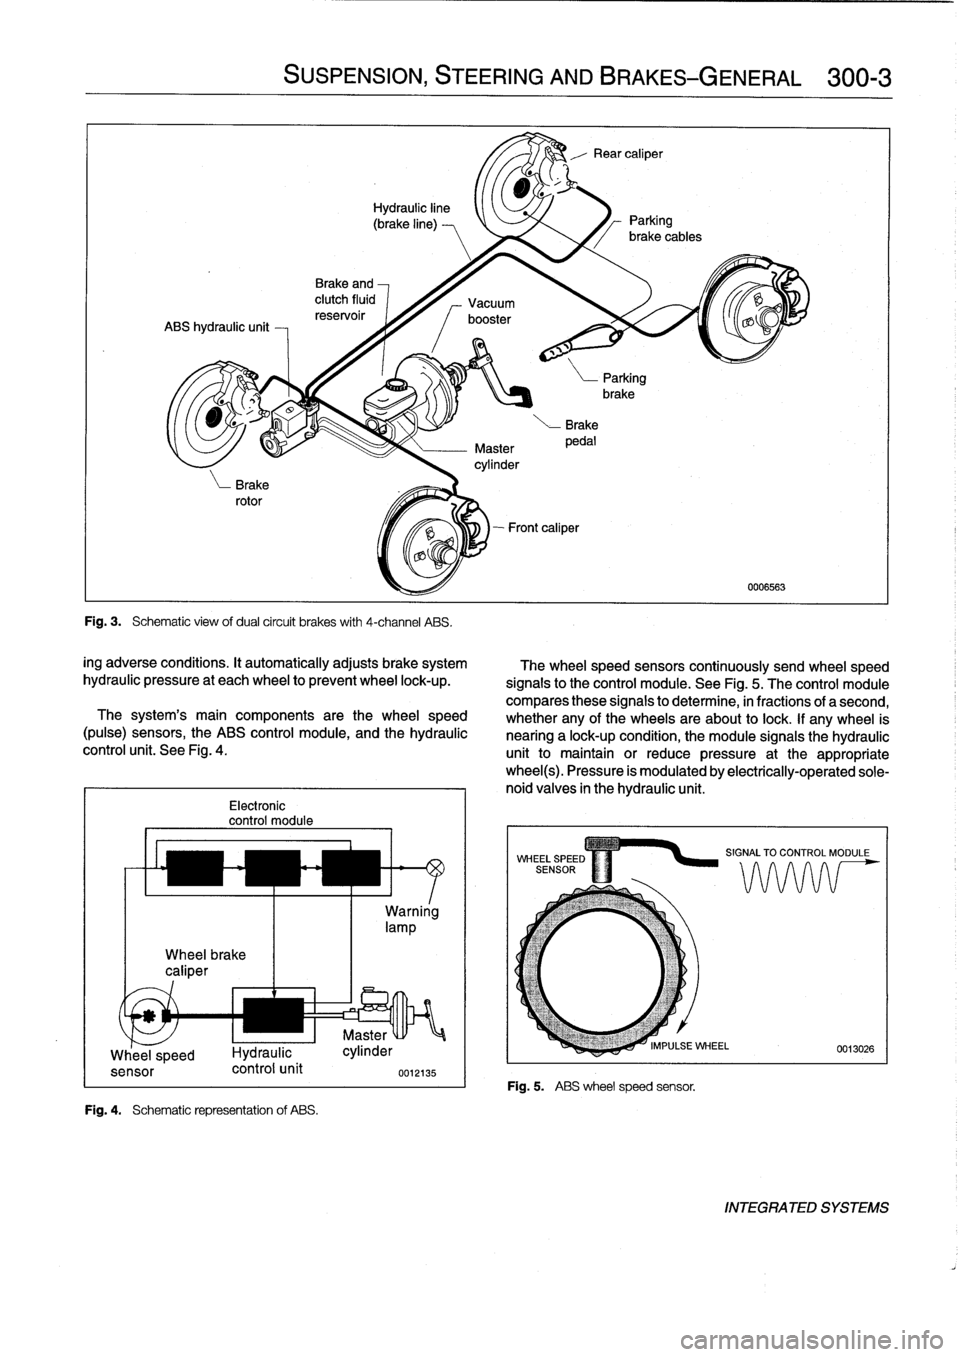
Wheel
brake
caliper
Electronic
control
module
Fig
.
4
.
Schematic
representation
of
ABS
.
SUSPENSION,
STEERING
ANDBRAKES-GENERAL
300-3
Fig
.
3
.
Schematic
view
ofdual
circuit
brakes
with
4-channel
ABS
.
ing
adverse
conditions
.
It
automatically
adjusts
brake
system
hydraulic
pressure
at
each
wheel
to
prevent
wheel
lock-up
.
The
system's
main
components
arethe
wheel
speed
(pulse)
sensors,
the
ABS
control
module,
and
the
hydraulic
control
unit
.
See
Fig
.
4
.
Warning
lamp
u
Master
Whee
_
l
speed
I-lydraulic
cylinder
sensor
control
unit
0012135
UNI
The
wheel
speed
sensors
continuously
send
wheel
speed
signals
to
the
control
module
.
See
Fig
.
5
.
The
control
module
compares
these
signals
to
determine,
in
fractions
of
a
second,
whether
any
of
the
wheels
areabout
to
lock
.
If
any
wheel
is
nearing
a
lock-up
condition,
the
module
signals
the
hydraulic
unit
to
maintain
or
reduce
pressure
at
the
appropriatewheel(s)
.
Pressure
is
modulated
by
electrically-operated
sole-
noid
valves
in
the
hydraulic
unit
.
Fig
.
5
.
ABS
wheelspeed
sensor
.
0006563
INTEGRATED
SYSTEMS
Page 252 of 759
300-4
SUSPENSION,
STEERING
AND
BRAKES-GENERAL
Three-channel
ABS
ís
used
on
al[
E36
cars
equipped
with
Al¡
Season
Traction
(AST)
standard
ABS
.
Each
front
wheelhas
a
separate
solenoid
valve
to
modulate
hydraulic
pressure
to
that
brake
caliper
.
The
traction
control
system
works
in
conjunction
with
ABS
The
rear
wheels
are
modulated
asa
pair,
controlled
by
a
sin-
and
the
engine
management
system
to
enhance
vehicle
con
gle
solenoid
valve
.
trol
.
The
main
function
of
the
AST
system
is
to
maintain
the
rolling
contact
between
the
tires
and
the
road
surface
under
al¡
driving
E36
cars
equipped
with
ABS/AST
utilize
a
four
channel
sys-
conditions
.
This
is
achieved
through
exact
application
and
tem,
which
functionsexactly
as
the
three
channelsystem
management
of
braking
and
drivetrain
forces
.
above,except
that
the
rear
wheels
are
modulated
individually
.
IDLE
SPEED
CONTROL
VALVE
HROTTLE
PLATE
6
.
Í
III
i
ADS
ACTU
AT
OR
THROTTLE
PLATE
POSITION
SENSOR
DME
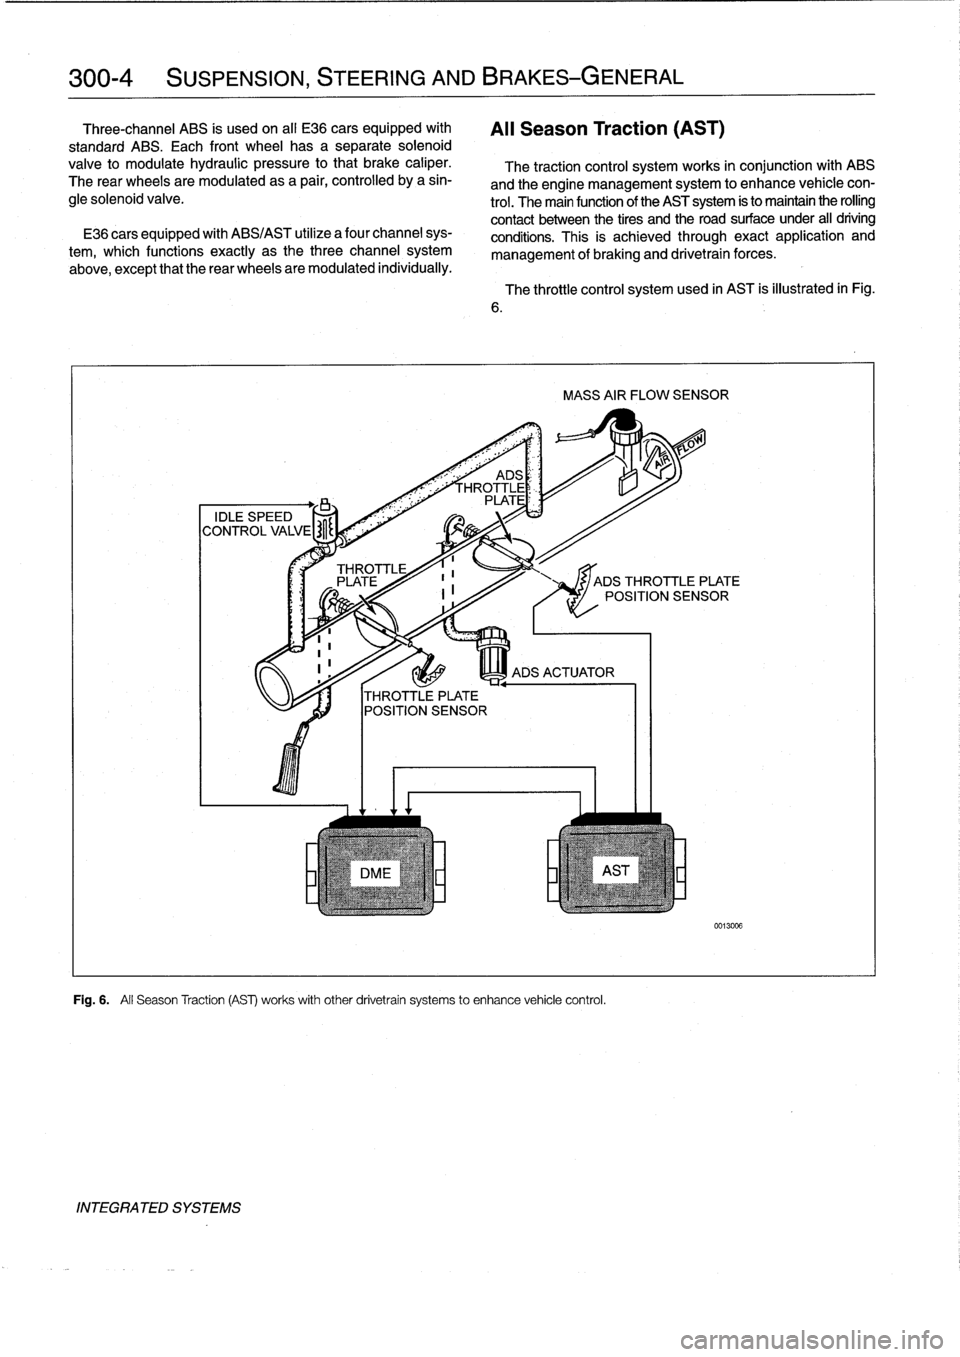
Fig
.
6
.
All
Season
Traction
(AS)
works
withother
drivetrain
systems
to
enhance
vehicle
control
.
INTEGRATED
SYSTEMS
The
throttle
control
system
used
in
AST
is
illustrated
in
Fig
.
MASS
AIR
FLOW
SENSOR
JADS
THROTTLE
PLATE
POSITION
SENSOR
0013006
Page 253 of 759
NOTE-
The
traction
control
system
referred
to
as
AST
(all
sea-
son
traction)
may
also
be
referred
to
as
ASC
(Automat-
ic
Stability
Control)
and
ASC+T
(Automatic
Stability
Control+Traction)
.
The
AST
system
improves
traction
by
electronically
apply-
ing
the
rear
brakes
when
therear
drive
wheels
are
spinning
at
a
faster
rate
than
the
front
wheels
.
The
combined
ABS/AST
control
module,
operating
through
the
ABS
hydraulic
control
unit,
modulates
braking
force
at
therear
wheels
.
In
addition,
AST
uses
retarded
ignition
timing
and
an
auxil-iary
engine
throttle
plate
to
reduceengine
torque
and
maintain
vehicle
stability
.
The
auxiliary
throttle
plate
is
held
open
by
spring
pressure
.
The
AST
system
actívates
the
auxiliary
throttie
position
motor
(ADS)
to
cose
the
AST
throttle
as
needed
.
This
reduces
the
volume
of
engine
intake
air
.
Due
to
the
throttle
closing
very
rapidly
during
AST
operationthe
driver
cannot
increase
theengine
power
output
regardless
of
how
far
theaccelerator
pedal
is
pushed
to
the
floor
.
The
auxiliary
throttle
plate
is
placed
ahead
of
the
conven-
tional
throttle
plate
in
the
throttle
body
.
Traction
control
also
comes
into
operationduringdecelera-
tion
.
Decelerating
on
snowy
or
icy
road
surfaces
can
lead
to
rear
wheel
slip
.
If
a
rear
wheel
startsto
drag
or
lock
up
when
the
throttle
is
closed
rapidly
orduringdownshifting,the
AST
system
can
limit
the
problem
by
advancing
the
ignition
timing
.
A
switch
on
the
center
console
is
used
to
togglethe
AST
on
or
off
.
The
AST
system
is
designed
to
be
maintenance
free
.
There
are
no
adjustments
that
can
be
made
.
Repair
and
trouble-
shooting
of
the
AST
system
requires
special
test
equipment
andknowledgeand
should
be
performed
only
by
an
autho-
rized
BMW
dealer
.
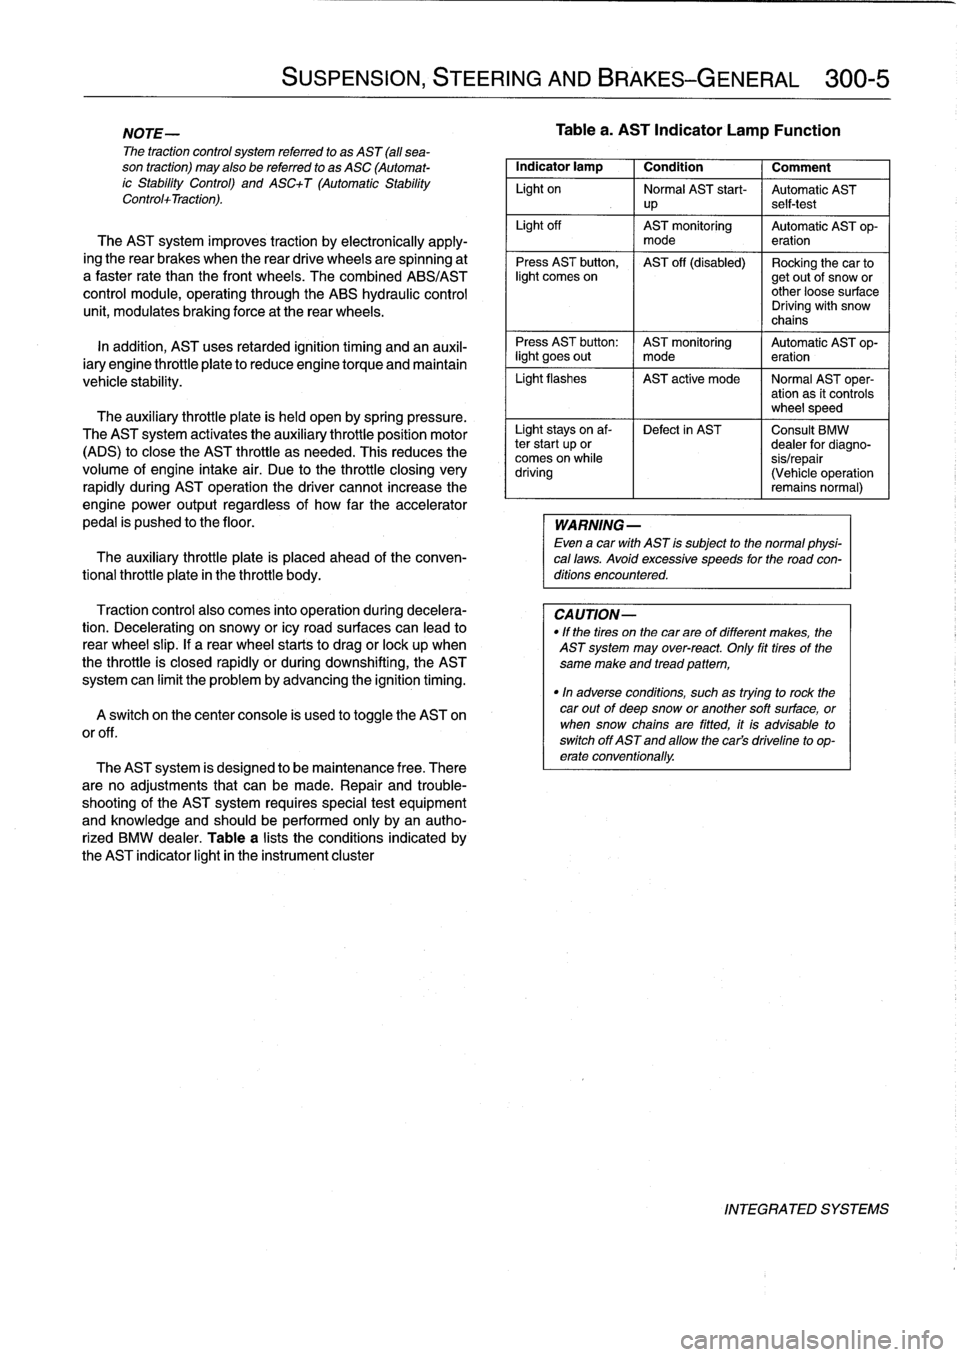
Table
a
lists
theconditions
indicated
by
the
AST
indicator
light
in
the
instrument
cluster
SUSPENSION,
STEERING
AND
BRAKES-GENERAL
300-5
Tablea
.
AST
Indicator
Lamp
Function
Indicator
lamp
1
Condition
1
Comment
Light
on
Normal
AST
start-
Automatic
AST
up
self-test
Light
off
AST
monitoring
Automatic
AST
op-
mode
eration
Press
AST
button,
AST
off
(disabled)
Rocking
the
car
tolight
comes
on
getout
of
snow
or
other
loose
surface
Driving
with
snow
chains
Press
AST
button
:
AST
monitoring
Automatic
AST
op-
light
goes
out
I
mode
eration
Light
flashes
AST
active
mode
I
Normal
AST
oper-
ation
as
it
controls
wheel
speed
Light
stays
on
af-
Defect
in
AST
Consult
BMW
ter
start
up
or
dealer
for
diagno-
comes
on
while
sis/repair
driving
(Vehicle
operation
remains
normal)
WARNING
-
Even
a
car
with
AST
is
subject
to
the
normal
physi-
cal
laws
.
Avoid
excessive
speeds
for
the
road
con-
ditions
encountered
.
CAUTION-
"
If
the
tires
on
the
carare
of
different
makes,
the
AST
system
may
over-react
.
Only
fit
tires
of
the
same
make
and
tread
pattem,
"In
adverse
conditions,
such
as
trying
to
rock
the
car
outof
deep
snow
or
another
soft
surface,
or
when
snow
chainsare
fitted,
it
is
advisable
to
switch
off
AST
and
allow
the
cars
driveline
to
op-
erate
conventionally
.
INTEGRATED
SYSTEMS
Page 254 of 759
300-6
SUSPENSION,
STEERING
AND
BRAKES-GENERAL
BATTE
RY
KL
30
ECM
MAIN
C~
RELAY
KL
15
DSC
SWITCH
LF1
;1~lZZ~
nSLn
l'
z
sJ
WHEEL
RF
c_
.
LR
r_
.
>
RR
ELECTRONIC
BRAKE
LIGHT
SWITCH
SPEED
SENSORS
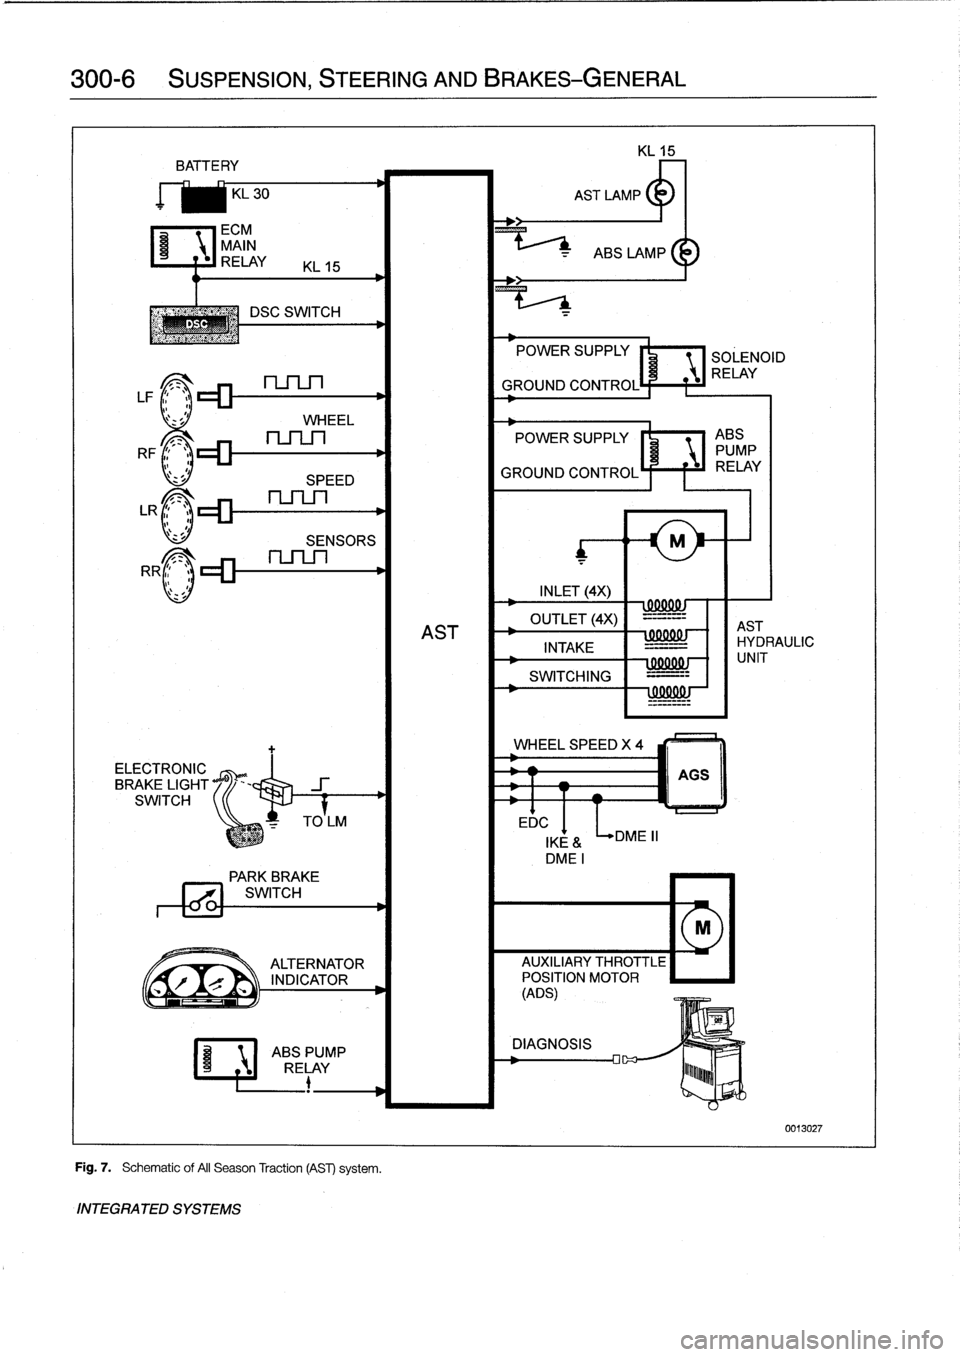
Fig
.
7
.
Schematic
of
AII
Season
Traction
(AST)
system
.
INTEGRATED
SYSTEMS
EDC
POWER
SUPPLY
SOLENOID
RELAY
GROUND
CONTROL
POWER
SUPPLY
I'
1
ABS
PUMP
GROUND
CONTROLÍ
F
f
iJ
RELAY
INLET
(4X)
wxxuw
OUTLET
(4X)
-=-=--
AST
AST
INTAKE
IHYDRAULIC
-
=-
SWITCHING
=---
!
99001
!J
WHEEL
SPEED
X
4
DME
II
000001
-
f
1
UNIT
AGS
IKE
&
DMEI
PARK
BREVE
771
SWITCH
M
ALTERNATOR
AUXILIARY
THROTTLE
r
`
INDICATOR
POSITION
MOTOR
(ADS)
ABSPUMP
DIAGNOSIS
RELAY
lu~~~b
0013027
Page 255 of 759
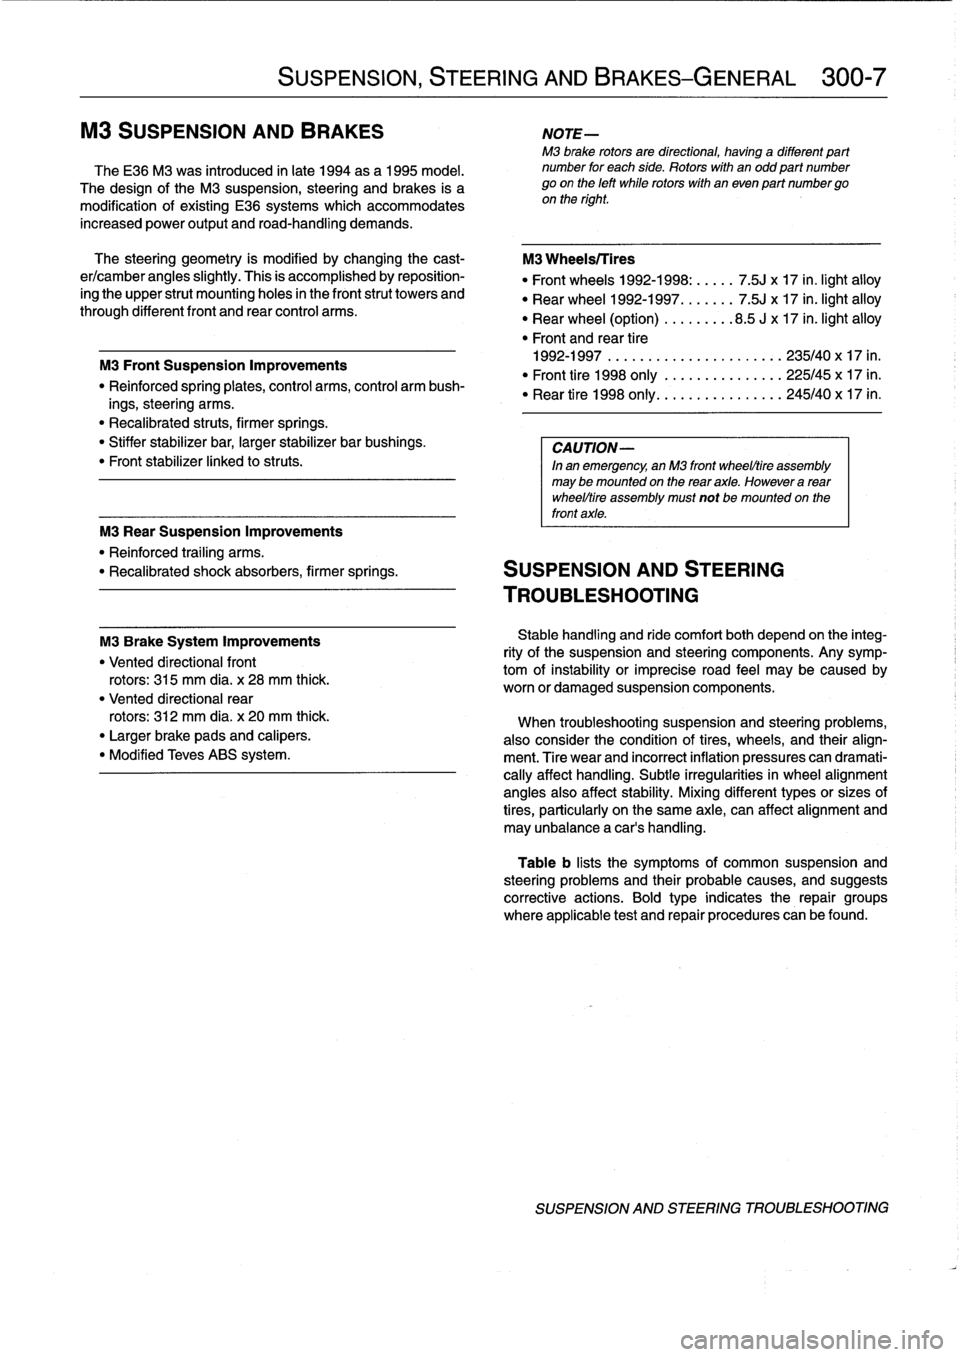
increased
power
output
and
road-handling
demands
.
The
steering
geometry
is
modified
by
changing
the
cast-
er/camber
angles
slightly
.
This
is
accomplishedby
reposition-
ing
the
upper
strut
mounting
holes
in
the
frontstrut
towers
and
through
different
front
and
rear
control
arms
.
M3
Brake
System
Improvements
"
Vented
directionalfront
rotors
:
315
mm
dia
.
x
28
mm
thick
.
"
Vented
directional
rear
rotors
:
312
mm
dia
.
x20
mm
thick
.
"
Larger
brake
pads
and
calipers
.
"
Modified
Teves
ABS
system
.
SUSPENSION,
STEERING
AND
BRAKES-GENERAL
300-
7
M3
SUSPENSION
AND
BRAKES
NOTE-
M3
brake
rotors
are
directional,
having
a
different
part
TheE36
M3
was
introduced
in
late
1994
as
a
1995
model
.
number
for
each
side
.
Rotors
with
an
odd
part
number
The
design
of
the
M3
suspension,
steering
and
brakes
is
a
go
on
the
left
while
rotors
with
en
even
part
numbergo
modification
of
existing
E36
systems
which
accommodates
on
the
right
.
M3
Front
SuspensionImprovements
"
Reinforced
spring
plates,control
arms,
control
arm
bush-
ings,
steering
arms
.
"
Recalibrated
struts,
firmer
springs
.
"
Stiffer
stabilizerbar,
larger
stabilizer
bar
bushings
.
"
Front
stabilizer
linked
to
struts
.
M3
Wheels/Tires
"
Front
wheels
1992-1998
:.....
7
.5J
x
17
in
.
light
alloy
"
Rear
wheel
1992-1997
.......
7
.5J
x17
in
.
light
alloy
"
Rear
wheel
(option)
........
.8
.5
Jx17
in
.
light
alloy
"
Front
and
rear
tire
1992-1997
.............
.
.
.
...
...
235/40
x
17
in
.
"
Front
tire
1998
only
......
...
.
.
.
...
225/45
x
17
in
.
"
Rear
tire
1998
only
.......
.
.
.
...
...
245/40
x
17
in
.
CAUTION-
In
en
emergency,
an
M3
front
wheel/tire
assembly
may
be
mounted
on
the
rearaxle
.
However
a
rear
wheel/tire
assemblymust
not
be
mounted
on
the
front
axle
.
M3
RearSuspensionImprovements
"
Reinforced
trailing
arms
.
"
Recalibrated
shock
absorbers,
firmer
springs
.
SUSPENSION
AND
STEERING
TROUBLESHOOTING
Stable
handling
and
ride
comfort
both
depend
on
the
integ-
rity
of
the
suspension
and
steering
components
.
Any
symp-
tom
of
instability
or
imprecise
road
feel
may
be
caused
by
worn
or
damaged
suspension
components
.
When
troubleshooting
suspension
and
steering
problems,
also
consider
the
condition
of
tires,
wheels,
and
their
align-
ment
.
Tire
wear
and
incorrect
inflation
pressures
can
dramati-
cally
affect
handling
.
Subtie
irregularities
in
wheel
alignment
angles
also
affect
stabílity
.
Mixing
different
types
or
sizes
of
tires,
particularly
on
the
same
axle,
can
affect
alignment
and
may
unbalancea
car's
handling
.
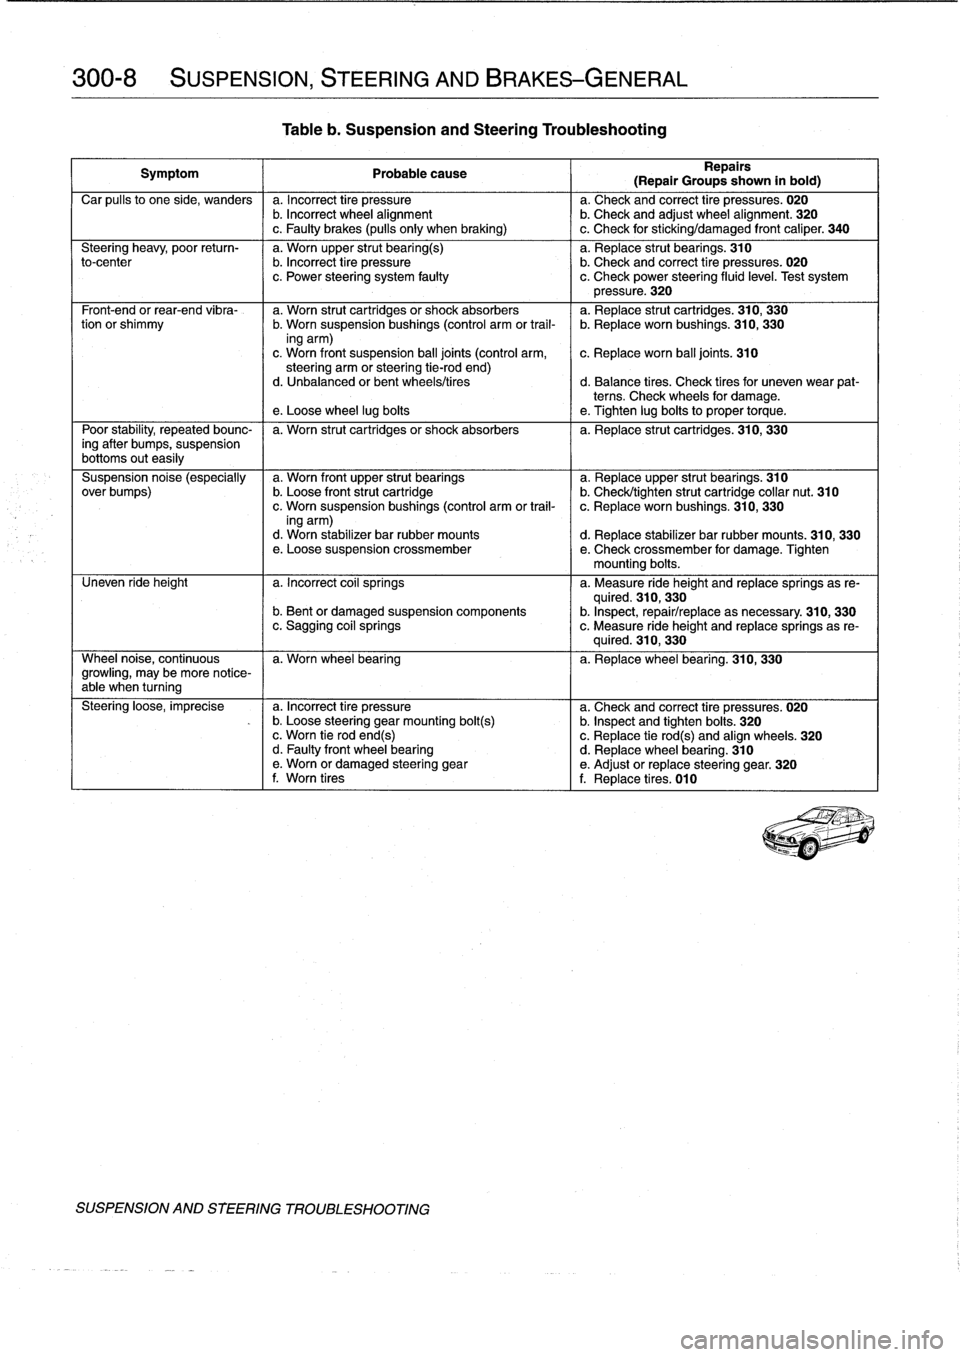
Table
b
lists
the
symptoms
of
common
suspension
and
steering
problems
and
their
probable
causes,
and
suggests
corrective
actions
.
Bold
type
indicates
the
repair
groups
where
applicable
test
and
repair
procedures
can
befound
.
SUSPENSION
AND
STEERING
TROUBLESHOOTING
Page 256 of 759
300-8
SUSPENSION,
STEERING
AND
BRAKES-GENERAL
Tableb
.
Suspension
and
Steering
Troubleshooting
Symptom
1
Probable
cause
Repairs
(Repair
Groups
shown
in
bold)
Car
pulís
to
one
side,
wanders
a
.
Incorrect
tire
pressure
a
.
Check
and
correct
tire
pressures
.
020
b
.
Incorrect
wheel
alignment
b
.
Check
and
adjust
wheel
alignment
.
320
c
.
Faulty
brakes
(pulls
only
when
braking)
I
c
.
Check
for
sticking/damaged
front
caliper
.
340
Steering
heavy,
poor
return-
a
.
Worn
upper
strut
bearing(s)
a
.
Replace
strut
bearings
.
310
to-center
b
.
Incorrect
tire
pressure
b
.
Check
and
correct
tire
pressures
.
020
c
.
Power
steering
system
faulty
c
.
Check
power
steering
fluid
level
.
Test
system
pressure
.
320
Front-end
or
rear-end
vibra-
a
.
Worn
strut
cartridgesor
shock
absorbers
a
.
Replace
strut
cartridges
.
310,
330
tion
or
shimmy
b
.
Worn
suspension
bushings
(control
arm
or
trail-
b
.
Replace
worn
bushings
.
310,
330
ing
arm)
c
.
Worn
front
suspension
ball
joints
(control
arm,
c
.
Replace
worn
ball
joints
.
310
steering
arm
orsteering
tie-rod
end)d
.
Unbalanced
or
bent
wheels/tires
d
.
Balance
tires
.
Check
tiresfor
uneven
wear
pat-
terns
.
Check
wheels
for
damage
.
e
.
Loose
wheel
lug
boits
e
.
Tighten
lug
boits
to
proper
torque
.
Poor
stability,
repeated
bounc-
I
a
.
Worn
strut
cartridgesor
shock
absorbers
I
a
.
Replace
strut
cartridges
.
310,
330
ing
after
bumps,
suspension
bottoms
outeasily
Suspension
noise
(especially
a
.
Worn
front
upper
strut
bearings
a
.
Replaceupper
strut
bearings
.
310
over
bumps)
b
.
Loose
front
strut
cartridge
b
.
Check/tighten
strut
cartridge
collar
nut
.
310
c
.
Worn
suspensionbushings
(control
arm
or
trail-
c
.
Replace
worn
bushings
.
310,
330
ing
arm)d
.
Worn
stabilizer
bar
rubber
mounts
d
.
Replace
stabilizer
bar
rubber
mounts
.
310,
330
e
.
Loose
suspension
crossmember
e
.
Check
crossmember
for
damage
.
Tighten
mounting
boits
.
Uneven
ride
height
a
.
Incorrect
coil
springs
a
.
Measure
ride
height
and
replacesprings
as
re-
quired
.
310,
330
b
.
Bent
or
damaged
suspension
components
b
.
Inspect,
repair/replace
asnecessary
.
310,
330
c
.
Sagging
coil
springs
c
.
Measure
ride
height
and
replace
springs
as
re-
quired
.
310,
330
Wheel
noise,
continuous
I
a
.
Worn
wheel
bearing
I
a
.
Replacewheel
bearing
.
310,
330
growling,
may
be
more
notíce-
able
when
turning
Steering
loose,
imprecise
a
.
Incorrect
tire
pressure
a
.
Check
and
correct
tire
pressures
.
020
-
b
.
Loose
steering
gearmounting
bolt(s)
b
.
Inspect
and
tighten
boits
.
320
c
.
Worn
tie
rodend(s)
c
.
Replace
tie
rod(s)
and
align
wheels
.
320
d
.
Faulty
front
wheel
bearing
d
.
Replace
wheel
bearing
.
310
e
.
Worn
or
damaged
steering
gear
e
.
Adjust
or
replace
steering
gear
.
320
f
.
Worn
tires
f
.
Replace
tires
.
010
SUSPENSION
AND
STEERING
TROUBLESHOOTING
Page 257 of 759
GENERAL
310
Front
Suspension
GENERAL
..
.
.
.
.
.
.
.
.
.
.......
.
........
.
310-1
FRONT
WHEEL
BEARINGS
..
.
.
.
.......
310-8
SHOCK
ABSORBERS
AND
SPRINGS
..
.
310-2
Front
wheel
bearing,
replacing
...
.
.
.
.
.
.
.
...
310-8
Strut
assembly,
removing
and
installing
.....
310-2
STABILIZER
BAR
..........
.
.
.
.
.
.
.
.
.
.
.
.
310-9
Strut
assembly,
disassembling
Stabilizerbar,
removing
and
installing
.
.
.
.
...
310-9
and
assembling
.
.
.
...
.
.....
.
.........
310-4
Ride
Height
.
.
.
.
.
.
.
.
.
.
.
.
.....
.
........
.
310-4
SUBFRAME
CROSSMEMBER
.
.
.
.
.
.
.
.
.
.
.
310-9
Subframe
crossmember,
CONTROL
ARMS
.
.
...
.
.
.
.
.
.
.
...
.
.....
310-5
removing
and
installing
.....
.
.
.
.
.
.
.
.
.
...
310-9
Control
arm,
removing
and
installing
....
..
310-5
Outer
control
arm
ball
joint,
replacing
Table
exce
t
M3
models
310-6
a
.
Front
Ride
Height
Specifications
..
.
.....
..
.
..
..
310-5
Control
arm
bushing,
replacing
.
.
.
...
.
.....
310-7
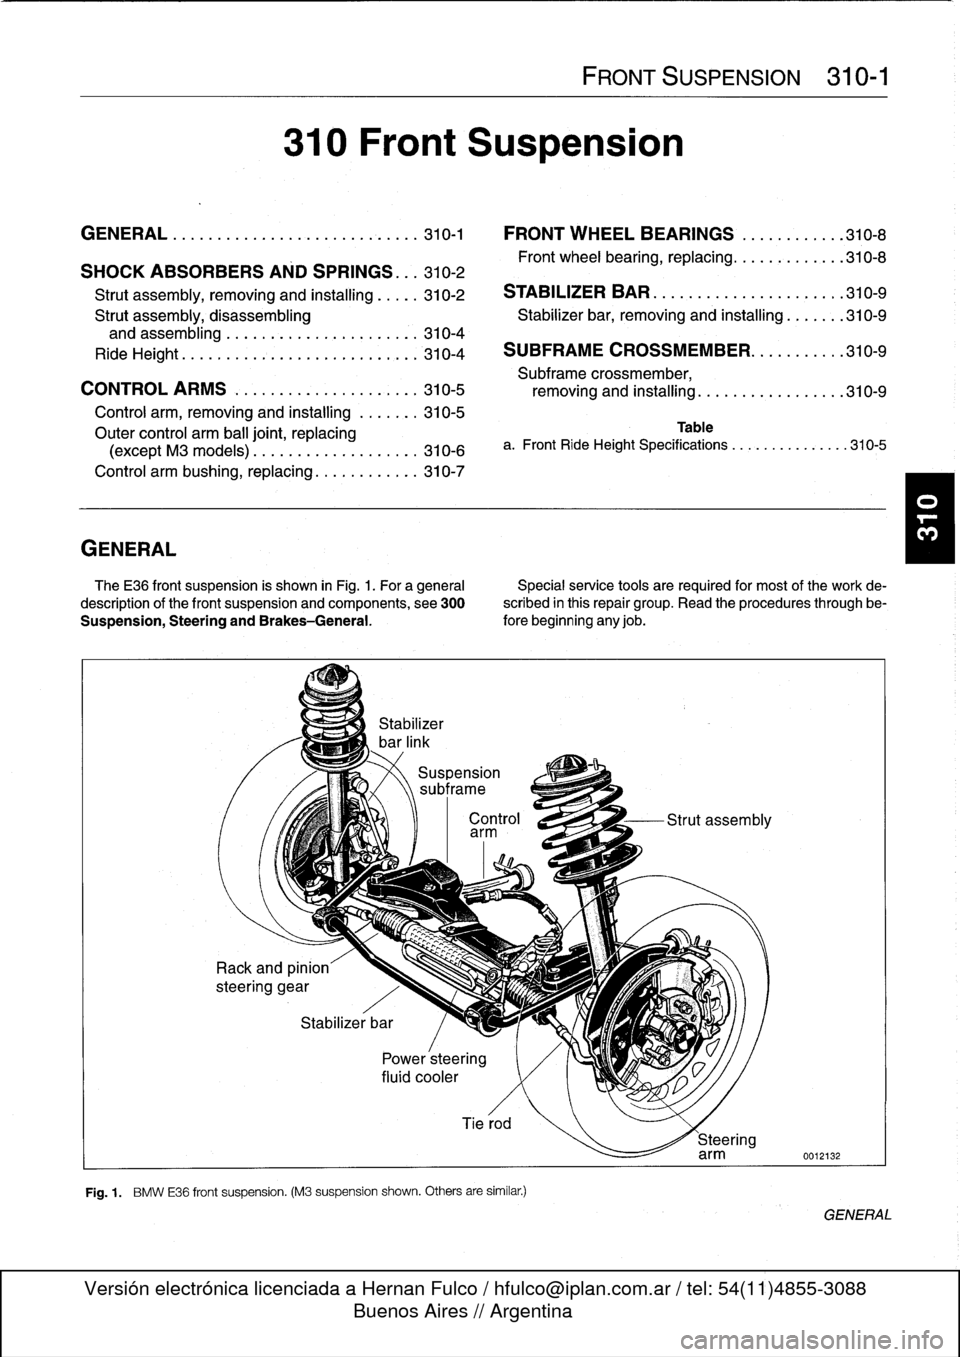
The
E36
front
suspension
is
shown
in
Fig
.
1
.
For
a
general
Specialservice
tools
arerequired
for
most
of
the
work
de-
description
of
the
front
suspension
and
components,
see
300
scribed
in
this
repair
group
.
Read
the
procedures
through
be-
Suspension,
Steering
and
Brakes-General
.
fore
beginning
any
job
.
Stabilizer
bar
Power
steering
fluid
cooler
Control
Strut
assembly
arm
Tierod
Fig
.
1
.
BMW
E36
front
suspension
.
(M3
suspension
shown
.
Others
are
similar
.)
FRONT
SUSPENSION
310-1
Steering
arm
0012132
GENERAL
Page 258 of 759
310-2
FRONT
SUSPENSION
WARNING-
"
Physical
safety
could
be
impaired
if
procedures
described
here
areundertaken
without
the
proper
service
tools
and
equipment
.
Be
sure
to
have
the
right
tools
onhand
before
beginning
any
job
.
"
Do
notreuse
self-locking
nuts
or
bolts
.
They
are
designed
to
beused
only
once
and
may
fail
if
re-
used
.
Always
replace
self-locking
fasteners
any
timethey
are
loosenedor
removed
.
"
Do
not
install
bolts
and
nuts
coated
with
under-
coating
wax,
as
the
correct
tightening
torque
can-
not
beassured
.
Always
clean
the
threads
with
solventbefore
installation,
or
install
new
parts
.
"
Do
not
attempt
to
weld
or
straighten
any
suspen-
sion
components
.
Replace
damaged
parts
.
SHOCK
ABSORBERS
AND
SPRINGS
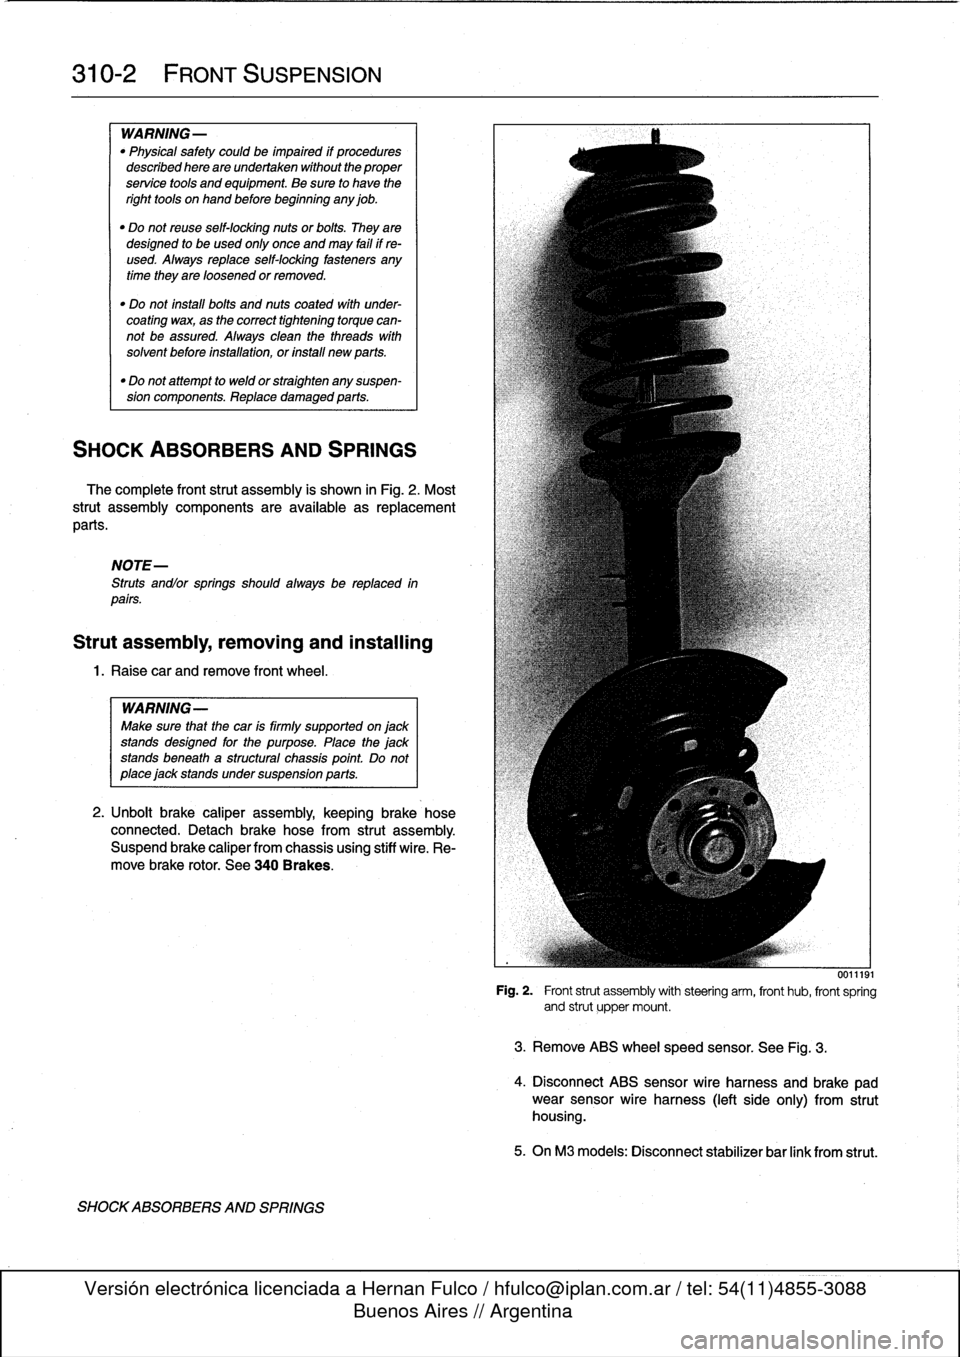
The
complete
front
strut
assembly
is
shown
in
Fig
.
2
.
Most
strut
assembly
components
are
available
asreplacement
parts
.
NOTE-
Struts
andlor
springs
shouldalways
be
replaced
in
parts
.
Strut
assembly,
removing
and
installing
1
.
Raisecar
and
remove
front
wheel
.
WARNING-
Make
sure
that
the
car
is
firmly
supported
on
jack
standsdesigned
for
the
purpose
.
Place
the
jack
standsbeneath
a
structural
chassis
point
Do
not
place
jack
stands
under
suspension
parts
.
2
.
Unbolt
brake
caliper
assembly,
keepingbrake
hose
connected
.
Detach
brake
hose
from
strut
assembly
.
Suspend
brake
caliper
from
chassis
using
stiff
wire
.
Re-
move
brake
rotor
.
See
340
Brakes
.
SHOCKABSORBERS
AND
SPRINGS
0011191
Fig
.
2
.
Front
strut
assembly
with
steering
arm,
front
hub,
front
spring
and
strut
upper
mount
.
3
.
Remove
ABS
wheelspeed
sensor
.
See
Fig
.
3
.
4
.
Disconnect
ABS
sensor
wire
harness
and
brake
pad
wear
sensor
wire
harness
(left
side
only)
from
strut
housing
.
5
.
OnM3
modeis
:
Disconnect
stabilizer
bar
link
from
strut
.
Page 259 of 759
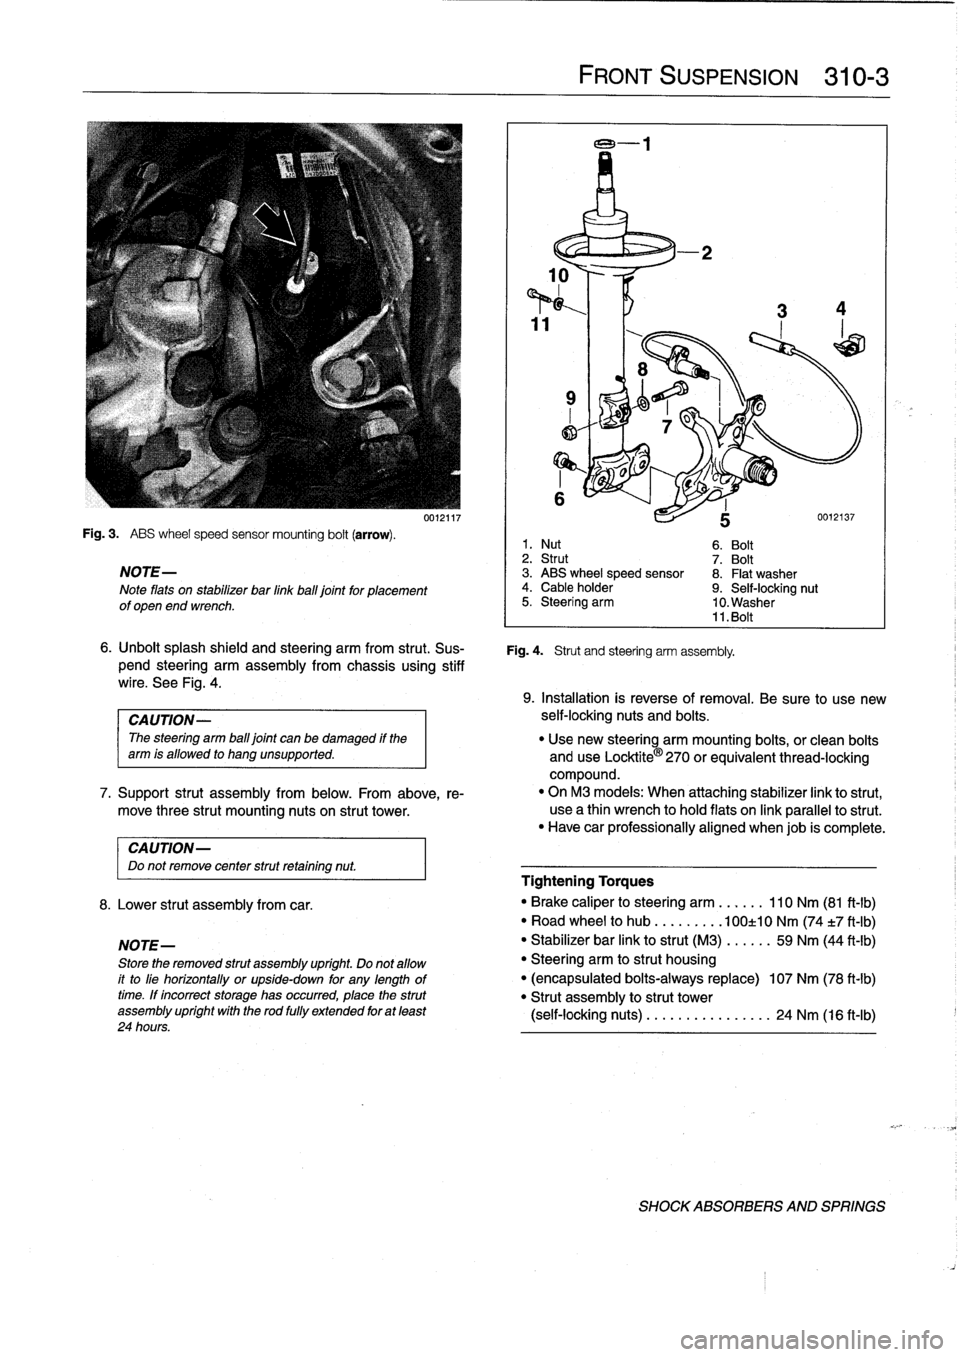
Fig
.
3
.
ABS
wheel
speed
sensor
mounting
bolt
(arrow)
.
NOTE-
Note
flats
on
stabilizer
bar
linkball
joint
for
placement
of
open
end
wrench
.
CAUTION-
Do
not
remove
center
strut
retaining
nut
.
8
.
Lower
strut
assembly
from
car
.
NOTE-
Store
the
removed
strut
assembly
upríght
.
Do
not
allow
it
to
líe
horizontally
or
upside-down
for
any
lengthoftime
.
If
íncorrect
storage
has
occurred,
place
the
strut
assembly
upríght
wíth
the
rod
fully
extended
for
at
least
24
hours
.
0012117
FRONT
SUSPENSION
310-3
6
.
Unbolt
splash
shield
and
steering
arm
from
strut
.
Sus-
Fig
.
4
.
Strut
and
steering
arm
assembly
.
pend
steering
arm
assembly
from
chassis
using
stiff
wire
.
See
Fig
.
4
.
1
.
Nut
6
.
Bolt
2
.
Strut
7
.
Bolt
3
.
ABS
wheel
speed
sensor
8
.
Flat
washer
4
.
Cable
holder
9
.
Self-locking
nut
5
.
Steering
arm
10
.
Washer
11
.
Bolt
9
.
Installation
is
reverse
of
removal
.
Be
sure
to
use
new
CAUTION-
self-locking
nuts
and
bolts
.
The
steering
arm
ball
joint
can
be
damaged
if
the
"
Use
new
steering
arm
mounting
bolts,
or
clean
bolts
arm
is
allowed
to
hang
unsupported
.
and
use
Locktite
®
270
orequivalent
thread-locking
compound
.
7
.
Support
strut
assembly
from
below
.
From
above,
re-
"
On
M3
models
:
When
attaching
stabilizer
link
to
strut,
move
three
strut
mounting
nuts
on
strut
tower
.
use
a
thin
wrench
to
hold
flats
on
link
parallelto
strut
.
"
Have
car
professionally
aligned
When
job
is
complete
.
Tightening
Torques
"
Brake
caliper
to
steering
arm
......
110
Nm
(81
ft-lb)
"
Road
wheel
to
hub
.........
100±10
Nm
(74
t7
ft-Ib)
"
Stabilizer
bar
link
to
strut
(M3)
.....
.
59
Nm
(44
ft-lb)
"
Steering
arm
to
strut
housing
"
(encapsulated
bolts-always
replace)
107
Nm
(78
ft-lb)
"
Strut
assembly
to
strut
tower
(self-locking
nuts)
........
...
..
..
.
24
Nm
(16
ft-Ib)
SHOCK
ABSORBERS
AND
SPRINGS
Page 260 of 759
310-
4
FRONT
SUSPENSION
Strut
assembly,
disassembling
and
assembling
-
Be
sure
upper
spring
pad
is
correctly
installed
to
upper
NOTE-
spring
plate
and
spring
end
is
correctly
seated
in
up-
Springs
andlor
struts
should
always
be
replaced
in
per
and
lower
spring
plates
.
pairs
.
"
Use
a
new
self-locking
top
(center)
nut
.
Tighten
nut
fui-
¡y
before
releasing
spring
compressor
.
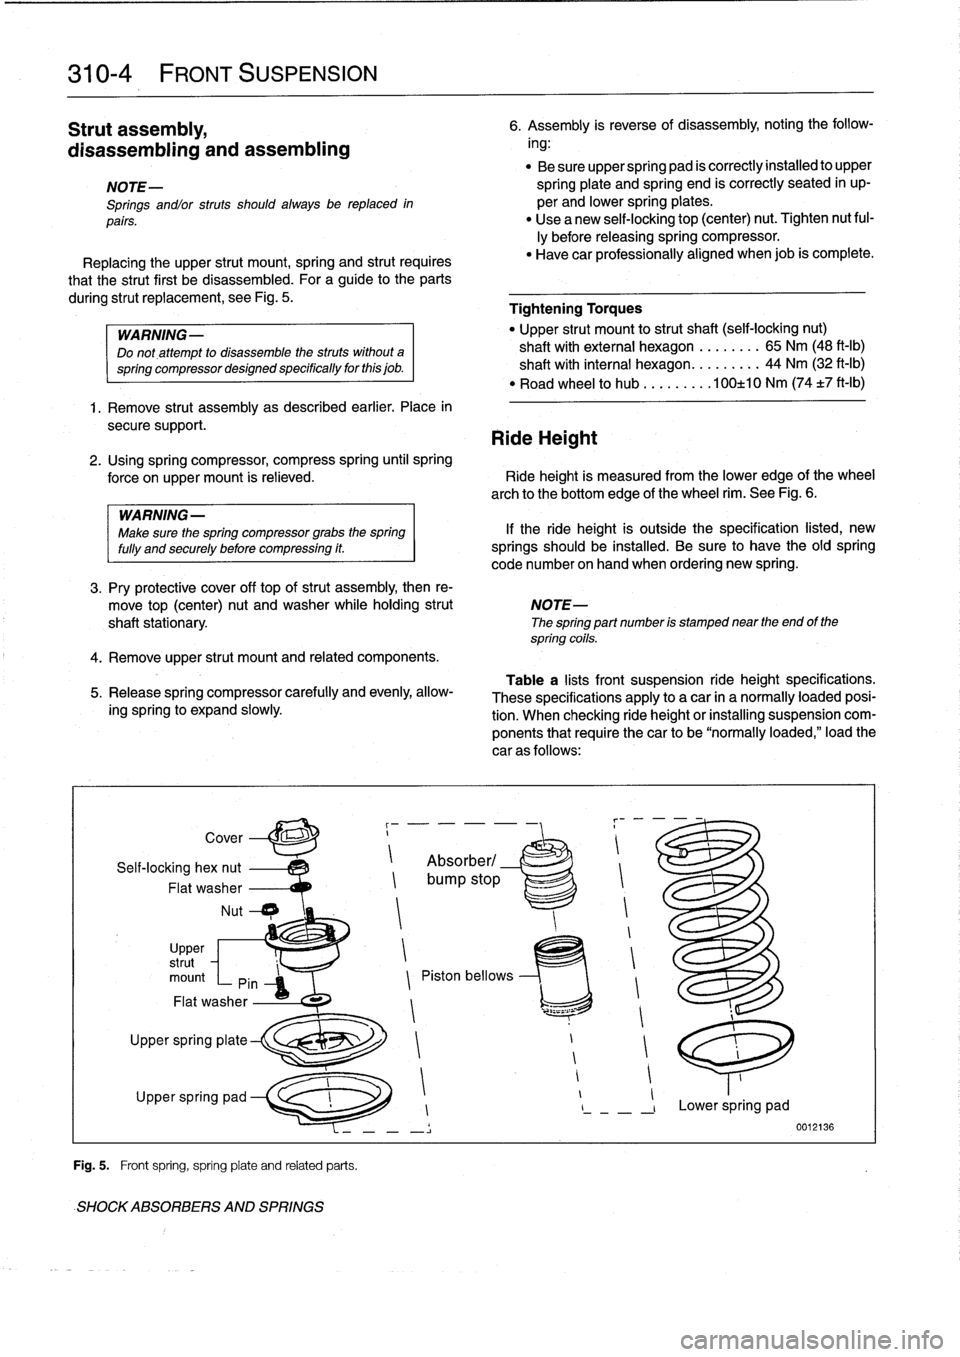
Replacing
the
upper
strut
mount,
spring
and
strut
requires
"
Have
car
professionally
aligned
when
job
is
complete
.
that
the
strut
first
bedisassembled
.
For
a
guide
to
the
parts
during
strut
replacement,
see
Fig
.
5
.
Tightening
Torques
WARNING-
"
Upper
strut
mount
to
strut
shaft
(seif-locking
nut)
Do
not,attempt
to
disassemble
thestruts
without
a
shaft
with
external
hexagon
......
..
65
Nm
(48
ft-1b)
springcompressordesignedspecificallyforthisjob
.
shaft
with
interna¡
hexagon
.......
..
44
Nm
(32
ft-Ib)
"
Road
wheel
to
hub
........
.100±10
Nm
(74
±7
ft-lb)
1
.
Remove
strut
assembly
as
described
earlier
.
Place
in
secure
support
.
Ride
Height
2
.
Using
spring
compressor,
compress
spring
until
spring
force
onupper
mount
is
relieved
.
Ride
height
is
measured
from
the
lower
edge
of
the
wheel
arch
to
the
bottom
edge
of
the
wheel
rim
.
See
Fig
.
6
.
WARNING
-
Make
sure
the
spring
compressor
grabs
the
spring
lf
the
ride
height
is
outside
the
specification
listed,
new
fully
and
securely
before
compressing
it
.
springs
should
be
installed
.
Be
sure
to
have
theold
spring
code
number
on
hand
when
ordering
new
spring
.
3
.
Pry
protective
cover
off
top
ofstrut
assembly,
then
re-
move
top
(center)
nut
andwasher
whileholding
strut
NOTE-
shaftstationary
The
spring
part
number
is
stamped
near
the
end
of
the
spring
cofls
.
4
.
Remove
upper
strut
mount
and
related
components
.
5
.
Release
spring
compressor
carefully
and
evenly,
allow-
ing
spring
lo
expand
slowly
1
Self-locking
hex
nut
Absorber/
Flat
washer
bump
stop
Nut
Cover
Upper
~
strut
mount
Pin
Z
Piston
bellows
Flat
washer
r
i
t1
~
1
Upper
spring
plate
1
1
1
Upper
spring
pad
I
1
-
,
Lower
spring
pad
-
Í
0012136
Fig
.
5
.
Front
spring,
spring
plate
and
related
parts
.
SHOCKABSORBERS
AND
SPRINGS
6
.
Assembly
is
reverse
of
disassembly,
noting
the
follow-
ing
:
Table
a
lists
front
suspension
ride
height
specifications
.
These
specifications
apply
to
a
car
in
a
normally
loaded
posi-
tion
.
When
checking
ride
height
or
installing
suspension
com-
ponents
that
require
thecar
to
be
"normally
loaded,"load
the
car
as
follows
: