BMW M3 1998 E36 Workshop Manual
Manufacturer: BMW, Model Year: 1998, Model line: M3, Model: BMW M3 1998 E36Pages: 759
Page 281 of 759
9
.
Packeach
CV
joint
and
rubber
boot
with
specified
REAR
SUSPENSION
ARMS
amount
of
lubricant
supplied
.
Apply
adhesive
to
large
end
of
boot
and
mount
it
on
joint
.
Secure
boot
with
clamps
.
The
trailing
arms,
control
arms
and
their
mountingbushings
Apply
sealer
to
inner
CV
joint
dust
cover
and
instan
.
control
the
position
of
the
rear
wheels
.
A
damaged
suspen-
sion
arm
or
worn
bushings
will
change
the
rear
wheel
align
NOTE-
ment
and
may
adversely
affect
handling
and
stability
.
"
Before
installing
each
small
boot
clamp
be
sure
to
"burp"
the
boot
by
flexing
the
CV
joint
as
far
overas
it
WARNING
will
go
.
A
small
screw-driver
inserted
between
the
Do
notattempt
to
straighten
a
damaged
suspension
boot
and
the
axle-shaft
will
help
the
process
.
arm
.
Bending
or
heating
may
weaken
the
original
"
BMW
recommends
Bostil101513
or
EppleC4851
ad-
part
.
If
the
suspension
arm
shows
any
signs
of
hesive,
and
Epple®39
or
Curil©T
sealer
damage
or
excessive
corrosion,
it
must
be
re-
placed
.
CV
Joint
Lubricant
Capacity
"
Wheel
hub
end
ex
.
M3
..
..
.
....
.
.............
80
gram
(2.8
oz
.)
M3
..
...
.
..
.................
100
gram
(3
.5
oz
.)
"
Finaldrive
end
.................
85
gram
(3
.0
oz
.)
10
.
Install
drive
axle
as
described
earlier
.
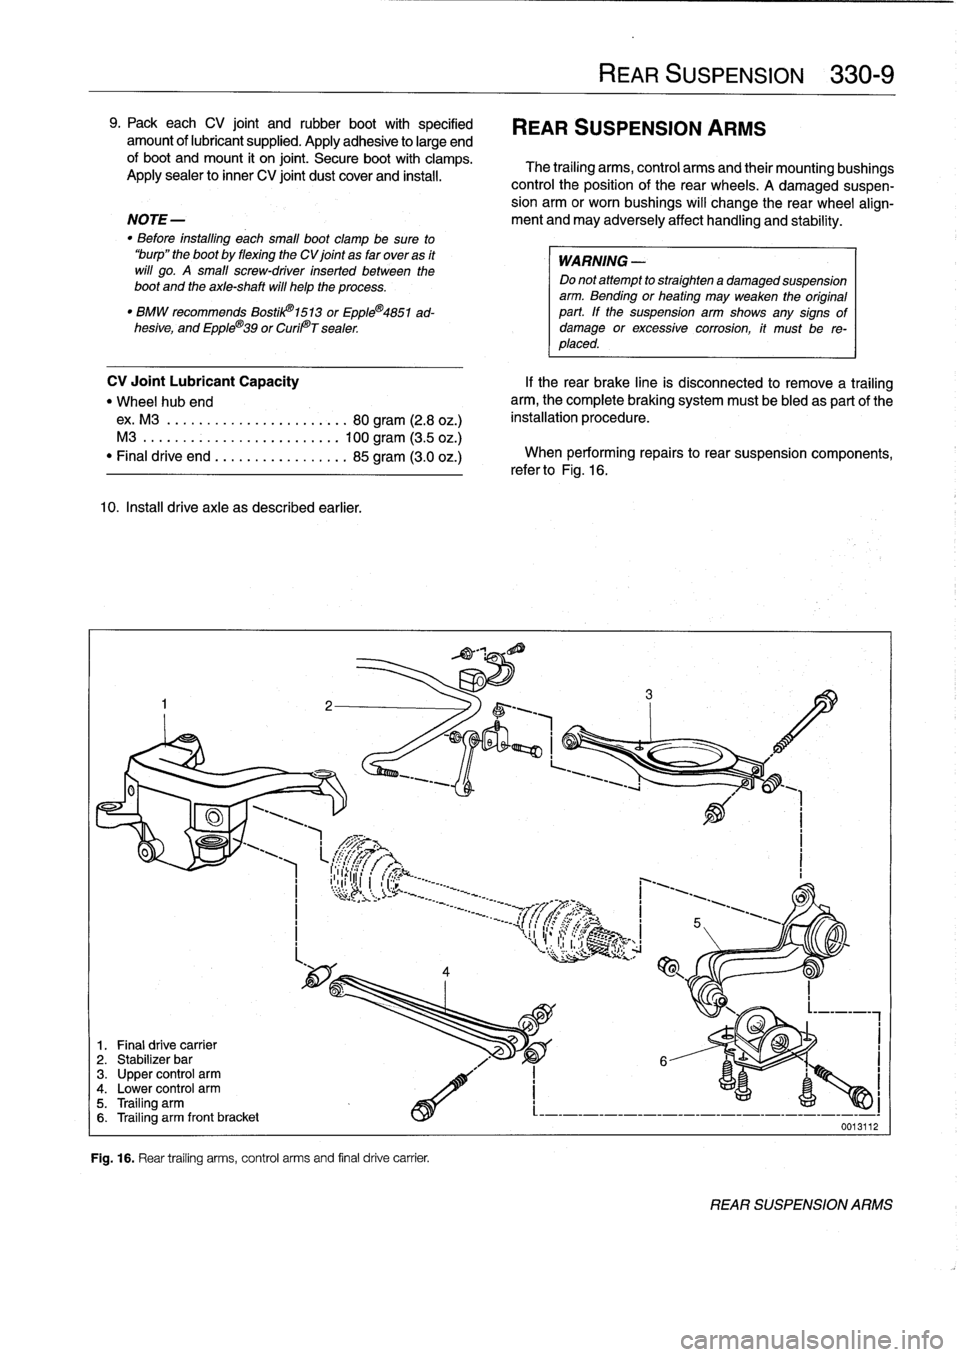
1
.
Final
drive
carrier
2
.
Stabilizer
bar
3
.
Upper
control
arm4
.
Lower
control
arm5
.
Trailing
arm6
.
Trailing
arm
front
bracket
Fig
.
16
.
Rear
trailing
arms,
control
arms
and
final
drive
carrier
.
If
the
rear
brake
cine
is
disconnected
to
remove
a
trailing
arm,
the
complete
braking
system
must
be
bled
as
partof
the
installation
procedure
.
When
performing
repairs
to
rear
suspension
components,
refer
to
Fig
.
16
.
REAR
SUSPENSION
330-
9
0013112
REAR
SUSPENSION
ARMS
Page 282 of 759
330-
1
0
REAR
SUSPENSION
Trailing
arm,
removing
and
installing
1
.
Raise
rear
end
of
car
and
remove
wheel
.
WARNING
-
Make
sure
that
the
car
is
firmly
supported
on
jack
standsdesigned
for
the
purpose
.
Place
the
jack
standsbeneatha
structural
chassis
point
.
Do
not
place
jack
stands
under
suspension
parts
.
2
.
Remove
drive
axle
as
described
earlier
.
3
.
Remove
brake
rotor
and
caliper
as
described
in
340
Brakes
.
Do
not
remove
brake
line
from
caliper
.
Hang
caliper
from
body
with
wire
.
4
.
Remove
parking
brakecable
frombrake
shoe
expand-
er
.
See
340
Brakes
.
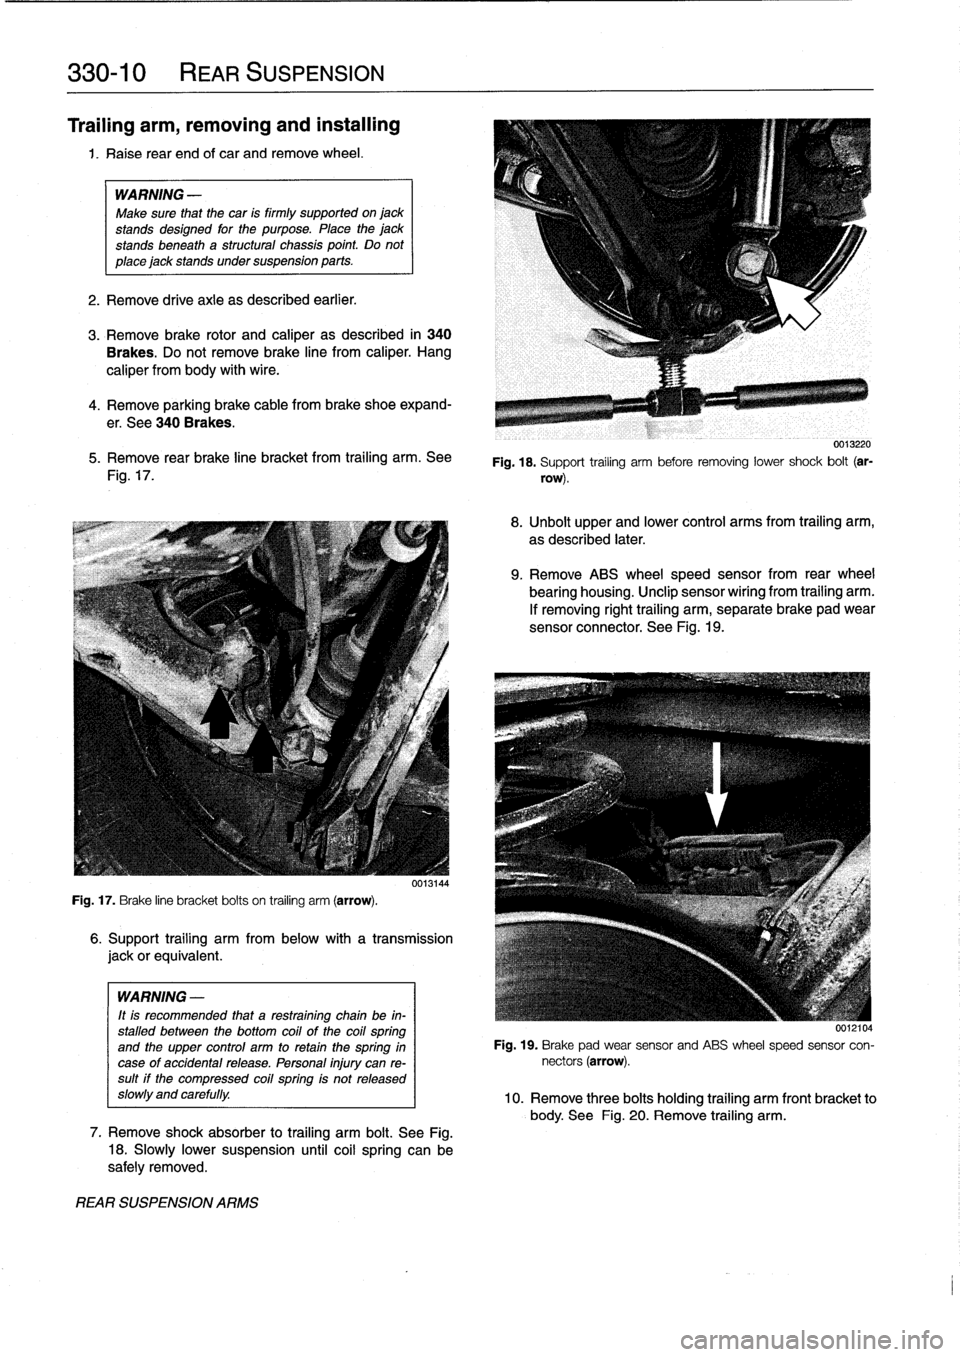
5
.
Remove
rear
brake
line
bracket
from
trailing
arm
.
See
Fig
.
17
.
Fig
.
17
.
Brake
line
bracket
bolts
on
trailing
arm
(arrow)
.
WARNING
-
It
is
recommended
that
a
restraining
chain
be
in-
stalled
between
the
bottom
coil
of
the
coil
spring
and
the
upper
control
arm
to
retainthe
spring
in
case
of
accidentalrelease
.
Personal
injury
can
re-sult
if
the
compressed
coil
spring
is
not
released
slow1y
and
carefully
.
REAR
SUSPENSION
ARMS
6
.
Support
trailing
arm
from
below
with
a
transmission
jackorequivalent
.
7
.
Remove
shock
absorber
to
trailing
arm
bolt
.
See
Fig
.
18
.
Slowly
lower
suspension
until
coil
spring
can
be
safely
removed
.
0013220
Fig
.
18
.
Support
trailing
arm
before
removing
lower
shock
bolt
(ar-
row)
.
8
.
Unbolt
upper
and
lower
control
arms
from
trailing
arm,
as
described
later
.
9
.
Remove
ABS
wheel
speed
sensor
from
rear
wheel
bearing
housing
.
Unclip
sensor
wiríng
from
trailing
arm
.
If
removing
right
trailing
arm,
separate
brake
pad
wear
sensor
connector
.
See
Fig
.
19
.
0012104
Fig
.
19
.
Brake
pad
wear
sensor
and
ABS
wheel
speed
sensor
con-
nectors
(arrow)
.
10
.
Remove
three
bolts
holding
trailing
arm
front
bracket
to
body
.
See
Fig
.
20
.
Remove
trailing
arm
.
Page 283 of 759
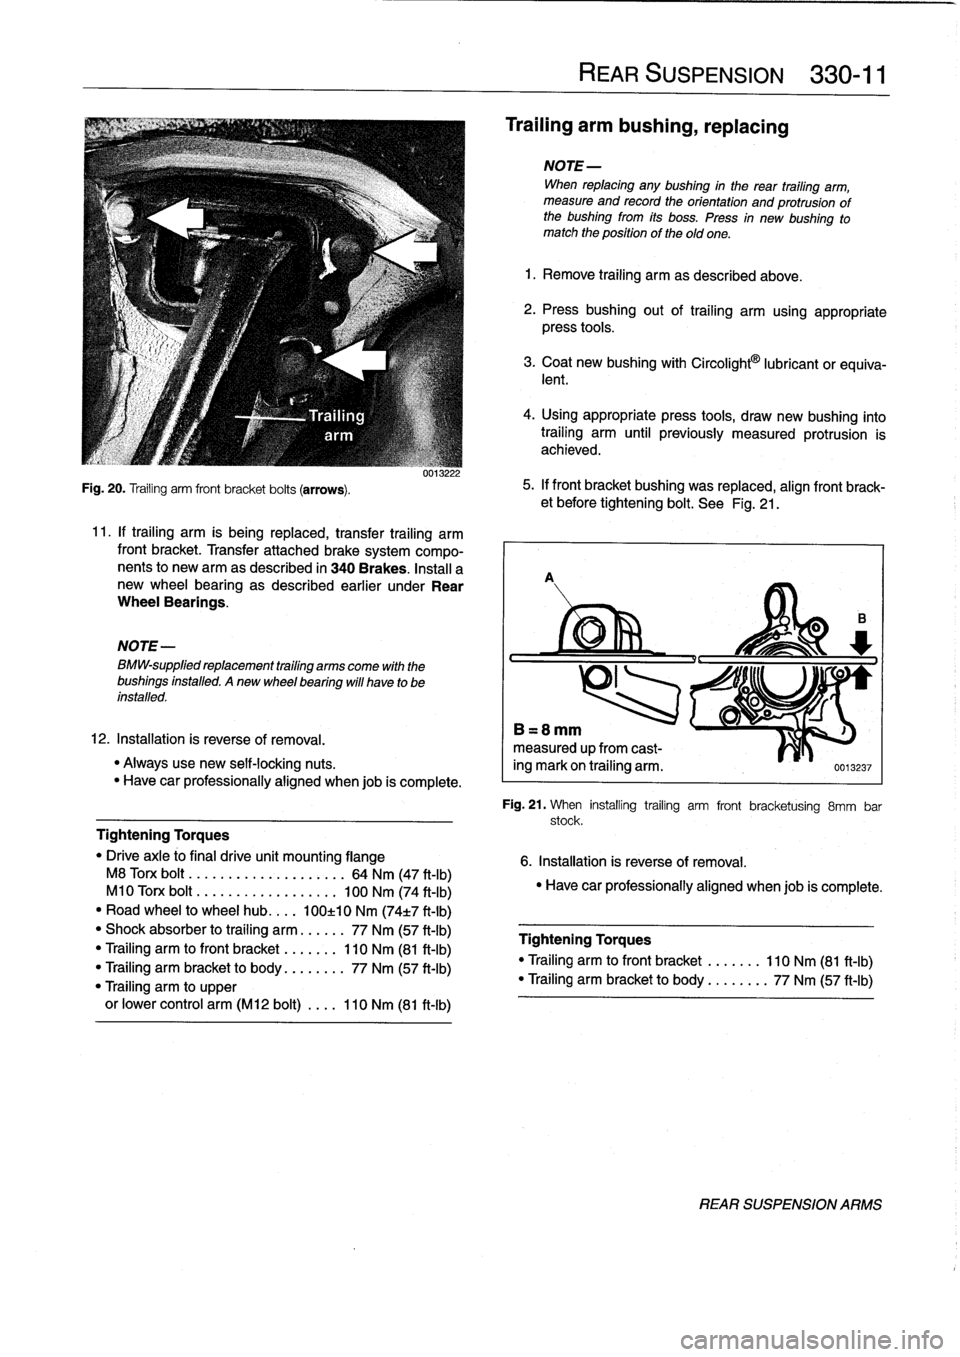
Fig
.
20
.
Trailing
arm
front
bracket
bolts
(arrows)
.
NOTE-
BMW-supplied
replacement
trailing
arms
come
with
the
bushings
installed
.
Anew
wheel
bearing
will
have
to
be
installed
.
0013222
11
.
If
trailing
arm
is
being
replaced,
transfer
trailing
arm
front
bracket
.
Transfer
attached
brake
system
compo-
nents
to
newarm
as
described
in
340Brakes
.
Insta¡¡
a
new
wheel
bearing
as
described
earlier
under
Rear
Wheel
Bearings
.
12
.
Installation
is
reverse
of
removal
.
"
Alwaysuse
new
self-locking
nuts
.
"
Have
car
professionally
aligned
when
job
is
complete
.
Tightening
Torques
"
Drive
axle
#o
final
drive
unit
mounting
flange
M8
Torx
bolt
......
.
...
.....
.
..
..
64
Nm
(47
ft-Ib)
M10
Torx
bolt
.....
...
.
....
.....
100
Nm
(74
ft-Ib)
"
Road
wheel
to
wheel
hub
.
...
100±10
Nm
(74t7
ft-Ib)
"
Shock
absorber
to
trailing
arm
......
77
Nm
(57
ft-Ib)
"
Trailing
arm
tofront
bracket
.......
110
Nm
(81
ft-Ib)
"
Trailing
arm
bracket
to
body
........
77
Nm
(57
ft-Ib)
"Trailing
arm
to
upper
or
lower
control
arm
(M12
bolt)
....
110
Nm
(81
ft-Ib)
REAR
SUSPENSION
330-
1
1
Trailing
arm
bushing,
replacing
NOTE-
When
replacing
any
bushing
in
the
rear
trailing
arm,
measure
and
recordthe
orientation
and
protrusion
of
the
bushing
from
its
boss
.
Press
in
new
bushing
to
match
the
positionof
theold
one
.
1
.
Remove
trailing
arm
as
described
above
.
2
.
Pressbushing
out
of
trailing
arm
using
appropriate
press
tools
.
3
.
Coat
new
bushing
with
Circolight
9
lubricant
or
equiva-
lent
.
4
.
Using
appropriate
press
tools,
draw
new
bushing
into
trailing
arm
until
previously
measured
protrusion
is
achieved
.
5
.
If
front
bracket
bushing
was
replaced,
alignfront
brack-
et
before
tightening
bolt
.
See
Fig
.
21
.
A
B=8mm
measured
upfrom
cast-
ing
mark
on
trailing
arm
.
0013237
Fig
.
21
.
When
installing
trailing
arm
front
bracketuising
8mm
bar
stock
.
6
.
Installation
is
reverse
of
removal
.
"
Have
car
professionally
aligned
when
job
is
complete
.
Tightening
Torques
"
Trailing
arm
tofront
bracket
.......
110
Nm
(81
ft-Ib)
"Trailing
arm
bracket
to
body
......
.
.
77
Nm
(57
ft-Ib)
REAR
SUSPENSION
ARMS
Page 284 of 759
330-
1
2
REAR
SUSPENSION
Upper
control
arm,
removing
and
installing
1.
Raise
rear
end
of
car
and
remove
wheel
.
WARNING
-
Make
sure
that
the
car
is
firmly
supportedon
jack
stands
designed
for
the
purpose
.
Place
the
jack
stands
beneatha
structural
chassis
point
.
Do
not
place
jack
stands
under
suspension
parts
.
2
.
Remove
drive
axle
as
described
earlier
.
3
.
Remove
stabilizer
bar
link
fromupper
control
arm
.
4
.
Support
trailing
arm
from
below
with
a
transmission
jackorequivalent
.
WARNING
-
It
is
recommended
that
a
retaining
chain
be
in-
stalled
between
the
bottom
coil
of
the
coil
spring
and
the
upper
control
arm
to
retain
thespring
in
case
of
accidental
release
.
Personal
injury
can
re-
sult
if
the
compressed
coil
spring
ís
not
released
slowly
and
carefully
.
5
.
Remove
lower
shock
absorber
bolt
.
Refer
to
Fig
.
18
.
Slowly
lower
trailing
arm
until
coil
spring
is
fully
re-
leased
.
Remove
restraining
chain
and
remove
spring
.
7
.
Installation
is
reverse
of
removal
.
"
Always
use
new
self-locking
nuts
.
"
Have
car
professionally
aligned
when
job
is
complete
.
"
Insta¡¡
drive
axle
as
described
earlier
.
Tightening
Torques
"
Drive
axleto
final
drive
flange
M8
Torx
bolt
..........
..
.
..
....
64
Nm
(47
ft-Ib)
M10
Torx
bolt
.........
..
..
.
...
100
Nm
(74
ft-Ib)
"
Shock
absorber
to
trailing
arm
..
..
..
77
Nm
(57
ft-Ib)
"
Upper
control
arm
to
final
drive
carrier
(M12
bolt)
...
..
.
77
Nm
(57
ft-Ib)
"
Upper
control
arm
to
trailing
arm
(M12
bolt)
.........
110
Nm
(81
ft-Ib)
Lower
control
arm,
1
.
Raise
rear
end
of
car
and
support
it
securely
on
jack-
stands
.
Remove
rear
wheel
.
2
.
Remove
both
lower
control
arm
mounting
bolts
.
FINAL
DRIVE
CARRIER
3
.
Use
a
soft
hammer
to
tap
control
arm
out
of
its
mount-
ing
points
.
4
.
Installation
is
reverse
of
removal
.
NOTE-
Use
a
new
bolt
and
washer
assembly
at
the
final
drive
carrier
mountíng
point
forthe
control
arm
.
Tightening
Torque
"
Lower
control
arm
to
final
drive
carrier
(M12
bolt)
......
77
Nm
(57
ft-Ib)
"
Lower
control
arm
to
trailing
arm
(M12
bolt)
....
..
.
..
110
Nm
(81
ft-Ib)
FINAL
DRIVE
CARRIER
Final
drive
carrier,
removing
and
installing
1
.
Raise
rear
end
of
car
and
support
it
securely
on
jack
stands
.
Remove
rear
wheels
.
2
.
Remove
driveshaft
.
See
260
Driveshaft
.
3
.
Remove
both
drive
axles
as
described
earlier
.
6
.
Remove
both
upper
control
arm
mounting
bolts
.
Re-
move
control
arm
.
4
.
Disconnect
stabilizer
bar
from
upper
control
arms
.
Re-
move
stabilizer
bar
mounts
.
5
.
Disconnect
speedometer
harness
connector
on
final
drive
(where
applicable)
.
6
.
Remove
rear
section
of
exhaust
system
.
See
180
Ex-
haust
System
.
NOTE-
It
may
be
easier
to
remove
complete
exhaust
asonepiece
.
See
180
Exhaust
System
.
7
.
Remove
upper
and
lower
control
arms
as
described
earlier
.
8
.
Support
final
drive
carrierwith
transmissíon
jack
.
Re-
move
mounting
bolts
and
nuts
at
final
drive
carrier
bushing
mounts
.
See
Fig
.
22
.
9
.
Slowly
lower
final
drive
and
final
drive
carrier,
detaching
removing
and
installing
wire
harness
and
connectors
as
necessary
.
10
.
Finaldrive
may
now
be
unbolted
from
final
drive
carrier
.
Page 285 of 759
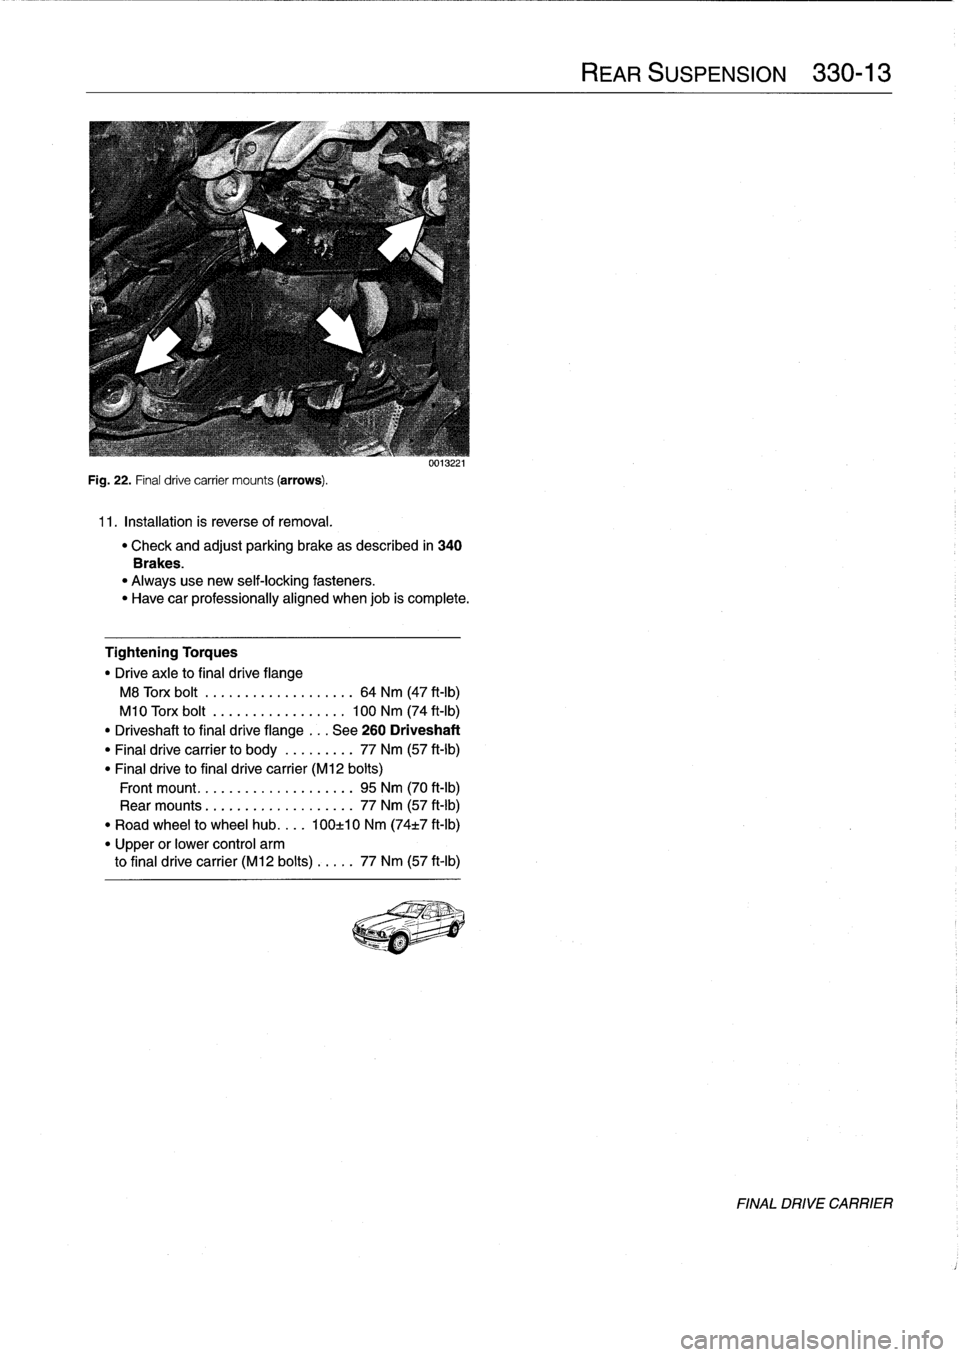
Fig
.
22
.
Final
drive
carrier
mounts
(arrows)
.
11
.
Installation
is
reverse
of
removal
.
uu1J221
"
Check
and
adjust
parking
brake
as
described
in
340
Brakes
.
"
Alwaysuse
new
self-locking
fasteners
.
"
Have
car
professionally
aligned
when
job
is
complete
.
Tightening
Torques
"
Drive
axle
to
final
drive
flange
M8
Torx
bolt
................
...
64
Nm
(47
ft-Ib)
M10
Torx
bolt
..........
..
...
.
.
100
Nm
(74
ft-Ib)
"
Driveshaft
to
final
drive
flange
...
See
260
Driveshaft
"
Final
drive
carrier
to
body
......
...
77
Nm
(57
ft-Ib)
"
Final
drive
to
final
drive
carrier
(M12
bolts)
Front
mount
.................
...
95
Nm
(70
ft-lb)
Rear
mounts
................
...
77
Nm
(57
ft-Ib)
"
Road
wheel
to
wheel
hub
....
100±10
Nm
(74t7
ft-Ib)
"
Upper
or
lower
control
arm
to
final
drive
carrier
(M12
bolts)
....
.
77
Nm
(57
ft-Ib)
Page 286 of 759

Page 287 of 759
GENERAL
......
.
.
.
.
.
.
.
.....
.
.
.
.
.
.
.
.
.
.
331-1
Final
Drive
Oil
Seals
.
.
...
.
.
.
.......
.
.
.
.
.
331-1
Finaldrive
flange
oil
sea¡,
replacing
....
.
.
.
..
331-2
FINAL
DRIVE
SERVICE
.
.....
.
.
.
.
.
.
.
.
.
.
331-1
Finaldrive
inputshaft
oil
seal,
replacing
.
.
.
.
.
331-3
Final
drive
oí¡,
draining
and
filling
.
.
.
.
.
.
.
.
.
.
331-1
Finaldrive
unit,
removíng
and
installing
.
.
.
.
.
.
331-3
GENERAL
This
repa¡r
group
covers
repair
operations
that
do
not
re-
quire
complicated
disassembly
of
the
final
drive
.
Internal
re-
pairs
and
final
drive
disassembly
are
not
covered
in
this
manual
.
FINAL
DRIVE
SERVICE
Al¡
final
drive
work
requires
some
method
of
raising
thecar
and
supporting
it
securely
while
the
work
is
performed
.
Jack
stands
and
a
floor
jack
can
easily
be
used,
but
use
extreme
caution
when
working
beneath
the
car
.
See010
Fundamen-
tais
for
the
Do-It-Yourself
Owner
.
NOTE-
Removal
of
final
drive
carrier
is
covered
in
330
Rear
Suspension
.
Final
drive
oil,
draining
and
filling
1
.
Drive
car
to
warm
final
drive
fluid
.
2
.
Raise
car
and
support
safely
.
WARNING
-
Make
sure
that
thecar
is
firmly
supported
on
jack
standsdesigned
for
the
purpose
.
Place
the
jack
standsbeneatha
structural
chassis
point
.
Do
not
place
jack
stands
under
suspension
parts
.
5
.
Fill
final
drive
with
appropriate
type
and
quantity
of
lu-
bricant
.
Insta¡¡
and
tighten
fill
plug
.
331
Final
Drive
0
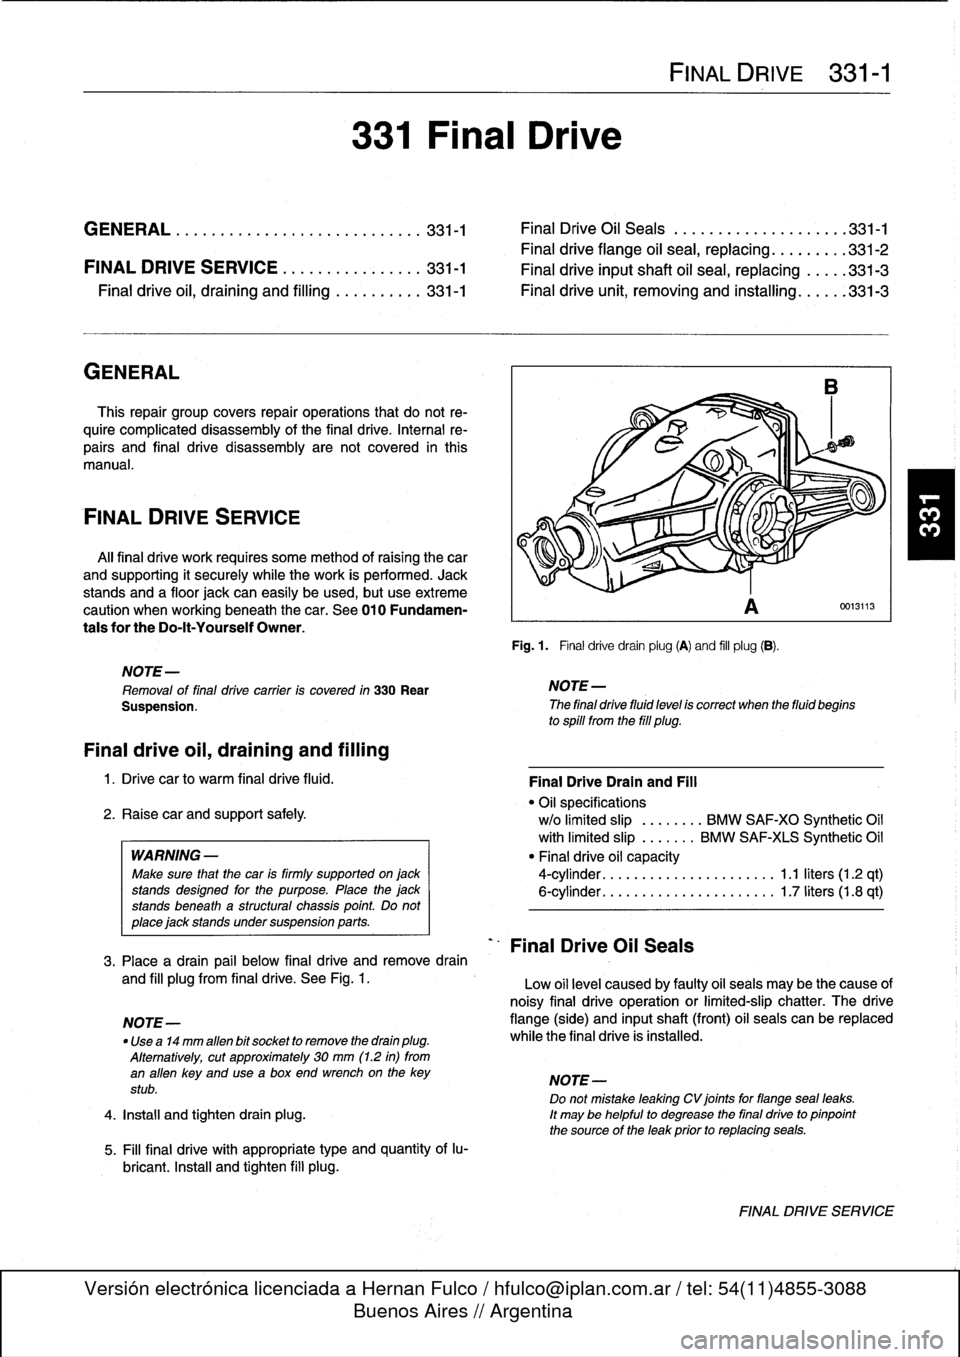
Fig
.
1
.
Final
drivedrain
plug
(A)
and
fill
plug
(B)
.
D
NOTE-
The
final
drive
fluid
level
is
correct
when
the
fluid
begins
to
spill
from
the
fill
plug
.
Final
Drive
Oil
Seals
FINAL
DRIVE
331-1
0013113
Final
DriveDrain
and
Fill
"
Oil
specifications
w/o
limited
slip
.
.......
BMW
SAF-XO
Synthetic
Oil
with
limited
slip
.
......
BMW
SAF-XIS
Synthetic
Oil
"
Final
drive
oil
capacity
4-cylinder
.
.
.
...
................
1
.1
liters
(1
.2
qt)
6-cylinder
.
.
.
...
................
1
.7liters(1.8
qt)
3
.
Place
a
drain
pail
below
final
drive
andremove
drain
and
fill
plugfrom
final
drive
.
See
Fig
.
1
.
Low
oil
level
caused
by
faulty
oil
seals
may
be
the
cause
of
noisy
final
drive
operation
or
limited-slip
chatter
.
The
drive
NOTE-
flange
(side)
and
inputshaft
(front)
oil
seals
can
be
replaced
"
Use
a14
mm
alíen
bit
socket
to
remove
the
drain
plug
.
while
the
final
drive
is
installed
.
Alternatively,
cut
approximately
30
mm
(1
.2
in)
from
an
alíen
key
and
usea
box
end
wrenchon
the
key
NOTE-
stub
.
Do
not
mistake
leaking
CV
joints
for
flangeseal
leaks
.
4
.
Install
and
tighten
drain
plug
.
It
may
be
helpful
to
degrease
the
final
drive
to
pinpoint
the
source
of
the
leak
prior
to
replacing
seals
.
FINAL
DRIVE
SERVICE
Page 288 of 759
331-2
FINAL
DRIVE
Make
sure
that
the
car
is
firm1y
supportedon
Tjack
.
.-
"
:
.-
:
.
n
-
2
.
Detach
drive
axle(s)
from
final
drive
.
See330
Rear
Suspension
.
CA
UTION-
Suspend
the
detached
drive
axlefrom
the
car
body
with
a
stiff
wire
hook
to
prevent
damage
to
the
outer
CV
joint
.
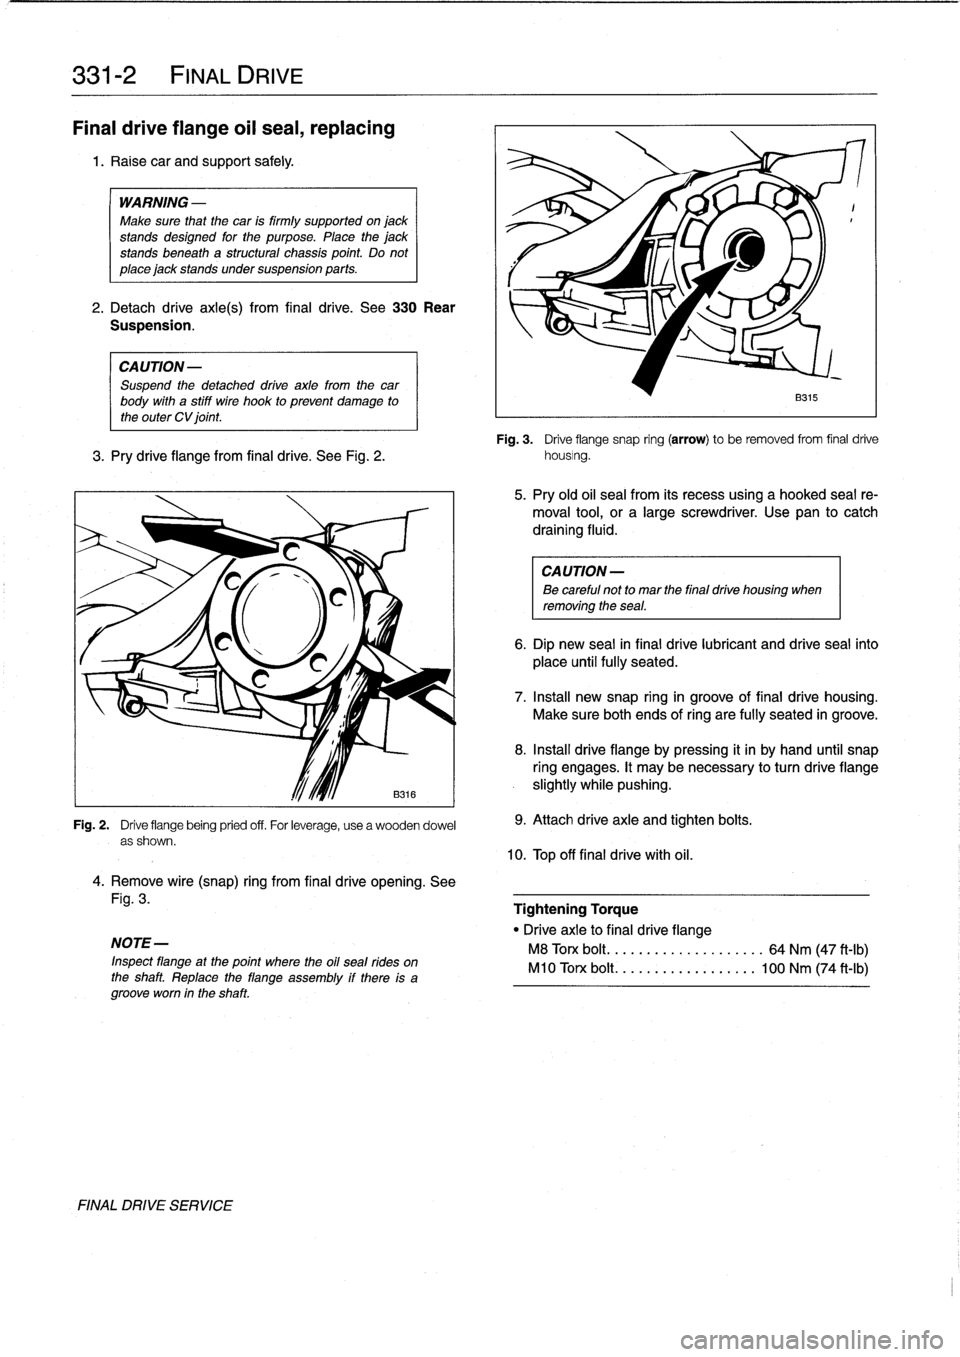
Fig
.
3
.
Drive
flange
snap
ring
(arrow)
to
be
removed
from
final
drive
3
.
Pry
drive
flange
from
final
drive
.
See
Fig
.
2
.
housing
.
Fig
.
2
.
Drive
flange
being
pried
off
.
For
leverage,
use
a
wooden
dowel
as
shown
.
4
.
Remove
wire(snap)
ring
from
final
drive
opening
.
See
Fig
.
3
.
NOTE-
Inspect
flangeat
the
point
where
the
oil
seal
rides
on
the
shaft
.
Replace
the
flange
assembly
if
there
is
agrooveworn
in
the
shaft
FINAL
DRIVE
SERVICE
9
.
Attach
drive
axle
and
tighten
bolts
.
10
.
Top
off
final
drive
with
ofl
.
B315
5
.
Pry
old
oil
sea¡
from
its
recess
using
a
hooked
seal
re-
moval
tool,
or
a
large
screwdriver
.
Use
pan
to
catch
draining
fluid
.
CA
UTION-
Be
careful
not
to
mar
the
final
drive
housing
when
removing
the
sea¡
.
6
.
Dip
new
seal
in
final
drive
lubricant
and
drive
seal
into
place
untilfully
seated
.
7
.
Insta¡¡
new
snap
ringin
groove
of
final
drive
housing
.
Make
sureboth
ends
ofring
are
fully
seated
in
groove
.
8
.
Insta¡¡
drive
flangeby
pressing
it
in
by
hand
until
snap
ring
engages
.
It
may
benecessary
to
turn
drive
flange
slightly
while
pushing
.
Tightening
Torque
"
Drive
axle
to
final
drive
flange
M8
Torx
bolt
..
..................
64
Nm
(47
ft-Ib)
M10
Torx
bolt
.
.................
100
Nm
(74
ft-Ib)
Page 289 of 759
Final
driveinputshaft
oil
sea¡,
replacing
1
.
Raise
car
and
support
safely
.
2
.
Drain
final
drive
oil
as
described
earlier
.
3
.
Remove
driveshaft
from
final
drive
inputshaft
flange
.
See
260
Driveshaft
.
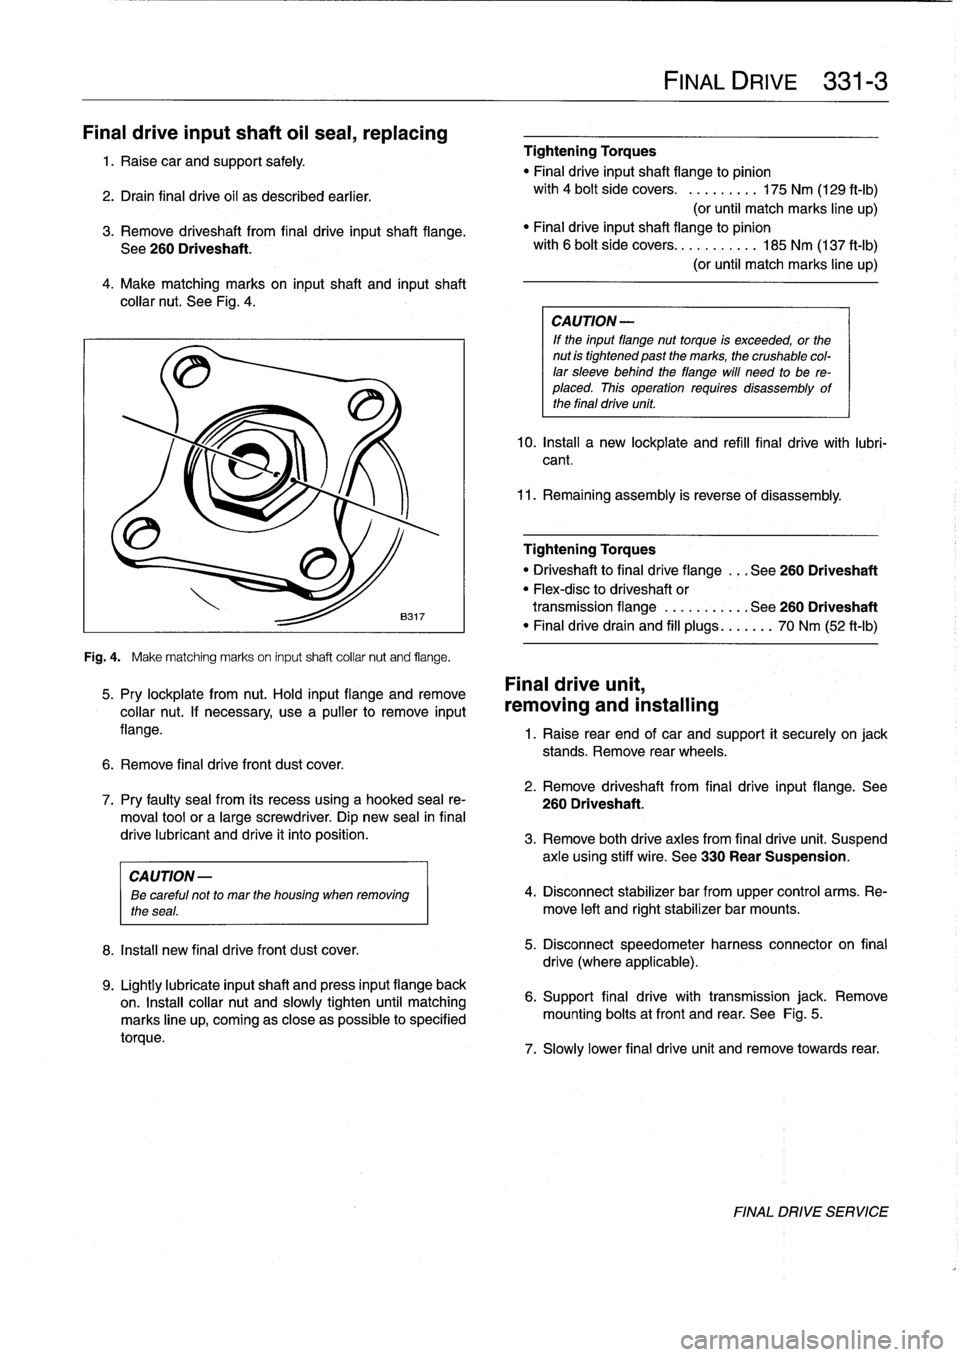
4
.
Make
matching
marks
on
input
shaft
and
inputshaft
collar
nut
.
See
Fig
.
4
.
Fig
.
4
.
Make
matching
marks
on
input
shaft
collar
nut
and
flange
.
5
.
Pry
lockplate
from
nut
.
Hold
input
flange
andremove
collar
nut
.
If
necessary,
usea
pullerto
remove
input
flange
.
6
.
Remove
final
drive
front
dust
cover
.
8
.
Install
new
final
drivefront
dust
cover
.
9
.
Lightly
lubricate
inputshaft
and
press
input
flange
back
on
.
Insta¡¡
collar
nut
and
slowly
tighten
until
matching
marks
line
up,
coming
as
close
aspossible
to
specified
torque
.
Tightening
Torques
"
Final
driveinputshaft
flange
to
pinion
with
4
bolt
side
covers
.
.........
175
Nm
(129
ft-Ib)
(or
until
match
marks
line
up)
"
Finaldriveinputshaft
flange
to
pinion
with
6
bolt
side
covers
...........
185
Nm
(137
ft-Ib)
(or
until
match
marks
line
up)
CA
UTION-
If
the
input
flange
nuttorque
is
exceeded,
or
the
nut
is
tightened
past
the
marks,
the
crushable
col-
lar
sleeve
behind
theflange
will
need
to
be
re-
placed
.
This
operation
requires
disassembly
of
the
final
drive
unit
.
10
.
Install
a
new
lockplate
and
refill
final
drive
with
lubri-
cant
.
11
.
Remaining
assembly
is
reverse
of
disassembly
.
Tightening
Torques
"
Driveshaftto
final
dríve
flange
...
See260
Driveshaft
"
Flex-disc
to
driveshaft
or
transmission
flange
...........
See260
Driveshaft
"
Finaldrivedrain
and
fill
plugs
...
.
..
.
70
Nm
(52
ft-Ib)
Final
drive
unit,
removing
and
installing
FINAL
DRIVE
331-
3
1
.
Raise
rear
end
of
car
and
support
it
securely
on
jack
stands
.
Remove
rear
wheels
.
2
.
Remove
driveshaft
from
final
drive
input
flange
.
See
7
.
Pry
faulty
sea¡
from
its
recess
using
a
hooked
sea¡
re-
260
Driveshaft
.
moval
toolor
a
large
screwdriver
.
Dip
new
sea¡
in
final
drive
lubricant
and
drive
it
into
position
.
3
.
Remove
both
drive
axles
from
final
drive
unit
.
Suspend
axle
using
stiff
wire
.
See
330
Rear
Suspension
.
CAUTION
-
ee
careful
not
to
mar
the
housing
when
removing
4
.
Disconnect
stabilizer
bar
from
upper
control
arms
.
Re-
the
seas
.
move
left
and
rightstabilizer
bar
mounts
.
5
.
Disconnect
speedometer
harness
connector
on
final
drive
(where
applicable)
.
6
.
Support
final
drive
with
transmission
jack
.
Remove
mounting
bolts
atfront
and
rear
.
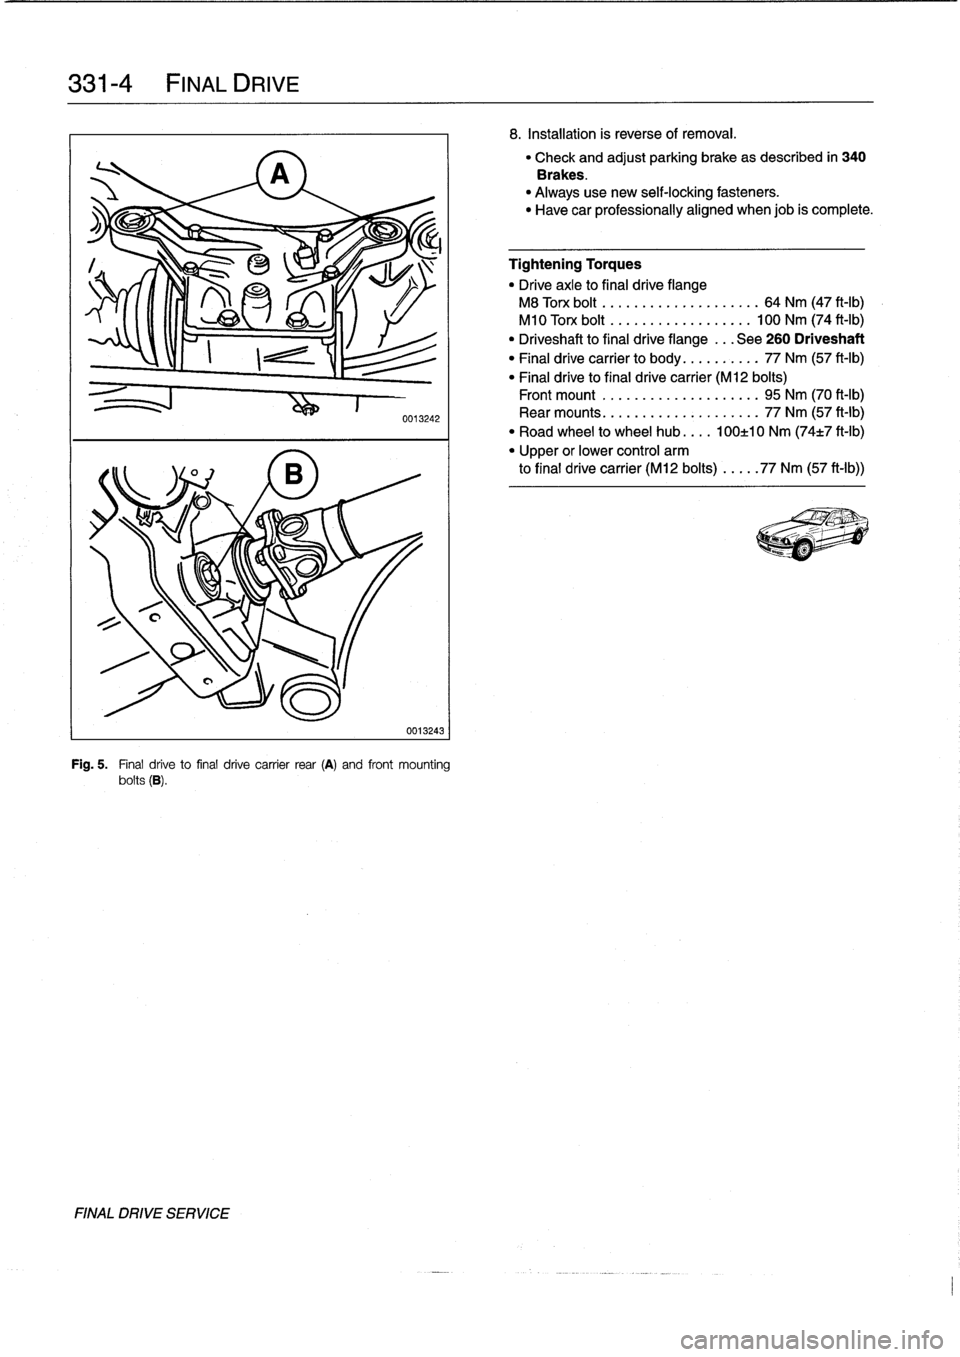
See
Fig
.
5
.
7
.
Slowly
lower
final
drive
unit
and
remove
towards
rear
.
FINAL
DRIVE
SERVICE
Page 290 of 759
331-
4
FINAL
DRIVE
FINAL
DRIVE
SERVICE
0013242
0013243
Fig
.
5
.
Final
drive
to
final
drive
carrier
rear
(A)
and
front
mounting
bolts
(B)
.
8
.
Installation
is
reverse
of
removal
.
"
Check
and
adjust
parking
brake
as
described
in
340
Brakes
.
"
Always
use
new
self-locking
fasteners
.
"
Have
car
professionally
aligned
when
job
is
complete
.
Tightening
Torques
"
Drive
axle
to
final
drive
flange
M8
Torx
bolt
..
.
...
...
..
.........
64
Nm
(47
ft-Ib)
M10
Torx
bolt
.
.
...
...
..
........
100
Nm
(74
ft-Ib)
"
Driveshaft
to
final
drive
flange
...
See
260
Driveshaft
"
Final
drive
carrier
to
body
..
........
77
Nm
(57
ft-Ib)
"
Final
drive
to
final
drive
carrier
(M12
bolts)
Front
mount
.....
...
.
...
........
95
Nm
(70
ft-Ib)
Rear
mounts
.....
.......
.
.
.
..
...
77
Nm
(57
ft-Ib)
"
Road
wheel
to
wheel
hub
....
100±10
Nm
(74±7
ft-Ib)
"
Upper
or
lower
control
arm
to
final
drive
carrier
(M12
bolts)
...
..
77
Nm
(57
ft-Ib))