BMW M3 1998 E36 Workshop Manual
Manufacturer: BMW, Model Year: 1998, Model line: M3, Model: BMW M3 1998 E36Pages: 759
Page 311 of 759
ENGINE
HOOD
Hood,
raising
to
service
position
CA
UTION-
Do
not
switch
on
the
windshield
wipers
wlth
the
engine
hood
raised
.
As
a
precaution,
remove
the
wiper
motor
fuse
.
See
610
Electrical
Compo-
nent
Locations
.
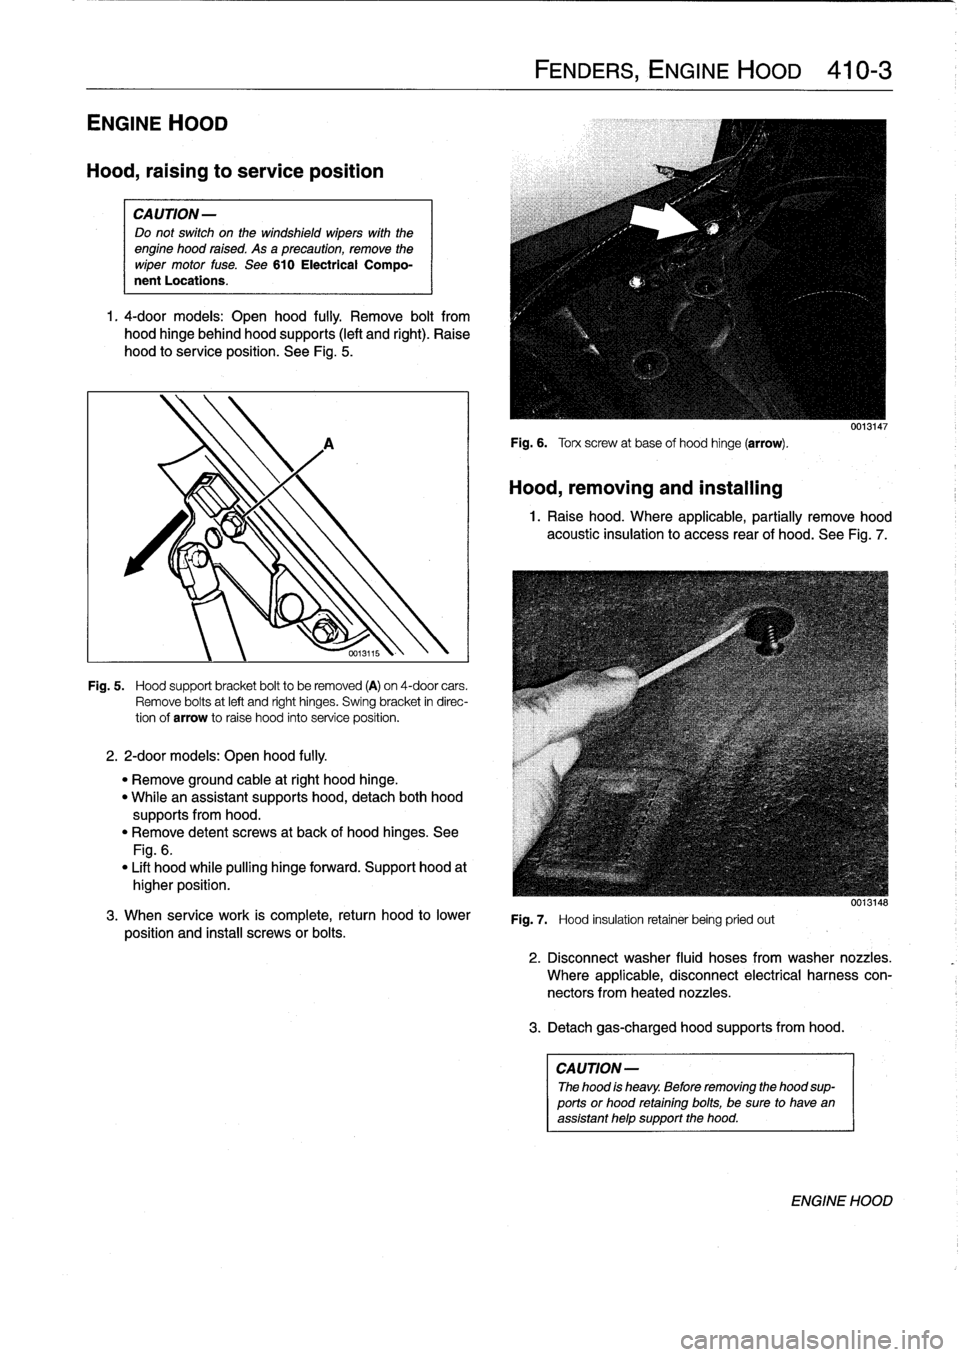
1
.
4-door
models
:
Open
hood
fully
.
Remove
bolt
from
hood
hinge
behind
hood
supports
(left
and
right)
.
Raise
hood
to
service
position
.
See
Fig
.
5
.
2
.
2-door
models
:
Open
hood
fully
.
Fig
.
5
.
Hood
support
bracket
boltto
be
removed
(A)
on
4-door
cars
.
Remove
bolts
at
left
and
right
hinges
.
Swing
bracket
in
direc-
tion
of
arrow
to
raise
hood
into
service
position
.
"
Remove
ground
cable
atright
hood
hinge
.
"
Whilean
assistant
supports
hood,
detach
both
hood
supportsfrom
hood
.
"
Remove
detent
screws
at
back
of
hood
hinges
.
See
Fig
.
6
.
"
Lift
hood
while
pulling
hinge
forward
.
Support
hood
at
higher
position
.
3
.
When
service
work
is
complete,
return
hood
to
lower
position
and
instaf
screws
or
bolts
.
FENDERS,
ENGINE
HOOD
410-
3
Fig
.
6
.
Torx
screw
at
base
of
hood
hinge
(arrow)
.
Hood,
removing
and
installing
0013147
1
.
Raise
hood
.
Where
applicable,
partially
remove
hood
acoustic
insulation
to
access
rear
of
hood
.
See
Fig
.
7
.
Fig
.
7
.
Hood
insulation
retainer
being
pried
out
3
.
Detachgas-charged
hood
supportsfrom
hood
.
CAUTION
-
The
hood
is
heavy
.
Before
removing
the
hood
sup-
ports
or
hood
retainingbolts,
be
sure
to
have
an
assistant
help
support
the
hood
.
0013148
2
.
Disconnect
washer
fluid
hoses
from
washer
nozzles
.
Where
applicable,
disconnect
electrical
harness
con-
nectors
fromheated
nozzles
.
ENGINE
HOOD
Page 312 of 759
410-4
FENDERS,
ENGINE
HOOD
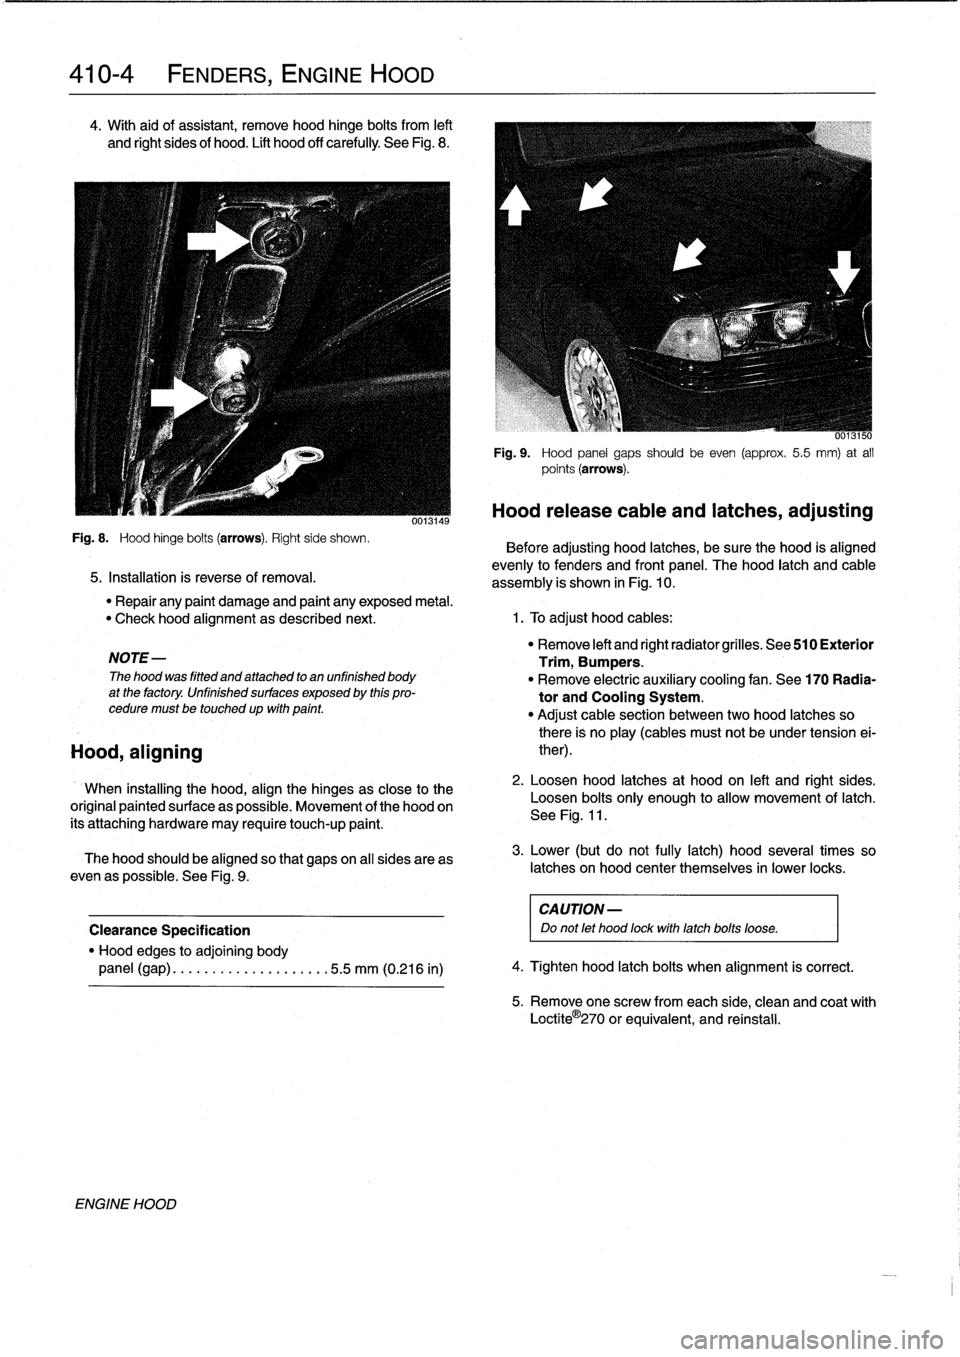
4
.
With
aid
of
assistant,
remove
hood
hinge
bolts
from
left
and
Rght
sides
of
hood
.
Lift
hood
off
carefully
See
Fig
.
8
.
Fig
.
8
.
Hood
hinge
bolts
(arrows)
.
Right
side
shown
.
5
.
Installation
is
reverse
of
removal
.
NOTE-
The
hood
was
fitted
and
attached
to
an
unfinished
body
at
the
factory
.
Unfinished
surfaces
exposed
by
this
pro-
cedure
must
betouchedup
wfth
pafnt
.
Hood,
aligning
ENGINE
HOOD
0013149
6013150
Fig
.
9
.
Hood
panel
gaps
should
be
even
(approx
.
5
.5
mm)
at
all
points
(arrows)
.
Hood
release
cable
and
latches,
adjusting
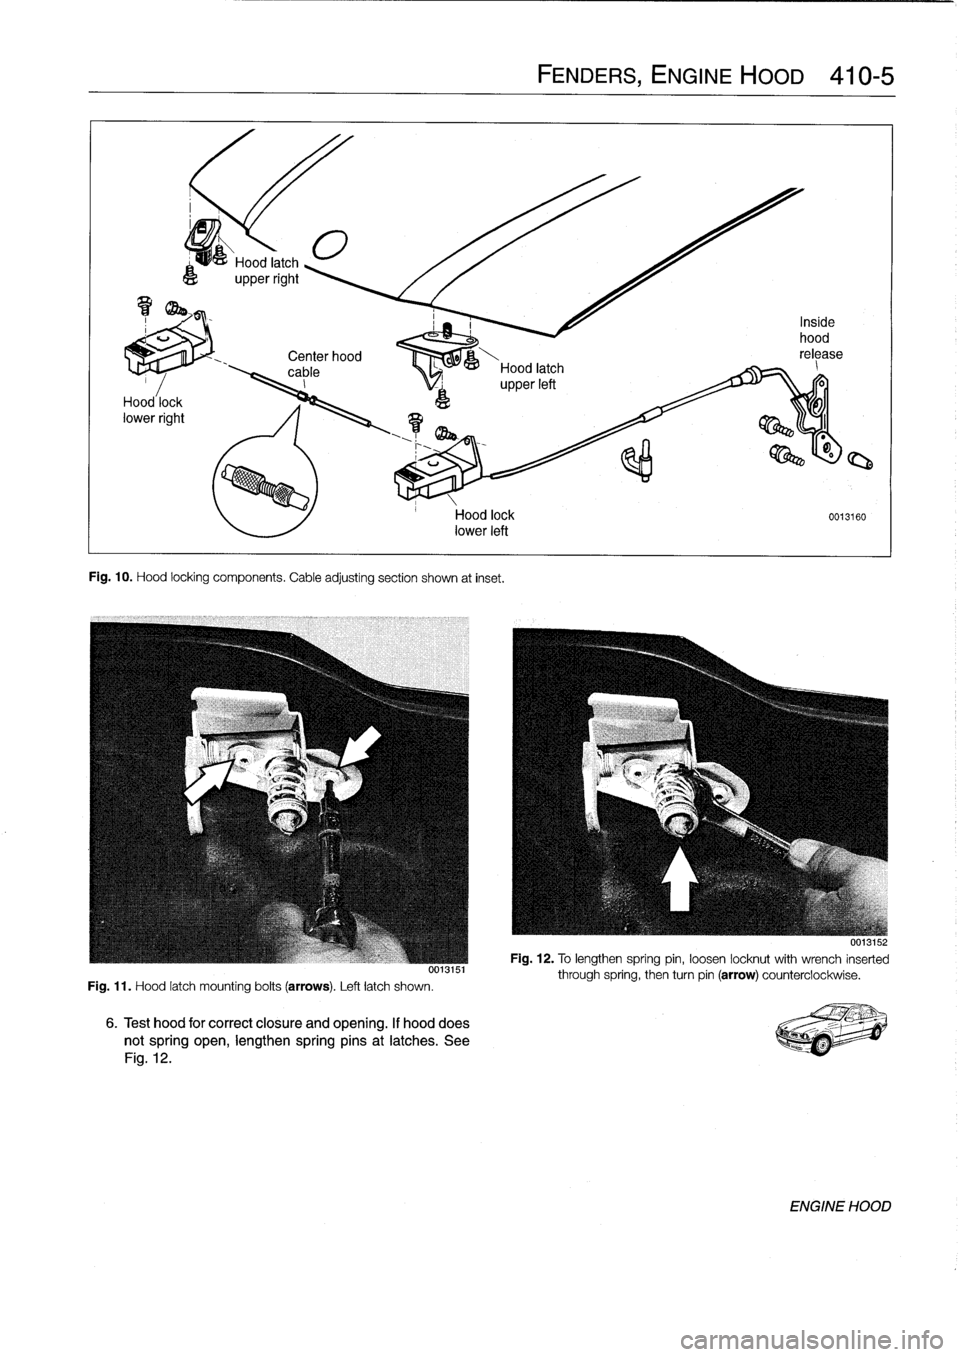
Before
adjusting
hood
latches,
be
sure
the
hood
is
aligned
evenly
to
fenders
and
front
panel
.
The
hood
latch
and
cable
assembly
is
shown
in
Fig
.
10
.
"
Repair
any
paint
damage
and
paint
any
exposed
metal
.
"
Check
hood
alignment
as
described
next
.
1
.
To
adjust
hood
cables
:
When
installing
the
hood,
align
the
hinges
as
close
to
the
original
paintedsurface
as
possible
.
Movement
of
the
hood
on
its'attaching
hardware
may
require
touch-up
paint
.
The
hood
should
be
aligned
so
that
gapson
all
sides
areas
even
as
possible
.
See
Fig
.
9
.
Clearance
Specification
"
Hood
edges
to
adjoining
body
panel
(gap)
........
..
..
..
.....
.5
.5
mm
(0.216
in)
"
Remove
left
and
right
radiator
grilles
.
See
510
Exterior
Trim,
Bumpers
.
"
Remove
electric
auxíliary
cooling
fan
.
See
170
Radia-
tor
and
Cooling
System
.
"
Adjust
cable
section
between
two
hood
latches
so
there
is
no
play
(cables
must
not
be
under
tension
ei-
ther)
.
2
.
Loosen
hood
latches
at
hood
on
left
and
right
sides
.
Loosen
bolts
only
enough
to
allow
movement
of
latch
.
See
Fig
.
11
.
3
.
Lower
(but
do
not
fully
latch)
hood
severa¡
times
so
latches
on
hood
center
themselves
in
lower
locks
.
CA
UTION-
Do
not
let
hood
fockwith
latchbolts
loose
.
4
.
Tighten
hood
latch
bolts
when
alignment
is
correct
.
5
.
Remove
one
screw
fromeach
side,
clean
and
coat
with
Loctite
O
270
or
equivalent,
and
reinstall
.
Page 313 of 759
Center
hood
,
00--&---
cable
Hood
latch
_
I
upperleft
Fig
.
10
.
Hood
locking
components
.
Cable
adjusting
section
shown
at
inset
.
Fig
.
11
.
Hood
latch
mounting
bolts
(arrows)
.
Left
latch
shown
.
Hood
lock
0013160
lower
left
6
.
Test
hood
for
correct
closure
and
opening
.
If
hooddoes
notspring
open,
lengthen
springpins
at
latches
.
See
Fig
.
12
.
FENDERS,
ENGINE
HOOD
410-5
001aio
Fig
.
12
.
To
lengthen
spring
pin,
loosen
locknut
with
wrench
inserted
through
spring,
then
turn
pin
(arrow)
counterclockwise
.
ENGINE
HOOD
Page 314 of 759

Page 315 of 759
GENERAL
This
repair
group
covers
front
and
rear
door
repair
informa-
tion,
including
removal
and
installationof
the
interior
doorpan-
els
.
DOORS
WARNING
-
Late
M3
moddis
havealuminum
doors
.
Use
extra
care
in
handling
aluminum
parts
in
order
to
avoid
damage
from
gouging
or
corrosión
.
NOTE-
"
For
information
on
the
power
door
windows
and
door
glass
replacement,
sea512Door
Windows
.
"
Forinformation
on
the
power
door
locking
system,
see
515
Central
Locking
and
Anti-Theft
.
WARNING
-
Some
1997
and
all
1998
cars
are
fitted
with
side-im-
pact
airbags
in
the
front
doors
.
When
servicing
doors
on
cars
with
front
side-impact
airbags,
always
dis-
connect
the
negative
(-)
battery
terminal
.
See
721
Airbag
System
(SRS)
for
cautions
and
procedures
relating
to
the
airbag
system
.
Front
orrear
door,
removing
and
installing
1
.
If
workingon
front
door
with
side-impact
airbag,
discon-
nect
negative
(-)
battery
cable
.
CAUTION
-
Prior
to
disconnectiog
the
battery,
read
the
battery
disconnection
cautions
given
at
the
front
of
this
manual
on
page
vüi
.
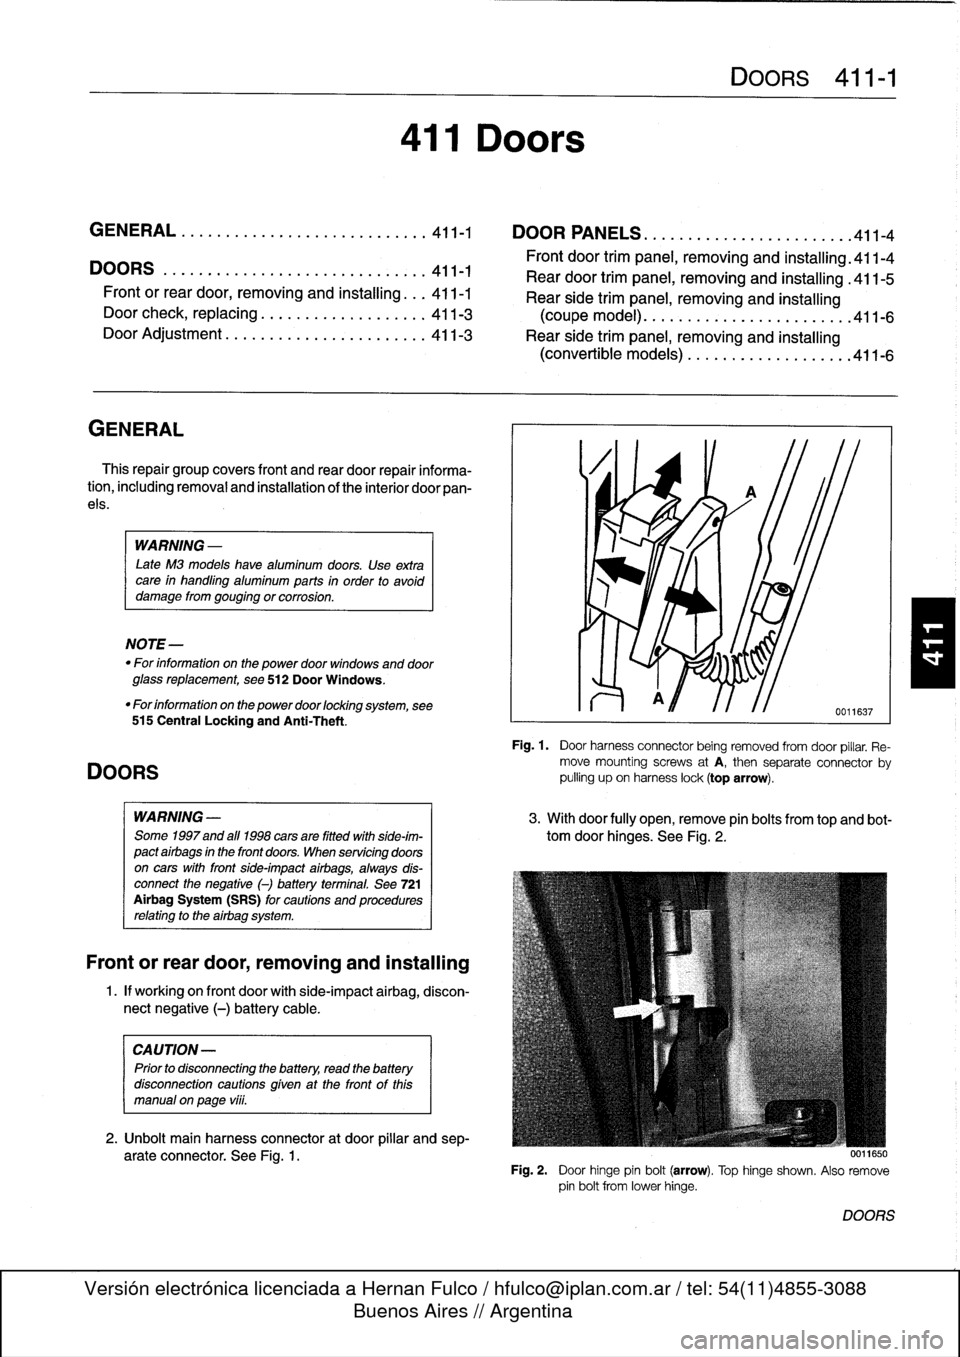
2
.
Unbolt
main
harness
connector
at
door
pillar
and
sep-
arate
connector
.
See
Fig
.
1
.
411
Doors
GENERAL
.............
.
.
.
.
.
.
.
.
.
.
.
.
.
..
411-1
DOOR
PANELS
.
.
.
.
.
.
.
...
.
.
.
.
.
.
.
.
.
...
.
.
411-4
Front
door
trim
panel,
removing
and
installing
.411-4
DOORS
..
.
.
.
.
.
.
.
.
.
...
.
.......
.
....
.
.
.
411-1
Rear
door
trim
panel,
removing
and
installing
.411-5
Front
or
reardoor,
removing
and
installing
..
.
411-1
Rear
side
trim
panel,
removing
and
installing
Door
check,
replacing
.
.
.
.
.
.
.
.
.
.
.
.
.......
411-3
(coupemodel)
.
.
.
.
.
.
....
.
.............
411-6
Door
Adjustment
.......
.
.
.
.
.
.
.
.
.
.
.
.....
411-3
Rear
side
trim
panel,
removing
and
installing
(convertible
models)
.
...
.
.
.
.
.
.
.
.
.
.
.
...
.
411-6
DOORS
411-1
Fig
.
1
.
Door
harness
connector
being
removed
fromdoor
pillar
.
Re-
move
mountingscrews
atA,
then
separate
connector
by
pulling
upon
harness
lock(top
arrow)
.
3
.
Withdoor
fully
open,
remove
pin
bolts
from
top
and
bot-
tom
door
hinges
.
See
Fig
.
2
.
0011650
Fig
.
2
.
Door
hinge
pin
bolt
(arrow)
.
Top
hinge
shown
.
Also
remove
pin
bolt
from
lowerhinge
.
DOORS
Page 316 of 759
411-2
DOORS
4
.
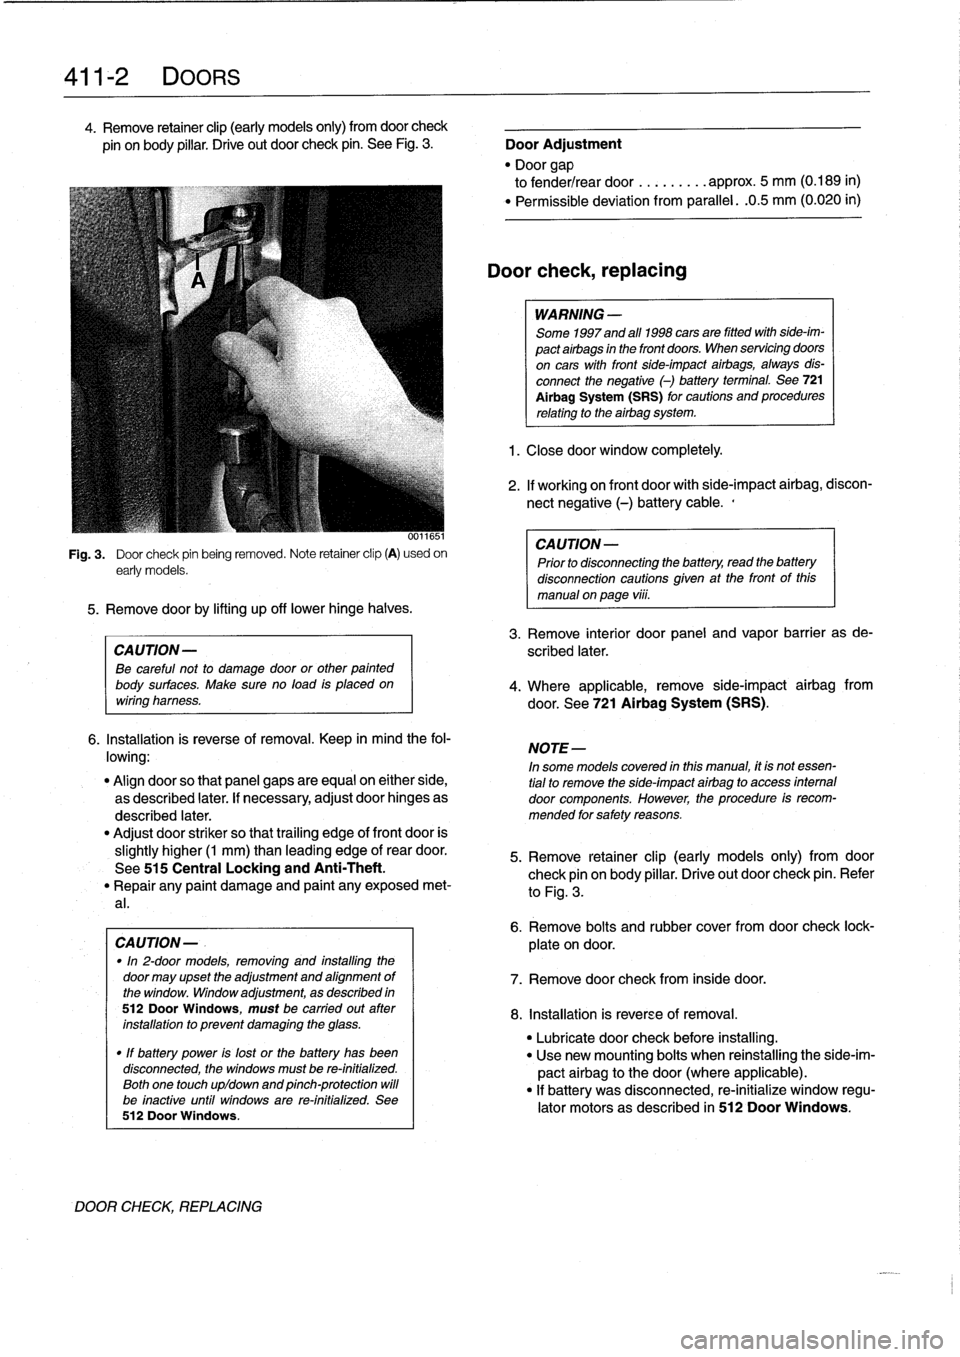
Remove
retainer
clip
(early
models
only)
from
doorcheck
pin
onbody
pillar
.
Drive
out
door
check
pin
.
See
Fig
.
3
.
Door
Adjustment
"
Door
gap
to
fender/rear
door
.........
approx
.
5
mm
(0
.189
in)
"
Permíssible
deviation
from
parallel
.
.0
.5
mm
(0
.020
in)
0011651
Fig
.
3
.
Door
check
pin
being
removed
.
Note
retainer
clip
(A)
usedon
early
models
.
5
.
Remove
doorby
lifting
up
off
lowerhinge
halves
.
CAUTION-
Be
careful
not
to
damage
door
or
other
painted
body
surfaces
.
Make
sure
no
load
is
placedon
wiring
harness
.
6
.
Installation
is
reverse
of
removal
.
Keep
in
mind
the
fol-
lowing
:
"
Align
doorso
that
panel
gaps
are
equal
on
either
side,
as
described
later
.
If
necessary,
adjust
door
hinges
as
described
later
.
"
Adjust
door
striker
so
that
trailing
edge
of
front
door
is
slightly
higher
(1
mm)
than
leading
edge
of
rear
door
.
See
515
Central
Locking
and
Anti-Theft
.
"
Repair
any
paint
damage
and
paínt
any
exposed
met-
al
.
CAUTION-
.
"In
2-door
models,
removing
and
installing
the
door
may
upset
the
adjustment
and
alignment
of
the
window
.
Window
adjustment,
as
described
in
512DoorWindows,
must
be
carried
out
ater
installation
to
prevent
damaging
the
glass
.
"
If
battery
power
is
lost
or
the
battery
has
been
disconnected,
the
windows
must
be
re-initialized
.
Both
one
touch
upldown
and
pinch-protection
will
be
inactive
until
windows
are
re-initialized
.
See
512
Door
Windows
.
DOOR
CHECK,
REPLACING
Door
check,replacing
WARNING
-
Some
1997
and
all
1998
cars
are
fitted
with
side-im-
pact
airbags
in
the
front
doors
.
When
servicing
doors
on
cars
with
front
side-impact
airbags,
always
dis-
connect
the
negative
(-)
battery
terminal
.
See
721
Al
rbag
System
(SRS)
for
cautions
and
procedures
relating
to
the
airbag
system
.
1
.
Closedoor
window
completely
.
2
.
If
working
on
front
door
with
side-impact
airbag,
discon-
nect
negative
(-)
battery
cable
.,
CAUTION-
Prior
to
disconnectiog
the
battery,
read
the
battery
disconnection
cautions
gíven
at
the
front
of
this
manual
on
page
viii
.
3
.
Remove
interior
door
panel
and
vapor
barrier
as
de-
scribed
later
.
4
.
Where
applicable,
remove
side-impact
airbag
from
door
.
See
721
Airbag
System
(SRS)
.
NOTE-
In
some
models
covered
inthis
manual,
ít
is
not
essen-
tial
to
remove
the
side-ímpact
airbag
to
access
internal
door
components
.
However,
the
procedure
is
recom-
mended
for
safety
reasons
.
5
.
Remove
retainer
clip
(early
models
only)
from
door
check
pin
on
body
pillar
.
Drive
out
door
check
pin
.
Refer
to
Fig
.
3
.
6
.
Remove
bolts
and
rubber
cover
fromdoor
check
lock-
plate
ondoor
.
7
.
Remove
door
check
from
inside
door
.
8
.
Installation
is
reverse
of
removal
.
"
Lubricate
door
check
before
installing
.
"
Use
new
mounting
bolts
when
reinstalling
the
side-im-
pact
airbag
to
thedoor(where
applicable)
.
"
If
battery
was
disconnected,
re-initialize
window
regu-
lator
motors
as
described
in
512
Door
Windows
.
Page 317 of 759
Door
Hinge
Adjustment
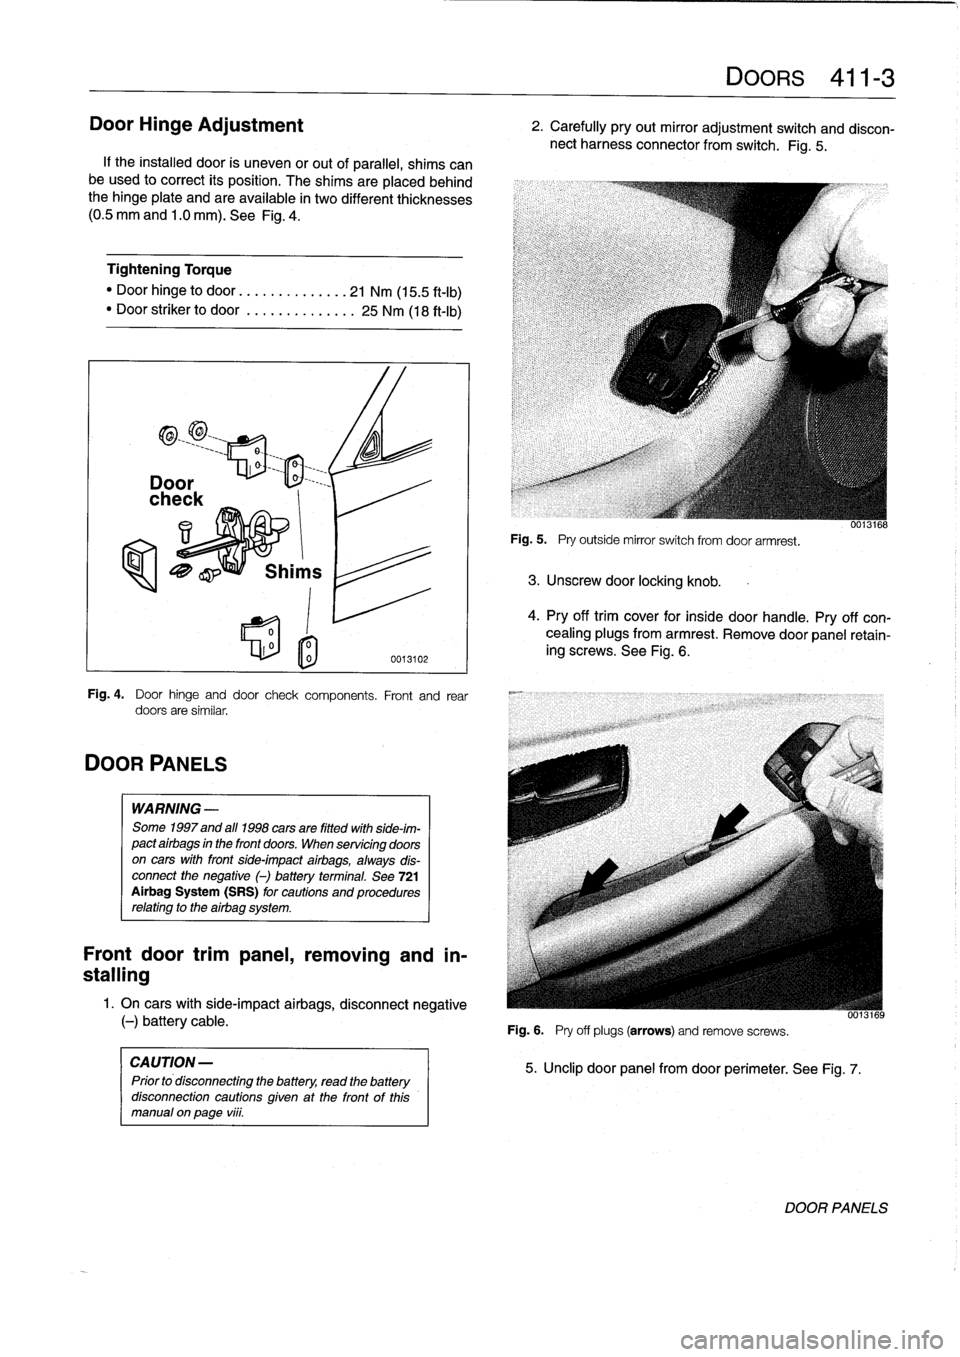
If
the
installed
door
is
uneven
or
out
of
parallel,
shims
can
be
used
to
correct
its
position
.
The
shims
are
placedbehind
the
hinge
plate
and
are
available
in
two
different
thicknesses
(0
.5
mm
and
1
.0
mm)
.
See
Fig
.
4
.
Tightening
Torque
"
Door
hinge
to
door
.............
..
21
Nm
(15
.5
ft-I
b)
"
Door
striker
to
door
...........
...
25
Nm
(18
ft-Ib)
DOOR
PANELS
0
l
o
0013102
Fig
.
4
.
Door
hinge
and
door
check
components
.
Front
and
rear
doors
are
similar
.
WARNING
-
Some
1997
and
all
1998
cars
are
fitted
with
side-im-
pact
airbags
in
the
front
doors
.
When
servicing
doors
on
cars
with
front
side-impact
airbags,
always
dis-
connect
the
negative
()
battery
terminal
.
See
721
Airbag
System
(SRS)
for
cautions
and
procedures
relating
to
the
airbag
system
.
Front
door
trimpanel,
removing
and
in-
stalling
1
.
On
cars
with
side-impact
airbags,
disconnect
negative
(-)
battery
cable
.
CAUTION
-
Prior
to
disconnecting
the
battery,
read
the
battery
disconnection
cautions
given
at
the
front
of
this
manual
on
page
viii
.
Fig
.
5
.
Pry
outside
mirror
switch
from
door
armrest
.
3
.
Unscrew
door
locking
knob
.
Fig
.
6
.
Pry
off
plugs
(arrows)
and
remove
screws
.
DOORS
411-
3
2
.
Carefully
pry
out
mirror
adjustment
switch
and
discon-
nect
harness
connector
from
switch
.
Fig
.
5
.
5
.
Unclip
door
panel
from
door
perimeter
.
See
Fig
.
7
.
0013168
4
.
Pry
off
trim
cover
for
insíde
door
handle
.
Pry
off
con-
cealing
plugs
from
armrest
.
Remove
door
panel
retain-
ing
screws
.
See
Fig
.
6
.
UU13169
DOOR
PANELS
Page 318 of 759
411-
4
DOORS
6
.
Disconnect
radio
speaker
harness
connector
.
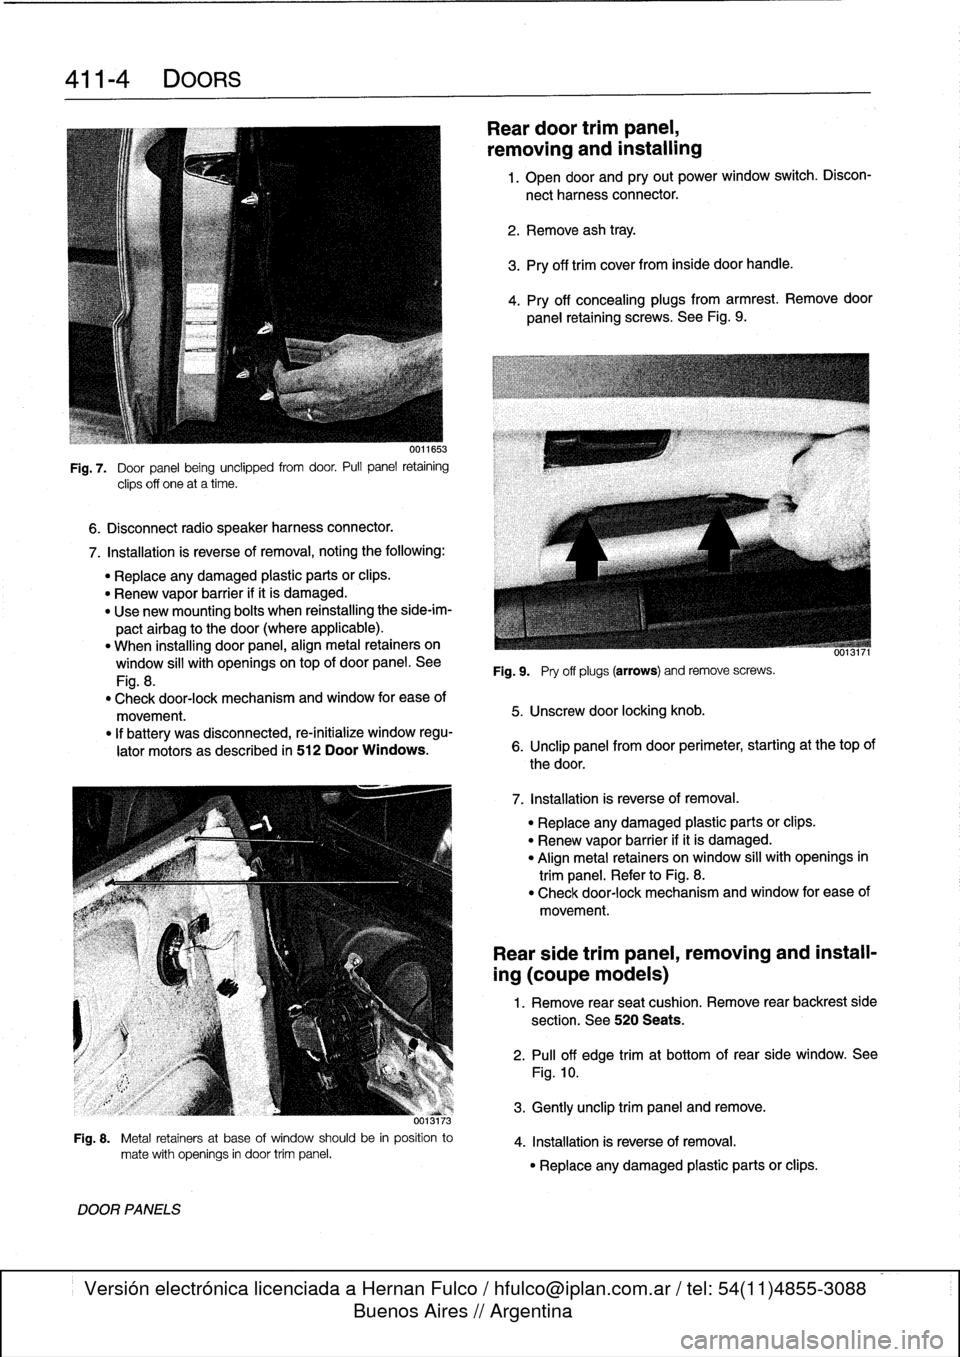
Fig
.
7
.
Door
panel
being
unclipped
from
door
.
Pull
panel
retaining
clips
off
one
at
a
time
.
7
.
Installation
is
reverse
of
removal,
noting
the
following
:
"
Replace
any
damaged
plastic
parts
orclips
.
"
Renew
vapor
barrier
ifit
is
damaged
.
"
Use
new
mounting
bolts
when
reinstalling
the
side-im-
pactairbag
to
the
door
(where
applicable)
.
"
When
installing
door
panel,
align
metal
retainers
on
window
sill
with
openingsontop
of
door
panel
.
See
Fig
.
8
.
"
Check
door-lock
mechanism
and
window
for
ease
of
movement
.
"
If
battery
was
disconnected,
re-initialize
window
regu-
lator
motors
as
described
in
512
Door
Windows
.
373
Fig
.
8
.
Metal
retainers
at
base
of
window
should
be
in
position
to
mate
with
openings
in
door
trim
panel
.
DOOR
PANELS
Reardoor
trimpanel,
removing
and
installing
1
.
Open
door
and
pry
out
power
window
switch
.
Discon-
nect
harness
connector
.
2
.
Remove
ash
tray
.
3
.
Pry
off
trim
cover
from
inside
door
handle
.
4
.
Pry
off
concealing
plugs
from
armrest
.
Remove
door
panel
retaining
screws
.
See
Fig
.
9
.
Fig
.
9
.
Pry
off
plugs
(arrows)
andremove
screws
.
5
.
Unscrew
door
locking
knob
.
6
.
Unclip
panel
from
door
perimeter,
starting
at
thetop
of
the
door
.
7
.
Installation
is
reverse
of
removal
.
"
Replace
any
damaged
plastic
parts
or
clips
.
"
Renew
vapor
barrier
ifit
is
damaged
.
"
Align
metal
retainers
on
window
sill
with
openings
in
trim
panel
.
Refer
to
Fig
.
8
.
"
Check
door-lock
mechanism
and
window
for
ease
of
movement
.
Rear
side
trim
panel,
removing
and
install-
ing
(coupe
models)
1
.
Remove
rear
seat
cushion
.
Remove
rear
backrest
side
section
.
See
520
Seats
.
2
.
Pull
off
edge
trimat
bottom
of
rear
side
window
.
See
Fig
.
10
.
3
.
Gently
unclip
trim
panel
andremove
.
4
.
Installation
is
reverse
of
removal
.
"
Replace
any
damaged
plastic
parts
or
clips
.
Page 319 of 759
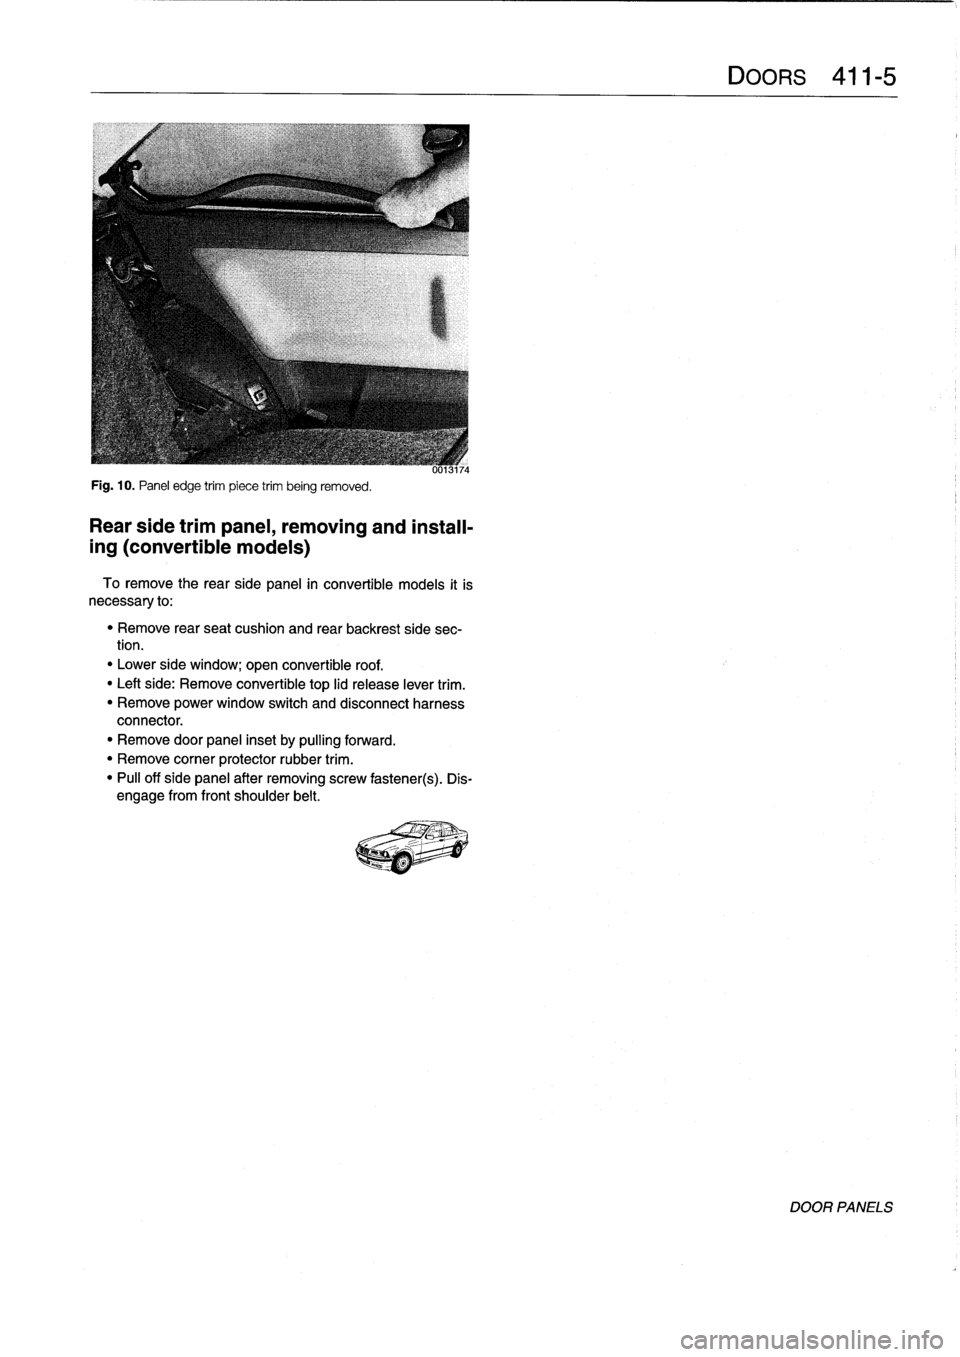
Fig
.
10
.
Panel
edge
trim
piece
trim
being
removed
.
Rear
side
trimpanel,
removing
and
install-
ing
(convertible
models)
To
remove
the
rearside
panel
in
convertible
models
it
is
necessary
to
:
"
Remove
rear
seat
cushion
and
rear
backrest
side
sec-
tion
.
"
Lower
side
window
;
open
convertible
roof
.
"
Leftside
:
Remove
convertible
top
lid
release
lever
trim
.
"
Remove
power
window
switch
and
disconnect
harness
connector
.
"
Remove
door
panel
inset
by
pulling
forward
.
"
Remove
corner
protector
rubber
trim
.
"
Pull
off
side
panel
after
removing
screw
fastener(s)
.
Dis-
engage
from
front
shoulder
belt
.
Page 320 of 759
