BMW M4 2016 Owners Manual
Manufacturer: BMW, Model Year: 2016, Model line: M4, Model: BMW M4 2016Pages: 228, PDF Size: 4.88 MB
Page 181 of 228
3.Take the filler hose of the sealant container
that was previously connected to the tyre
valve and connect it to the free connection
on the sealant container.
This can prevent sealant residues from es‐
caping from the container.4.Pack empty sealant container to avoid soil‐
ing in the boot.5.Store Mobility system in the vehicle again.
Spreading sealant compound
Immediately drive for approximately
10 km/5 mi to evenly distribute the sealing
compound in the tyre.
Do not exceed a speed of 80 km/h/50 mph.
If possible, do not drive slower than
20 km/h/12 mph.
Correcting the tyre inflation pressure
1.Stop in a suitable area.2.Bolt the connecting hose of the compres‐
sor directly onto the tyre valve.3.Insert the plug into the socket on the inside
of the vehicle.4.Correct tyre inflation pressure to 2.5 bar.▷Increase pressure: switch on the com‐
pressor with the engine running or the
ignition switched on.▷Reduce pressure: press the button on
the compressor.
Continuing with journey
Do not exceed maximum permitted speed of
80 km/h, approximately 50 mph.
Reinitialise runflat indicator.
Reinitialise Tyre Pressure Monitor.
Have the punctured tyre and the sealant con‐
tainer of the Mobility system replaced as soon
as possible.
Snow chains
Fine-link snow chains Only certain fine-link snow chains have been
tested, found safe for use in traffic, and cate‐
gorised as suitable by the manufacturer of your
vehicle.
Information regarding suitable snow chains is
available from a Service Partner or a qualified
specialist workshop.
Using Snow chains may only be used in pairs on the
rear wheels with tyres of the following sizes:▷255/40 R 18.▷255/35 R 19.
Observe the snow chain manufacturer's notes.
Ensure that the snow chains are always ade‐
quately taut. Re-tighten them if necessary in
accordance with the chain manufacturer's in‐
structions.
Do not initialise the runflat indicator with snow
chains fitted, as the instrument might other‐
wise issue an incorrect reading.
Do not initialise the Tyre Pressure Monitor with
snow chains fitted, as the instrument might
otherwise issue an incorrect reading.
When driving with snow chains, activate M Dy‐
namic Mode briefly if necessary.
Maximum speed with snow chains
When snow chains are fitted, do not exceed
50 km/h, 30 mph.
Seite 181Wheels and tyresMobility181
Online Edition for Part no. 01 40 2 964 013 - VI/15
Page 182 of 228
Engine compartmentVehicle equipmentThis chapter describes all standard, national
and special equipment provided in the model
series. Equipment not available in the vehicle is
therefore also described, for example the se‐lected special equipment or national version.
This also applies to safety-relevant functions
and systems. Comply with the relevant na‐
tional regulations when using the correspond‐
ing functions and systems.
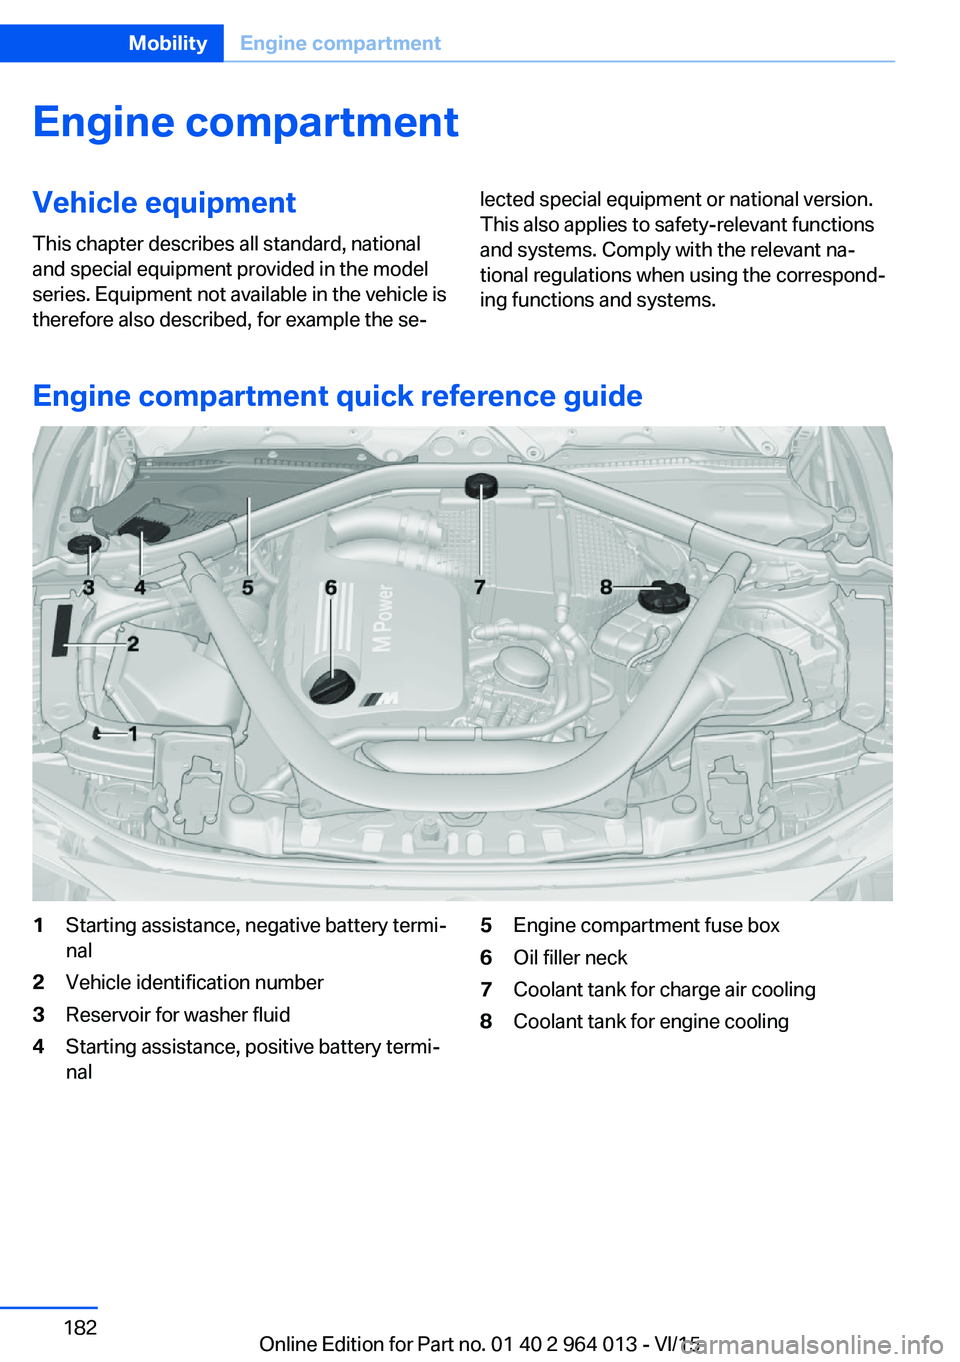
Engine compartment quick reference guide
1Starting assistance, negative battery termi‐
nal2Vehicle identification number3Reservoir for washer fluid4Starting assistance, positive battery termi‐
nal5Engine compartment fuse box6Oil filler neck7Coolant tank for charge air cooling8Coolant tank for engine coolingSeite 182MobilityEngine compartment182
Online Edition for Part no. 01 40 2 964 013 - VI/15
Page 183 of 228
Bonnet
Notes WARNING
Incorrectly performed work in the engine
compartment can damage components and
lead to a safety risk. Danger of accident or damage to property. Have work in the engine
compartment carried out by a Service Partner
or a qualified specialist workshop.◀
WARNING
The engine compartment contains mov‐
ing components. Certain components can also
move in the engine compartment when the ve‐
hicle is switched off, for example the radiator
fan. Danger of injury. Do not reach into the area
of moving parts. Keep articles of clothing and
hair away from moving parts.◀
ATTENTION
When wipers are folded away from the
windscreen, they can be trapped when the
bonnet is opened. Danger of damage to prop‐
erty. Before opening the bonnet, make sure
that the wipers with wiper blades fitted are in
contact with the windscreen.◀
WARNING
The bonnet has projecting parts on the
inside, for example locking hooks. Danger of
injury. When the bonnet is open, watch out for
projecting parts and keep these areas clear.◀
ATTENTION
When closing, the bonnet must audibly
click into place. Additional pushing can dam‐
age the bonnet. Danger of damage to property.
Open and close the bonnet once more. Avoid
additional pushing.◀WARNING
If the bonnet is not correctly locked, it
can come open during the journey and impair
visibility. Danger of accidents. Stop immedi‐
ately and close the bonnet correctly.◀
WARNING
Parts of the body can become trapped
when opening and closing the bonnet. Danger
of injury. When opening and closing, make
sure that the area of movement of the bonnet
is free.◀
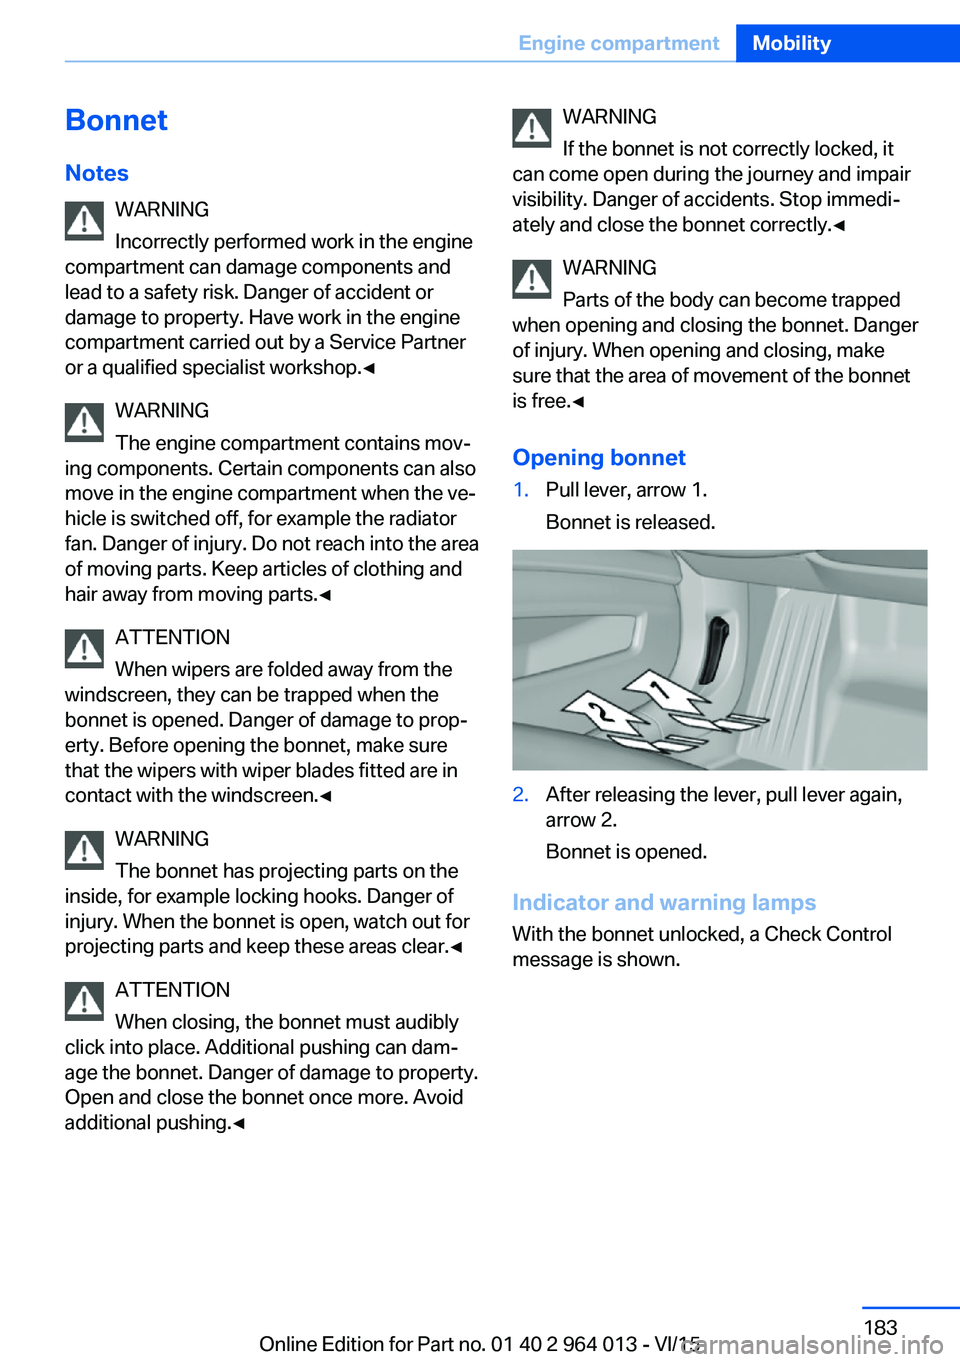
Opening bonnet1.Pull lever, arrow 1.
Bonnet is released.2.After releasing the lever, pull lever again,
arrow 2.
Bonnet is opened.
Indicator and warning lamps With the bonnet unlocked, a Check Control
message is shown.
Seite 183Engine compartmentMobility183
Online Edition for Part no. 01 40 2 964 013 - VI/15
Page 184 of 228
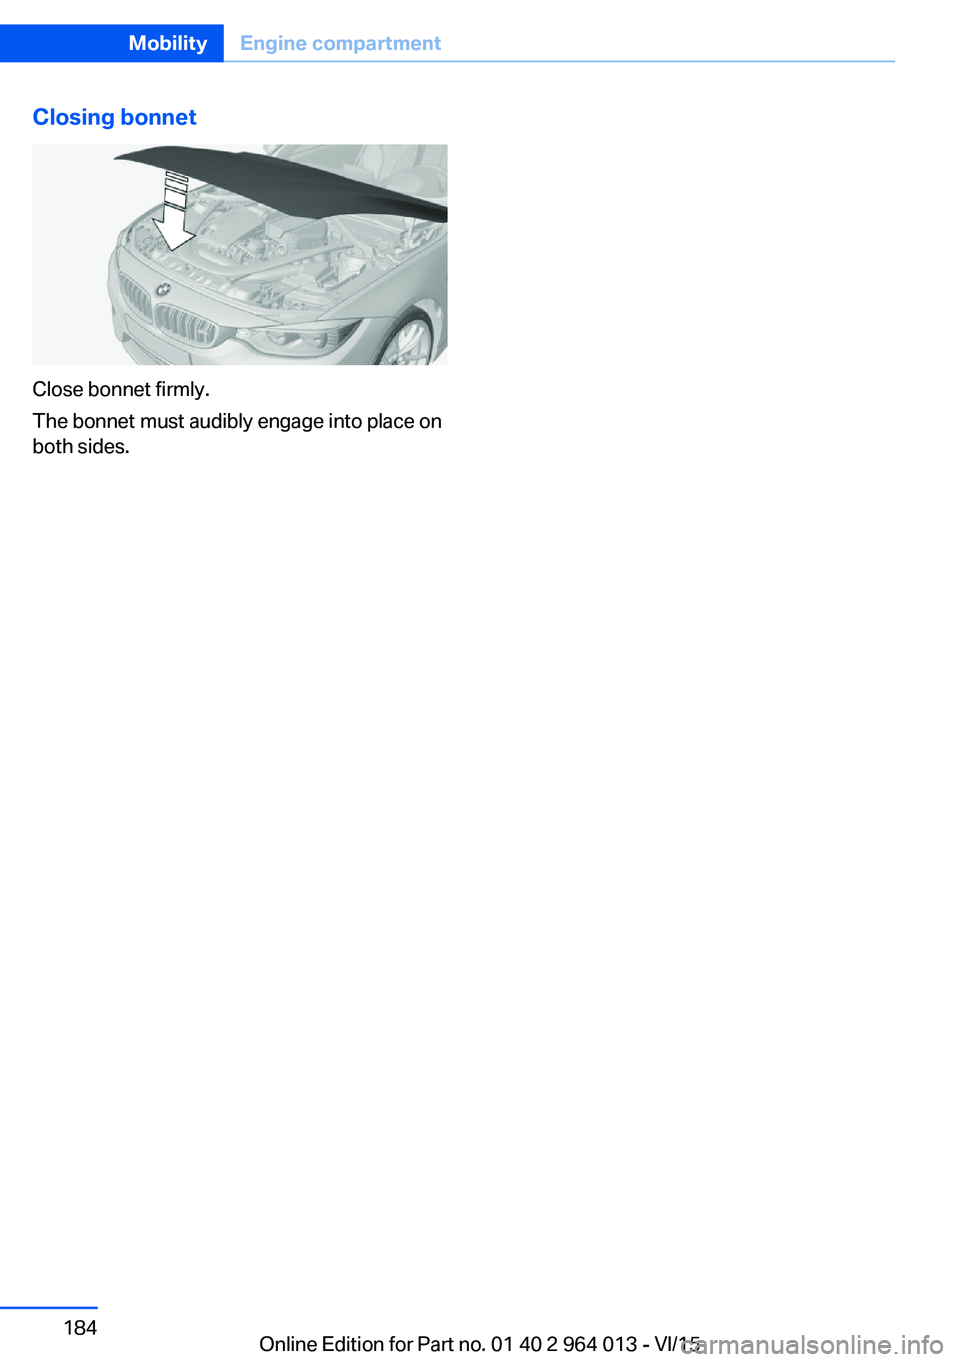
Closing bonnet
Close bonnet firmly.
The bonnet must audibly engage into place on
both sides.
Seite 184MobilityEngine compartment184
Online Edition for Part no. 01 40 2 964 013 - VI/15
Page 185 of 228
Engine oilVehicle equipment
This chapter describes all standard, national
and special equipment provided in the model
series. Equipment not available in the vehicle is
therefore also described, for example the se‐
lected special equipment or national version.
This also applies to safety-relevant functions
and systems. Comply with the relevant na‐
tional regulations when using the correspond‐
ing functions and systems.
General
The engine oil consumption depends on the
driving style and operating conditions.
Engine oil consumption can be increased, for
example, in the following situations:▷Dynamic driving style.▷Running in the engine.▷Engine idling.▷Use of engine oil grades categorised as
unsuitable.
Therefore check the engine oil level regularly
after each time you fill up with fuel.
With dynamic driving, for example, rapid cor‐
nering, the system cannot make any oil meas‐
urement. With this driving mode, the engine oil
is measured using a detailed measurement,
see page 186.
The vehicle has electronic oil measurement.
Electronic oil measurement has two measure‐
ment principles:
▷Status display▷Detailed measurementElectronic oil measurement
Status display
Principle
The engine oil level is electronically monitored
when travelling and shown on the Control Dis‐
play.
If the engine oil level reaches the minimum, a
check control message is shown.
RequirementsA current measurement is available after ap‐
proximately 30 minutes of driving. With a
shorter trip, the status of the last sufficiently
long trip is shown.
When frequently making short trips, regularly
take a detailed measurement.
Displaying engine oil level On the Control Display:1."Vehicle information"2."Vehicle status"3. "Engine oil level"
Messages for the engine oil level
ATTENTION
Too little engine oil causes engine dam‐
age. Danger of damage to property. Immedi‐
ately replenish engine oil.◀
Ensure not to top up with too much engine oil. ATTENTION
Too much engine oil can damage the en‐
gine or the catalytic converter. Danger of dam‐
age to property. Do not top up with too much
engine oil. If you fill too much engine oil, have
the excess extracted by a Service Partner or a
qualified specialist workshop.◀
Seite 185Engine oilMobility185
Online Edition for Part no. 01 40 2 964 013 - VI/15
Page 186 of 228
Different messages are shown on the display,
depending on the engine oil level. Follow these
messages.
If there is too little engine oil, within the next
200 km, approximately 120 miles top up en‐
gine oil, see page 186.
Detailed measurement
Principle In the detailed measurement, the engine oil
level is checked and shown on a scale.
If the engine oil level reaches the minimum, a
Check Control message is shown.
During the measurement, the idle speed is
slightly raised.
Requirements▷Vehicle is on an even road.▷Manual gearbox: gear lever in neutral posi‐
tion, clutch and accelerator pedal not de‐
pressed.▷M double clutch transmission: selector
lever in selector lever position N and accel‐
erator pedal not depressed.▷Engine is running and is at operating tem‐
perature.
Carrying out a detailed measurement
Carry out a detailed measurement of the en‐
gine oil level:
1."Vehicle information"2."Vehicle status"3. "Measure engine oil level"4."Start measurement"
The engine oil level is checked and shown on a
scale.
Duration: approximately 1 minute.
Adding engine oil
Notes ATTENTION
Too little engine oil causes engine dam‐
age. Danger of damage to property.
Top up the engine oil within the next 200 km,
approximately 120 miles.◀
ATTENTION
Too much engine oil can damage the en‐
gine or the catalytic converter. Danger of dam‐
age to property. Do not top up with too much
engine oil. If you fill too much engine oil, have
the excess extracted by a Service Partner or a
qualified specialist workshop.◀
WARNING
Service products, for example oils,
greases, coolants and fuels, can contain sub‐
stances that are harmful to health. Danger of
injury or life. Comply with the notes on the
containers. Do not allow service products to
come into contact with clothing, skin eyes. Do
not pour service products into other bottles.
Keep service products out of the reach of chil‐
dren.◀
General Do not top up engine oil unless message isdisplayed in instrument cluster. The top-up
amount is specified in the message on the in‐
strument cluster.
Switch off the ignition and securely stop the
vehicle before topping up with engine oil.
Spilled engine oil can damage carbon parts.
Wipe up spilled engine oil with a lint-free cloth.
Overview
The oil filler neck is in the engine compart‐
ment, see page 182.Seite 186MobilityEngine oil186
Online Edition for Part no. 01 40 2 964 013 - VI/15
Page 187 of 228
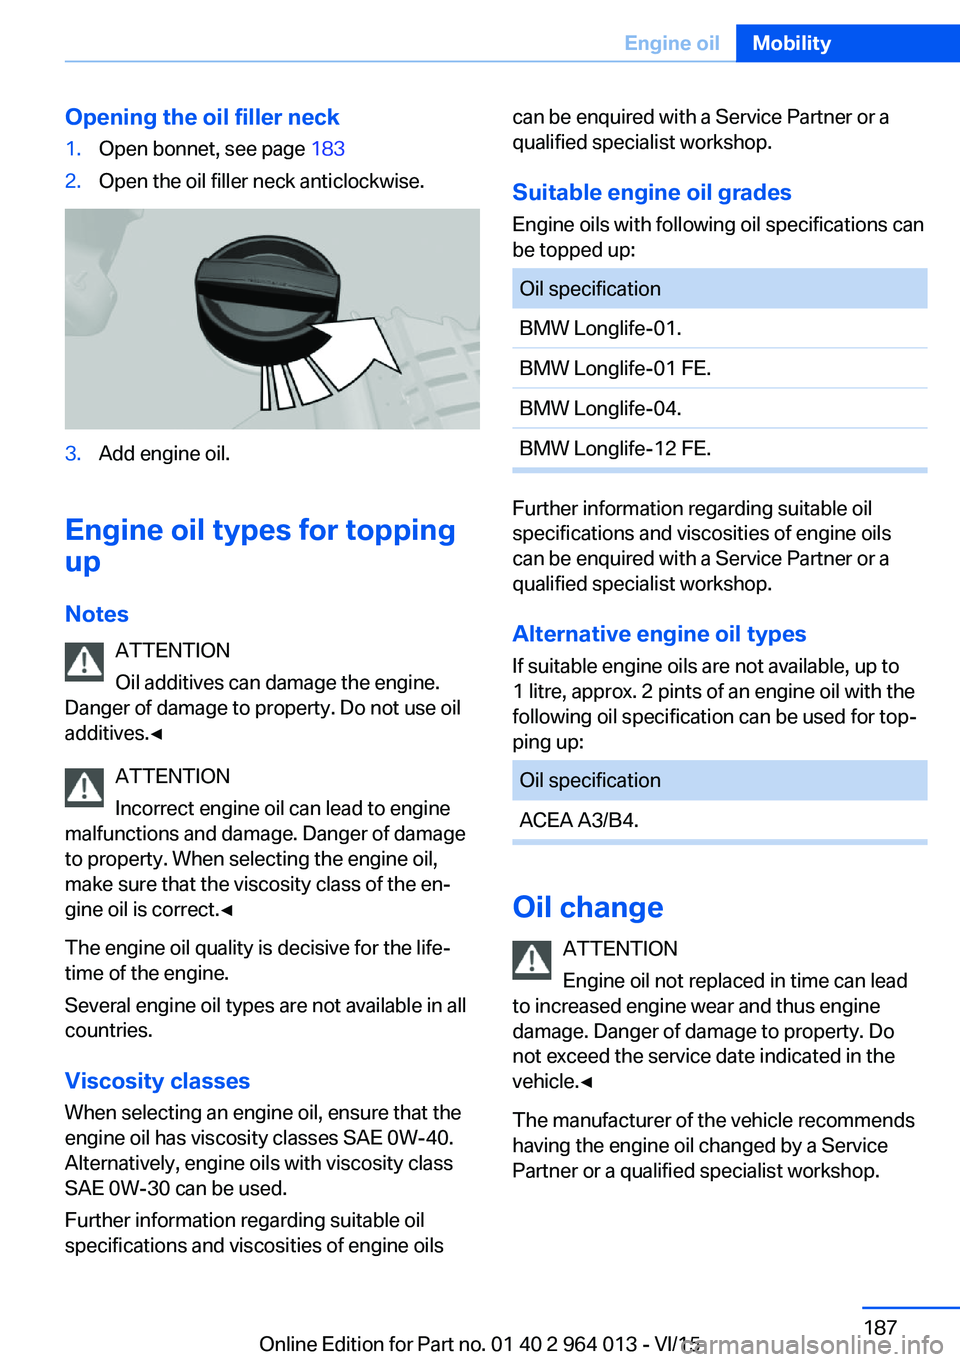
Opening the oil filler neck1.Open bonnet, see page 1832.Open the oil filler neck anticlockwise.3.Add engine oil.
Engine oil types for topping
up
Notes ATTENTION
Oil additives can damage the engine.
Danger of damage to property. Do not use oil
additives.◀
ATTENTION
Incorrect engine oil can lead to engine
malfunctions and damage. Danger of damage
to property. When selecting the engine oil,
make sure that the viscosity class of the en‐
gine oil is correct.◀
The engine oil quality is decisive for the life‐
time of the engine.
Several engine oil types are not available in all
countries.
Viscosity classes When selecting an engine oil, ensure that the
engine oil has viscosity classes SAE 0W-40.
Alternatively, engine oils with viscosity class
SAE 0W-30 can be used.
Further information regarding suitable oil
specifications and viscosities of engine oils
can be enquired with a Service Partner or a
qualified specialist workshop.
Suitable engine oil grades
Engine oils with following oil specifications can
be topped up:Oil specificationBMW Longlife-01.BMW Longlife-01 FE.BMW Longlife-04.BMW Longlife-12 FE.
Further information regarding suitable oil
specifications and viscosities of engine oils
can be enquired with a Service Partner or a
qualified specialist workshop.
Alternative engine oil types If suitable engine oils are not available, up to
1 litre, approx. 2 pints of an engine oil with the
following oil specification can be used for top‐
ping up:
Oil specificationACEA A3/B4.
Oil change
ATTENTION
Engine oil not replaced in time can lead
to increased engine wear and thus engine
damage. Danger of damage to property. Do
not exceed the service date indicated in the
vehicle.◀
The manufacturer of the vehicle recommends
having the engine oil changed by a Service
Partner or a qualified specialist workshop.
Seite 187Engine oilMobility187
Online Edition for Part no. 01 40 2 964 013 - VI/15
Page 188 of 228
Seite 188MobilityEngine oil188
Online Edition for Part no. 01 40 2 964 013 - VI/15
Page 189 of 228
CoolantVehicle equipmentThis chapter describes all standard, national
and special equipment provided in the model
series. Equipment not available in the vehicle is
therefore also described, for example the se‐
lected special equipment or national version.
This also applies to safety-relevant functions
and systems. Comply with the relevant na‐
tional regulations when using the correspond‐
ing functions and systems.
General
The vehicle has two coolant tanks located in
the engine compartment.
To guarantee operational safety of the vehicle,
always check the coolant levels of both coolant
tanks.
Notes WARNING
If the cooling system is opened when the
engine is hot, coolant can escape and cause
scalds. Danger of injury. Only open the cooling
system when the engine has cooled down.◀
WARNING
Additives are harmful to health and incor‐
rect additives can damage the engine. Danger
of injury and damage to property. Do not allow
additives to come into contact with clothing,
skin or eyes, and do not swallow them. Only
use suitable additives.◀
Coolant is a mixture of water and an additive.
Not all commercially available additives are
suitable for the vehicle. Information regarding
suitable additives is available from a Service
Partner or a qualified specialist workshop.Coolant level
Overview
Depending on the engine version, the coolant
tank is located on the right or left of the engine
compartment.
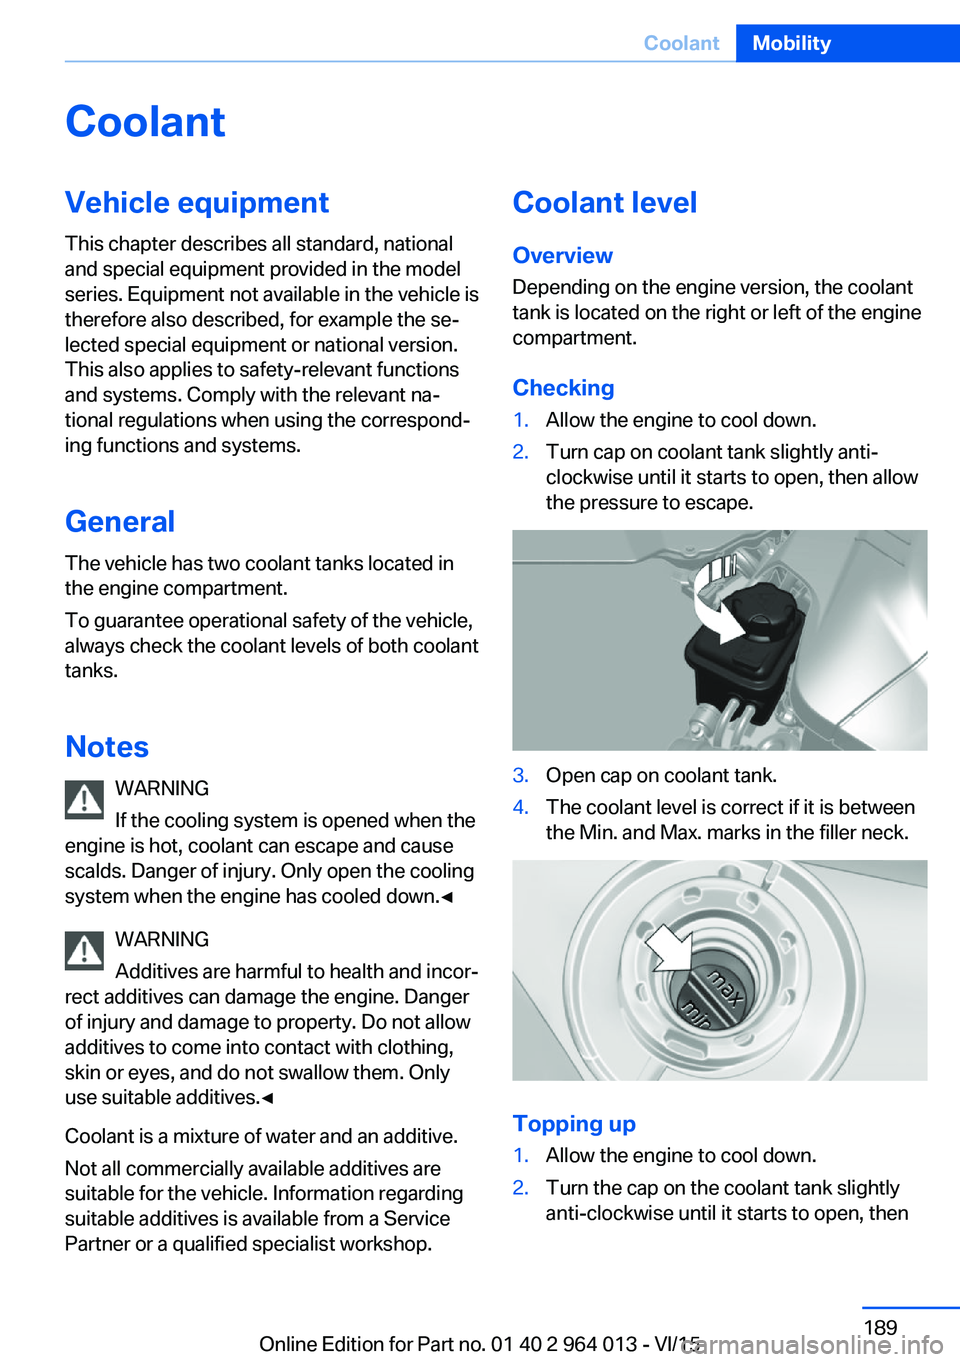
Checking1.Allow the engine to cool down.2.Turn cap on coolant tank slightly anti-
clockwise until it starts to open, then allow
the pressure to escape.3.Open cap on coolant tank.4.The coolant level is correct if it is between
the Min. and Max. marks in the filler neck.
Topping up
1.Allow the engine to cool down.2.Turn the cap on the coolant tank slightly
anti-clockwise until it starts to open, thenSeite 189CoolantMobility189
Online Edition for Part no. 01 40 2 964 013 - VI/15
Page 190 of 228
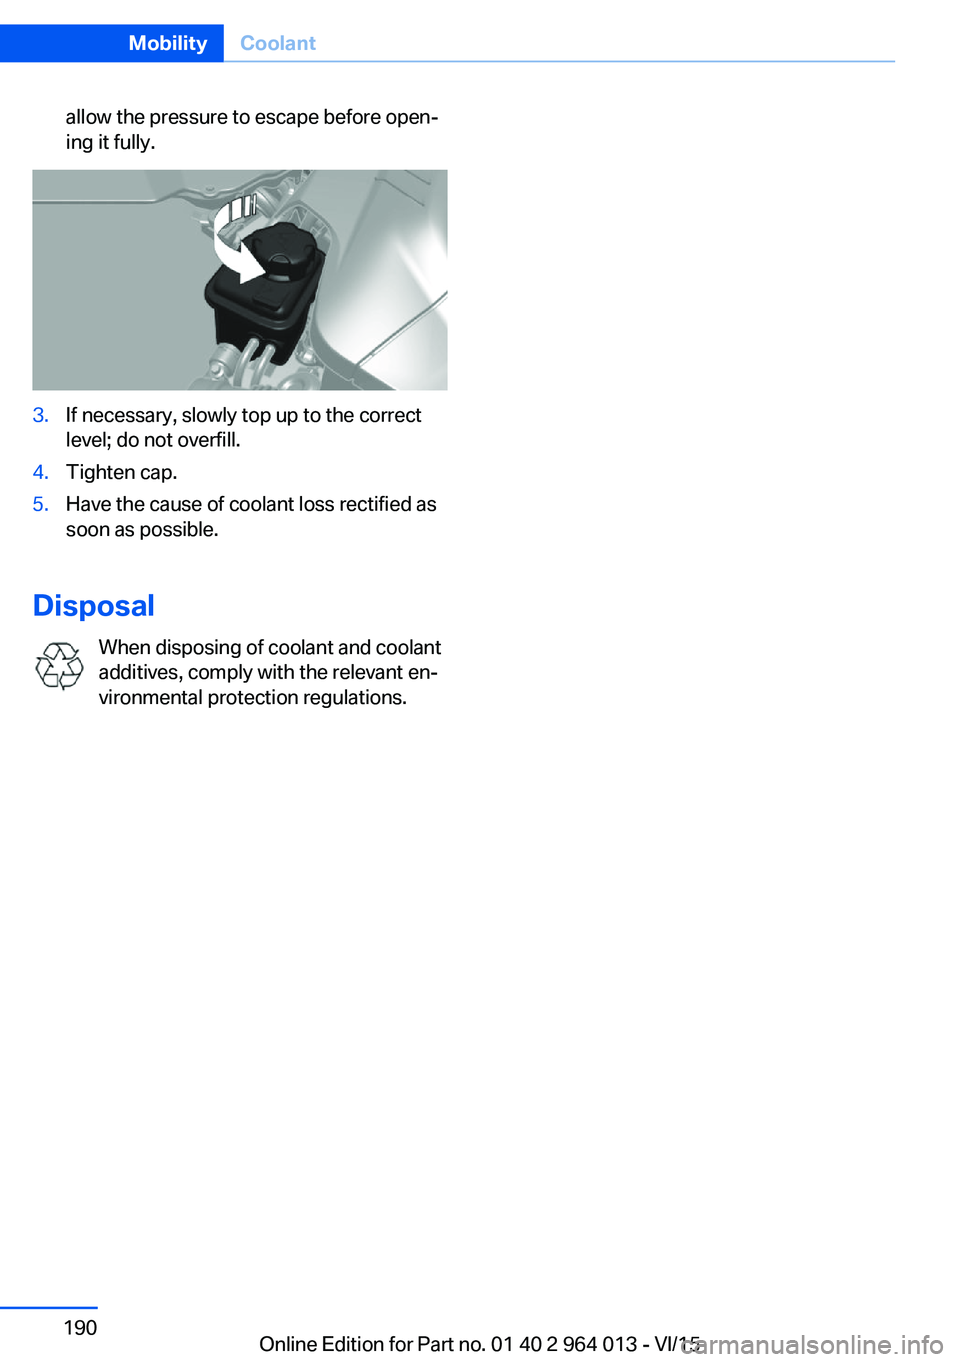
allow the pressure to escape before open‐
ing it fully.3.If necessary, slowly top up to the correct
level; do not overfill.4.Tighten cap.5.Have the cause of coolant loss rectified as
soon as possible.
Disposal
When disposing of coolant and coolant
additives, comply with the relevant en‐
vironmental protection regulations.
Seite 190MobilityCoolant190
Online Edition for Part no. 01 40 2 964 013 - VI/15