BMW M4 2016 Owners Manual
Manufacturer: BMW, Model Year: 2016, Model line: M4, Model: BMW M4 2016Pages: 228, PDF Size: 4.88 MB
Page 201 of 228
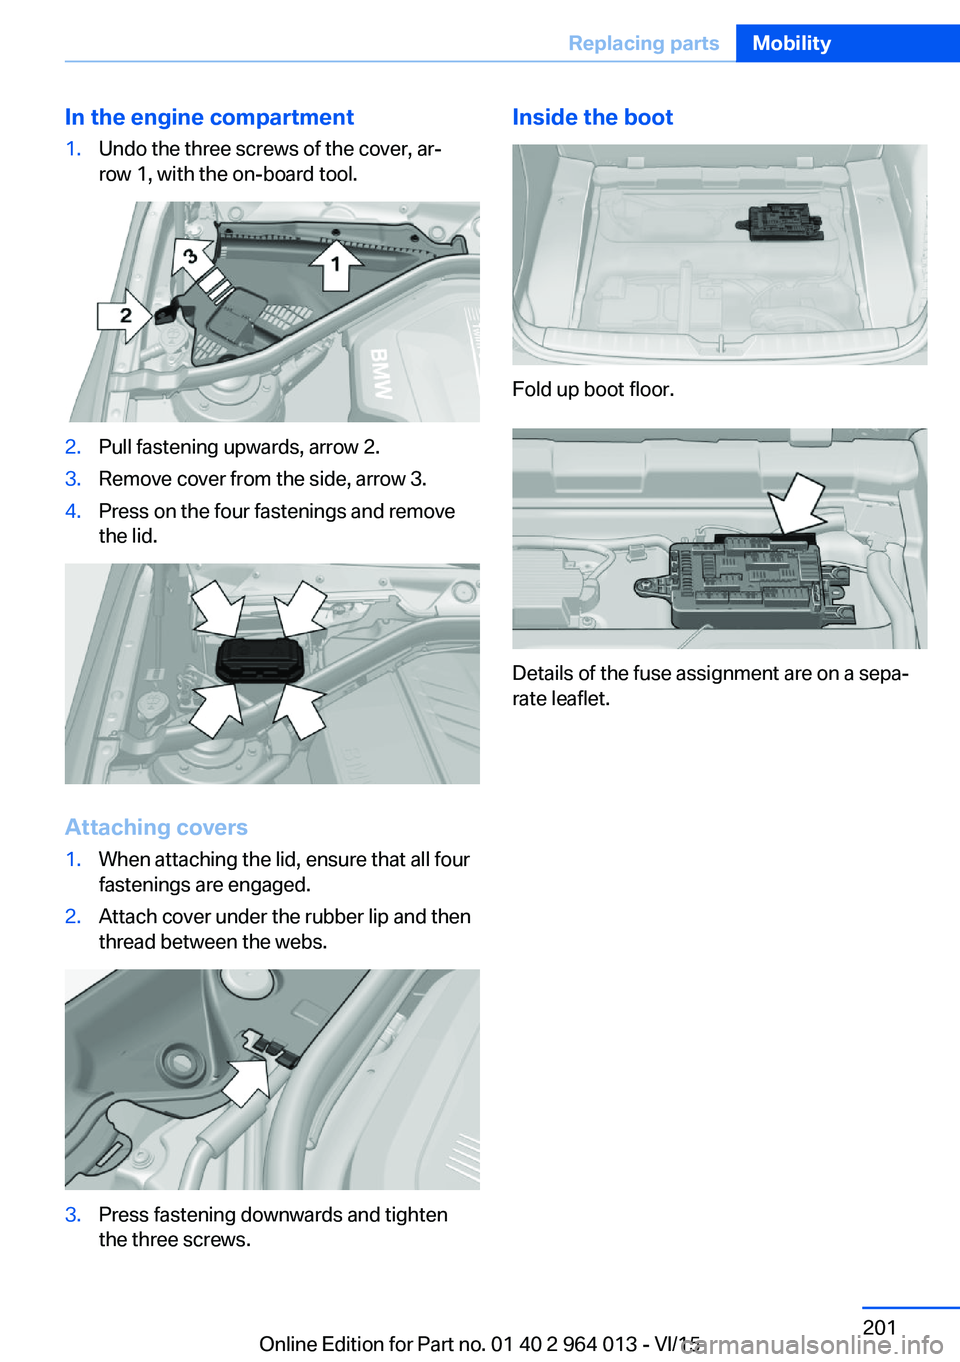
In the engine compartment1.Undo the three screws of the cover, ar‐
row 1, with the on-board tool.2.Pull fastening upwards, arrow 2.3.Remove cover from the side, arrow 3.4.Press on the four fastenings and remove
the lid.
Attaching covers
1.When attaching the lid, ensure that all four
fastenings are engaged.2.Attach cover under the rubber lip and then
thread between the webs.3.Press fastening downwards and tighten
the three screws.Inside the boot
Fold up boot floor.
Details of the fuse assignment are on a sepa‐
rate leaflet.
Seite 201Replacing partsMobility201
Online Edition for Part no. 01 40 2 964 013 - VI/15
Page 202 of 228
Help in the event of a breakdownVehicle equipment
This chapter describes all standard, national
and special equipment provided in the model
series. Equipment not available in the vehicle is
therefore also described, for example the se‐
lected special equipment or national version.
This also applies to safety-relevant functions
and systems. Comply with the relevant na‐
tional regulations when using the correspond‐
ing functions and systems.
Hazard warning lights
The button is located in the centre console.
Intelligent emergency call
Principle This system can be used for sending an emer‐
gency call in emergency situations.
General Press the SOS button in an emergency only.
Even if no emergency call through BMW is
possible, in some cases an emergency call may still be set up to a public emergency call
number. This depends on factors such as the
specific mobile telephone network and the na‐
tional regulations.
For technical reasons, it might not be possible
to make an emergency call in highly adverse
conditions.
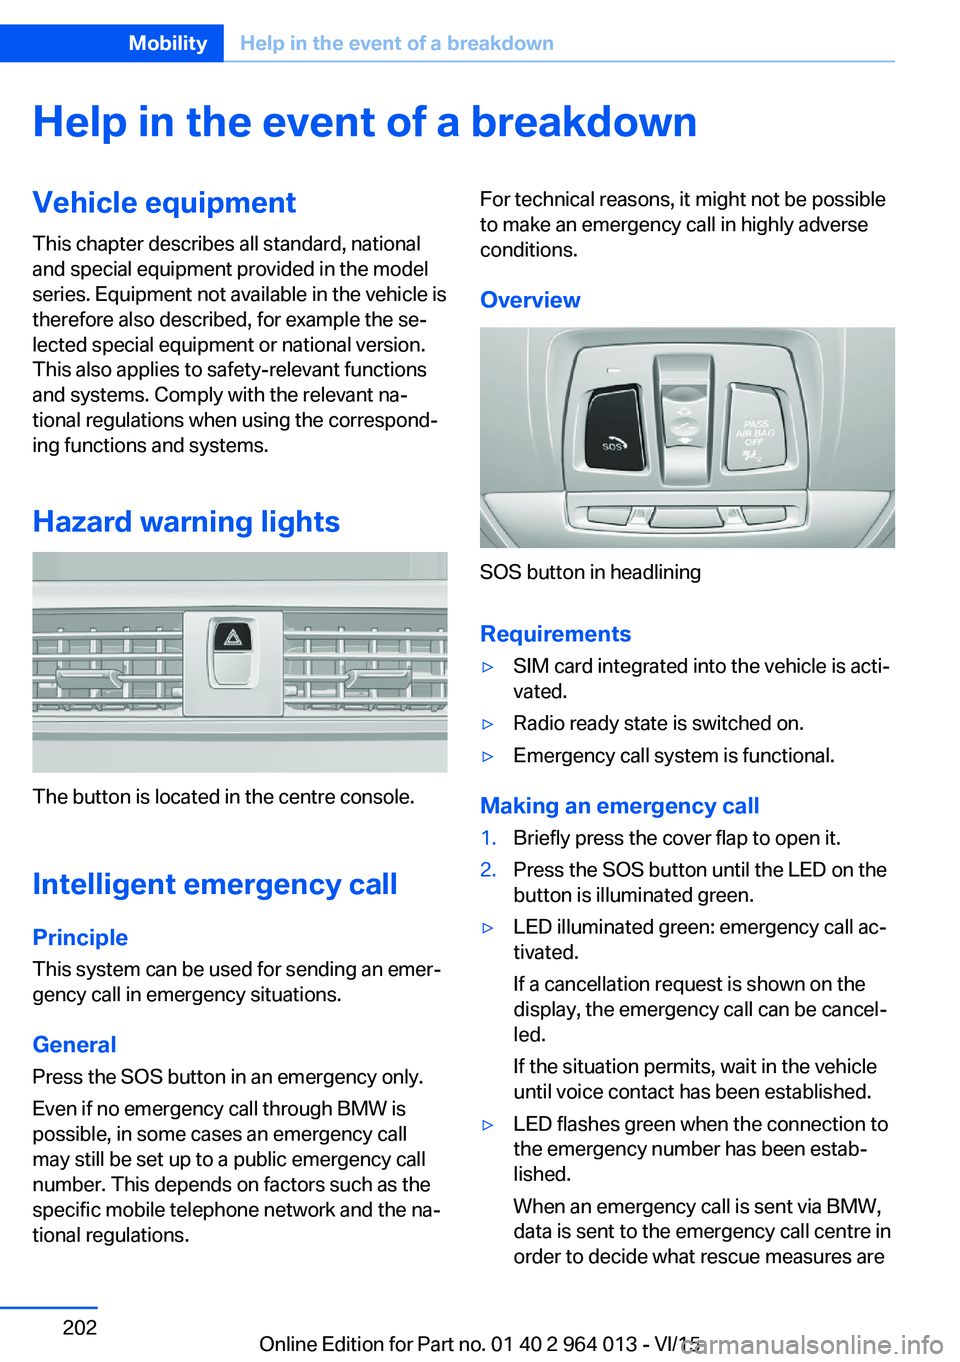
Overview
SOS button in headlining
Requirements
▷SIM card integrated into the vehicle is acti‐
vated.▷Radio ready state is switched on.▷Emergency call system is functional.
Making an emergency call
1.Briefly press the cover flap to open it.2.Press the SOS button until the LED on the
button is illuminated green.▷LED illuminated green: emergency call ac‐
tivated.
If a cancellation request is shown on the
display, the emergency call can be cancel‐
led.
If the situation permits, wait in the vehicle
until voice contact has been established.▷LED flashes green when the connection to
the emergency number has been estab‐
lished.
When an emergency call is sent via BMW,
data is sent to the emergency call centre in
order to decide what rescue measures areSeite 202MobilityHelp in the event of a breakdown202
Online Edition for Part no. 01 40 2 964 013 - VI/15
Page 203 of 228
required. For example, the current position
of the vehicle, if this can be determined. If
questions posed by the emergency call
centre remain unanswered, rescue meas‐
ures are automatically initiated.▷If the LED is flashing green but the emer‐
gency call centre can no longer be heard
over the loudspeaker, you may still be able
to be heard by the emergency call centre.
Automatically activating emergency
calls
In certain circumstances, an emergency call
may be placed automatically immediately after
a serious accident. An automatic emergency
call is not influenced by pressing the SOS but‐
ton.
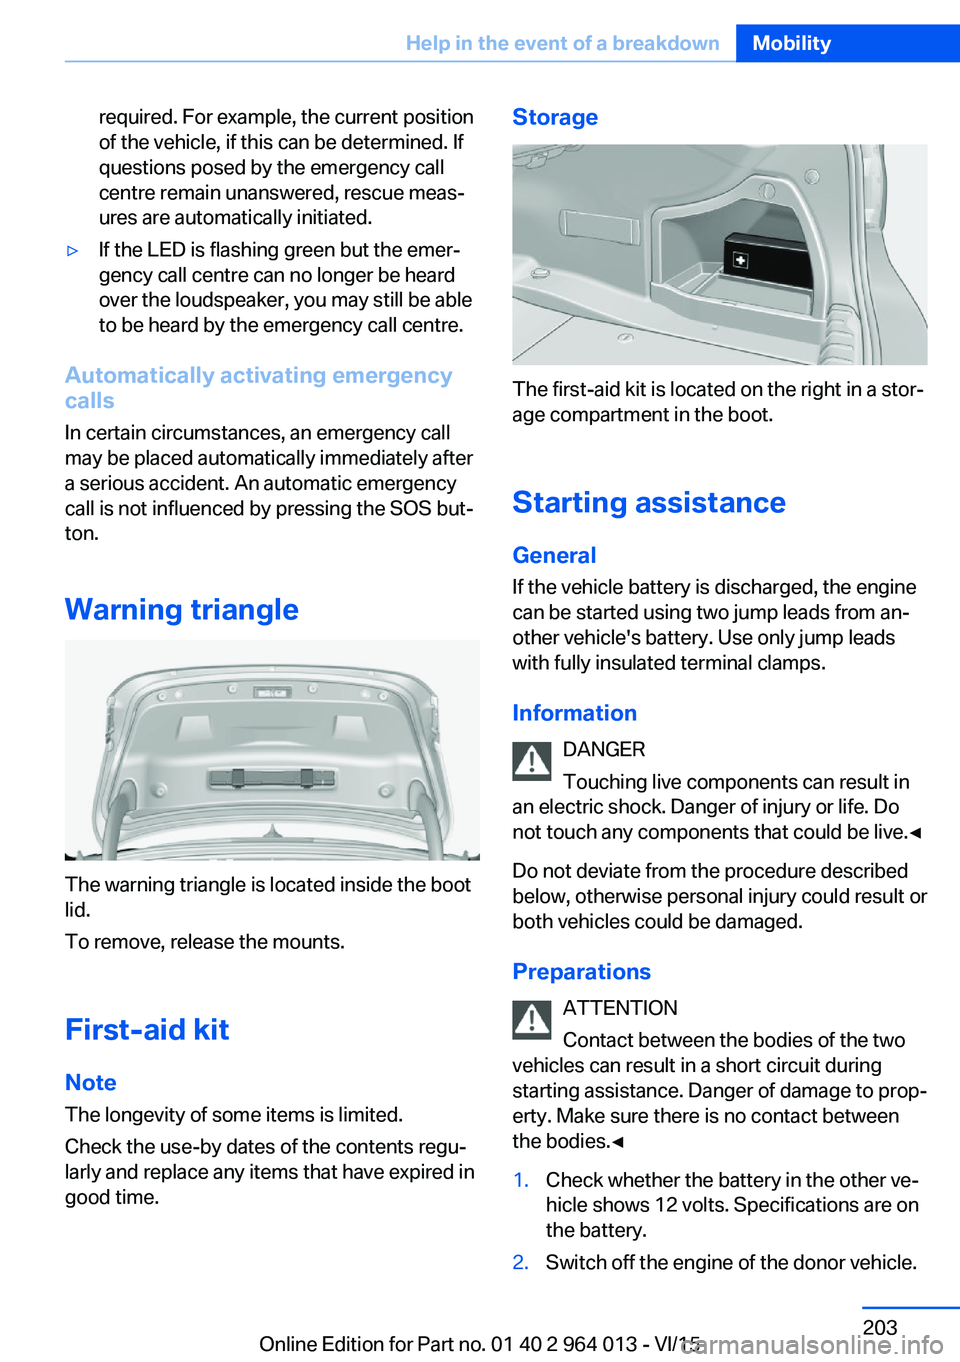
Warning triangle
The warning triangle is located inside the boot
lid.
To remove, release the mounts.
First-aid kit
Note The longevity of some items is limited.
Check the use-by dates of the contents regu‐
larly and replace any items that have expired in
good time.
Storage
The first-aid kit is located on the right in a stor‐
age compartment in the boot.
Starting assistance General
If the vehicle battery is discharged, the engine
can be started using two jump leads from an‐
other vehicle's battery. Use only jump leads
with fully insulated terminal clamps.
Information DANGER
Touching live components can result in
an electric shock. Danger of injury or life. Do
not touch any components that could be live.◀
Do not deviate from the procedure described
below, otherwise personal injury could result or
both vehicles could be damaged.
Preparations ATTENTION
Contact between the bodies of the two
vehicles can result in a short circuit during
starting assistance. Danger of damage to prop‐
erty. Make sure there is no contact between
the bodies.◀
1.Check whether the battery in the other ve‐
hicle shows 12 volts. Specifications are on
the battery.2.Switch off the engine of the donor vehicle.Seite 203Help in the event of a breakdownMobility203
Online Edition for Part no. 01 40 2 964 013 - VI/15
Page 204 of 228
3.Switch off any electrical systems in both
vehicles.
Jump-starting connections
WARNING
Connecting the jump leads in the wrong
sequence can cause sparks. Danger of injury.
Comply with the correct sequence when con‐
necting up.◀
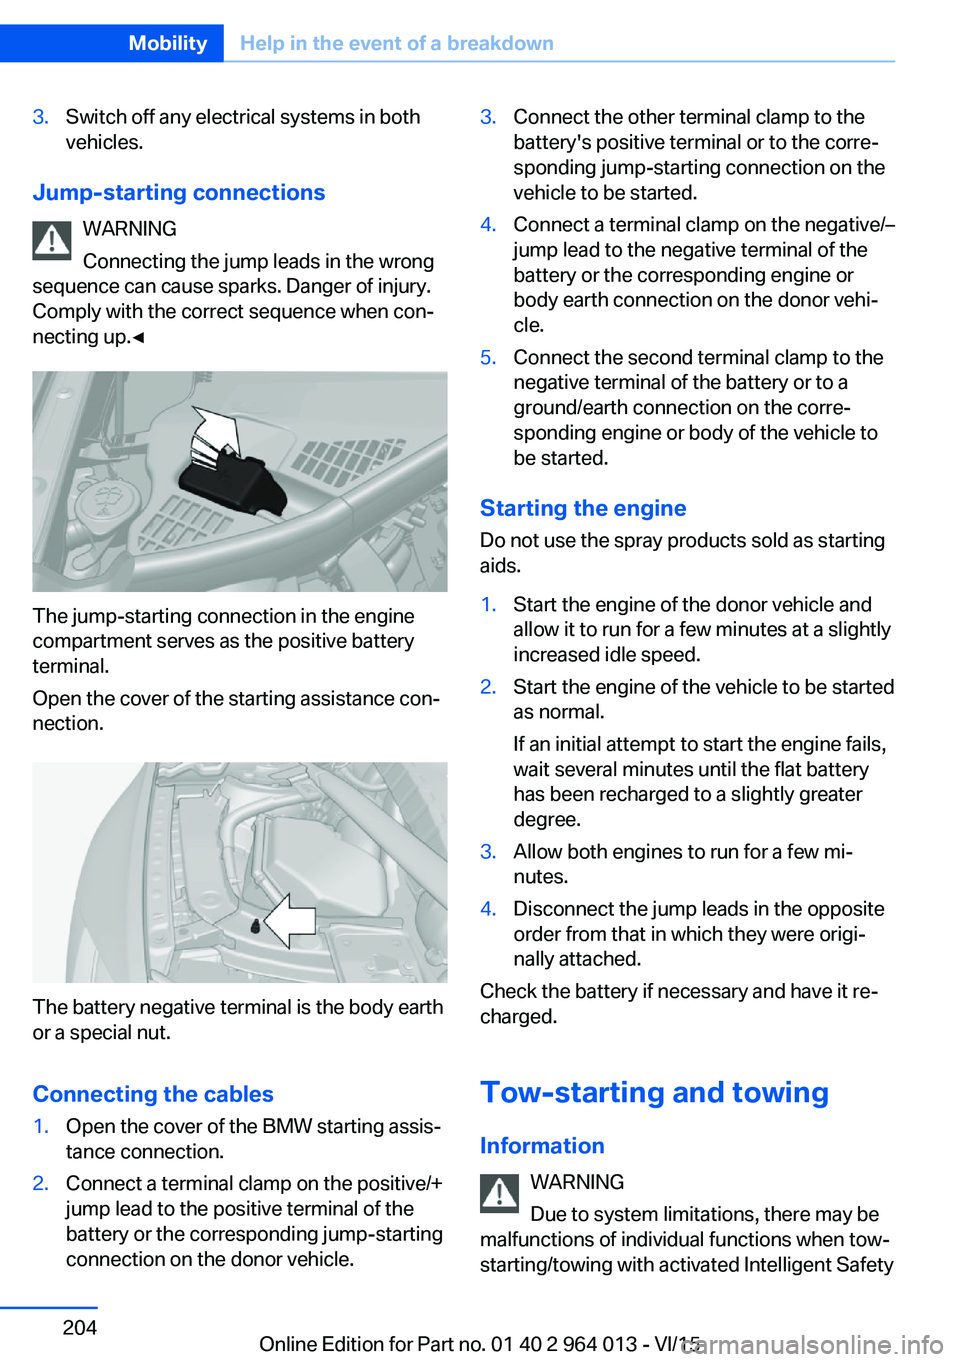
The jump-starting connection in the engine
compartment serves as the positive battery
terminal.
Open the cover of the starting assistance con‐
nection.
The battery negative terminal is the body earth
or a special nut.
Connecting the cables
1.Open the cover of the BMW starting assis‐
tance connection.2.Connect a terminal clamp on the positive/+
jump lead to the positive terminal of the
battery or the corresponding jump-starting
connection on the donor vehicle.3.Connect the other terminal clamp to the
battery's positive terminal or to the corre‐
sponding jump-starting connection on the
vehicle to be started.4.Connect a terminal clamp on the negative/–
jump lead to the negative terminal of the
battery or the corresponding engine or
body earth connection on the donor vehi‐
cle.5.Connect the second terminal clamp to the
negative terminal of the battery or to a
ground/earth connection on the corre‐
sponding engine or body of the vehicle to
be started.
Starting the engine
Do not use the spray products sold as starting
aids.
1.Start the engine of the donor vehicle and
allow it to run for a few minutes at a slightly
increased idle speed.2.Start the engine of the vehicle to be started
as normal.
If an initial attempt to start the engine fails,
wait several minutes until the flat battery
has been recharged to a slightly greater
degree.3.Allow both engines to run for a few mi‐
nutes.4.Disconnect the jump leads in the opposite
order from that in which they were origi‐
nally attached.
Check the battery if necessary and have it re‐
charged.
Tow-starting and towing Information WARNING
Due to system limitations, there may be
malfunctions of individual functions when tow-
starting/towing with activated Intelligent Safety
Seite 204MobilityHelp in the event of a breakdown204
Online Edition for Part no. 01 40 2 964 013 - VI/15
Page 205 of 228
Systems, for example approach control warn‐
ing with light braking function. Danger of acci‐
dents. Switch off all Intelligent Safety Systems
before tow-starting/towing.◀
Manual gearboxGearshift lever in idle position.
Being towed Observe the following information:▷Make sure that the ignition is switched on,
otherwise low-beam headlights, rear lights,
turn indicators and wipers would not be
available.▷Do not tow the vehicle with the rear axle
raised, otherwise the steering can turn.▷When the engine is not running, there is no
power assistance and the brake servo is
out of action. The steering and brakes will
require extra effort to operate.▷Greater steering wheel movements are
necessary.▷The towing vehicle must not be lighter
than the towed vehicle, otherwise it may be
unable to keep the towed vehicle reliably
under control.▷Do not exceed a towing speed of on
50 km/h, 30 mph.▷Do not exceed a towing distance of 50 km,
30 miles.Towing truck
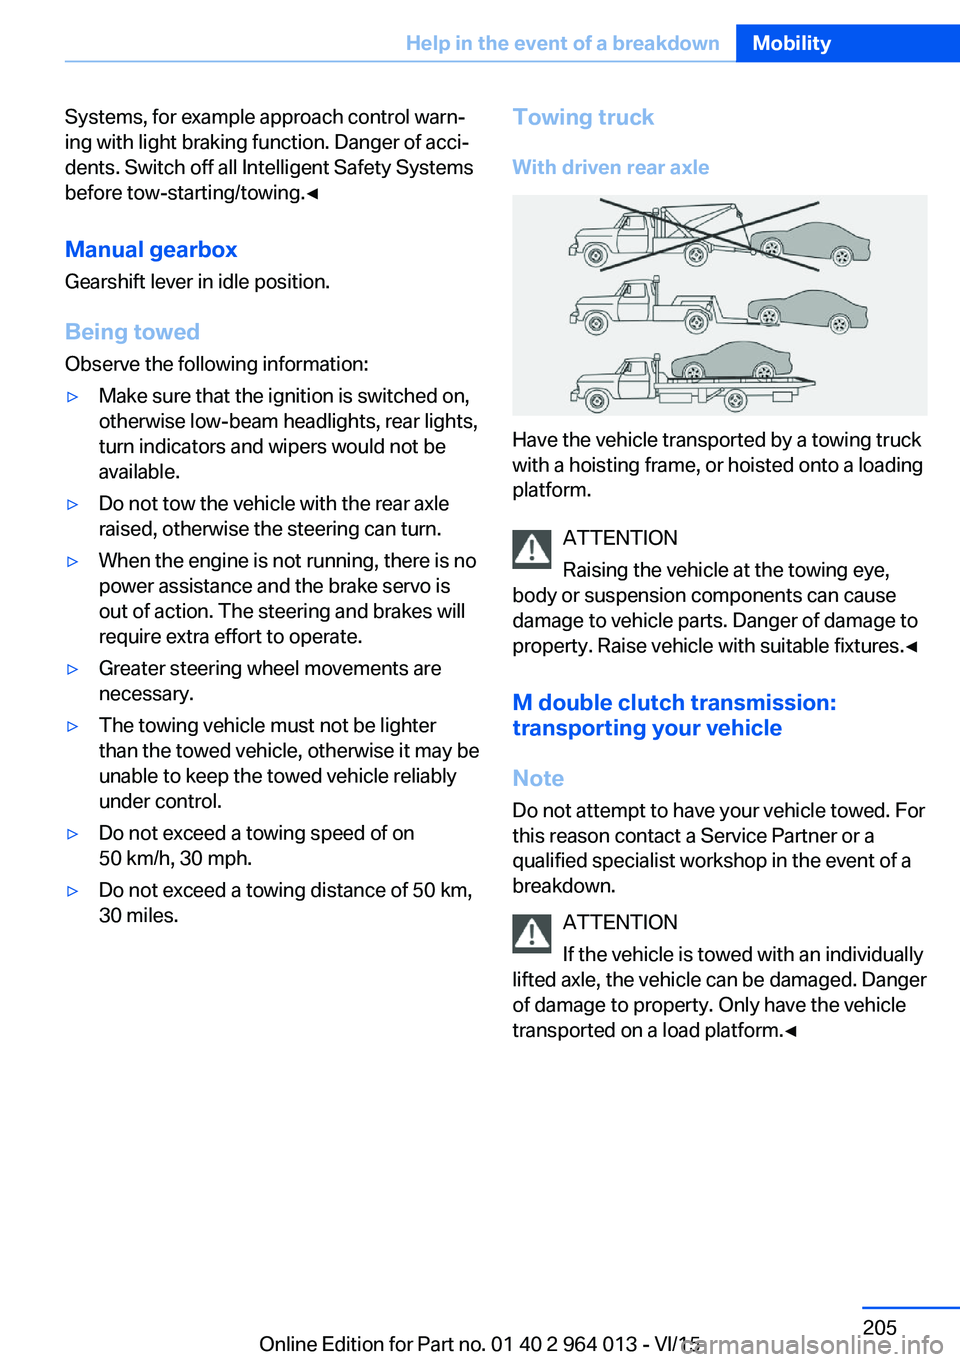
With driven rear axle
Have the vehicle transported by a towing truck
with a hoisting frame, or hoisted onto a loading
platform.
ATTENTION
Raising the vehicle at the towing eye,
body or suspension components can cause
damage to vehicle parts. Danger of damage to
property. Raise vehicle with suitable fixtures.◀
M double clutch transmission:
transporting your vehicle
Note
Do not attempt to have your vehicle towed. For
this reason contact a Service Partner or a
qualified specialist workshop in the event of a
breakdown.
ATTENTION
If the vehicle is towed with an individually
lifted axle, the vehicle can be damaged. Danger
of damage to property. Only have the vehicle
transported on a load platform.◀
Seite 205Help in the event of a breakdownMobility205
Online Edition for Part no. 01 40 2 964 013 - VI/15
Page 206 of 228
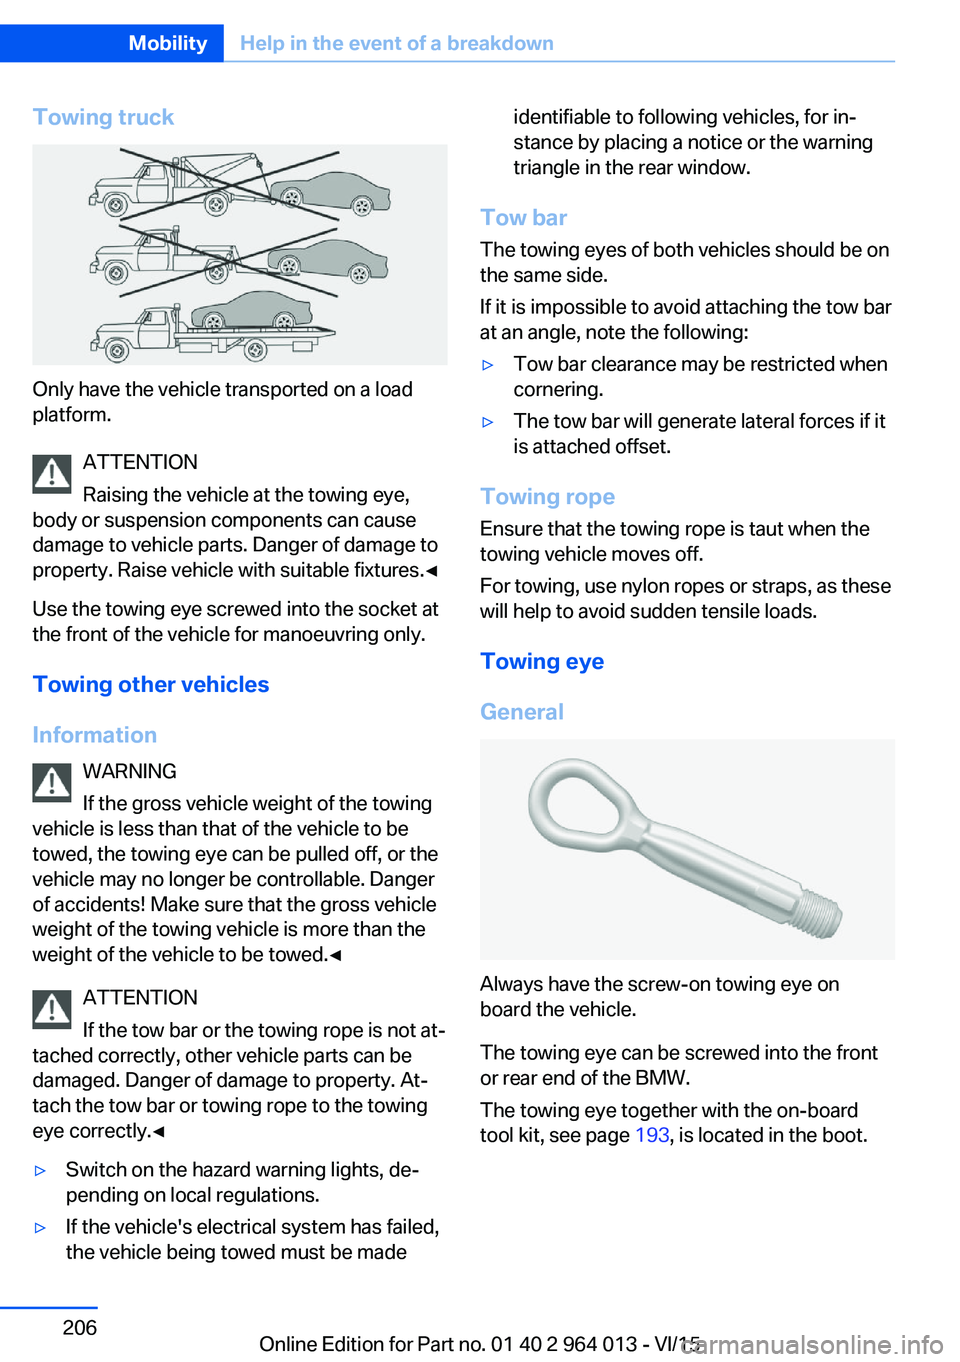
Towing truck
Only have the vehicle transported on a load
platform.
ATTENTION
Raising the vehicle at the towing eye,
body or suspension components can cause
damage to vehicle parts. Danger of damage to
property. Raise vehicle with suitable fixtures.◀
Use the towing eye screwed into the socket at
the front of the vehicle for manoeuvring only.
Towing other vehicles
Information WARNING
If the gross vehicle weight of the towing
vehicle is less than that of the vehicle to be
towed, the towing eye can be pulled off, or the
vehicle may no longer be controllable. Danger
of accidents! Make sure that the gross vehicle
weight of the towing vehicle is more than the
weight of the vehicle to be towed.◀
ATTENTION
If the tow bar or the towing rope is not at‐
tached correctly, other vehicle parts can be
damaged. Danger of damage to property. At‐
tach the tow bar or towing rope to the towing
eye correctly.◀
▷Switch on the hazard warning lights, de‐
pending on local regulations.▷If the vehicle's electrical system has failed,
the vehicle being towed must be madeidentifiable to following vehicles, for in‐
stance by placing a notice or the warning
triangle in the rear window.
Tow bar
The towing eyes of both vehicles should be on
the same side.
If it is impossible to avoid attaching the tow bar
at an angle, note the following:
▷Tow bar clearance may be restricted when
cornering.▷The tow bar will generate lateral forces if it
is attached offset.
Towing rope
Ensure that the towing rope is taut when the
towing vehicle moves off.
For towing, use nylon ropes or straps, as these
will help to avoid sudden tensile loads.
Towing eye
General
Always have the screw-on towing eye on
board the vehicle.
The towing eye can be screwed into the front
or rear end of the BMW.
The towing eye together with the on-board
tool kit, see page 193, is located in the boot.
Seite 206MobilityHelp in the event of a breakdown206
Online Edition for Part no. 01 40 2 964 013 - VI/15
Page 207 of 228
NotesATTENTION
If the towing eye is not used as intended,
the vehicle or towing eye is damaged. Danger
of damage to property. Observe the notes on
using the towing eye.◀
Using the towing eye:▷Use only the towing eye supplied with the
vehicle, and make sure that it is screwed in
fully and is tight.▷Only use the towing eye for towing on nor‐
mal roads (in other words not off-road).▷Use the towing eye screwed into the
socket at the front of the vehicle for ma‐
noeuvring only.▷Avoid lateral loads on the towing eye, for
example do not raise the vehicle at the
towing eye.
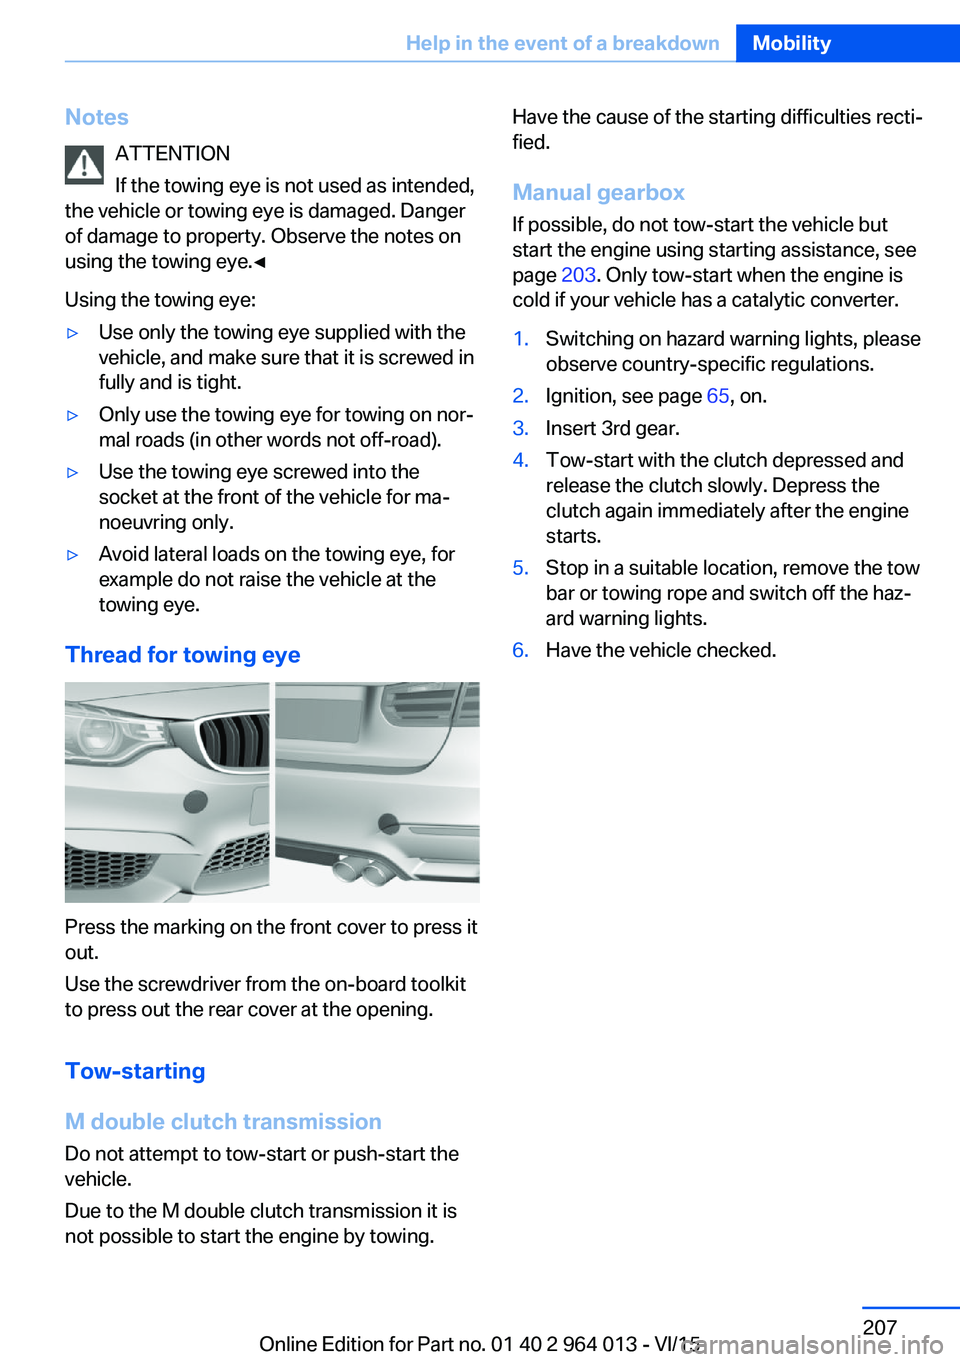
Thread for towing eye
Press the marking on the front cover to press it
out.
Use the screwdriver from the on-board toolkit
to press out the rear cover at the opening.
Tow-starting
M double clutch transmission Do not attempt to tow-start or push-start the
vehicle.
Due to the M double clutch transmission it is
not possible to start the engine by towing.
Have the cause of the starting difficulties recti‐
fied.
Manual gearbox If possible, do not tow-start the vehicle but
start the engine using starting assistance, see
page 203. Only tow-start when the engine is
cold if your vehicle has a catalytic converter.1.Switching on hazard warning lights, please
observe country-specific regulations.2.Ignition, see page 65, on.3.Insert 3rd gear.4.Tow-start with the clutch depressed and
release the clutch slowly. Depress the
clutch again immediately after the engine
starts.5.Stop in a suitable location, remove the tow
bar or towing rope and switch off the haz‐
ard warning lights.6.Have the vehicle checked.Seite 207Help in the event of a breakdownMobility207
Online Edition for Part no. 01 40 2 964 013 - VI/15
Page 208 of 228
General careVehicle equipment
This chapter describes all standard, national
and special equipment provided in the model
series. Equipment not available in the vehicle is
therefore also described, for example the se‐
lected special equipment or national version.
This also applies to safety-relevant functions
and systems. Comply with the relevant na‐
tional regulations when using the correspond‐
ing functions and systems.
Washing the vehicle
General Regularly remove foreign bodied, for example,
leaves, with the bonnet opened in the area be‐
neath with windscreen.
Especially in winter, wash the car more fre‐
quently. Very high levels of dirt and spreading
salt can cause damage to the car.
Steam-jet cleaners and high-pressure
cleaners
Notes ATTENTION
When cleaning with high-pressure clean‐
ers, excessive pressure or excessive tempera‐
tures can damage various components. Dan‐
ger of damage to property. Ensure a sufficient
distance and do not spray for an extended pe‐
riod of time. Comply with the instructions for
the high-pressure cleaner.◀
Distances and temperature▷Maximum temperature: 60 ℃/140 ℉.▷Minimum distance to sensors, cameras,
seals: 30 cm, approx. 12 in.▷Minimum distance to the Glass Roof:
80 cm, approx. 31.5 in.
Automatic car washes.
Notes ATTENTION
Water can penetrate in the window area
due to high pressure washers. Danger of dam‐
age to property. Avoid high pressure wash‐
ers.◀
▷Textile car washes or systems using soft
brushes are preferable, to avoid damage to
the paintwork.▷Make sure the wheels and tyres are not
damaged by the conveying mechanism.▷Fold in the exterior mirrors, as they could
otherwise sustain damage due to the vehi‐
cle's width.▷Deactivate the rain sensor, see page 72, to
avoid unintentional operation of the wipers.▷In some instances, depending on the inte‐
rior movement detector of the alarm sys‐
tem, a false alarm may be triggered. Ob‐
serve the notes on avoiding false alarm,
see page 43.
ATTENTION
Excessively high guide rails in car
washes can damage parts of the body. Danger
of damage to property. Avoid washing bays or
car washes with guide rails more than 10 cm,
approximately 4 in high.◀
Entering a car wash
Follow the below steps so that the vehicle can
be driven into a vehicle wash:
Seite 208MobilityGeneral care208
Online Edition for Part no. 01 40 2 964 013 - VI/15
Page 209 of 228
Manual gearbox:1.Drive into the car wash.2.Engage idle position.3.Stop the engine.4.Switch on ignition.
M double clutch transmission:
1.Drive into the car wash.2.Engage selector lever position N.3.Stop the engine.
In this way the ignition remains switched
on and a Check Control message is dis‐
played.
It is not possible to lock the vehicle from the
outside in selector lever position N. If an at‐
tempt is made to lock the vehicle, a signal
sounds.
When starting engine with manual gearbox:
1.Press clutch pedal.2.Press the start/stop button.
When starting engine with M double clutch
transmission:
1.Press the brake.2.Press the start/stop button.
Pressing the start/stop button or depressing
the brake switches off the ignition.
Transmission position
Transmission position P is automatically en‐
gaged:
▷With the ignition switched off.▷After approximately 15 minutes.
Headlights
▷Do not rub them when dry or use abrasive
or corrosive cleaning agents.▷Soak impurities such as insects with sham‐
poo and wash off with water.▷Remove ice with a de-icer spray; do not
use an ice scraper.After washing the car
After washing the car, drive it briefly and apply
the brakes to dry them out; this is necessary to
prevent reduced braking action, and also to
avoid corrosion of the brake discs.
Completely remove residues on the wind‐
screens to avoid affecting visibility due to
smearing, and to reduce wiping noise and
wiper blade wear.
Car care Care products The manufacturer of your vehicle recommends
the use of BMW care and cleaning products,
as they are tested by BMW and categorised as
suitable for the use on the vehicle.
WARNING
Cleaning agents can contain hazardous
substances or constitute a health risk. Danger
of injury. When cleaning the interior, open the
doors or windows. Use only products that are
intended for cleaning the vehicle's interior. Ob‐
serve the notes on the pack.◀
Vehicle paintwork Regular care promotes driving safety and pre‐
serves your vehicle's value. Environmental ef‐
fects in areas with higher air pollution or natu‐
ral contaminations, for example tree resin or
leaf dust, may have an effect on the vehicle
paintwork. Base the frequency and extent of
vehicle care on such factors.
Remove corrosive substances, such as run-off
fuel, oil, grease or bird droppings immediately
to avoid changes to the paint or discoloura‐
tions.
Only use suitable cleaning and care products
for matt paintwork. Suitable matt paintwork
care products are available from a Service
Partner or a qualified specialist workshop.Seite 209General careMobility209
Online Edition for Part no. 01 40 2 964 013 - VI/15
Page 210 of 228
Leather care
Remove dust from the leather at regular inter‐
vals with a cloth or vacuum cleaner.
Dust and road dirt will otherwise become
worked into pores and folds, causing consider‐
able abrasion and causing the leather surface
to become prematurely brittle.
In order to protect against discolouration, for
example from clothing, clean the leather ap‐
proximately every two months.
Clean light-coloured leather more frequently
as it has the tendency to soil faster.
Use leather cleaner, otherwise dirt and grease
will attack the protective coating of the leather.
Suitable care products are available from a
Service Partner or a qualified specialist work‐
shop.
Care of upholstery fabrics
Clean regularly with a vacuum cleaner.
In the event of heavy soiling, for example stains
caused by drinks, use a soft sponge or a lint-
free microfibre cloth with suitable interior
cleaning agents.
Clean upholstery materials over a large area up
to the seams. Avoid strong rubbing.
ATTENTION
Open Velcro fasteners on articles of
clothing can damage the seat covers. Danger
of damage to property. Make sure that any Vel‐
cro fasteners on your clothing are closed.◀
Care of special parts
Light alloy wheels Only when cleaning on the vehicle use neutral
rim cleaner with a pH value of between 5 and 9.
Do not use any rough cleaner or steam cleaner
above 60 ℃/140 ℉. Observe the manufactur‐
er's information.Corrosive, acidic or alkaline cleaners may de‐
stroy the protective layer of neighbouring
parts, such as brake discs, for example.
Chrome surfaces Carefully clean parts such as the radiator grille
and door handles with plenty of water to which
a shampoo may be added, particularly if ex‐
posed to road salt.
Rubber parts
The surfaces of rubber parts can be contami‐
nated or loose their shine due to environmental
influences. Only use water and suitable care
products for cleaning. The manufacturer of
your vehicle recommends genuine BMW care
products.
Treat particularly stressed rubber parts at reg‐
ular intervals with rubber care products. Do not
use any silicone-based care products for treat‐
ing rubber seals, otherwise these could be
damaged and become a source of noise.
Fine wood parts Clean fine wood trims and fine wood parts with
a damp cloth only. Then dry them with a soft
cloth.
Plastic parts
These include:▷Imitation leather surfaces.▷Roof lining.▷Light covers.▷Glass cover of instrument cluster.▷Parts sprayed matt black.▷Painted parts in the interior.
Use a microfibre cloth to clean.
Slightly moisten the cloth with water.
Do not soak the roof lining.
Seite 210MobilityGeneral care210
Online Edition for Part no. 01 40 2 964 013 - VI/15