engine BMW MOTORRAD G 650 GS 2010 Rider's Manual (in English)
[x] Cancel search | Manufacturer: BMW MOTORRAD, Model Year: 2010, Model line: G 650 GS, Model: BMW MOTORRAD G 650 GS 2010Pages: 136, PDF Size: 1.73 MB
Page 60 of 136
General instructions
BMW Motorrad recommendsthe use of parts and accessoriesfor your motorcycle that are ap-proved by BMW for this purpose.
Genuine BMW parts and ac-cessories and other productswhich BMW has approved canbe obtained from your authorisedBMW Motorrad dealer, togetherwith expert advice on their install-ation and use.
These parts and products havebeen tested by BMW for safety,function and suitability. BMWaccepts product liability for them.
Conversely, BMW is unable toaccept any liability whatsoeverfor parts and accessories which ithas not approved.
Also bear in mind the informa-tion on the effect of wheel sizeon suspension-control systems(77).
BMW Motorrad cannotassess each non-BMWproduct to determine wheth-er it can be used on or in con-nection with BMW motorcycleswithout constituting a safety haz-ard. Country-specific official au-thorisation does not suffice asassurance. Tests conducted bythese instances cannot makeprovision for all operating con-ditions experienced by BMW mo-torcycles and, consequently, theyare not sufficient in some circum-stances.
Use only parts and accessor-ies approved by BMW for yourmotorcycle.
Whenever you are planningmodifications, comply with all thelegal requirements. Make surethat the motorcycle does notinfringe the national road-vehicleconstruction and use regulationsapplicable in your country.
Power sockets
Notes on use of power sockets:
Operating electricalaccessories
Electrically powered accessoriesinevitably place a strain on thebattery. It is essential to ensurethat the battery retains its abilityto start the engine.
Cable routing
The cables from the power sock-ets to the auxiliary devices mustbe routed in such a way thatthey:
Do not impede the rider
Do not restrict the steeringangle or obstruct handling
Cannot be trapped
7
58
zAccessories
Page 67 of 136
Maintenance
Maintenance
Notes . . . . . . . . . . . . . . . . . . . . . . . . . . . . . . . 66
Toolkit . . . . . . . . . . . . . . . . . . . . . . . . . . . . . . 66
Engine oil . . . . . . . . . . . . . . . . . . . . . . . . . . . 66
Brake system . . . . . . . . . . . . . . . . . . . . . . . 68
Brake pads . . . . . . . . . . . . . . . . . . . . . . . . . 68
Brake fluid . . . . . . . . . . . . . . . . . . . . . . . . . . 70
Coolant . . . . . . . . . . . . . . . . . . . . . . . . . . . . . 72
Clutch . . . . . . . . . . . . . . . . . . . . . . . . . . . . . . 73
Tyres . . . . . . . . . . . . . . . . . . . . . . . . . . . . . . . 74
Rims . . . . . . . . . . . . . . . . . . . . . . . . . . . . . . . . 74
Chain . . . . . . . . . . . . . . . . . . . . . . . . . . . . . . . 75
Wheels . . . . . . . . . . . . . . . . . . . . . . . . . . . . . 76
BMW Motorrad front-wheel
stand . . . . . . . . . . . . . . . . . . . . . . . . . . . . . . . 83
Fuses . . . . . . . . . . . . . . . . . . . . . . . . . . . . . . . 84
Bulbs . . . . . . . . . . . . . . . . . . . . . . . . . . . . . . . 85
Air filter . . . . . . . . . . . . . . . . . . . . . . . . . . . . . 91
Jump starting . . . . . . . . . . . . . . . . . . . . . . . 92
Battery . . . . . . . . . . . . . . . . . . . . . . . . . . . . . . 93
Body panels . . . . . . . . . . . . . . . . . . . . . . . . 96
8
65
zMaintenance
Page 68 of 136
Notes
The "Maintenance" chapter de-scribes straightforward proced-ures for checking and replacingcertain wear parts.
Special tightening torques are lis-ted as applicable. The tighteningtorques for the threaded fasten-ers on your motorcycle are listedin the section entitled "Technicaldata".
You will find information on moreextensive maintenance and repairwork in the Repair Manual onDVD for your motorcycle, whichis available from your authorisedBMW Motorrad dealer.
Some of the work calls for spe-cial tools and a thorough know-ledge of motorcycle technology.If you are in doubt consult a spe-cialist workshop, preferably yourauthorised BMW Motorrad deal-er.
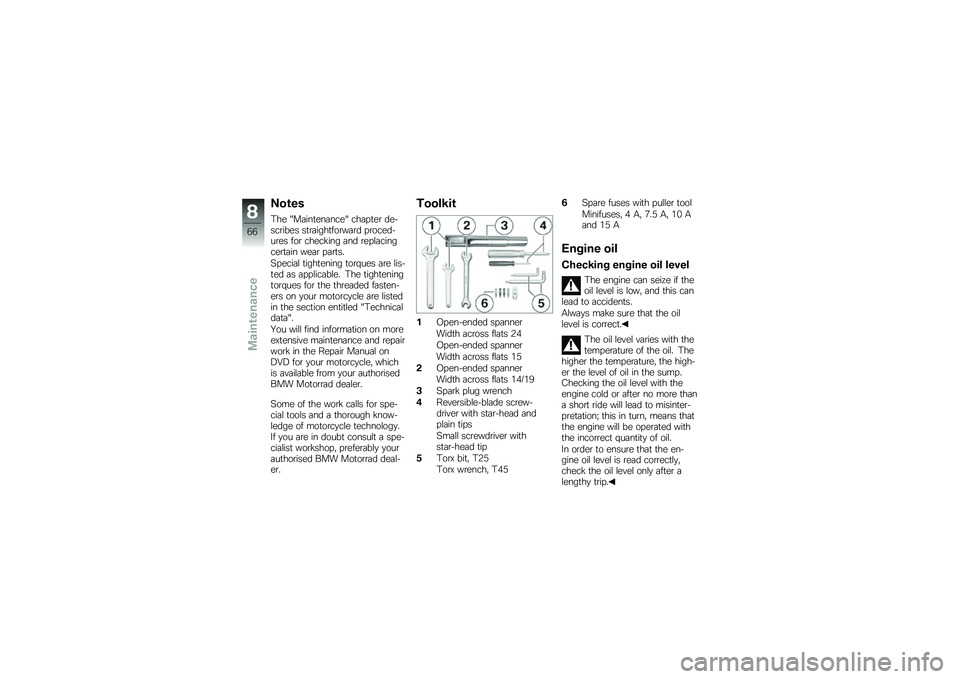
Toolkit
1Open-ended spanner
Width across flats 24
Open-ended spanner
Width across flats 15
2Open-ended spanner
Width across flats 14/19
3Spark plug wrench
4Reversible-blade screw-driver with star-head andplain tips
Small screwdriver withstar-head tip
5Torx bit, T25
Torx wrench, T45
6Spare fuses with puller tool
Minifuses, 4 A, 7.5 A, 10 Aand 15 A
Engine oil
Checking engine oil level
The engine can seize if theoil level is low, and this canlead to accidents.
Always make sure that the oillevel is correct.
The oil level varies with thetemperature of the oil. Thehigher the temperature, the high-er the level of oil in the sump.Checking the oil level with theengine cold or after no more thana short ride will lead to misinter-pretation; this in turn, means thatthe engine will be operated withthe incorrect quantity of oil.
In order to ensure that the en-gine oil level is read correctly,check the oil level only after alengthy trip.
8
66
zMaintenance
Page 69 of 136
Wipe the area around the oilfiller neck clean.
Allow the engine to idle untilthe fan starts up, then allow itto idle one minute longer.
Switch off the engine.
Make sure the engine is at op-erating temperature and holdthe motorcycle upright.
with centre standOE
Check that the engine is at op-erating temperature, make surethe ground is level and firmand place the motorcycle on itscentre stand.
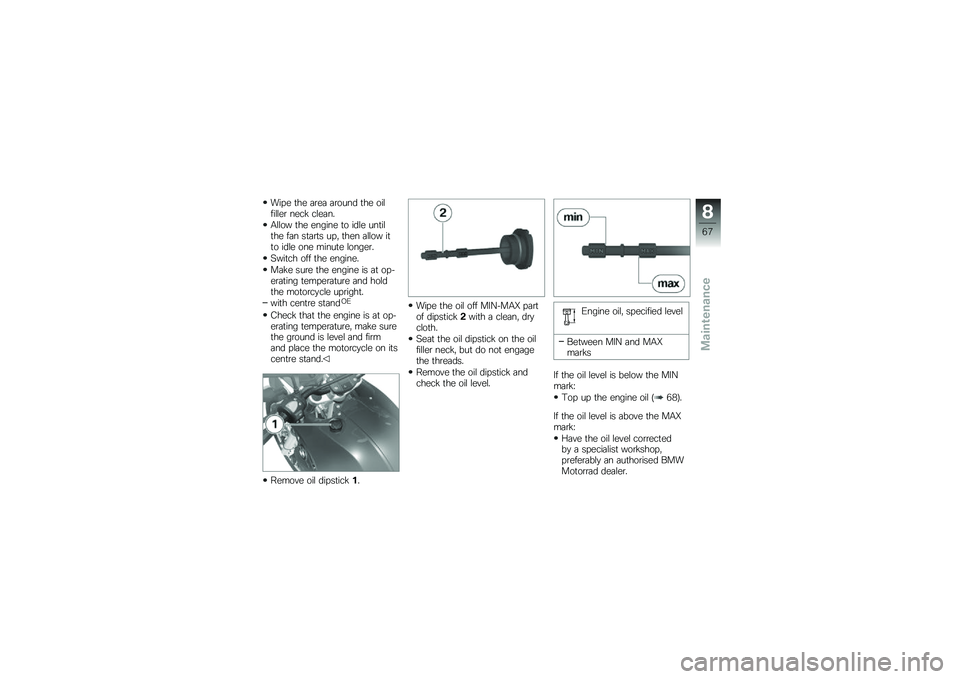
Remove oil dipstick1.
Wipe the oil off MIN-MAX partof dipstick2with a clean, drycloth.
Seat the oil dipstick on the oilfiller neck, but do not engagethe threads.
Remove the oil dipstick andcheck the oil level.
Engine oil, specified level
Between MIN and MAXmarks
If the oil level is below the MINmark:
Top up the engine oil (68).
If the oil level is above the MAXmark:
Have the oil level correctedby a specialist workshop,preferably an authorised BMWMotorrad dealer.
8
67
zMaintenance
Page 70 of 136
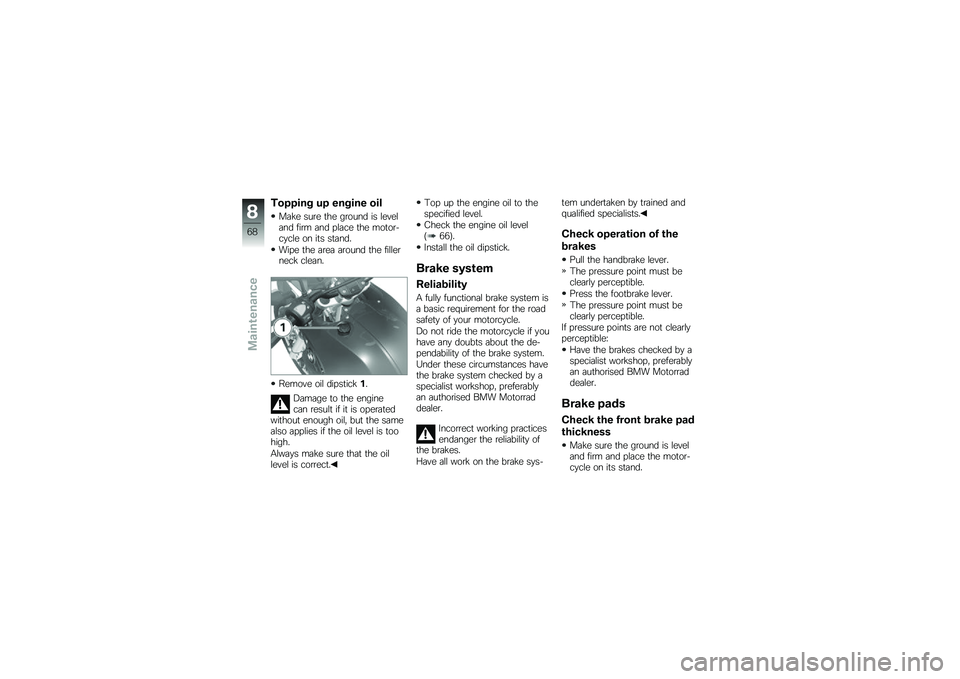
Topping up engine oil
Make sure the ground is leveland firm and place the motor-cycle on its stand.
Wipe the area around the fillerneck clean.
Remove oil dipstick1.
Damage to the enginecan result if it is operatedwithout enough oil, but the samealso applies if the oil level is toohigh.
Always make sure that the oillevel is correct.
Top up the engine oil to thespecified level.
Check the engine oil level(66).
Install the oil dipstick.
Brake system
Reliability
A fully functional brake system isa basic requirement for the roadsafety of your motorcycle.
Do not ride the motorcycle if youhave any doubts about the de-pendability of the brake system.
Under these circumstances havethe brake system checked by aspecialist workshop, preferablyan authorised BMW Motorraddealer.
Incorrect working practicesendanger the reliability ofthe brakes.
Have all work on the brake sys-
tem undertaken by trained andqualified specialists.
Check operation of the
brakes
Pull the handbrake lever.
The pressure point must beclearly perceptible.
Press the footbrake lever.
The pressure point must beclearly perceptible.
If pressure points are not clearlyperceptible:
Have the brakes checked by aspecialist workshop, preferablyan authorised BMW Motorraddealer.
Brake pads
Check the front brake pad
thickness
Make sure the ground is leveland firm and place the motor-cycle on its stand.
8
68
zMaintenance
Page 94 of 136
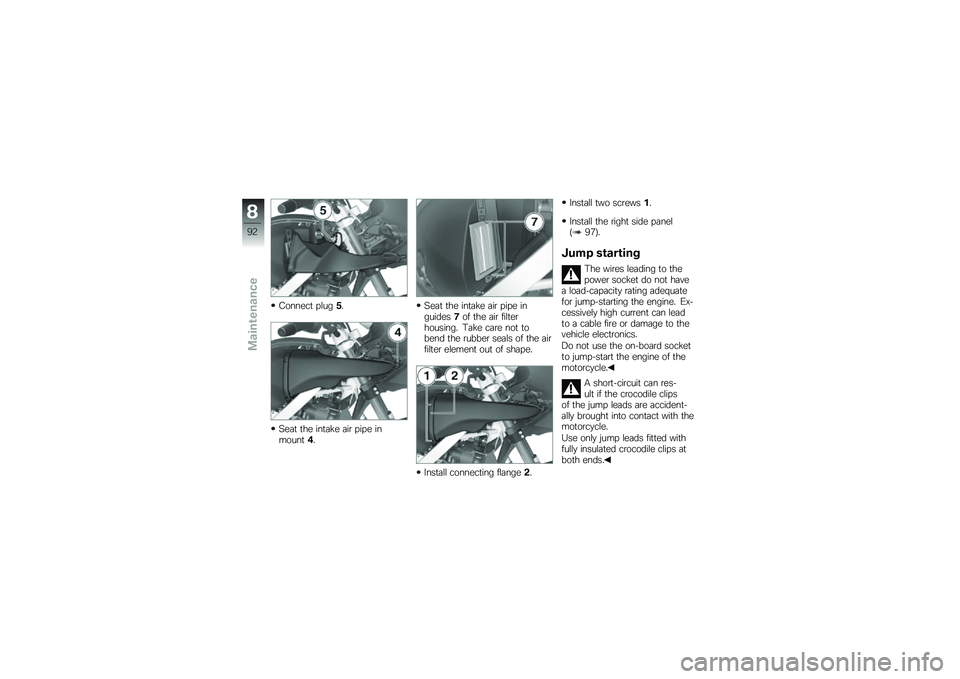
Connect plug5.
Seat the intake air pipe inmount4.
Seat the intake air pipe inguides7of the air filterhousing. Take care not tobend the rubber seals of the airfilter element out of shape.
Install connecting flange2.
Install two screws1.
Install the right side panel(97).
Jump starting
The wires leading to thepower socket do not havea load-capacity rating adequatefor jump-starting the engine. Ex-cessively high current can leadto a cable fire or damage to thevehicle electronics.
Do not use the on-board socketto jump-start the engine of themotorcycle.
A short-circuit can res-ult if the crocodile clipsof the jump leads are accident-ally brought into contact with themotorcycle.
Use only jump leads fitted withfully insulated crocodile clips atboth ends.
8
92
zMaintenance
Page 95 of 136
Jump-starting with a donor-battery voltage higher than12 V can damage the vehicleelectronics.
Make sure that the battery of thedonor vehicle has a voltage ratingof 12 V.
Make sure the ground is leveland firm and place the motor-cycle on its stand.
Remove the seat (38).
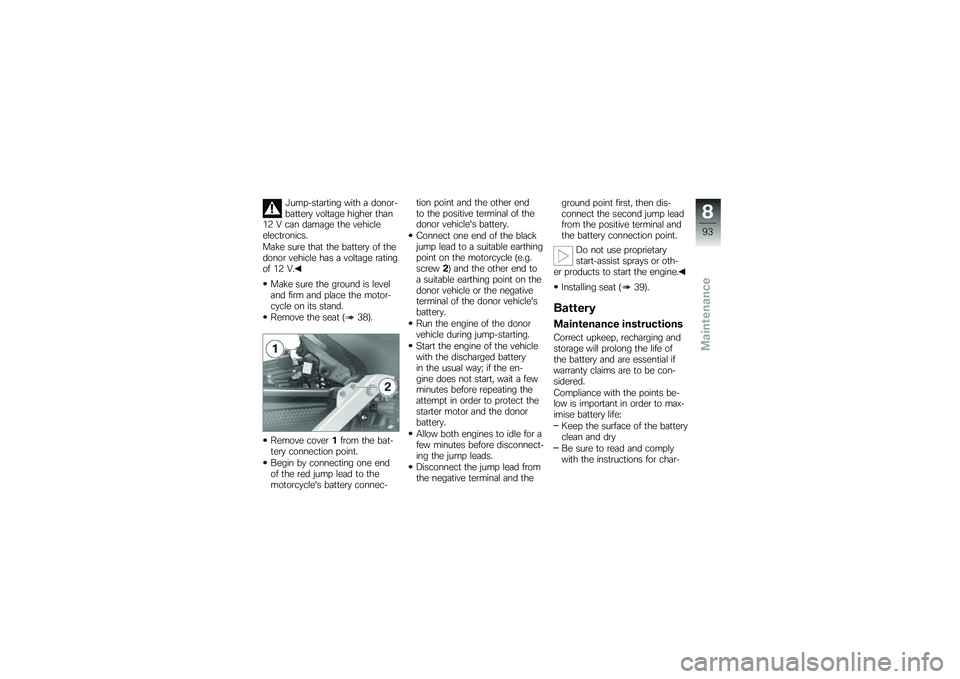
Remove cover1from the bat-tery connection point.
Begin by connecting one endof the red jump lead to themotorcycle's battery connec-
tion point and the other endto the positive terminal of thedonor vehicle's battery.
Connect one end of the blackjump lead to a suitable earthingpoint on the motorcycle (e.g.screw2) and the other end toa suitable earthing point on thedonor vehicle or the negativeterminal of the donor vehicle'sbattery.
Run the engine of the donorvehicle during jump-starting.
Start the engine of the vehiclewith the discharged batteryin the usual way; if the en-gine does not start, wait a fewminutes before repeating theattempt in order to protect thestarter motor and the donorbattery.
Allow both engines to idle for afew minutes before disconnect-ing the jump leads.
Disconnect the jump lead fromthe negative terminal and the
ground point first, then dis-connect the second jump leadfrom the positive terminal andthe battery connection point.
Do not use proprietarystart-assist sprays or oth-er products to start the engine.
Installing seat (39).
Battery
Maintenance instructions
Correct upkeep, recharging andstorage will prolong the life ofthe battery and are essential ifwarranty claims are to be con-sidered.
Compliance with the points be-low is important in order to max-imise battery life:
Keep the surface of the batteryclean and dry
Be sure to read and complywith the instructions for char-
8
93
zMaintenance
Page 107 of 136
Technical data
Technical data
Troubleshooting chart . . . . . . . . . . . . . 106
Threaded fasteners . . . . . . . . . . . . . . . . 107
Engine . . . . . . . . . . . . . . . . . . . . . . . . . . . . . 109
Fuel . . . . . . . . . . . . . . . . . . . . . . . . . . . . . . . . 110
Engine oil . . . . . . . . . . . . . . . . . . . . . . . . . . 110
Clutch . . . . . . . . . . . . . . . . . . . . . . . . . . . . . 111
Transmission . . . . . . . . . . . . . . . . . . . . . . 111
Rear-wheel drive . . . . . . . . . . . . . . . . . . . 112
Running gear . . . . . . . . . . . . . . . . . . . . . . 112
Brakes . . . . . . . . . . . . . . . . . . . . . . . . . . . . . 113
Wheels and tyres . . . . . . . . . . . . . . . . . . 113
Electrics . . . . . . . . . . . . . . . . . . . . . . . . . . . 114
Frame . . . . . . . . . . . . . . . . . . . . . . . . . . . . . 116
Dimensions . . . . . . . . . . . . . . . . . . . . . . . . 117
Weights . . . . . . . . . . . . . . . . . . . . . . . . . . . . 117
Riding specifications . . . . . . . . . . . . . . . 11810
105
zTechnical data
Page 108 of 136
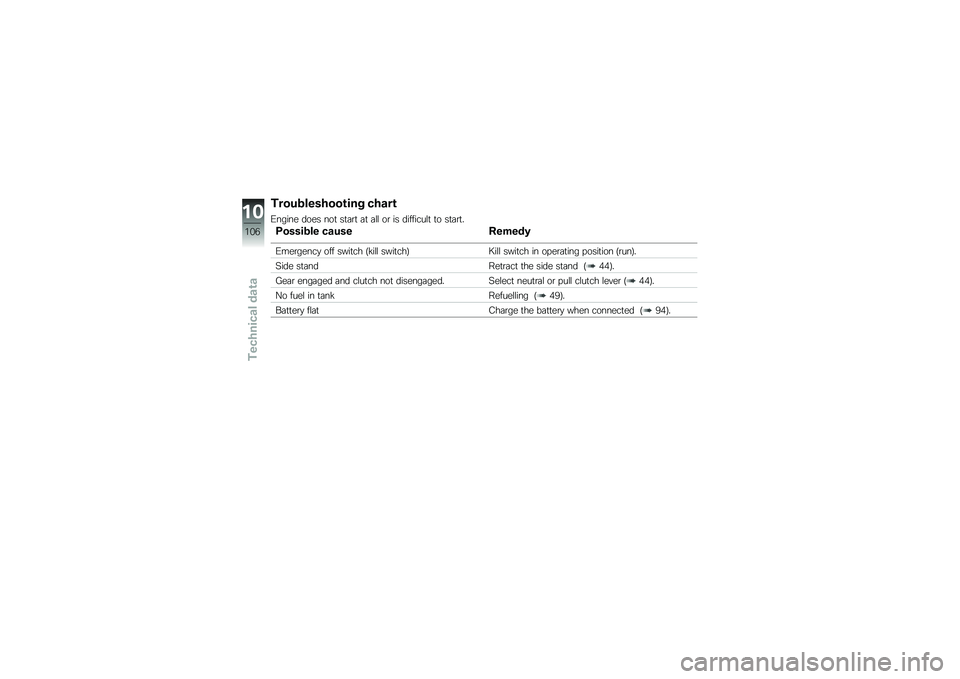
Troubleshooting chart
Engine does not start at all or is difficult to start.
Possible cause Remedy
Emergency off switch (kill switch) Kill switch in operating position (run).
Side standRetract the side stand (44).
Gear engaged and clutch not disengaged.Select neutral or pull clutch lever (44).
No fuel in tankRefuelling (49).
Battery flatCharge the battery when connected (94).
10
106
zTechnical data
Page 111 of 136
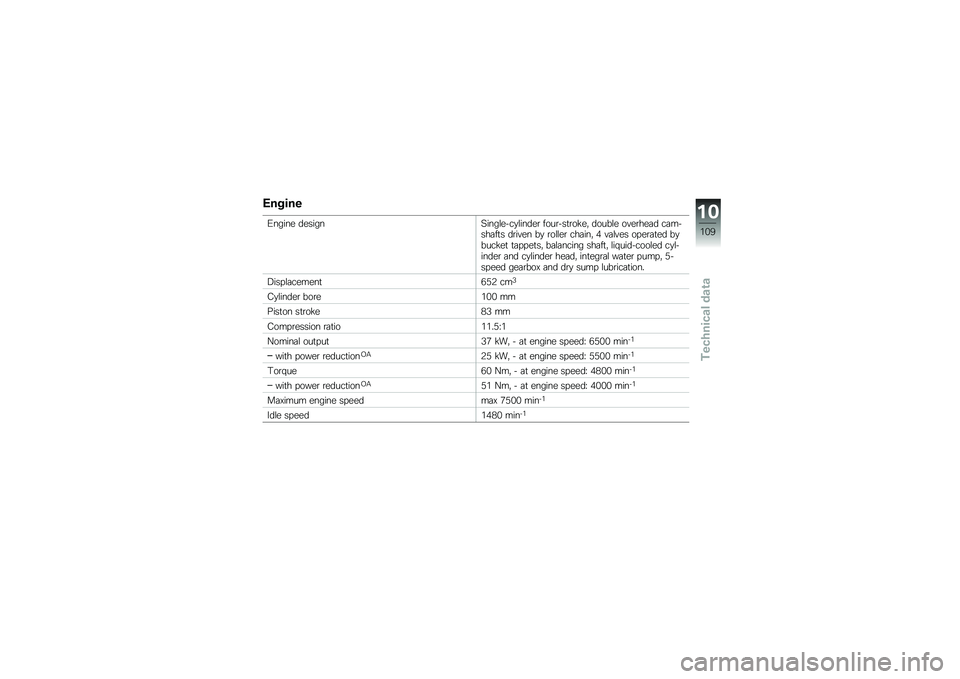
Engine
Engine designSingle-cylinder four-stroke, double overhead cam-shafts driven by roller chain, 4 valves operated bybucket tappets, balancing shaft, liquid-cooled cyl-inder and cylinder head, integral water pump, 5-speed gearbox and dry sump lubrication.
Displacement652 cm3
Cylinder bore100 mm
Piston stroke83 mm
Compression ratio11.5:1
Nominal output37 kW, - at engine speed: 6500 min-1
with power reductionOA25 kW, - at engine speed: 5500 min-1
Torque60 Nm, - at engine speed: 4800 min-1
with power reductionOA51 Nm, - at engine speed: 4000 min-1
Maximum engine speedmax 7500 min-1
Idle speed1480 min-1
10
109
zTechnical data