battery BMW MOTORRAD G 650 GS 2010 Rider's Manual (in English)
[x] Cancel search | Manufacturer: BMW MOTORRAD, Model Year: 2010, Model line: G 650 GS, Model: BMW MOTORRAD G 650 GS 2010Pages: 136, PDF Size: 1.73 MB
Page 5 of 136

Clutch . . . . . . . . . . . . . . . . . . . . . . . 73Tyres . . . . . . . . . . . . . . . . . . . . . . . . 74Rims . . . . . . . . . . . . . . . . . . . . . . . . 74Chain . . . . . . . . . . . . . . . . . . . . . . . . 75Wheels . . . . . . . . . . . . . . . . . . . . . . 76BMW Motorrad front-wheelstand . . . . . . . . . . . . . . . . . . . . . . . . 83Fuses . . . . . . . . . . . . . . . . . . . . . . . 84Bulbs . . . . . . . . . . . . . . . . . . . . . . . . 85Air filter . . . . . . . . . . . . . . . . . . . . . . 91Jump starting . . . . . . . . . . . . . . . 92Battery . . . . . . . . . . . . . . . . . . . . . . 93Body panels . . . . . . . . . . . . . . . . . 96
9 Care . . . . . . . . . . . . . . . . . . . . 101Care products . . . . . . . . . . . . . 102Washing motorcycle . . . . . . . 102Cleaning easily damagedcomponents . . . . . . . . . . . . . . . 102Paint care . . . . . . . . . . . . . . . . . 103Protective wax coating . . . . 104Laying up motorcycle . . . . . 104Restoring motorcycle touse . . . . . . . . . . . . . . . . . . . . . . . . 104
10 Technical data . . . . . . 105Troubleshooting chart . . . . . 106Threaded fasteners . . . . . . . 107Engine . . . . . . . . . . . . . . . . . . . . 109Fuel . . . . . . . . . . . . . . . . . . . . . . . 110Engine oil . . . . . . . . . . . . . . . . . 110Clutch . . . . . . . . . . . . . . . . . . . . . 111Transmission . . . . . . . . . . . . . . 111Rear-wheel drive . . . . . . . . . . 112Running gear . . . . . . . . . . . . . . 112Brakes . . . . . . . . . . . . . . . . . . . . 113Wheels and tyres . . . . . . . . . . 113Electrics . . . . . . . . . . . . . . . . . . . 114Frame . . . . . . . . . . . . . . . . . . . . . 116Dimensions . . . . . . . . . . . . . . . 117Weights . . . . . . . . . . . . . . . . . . . 117Riding specifications . . . . . . 118
11 Service . . . . . . . . . . . . . . . 119BMW Motorrad service . . . . 120BMW Motorrad servicequality . . . . . . . . . . . . . . . . . . . . . 120BMW Motorrad mobilityservices - roadside assist-ance . . . . . . . . . . . . . . . . . . . . . . . 120
BMW Motorrad servicenetwork . . . . . . . . . . . . . . . . . . . 121Maintenance work . . . . . . . . . 121Confirmation of mainten-ance work . . . . . . . . . . . . . . . . . 122Confirmation of service . . . . 127
Page 13 of 136

General view, left side
1Battery (underneath centretrim panel) (93)
2Oil dipstick and engine-oilfiller neck (66)
3Seat lock (38)
4Power socket (58)
5Coolant-level indicator(72)
2
11
zGeneral views
Page 32 of 136
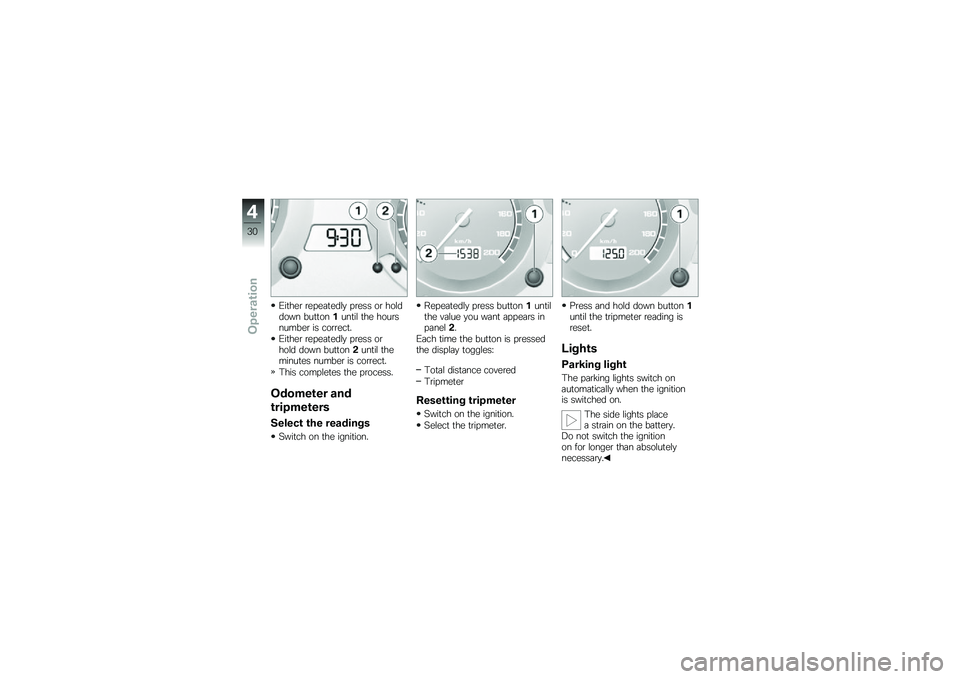
Either repeatedly press or holddown button1until the hoursnumber is correct.
Either repeatedly press orhold down button2until theminutes number is correct.
This completes the process.
Odometer and
tripmeters
Select the readings
Switch on the ignition.
Repeatedly press button1untilthe value you want appears inpanel2.
Each time the button is pressedthe display toggles:
Total distance covered
Tripmeter
Resetting tripmeter
Switch on the ignition.
Select the tripmeter.
Press and hold down button1until the tripmeter reading isreset.
Lights
Parking light
The parking lights switch onautomatically when the ignitionis switched on.
The side lights placea strain on the battery.Do not switch the ignitionon for longer than absolutelynecessary.
4
30
zOperation
Page 34 of 136
The hazard warning flash-ers place a strain on thebattery. Do not use the hazardwarning flashers for longer thanabsolutely necessary.
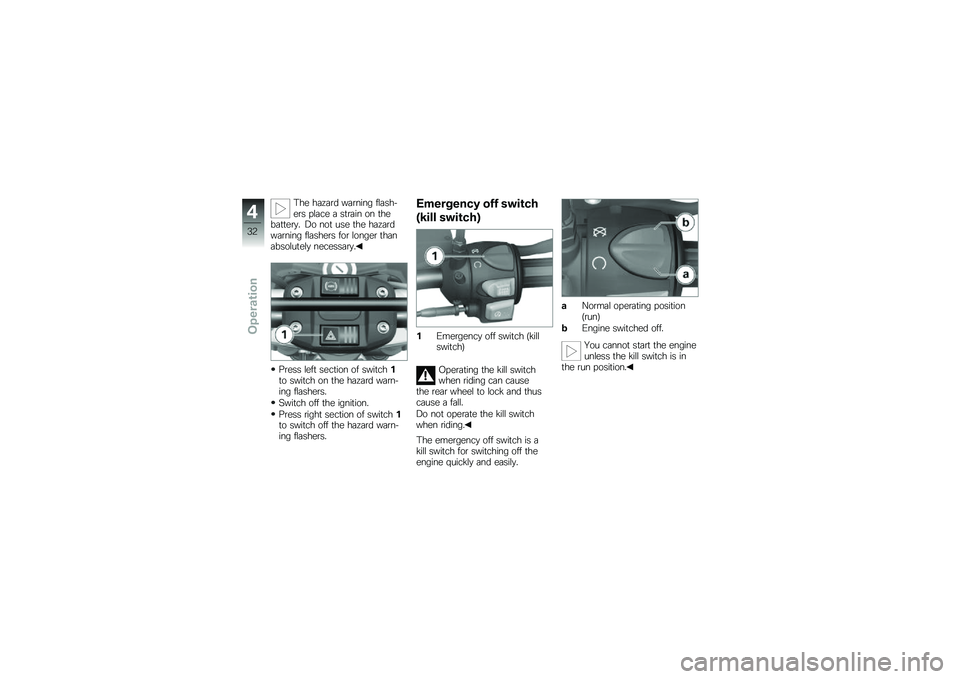
Press left section of switch1to switch on the hazard warn-ing flashers.
Switch off the ignition.
Press right section of switch1to switch off the hazard warn-ing flashers.
Emergency off switch
(kill switch)
1Emergency off switch (killswitch)
Operating the kill switchwhen riding can causethe rear wheel to lock and thuscause a fall.
Do not operate the kill switchwhen riding.
The emergency off switch is akill switch for switching off theengine quickly and easily.
aNormal operating position(run)
bEngine switched off.
You cannot start the engineunless the kill switch is inthe run position.
4
32
zOperation
Page 35 of 136
Grip heating
1Grip-heating switch
The handlebar grips have two-stage heating. Stage two is forheating the grips quickly: it is ad-visable to switch back to stageone as soon as the grips arewarm.
The handlebar-grip heat-ing places a strain on thebattery. Do not switch on thegrip heating unless the engine isrunning.
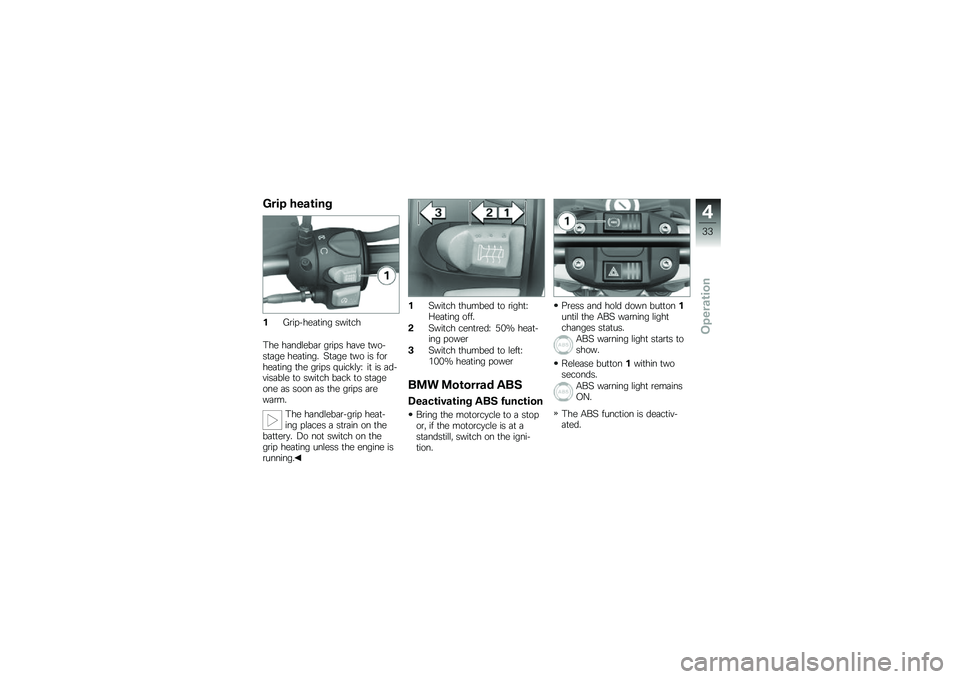
1Switch thumbed to right:Heating off.
2Switch centred: 50% heat-ing power
3Switch thumbed to left:100% heating power
BMW Motorrad ABS
Deactivating ABS function
Bring the motorcycle to a stopor, if the motorcycle is at astandstill, switch on the igni-tion.
Press and hold down button1until the ABS warning lightchanges status.
ABS warning light starts toshow.
Release button1within twoseconds.
ABS warning light remainsON.
The ABS function is deactiv-ated.
4
33
zOperation
Page 47 of 136

Wait until the warning light forthe coolant temperature stopsflashing.
The idle actuator is posi-tioned after you switch onthe ignition. The coolant-tem-perature warning light flashesif the idle actuator has not cor-rectly positioned before the pre-ride check completes. In orderto avoid subsequent problems,wait for this process to completebefore proceeding.
Press starter button2.
If ambient temperatures arevery low, you might find itnecessary to open the throttleslightly when starting the engine.At ambient temperatures below0 °C, disengage the clutch afterswitching on the ignition.
If the engine fails to starteven though the starterturns, insufficient battery voltagemight be causing the problem.Recharge the battery before youstart the engine, or use jumpleads and a donor battery tostart.
The engine starts.
Consult the troubleshootingchart below if the engine re-fuses to start. (106)
ABS self-diagnosis
BMW Motorrad ABS performsself-diagnosis to ensure its op-erability. Self-diagnosis is per-formed automatically when youswitch on the ignition. The mo-
torcycle has to move forward afew metres for the wheel sensorsto be tested.
Phase 1
Test of the diagnosis-compat-ible system components withthe motorcycle at a standstill.
ABS warning light flashes.
Phase 2
Test of the wheel sensors asthe motorcycle pulls away fromrest.
ABS warning light flashes.
ABS self-diagnosiscompleted
The ABS warning light goesout.
5
45
zRiding
Page 60 of 136

General instructions
BMW Motorrad recommendsthe use of parts and accessoriesfor your motorcycle that are ap-proved by BMW for this purpose.
Genuine BMW parts and ac-cessories and other productswhich BMW has approved canbe obtained from your authorisedBMW Motorrad dealer, togetherwith expert advice on their install-ation and use.
These parts and products havebeen tested by BMW for safety,function and suitability. BMWaccepts product liability for them.
Conversely, BMW is unable toaccept any liability whatsoeverfor parts and accessories which ithas not approved.
Also bear in mind the informa-tion on the effect of wheel sizeon suspension-control systems(77).
BMW Motorrad cannotassess each non-BMWproduct to determine wheth-er it can be used on or in con-nection with BMW motorcycleswithout constituting a safety haz-ard. Country-specific official au-thorisation does not suffice asassurance. Tests conducted bythese instances cannot makeprovision for all operating con-ditions experienced by BMW mo-torcycles and, consequently, theyare not sufficient in some circum-stances.
Use only parts and accessor-ies approved by BMW for yourmotorcycle.
Whenever you are planningmodifications, comply with all thelegal requirements. Make surethat the motorcycle does notinfringe the national road-vehicleconstruction and use regulationsapplicable in your country.
Power sockets
Notes on use of power sockets:
Operating electricalaccessories
Electrically powered accessoriesinevitably place a strain on thebattery. It is essential to ensurethat the battery retains its abilityto start the engine.
Cable routing
The cables from the power sock-ets to the auxiliary devices mustbe routed in such a way thatthey:
Do not impede the rider
Do not restrict the steeringangle or obstruct handling
Cannot be trapped
7
58
zAccessories
Page 67 of 136

Maintenance
Maintenance
Notes . . . . . . . . . . . . . . . . . . . . . . . . . . . . . . . 66
Toolkit . . . . . . . . . . . . . . . . . . . . . . . . . . . . . . 66
Engine oil . . . . . . . . . . . . . . . . . . . . . . . . . . . 66
Brake system . . . . . . . . . . . . . . . . . . . . . . . 68
Brake pads . . . . . . . . . . . . . . . . . . . . . . . . . 68
Brake fluid . . . . . . . . . . . . . . . . . . . . . . . . . . 70
Coolant . . . . . . . . . . . . . . . . . . . . . . . . . . . . . 72
Clutch . . . . . . . . . . . . . . . . . . . . . . . . . . . . . . 73
Tyres . . . . . . . . . . . . . . . . . . . . . . . . . . . . . . . 74
Rims . . . . . . . . . . . . . . . . . . . . . . . . . . . . . . . . 74
Chain . . . . . . . . . . . . . . . . . . . . . . . . . . . . . . . 75
Wheels . . . . . . . . . . . . . . . . . . . . . . . . . . . . . 76
BMW Motorrad front-wheel
stand . . . . . . . . . . . . . . . . . . . . . . . . . . . . . . . 83
Fuses . . . . . . . . . . . . . . . . . . . . . . . . . . . . . . . 84
Bulbs . . . . . . . . . . . . . . . . . . . . . . . . . . . . . . . 85
Air filter . . . . . . . . . . . . . . . . . . . . . . . . . . . . . 91
Jump starting . . . . . . . . . . . . . . . . . . . . . . . 92
Battery . . . . . . . . . . . . . . . . . . . . . . . . . . . . . . 93
Body panels . . . . . . . . . . . . . . . . . . . . . . . . 96
8
65
zMaintenance
Page 95 of 136

Jump-starting with a donor-battery voltage higher than12 V can damage the vehicleelectronics.
Make sure that the battery of thedonor vehicle has a voltage ratingof 12 V.
Make sure the ground is leveland firm and place the motor-cycle on its stand.
Remove the seat (38).
Remove cover1from the bat-tery connection point.
Begin by connecting one endof the red jump lead to themotorcycle's battery connec-
tion point and the other endto the positive terminal of thedonor vehicle's battery.
Connect one end of the blackjump lead to a suitable earthingpoint on the motorcycle (e.g.screw2) and the other end toa suitable earthing point on thedonor vehicle or the negativeterminal of the donor vehicle'sbattery.
Run the engine of the donorvehicle during jump-starting.
Start the engine of the vehiclewith the discharged batteryin the usual way; if the en-gine does not start, wait a fewminutes before repeating theattempt in order to protect thestarter motor and the donorbattery.
Allow both engines to idle for afew minutes before disconnect-ing the jump leads.
Disconnect the jump lead fromthe negative terminal and the
ground point first, then dis-connect the second jump leadfrom the positive terminal andthe battery connection point.
Do not use proprietarystart-assist sprays or oth-er products to start the engine.
Installing seat (39).
Battery
Maintenance instructions
Correct upkeep, recharging andstorage will prolong the life ofthe battery and are essential ifwarranty claims are to be con-sidered.
Compliance with the points be-low is important in order to max-imise battery life:
Keep the surface of the batteryclean and dry
Be sure to read and complywith the instructions for char-
8
93
zMaintenance
Page 96 of 136

ging the battery on the follow-ing pages
Do not turn the battery upsidedown
If the battery is not discon-nected, the on-board elec-tronics (e.g. clock, etc.) graduallydrain the battery. This can causethe battery to run flat. If this hap-pens, warranty claims will not beaccepted.
If the motorcycle is to be out ofuse for more than four weeks,disconnect the battery or con-nect a suitable trickle charger tothe battery.
Charging battery when
connected
Charging the connectedbattery directly at the bat-tery terminals can damage thevehicle electronics.
Always disconnect the batteryfrom the on-board circuits be-
fore recharging it with a chargerconnected directly to the batteryposts.
If you switch on the igni-tion and the multifunctiondisplay and telltale lights fail tolight up, the battery is completelyflat. Attempting to charge a com-pletely flat battery via the on-board socket can cause damageto the motorcycle's electronics.
If a battery has discharged to theextent that it is completely flat, ithas to be disconnected from theon-board circuits and chargedwith the charger connected dir-ectly to the battery posts.
With the battery connectedto the motorcycle's on-boardelectrical system, charge onlyvia the power socket.
Comply with the operating in-structions of the charger.
Charging battery when
disconnected
Charge the battery using asuitable charger.
Comply with the operating in-structions of the charger.
Once the battery is fullycharged, disconnect thecharger's terminal clips fromthe battery terminals.
The battery has to be re-charged at regular intervalsin the course of a lengthy periodof disuse. See the instructionsfor caring for your battery. Al-ways fully recharge the batterybefore restoring it to use
Removing battery
Switch off the ignition.
Remove the centre trim panel(100).
8
94
zMaintenance