fuse BMW MOTORRAD G 650 GS 2010 Rider's Manual (in English)
[x] Cancel search | Manufacturer: BMW MOTORRAD, Model Year: 2010, Model line: G 650 GS, Model: BMW MOTORRAD G 650 GS 2010Pages: 136, PDF Size: 1.73 MB
Page 5 of 136

Clutch . . . . . . . . . . . . . . . . . . . . . . . 73Tyres . . . . . . . . . . . . . . . . . . . . . . . . 74Rims . . . . . . . . . . . . . . . . . . . . . . . . 74Chain . . . . . . . . . . . . . . . . . . . . . . . . 75Wheels . . . . . . . . . . . . . . . . . . . . . . 76BMW Motorrad front-wheelstand . . . . . . . . . . . . . . . . . . . . . . . . 83Fuses . . . . . . . . . . . . . . . . . . . . . . . 84Bulbs . . . . . . . . . . . . . . . . . . . . . . . . 85Air filter . . . . . . . . . . . . . . . . . . . . . . 91Jump starting . . . . . . . . . . . . . . . 92Battery . . . . . . . . . . . . . . . . . . . . . . 93Body panels . . . . . . . . . . . . . . . . . 96
9 Care . . . . . . . . . . . . . . . . . . . . 101Care products . . . . . . . . . . . . . 102Washing motorcycle . . . . . . . 102Cleaning easily damagedcomponents . . . . . . . . . . . . . . . 102Paint care . . . . . . . . . . . . . . . . . 103Protective wax coating . . . . 104Laying up motorcycle . . . . . 104Restoring motorcycle touse . . . . . . . . . . . . . . . . . . . . . . . . 104
10 Technical data . . . . . . 105Troubleshooting chart . . . . . 106Threaded fasteners . . . . . . . 107Engine . . . . . . . . . . . . . . . . . . . . 109Fuel . . . . . . . . . . . . . . . . . . . . . . . 110Engine oil . . . . . . . . . . . . . . . . . 110Clutch . . . . . . . . . . . . . . . . . . . . . 111Transmission . . . . . . . . . . . . . . 111Rear-wheel drive . . . . . . . . . . 112Running gear . . . . . . . . . . . . . . 112Brakes . . . . . . . . . . . . . . . . . . . . 113Wheels and tyres . . . . . . . . . . 113Electrics . . . . . . . . . . . . . . . . . . . 114Frame . . . . . . . . . . . . . . . . . . . . . 116Dimensions . . . . . . . . . . . . . . . 117Weights . . . . . . . . . . . . . . . . . . . 117Riding specifications . . . . . . 118
11 Service . . . . . . . . . . . . . . . 119BMW Motorrad service . . . . 120BMW Motorrad servicequality . . . . . . . . . . . . . . . . . . . . . 120BMW Motorrad mobilityservices - roadside assist-ance . . . . . . . . . . . . . . . . . . . . . . . 120
BMW Motorrad servicenetwork . . . . . . . . . . . . . . . . . . . 121Maintenance work . . . . . . . . . 121Confirmation of mainten-ance work . . . . . . . . . . . . . . . . . 122Confirmation of service . . . . 127
Page 16 of 136

Underneath the seat
1Fuse box (84)
2Toolkit
3Payload table
Tray for Rider's Manual
2
14
zGeneral views
Page 47 of 136

Wait until the warning light forthe coolant temperature stopsflashing.
The idle actuator is posi-tioned after you switch onthe ignition. The coolant-tem-perature warning light flashesif the idle actuator has not cor-rectly positioned before the pre-ride check completes. In orderto avoid subsequent problems,wait for this process to completebefore proceeding.
Press starter button2.
If ambient temperatures arevery low, you might find itnecessary to open the throttleslightly when starting the engine.At ambient temperatures below0 °C, disengage the clutch afterswitching on the ignition.
If the engine fails to starteven though the starterturns, insufficient battery voltagemight be causing the problem.Recharge the battery before youstart the engine, or use jumpleads and a donor battery tostart.
The engine starts.
Consult the troubleshootingchart below if the engine re-fuses to start. (106)
ABS self-diagnosis
BMW Motorrad ABS performsself-diagnosis to ensure its op-erability. Self-diagnosis is per-formed automatically when youswitch on the ignition. The mo-
torcycle has to move forward afew metres for the wheel sensorsto be tested.
Phase 1
Test of the diagnosis-compat-ible system components withthe motorcycle at a standstill.
ABS warning light flashes.
Phase 2
Test of the wheel sensors asthe motorcycle pulls away fromrest.
ABS warning light flashes.
ABS self-diagnosiscompleted
The ABS warning light goesout.
5
45
zRiding
Page 67 of 136

Maintenance
Maintenance
Notes . . . . . . . . . . . . . . . . . . . . . . . . . . . . . . . 66
Toolkit . . . . . . . . . . . . . . . . . . . . . . . . . . . . . . 66
Engine oil . . . . . . . . . . . . . . . . . . . . . . . . . . . 66
Brake system . . . . . . . . . . . . . . . . . . . . . . . 68
Brake pads . . . . . . . . . . . . . . . . . . . . . . . . . 68
Brake fluid . . . . . . . . . . . . . . . . . . . . . . . . . . 70
Coolant . . . . . . . . . . . . . . . . . . . . . . . . . . . . . 72
Clutch . . . . . . . . . . . . . . . . . . . . . . . . . . . . . . 73
Tyres . . . . . . . . . . . . . . . . . . . . . . . . . . . . . . . 74
Rims . . . . . . . . . . . . . . . . . . . . . . . . . . . . . . . . 74
Chain . . . . . . . . . . . . . . . . . . . . . . . . . . . . . . . 75
Wheels . . . . . . . . . . . . . . . . . . . . . . . . . . . . . 76
BMW Motorrad front-wheel
stand . . . . . . . . . . . . . . . . . . . . . . . . . . . . . . . 83
Fuses . . . . . . . . . . . . . . . . . . . . . . . . . . . . . . . 84
Bulbs . . . . . . . . . . . . . . . . . . . . . . . . . . . . . . . 85
Air filter . . . . . . . . . . . . . . . . . . . . . . . . . . . . . 91
Jump starting . . . . . . . . . . . . . . . . . . . . . . . 92
Battery . . . . . . . . . . . . . . . . . . . . . . . . . . . . . . 93
Body panels . . . . . . . . . . . . . . . . . . . . . . . . 96
8
65
zMaintenance
Page 68 of 136

Notes
The "Maintenance" chapter de-scribes straightforward proced-ures for checking and replacingcertain wear parts.
Special tightening torques are lis-ted as applicable. The tighteningtorques for the threaded fasten-ers on your motorcycle are listedin the section entitled "Technicaldata".
You will find information on moreextensive maintenance and repairwork in the Repair Manual onDVD for your motorcycle, whichis available from your authorisedBMW Motorrad dealer.
Some of the work calls for spe-cial tools and a thorough know-ledge of motorcycle technology.If you are in doubt consult a spe-cialist workshop, preferably yourauthorised BMW Motorrad deal-er.
Toolkit
1Open-ended spanner
Width across flats 24
Open-ended spanner
Width across flats 15
2Open-ended spanner
Width across flats 14/19
3Spark plug wrench
4Reversible-blade screw-driver with star-head andplain tips
Small screwdriver withstar-head tip
5Torx bit, T25
Torx wrench, T45
6Spare fuses with puller tool
Minifuses, 4 A, 7.5 A, 10 Aand 15 A
Engine oil
Checking engine oil level
The engine can seize if theoil level is low, and this canlead to accidents.
Always make sure that the oillevel is correct.
The oil level varies with thetemperature of the oil. Thehigher the temperature, the high-er the level of oil in the sump.Checking the oil level with theengine cold or after no more thana short ride will lead to misinter-pretation; this in turn, means thatthe engine will be operated withthe incorrect quantity of oil.
In order to ensure that the en-gine oil level is read correctly,check the oil level only after alengthy trip.
8
66
zMaintenance
Page 86 of 136
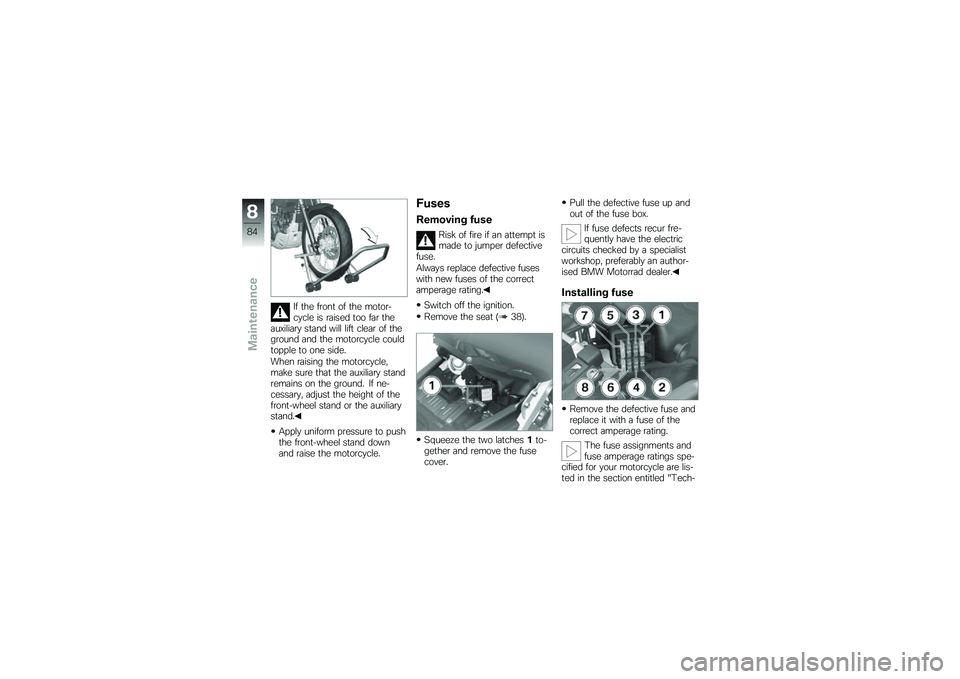
If the front of the motor-cycle is raised too far theauxiliary stand will lift clear of theground and the motorcycle couldtopple to one side.
When raising the motorcycle,make sure that the auxiliary standremains on the ground. If ne-cessary, adjust the height of thefront-wheel stand or the auxiliarystand.
Apply uniform pressure to pushthe front-wheel stand downand raise the motorcycle.
Fuses
Removing fuse
Risk of fire if an attempt ismade to jumper defectivefuse.
Always replace defective fuseswith new fuses of the correctamperage rating.
Switch off the ignition.
Remove the seat (38).
Squeeze the two latches1to-gether and remove the fusecover.
Pull the defective fuse up andout of the fuse box.
If fuse defects recur fre-quently have the electriccircuits checked by a specialistworkshop, preferably an author-ised BMW Motorrad dealer.
Installing fuse
Remove the defective fuse andreplace it with a fuse of thecorrect amperage rating.
The fuse assignments andfuse amperage ratings spe-cified for your motorcycle are lis-ted in the section entitled "Tech-
8
84
zMaintenance
Page 87 of 136
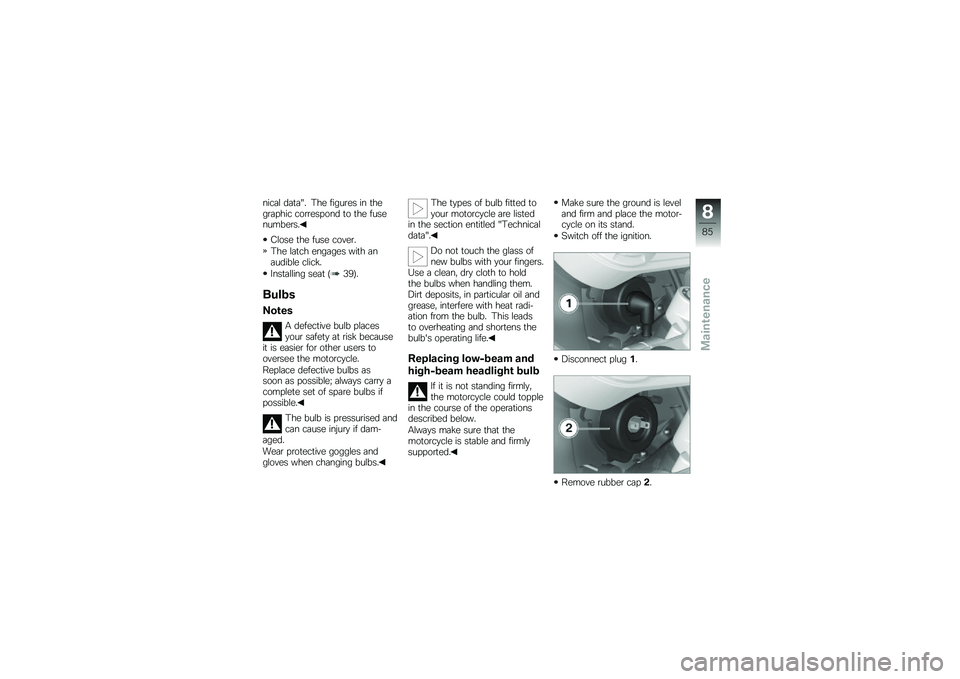
nical data". The figures in thegraphic correspond to the fusenumbers.
Close the fuse cover.
The latch engages with anaudible click.
Installing seat (39).
Bulbs
Notes
A defective bulb placesyour safety at risk becauseit is easier for other users tooversee the motorcycle.
Replace defective bulbs assoon as possible; always carry acomplete set of spare bulbs ifpossible.
The bulb is pressurised andcan cause injury if dam-aged.
Wear protective goggles andgloves when changing bulbs.
The types of bulb fitted toyour motorcycle are listedin the section entitled "Technicaldata".
Do not touch the glass ofnew bulbs with your fingers.Use a clean, dry cloth to holdthe bulbs when handling them.Dirt deposits, in particular oil andgrease, interfere with heat radi-ation from the bulb. This leadsto overheating and shortens thebulb's operating life.
Replacing low-beam and
high-beam headlight bulb
If it is not standing firmly,the motorcycle could topplein the course of the operationsdescribed below.
Always make sure that themotorcycle is stable and firmlysupported.
Make sure the ground is leveland firm and place the motor-cycle on its stand.
Switch off the ignition.
Disconnect plug1.
Remove rubber cap2.
8
85
zMaintenance
Page 96 of 136

ging the battery on the follow-ing pages
Do not turn the battery upsidedown
If the battery is not discon-nected, the on-board elec-tronics (e.g. clock, etc.) graduallydrain the battery. This can causethe battery to run flat. If this hap-pens, warranty claims will not beaccepted.
If the motorcycle is to be out ofuse for more than four weeks,disconnect the battery or con-nect a suitable trickle charger tothe battery.
Charging battery when
connected
Charging the connectedbattery directly at the bat-tery terminals can damage thevehicle electronics.
Always disconnect the batteryfrom the on-board circuits be-
fore recharging it with a chargerconnected directly to the batteryposts.
If you switch on the igni-tion and the multifunctiondisplay and telltale lights fail tolight up, the battery is completelyflat. Attempting to charge a com-pletely flat battery via the on-board socket can cause damageto the motorcycle's electronics.
If a battery has discharged to theextent that it is completely flat, ithas to be disconnected from theon-board circuits and chargedwith the charger connected dir-ectly to the battery posts.
With the battery connectedto the motorcycle's on-boardelectrical system, charge onlyvia the power socket.
Comply with the operating in-structions of the charger.
Charging battery when
disconnected
Charge the battery using asuitable charger.
Comply with the operating in-structions of the charger.
Once the battery is fullycharged, disconnect thecharger's terminal clips fromthe battery terminals.
The battery has to be re-charged at regular intervalsin the course of a lengthy periodof disuse. See the instructionsfor caring for your battery. Al-ways fully recharge the batterybefore restoring it to use
Removing battery
Switch off the ignition.
Remove the centre trim panel(100).
8
94
zMaintenance
Page 117 of 136

Lighting
Bulb for low-beam and high-beam headlightH4 / 12 V / 55 W / 60 W
Bulb for parking lightW5W / 12 V / 5 W
Bulb for tail light/brake lightP21/5W / 12 V / 5 W / 21 W
Bulbs for flashing turn indicators, frontR10W / 12 V / 10 W
Bulbs for flashing turn indicators, rearR10W / 12 V / 10 W
Fuses
Current rating of fuse 1 (for engine electronics)15 A
Current rating of fuse 2 (for instrument panel, haz-ard warning flashers, on-board socket, optionalaccessories and diagnosis plug)
10 A
Current rating of fuse 3 (for horn and headlightflasher)7.5 A
Current rating of fuse 4 (for low-beam headlight)7.5 A
10
115
zTechnical data
Page 118 of 136

Current rating of fuse 5 (for high-beam headlight)7.5 A
Current rating of fuse 6 (for instrument panel,flashing turn indicators, hazard warning flashers,brake light and optional accessories)
7.5 A
Current rating of fuse 7 (for rear light and parkinglight)4 A
Current rating of fuse 8 (for heated handlebargrips)4 A
Frame
Frame typeBridge-type steel frame with bottom truss andbolt-on rear frame
Type plate locationMain frame, top right on steering head
VIN locationSteering head, right
10
116
zTechnical data