parking brake BMW MOTORRAD K 1200 GT 2006 Rider's Manual (in English)
[x] Cancel search | Manufacturer: BMW MOTORRAD, Model Year: 2006, Model line: K 1200 GT, Model: BMW MOTORRAD K 1200 GT 2006Pages: 172, PDF Size: 1.98 MB
Page 5 of 172
Spring preload.......... 69
Shock absorbers . . . . . . . . 70
Electronic Suspension
Adjustment ESA
OE
....... 71
Tyres . . ................. 73
5 Riding . . . . . . .......... 75
Safety instructions . . . . . . . 76
Checklist . . . . . . .......... 78
Starting ................. 78
Running in . . . . .......... 81
Parking your
motorcycle . . . . .......... 82
Refuelling . . . . . .......... 83
Tyre pressure control
RDC
OE
.................. 85
Brake system, general . . . 85
Brake system with BMW
Motorrad Integral ABS . . . 86
Electronic engine
management with BMW
Motorrad ASC
OE
......... 90
6 Accessories .......... 93
General instructions . . . . . 94
Power socket . .......... 94
Luggage . . . . . . .......... 95 Case . . .
................. 95
Topcase
OA
.............. 98
7 Maintenance . . . ..... 101
General instructions . . . . 102
Toolkit . ................ 102
Engine oil . . . . . ......... 103
Brake system,
general ................ 105
Brake pads . . . . ......... 105
Brake fluid . . . . ......... 107
Clutch . ................ 109
Tyres . . ................ 109
Rims . . . ................ 110
Wheels . ................ 110
Front-wheel stand . ..... 117
Bulbs . . ................ 119
Jump start . . . . ......... 127
Battery . ................ 128
8 Care . ................ 133
Care products . ......... 134
Washing motorcycle . . . . 134
Cleaning easily damaged
components . . . ......... 135
Paint care . . . . . ......... 136 Protective wax
coating
................ 136
Laying up the
motorcycle . . . . ......... 136
Restoring motorcycle to
use .................... 137
9 Technical data . . ..... 139
Troubleshooting
chart . . . ................ 140
Threaded fasteners ..... 141
Engine . ................ 142
Riding specifications . . . . 145
Clutch . ................ 145
Transmission . . ......... 145
Final drive . . . . . ......... 147
Running gear . . ......... 147
Brakes . ................ 148
Wheels and tyres . . ..... 148
Electrics . . . . . . ......... 149
Frame . . ................ 151
Dimensions . . . ......... 151
Weights ................ 152
Page 77 of 172
Riding
Safety instructions . . . . . . . . . . . . . 76
Checklist . . . . . . . . . . . . . . . . . . . . . . 78
Starting . . . . . . . . . . . . . . . . . . . . . . . 78
Running in . . . . . . . . . . . . . . . . . . . . 81
Parking your motorcycle . . . . . . . 82
Refuelling . . . . . . . . . . . . . . . . . . . . . 83
Tyre pressure control RDC
OE
.. 85
Brake system, general . . . . . . . . . 85
Brake system with BMW
Motorrad Integral ABS . . . . . . . . . 86
Electronic engine management
with BMW Motorrad ASC
OE
.... 90
575zRiding
Page 84 of 172
TyresNew tyres have a smooth
surface. This must be
roughened by riding in a
restrained manner at various
heel angles until the tyres
are run in. This running in
procedure is essential if the
tyres are to achieve maximum
grip.Tyres do not have their
full grip when new and
there is a risk of accidents at
extreme angles of heel.
Avoid extreme angles of
heel.Parking your
motorcyclePlace the motorcycle on
side stand
If the ground is soft or
uneven, there is no guar- antee that the motorcycle will
rest firmly on the stand.
Always check that the ground
under the stand is level and
firm.
Switch off the engine.
Pull the handbrake lever.
Hold the motorcycle upright
and balanced.
Use your left foot to extend
the side stand fully. The side stand is de-
signed to support only
the weight of the motorcycle.
Do not lean or sit on the mo-
torcycle with the side stand
extended.
Slowly lean the motorcycle
to the side until its weight
is taken by the stand and
dismount to the left. If the motorcycle is on
the side stand, the sur-
face of the ground will de-
termine whether it is better to turn the handlebars to the
left or right. However, the mo-
torcycle is more stable on a
level surface with the handle-
bars turned to the left than
with the handlebars turned to
the right.
On level ground, always turn
the handlebars to the left to
set the steering lock.
Turn the handlebars to full
left or right lock.
Check that the motorcycle
is standing firmly. On a gradient, the mo-
torcycle should always
face uphill; select 1st gear.
Lock the steering lock.
Remove the motorcycle
from side standUnlock the steering lock.
From the left, grip the
handlebars with both hands.
582zRiding
Page 125 of 172
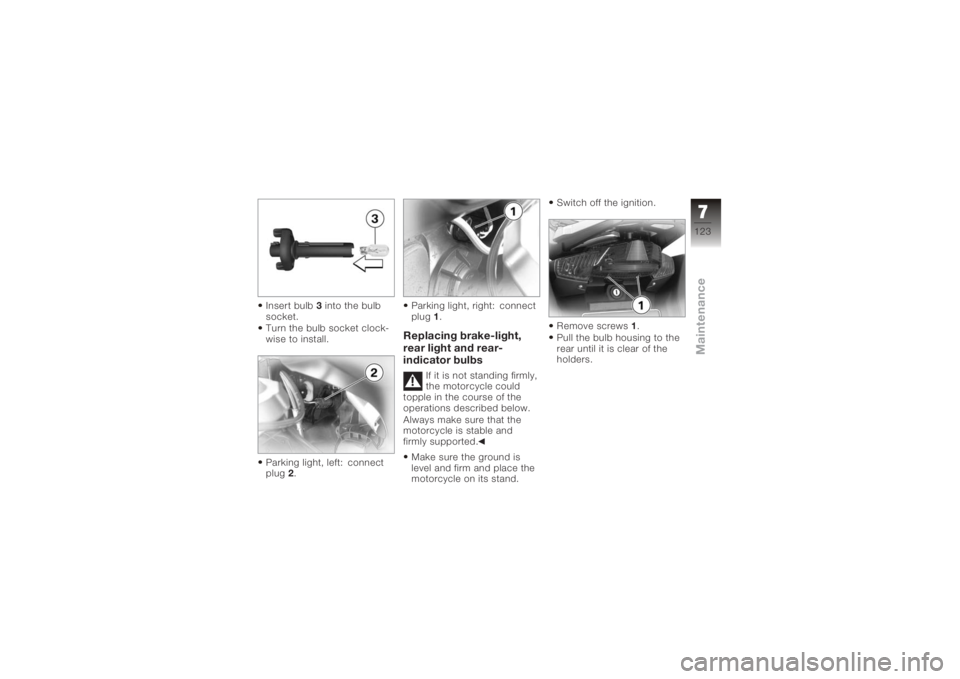
Insert bulb3into the bulb
socket.
Turn the bulb socket clock-
wise to install.
Parking light, left: connect
plug 2. Parking light, right: connect
plug
1.
Replacing brake-light,
rear light and rear-
indicator bulbs
If it is not standing firmly,
the motorcycle could
topple in the course of the
operations described below.
Always make sure that the
motorcycle is stable and
firmly supported.
Make sure the ground is
level and firm and place the
motorcycle on its stand. Switch off the ignition.
Remove screws
1.
Pull the bulb housing to the
rear until it is clear of the
holders.
7123zMaintenance
Page 152 of 172
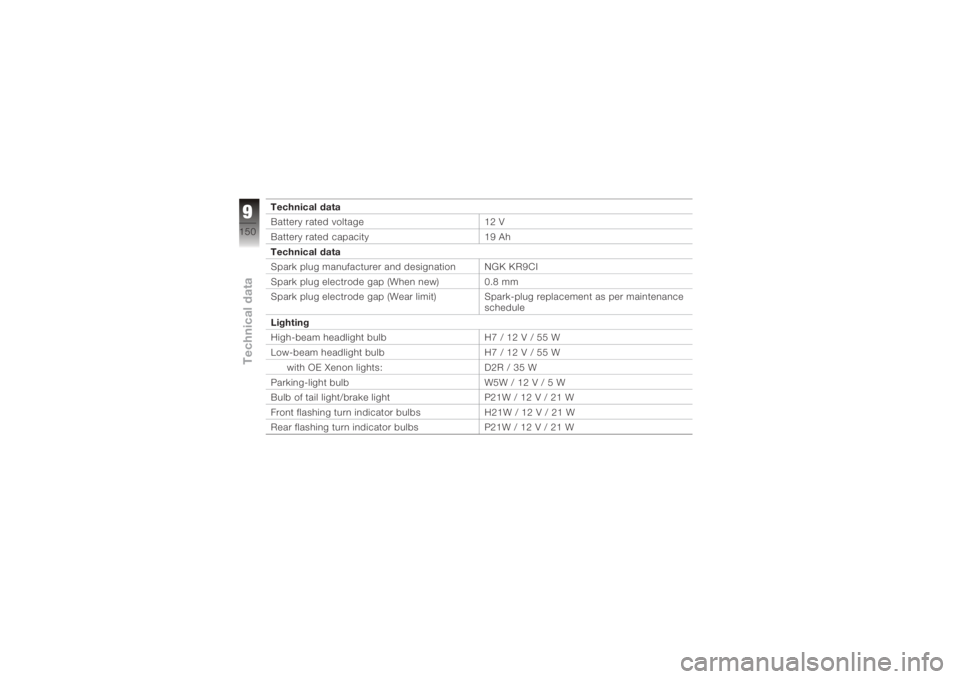
Technical data
Battery rated voltage12 V
Battery rated capacity 19 Ah
Technical data
Spark plug manufacturer and designation NGK KR9CI
Spark plug electrode gap (When new) 0.8 mm
Spark plug electrode gap (Wear limit) Spark-plug replacement as per maintenance
schedule
Lighting
High-beam headlight bulb H7 / 12 V / 55 W
Low-beam headlight bulb H7 / 12 V / 55 W
with OE Xenon lights: D2R / 35 W
Parking-light bulb W5W / 12 V / 5 W
Bulb of tail light/brake light P21W / 12 V / 21 W
Front flashing turn indicator bulbs H21W / 12 V / 21 W
Rear flashing turn indicator bulbs P21W / 12 V / 21 W
9150zTechnical data
Page 166 of 172
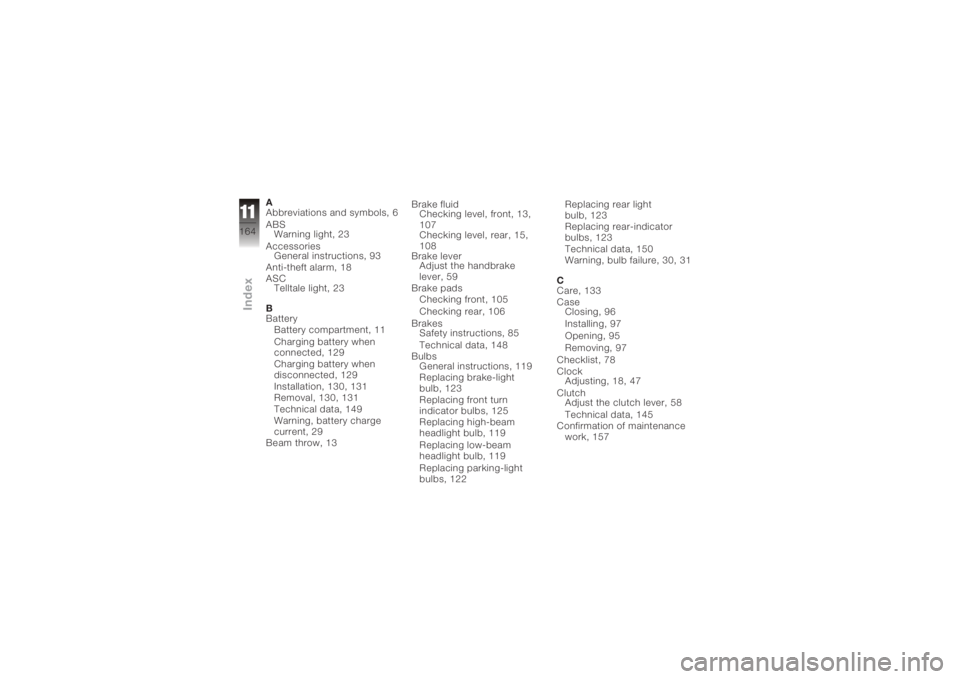
A
Abbreviations and symbols, 6
ABSWarning light, 23
Accessories General instructions, 93
Anti-theft alarm, 18
ASC Telltale light, 23
B
Battery Battery compartment, 11
Charging battery when
connected, 129
Charging battery when
disconnected, 129
Installation, 130, 131
Removal, 130, 131
Technical data, 149
Warning, battery charge
current, 29
Beam throw, 13 Brake fluid
Checking level, front, 13,
107
Checking level, rear, 15,
108
Brake lever Adjust the handbrake
lever, 59
Brake pads Checking front, 105
Checking rear, 106
Brakes Safety instructions, 85
Technical data, 148
Bulbs General instructions, 119
Replacing brake-light
bulb, 123
Replacing front turn
indicator bulbs, 125
Replacing high-beam
headlight bulb, 119
Replacing low-beam
headlight bulb, 119
Replacing parking-light
bulbs, 122 Replacing rear light
bulb, 123
Replacing rear-indicator
bulbs, 123
Technical data, 150
Warning, bulb failure, 30, 31
C
Care, 133
Case Closing, 96
Installing, 97
Opening, 95
Removing, 97
Checklist, 78
Clock Adjusting, 18, 47
Clutch Adjust the clutch lever, 58
Technical data, 145
Confirmation of maintenance work, 157
11164zIndex