display BMW X1 XDRIVE 35I 2013 Owners Manual
[x] Cancel search | Manufacturer: BMW, Model Year: 2013, Model line: X1 XDRIVE 35I, Model: BMW X1 XDRIVE 35I 2013Pages: 291, PDF Size: 6.58 MB
Page 5 of 291
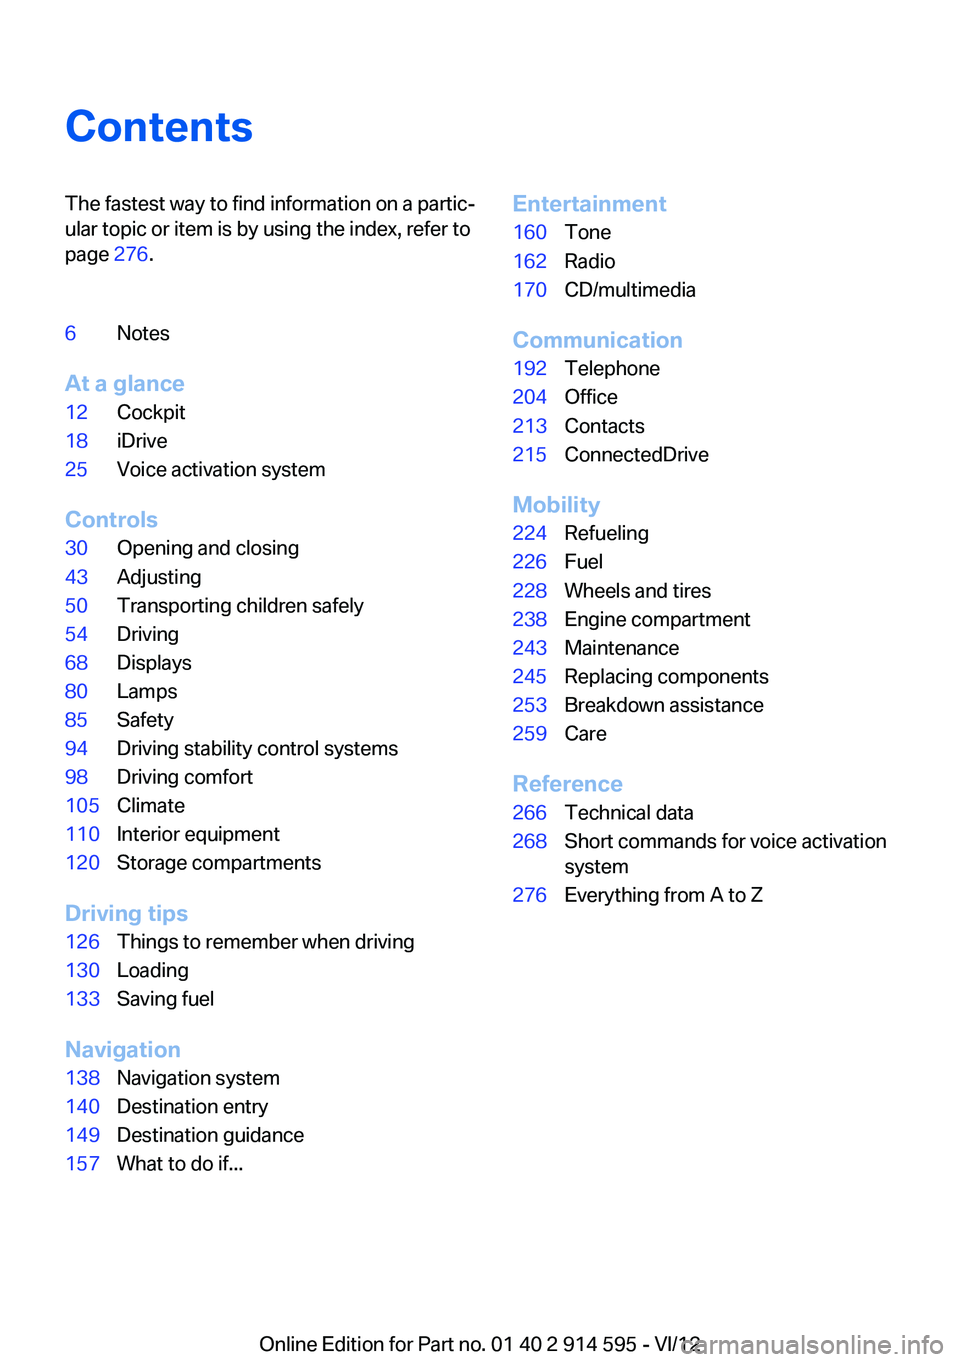
ContentsThe fastest way to find information on a partic‐
ular topic or item is by using the index, refer to
page 276.6Notes
At a glance
12Cockpit18iDrive25Voice activation system
Controls
30Opening and closing43Adjusting50Transporting children safely54Driving68Displays80Lamps85Safety94Driving stability control systems98Driving comfort105Climate110Interior equipment120Storage compartments
Driving tips
126Things to remember when driving130Loading133Saving fuel
Navigation
138Navigation system140Destination entry149Destination guidance157What to do if...Entertainment160Tone162Radio170CD/multimedia
Communication
192Telephone204Office213Contacts215ConnectedDrive
Mobility
224Refueling226Fuel228Wheels and tires238Engine compartment243Maintenance245Replacing components253Breakdown assistance259Care
Reference
266Technical data268Short commands for voice activation
system276Everything from A to Z
Online Edition for Part no. 01 40 2 914 595 - VI/12
Page 6 of 291
NotesUsing this Owner's Manual
The fastest way to find information on a partic‐
ular topic is by using the index.
An initial overview of the vehicle is provided in
the first chapter.
Additional sources of information
Should you have any questions, your service
center will be glad to advise you at any time.
Information on BMW, e.g., on technology, is
available on the Internet: bmwusa.com
Symbols
Indicates precautions that must be followed
precisely in order to avoid the possibility of per‐
sonal injury and serious damage to the vehicle.
◄ Marks the end of a specific item of informa‐
tion.
"..." Identifies Control Display texts used to se‐
lect individual functions.
›...‹ Verbal instructions to use with the voice ac‐
tivation system.
››...‹‹ Identifies the answers generated by the
voice activation system.
Refers to measures that can be taken to help
protect the environment.
Symbols on vehicle components
Indicates that you should consult the rele‐
vant section of this Owner's Manual for infor‐
mation on a particular part or assembly.
Vehicle equipment
This Owner's Manual describes all models, all
series equipment, as well as country-specific
and special equipment offered in the model ser‐
ies.Therefore, this Owner's Manual also de‐
scribes and depicts equipment that may not be
contained in your vehicle because of the se‐
lected special equipment or country version, for
example.
This also applies to safety-related functions and
systems.
For options and equipment not described in this
Owner's Manual, please refer to the Supple‐
mentary Owner's Manuals.
On right-hand drive vehicles, some controls are
arranged differently than shown in the illustra‐
tions.
Status of this Owner's Manual
at time of printing
The manufacturer of your vehicle pursues a pol‐
icy of constant development that is conceived
to ensure that our vehicles continue to embody
the highest quality and safety standards. In rare
cases, therefore, the features described in this
Owner's Manual may differ from those in your
vehicle.
Updates made after the editorial
deadline
Any updates made after the editorial deadline for
the Owner's Manuals are located in the appen‐
dix of the printed quick reference for the vehicle.
For your own safety
Maintenance and repairs
Advanced technology, e.g., the use of modern
materials and high-performance electronics, re‐
quires suitable maintenance and repair meth‐
ods.
Therefore, have this work performed only by a
BMW center or a workshop that works accord‐Seite 6Notes6
Online Edition for Part no. 01 40 2 914 595 - VI/12
Page 11 of 291
At a glance
These overviews of buttons, switches and
displays are intended to familiarize you with your
vehicle. You will also become quickly acquainted with the available control concepts and options.Online Edition for Part no. 01 40 2 914 595 - VI/12
Page 14 of 291
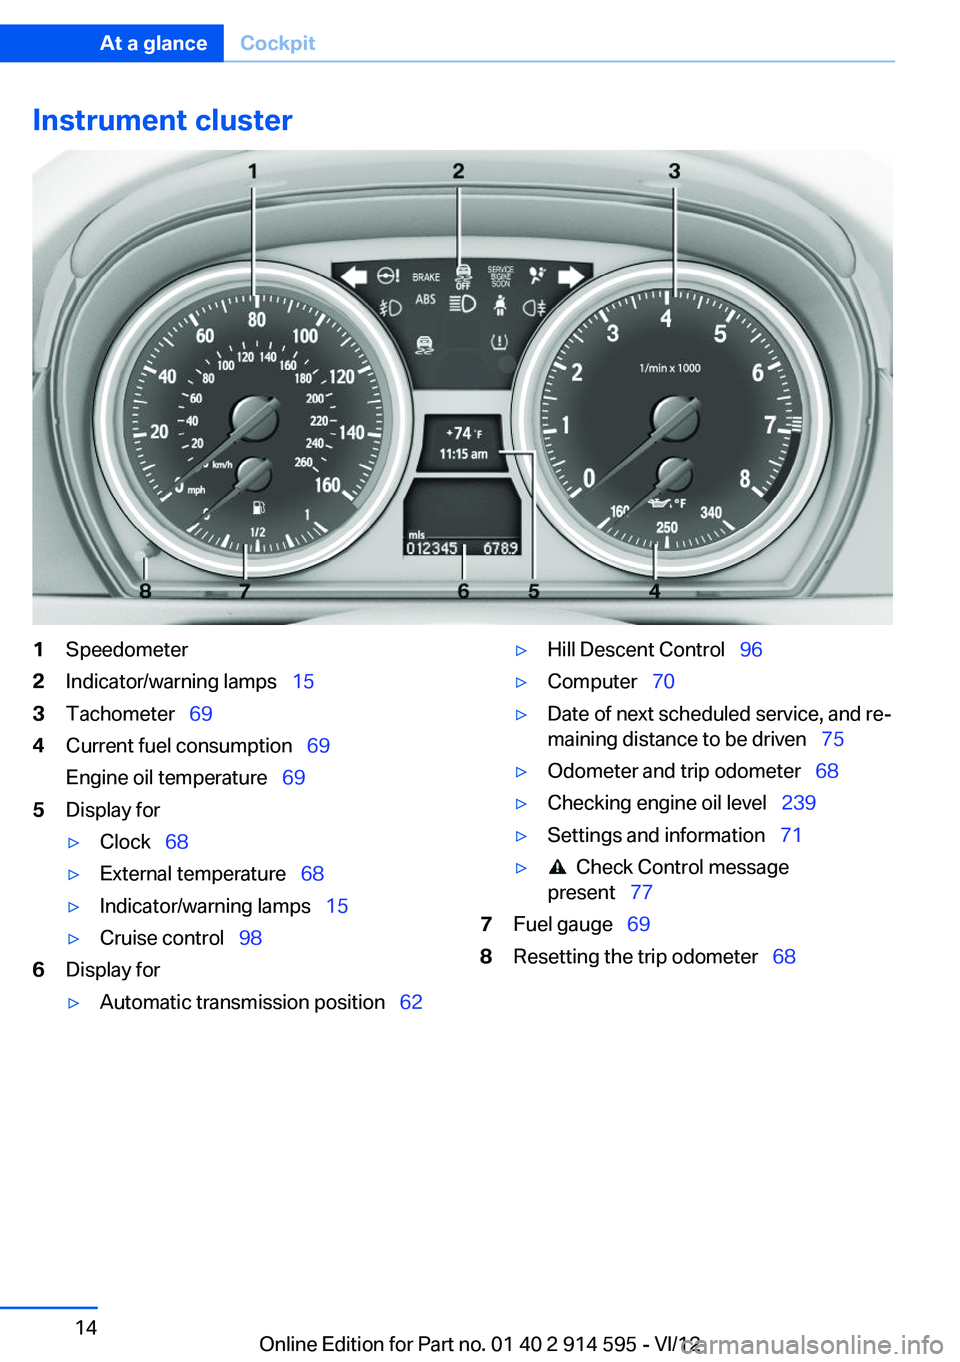
Instrument cluster1Speedometer2Indicator/warning lamps 153Tachometer 694Current fuel consumption 69
Engine oil temperature 695Display for▷Clock 68▷External temperature 68▷Indicator/warning lamps 15▷Cruise control 986Display for▷Automatic transmission position 62▷Hill Descent Control 96▷Computer 70▷Date of next scheduled service, and re‐
maining distance to be driven 75▷Odometer and trip odometer 68▷Checking engine oil level 239▷Settings and information 71▷ Check Control message
present 777Fuel gauge 698Resetting the trip odometer 68Seite 14At a glanceCockpit14
Online Edition for Part no. 01 40 2 914 595 - VI/12
Page 15 of 291
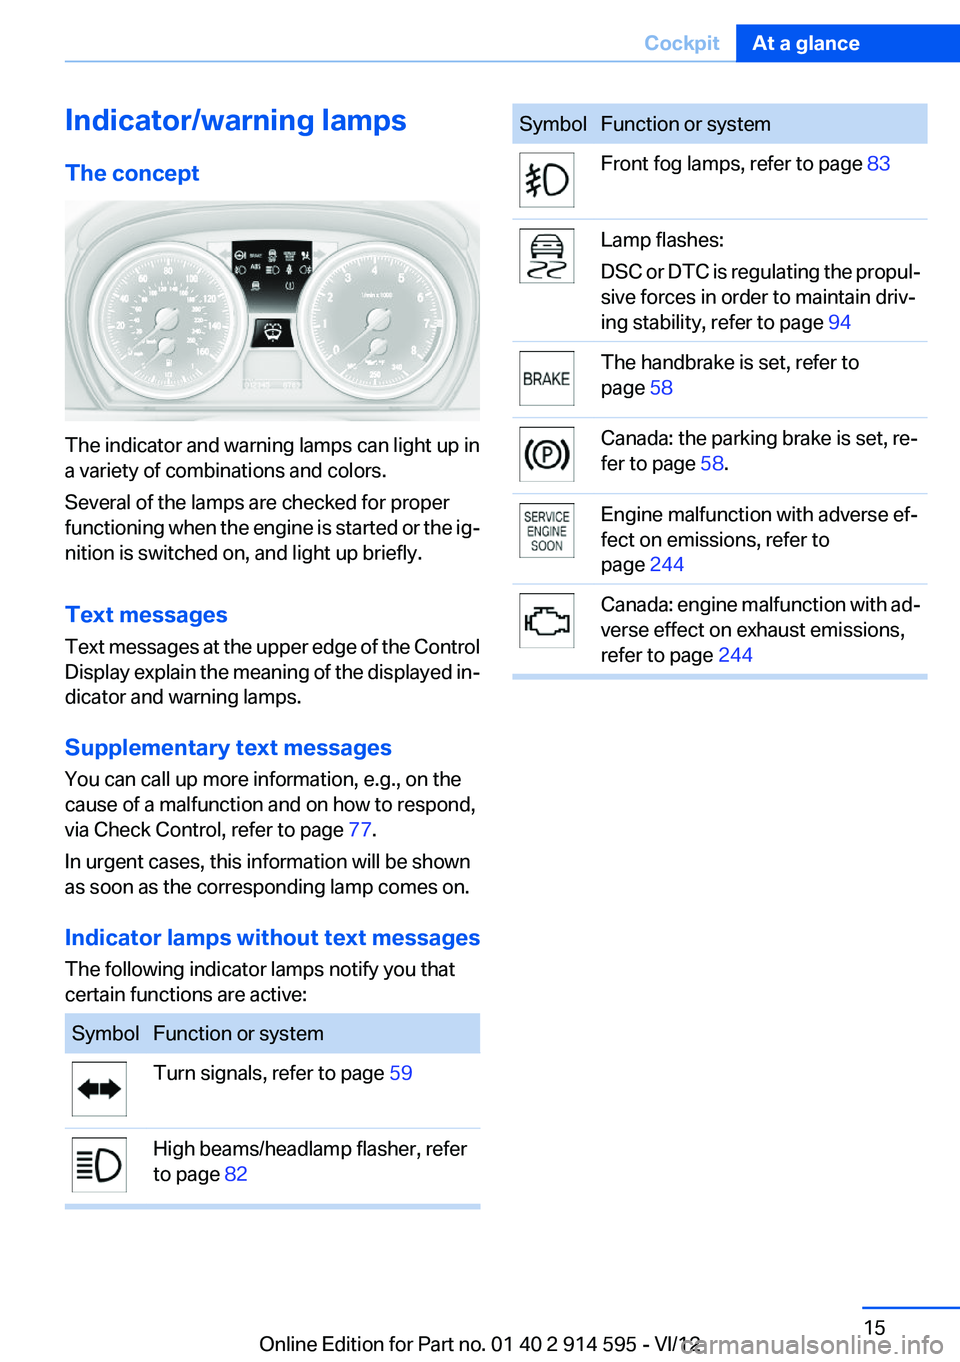
Indicator/warning lamps
The concept
The indicator and warning lamps can light up in
a variety of combinations and colors.
Several of the lamps are checked for proper
functioning when the engine is started or the ig‐
nition is switched on, and light up briefly.
Text messages
Text messages at the upper edge of the Control
Display explain the meaning of the displayed in‐
dicator and warning lamps.
Supplementary text messages
You can call up more information, e.g., on the
cause of a malfunction and on how to respond,
via Check Control, refer to page 77.
In urgent cases, this information will be shown
as soon as the corresponding lamp comes on.
Indicator lamps without text messages
The following indicator lamps notify you that
certain functions are active:
SymbolFunction or systemTurn signals, refer to page 59High beams/headlamp flasher, refer
to page 82SymbolFunction or systemFront fog lamps, refer to page 83Lamp flashes:
DSC or DTC is regulating the propul‐
sive forces in order to maintain driv‐
ing stability, refer to page 94The handbrake is set, refer to
page 58Canada: the parking brake is set, re‐
fer to page 58.Engine malfunction with adverse ef‐
fect on emissions, refer to
page 244Canada: engine malfunction with ad‐
verse effect on exhaust emissions,
refer to page 244Seite 15CockpitAt a glance15
Online Edition for Part no. 01 40 2 914 595 - VI/12
Page 16 of 291
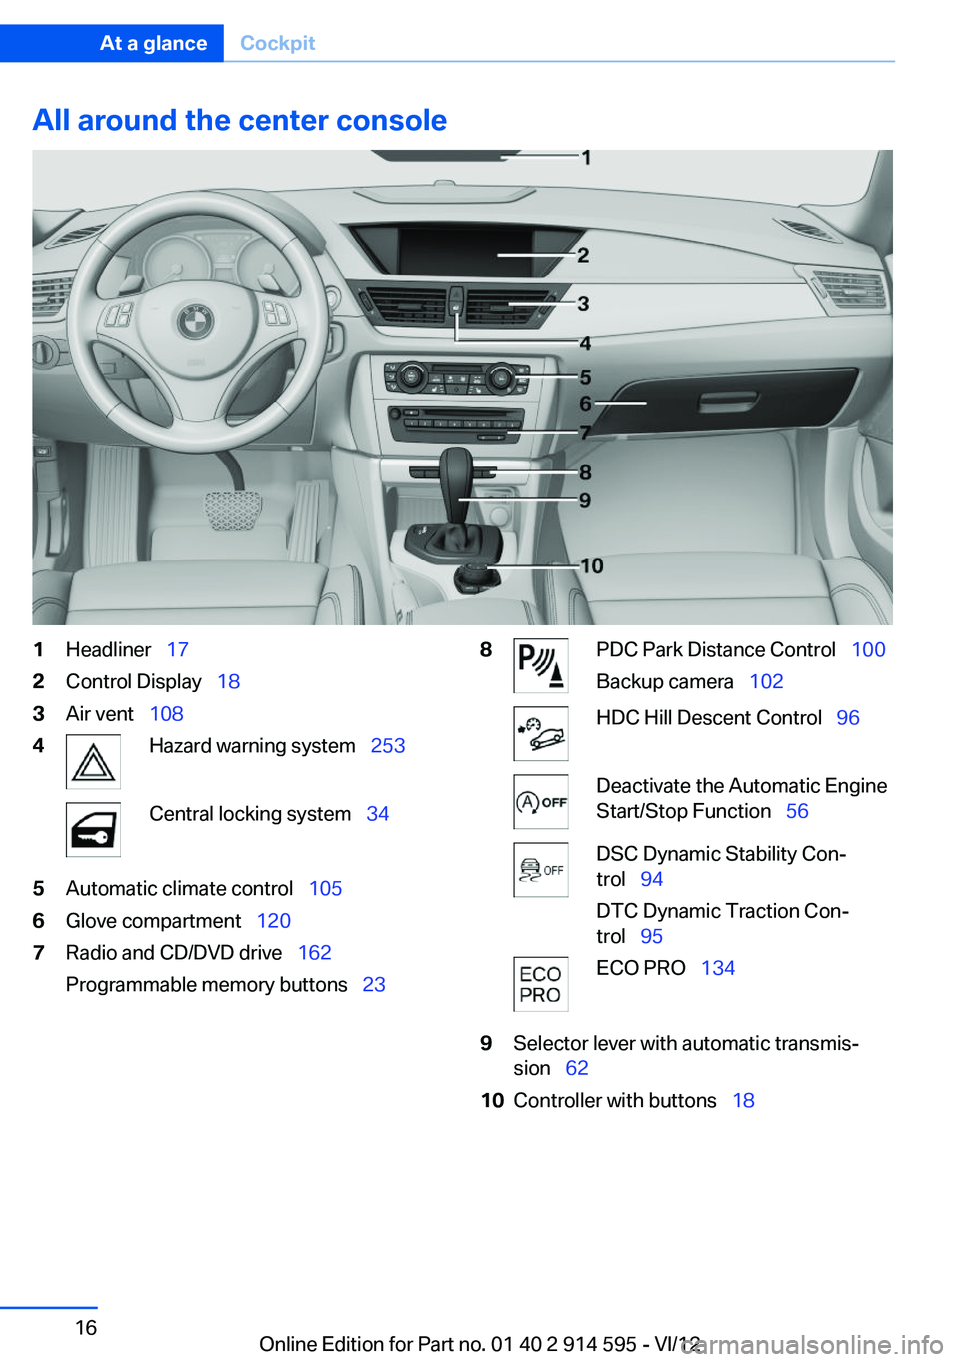
All around the center console1Headliner 172Control Display 183Air vent 1084Hazard warning system 253Central locking system 345Automatic climate control 1056Glove compartment 1207Radio and CD/DVD drive 162
Programmable memory buttons 238PDC Park Distance Control 100
Backup camera 102HDC Hill Descent Control 96Deactivate the Automatic Engine
Start/Stop Function 56DSC Dynamic Stability Con‐
trol 94
DTC Dynamic Traction Con‐
trol 95ECO PRO 1349Selector lever with automatic transmis‐
sion 6210Controller with buttons 18Seite 16At a glanceCockpit16
Online Edition for Part no. 01 40 2 914 595 - VI/12
Page 18 of 291
iDriveVehicle equipment
This chapter describes all series equipment as
well as country-specific and special equipment
offered for this model series.Therefore, it also
describes equipment that may not be found in
your vehicle, for instance due to the selected
special equipment or the country version. This
also applies to safety-related functions and sys‐
tems.
The concept
The iDrive combines the functions of a multitude
of switches. Thus, these functions can be oper‐
ated from a central location.
Using the iDrive during a trip
To avoid becoming distracted and posing
an unnecessary hazard to your vehicle's occu‐
pants and to other road users, never attempt to
use the controls or enter information unless traf‐
fic and road conditions allow this.◀
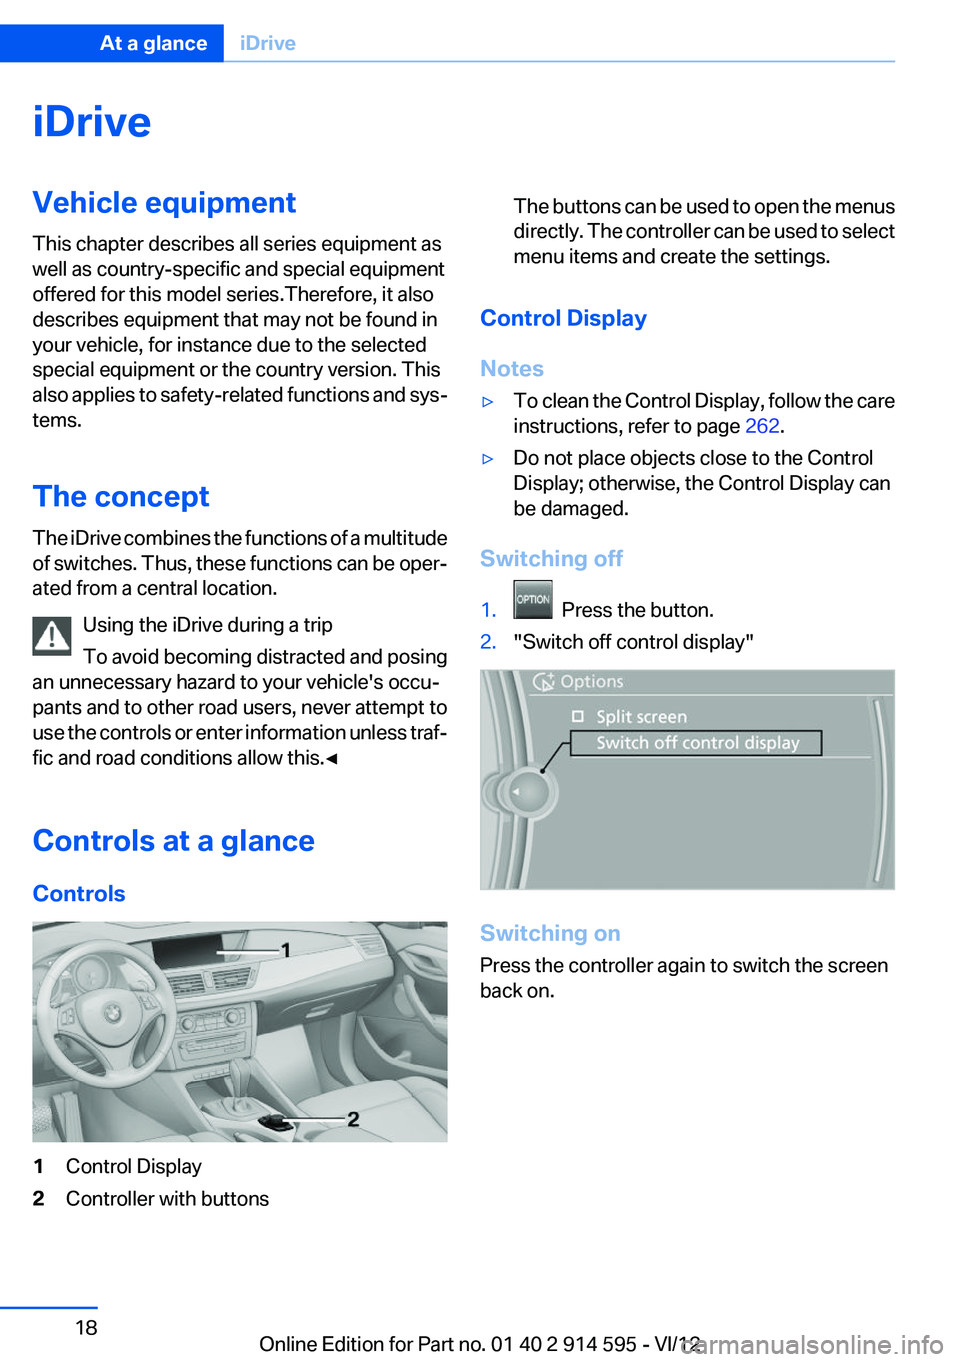
Controls at a glance
Controls1Control Display2Controller with buttonsThe buttons can be used to open the menus
directly. The controller can be used to select
menu items and create the settings.
Control Display
Notes
▷To clean the Control Display, follow the care
instructions, refer to page 262.▷Do not place objects close to the Control
Display; otherwise, the Control Display can
be damaged.
Switching off
1. Press the button.2."Switch off control display"
Switching on
Press the controller again to switch the screen
back on.
Seite 18At a glanceiDrive18
Online Edition for Part no. 01 40 2 914 595 - VI/12
Page 19 of 291
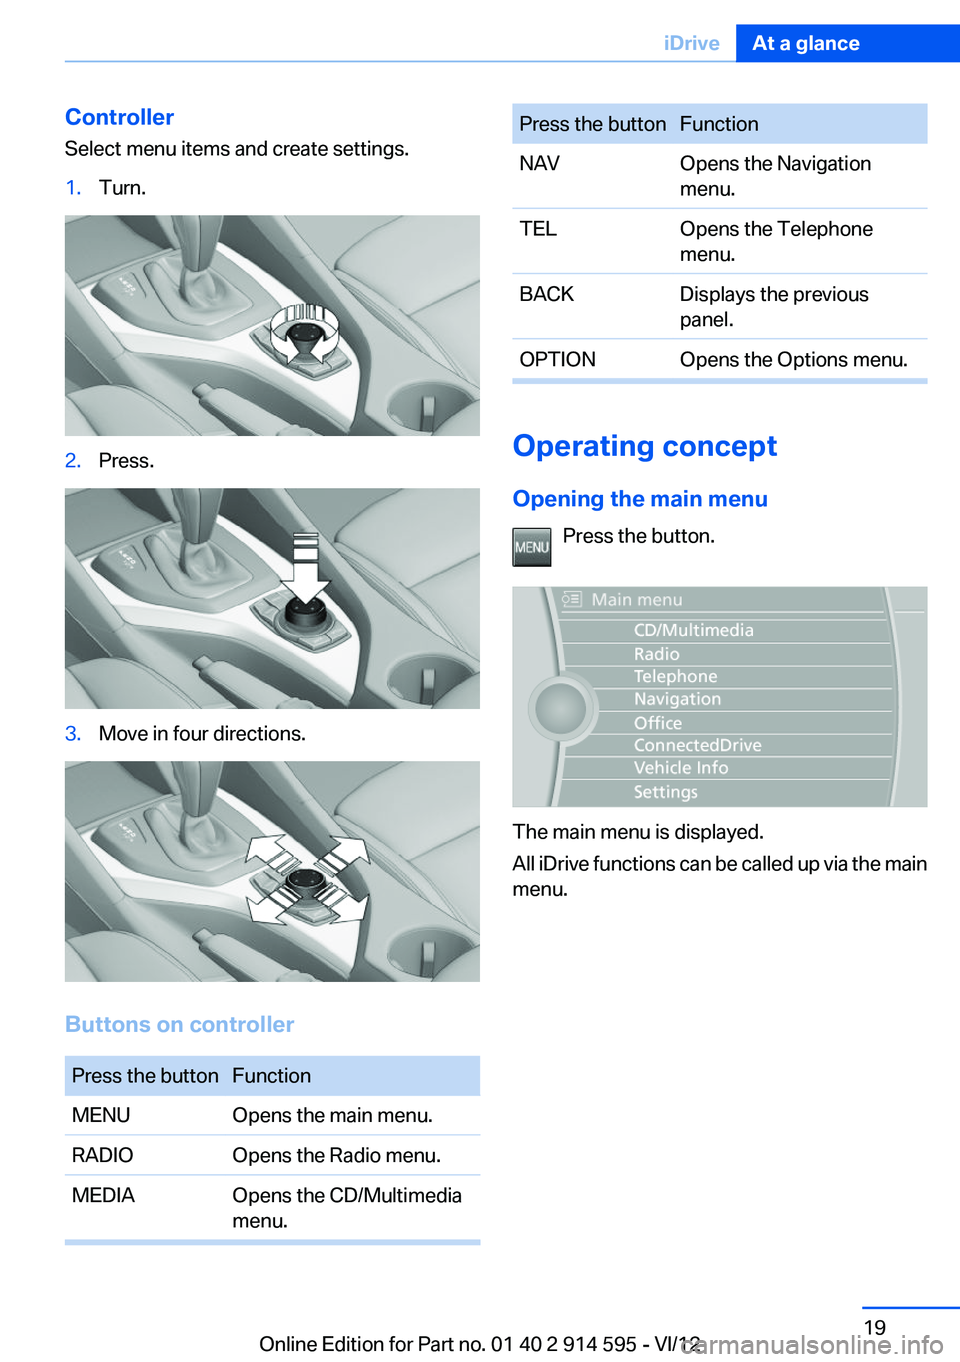
Controller
Select menu items and create settings.1.Turn.2.Press.3.Move in four directions.
Buttons on controller
Press the buttonFunctionMENUOpens the main menu.RADIOOpens the Radio menu.MEDIAOpens the CD/Multimedia
menu.Press the buttonFunctionNAVOpens the Navigation
menu.TELOpens the Telephone
menu.BACKDisplays the previous
panel.OPTIONOpens the Options menu.
Operating concept
Opening the main menu Press the button.
The main menu is displayed.
All iDrive functions can be called up via the main
menu.
Seite 19iDriveAt a glance19
Online Edition for Part no. 01 40 2 914 595 - VI/12
Page 20 of 291
Selecting menu items
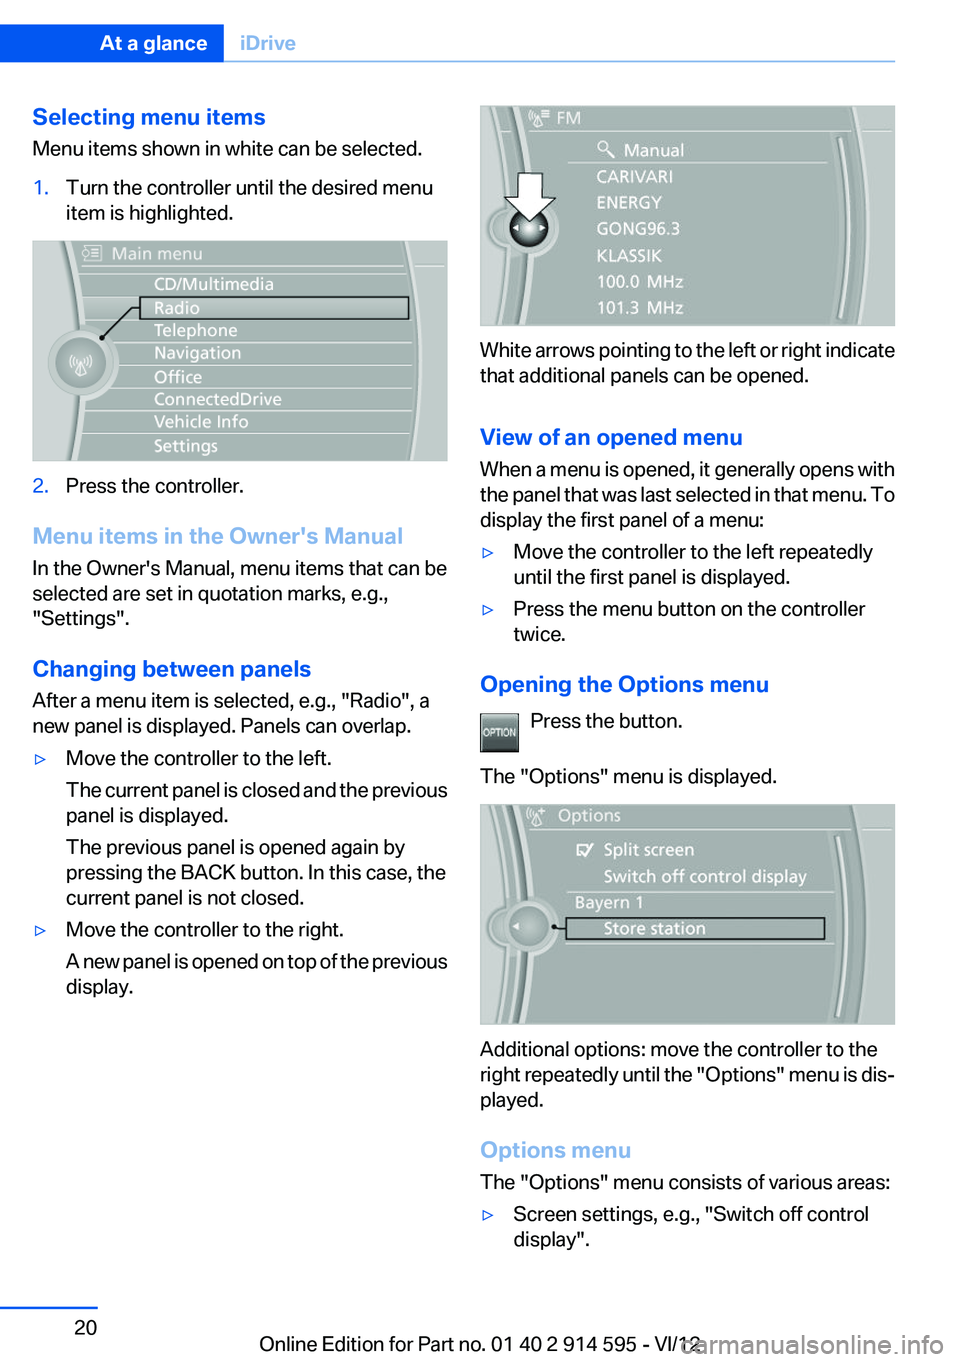
Menu items shown in white can be selected.1.Turn the controller until the desired menu
item is highlighted.2.Press the controller.
Menu items in the Owner's Manual
In the Owner's Manual, menu items that can be
selected are set in quotation marks, e.g.,
"Settings".
Changing between panels
After a menu item is selected, e.g., "Radio", a
new panel is displayed. Panels can overlap.
▷Move the controller to the left.
The current panel is closed and the previous
panel is displayed.
The previous panel is opened again by
pressing the BACK button. In this case, the
current panel is not closed.▷Move the controller to the right.
A new panel is opened on top of the previous
display.
White arrows pointing to the left or right indicate
that additional panels can be opened.
View of an opened menu
When a menu is opened, it generally opens with
the panel that was last selected in that menu. To
display the first panel of a menu:
▷Move the controller to the left repeatedly
until the first panel is displayed.▷Press the menu button on the controller
twice.
Opening the Options menu
Press the button.
The "Options" menu is displayed.
Additional options: move the controller to the
right repeatedly until the "Options" menu is dis‐
played.
Options menu
The "Options" menu consists of various areas:
▷Screen settings, e.g., "Switch off control
display".Seite 20At a glanceiDrive20
Online Edition for Part no. 01 40 2 914 595 - VI/12
Page 21 of 291
▷Control options for the selected main menu,
e.g., for "Radio".▷If applicable, further operating options for
the selected menu, for instance "Store
station".
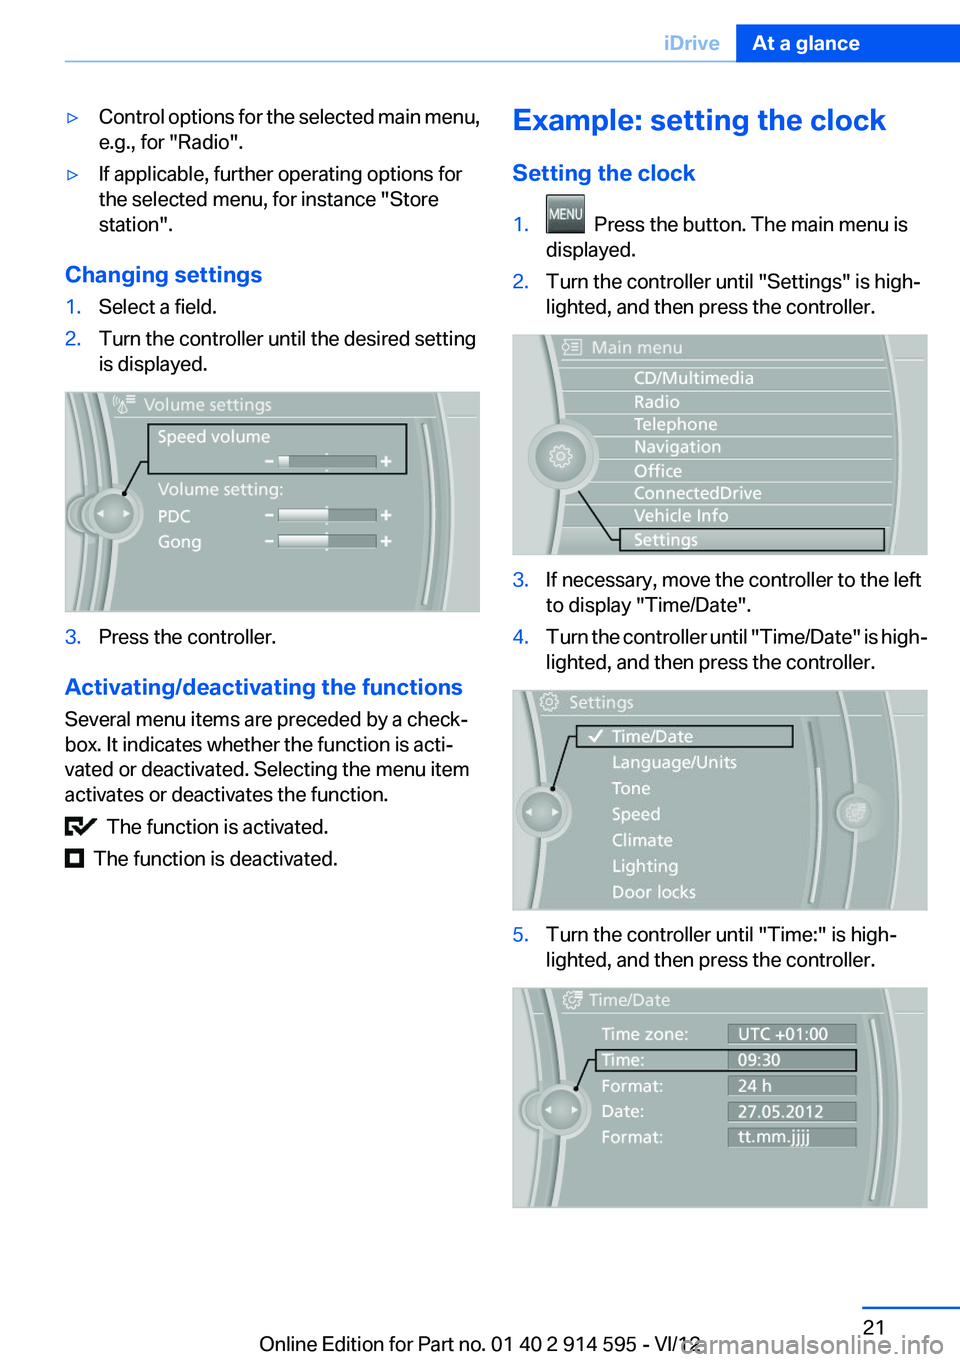
Changing settings
1.Select a field.2.Turn the controller until the desired setting
is displayed.3.Press the controller.
Activating/deactivating the functions
Several menu items are preceded by a check‐
box. It indicates whether the function is acti‐
vated or deactivated. Selecting the menu item
activates or deactivates the function.
The function is activated.
The function is deactivated.
Example: setting the clock
Setting the clock1. Press the button. The main menu is
displayed.2.Turn the controller until "Settings" is high‐
lighted, and then press the controller.3.If necessary, move the controller to the left
to display "Time/Date".4.Turn the controller until "Time/Date" is high‐
lighted, and then press the controller.5.Turn the controller until "Time:" is high‐
lighted, and then press the controller.Seite 21iDriveAt a glance21
Online Edition for Part no. 01 40 2 914 595 - VI/12