display BMW X5 2009 E70 Owners Manual
[x] Cancel search | Manufacturer: BMW, Model Year: 2009, Model line: X5, Model: BMW X5 2009 E70Pages: 317, PDF Size: 9.56 MB
Page 170 of 317
Destination guidance
168
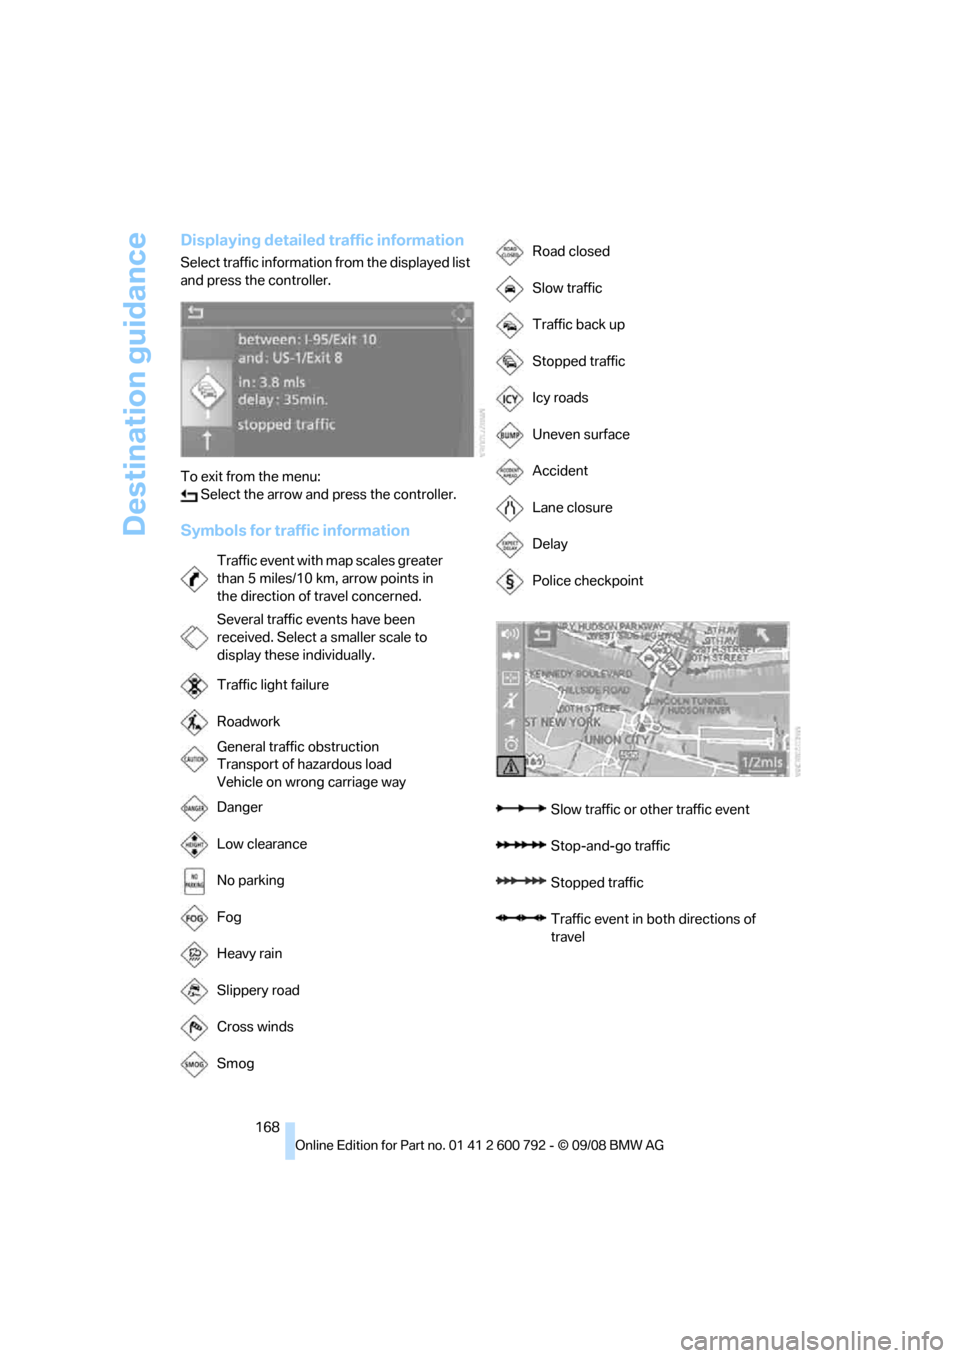
Displaying detailed traffic information
Select traffic information from the displayed list
and press the controller.
To exit from the menu: Select the arrow and press the controller.
Symbols for traffic information
Traffic event with map scales greater
than 5 miles/10 km, arrow points in
the direction of travel concerned.
Several traffic events have been
received. Select a smaller scale to
display these individually.
Traffic light failure
Roadwork
General traffic obstruction
Transport of hazardous load
Vehicle on wrong carriage way
Danger
Low clearance
No parking
Fog
Heavy rain
Slippery road
Cross winds
Smog
Road closed
Slow traffic
Traffic back up
Stopped traffic
Icy roads
Uneven surface
Accident
Lane closure
Delay
Police checkpoint
Slow traffic or other traffic event
Stop-and-go traffic
Stopped traffic
Traffic event in bo th directions of
travel
Page 171 of 317
Navigation
Driving tips
169Reference
At a glance
Controls
Communications
Entertainment
Mobility
Traffic information during destination
guidance
If there are traffic obstructions on the planned
route, the traffic information symbols are dis-
played with a red border.
System response will vary depending on
whether or not "Dynamic route" is selected,
refer to page 160.
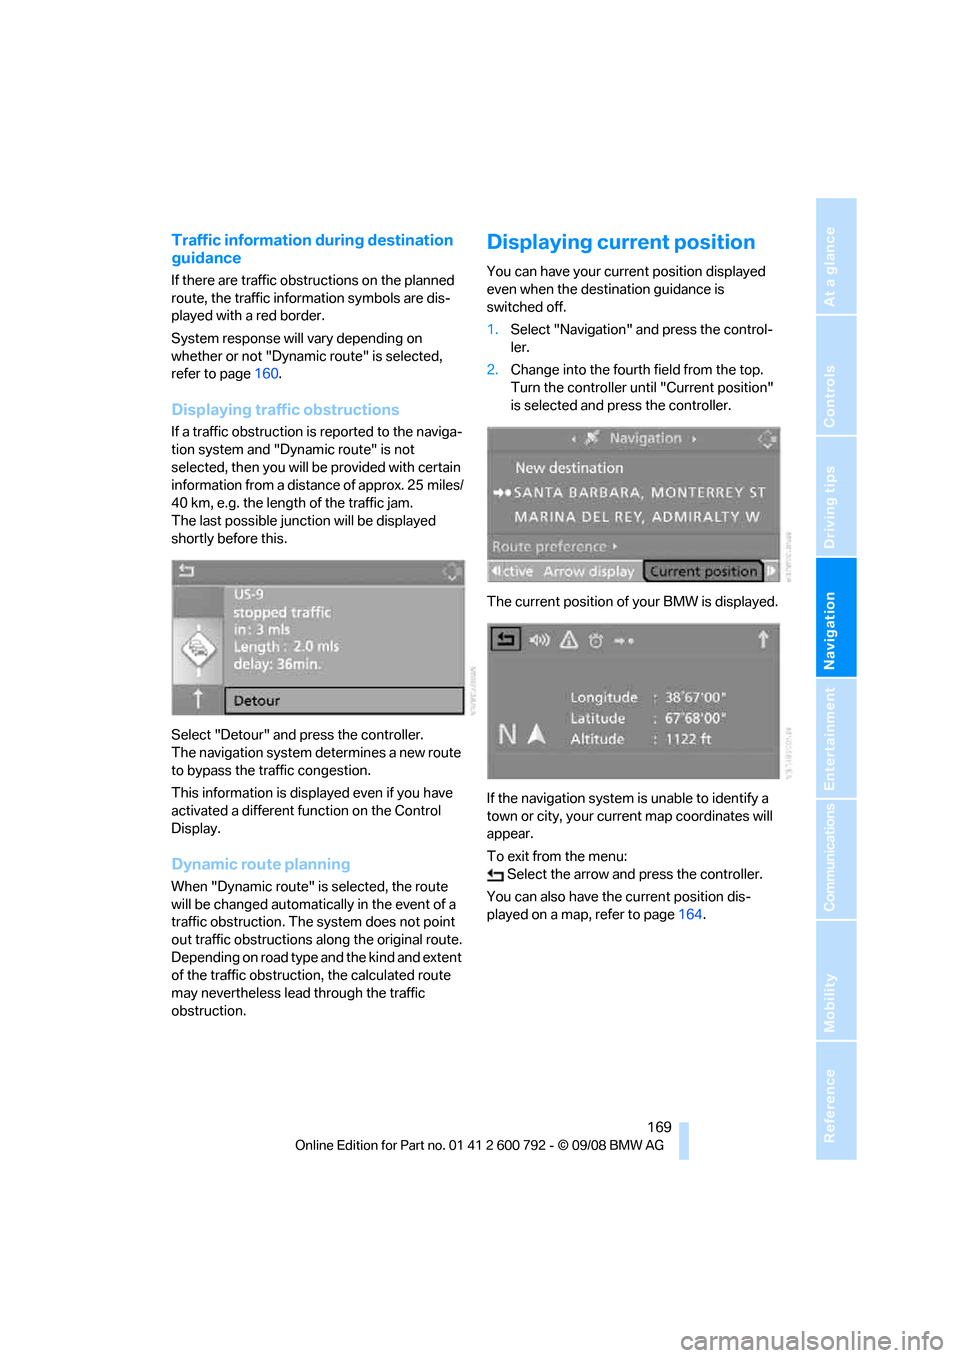
Displaying traffic obstructions
If a traffic obstruction is reported to the naviga-
tion system and "Dynamic route" is not
selected, then you will be provided with certain
information from a distance of approx. 25 miles/
40 km, e.g. the length of the traffic jam.
The last possible junction will be displayed
shortly before this.
Select "Detour" and press the controller.
The navigation system determines a new route
to bypass the traffic congestion.
This information is disp layed even if you have
activated a different fu nction on the Control
Display.
Dynamic route planning
When "Dynamic route" is selected, the route
will be changed automatica lly in the event of a
traffic obstruction. The system does not point
out traffic obstructions along the original route.
Depending on road type and the kind and extent
of the traffic obstruction, the calculated route
may nevertheless lead through the traffic
obstruction.
Displaying current position
You can have your current position displayed
even when the destination guidance is
switched off.
1. Select "Navigation" and press the control-
ler.
2. Change into the fourth field from the top.
Turn the controller until "Current position"
is selected and pr ess the controller.
The current position of your BMW is displayed.
If the navigation system is unable to identify a
town or city, your current map coordinates will
appear.
To exit from the menu: Select the arrow an d press the controller.
You can also have the current position dis-
played on a map, refer to page 164.
Page 172 of 317
What to do if …
170
What to do if …
What to do if …
>a navigation DVD is inserted, but an instruc-
tion to insert the DVD appears on the Con-
trol Display?
The navigation DVD ma y not be the correct
DVD for the navigation system. This infor-
mation is indicated on the DVD label.
> you request the current position of your
vehicle, but do not receive a precise dis-
play?
The system is unable to receive enough
GPS signals at your cu rrent position due to
obstructions, your position is not yet avail-
able on your navigation DVD, or the system
is in the process of calculating your posi-
tion. Reception is best when you have an
unobstructed view to the sky.
> the destination guidance does not accept a
destination?
The data of the destination is not stored on
the navigation DVD that is loaded. Select a
destination that is as close as possible to
the original.
> the destination guidance does not accept
an address without the street name?
On the navigation DVD, no downtown area
can be determined fo r the city or town
entered. Enter any street, or a destination
such as the railway st ation in the selected
town, and then start the destination guid-
ance.
> you want to enter a de stination for the des-
tination guidance, but it is not possible to
select the letters fo r your desired entry?
The data of the destination is not stored on
the navigation DVD that is loaded. In this
case, the system will not offer you any let-
ters to choose from. Select a destination
that is as close as possible to the original. >
the system stops furnishing directions on
which way to turn as you approach intersec-
tions?
You are driving in an area that has not yet
been completely reco rded on the naviga-
tion DVD. Instead of an arrow indicating a
turn, you will see an arrow which indicates
the general direction of your planned route.
Or you have left the recommended route
and the system requires a few seconds to
calculate a new recommended route.
> the navigation system does not react to
entries?
If the battery was disconnected, it takes
about 10 minutes before the system is once
again operational.
Page 177 of 317
Navigation
Entertainment
Driving tips
175Reference
At a glance
Controls
Communications
Mobility
You have the following choices:
>"FM" and "AM": radio reception
> "WB": Weather Band station
> "SAT": satellite radio
*
>"CD": CD player or changer*
>"AUX": AUX-In connection, USB audio
interface
*
>"Set": depending on the audio source,
other adjustments can be made, e.g. with
the radio: update st ation with strongest
reception, store station, tone control, sam-
ple stations.
From another menu, you can change
directly to the scr een last displayed,
refer to Comfort opening of menu items,
page 18.<
From radio readiness, the selected audio
source is stored for the remote control currently
in use.
Switching on/off
To switch the Entertainment sound output on
and off:
Press knob 1 on the CD player.
This symbol on the Control Display indi-
cates that sound output is switched off.
For equipment with a single drive, the sound
output is available for approx. 20 minutes with
the ignition switched off.
Switch on the sound output again for this pur-
pose.
Adjusting volume
Turn knob 1 on the CD player until the desired
volume is set.
You can also adjust the volume with buttons on
the steering wheel, refer to page 11.
From radio readiness, the setting is stored for
the remote control currently in use.
Tone control
You can alter various tone settings, e.g. treble
and bass, or the speed-dependent volume
increase.
The tone settings are set for all audio sources at
once.
From radio readiness, the settings are stored
for the remote contro l currently in use.
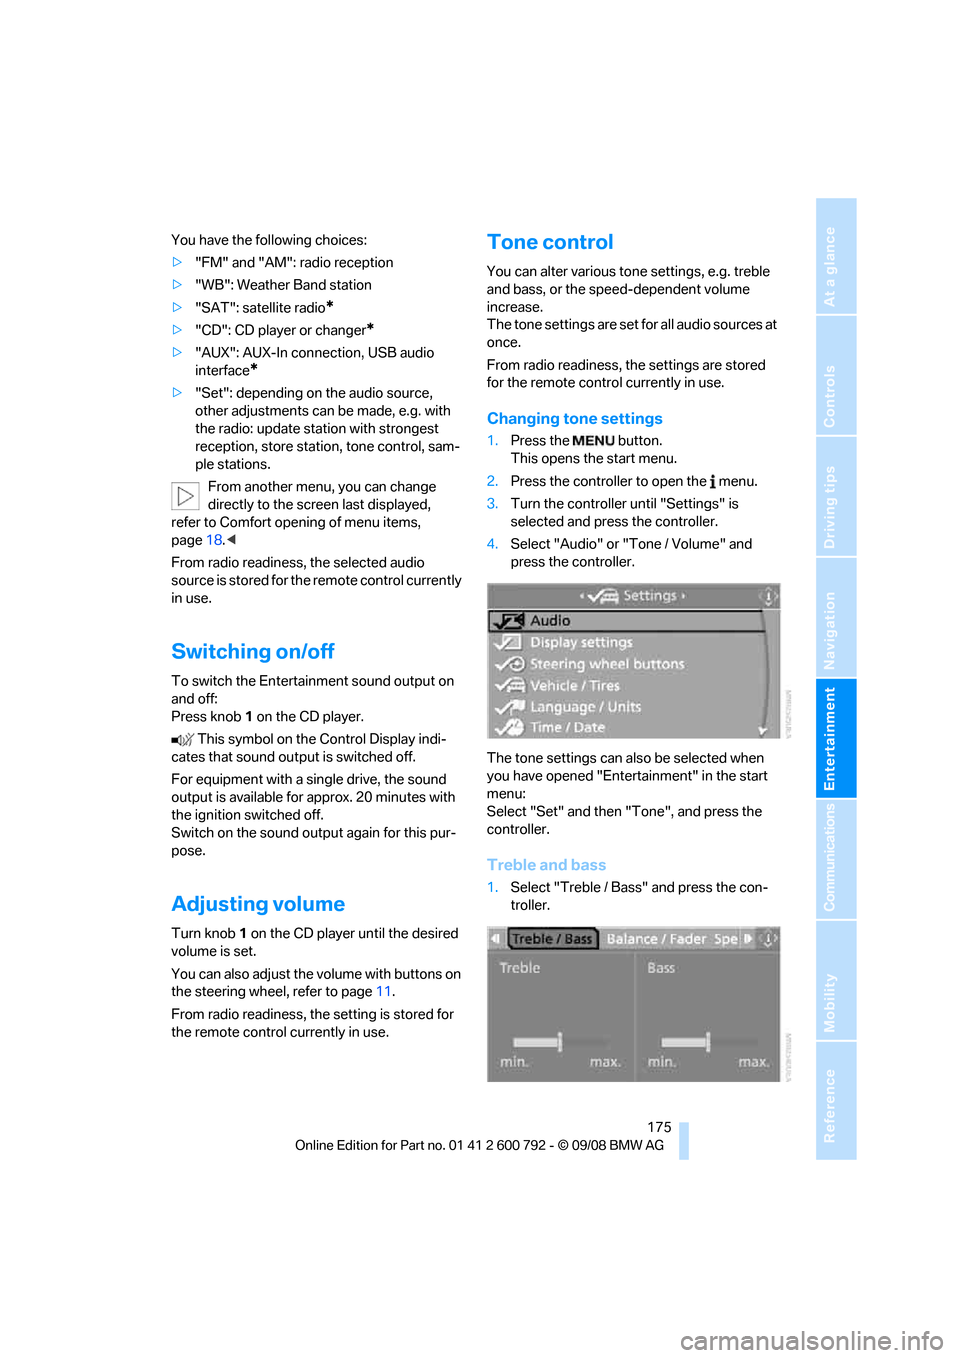
Changing tone settings
1.Press the button.
This opens the start menu.
2. Press the controller to open the menu.
3. Turn the controller until "Settings" is
selected and press the controller.
4. Select "Audio" or "Tone / Volume" and
press the controller.
The tone settings can also be selected when
you have opened "Entertainment" in the start
menu:
Select "Set" and then "Tone", and press the
controller.
Treble and bass
1. Select "Treble / Bass" and press the con-
troller.
Page 180 of 317
Radio
178
Radio
Your radio provides reception of the FM and AM
wavebands.
Listening to radio
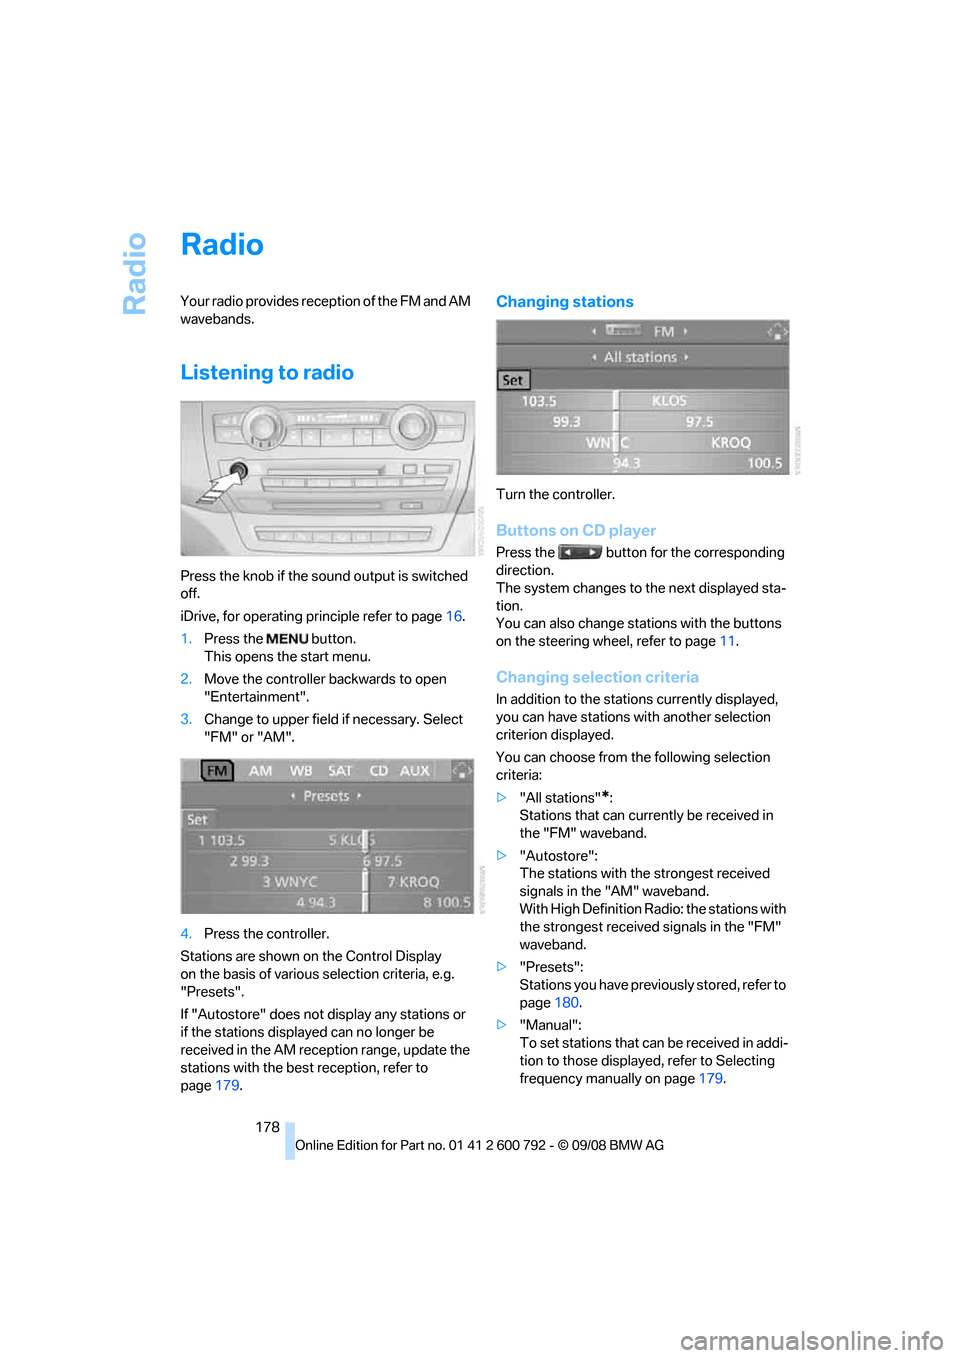
Press the knob if the sound output is switched
off.
iDrive, for operating principle refer to page16.
1. Press the button.
This opens the start menu.
2. Move the controller backwards to open
"Entertainment".
3. Change to upper field if necessary. Select
"FM" or "AM".
4. Press the controller.
Stations are shown on the Control Display
on the basis of various selection criteria, e.g.
"Presets".
If "Autostore" does not display any stations or
if the stations displayed can no longer be
received in the AM reception range, update the
stations with the best reception, refer to
page 179.
Changing stations
Turn the controller.
Buttons on CD player
Press the button for the corresponding
direction.
The system changes to the next displayed sta-
tion.
You can also change stat ions with the buttons
on the steering wheel, refer to page 11.
Changing selection criteria
In addition to the stations currently displayed,
you can have stations with another selection
criterion displayed.
You can choose from the following selection
criteria:
> "All stations"
*:
Stations that can currently be received in
the "FM" waveband.
> "Autostore":
The stations with the strongest received
signals in the "AM" waveband.
With High Definition Radio: the stations with
the strongest received signals in the "FM"
waveband.
> "Presets":
Stations you have previously stored, refer to
page 180.
> "Manual":
To set stations that ca n be received in addi-
tion to those displayed, refer to Selecting
frequency manually on page 179.
Page 181 of 317
Navigation
Entertainment
Driving tips
179Reference
At a glance
Controls
Communications
Mobility
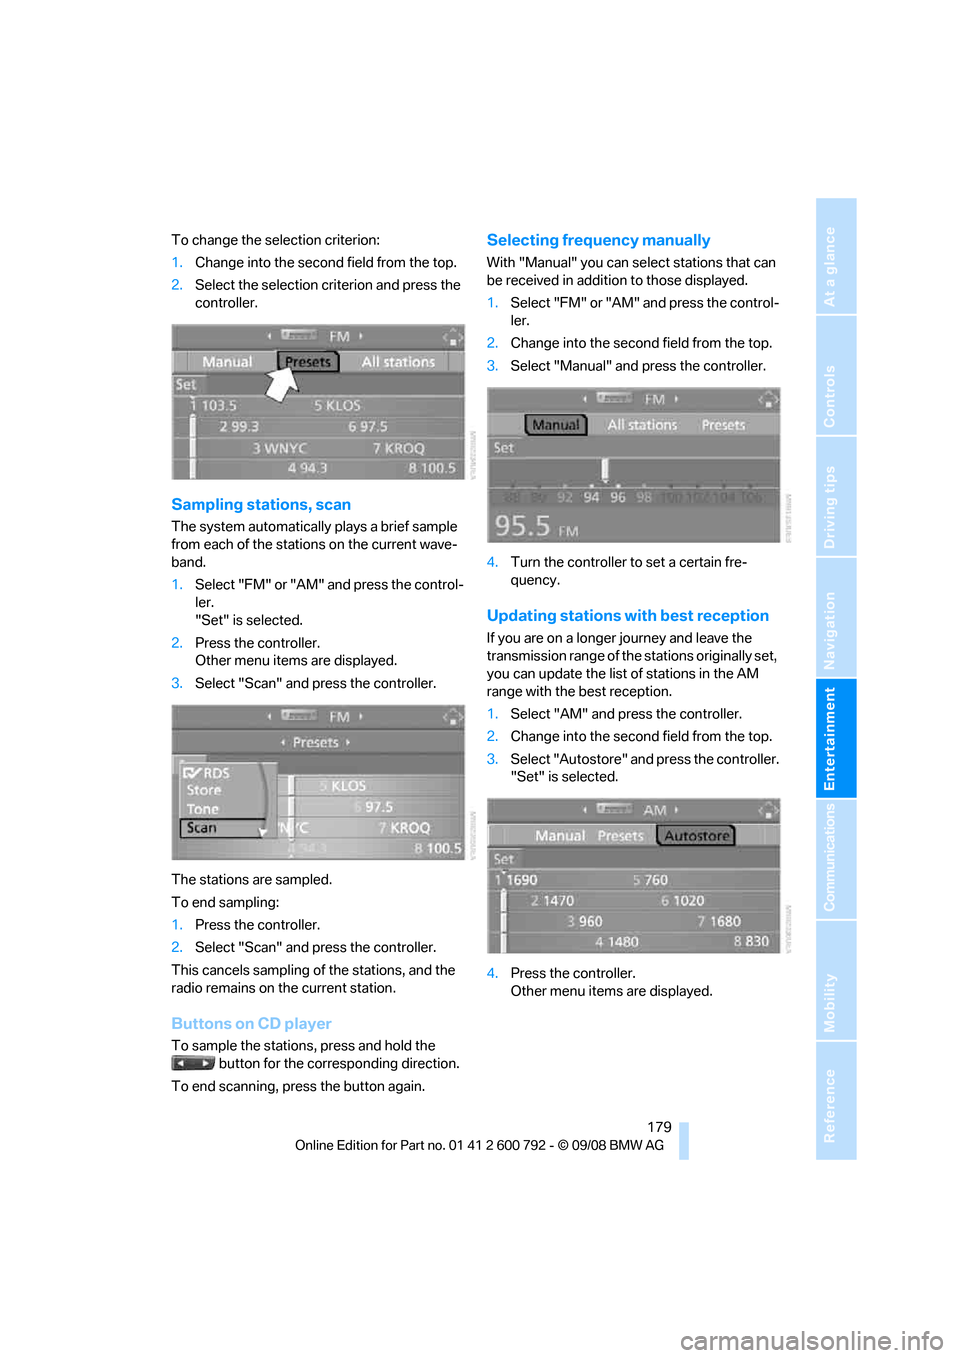
To change the selection criterion:
1.Change into the second field from the top.
2. Select the selection criterion and press the
controller.
Sampling stations, scan
The system automatically plays a brief sample
from each of the stations on the current wave-
band.
1.Select "FM" or "AM" and press the control-
ler.
"Set" is selected.
2. Press the controller.
Other menu items are displayed.
3. Select "Scan" and press the controller.
The stations are sampled.
To end sampling:
1. Press the controller.
2. Select "Scan" and press the controller.
This cancels sampling of the stations, and the
radio remains on the current station.
Buttons on CD player
To sample the stations, press and hold the button for the corresponding direction.
To end scanning, press the button again.
Selecting frequency manually
With "Manual" you can se lect stations that can
be received in additi on to those displayed.
1. Select "FM" or "AM" and press the control-
ler.
2. Change into the second field from the top.
3. Select "Manual" and press the controller.
4. Turn the controller to set a certain fre-
quency.
Updating stations with best reception
If you are on a longer journey and leave the
transmission range of the stations originally set,
you can update the list of stations in the AM
range with the best reception.
1.Select "AM" and pr ess the controller.
2. Change into the second field from the top.
3. Select "Autostore" and press the controller.
"Set" is selected.
4. Press the controller.
Other menu items are displayed.
Page 182 of 317
Radio
180
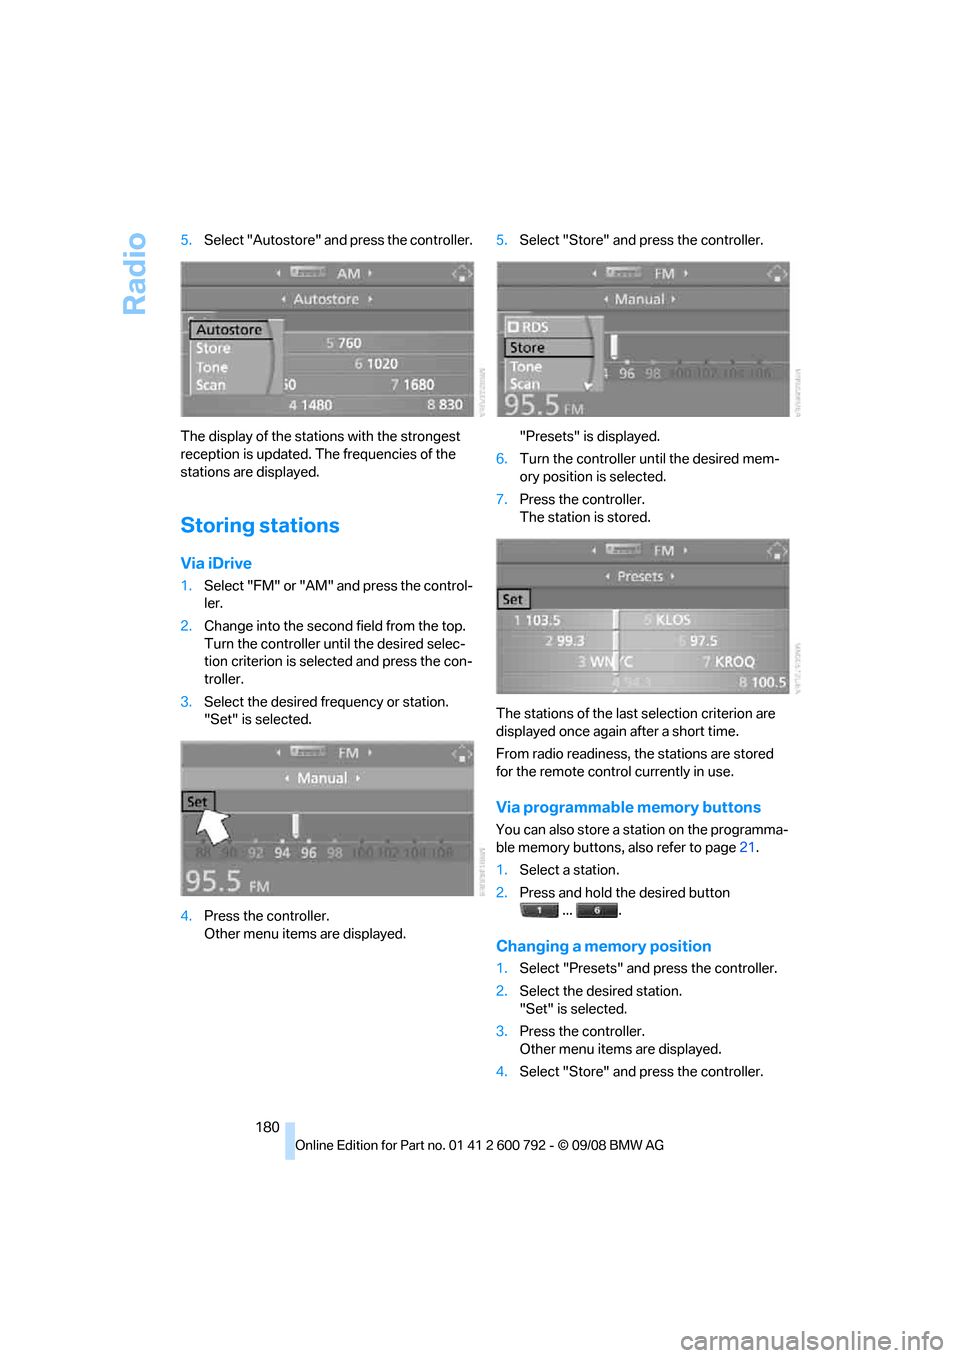
5.
Select "Autostore" and press the controller.
The display of the stations with the strongest
reception is updated. The frequencies of the
stations are displayed.
Storing stations
Via iDrive
1. Select "FM" or "AM" and press the control-
ler.
2. Change into the second field from the top.
Turn the controller until the desired selec-
tion criterion is selected and press the con-
troller.
3. Select the desired frequency or station.
"Set" is selected.
4. Press the controller.
Other menu items are displayed. 5.
Select "Store" and press the controller.
"Presets" is displayed.
6. Turn the controller until the desired mem-
ory position is selected.
7. Press the controller.
The station is stored.
The stations of the last selection criterion are
displayed once again after a short time.
From radio readiness, the stations are stored
for the remote control currently in use.
Via programmable memory buttons
You can also store a station on the programma-
ble memory buttons, also refer to page21.
1. Select a station.
2. Press and hold the desired button
... .
Changing a memory position
1.Select "Presets" and press the controller.
2. Select the desired station.
"Set" is selected.
3. Press the controller.
Other menu items are displayed.
4. Select "Store" and press the controller.
Page 183 of 317
Navigation
Entertainment
Driving tips
181Reference
At a glance
Controls
Communications
Mobility
5.Turn the controller until the desired mem-
ory position is selected.
The number of the memory position
appears beside the na me or frequency of
the station.
6. Press the controller.
The station is stored.
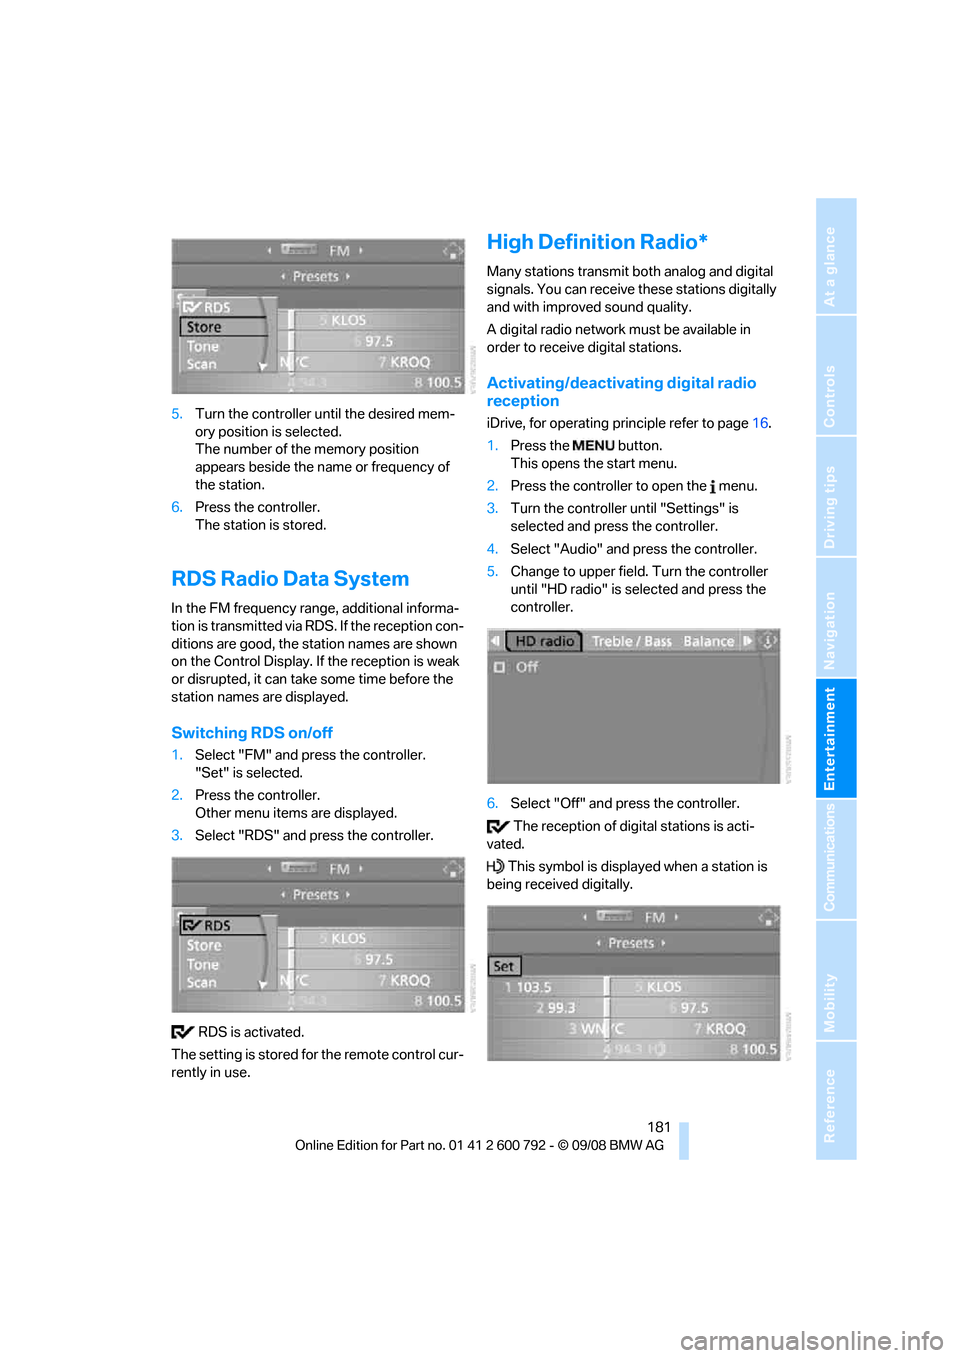
RDS Radio Data System
In the FM frequency range, additional informa-
tion is transmitted via RDS. If the reception con-
ditions are good, the station names are shown
on the Control Display. If the reception is weak
or disrupted, it can take some time before the
station names are displayed.
Switching RDS on/off
1. Select "FM" and press the controller.
"Set" is selected.
2. Press the controller.
Other menu items are displayed.
3. Select "RDS" and press the controller.
RDS is activated.
The setting is stored for the remote control cur-
rently in use.
High Definition Radio*
Many stations transmit both analog and digital
signals. You can receive these stations digitally
and with improved sound quality.
A digital radio network must be available in
order to receive digital stations.
Activating/deactivating digital radio
reception
iDrive, for operating pr inciple refer to page16.
1. Press the button.
This opens the start menu.
2. Press the controller to open the menu.
3. Turn the controller until "Settings" is
selected and press the controller.
4. Select "Audio" and press the controller.
5. Change to upper field. Turn the controller
until "HD radio" is se lected and press the
controller.
6. Select "Off" and press the controller.
The reception of digital stations is acti-
vated.
This symbol is displa yed when a station is
being received digitally.
Page 184 of 317
Radio
182
With some stations the
digital signals are not
transmitted simultaneously with the analog sig-
nals. If you are in an ar ea in which the selected
station is not continuous ly received digitally,
playback changes betwee n analog and digital
reception. This can result in repetitions or inter-
ruptions. In this case it may be advisable to
deactivate digital radio reception.
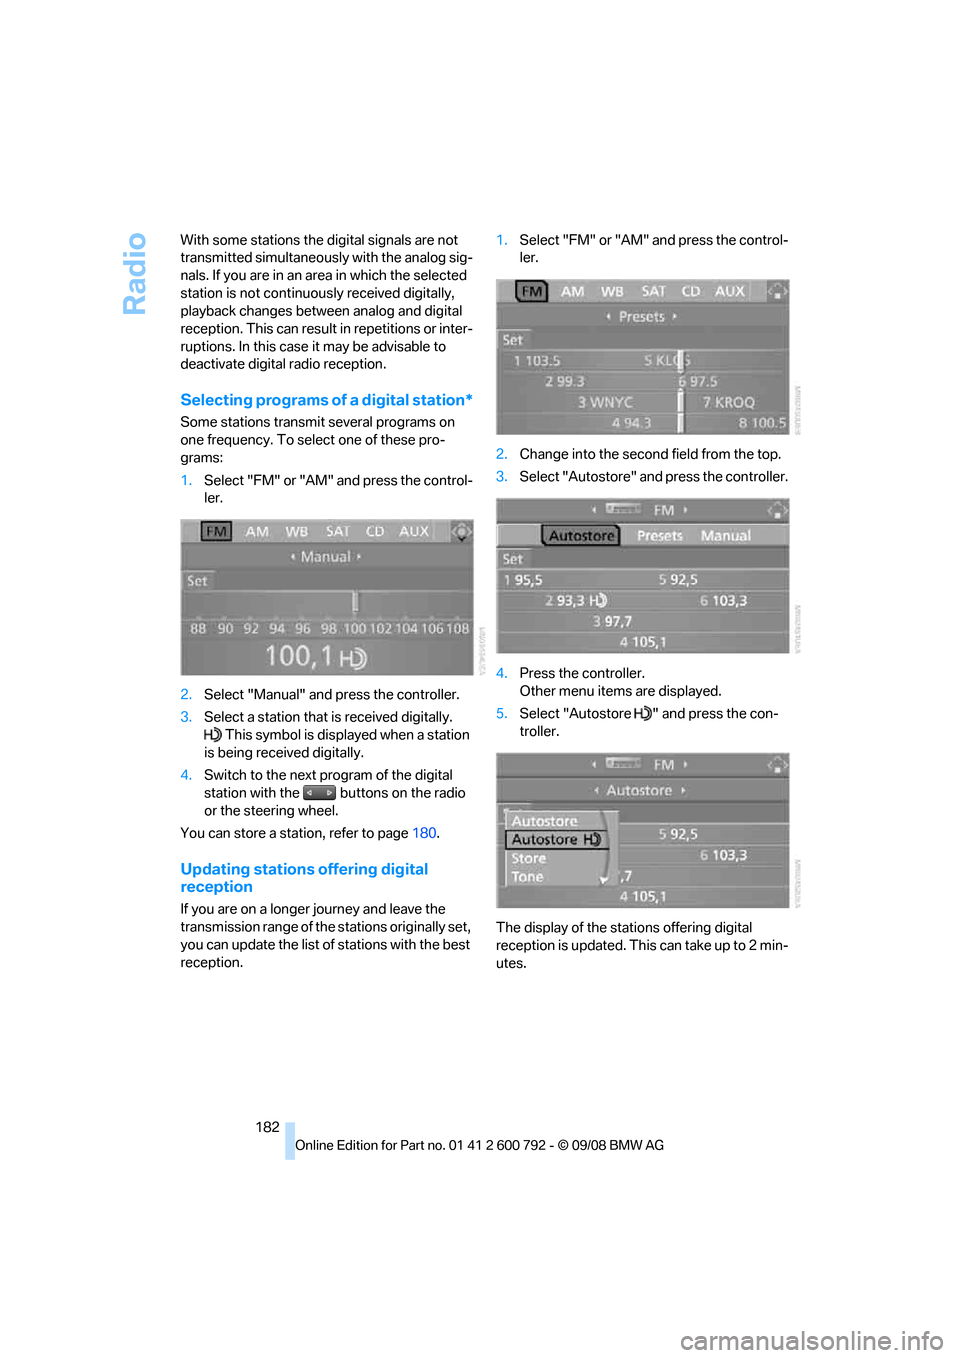
Selecting programs of a digital station*
Some stations transmit several programs on
one frequency. To select one of these pro-
grams:
1. Select "FM" or "AM" and press the control-
ler.
2. Select "Manual" and press the controller.
3. Select a station that is received digitally.
This symbol is displayed when a station
is being received digitally.
4. Switch to the next program of the digital
station with the buttons on the radio
or the steering wheel.
You can store a station, refer to page 180.
Updating stations offering digital
reception
If you are on a longer journey and leave the
transmission range of the stations originally set,
you can update the list of stations with the best
reception. 1.
Select "FM" or "AM" and press the control-
ler.
2. Change into the second field from the top.
3. Select "Autostore" and press the controller.
4. Press the controller.
Other menu items are displayed.
5. Select "Autostore " and press the con-
troller.
The display of the stations offering digital
reception is updated. This can take up to 2 min-
utes.
Page 185 of 317
Navigation
Entertainment
Driving tips
183Reference
At a glance
Controls
Communications
Mobility
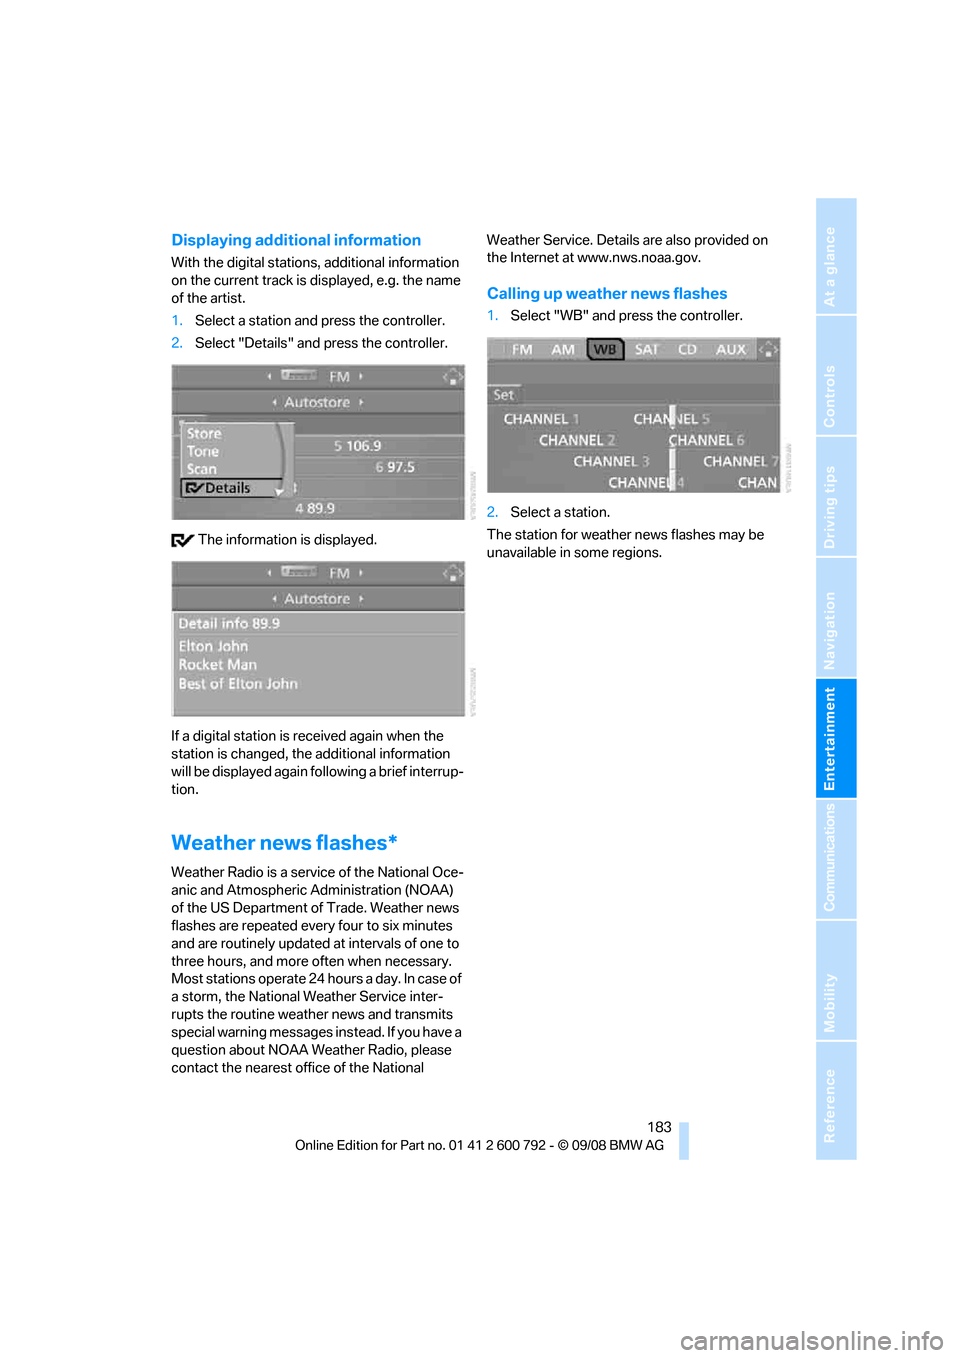
Displaying additional information
With the digital stations, additional information
on the current track is displayed, e.g. the name
of the artist.
1. Select a station and press the controller.
2. Select "Details" and press the controller.
The information is displayed.
If a digital station is received again when the
station is changed, the additional information
will be displayed again following a brief interrup-
tion.
Weather news flashes*
Weather Radio is a service of the National Oce-
anic and Atmospheric Administration (NOAA)
of the US Department of Trade. Weather news
flashes are repeated every four to six minutes
and are routinely updated at intervals of one to
three hours, and more often when necessary.
Most stations operate 24 ho urs a day. In case of
a storm, the National Weather Service inter-
rupts the routine weather news and transmits
special warning messages in stead. If you have a
question about NOAA Weather Radio, please
contact the nearest offi ce of the National Weather Service. Details are also provided on
the Internet at www.nws.noaa.gov.
Calling up weather news flashes
1.
Select "WB" and press the controller.
2. Select a station.
The station for weather news flashes may be
unavailable in some regions.