Compartment BMW X5 2009 E70 Owner's Manual
[x] Cancel search | Manufacturer: BMW, Model Year: 2009, Model line: X5, Model: BMW X5 2009 E70Pages: 317, PDF Size: 9.56 MB
Page 17 of 317
At a glance
15Reference
Controls
Driving tips
Communications
Navigation
Entertainment
Mobility
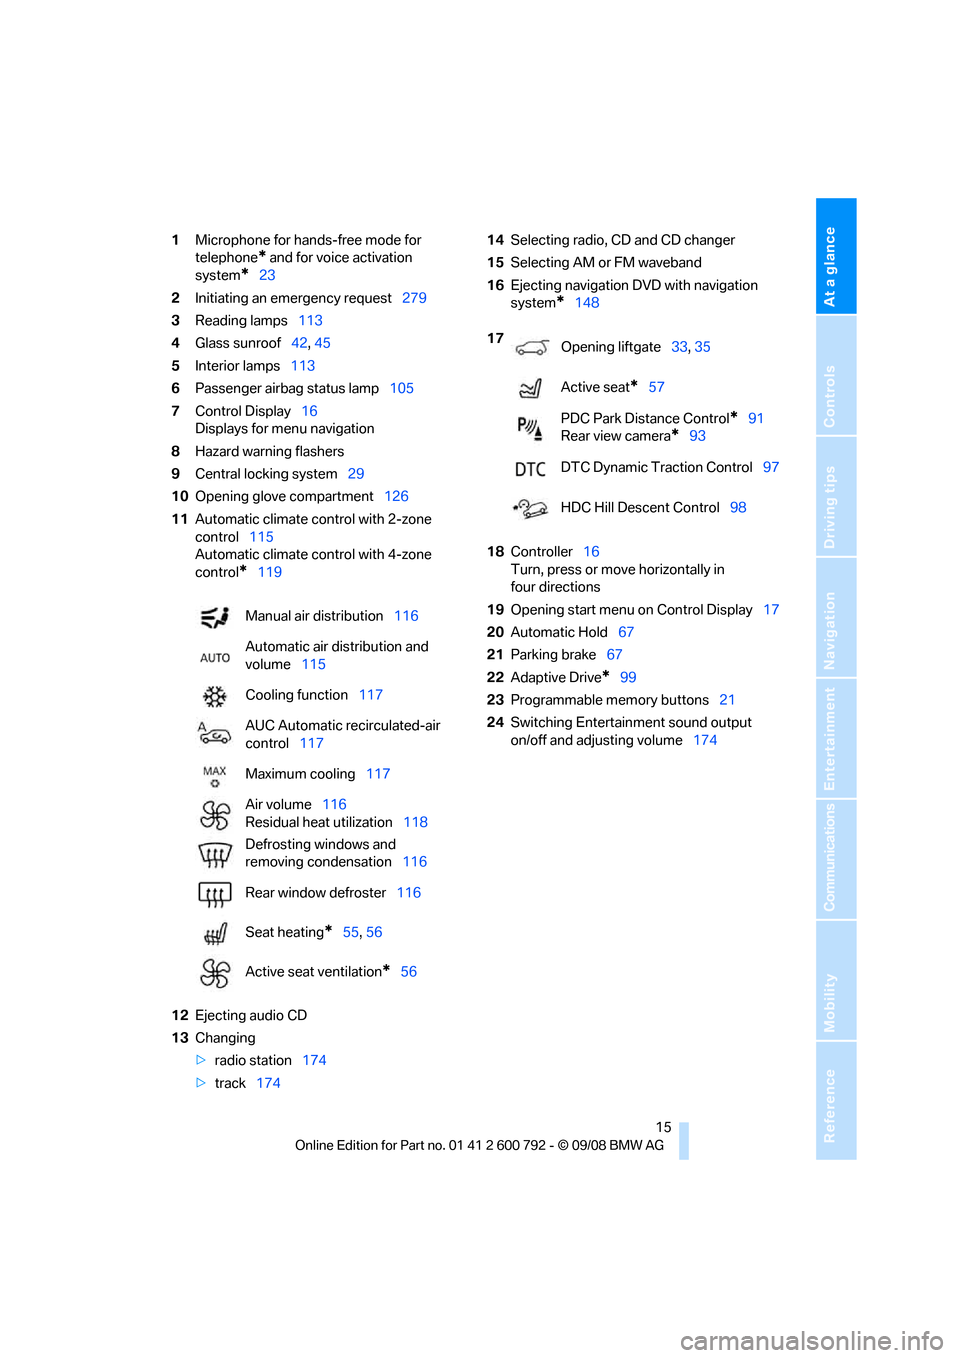
1Microphone for hands-free mode for
telephone
* and for voice activation
system
*23
2 Initiating
an emergency request 279
3 Reading lamps 113
4 Glass sunroof 42, 45
5 Interior lamps 113
6 Passenger airbag status lamp 105
7 Control Display 16
Displays for menu navigation
8 Hazard warning flashers
9 Central locking system 29
10 Opening glove compartment 126
11 Automatic climate control with 2-zone
control 115
Automatic climate control with 4-zone
control
*119
12 Ejecting audio CD
13 Changing
>radio station 174
> track 174 14
Selecting radio, CD and CD changer
15 Selecting AM or FM waveband
16 Ejecting navigation DVD with navigation
system
*148
18 Controller 16
Turn, press or move horizontally in
four directions
19 Opening start menu on Control Display 17
20 Automatic Hold 67
21 Parking brake 67
22 Adaptive Drive
*99
23 Programmable memory buttons 21
24 Switching Entertainment sound output
on/off and adjusting volume 174
Manual air distribution
116
Automatic air distribution and
volume 115
Cooling function 117
AUC Automatic recirculated-air
control 117
Maximum cooling 117
Air volume 116
Residual heat utilization 118
Defrosting windows and
removing condensation 116
Rear window defroster 116
Seat heating
*55, 56
Active seat ventilation
*56
17 Opening liftgate 33, 35
Active seat
*57
PDC Park Distance Control
*91
Rear view camera
*93
DTC Dynamic Traction Control 97
HDC Hill Descent Control 98
Page 23 of 317
At a glance
21Reference
Controls
Driving tips
Communications
Navigation
Entertainment
Mobility
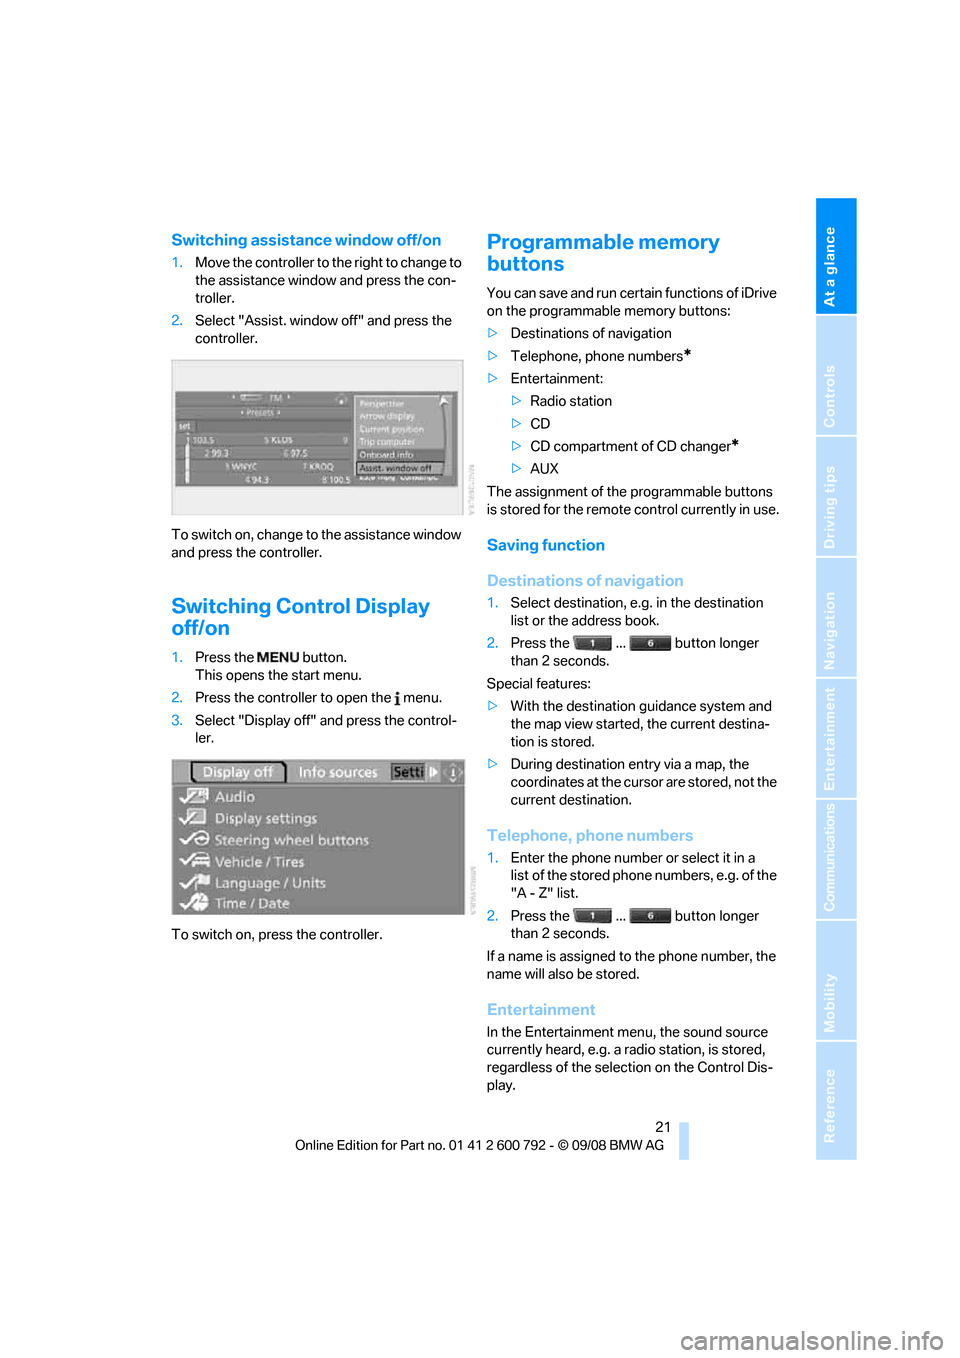
Switching assistance window off/on
1.Move the controller to th e right to change to
the assistance window and press the con-
troller.
2. Select "Assist. window off" and press the
controller.
To switch on, change to the assistance window
and press the controller.
Switching Control Display
off/on
1. Press the button.
This opens the start menu.
2. Press the controller to open the menu.
3. Select "Display off" and press the control-
ler.
To switch on, press the controller.
Programmable memory
buttons
You can save and run certain functions of iDrive
on the programmable memory buttons:
> Destinations of navigation
> Telephone, phone numbers
*
>Entertainment:
>Radio station
> CD
> CD compartment of CD changer
*
>AUX
The assignment of the programmable buttons
is stored for the remote control currently in use.
Saving function
Destinations of navigation
1. Select destination, e.g. in the destination
list or the address book.
2. Press the ... button longer
than 2 seconds.
Special features:
> With the destination guidance system and
the map view started, the current destina-
tion is stored.
> During destination entry via a map, the
coordinates at the cursor are stored, not the
current destination.
Telephone, phone numbers
1.Enter the phone number or select it in a
list of the stored phone numbers, e.g. of the
"A - Z" list.
2. Press the ... button longer
than 2 seconds.
If a name is assigned to the phone number, the
name will also be stored.
Entertainment
In the Entertainment menu, the sound source
currently heard, e.g. a radio station, is stored,
regardless of the selection on the Control Dis-
play.
Page 45 of 317
Controls
43Reference
At a glance
Driving tips
Communications
Navigation
Entertainment
Mobility
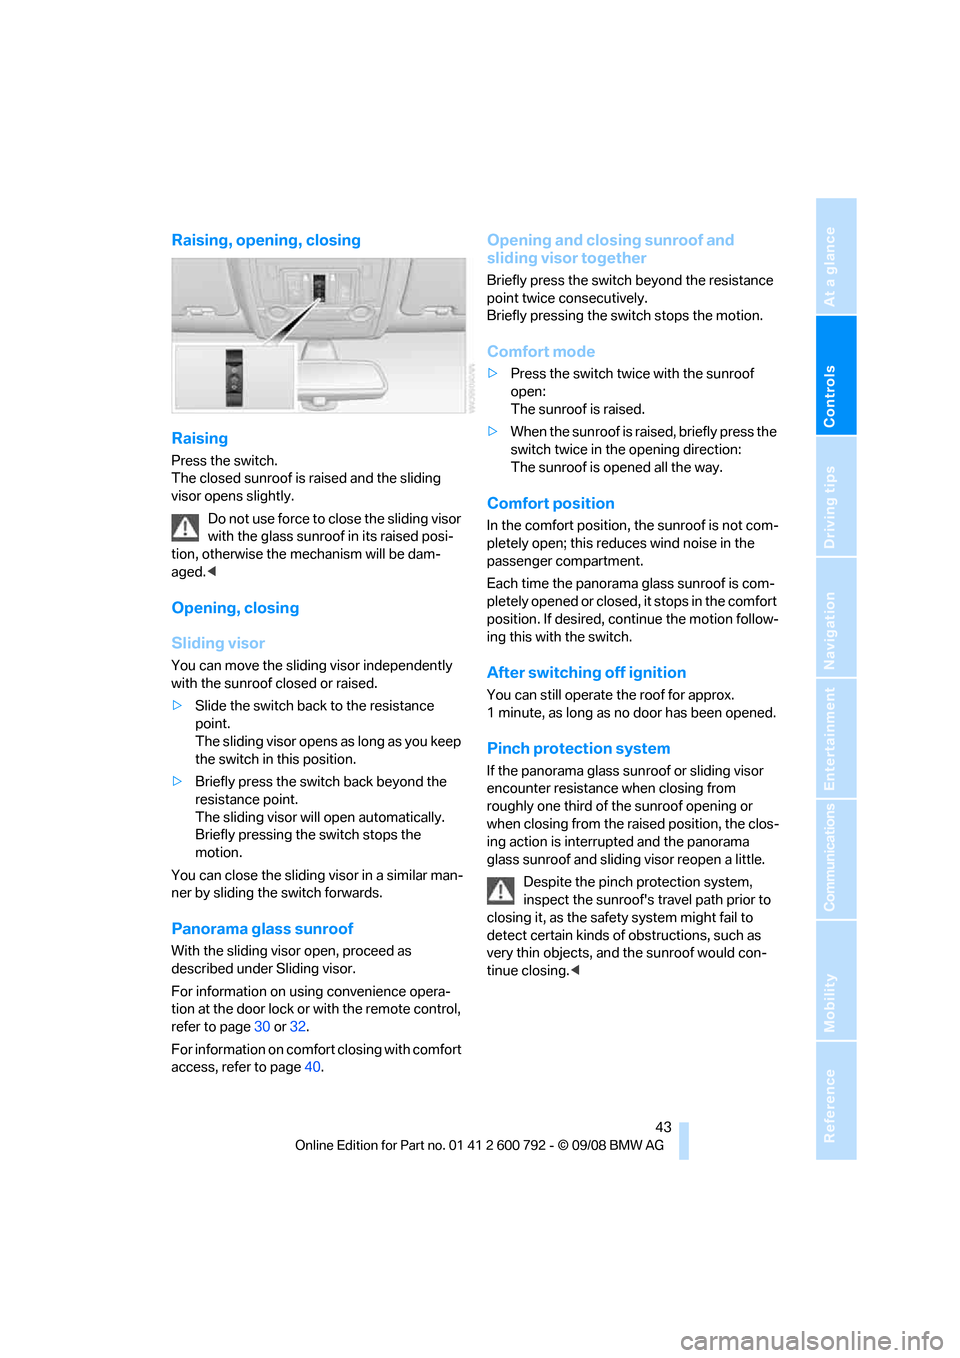
Raising, opening, closing
Raising
Press the switch.
The closed sunroof is raised and the sliding
visor opens slightly.Do not use force to close the sliding visor
with the glass sunroof in its raised posi-
tion, otherwise the mechanism will be dam-
aged. <
Opening, closing
Sliding visor
You can move the sliding visor independently
with the sunroof closed or raised.
>Slide the switch back to the resistance
point.
The sliding visor opens as long as you keep
the switch in this position.
> Briefly press the switch back beyond the
resistance point.
The sliding visor will open automatically.
Briefly pressing the switch stops the
motion.
You can close the sliding visor in a similar man-
ner by sliding the switch forwards.
Panorama glass sunroof
With the sliding visor open, proceed as
described under Sliding visor.
For information on using convenience opera-
tion at the door lock or with the remote control,
refer to page 30 or32.
For information on comfort closing with comfort
access, refer to page 40.
Opening and closing sunroof and
sliding visor together
Briefly press the switch beyond the resistance
point twice consecutively.
Briefly pressing the switch stops the motion.
Comfort mode
>Press the switch twice with the sunroof
open:
The sunroof is raised.
> When the sunroof is raised, briefly press the
switch twice in the opening direction:
The sunroof is opened all the way.
Comfort position
In the comfort position, the sunroof is not com-
pletely open; this reduces wind noise in the
passenger compartment.
Each time the panorama glass sunroof is com-
pletely opened or closed, it stops in the comfort
position. If desired, co ntinue the motion follow-
ing this with the switch.
After switching off ignition
You can still operate the roof for approx.
1 minute, as long as no door has been opened.
Pinch protection system
If the panorama glass su nroof or sliding visor
encounter resistance when closing from
roughly one third of the sunroof opening or
when closing from the raised position, the clos-
ing action is interrupted and the panorama
glass sunroof and slidin g visor reopen a little.
Despite the pinch protection system,
inspect the sunroof's tr avel path prior to
closing it, as the safety system might fail to
detect certain kinds of obstructions, such as
very thin objects, an d the sunroof would con-
tinue closing. <
Page 47 of 317
Controls
45Reference
At a glance
Driving tips
Communications
Navigation
Entertainment
Mobility
BMW X6: glass sunroof*,
electric
The glass sunroof is ready for operation when
the ignition is switched on, refer to page65.
To prevent injuries, exercise care when
closing the glass sunroof and keep it in
your field of vision until it is closed.
Always take along the remote control when you
leave the vehicle, otherw ise children could, for
example, operate the roof and injure them-
selves. <
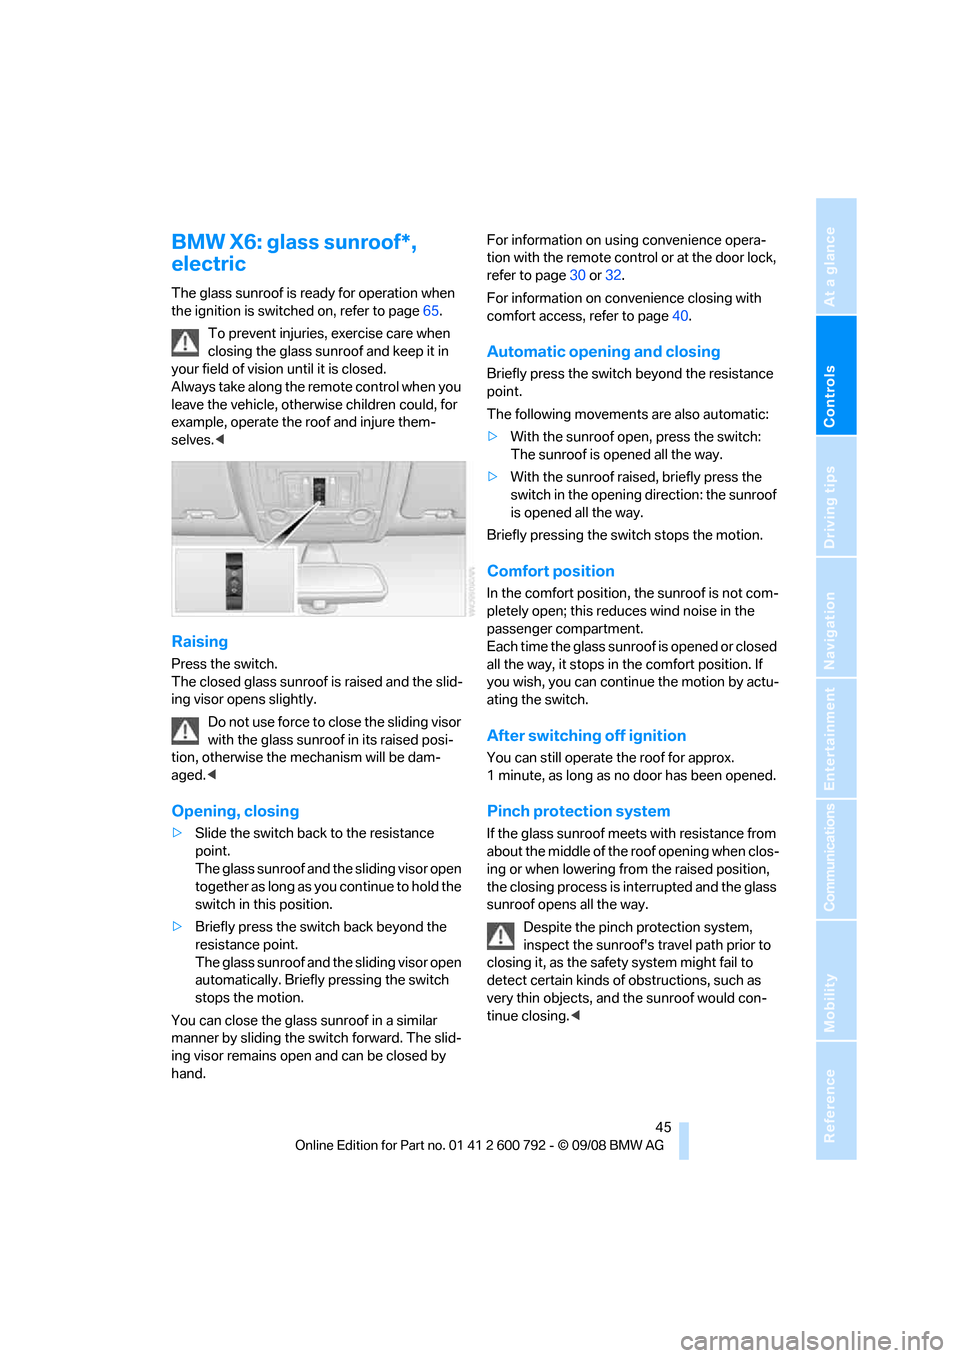
Raising
Press the switch.
The closed glass sunroof is raised and the slid-
ing visor opens slightly.
Do not use force to close the sliding visor
with the glass sunroof in its raised posi-
tion, otherwise the mechanism will be dam-
aged. <
Opening, closing
>Slide the switch back to the resistance
point.
The glass sunroof and the sliding visor open
together as long as yo u continue to hold the
switch in this position.
> Briefly press the switch back beyond the
resistance point.
The glass sunroof and the sliding visor open
automatically. Briefly pressing the switch
stops the motion.
You can close the glass sunroof in a similar
manner by sliding the swit ch forward. The slid-
ing visor remains open and can be closed by
hand. For information on using convenience opera-
tion with the remote cont
rol or at the door lock,
refer to page 30 or 32.
For information on convenience closing with
comfort access, refer to page 40.
Automatic opening and closing
Briefly press the switch beyond the resistance
point.
The following movements are also automatic:
>With the sunroof open, press the switch:
The sunroof is opened all the way.
> With the sunroof rais ed, briefly press the
switch in the opening direction: the sunroof
is opened all the way.
Briefly pressing the switch stops the motion.
Comfort position
In the comfort position, the sunroof is not com-
pletely open; this reduces wind noise in the
passenger compartment.
Each time the glass sunroof is opened or closed
all the way, it stops in the comfort position. If
you wish, you can continue the motion by actu-
ating the switch.
After switching off ignition
You can still operate the roof for approx.
1 minute, as long as no door has been opened.
Pinch protection system
If the glass sunroof meets with resistance from
about the middle of the roof opening when clos-
ing or when lowering fr om the raised position,
the closing process is interrupted and the glass
sunroof opens all the way.
Despite the pinch protection system,
inspect the sunroof's tr avel path prior to
closing it, as the safety system might fail to
detect certain kinds of obstructions, such as
very thin objects, an d the sunroof would con-
tinue closing. <
Page 56 of 317
Adjusting
54
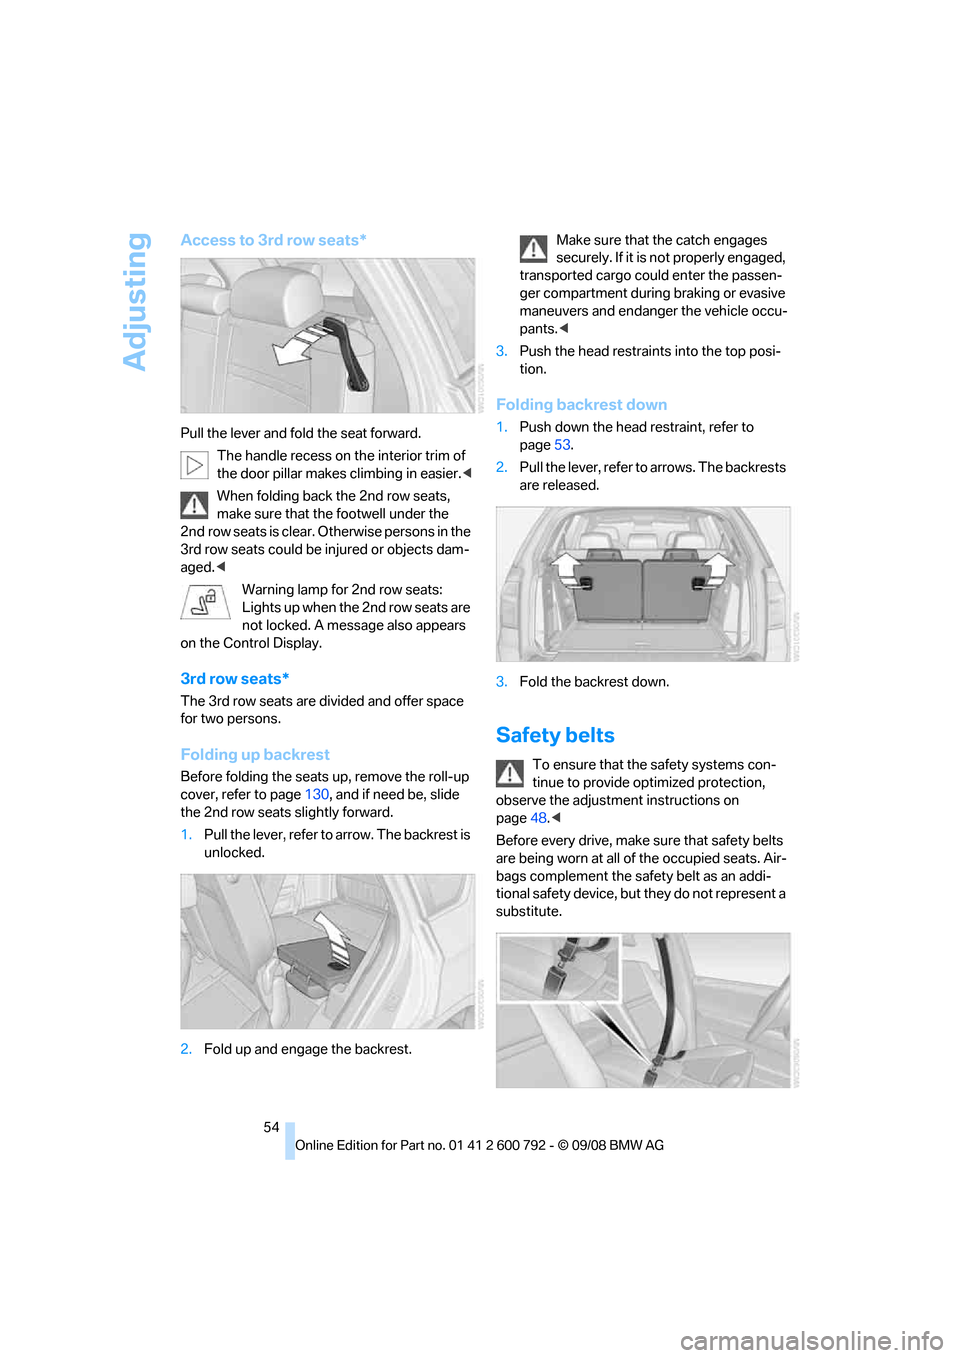
Access to 3rd row seats*
Pull the lever and fold the seat forward.The handle recess on th e interior trim of
the door pillar makes climbing in easier. <
When folding back the 2nd row seats,
make sure that the footwell under the
2nd row seats is clear. Otherwise persons in the
3rd row seats could be injured or objects dam-
aged.<
Warning lamp for 2nd row seats:
Lights up when the 2nd row seats are
not locked. A message also appears
on the Control Display.
3rd row seats*
The 3rd row seats are divided and offer space
for two persons.
Folding up backrest
Before folding the seats up, remove the roll-up
cover, refer to page 130, and if need be, slide
the 2nd row seats slightly forward.
1. Pull the lever, refer to arrow. The backrest is
unlocked.
2. Fold up and engage the backrest. Make sure that the catch engages
securely. If it is no
t properly engaged,
transported cargo could enter the passen-
ger compartment during braking or evasive
maneuvers and endanger the vehicle occu-
pants. <
3. Push the head restraints into the top posi-
tion.
Folding backrest down
1.Push down the head restraint, refer to
page 53.
2. Pull the lever, refer to arrows. The backrests
are released.
3. Fold the backrest down.
Safety belts
To ensure that the safety systems con-
tinue to provide optimized protection,
observe the adjustment instructions on
page 48.<
Before every drive, make sure that safety belts
are being worn at all of the occupied seats. Air-
bags complement the safety belt as an addi-
tional safety device, but they do not represent a
substitute.
Page 117 of 317
Controls
115Reference
At a glance
Driving tips
Communications
Navigation
Entertainment
Mobility
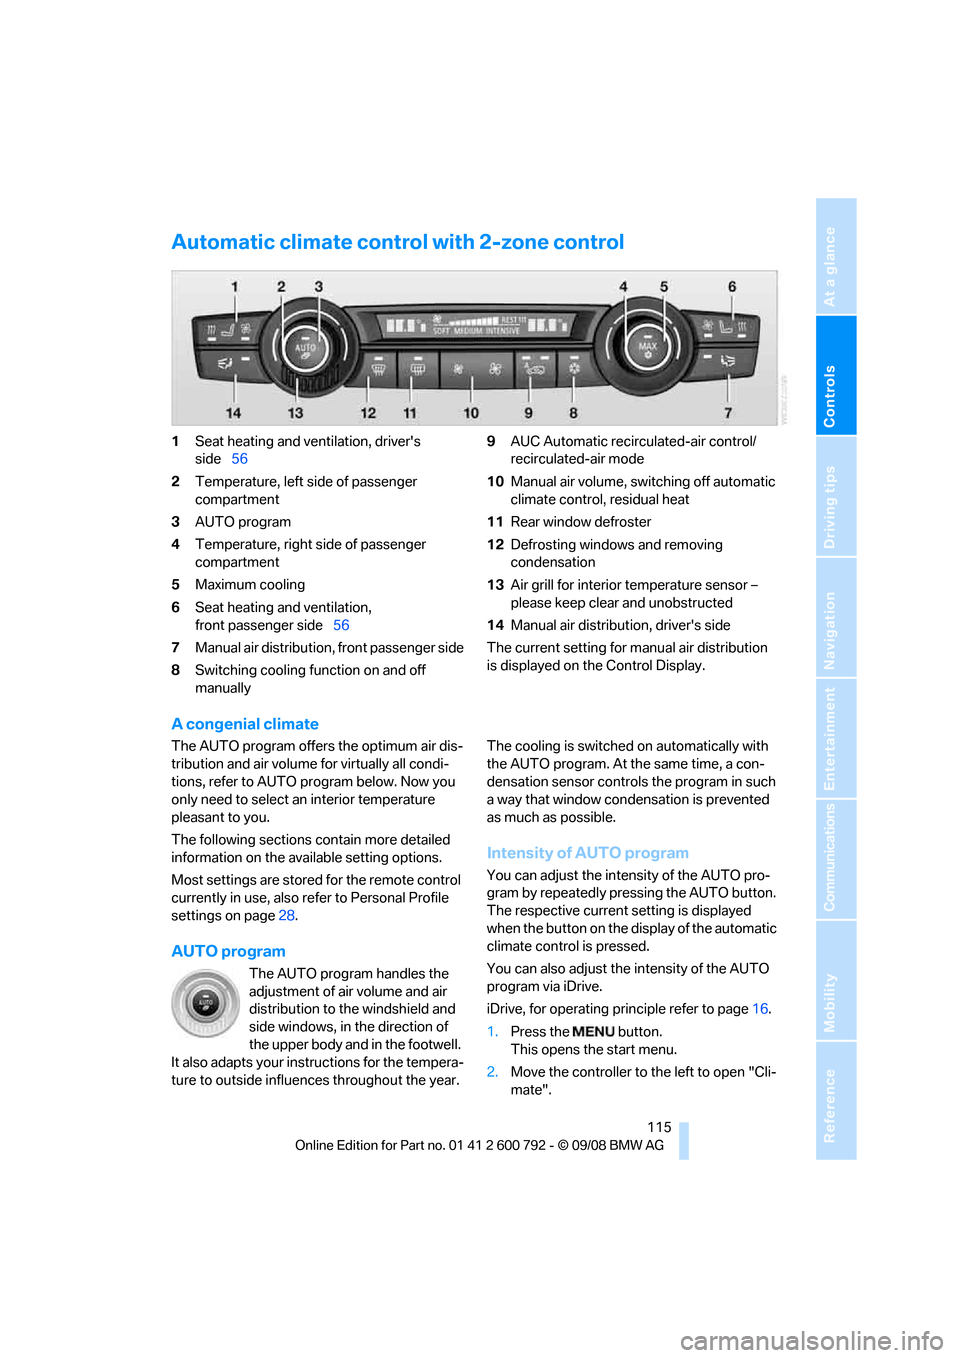
Automatic climate control with 2-zone control
1Seat heating and ventilation, driver's
side 56
2 Temperature, left side of passenger
compartment
3 AUTO program
4 Temperature, right side of passenger
compartment
5 Maximum cooling
6 Seat heating
and ventilation,
front passenger side 56
7 Manual air distribution, front passenger side
8 Switching cooling function on and off
manually 9
AUC Automatic recirculated-air control/
recirculated-air mode
10 Manual air volume, sw itching off automatic
climate control, residual heat
11 Rear window defroster
12 Defrosting windows and removing
condensation
13 Air grill for interior temperature sensor –
please keep clear and unobstructed
14 Manual air distribution, driver's side
The current setting for manual air distribution
is displayed on the Control Display.
A congenial climate
The AUTO program offers the optimum air dis-
tribution and air volume for virtually all condi-
tions, refer to AUTO pr ogram below. Now you
only need to select an interior temperature
pleasant to you.
The following sections contain more detailed
information on the available setting options.
Most settings are stored for the remote control
currently in use, also re fer to Personal Profile
settings on page 28.
AUTO program
The AUTO program handles the
adjustment of air volume and air
distribution to the windshield and
side windows, in the direction of
the upper body and in the footwell.
It also adapts your inst ructions for the tempera-
ture to outside influenc es throughout the year. The cooling is switched
on automatically with
the AUTO program. At the same time, a con-
densation sensor controls the program in such
a way that window condensation is prevented
as much as possible.
Intensity of AUTO program
You can adjust the intensity of the AUTO pro-
gram by repeatedly pr essing the AUTO button.
The respective current setting is displayed
when the button on the display of the automatic
climate control is pressed.
You can also adjust the intensity of the AUTO
program via iDrive.
iDrive, for operating pr inciple refer to page16.
1. Press the button.
This opens the start menu.
2. Move the controller to the left to open "Cli-
mate".
Page 120 of 317
Climate
118
By pressing the button repeatedly, you can
request three operating modes:
>
LED off: outside air flows in continuously.
> Left LED on, AUC mode: the system
detects pollutants in the outside air and
shuts off the supply as needed.
> Right LED on, recirculated-air mode: the
supply of outside air is permanently shut off.
Should the windows fog up in the recircu-
lated-air mode, press the AUTO button or
switch off the recirc ulated-air mode and
increase the air volume if necessary.
The recirculated-air mode should not be used
without interruption over an extended period of
time, as the air quality inside the vehicle deteri-
orates continuously. <
Residual heat
The heat stored in the engine is used to heat the
passenger compartment, e.g. while stopped at
a school to pick up a child.
Switching on
Pressing the right side switches on
the residual heat utilization when
the following conditions are met:
> up to 15 minutes after switching off the
engine
> with the engine at operating temperature
> with sufficient battery voltage
> at an outside temperature below 77 7/
25 6
REST appears on the display of the automatic
climate control when the residual heat utiliza-
tion is switched on.
From radio readiness the interior temperature,
the air volume and the air distribution can be
set.
Switching off
You can select the lowe st blower speed by
pressing and holding th e left side. Pressing
again switches off the re sidual heat utilization.
REST disappears from the display of the auto-
matic climate control.
Switching automatic climate control on
and off
You can select the lowest blower
speed by pressing and holding the
left side. Pressing again switches
off the automatic climate control.
Y o u s w i t c h o n t h e s y s t e m a g a i n b y p r e s s i n g a n y
button of the automatic climate control.
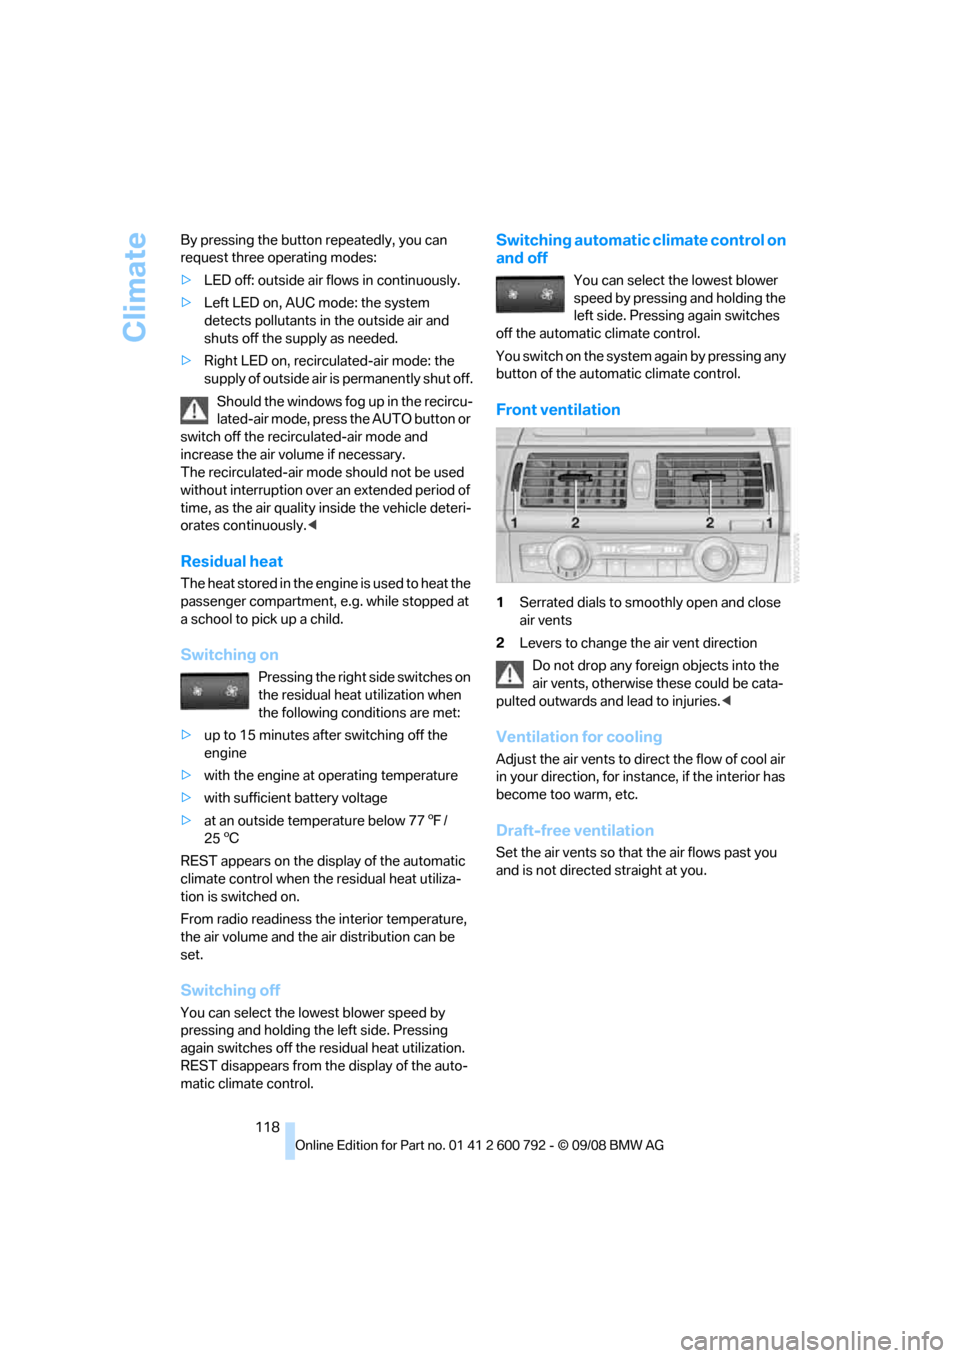
Front ventilation
1 Serrated dials to smoothly open and close
air vents
2 Levers to change th e air vent direction
Do not drop any foreign objects into the
air vents, otherwise these could be cata-
pulted outwards and lead to injuries. <
Ventilation for cooling
Adjust the air vents to direct the flow of cool air
in your direction, for instance, if the interior has
become too warm, etc.
Draft-free ventilation
Set the air vents so that the air flows past you
and is not directed straight at you.
Page 121 of 317
Controls
119Reference
At a glance
Driving tips
Communications
Navigation
Entertainment
Mobility
Ventilation in rear
1Serrated dials to smoothly open and close
air vents
2 Serrated dial for adjusting the temperature
in the upper body region:
>Turn toward blue: colder
> Turn toward red: warmer
3 Levers to change the air vent direction
BMW X5: heating and ventilation,
3rd row seats
The air in the area of the 3rd row seats can be
heated or recirculated. Air vents are located in
the storage compartmen t area between the
seats and in the footwell of the 3rd row seats.
1 Serrated dial:
>Activating heating and distributing air in
footwell:
Turn toward front
> Distributing air in storage compartment
area between seats:
Turn toward rear
2 Button for switching on blower:
LED lights up
The heating is not ready for operation
without switching on the blower. After the heating is switched off, the blower can be used
to recirculate the air within the vehicle, e.g. at
high temperatures. To do
this, turn the serrated
dial 1 toward the rear and switch on the blower,
button 2.<
Microfilter/activated-charcoal filter
The microfilter removes dust and pollen from
the incoming air. The activated-charcoal filter
provides additional protection by filtering gas-
eous pollutants from the outside air. This com-
bined filter is changed during maintenance by
your BMW Sports Activity Vehicle Center.
You can select a display of more detailed infor-
mation on the Control Display, refer to page 82.
Automatic climate control
with 4-zone control*
Front operation
Corresponds to the operation of the automatic
climate control with 2-zone control, refer to
page 115.
Rear operation
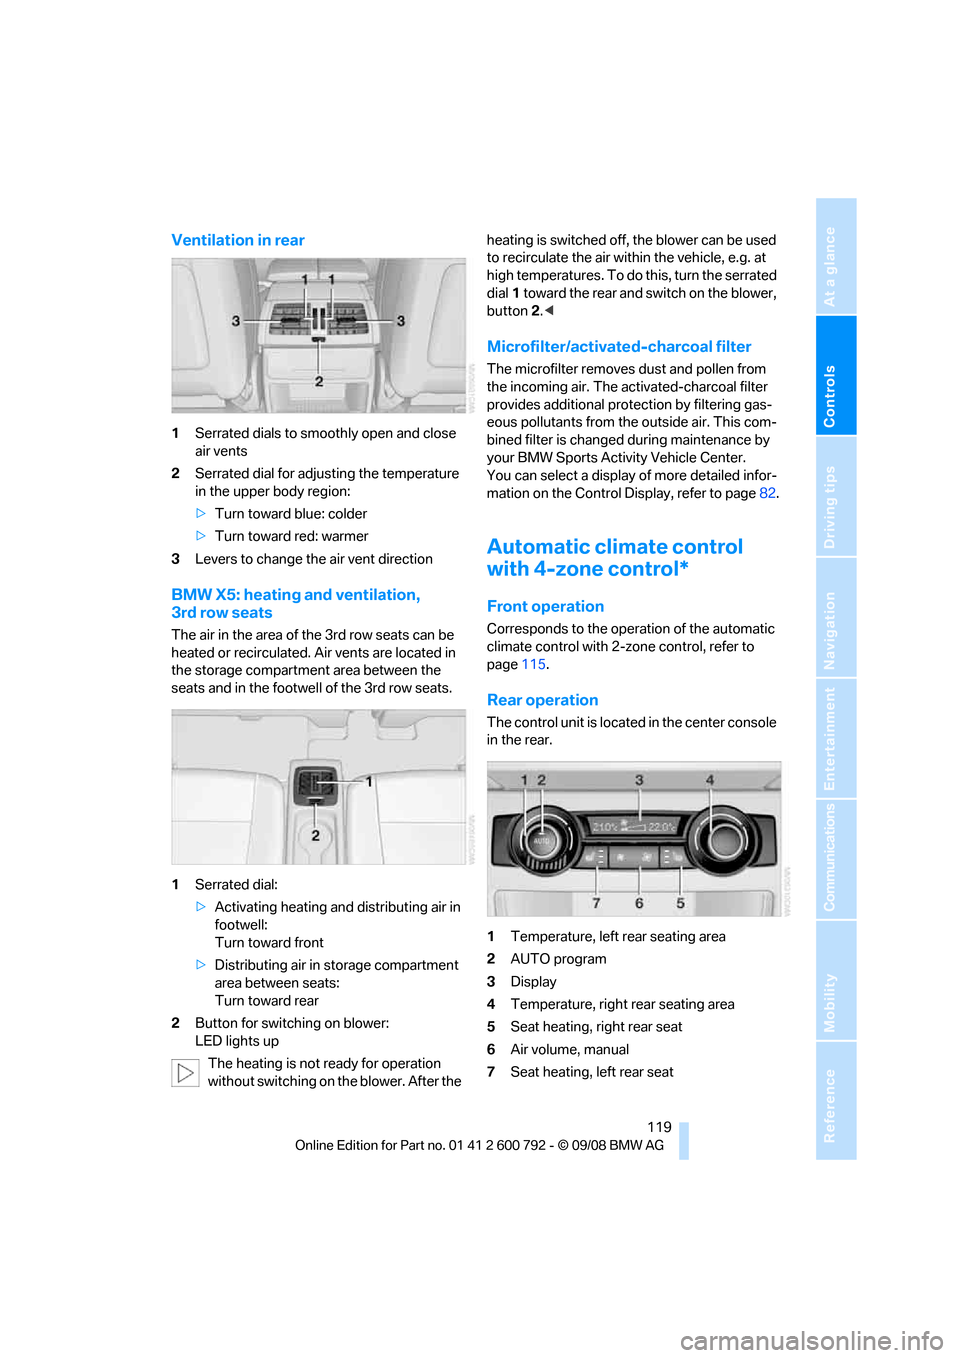
The control unit is located in the center console
in the rear.
1Temperature, left rear seating area
2 AUTO program
3 Display
4 Temperature, right rear seating area
5 Seat heating, right rear seat
6 Air volume, manual
7 Seat heating, left rear seat
Page 123 of 317
Controls
121Reference
At a glance
Driving tips
Communications
Navigation
Entertainment
Mobility
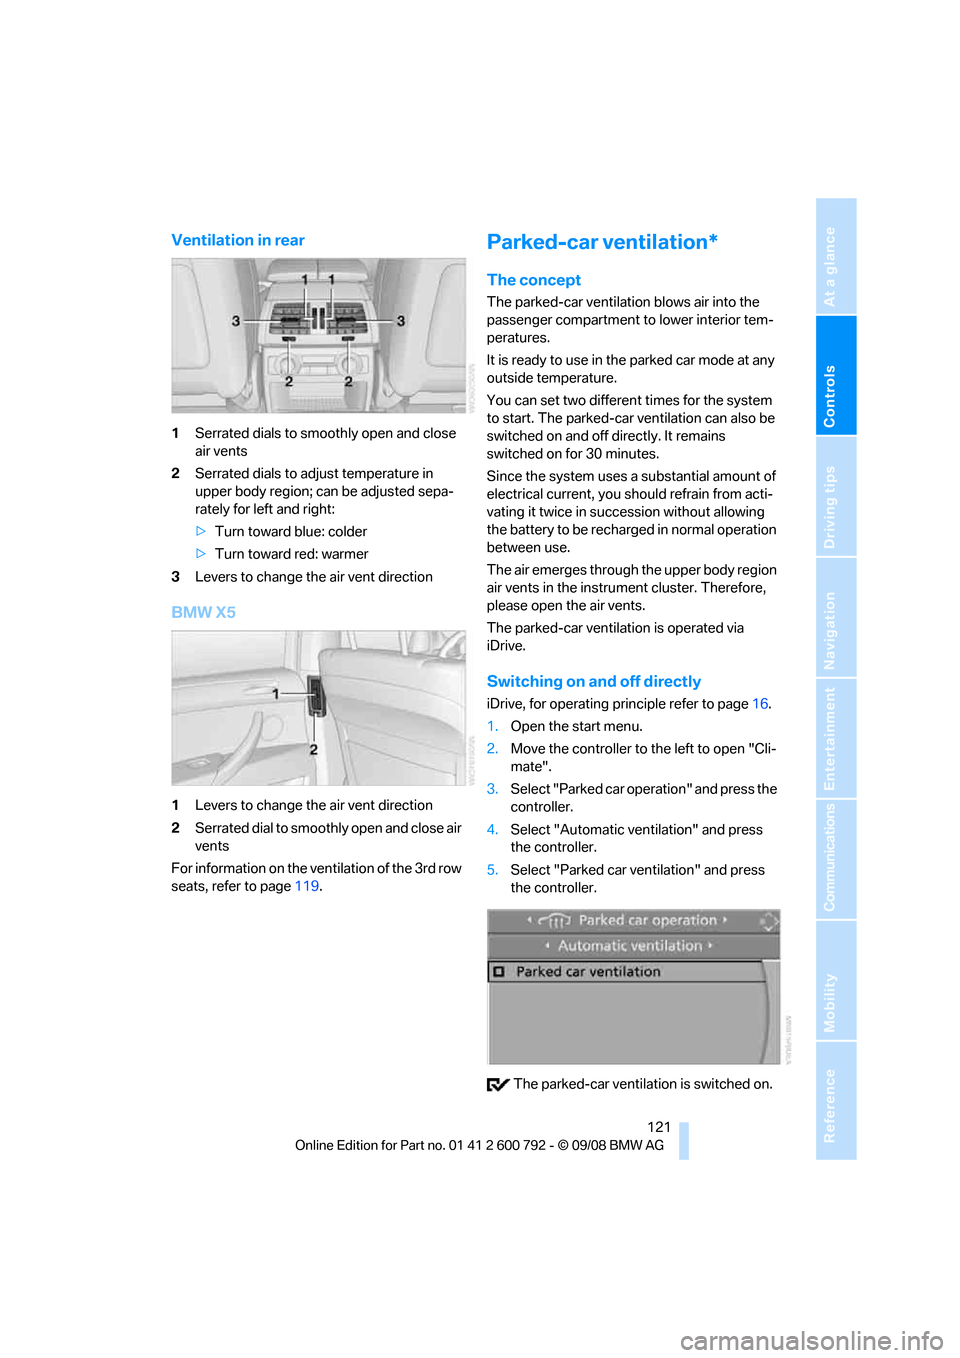
Ventilation in rear
1Serrated dials to smoothly open and close
air vents
2 Serrated dials to adjust temperature in
upper body region; ca n be adjusted sepa-
rately for left and right:
> Turn toward blue: colder
> Turn toward red: warmer
3 Levers to change the air vent direction
BMW X5
1Levers to change the air vent direction
2 Serrated dial to smoothly open and close air
vents
For information on the ventilation of the 3rd row
seats, refer to page 119.
Parked-car ventilation*
The concept
The parked-car ventilation blows air into the
passenger compartment to lower interior tem-
peratures.
It is ready to use in the parked car mode at any
outside temperature.
You can set two different times for the system
to start. The parked-car ventilation can also be
switched on and off directly. It remains
switched on for 30 minutes.
Since the system uses a substantial amount of
electrical current, you should refrain from acti-
vating it twice in succ ession without allowing
the battery to be rechar ged in normal operation
between use.
The air emerges through the upper body region
air vents in the instrument cluster. Therefore,
please open the air vents.
The parked-car ventilation is operated via
iDrive.
Switching on and off directly
iDrive, for operating pr inciple refer to page16.
1. Open the start menu.
2. Move the controller to the left to open "Cli-
mate".
3. Select "Parked car operation" and press the
controller.
4. Select "Automatic ventilation" and press
the controller.
5. Select "Parked car ventilation" and press
the controller.
The parked-car ventila tion is switched on.
Page 128 of 317
Practical interior accessories
126
Calibrating digital compass
Calibrate the digital compass In the following
situations:
>The wrong cardinal direction appears on
the display.
> The cardinal direction displayed does not
change despite a change in the direction of
travel.
> Not all cardinal directions are displayed.
Procedure
1.Make sure that there are no large metal
objects or overhead power lines in the vicin-
ity of your vehicle and that you have enough
space to drive in a circle.
2. Input the currently applicable compass
zone.
3. Press the adjustment button for approx.
6-7 seconds to display C. Then drive in a
complete circle at least once at a maximum
speed of 4 mph/7 km/h.
If the calibration is successful, display C is
replaced with the points of the compass.
Setting right/left-hand drive vehicle
Your digital compass is already set to right or
left-hand drive vehicle to match your vehicle at
the factory.
Setting language
You can set the langua ge of the display.
Press the adjustment button for approx.
12-13 seconds. Briefly press the adjustment
button again to change between English "E"
and German "O".
The setting is automatica lly stored after approx.
10 seconds.
Roller sun blinds for rear side
windows*
Pull the loop of the roller sun blind and hook
onto bracket.
Do not open the window with the roller
blind raised, as otherwise there is a dan-
ger of damage, and therefore a danger of inju-
ries at higher speeds. <
Glove compartment
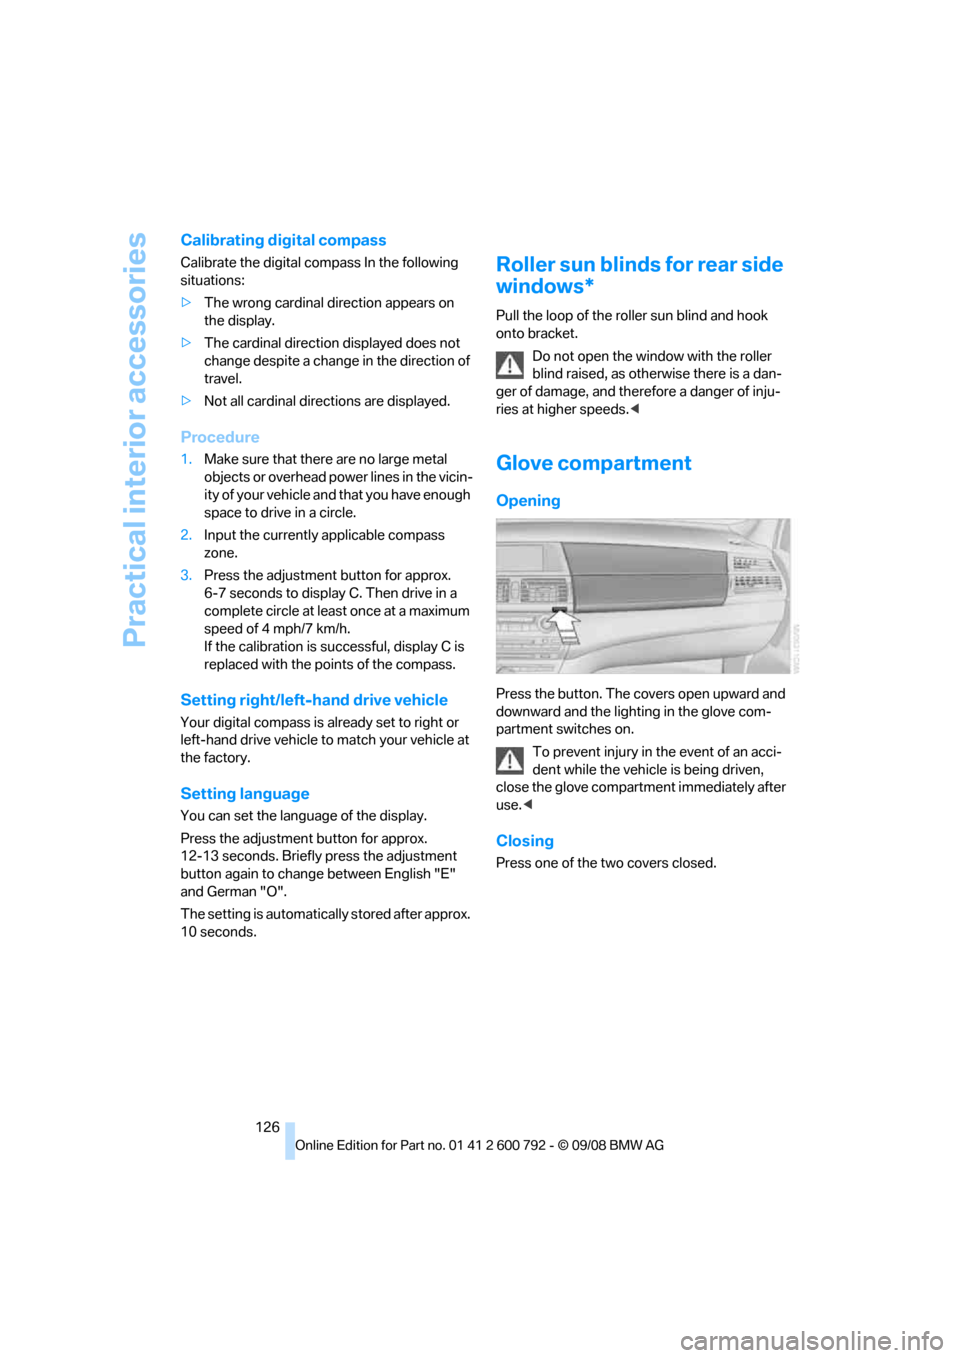
Opening
Press the button. The covers open upward and
downward and the lighting in the glove com-
partment switches on.
To prevent injury in the event of an acci-
dent while the vehicle is being driven,
close the glove compartment immediately after
use. <
Closing
Press one of the two covers closed.