BMW X5 4.4I 2005 E53 Owner's Manual
Manufacturer: BMW, Model Year: 2005, Model line: X5 4.4I, Model: BMW X5 4.4I 2005 E53Pages: 200, PDF Size: 3.55 MB
Page 141 of 200
141n
OverviewControlsMaintenanceRepairsDataIndex
Information for your safety It is not merely the tire's service life, but
also driving comfort and – to a great
extent – driving safety that depend on
the condition of the tires and the main-
tenance of the specified tire pressure. Checking inflation pressureOnly check tire inflation pressure when
the tires are cold. i.e. after driving a
maximum of 1.25 miles/2 km or when
the vehicle has been parked for at least
2 hours. When tires are warm, the tire
inflation pressure increases.
Regularly check the tire inflation
pressure and correct as needed,
including the spare tire: at least every
two weeks and before beginning a
longer trip. If this is not done, incorrect
tire pressures can cause driving insta-
bility and tire damage, ultimately result-
ing in an accident. Do not drive with a
depressurized, i.e. flat, tire. A flat tire
greatly impairs steering and braking
response, and can lead to complete
loss of control over the vehicle.<
After correcting the inflation pres-
sure(s), always reinitialize the Flat
Tire Monitor, refer to page102.<
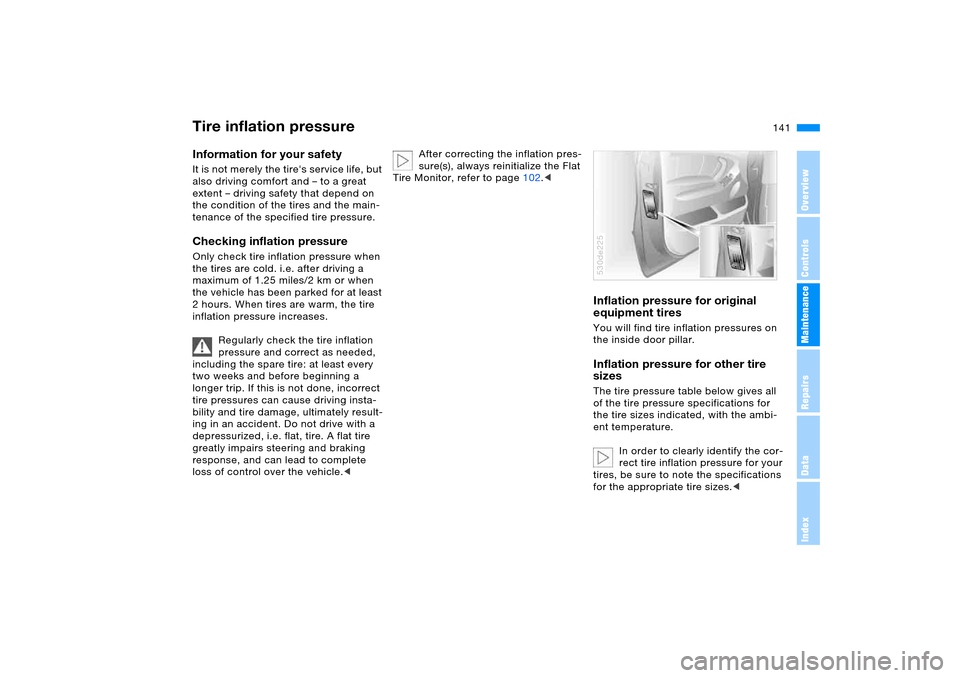
Inflation pressure for original
equipment tiresYou will find tire inflation pressures on
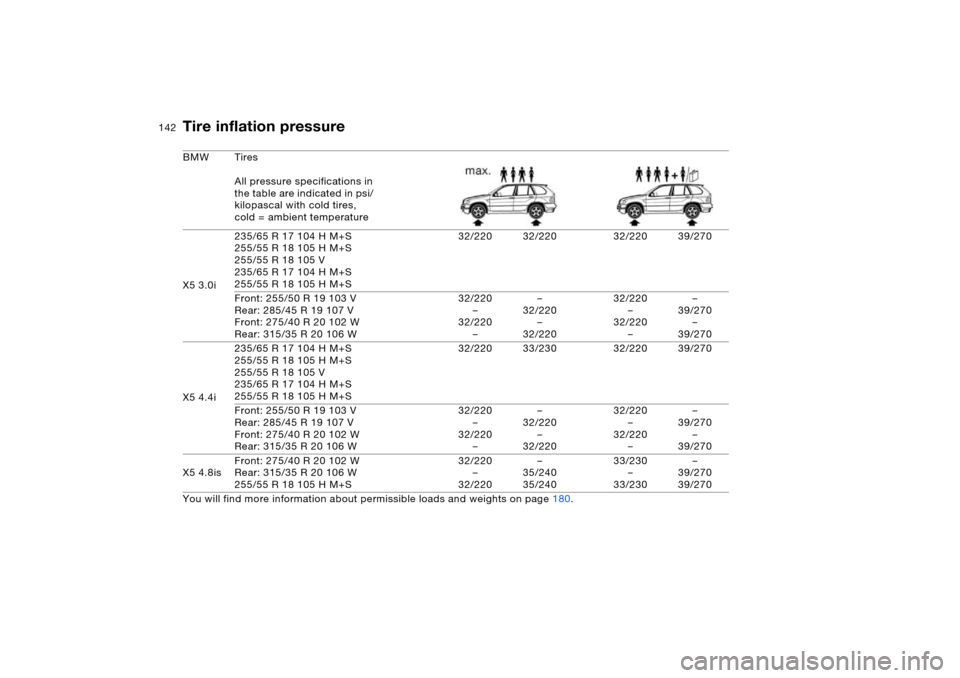
the inside door pillar.Inflation pressure for other tire
sizesThe tire pressure table below gives all
of the tire pressure specifications for
the tire sizes indicated, with the ambi-
ent temperature.
In order to clearly identify the cor-
rect tire inflation pressure for your
tires, be sure to note the specifications
for the appropriate tire sizes.<530de225
Tire inflation pressure
Page 142 of 200
142n
Tire inflation pressureBMW Tires
All pressure specifications in
the table are indicated in psi/
kilopascal with cold tires,
cold = ambient temperature
X5 3.0i235/65 R 17 104 H M+S
255/55 R 18 105 H M+S
255/55 R 18 105 V
235/65 R 17 104 H M+S
255/55 R 18 105 H M+S32/220 32/220 32/220 39/270
Front: 255/50 R 19 103 V
Rear: 285/45 R 19 107 V
Front: 275/40 R 20 102 W
Rear: 315/35 R 20 106 W32/220
–
32/220
––
32/220
–
32/22032/220
–
32/220
––
39/270
–
39/270
X5 4.4i235/65 R 17 104 H M+S
255/55 R 18 105 H M+S
255/55 R 18 105 V
235/65 R 17 104 H M+S
255/55 R 18 105 H M+S32/220 33/230 32/220 39/270
Front: 255/50 R 19 103 V
Rear: 285/45 R 19 107 V
Front: 275/40 R 20 102 W
Rear: 315/35 R 20 106 W32/220
–
32/220
––
32/220
–
32/22032/220
–
32/220
––
39/270
–
39/270
X5 4.8isFront: 275/40 R 20 102 W
Rear: 315/35 R 20 106 W
255/55 R 18 105 H M+S32/220
–
32/220–
35/240
35/24033/230
–
33/230–
39/270
39/270
You will find more information about permissible loads and weights on page180.
Page 143 of 200
143n
OverviewControlsMaintenanceRepairsDataIndex
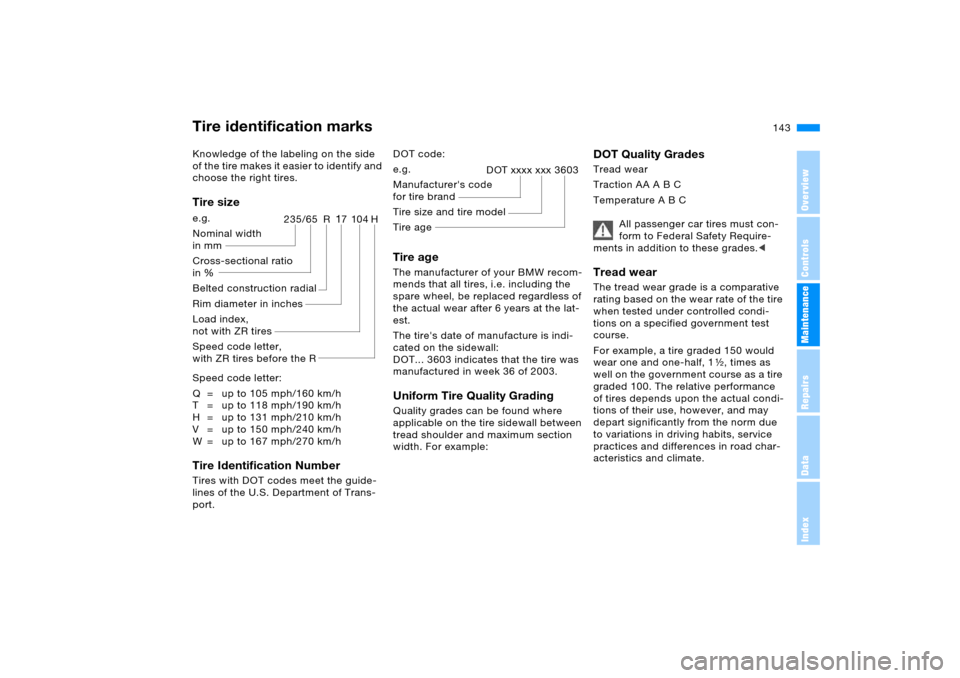
Tire identification marksKnowledge of the labeling on the side
of the tire makes it easier to identify and
choose the right tires.Tire sizeSpeed code letter:
Q = up to 105 mph/160 km/h
T = up to 118 mph/190 km/h
H = up to 131 mph/210 km/h
V = up to 150 mph/240 km/h
W = up to 167 mph/270 km/hTire Identification Number Tires with DOT codes meet the guide-
lines of the U.S. Department of Trans-
port. e.g.
Nominal width
in mm
Cross-sectional ratio
in Ξ
Belted construction radial
Rim diameter in inches
Load index,
not with ZR tires
Speed code letter,
with ZR tires before the R
235/65 R
17104H
DOT code:Tire age The manufacturer of your BMW recom-
mends that all tires, i.e. including the
spare wheel, be replaced regardless of
the actual wear after 6 years at the lat-
est.
The tire's date of manufacture is indi-
cated on the sidewall:
DOT... 3603 indicates that the tire was
manufactured in week 36 of 2003. Uniform Tire Quality Grading Quality grades can be found where
applicable on the tire sidewall between
tread shoulder and maximum section
width. For example: e.g.
Manufacturer's code
for tire brand
Tire size and tire model
Tire age
DOT xxxx xxx 3603
DOT Quality Grades Tread wear
Traction AA A B C
Temperature A B C
All passenger car tires must con-
form to Federal Safety Require-
ments in addition to these grades.< Tread wear The tread wear grade is a comparative
rating based on the wear rate of the tire
when tested under controlled condi-
tions on a specified government test
course.
For example, a tire graded 150 would
wear one and one-half, 1γ, times as
well on the government course as a tire
graded 100. The relative performance
of tires depends upon the actual condi-
tions of their use, however, and may
depart significantly from the norm due
to variations in driving habits, service
practices and differences in road char-
acteristics and climate.
Page 144 of 200
144n
Tire identification marks Wheel/tire condition Traction The traction grades, from highest to
lowest, are AA, A, B, and C.
Those grades represent the tire's ability
to stop on wet pavement as measured
under controlled conditions on speci-
fied government test surfaces of
asphalt and concrete. A tire marked C
may have poor traction performance.
The traction grade assigned to
this tire is based on straight-ahead
braking traction tests, and does not
include acceleration, cornering, hydro-
planing, or peak traction characteris-
tics.< TemperatureThe temperature grades are A, the
highest, B, and C, representing the
tire's resistance to the generation of
heat and its ability to dissipate heat
when tested under controlled condi-
tions on a specified indoor laboratory
test wheel.
Sustained high temperature can cause
the material of the tire to degenerate
and reduce tire life, and excessive tem-
perature can lead to a sudden flat tire.
The grade C corresponds to a level of
performance which all passenger car
tires must meet under the Federal
Motor Vehicle Safety Standard No. 109.
Grades B and A represent higher levels
of performance on the laboratory test
wheel than the minimum required by
law.
The temperature grade for this tire
is established for a tire that is
properly inflated and not overloaded.
Excessive speed, underinflation, or
excessive loading, either separately or
in combination, can cause heat buildup
and possible a tire failure.< M+SWinter and all-season tires.
These have better winter properties
than summer tires.
Wheel/tire damage Inspect your wheels and tires frequently
for tread wear, signs of damage and for
foreign objects lodged in the tread.
Check the tread pattern depth.
Please note that low-profile tires
make your wheels, tires and sus-
pension parts more susceptible to road
hazard and consequential damages.
Unusual vibrations encountered during
normal vehicle operation can indicate
tire failure or some other vehicle defect.
This can, for example, be caused by
driving over curbs. This is also true for
irregularities in the vehicle's handling
characteristics, such as a pronounced
tendency to pull to the left or right.
Should this occur, respond by immedi-
ately reducing your speed. Carefully
proceed – or have your vehicle towed –
to the nearest BMW Sports Activity
Vehicle center or tire dealer to have the
wheels or tires inspected.
Tire damage, extending to sudden and
complete loss of pressure in extreme
cases, can pose a potentially lethal
safety hazard for the vehicle's occu-
pants and other road users alike.<
Page 145 of 200
145n
OverviewControlsMaintenanceRepairsDataIndex
Wheel/tire conditionTire tread The tread depth should not fall below
0.12 in/3 mm although, for example,
European regulations only require a
minimum tread depth of 0.063 in/
1.6 mm.
At tread depths below 0.12 in/3 mm
there is an increased risk of high-speed
hydroplaning, even when only small
amounts of water are present on the
road surface.
As winter tires display a noticeable loss
in their ability to cope with cold-
weather driving conditions once the
tread wears to below 0.16 in/4 mm, you
should always have such tires replaced
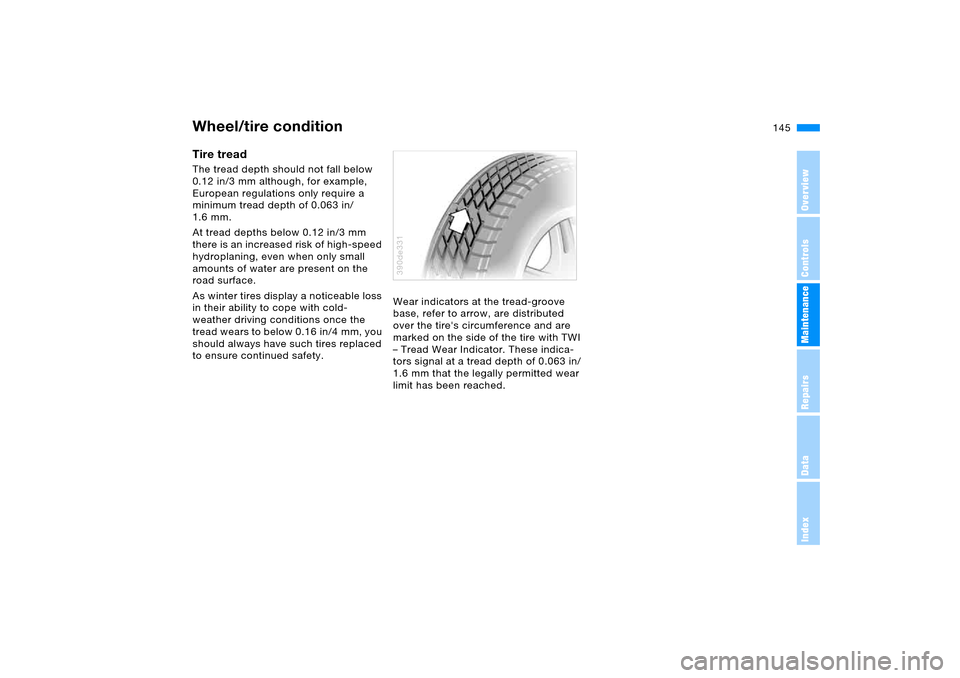
to ensure continued safety.Wear indicators at the tread-groove
base, refer to arrow, are distributed
over the tire's circumference and are
marked on the side of the tire with TWI
– Tread Wear Indicator. These indica-
tors signal at a tread depth of 0.063 in/
1.6 mm that the legally permitted wear
limit has been reached.
390de331
Page 146 of 200
146n
Replacing wheels/tires
Have new wheels and tires
installed only by your BMW Sports
Activity Vehicle center or a tire special-
ist workshop that works according to
BMW guidelines with appropriately
trained personnel. If this work is not
carried out properly, there is a danger
of subsequent damage and related
safety hazards.<
Retreaded tires
BMW does not recommend the
use of retread tires, as otherwise
driving safety may be reduced. The rea-
son for this is that possible variations in
the design and aging – which could be
substantial – of the tire casing can
result in a limited service life.<
The right wheels and tires
BMW recommends that you use
only wheel and tire combinations
that BMW has tested and approved for
your particular vehicle. Variations in fac-
tors such as manufacturing tolerances
mean that even wheels and tires with
identical official size ratings could actu-
ally have different dimensions than the
approved units – these differences
could lead to body contact, and with it
the risk of severe accidents. If non-
approved wheels and tires are used,
BMW cannot evaluate their suitability,
and therefore cannot be held liable for
driving safety.<
You can ask your BMW Sports Activity
Vehicle center for the correct wheel/tire
combination.
The correct wheel/tire combination also
affects various systems whose function
would otherwise be impaired, e.g. ABS,
DSC, xDrive.
To maintain good handling and vehicle
response, use only tires of a single
tread configuration from a single manu-
facturer. After a flat tire, always remem-
ber to have the original wheel and tire
combination remounted on the vehicle
as soon as possible.
Recommended tire sizes and makes:
For each tire size, certain tire makes
have been tested by BMW and classi-
fied and approved as safe. You can find
out about them at a specialized store,
preferably your BMW Sports Activity
Vehicle center. Follow any national reg-
ulations, e. g. listed in the vehicle docu-
ments.
The factory-approved radial ply tires are
matched to your vehicle and with
proper use, offer both optimal driving
safety and the desired driving comfort.
Special features of winter tires BMW recommends winter tires for use
in cold winter driving conditions.
Although all-season M+S tires provide
better winter traction than summer
tires, they generally fail to provide the
same levels of cold-weather perfor-
mance as winter tires.
When switching to winter tires, observe
the description under Tire condition,
page144, and Replacing wheels/tires.
Observing speed ratings:
Never exceed the maximum
speed for which the winter tires
are rated. Unprofessional attempts by
laymen to service tires can lead to dam-
age and accidents. Have this work per-
formed by skilled professionals only.
The technicians at your BMW Sports
Activity Vehicle center will be glad to
assist you with the required profes-
sional knowledge and specialized
equipment.<
Page 147 of 200
147n
OverviewControlsMaintenanceRepairsDataIndex
Replacing wheels/tires Snow chains
*
Storage Store wheels or tires in a cool, dry
place, protecting them against light
whenever possible. Always protect tires
against all contact with oil, grease and
fuels.
Do not exceed the maximum tire infla-
tion pressure indicated on the side wall
of the tire.Only certain snow chains have been
tested by BMW and classified and
approved as safe. Consult your BMW
Sports Activity Vehicle center for
details. BMW recommends only using
these approved, narrow-link snow
chains. Use is only permitted in pairs on
the rear wheels with the following tire
sizes:
X5 4.8is: 255/55 R 18
All other models: 235/65 R 17
Observe the manufacturer's instruc-
tions when installing snow chains.
Do not exceed a maximum speed of
30 mph/50 km/h.
After mounting snow chains, do
not initialize the Flat Tire Monitor.
When you are driving with snow chains,
it can be beneficial to switch off DSC
briefly, refer to page96.<
Page 148 of 200
148n
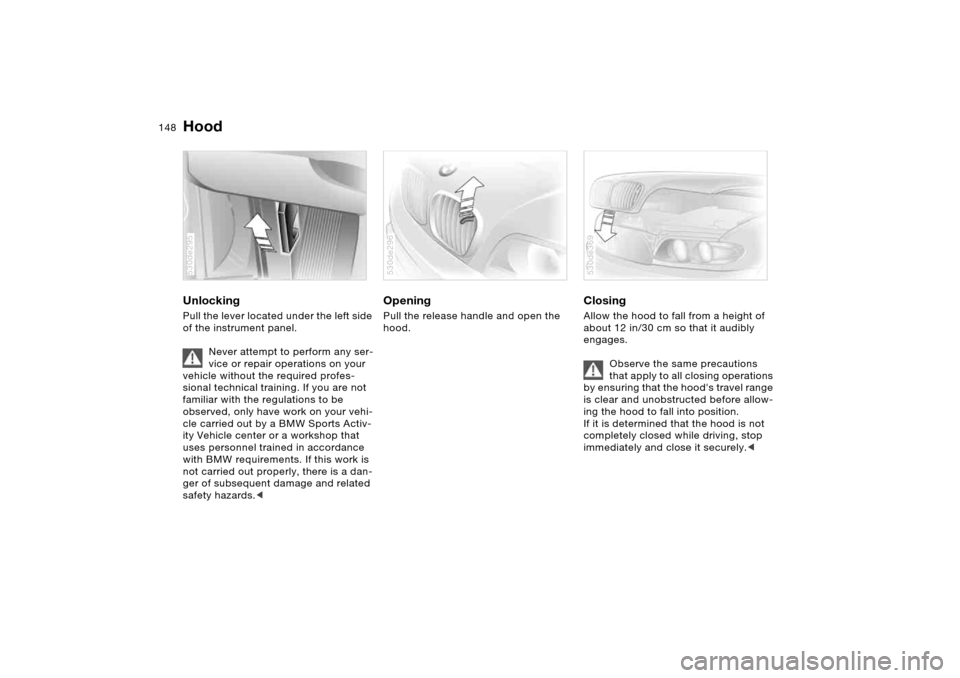
Hood Unlocking Pull the lever located under the left side
of the instrument panel.
Never attempt to perform any ser-
vice or repair operations on your
vehicle without the required profes-
sional technical training. If you are not
familiar with the regulations to be
observed, only have work on your vehi-
cle carried out by a BMW Sports Activ-
ity Vehicle center or a workshop that
uses personnel trained in accordance
with BMW requirements. If this work is
not carried out properly, there is a dan-
ger of subsequent damage and related
safety hazards.< 530de295
Opening Pull the release handle and open the
hood. 530de296
Closing Allow the hood to fall from a height of
about 12 in/30 cm so that it audibly
engages.
Observe the same precautions
that apply to all closing operations
by ensuring that the hood's travel range
is clear and unobstructed before allow-
ing the hood to fall into position.
If it is determined that the hood is not
completely closed while driving, stop
immediately and close it securely.< 530de369
Page 149 of 200
149n
OverviewControlsMaintenanceRepairsDataIndex
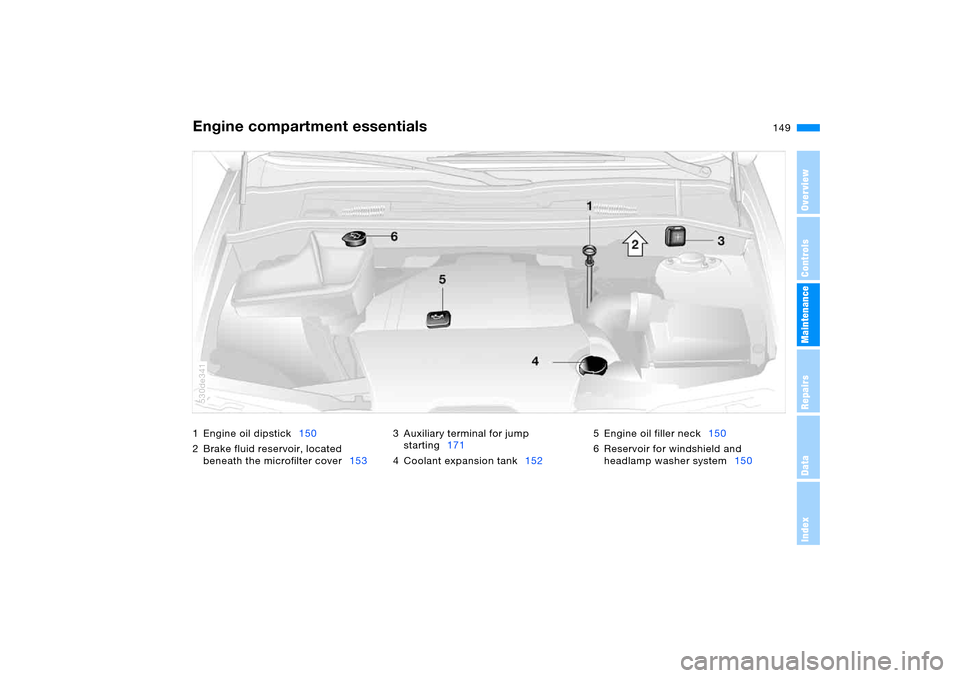
1Engine oil dipstick150
2 Brake fluid reservoir, located
beneath the microfilter cover1533 Auxiliary terminal for jump
starting171
4 Coolant expansion tank1525 Engine oil filler neck150
6 Reservoir for windshield and
headlamp washer system150Engine compartment essentials
530de341
Page 150 of 200
150n
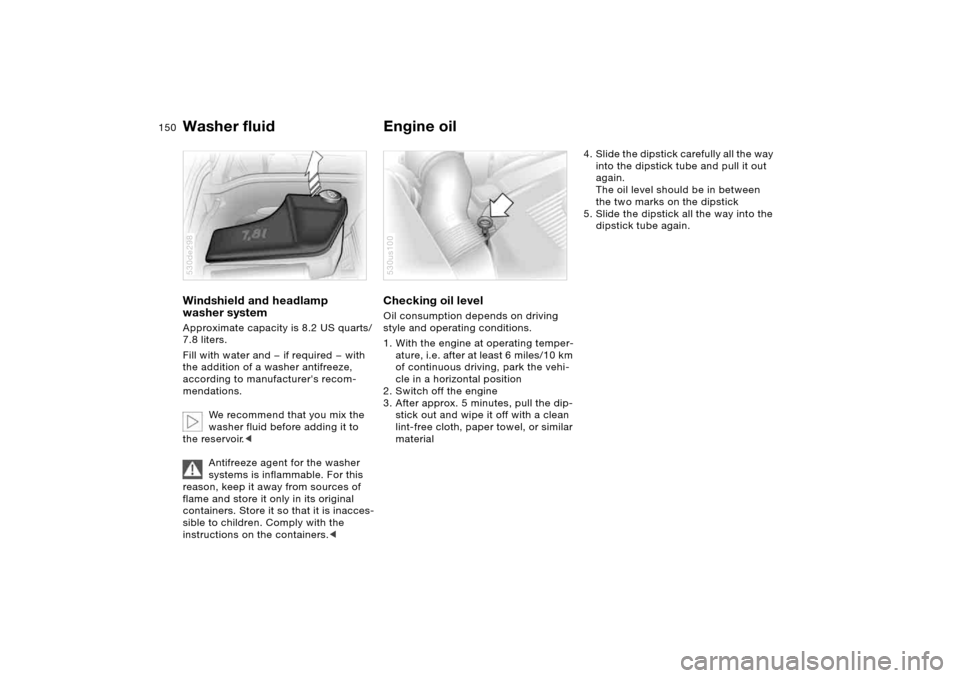
Washer fluid Engine oilWindshield and headlamp
washer system Approximate capacity is 8.2 US quarts/
7.8 liters.
Fill with water and — if required — with
the addition of a washer antifreeze,
according to manufacturer's recom-
mendations.
We recommend that you mix the
washer fluid before adding it to
the reservoir.<
Antifreeze agent for the washer
systems is inflammable. For this
reason, keep it away from sources of
flame and store it only in its original
containers. Store it so that it is inacces-
sible to children. Comply with the
instructions on the containers.< 530de298
Checking oil level Oil consumption depends on driving
style and operating conditions.
1. With the engine at operating temper-
ature, i.e. after at least 6 miles/10 km
of continuous driving, park the vehi-
cle in a horizontal position
2. Switch off the engine
3. After approx. 5 minutes, pull the dip-
stick out and wipe it off with a clean
lint-free cloth, paper towel, or similar
material 530us100
4. Slide the dipstick carefully all the way
into the dipstick tube and pull it out
again.
The oil level should be in between
the two marks on the dipstick
5. Slide the dipstick all the way into the
dipstick tube again.