BUICK LACROSSE 2010 Owner's Manual
Manufacturer: BUICK, Model Year: 2010, Model line: LACROSSE, Model: BUICK LACROSSE 2010Pages: 414
Page 211 of 414
Infotainment System 6-65
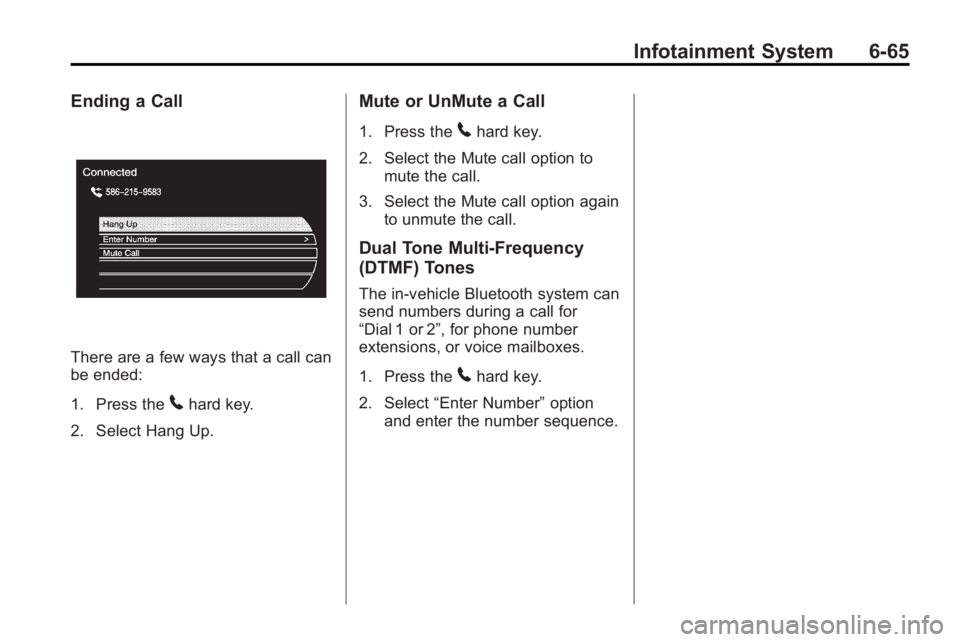
Ending a Call
There are a few ways that a call can
be ended:
1. Press the
5hard key.
2. Select Hang Up.
Mute or UnMute a Call
1. Press the5hard key.
2. Select the Mute call option to mute the call.
3. Select the Mute call option again to unmute the call.
Dual Tone Multi-Frequency
(DTMF) Tones
The in-vehicle Bluetooth system can
send numbers during a call for
“Dial 1 or 2”, for phone number
extensions, or voice mailboxes.
1. Press the
5hard key.
2. Select “Enter Number” option
and enter the number sequence.
Page 212 of 414

6-66 Infotainment System
2@NOTES
Page 213 of 414
Climate Controls 7-1
Climate Controls
Climate Control Systems
Automatic Climate ControlSystem . . . . . . . . . . . . . . . . . . . . . . 7-1
Dual Automatic Climate Control System . . . . . . . . . . . . . . 7-4
Air Vents
Air Vents . . . . . . . . . . . . . . . . . . . . . . 7-8
Maintenance
Air Intake . . . . . . . . . . . . . . . . . . . . . 7-8
Passenger Compartment AirFilter . . . . . . . . . . . . . . . . . . . . . . . . . 7-8
Climate Control Systems
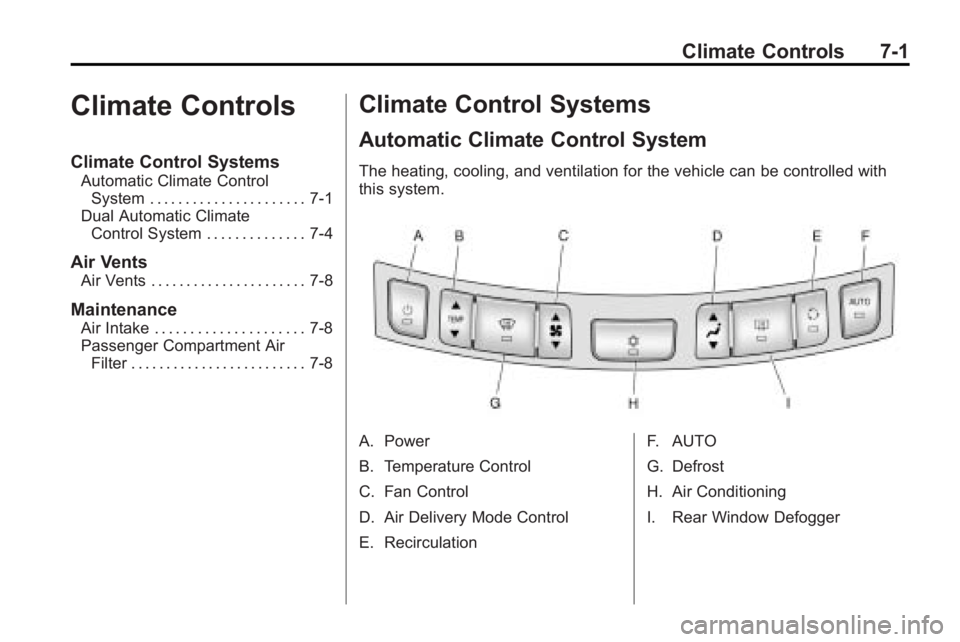
Automatic Climate Control System
The heating, cooling, and ventilation for the vehicle can be controlled with
this system.
A. Power
B. Temperature Control
C. Fan Control
D. Air Delivery Mode Control
E. Recirculation F. AUTO
G. Defrost
H. Air Conditioning
I. Rear Window Defogger
Page 214 of 414
7-2 Climate Controls
Automatic Operation
The system automatically controls
the fan speed, air delivery, air
conditioning and recirculation in
order to heat or cool the vehicle to
the desired temperature.
When the AUTO indicator light is
on, the system is in full automatic
operation. If the air delivery mode,
fan speed, recirculation or air
conditioning setting is adjusted, the
AUTO indicator turns off and the
selected settings will appear on the
display.
To place the system in automatic
mode do the following:
1. Press AUTO.
2. Set the temperature. Allow thesystem time to stabilize. Adjust
the temperature as needed for
best comfort.
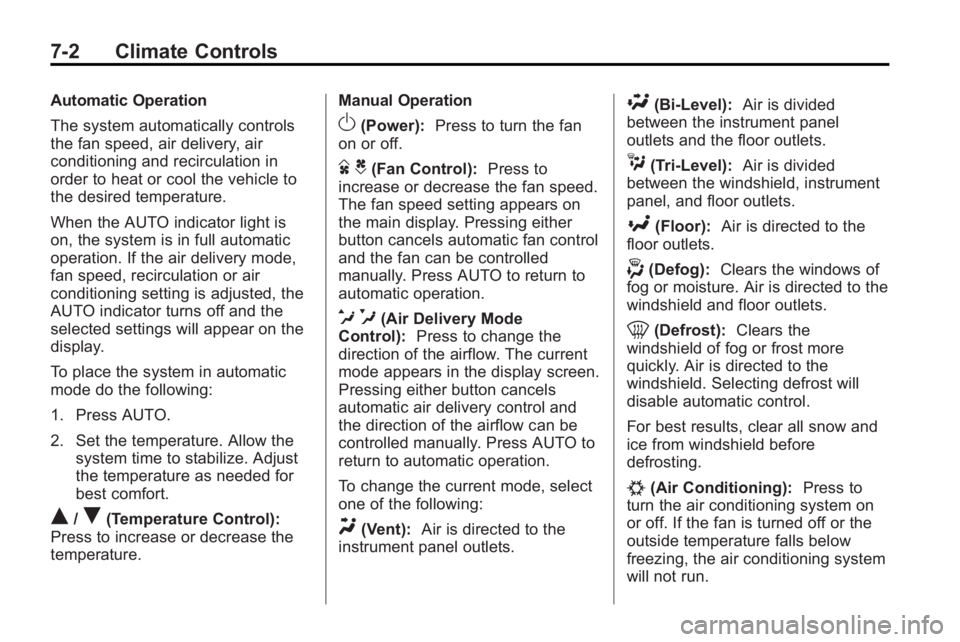
Q/R(Temperature Control):
Press to increase or decrease the
temperature. Manual Operation
O(Power):
Press to turn the fan
on or off.
D C(Fan Control): Press to
increase or decrease the fan speed.
The fan speed setting appears on
the main display. Pressing either
button cancels automatic fan control
and the fan can be controlled
manually. Press AUTO to return to
automatic operation.
e *(Air Delivery Mode
Control): Press to change the
direction of the airflow. The current
mode appears in the display screen.
Pressing either button cancels
automatic air delivery control and
the direction of the airflow can be
controlled manually. Press AUTO to
return to automatic operation.
To change the current mode, select
one of the following:
Y(Vent): Air is directed to the
instrument panel outlets.
\(Bi-Level): Air is divided
between the instrument panel
outlets and the floor outlets.
C(Tri-Level): Air is divided
between the windshield, instrument
panel, and floor outlets.
[(Floor): Air is directed to the
floor outlets.
-(Defog): Clears the windows of
fog or moisture. Air is directed to the
windshield and floor outlets.
0(Defrost): Clears the
windshield of fog or frost more
quickly. Air is directed to the
windshield. Selecting defrost will
disable automatic control.
For best results, clear all snow and
ice from windshield before
defrosting.
#(Air Conditioning): Press to
turn the air conditioning system on
or off. If the fan is turned off or the
outside temperature falls below
freezing, the air conditioning system
will not run.
Page 215 of 414
Climate Controls 7-3
Pressing this button cancels
automatic air conditioning and turns
off the air conditioner. Press AUTO
to return to automatic operation and
the air conditioner runs
automatically as needed. When the
indicator light is on, the air
conditioner runs automatically to
cool the air inside the vehicle or to
dry the air needed to defog the
windshield faster.
>(Recirculation):Press to
alternate between recirculating air
inside the vehicle or pulling in
outside air. When the indicator light
is on, air is being recirculated inside
the vehicle. This helps to quickly
cool the air inside the vehicle or
prevent outside air and odors from
entering.
Pressing this button cancels
automatic recirculation. Press AUTO
to return to automatic operation and
recirculation runs automatically as
needed.
Rear Window Defogger
=(Rear Window Defogger):
Press to turn the rear window
defogger on or off.
The rear window defogger turns off
automatically after about
10 minutes. If turned on again it
runs for about 5 minutes before
turning off. The defogger can also
be turned off by turning the ignition
to ACC/ACCESSORY or
LOCK/OFF.
The rear window defogger can be
set to automatic operation, see
Climate and Air Quality under
Vehicle Personalization
on
page 4‑38. When auto rear defog is
selected, the rear window defogger
turns on automatically when the
interior temperature is cold and the
outside temperature is about 40°F
and below. The auto rear defogger
turns off automatically after about
10 minutes, or after 5 minutes if the
outside temperature is not as cold. For vehicles with heated outside
rearview mirrors, they turn on when
the rear window defogger button is
on and helps to clear fog or frost
from the surface of the mirror. See
Heated Mirrors on page 1‑16.
Notice:
Do not try to clear frost
or other material from the inside
of the front windshield and rear
window with a razor blade or
anything else that is sharp. This
may damage the rear window
defogger grid and affect your
radio's ability to pick up stations
clearly. The repairs wouldn't be
covered by your warranty.
Remote Start Climate Control
Operation: For vehicles with the
remote vehicle start feature, the
climate control system may run
when the vehicle is started remotely.
The system uses the driver's
previous settings to heat or cool the
inside of the vehicle. See Remote
Vehicle Start on page 1‑8.
The rear window defogger turns on
if it is cold outside.
Page 216 of 414
7-4 Climate Controls
Sensors
The solar sensor located on top of
the instrument panel near the
windshield monitors the solar heat.
The climate control system uses the
sensor information to adjust the
temperature, fan speed,
recirculation, and air delivery mode
for best comfort.
Do not cover the sensors or the
automatic climate control system
may not work properly.
Dual Automatic Climate Control System
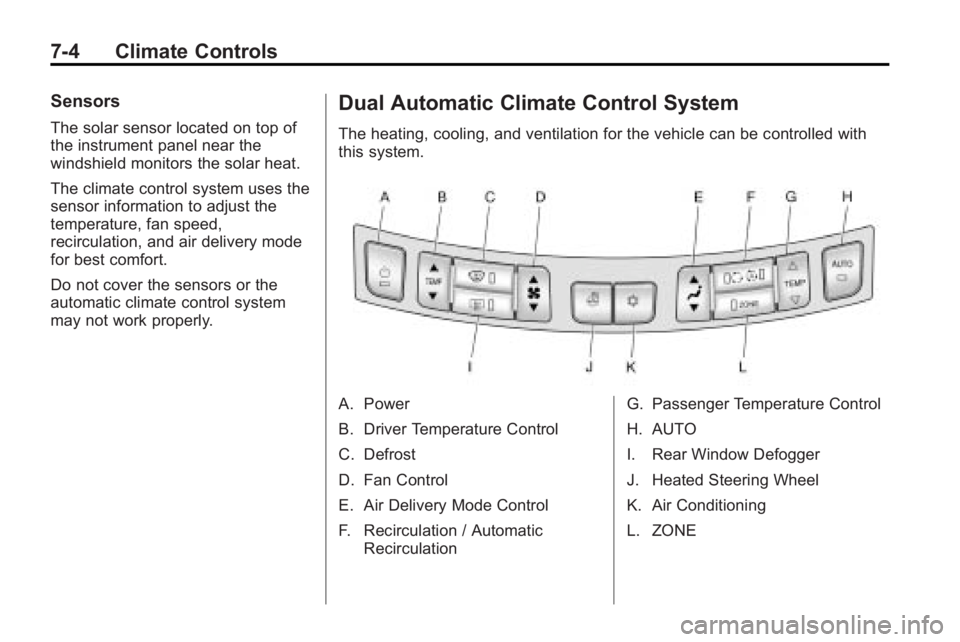
The heating, cooling, and ventilation for the vehicle can be controlled with
this system.
A. Power
B. Driver Temperature Control
C. Defrost
D. Fan Control
E. Air Delivery Mode Control
F. Recirculation / AutomaticRecirculation G. Passenger Temperature Control
H. AUTO
I. Rear Window Defogger
J. Heated Steering Wheel
K. Air Conditioning
L. ZONE
Page 217 of 414
Climate Controls 7-5
Automatic Operation
The system automatically controls
the fan speed, air delivery, air
conditioning and recirculation in
order to heat or cool the vehicle to
the desired temperature.
When the AUTO indicator light is
on, the system is in full automatic
operation. If the air delivery mode,
fan speed, recirculation or air
conditioning setting is adjusted, the
AUTO indicator turns off and the
selected settings will appear on the
display.
To place the system in automatic
mode do the following:
1. Press AUTO.
2. Set the temperature. Allow thesystem time to stabilize. Adjust
the temperature as needed for
best comfort.Q/R(Driver and Passenger
Temperature Control): The
temperature can be adjusted
separately for the driver and the
passenger. Press to increase or
decrease the temperature.
ZONE: Press to link all climate
zone settings to the driver's
settings. The ZONE indicator light
will turn off. When the passenger
settings are adjusted, the ZONE
indicator light is on.
Manual Operation
O(Power): Press to turn the fan
off or on.
D C(Fan Control): Press to
increase or decrease the fan speed.
The fan speed setting appears on
the main display. Pressing either
button cancels automatic fan control
and the fan is controlled manually.
Press AUTO to return to automatic
operation.
e *(Air Delivery Mode
Control): Press to change the
direction of the airflow. The current
mode appears in the display screen.
Pressing either button cancels
automatic air delivery control and
the direction of the airflow is
controlled manually. Press AUTO to
return to automatic operation.
To change the current mode, select
one of the following:
Y(Vent): Air is directed to the
instrument panel outlets.
\(Bi-Level): Air is divided
between the instrument panel
outlets and the floor outlets.
C(Tri-Level): Air is divided
between the windshield, instrument
panel, and floor outlets.
[(Floor): Air is directed to the
floor outlets.
-(Defog): Clears the windows of
fog or moisture. Air is directed to the
windshield and floor outlets.
Page 218 of 414
7-6 Climate Controls
0(Defrost):Clears the
windshield of fog or frost more
quickly. Air is directed to the
windshield.
For best results, clear all snow and
ice from windshield before
defrosting.
#(Air Conditioning): Press to
turn the air conditioning system on
or off. If the fan is turned off or the
outside temperature falls below
freezing, the air conditioner will
not run.
Pressing this button cancels
automatic air conditioning and turns
off the air conditioner. Press AUTO
to return to automatic operation and
the air conditioner runs
automatically as needed. When the
indicator light is on, the air
conditioner runs automatically to
cool the air inside the vehicle or to
dry the air needed to defog the
windshield faster.
>//(Recirculation/Auto
Recirculation): Press to change to
automatic control of air recirculation
inside the vehicle. When the auto
recirculation indicator light is on, the
air is automatically recirculated as
needed to help quickly cool the air
inside the vehicle.
In auto recirculation control, the Air
Quality Control system may operate
when pollution is detected. To adjust
the sensitivity of the Air Quality
Control, see Climate and Air Quality
under Vehicle Personalization
on
page 4‑38.
When the
>indicator light is on, air
is recirculated inside the vehicle.
If both indicator lights are off,
outside air will flow into the vehicle.
Press AUTO or
/to return to
automatic operation. Auto Defog:
The climate control
system may have a sensor to
automatically detect high humidity
inside the vehicle. When high
humidity is detected, the climate
control system may adjust to
outside air supply and turn on the
air conditioner. The fan speed may
slightly increase to help prevent
fogging. If the climate control
system does not detect possible
window fogging, it returns to normal
operation. To turn Auto Defog off or
on, see Climate and Air Quality
under Vehicle Personalization
on
page 4‑38.
Page 219 of 414
Climate Controls 7-7
Rear Window Defogger
=(Rear Window Defogger):
Press to turn the rear window
defogger on or off.
The rear window defogger turns off
automatically after about
10 minutes. If turned on again it
runs for about 5 minutes before
turning off. The defogger can also
be turned off by turning the ignition
to ACC/ACCESSORY or
LOCK/OFF.
The rear window defogger can be
set to automatic operation, see
Climate and Air Quality under
Vehicle Personalization
on
page 4‑38. When auto rear defog is
selected, the rear window defogger
turns on automatically when the
interior temperature is cold and the
outside temperature is about 40°F
and below. The auto rear defogger
turns off automatically after about
10 minutes, or after 5 minutes if the
outside temperature is not as cold. For vehicles with heated outside
rearview mirrors, they turn on when
the rear window defogger button is
on and helps to clear fog or frost
from the surface of the mirror. See
Heated Mirrors on page 1‑16.
Notice:
Do not try to clear frost
or other material from the inside
of the front windshield and rear
window with a razor blade or
anything else that is sharp. This
may damage the rear window
defogger grid and affect your
radio's ability to pick up stations
clearly. The repairs wouldn't be
covered by your warranty.((Heated Steering Wheel): For
vehicles with this feature, press to
turn on or off. See Heated Steering
Wheel on page 4‑7. Remote Start Climate Control
Operation:
For vehicles with the
remote vehicle start feature, the
climate control system may run
when the vehicle is started remotely.
The system uses the driver's
previous settings to heat or cool the
inside of the vehicle. See Remote
Vehicle Start on page 1‑8.
The rear window defogger turns on
if it is cold outside.
Sensors
The solar sensor, located on top of
the instrument panel near the
windshield monitors the solar heat.
The climate control system uses the
sensor information to adjust the
temperature, fan speed,
recirculation, and air delivery mode
for best comfort.
Do not cover the sensors or the
automatic climate control system
may not work properly.
Page 220 of 414
7-8 Climate Controls
Air Vents
Use the louvers located on the air
vents to change the direction of the
airflow.
To open the vent, move the
thumbwheel to
R. To close the vent,
move the thumbwheel to
(.
Operation Tips
.Keep all outlets open whenever
possible for best system
performance.
.Keep the path under all seats
clear of objects to help circulate
the air inside the vehicle more
effectively.
.Use of non-GM approved hood
deflectors can adversely affect
the performance of the system.
Maintenance
Air Intake
Clear away any ice, snow, or leaves
from the air intake at the base of the
windshield that can block the flow of
air into the vehicle.
Passenger Compartment
Air Filter
The filter removes dust, pollen, and
other airborne irritants from outside
air that is pulled into the vehicle.
The filter should be replaced as part
of routine scheduled maintenance.
See Scheduled Maintenance
on
page 10‑2for replacement
intervals. To find out what type of
filter to use, see Maintenance
Replacement Parts on page 10‑9. The passenger compartment air
filter can be accessed by removing
the entire glove box.
1. Open the passenger side door.
Remove the end cover located
on the side of the instrument
panel in the top right corner.
Remove the screw affixed to the
side of the glove box.
2. Open the glove box door and remove the attached screws
from around the glove box.
3. Lower the loosened glove box housing.
4. Unplug both wire cables and remove the glove box.
5. Pull the three tabs to release and open the filter door.