BUICK REGAL 2017 Get To Know Guide
Manufacturer: BUICK, Model Year: 2017, Model line: REGAL, Model: BUICK REGAL 2017Pages: 20, PDF Size: 4.46 MB
Page 1 of 20

1
Review this Quick Reference Guide for an overview of some important features in your Buick Regal. More detailed information can be found in your Owner Manual.
Some optional equipment
described in this guide may not be included in your vehicle.
For easy reference, keep this guide with your Owner Manual in your glove box.
www.buick.com
2017 Regal
Getting to Know Your
Page 2 of 20
2
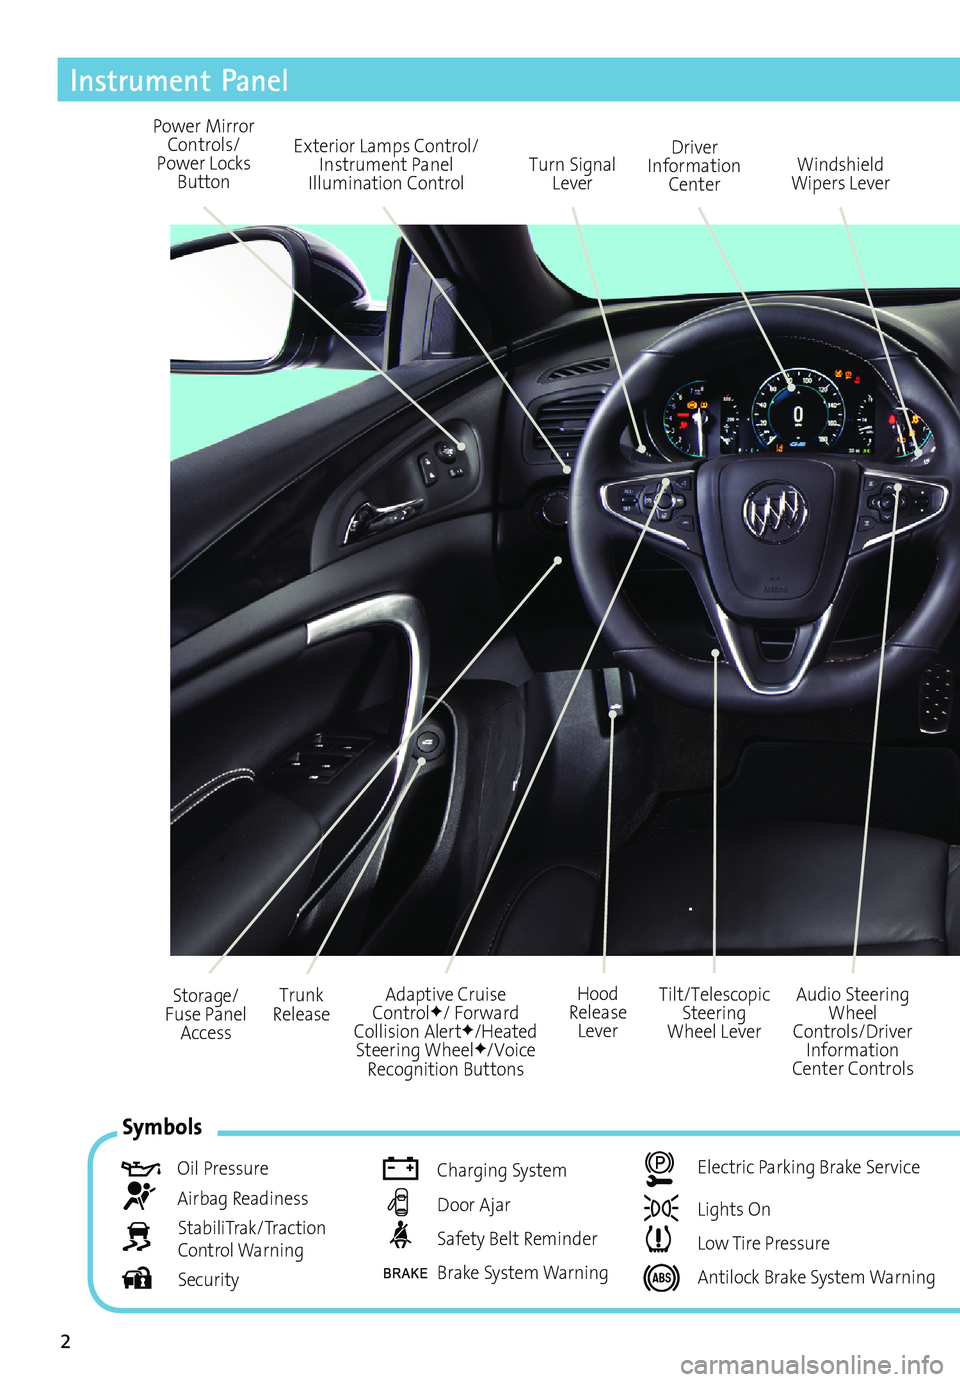
Exterior Lamps Control/Instrument Panel
Illumination Control Turn Signal
Lever
Power Mirror
Controls/
Power Locks Button Driver
Information Center
Tilt/Telescopic Steering
Wheel Lever
Adaptive Cruise
Control
F/ Forward
Collision AlertF/Heated
Steering WheelF/Voice
Recognition Buttons Audio Steering
Wheel
Controls/Driver Information
Center Controls Windshield
Wipers Lever
Hood
Release Lever
Trunk
Release
Storage/
Fuse Panel Access
Instrument Panel
Symbols
Oil Pressure
Airbag Readiness
StabiliTrak/Traction
Control Warning
Security
Charging System
Door Ajar
Safety Belt Reminder
Brake System Warning
Electric Parking Brake Service
Lights On
Low Tire Pressure
Antilock Brake System Warning
Page 3 of 20
3
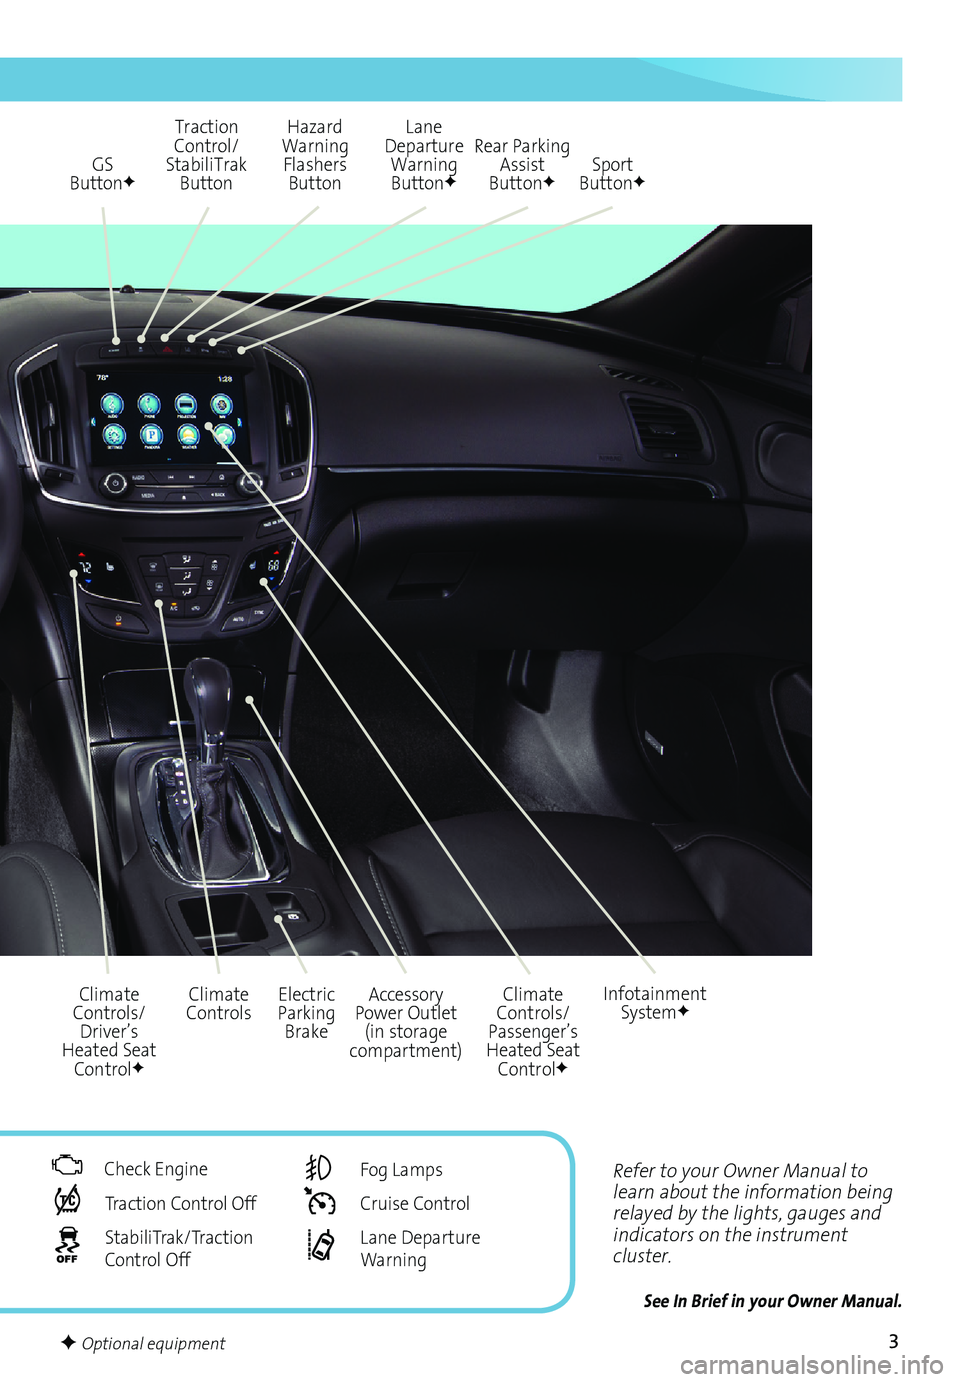
Refer to your Owner Manual to
learn about the information being
relayed by the lights, gauges and
indicators on the instrument
cluster.
See In Brief in your Owner Manual.
GS
ButtonF
Accessory
Power Outlet (in storage
compartment)
Climate
Controls Electric
Parking Brake Climate
Controls/
Passenger’s
Heated Seat Control
F
Infotainment SystemF
Traction
Control/
StabiliTrak Button Hazard
Warning Flashers Button
Climate
Controls/ Driver’s
Heated Seat Control
F
Rear Parking Assist
Button
F
Lane
Departure Warning Button
FSport
ButtonF
Check Engine
Traction Control Off
StabiliTrak/Traction
Control Off
Fog Lamps
Cruise Control
Lane Departure
Warning
F Optional equipment
Page 4 of 20

4
Remote Keyless Entry Transmitter (Key Fob)
Unlock
Press to unlock the driver’s door.
Press again to unlock all doors.
Lock
Press to lock all doors. The driver’s
door will not lock when open
if the Unlocked Door Anti-
Lockout feature is turned on.
Vehicle Locator/ Panic Alarm
Press and release to locate
your vehicle. The turn signal
lamps will flash and the horn
will sound.
Press and hold to activate the
alarm. The turn signal lamps will
flash and the horn will sound
until the button is pressed again or
the ignition is turned on.
Trunk
Press and hold to unlock the trunk.
Press the power door Unlock/ Lock button on the front doors to unlock or lock
all doors.
To open a locked door from the inside, pull the inside door handle to unlock the door
and then pull the handle again to open the door.
To prevent a rear door from opening from the inside, activate the Rear Door
Security Lock. See your Owner Manual for more information.
See Keys, Doors and Windows in your Owner Manual.
Remote Vehicle StartF
Press and release the Lock button and
then press and hold the button until
the turn signal lamps flash to start the engine from outside the vehicle. After entering the vehicle, turn the ignition to the ON position or press the ENGINE START/STOP button
F.
• During a remote start, the
engine will run for 10 minutes.
• Press and hold the
button
until the parking lamps turn
off to cancel a remote start.
Note: To change the remote lock,
unlock, and remote start settings, go
to Remote Lock, Unlock, Start in the Vehicle Settings menu.
If the remote start heated seat option
is selected, the heated seat button
indicators will not illuminate and the
temperature of the unoccupied heated seat may
be reduced during the remote start. The heated
seat turns off when the ignition is turned on.
See Keys, Doors and Windows in your Owner Manual.
F Optional equipment
Power Door Locks/Door Opening
Page 5 of 20
5F Optional equipment
Keyless Access SystemF
The Keyless Access System enables operation of the doors and ignition without remov-ing the key fob from a pocket or purse. The key fob must be within three feet of the door
being unlocked or the trunk.
Keyless Unlocking
With the key fob within range:
Press the lock button on the driver’s door handle to unlock the driver’s door; press it again within five seconds to unlock all doors.
Press the lock button on a passenger door handle to unlock all doors.
Press the touchpad above the license plate to open the trunk.
Keyless Locking
With the ignition off, the key fob out of the vehicle, and all doors closed:
Press the lock button on any door handle to lock all doors immediately.
If Passive Locking is turned on, all doors will lock automatically after a short delay once
all doors are closed.
Note: To change the door lock and unlock settings, go to Remote Lock, Unlock, Start in the Vehicle
Settings menu.
See Keys, Doors and Windows in your Owner Manual.
Keyless Access StartF
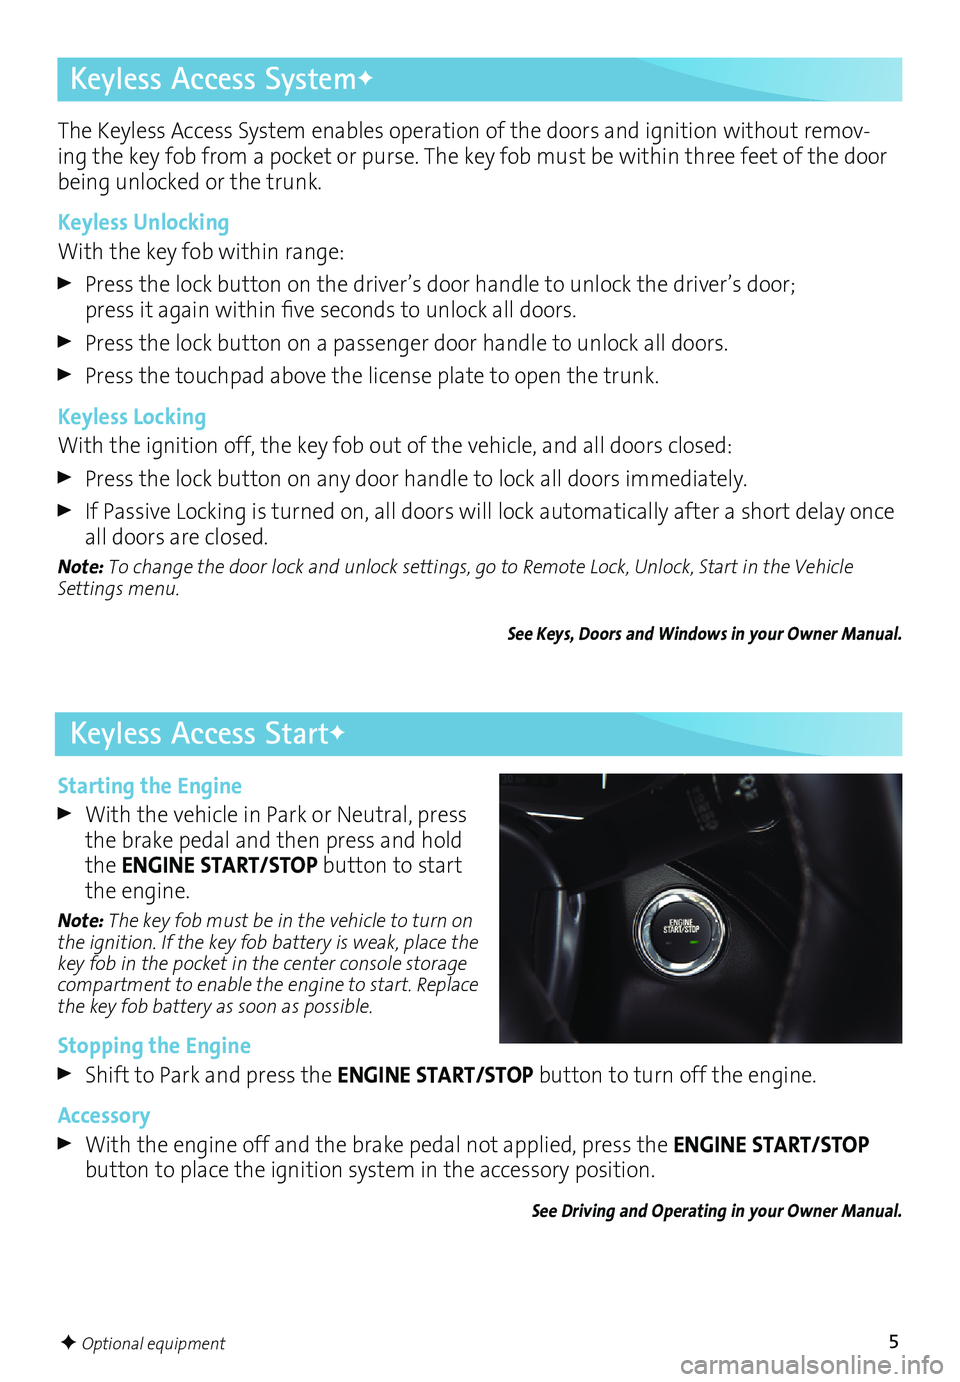
Starting the Engine
With the vehicle in Park or Neutral, press
the brake pedal and then press and hold
the ENGINE START/STOP button to start
the engine.
Note: The key fob must be in the vehicle to turn on
the ignition. If the key fob battery is weak, place the
key fob in the pocket in the center console storage
compartment to enable the engine to start. Replace
the key fob battery as soon as possible.
Stopping the Engine
Shift to Park and press the ENGINE START/STOP button to turn off the engine.
Accessory
With the engine off and the brake pedal not applied, press the ENGINE START/STOP
button to place the ignition system in the accessory position.
See Driving and Operating in your Owner Manual.
Page 6 of 20
6F Optional equipment
See Seats and Restraints in your Owner Manual.
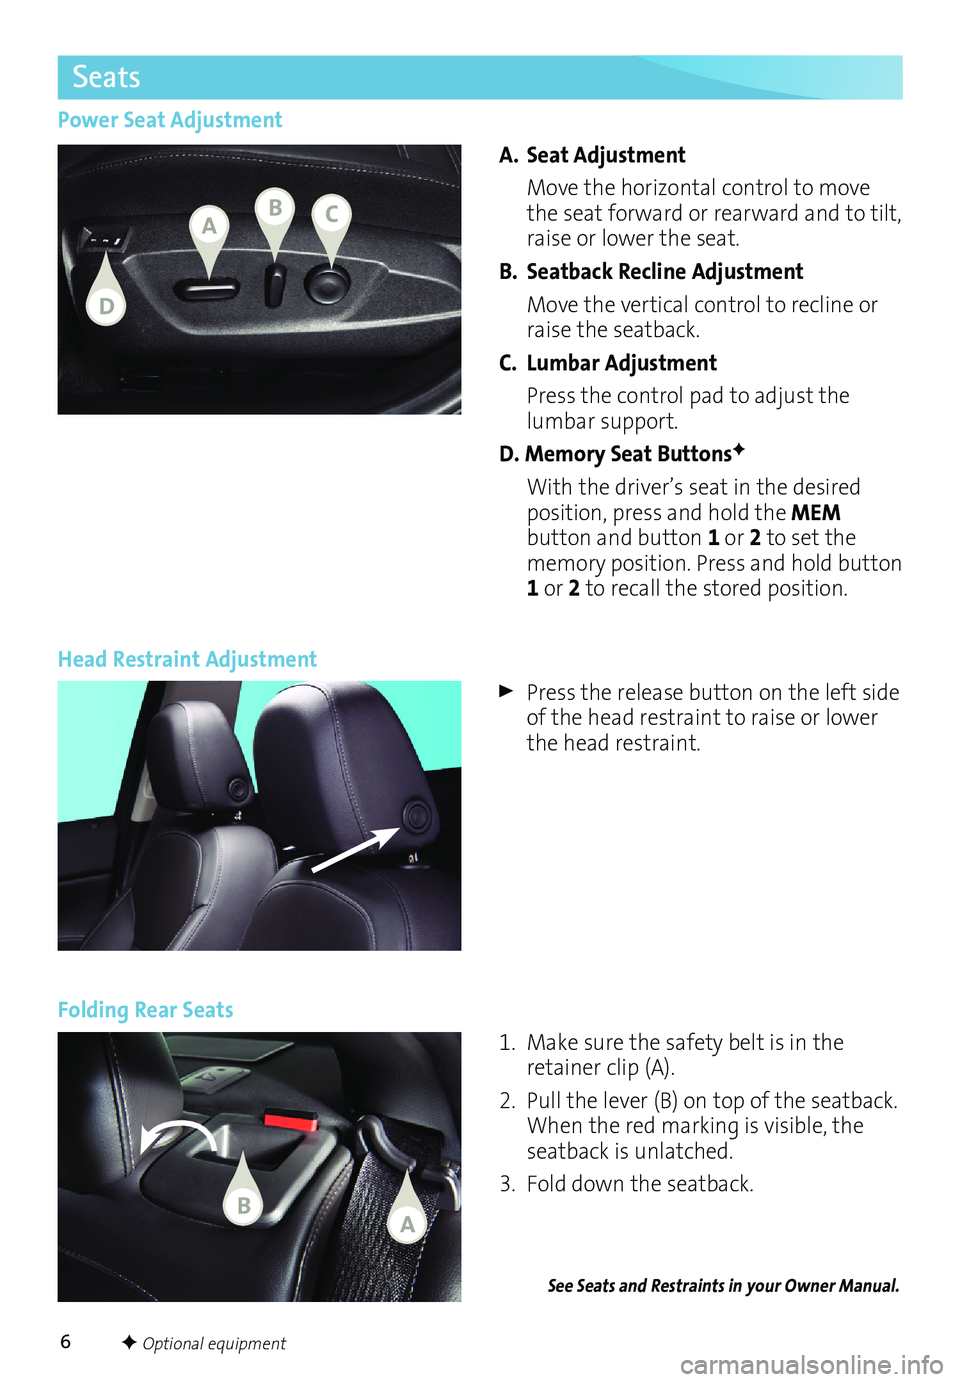
Power Seat AdjustmentA. Seat Adjustment
Move the horizontal control to move
the seat forward or rearward and to tilt,
raise or lower the seat.
B. Seatback Recline Adjustment
Move the vertical control to recline or
raise the seatback.
C. Lumbar Adjustment
Press the control pad to adjust the
lumbar support.
D. Memory Seat Buttons
F
With the driver’s seat in the desired
position, press and hold the MEM
button and button 1 or 2 to set the
memory position. Press and hold button
1 or 2 to recall the stored position.
Head Restraint Adjustment
Press the release button on the left side
of the head restraint to raise or lower
the head restraint.
Folding Rear Seats
1. Make sure the safety belt is in the
retainer clip (A).
2. Pull the lever (B) on top of the seatback.
When the red marking is
visible, the
seatback is unlatched.
3. Fold down the seatback.
Seats
ABC
D
BA
Page 7 of 20
7F Optional equipment
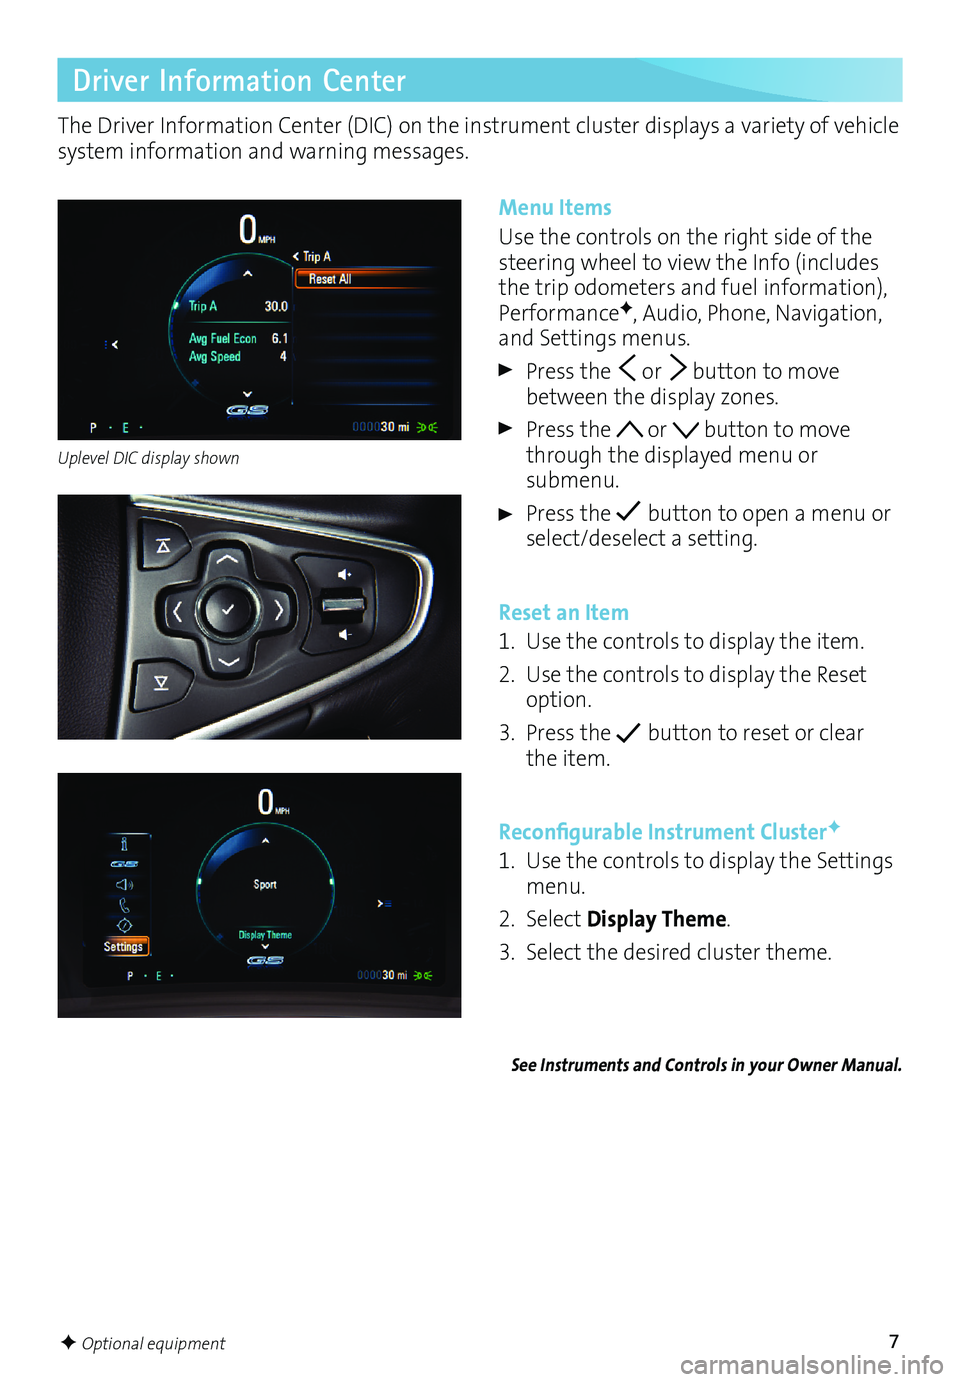
The Driver Information Center (DIC) on the instrument cluster displays a variety of vehicle
system information and warning messages.
Driver Information Center
Menu Items
Use the controls on the right side of the
steering wheel to view the Info (includes
the trip odometers and fuel information),
Performance
F, Audio, Phone, Navigation,
and Settings menus.
Press the or button to move
between the display zones.
Press the or button to move
through the displayed menu or
submenu.
Press the button to open a menu or
select/deselect a setting.
Reset an Item
1. Use the controls to display the item.
2. Use the controls to display the Reset
option.
3. Press the
button to reset or clear
the item.
Reconfigurable Instrument Cluster
F
1. Use the controls to display the Settings
menu.
2. Select Display Theme.
3. Select the desired cluster theme.
See Instruments and Controls in your Owner Manual.
Uplevel DIC display shown
Page 8 of 20

8F Optional equipment
Climate Controls
Driver’s
Temperature Control Fan Speed
Control Defrost Mode Rear Window Defogger Passenger’s
Temperature Control
Defog Vent Floor Air Delivery Modes
Automatic Operation
1. Press
AUTO.
2. Set the temperature for the driver and front passenger. The system automatically
controls the fan speed, air delivery, air conditioning and recirculation to reach the set
temperature. Allow time for the system to reach the desired temperature.
If the air delivery mode or fan speed is manually adjusted, automatic operation is
turned off.
Note: When the recirculation mode is used without air conditioning, the air humidity increases and the
windows may fog.
See Climate Controls in your Owner Manual.
A/C Air
Conditioning Control Power
On/Off Driver’s Heated Seat ControlF
Recirculation Mode AUTO
Automatic Operation SYNC
Link passenger’s
temperature
setting to driver’s temperature setting Passenger’s
Heated Seat Control
F
Page 9 of 20
9F Optional equipment
Lighting
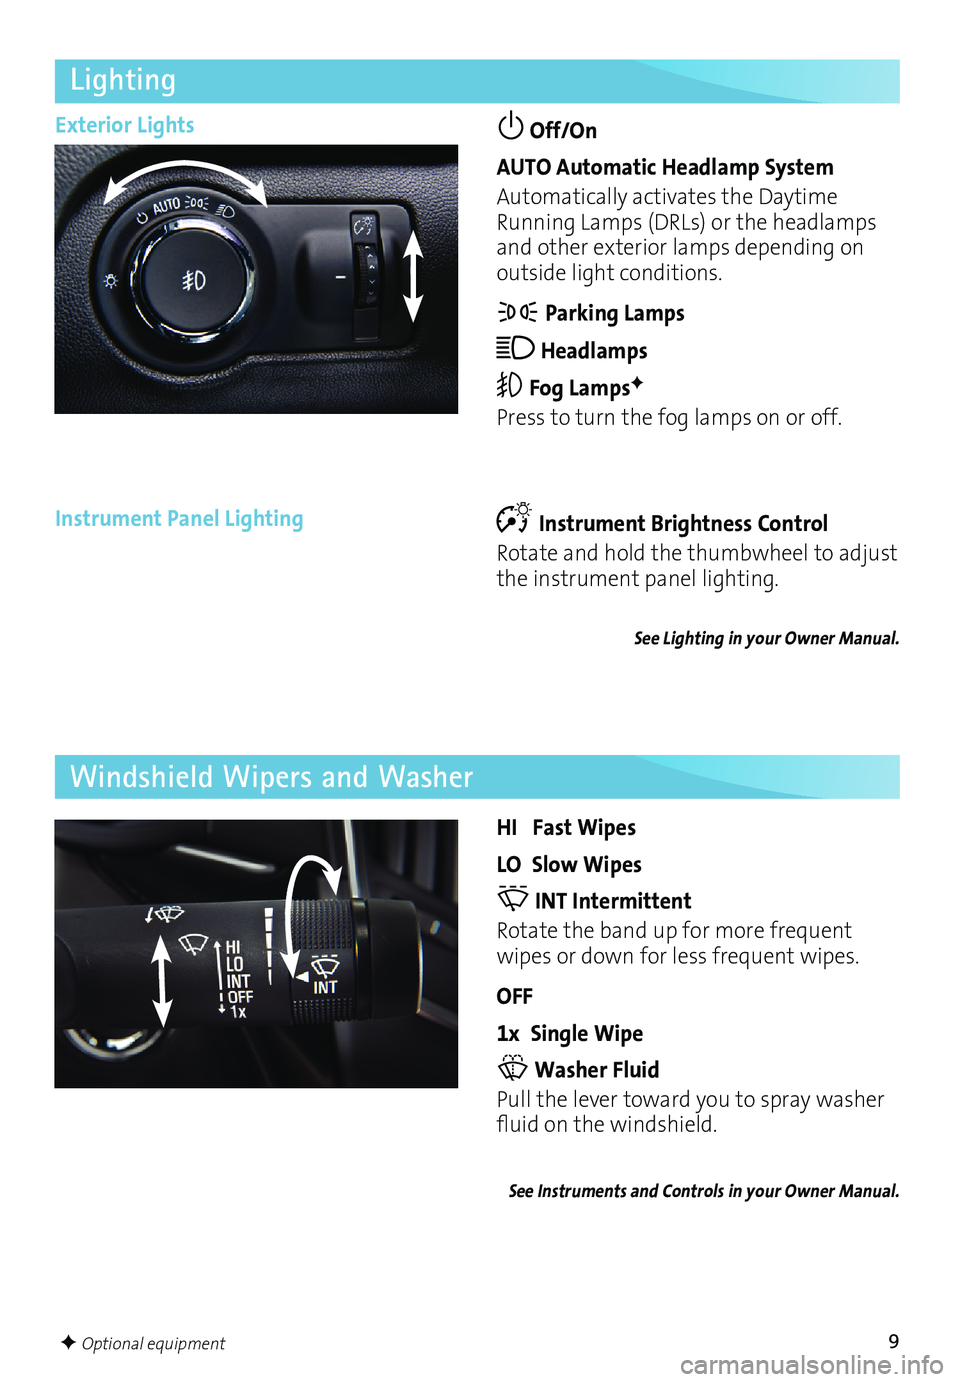
Exterior Lights Off/On
AUTO Automatic Headlamp System
Automatically activates the Daytime
Running Lamps (DRLs) or the headlamps
and other exterior lamps depending on
outside light conditions.
Parking Lamps
Headlamps
Fog LampsF
Press to turn the fog lamps on or off.
Instrument Brightness Control
Rotate and hold the thumbwheel to adjust
the instrument panel lighting.
See Lighting in your Owner Manual.
Instrument Panel Lighting
HI Fast Wipes
LO Slow Wipes
INT Intermittent
Rotate the band up for more frequent
wipes or down for less frequent wipes.
OFF
1x Single Wipe
Washer Fluid
Pull the lever toward you to spray washer
fluid on the windshield.
See Instruments and Controls in your Owner Manual.
Windshield Wipers and Washer
Page 10 of 20
10F Optional equipment
Infotainment System
Refer to your Owner Manual for important safety information about using the infotainment system
while driving.
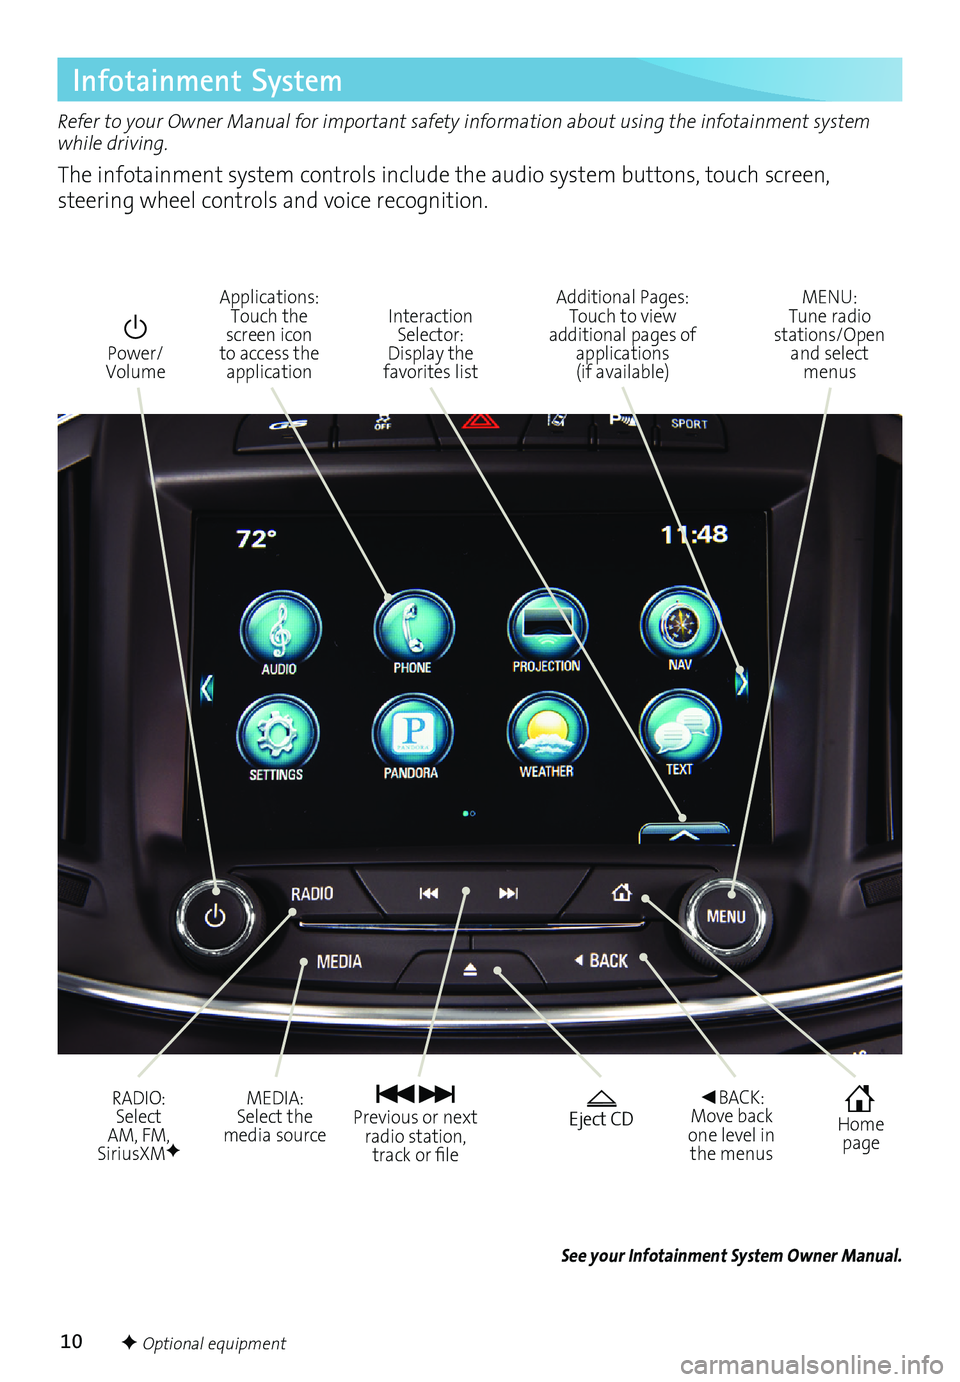
The infotainment system controls include the audio system buttons, touch screen,
steering wheel controls and voice recognition.
Power/
Volume
RADIO:
Select
AM, FM,
SiriusXM
F
Applications: Touch the
screen icon
to access the application
Home page
Interaction
Selector:
Display the
favorites list Additional Pages:
Touch to view
additional pages of applications
(if available)
Eject CD Previous or next radio station, track or file◄BACK: Move back
one level in the menus MENU:
Tune radio
stations/Open and select menus
MEDIA:
Select the
media source
See your Infotainment System Owner Manual.