CADILLAC CT6 2017 1.G Owners Manual
Manufacturer: CADILLAC, Model Year: 2017, Model line: CT6, Model: CADILLAC CT6 2017 1.GPages: 337, PDF Size: 3.89 MB
Page 271 of 337

Cadillac CT6 Owner Manual (GMNA-Localizing-MidEast-10293390) - 2017 -
CRC - 6/21/16
270 VEHICLE CARE
Number Usage1 Traction power inverter 2 Number Usage
2 Power coolant pump
3 – Number Usage
4 Traction power inverter 1
5 Transmission/ Ignition
6 –
7 Starter 2
8 Starter 1
9 Horn
10 –
11 Right LED
12 Left LED
13 High-beam headlamps
14 A/C control relay
15 Starter 2 relay
16 Starter 1 relay
17 Run/Crank relay
18 Right cornering LED
19 Low-beam headlamp relay
20 High-beam headlamp relay
Page 272 of 337
Cadillac CT6 Owner Manual (GMNA-Localizing-MidEast-10293390) - 2017 -
CRC - 6/21/16
VEHICLE CARE 271
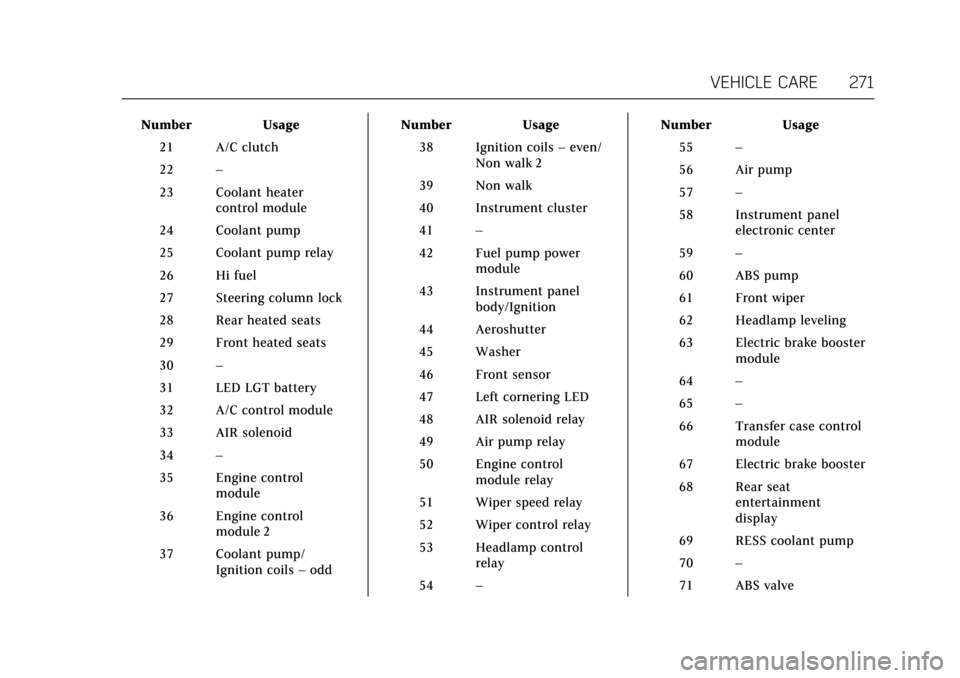
Number Usage21 A/C clutch
22 –
23 Coolant heater control module
24 Coolant pump
25 Coolant pump relay
26 Hi fuel
27 Steering column lock
28 Rear heated seats
29 Front heated seats
30 –
31 LED LGT battery
32 A/C control module
33 AIR solenoid
34 –
35 Engine control module
36 Engine control module 2
37 Coolant pump/ Ignition coils –odd Number Usage
38 Ignition coils –even/
Non walk 2
39 Non walk
40 Instrument cluster
41 –
42 Fuel pump power module
43 Instrument panel body/Ignition
44 Aeroshutter
45 Washer
46 Front sensor
47 Left cornering LED
48 AIR solenoid relay
49 Air pump relay
50 Engine control module relay
51 Wiper speed relay
52 Wiper control relay
53 Headlamp control relay
54 – Number Usage
55 –
56 Air pump
57 –
58 Instrument panel electronic center
59 –
60 ABS pump
61 Front wiper
62 Headlamp leveling
63 Electric brake booster module
64 –
65 –
66 Transfer case control module
67 Electric brake booster
68 Rear seat entertainment
display
69 RESS coolant pump
70 –
71 ABS valve
Page 273 of 337

Cadillac CT6 Owner Manual (GMNA-Localizing-MidEast-10293390) - 2017 -
CRC - 6/21/16
272 VEHICLE CARE
Number Usage72 –
73 –
Instrument Panel Fuse
Block
The instrument panel fuse block is
behind the driver side instrument
panel storage compartment.
The storage compartment has a press
to open latch. To access the fuses,
open the compartment by pressing
and releasing near the top center
square.Apply pressure to the two retaining
tabs on the sides of the compartment,
until the two retaining tabs clear the
sides of the instrument panel. Allow
the compartment to move downward,
and out of the way.
To reinstall the compartment, reverse
the steps.
The vehicle may not be equipped with
all of the fuses and relays shown.
Page 274 of 337
Cadillac CT6 Owner Manual (GMNA-Localizing-MidEast-10293390) - 2017 -
CRC - 6/21/16
VEHICLE CARE 273
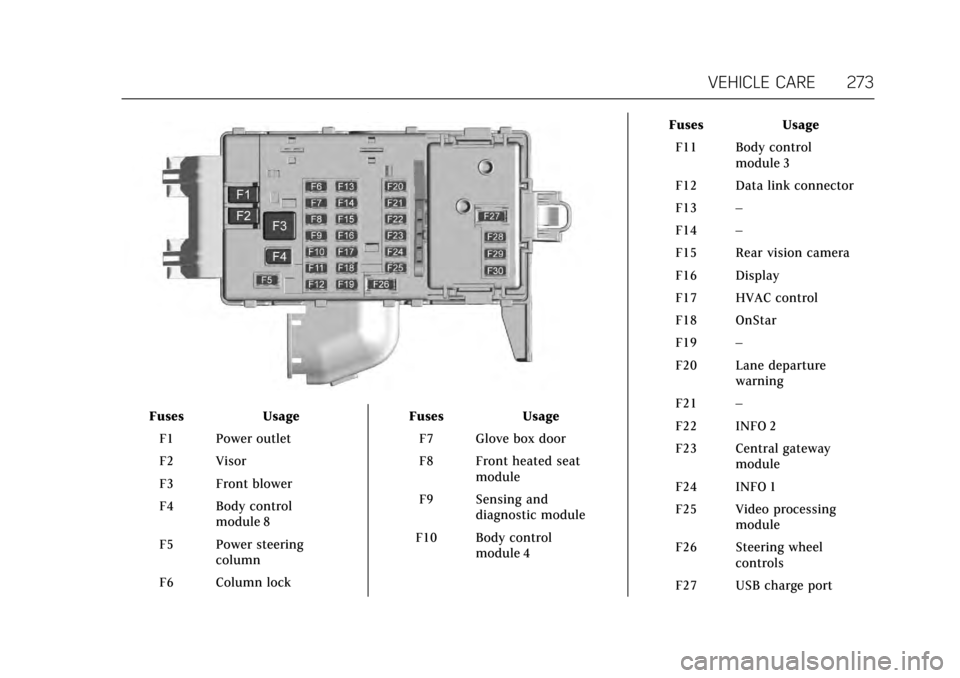
FusesUsage
F1 Power outlet
F2 Visor
F3 Front blower
F4 Body control module 8
F5 Power steering column
F6 Column lock Fuses
Usage
F7 Glove box door
F8 Front heated seat module
F9 Sensing and diagnostic module
F10 Body control module 4 Fuses
Usage
F11 Body control module 3
F12 Data link connector
F13 –
F14 –
F15 Rear vision camera
F16 Display
F17 HVAC control
F18 OnStar
F19 –
F20 Lane departure warning
F21 –
F22 INFO 2
F23 Central gateway module
F24 INFO 1
F25 Video processing module
F26 Steering wheel controls
F27 USB charge port
Page 275 of 337

Cadillac CT6 Owner Manual (GMNA-Localizing-MidEast-10293390) - 2017 -
CRC - 6/21/16
274 VEHICLE CARE
FusesUsage
F28 Wireless charger
F29 –
F30 Speaker
Rear Compartment Fuse
Block
The rear compartment fuse block is
behind a cover on the passenger side
of the rear compartment.
The vehicle may not be equipped with
all of the fuses, relays, and features
shown.
Fuse Usage
F01 UCAP
F02 Trunk power outlet
F03 Driver window motor
F04 –
F05 Canister vent
F06 Right rear memory seat Fuse
Usage
F07 Body control module 7
F08 Driver seat adjustment switch
F09 Passive entry/Passive start
F10 Rear subwoofer am- plifier
Page 276 of 337
Cadillac CT6 Owner Manual (GMNA-Localizing-MidEast-10293390) - 2017 -
CRC - 6/21/16
VEHICLE CARE 275
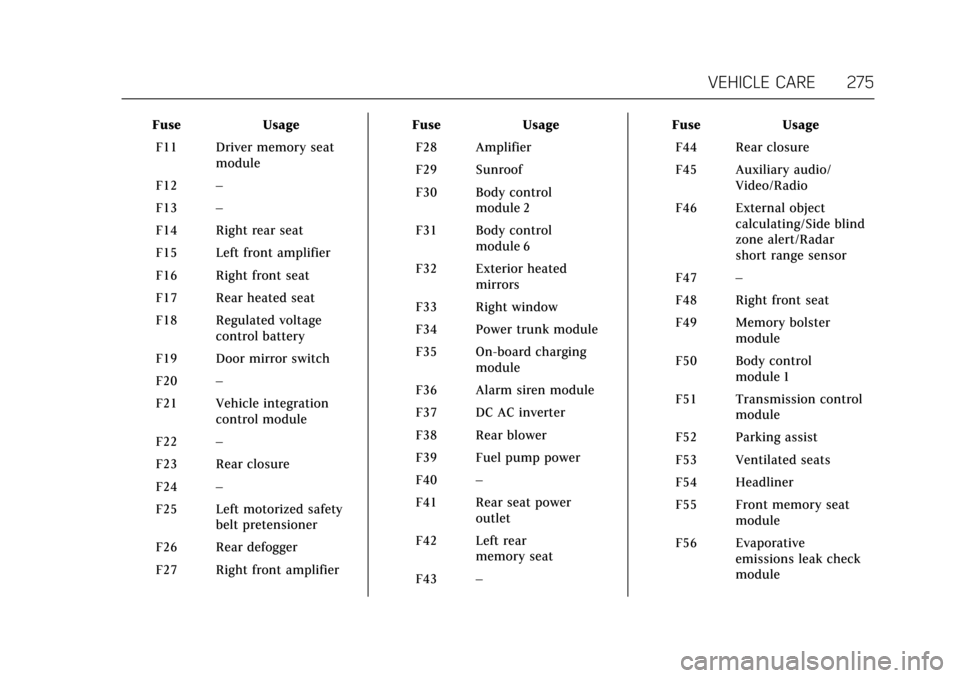
FuseUsage
F11 Driver memory seat module
F12 –
F13 –
F14 Right rear seat
F15 Left front amplifier
F16 Right front seat
F17 Rear heated seat
F18 Regulated voltage control battery
F19 Door mirror switch
F20 –
F21 Vehicle integration control module
F22 –
F23 Rear closure
F24 –
F25 Left motorized safety belt pretensioner
F26 Rear defogger
F27 Right front amplifier Fuse
Usage
F28 Amplifier
F29 Sunroof
F30 Body control module 2
F31 Body control module 6
F32 Exterior heated mirrors
F33 Right window
F34 Power trunk module
F35 On-board charging module
F36 Alarm siren module
F37 DC AC inverter
F38 Rear blower
F39 Fuel pump power
F40 –
F41 Rear seat power outlet
F42 Left rear memory seat
F43 – Fuse
Usage
F44 Rear closure
F45 Auxiliary audio/ Video/Radio
F46 External object calculating/Side blind
zone alert/Radar
short range sensor
F47 –
F48 Right front seat
F49 Memory bolster module
F50 Body control module 1
F51 Transmission control module
F52 Parking assist
F53 Ventilated seats
F54 Headliner
F55 Front memory seat module
F56 Evaporative emissions leak check
module
Page 277 of 337
Cadillac CT6 Owner Manual (GMNA-Localizing-MidEast-10293390) - 2017 -
CRC - 6/21/16
276 VEHICLE CARE
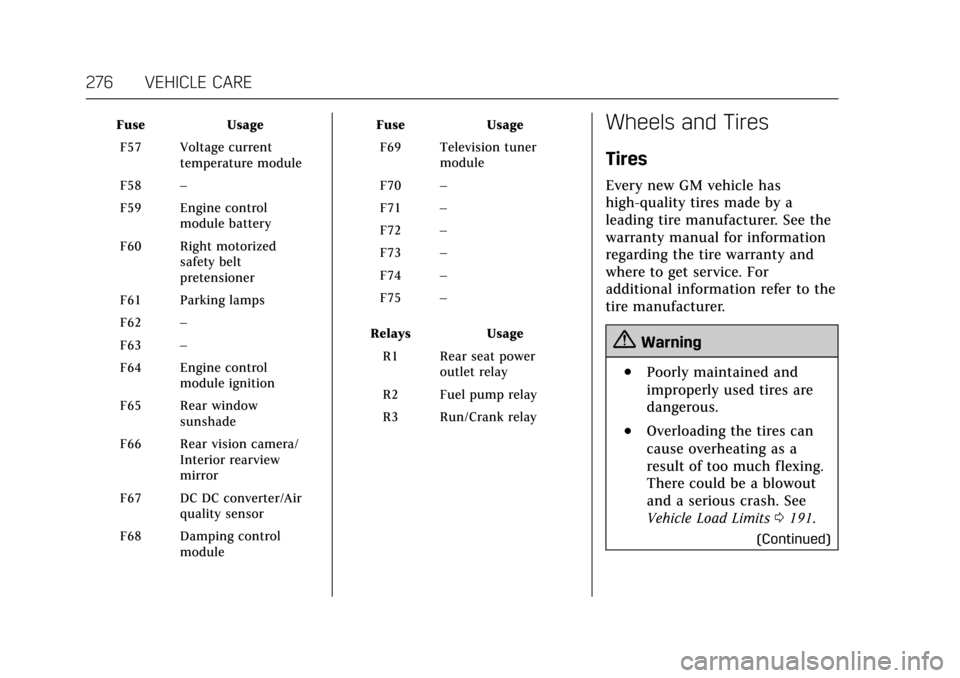
FuseUsage
F57 Voltage current temperature module
F58 –
F59 Engine control module battery
F60 Right motorized safety belt
pretensioner
F61 Parking lamps
F62 –
F63 –
F64 Engine control module ignition
F65 Rear window sunshade
F66 Rear vision camera/ Interior rearview
mirror
F67 DC DC converter/Air quality sensor
F68 Damping control module Fuse
Usage
F69 Television tuner module
F70 –
F71 –
F72 –
F73 –
F74 –
F75 –
Relays Usage
R1 Rear seat power outlet relay
R2 Fuel pump relay
R3 Run/Crank relayWheels and Tires
Tires
Every new GM vehicle has
high-quality tires made by a
leading tire manufacturer. See the
warranty manual for information
regarding the tire warranty and
where to get service. For
additional information refer to the
tire manufacturer.
{Warning
.Poorly maintained and
improperly used tires are
dangerous.
.Overloading the tires can
cause overheating as a
result of too much flexing.
There could be a blowout
and a serious crash. See
Vehicle Load Limits 0191.
(Continued)
Page 278 of 337

Cadillac CT6 Owner Manual (GMNA-Localizing-MidEast-10293390) - 2017 -
CRC - 6/21/16
VEHICLE CARE 277
Warning (Continued)
.Underinflated tires pose
the same danger as
overloaded tires. The
resulting crash could cause
serious injury. Check all
tires frequently to
maintain the
recommended pressure.
Tire pressure should be
checked when the tires
are cold.
.Overinflated tires are more
likely to be cut, punctured,
or broken by a sudden
impact—such as when
hitting a pothole. Keep
tires at the recommended
pressure.
.Worn or old tires can
cause a crash. If the tread
is badly worn,
replace them.
(Continued)
Warning (Continued)
.Replace any tires that have
been damaged by impacts
with potholes, curbs, etc.
.Improperly repaired tires
can cause a crash. Only
the dealer or an authorized
tire service center should
repair, replace, dismount,
and mount the tires.
.Do not spin the tires in
excess of 56 km/h
(35 mph) on slippery
surfaces such as snow,
mud, ice, etc. Excessive
spinning may cause the
tires to explode.
See Tire Pressure for High-Speed
Operation 0280 for inflation
pressure adjustment for
high-speed driving.
All-Season Tires
This vehicle may come with all-season
tires. These tires are designed to
provide good overall performance on
most road surfaces and weather
conditions. Original equipment tires
designed to GM's specific tire
performance criteria have a TPC
specification code molded onto the
sidewall. Original equipment
all-season tires can be identified by
the last two characters of this TPC
code, which will be “MS.”
Consider installing winter tires on the
vehicle if frequent driving on snow or
ice-covered roads is expected.
All-season tires provide adequate
performance for most winter driving
conditions, but they may not offer the
same level of traction or performance
as winter tires on snow or ice-covered
roads. See Winter Tires 0277.
Winter Tires
This vehicle was not originally
equipped with winter tires. Winter
tires are designed for increased
traction on snow and ice-covered
roads. Consider installing winter tires
Page 279 of 337

Cadillac CT6 Owner Manual (GMNA-Localizing-MidEast-10293390) - 2017 -
CRC - 6/21/16
278 VEHICLE CARE
on the vehicle if frequent driving on
ice or snow covered roads is expected.
See your dealer for details regarding
winter tire availability and proper tire
selection. Also, seeBuying New
Tires 0286.
With winter tires, there may be
decreased dry road traction, increased
road noise, and shorter tread life.
After changing to winter tires, be alert
for changes in vehicle handling and
braking.
If using winter tires:
. Use tires of the same brand and
tread type on all four wheel
positions.
. Use only radial ply tires of the
same size, load range, and speed
rating as the original equipment
tires.
Winter tires with the same speed
rating as the original equipment tires
may not be available for H, V, W, Y,
and ZR speed rated tires. If winter
tires with a lower speed rating are
chosen, never exceed the tire's
maximum speed capability.Low-Profile Tires
If the vehicle has 245/45R19 or
245/40R20 size tires, they are
classified as low-profile tires.
Caution
Low-profile tires are more
susceptible to damage from road
hazards or curb impact than
standard profile tires. Tire and/or
wheel assembly damage can occur
when coming into contact with
road hazards like potholes, or sharp
edged objects, or when sliding into
a curb. The warranty does not cover
this type of damage. Keep tires set
to the correct inflation pressure and
when possible, avoid contact with
curbs, potholes, and other road
hazards.
Summer Tires
This vehicle may come with high
performance summer tires. These tires
have a special tread and compound
that are optimized for maximum dry
and wet road performance. This special tread and compound will have
decreased performance in cold
climates, and on ice and snow. It is
recommended that winter tires be
installed on the vehicle if frequent
driving at temperatures below
approximately 5 °C (40 °F) or on ice or
snow covered roads is expected. See
Winter Tires
0277.
Caution
High performance summer tires
have rubber compounds that lose
flexibility and may develop surface
cracks in the tread area at
temperatures below −7 °C (20 °F).
Always store high performance
summer tires indoors and at
temperatures above −7 °C (20 °F)
when not in use. If the tires have
been subjected to −7 °C (20 °F) or
less, let them warm up in a heated
space to at least 5 °C (40 °F) for
24 hours or more before being
installed or driving a vehicle on
which they are installed. Do not
apply heat or blow heated air
(Continued)
Page 280 of 337
Cadillac CT6 Owner Manual (GMNA-Localizing-MidEast-10293390) - 2017 -
CRC - 6/21/16
VEHICLE CARE 279
Caution (Continued)
directly on the tires. Always inspect
tires before use. SeeTire
Inspection 0284.
Tire Pressure
Tires need the correct amount of
air pressure to operate effectively.
Caution
Neither tire underinflation nor
overinflation is good.
Underinflated tires, or tires that
do not have enough air, can
result in:
.Tire overloading and
overheating which could
lead to a blowout.
.Premature or
irregular wear.
.Poor handling.
.Reduced fuel economy.
(Continued)
Caution (Continued)
Overinflated tires, or tires that
have too much air, can result in:
.Unusual wear.
.Poor handling.
.Rough ride.
.Needless damage from
road hazards.
The Tire and Loading Information
label on the vehicle indicates the
original equipment tires and the
correct cold tire inflation
pressures. The recommended
pressure is the minimum air
pressure needed to support the
vehicle's maximum load carrying
capacity. See Vehicle Load
Limits 0191.
How the vehicle is loaded affects
vehicle handling and ride comfort.
Never load the vehicle with more
weight than it was designed to
carry. When to Check
Check the tires once a month or
more. Do not forget the compact
spare, if the vehicle has one. The
cold compact spare tire pressure
should be at 420 kPa (60 psi). See
Compact Spare Tire
0295.
How to Check
Use a good quality pocket-type
gauge to check tire pressure.
Proper tire inflation cannot be
determined by looking at the tire.
Check the tire inflation pressure
when the tires are cold, meaning
the vehicle has not been driven for
at least three hours or no more
than 1.6 km (1 mi).
Remove the valve cap from the
tire valve stem. Press the tire
gauge firmly onto the valve to get
a pressure measurement. If the
cold tire inflation pressure
matches the recommended
pressure on the Tire and Loading
Information label, no further
adjustment is necessary. If the