clock CADILLAC CTS 2013 2.G Owner's Manual
[x] Cancel search | Manufacturer: CADILLAC, Model Year: 2013, Model line: CTS, Model: CADILLAC CTS 2013 2.GPages: 478, PDF Size: 7.7 MB
Page 391 of 478
Black plate (91,1)Cadillac CTS/CTS-V Owner Manual - 2013 - crc2 - 8/22/12
Vehicle Care 10-91
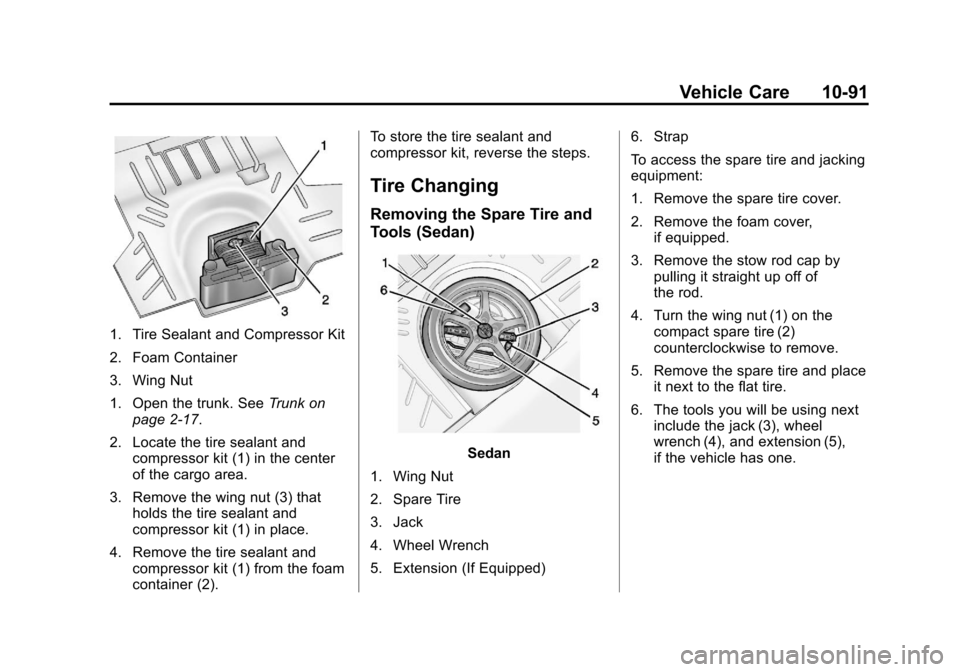
1. Tire Sealant and Compressor Kit
2. Foam Container
3. Wing Nut
1. Open the trunk. SeeTrunk on
page 2‑17.
2. Locate the tire sealant and compressor kit (1) in the center
of the cargo area.
3. Remove the wing nut (3) that holds the tire sealant and
compressor kit (1) in place.
4. Remove the tire sealant and compressor kit (1) from the foam
container (2). To store the tire sealant and
compressor kit, reverse the steps.
Tire Changing
Removing the Spare Tire and
Tools (Sedan)
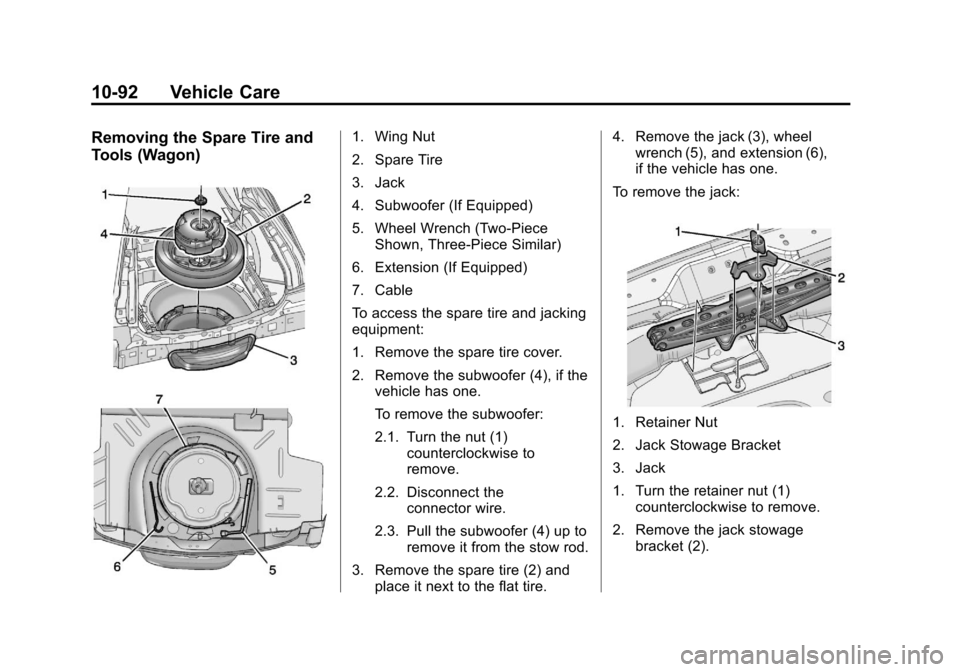
Sedan
1. Wing Nut
2. Spare Tire
3. Jack
4. Wheel Wrench
5. Extension (If Equipped) 6. Strap
To access the spare tire and jacking
equipment:
1. Remove the spare tire cover.
2. Remove the foam cover,
if equipped.
3. Remove the stow rod cap by pulling it straight up off of
the rod.
4. Turn the wing nut (1) on the compact spare tire (2)
counterclockwise to remove.
5. Remove the spare tire and place it next to the flat tire.
6. The tools you will be using next include the jack (3), wheel
wrench (4), and extension (5),
if the vehicle has one.
Page 392 of 478
Black plate (92,1)Cadillac CTS/CTS-V Owner Manual - 2013 - crc2 - 8/22/12
10-92 Vehicle Care
Removing the Spare Tire and
Tools (Wagon)1. Wing Nut
2. Spare Tire
3. Jack
4. Subwoofer (If Equipped)
5. Wheel Wrench (Two-PieceShown, Three-Piece Similar)
6. Extension (If Equipped)
7. Cable
To access the spare tire and jacking
equipment:
1. Remove the spare tire cover.
2. Remove the subwoofer (4), if the vehicle has one.
To remove the subwoofer:
2.1. Turn the nut (1)
counterclockwise to
remove.
2.2. Disconnect the connector wire.
2.3. Pull the subwoofer (4) up to remove it from the stow rod.
3. Remove the spare tire (2) and place it next to the flat tire. 4. Remove the jack (3), wheel
wrench (5), and extension (6),
if the vehicle has one.
To remove the jack:
1. Retainer Nut
2. Jack Stowage Bracket
3. Jack
1. Turn the retainer nut (1) counterclockwise to remove.
2. Remove the jack stowage bracket (2).
Page 394 of 478
Black plate (94,1)Cadillac CTS/CTS-V Owner Manual - 2013 - crc2 - 8/22/12
10-94 Vehicle Care
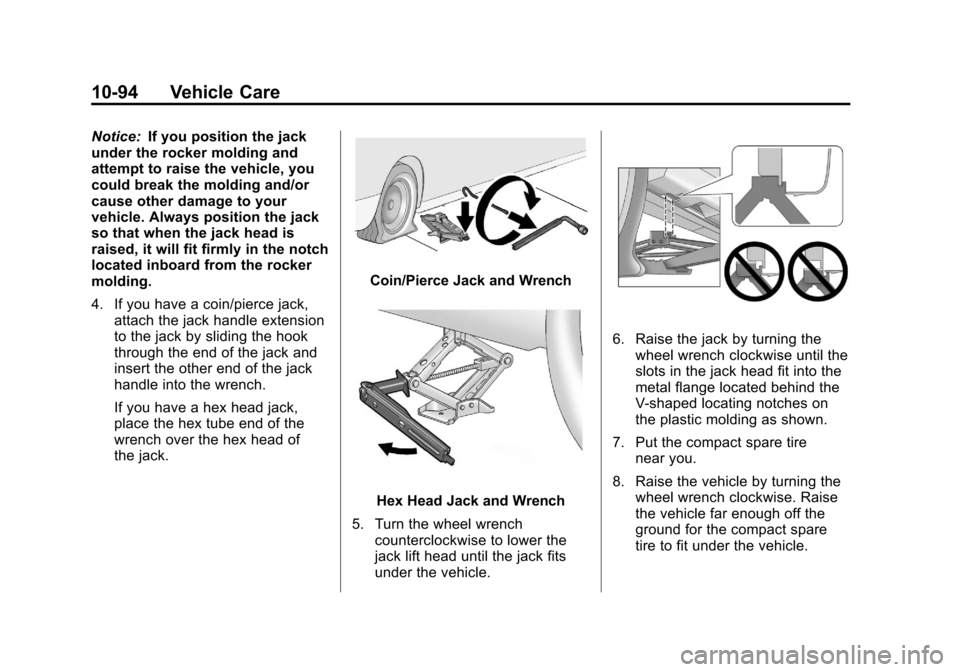
Notice:If you position the jack
under the rocker molding and
attempt to raise the vehicle, you
could break the molding and/or
cause other damage to your
vehicle. Always position the jack
so that when the jack head is
raised, it will fit firmly in the notch
located inboard from the rocker
molding.
4. If you have a coin/pierce jack,
attach the jack handle extension
to the jack by sliding the hook
through the end of the jack and
insert the other end of the jack
handle into the wrench.
If you have a hex head jack,
place the hex tube end of the
wrench over the hex head of
the jack.
Coin/Pierce Jack and Wrench
Hex Head Jack and Wrench
5. Turn the wheel wrench counterclockwise to lower the
jack lift head until the jack fits
under the vehicle.
6. Raise the jack by turning thewheel wrench clockwise until the
slots in the jack head fit into the
metal flange located behind the
V-shaped locating notches on
the plastic molding as shown.
7. Put the compact spare tire near you.
8. Raise the vehicle by turning the wheel wrench clockwise. Raise
the vehicle far enough off the
ground for the compact spare
tire to fit under the vehicle.
Page 395 of 478
Black plate (95,1)Cadillac CTS/CTS-V Owner Manual - 2013 - crc2 - 8/22/12
Vehicle Care 10-95
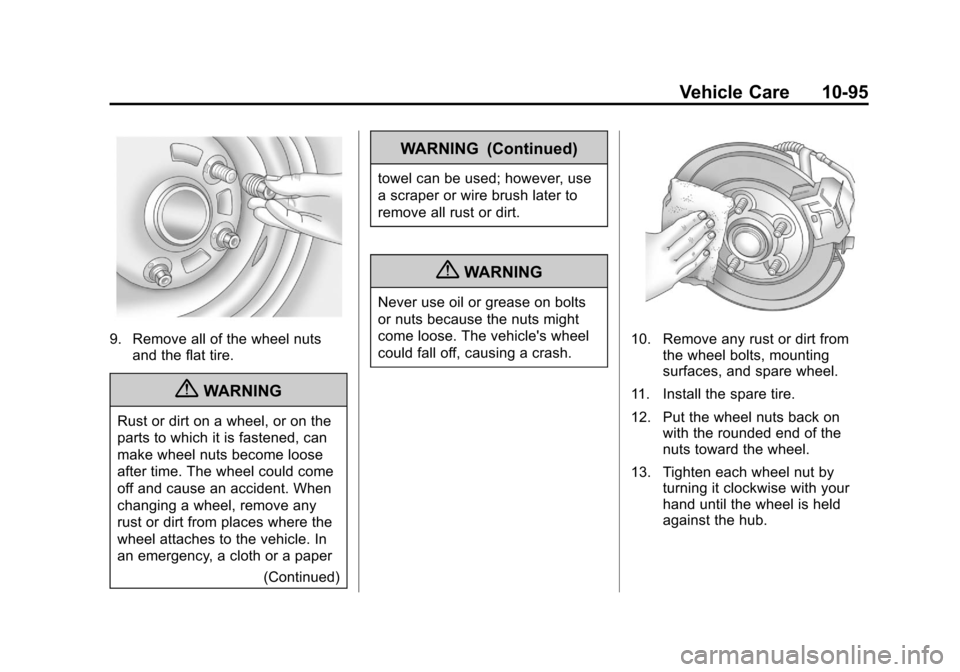
9. Remove all of the wheel nutsand the flat tire.
{WARNING
Rust or dirt on a wheel, or on the
parts to which it is fastened, can
make wheel nuts become loose
after time. The wheel could come
off and cause an accident. When
changing a wheel, remove any
rust or dirt from places where the
wheel attaches to the vehicle. In
an emergency, a cloth or a paper
(Continued)
WARNING (Continued)
towel can be used; however, use
a scraper or wire brush later to
remove all rust or dirt.
{WARNING
Never use oil or grease on bolts
or nuts because the nuts might
come loose. The vehicle's wheel
could fall off, causing a crash.
10. Remove any rust or dirt fromthe wheel bolts, mounting
surfaces, and spare wheel.
11. Install the spare tire.
12. Put the wheel nuts back on with the rounded end of the
nuts toward the wheel.
13. Tighten each wheel nut by turning it clockwise with your
hand until the wheel is held
against the hub.
Page 396 of 478
Black plate (96,1)Cadillac CTS/CTS-V Owner Manual - 2013 - crc2 - 8/22/12
10-96 Vehicle Care
14. Lower the vehicle by turningthe wheel wrench
counterclockwise. Lower the
jack completely.
{WARNING
Wheel nuts that are improperly or
incorrectly tightened can cause
the wheels to become loose or
come off. The wheel nuts should
be tightened with a torque wrench
to the proper torque specification
after replacing. Follow the torque
specification supplied by the
aftermarket manufacturer when
using accessory locking wheel
nuts. See Capacities and
Specifications on page 12‑2 for
original equipment wheel nut
torque specifications.
Notice: Improperly tightened
wheel nuts can lead to brake
pulsation and rotor damage. To
avoid expensive brake repairs,
evenly tighten the wheel nuts in the proper sequence and to the
proper torque specification. See
Capacities and Specifications on
page 12‑2
for the wheel nut
torque specification.
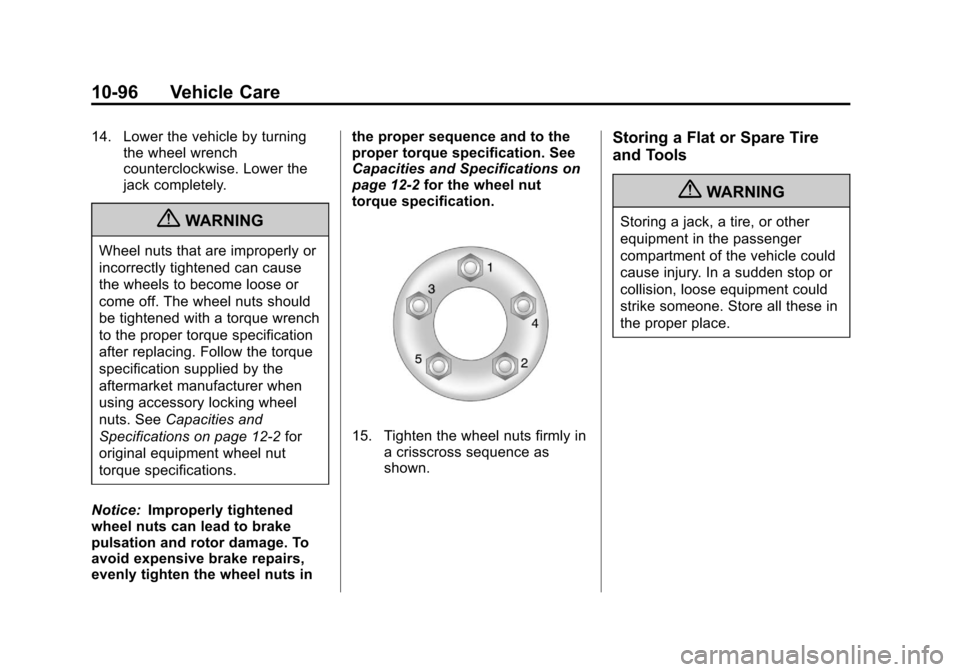
15. Tighten the wheel nuts firmly in a crisscross sequence as
shown.
Storing a Flat or Spare Tire
and Tools
{WARNING
Storing a jack, a tire, or other
equipment in the passenger
compartment of the vehicle could
cause injury. In a sudden stop or
collision, loose equipment could
strike someone. Store all these in
the proper place.
Page 467 of 478

Black plate (3,1)Cadillac CTS/CTS-V Owner Manual - 2013 - crc2 - 8/22/12
INDEX i-3
CleaningExterior Care . . . . . . . . . . . . . . 10-105
Interior Care . . . . . . . . . . . . . . . 10-108
Climate Control Systems Dual Automatic . . . . . . . . . . . . . . . . 8-1
Clock . . . . . . . . . . . . . . . . . . . . . . . . . . . 5-9
Cluster, Instrument . . . . . . . . . . . . 5-11
Clutch, Hydraulic . . . . . . . . . . . . . 10-13
Collision Damage Repair . . . . . 13-14
Compact Spare Tire . . . . . . . . . . 10-98
Compass . . . . . . . . . . . . . . . . . . . . . . . 5-7 Messages . . . . . . . . . . . . . . . . . . . . 5-33
Competitive Driving . . . . . . . . . . . . . 9-5
Competitive Driving Mode . . . . . 9-37
Compressor Kit, Tire Sealant . . . . . . . . . . . . . . . . . . . . . . 10-82
Connections OnStar
®. . . . . . . . . . . . . . . . . . . . . . 14-3
Control of a Vehicle . . . . . . . . . . . . . 9-3
Convenience Net . . . . . . . . . . . . . . . 4-5
Convex Mirrors . . . . . . . . . . . . . . . . 2-26 Coolant
Engine . . . . . . . . . . . . . . . . . . . . . . 10-17
Engine Temperature
Gauge . . . . . . . . . . . . . . . . . . . . . . 5-16
Engine Temperature Warning Light . . . . . . . . . . . . . . . 5-24
Cooling System . . . . . . . . . . . . . . . 10-16
Engine Messages . . . . . . . . . . . . 5-34
Courtesy Transportation Program . . . . . . . . . . . . . . . . . . . . . 13-13
Cover
Cargo . . . . . . . . . . . . . . . . . . . . . . . . . . 4-2
Engine . . . . . . . . . . . . . . . . . . . . . . . . 10-8
Cruise Control . . . . . . . . . . . . . . . . . 9-39 Light . . . . . . . . . . . . . . . . . . . . . . . . . . 5-27
Messages . . . . . . . . . . . . . . . . . . . . 5-34
Cupholders . . . . . . . . . . . . . . . . . . . . . 4-1
Customer Assistance . . . . . . . . . . 13-5 Offices . . . . . . . . . . . . . . . . . . 13-4, 13-5
Text Telephone (TTY)Users . . . . . . . . . . . . . . . . . . . . . . . 13-5
Customer Information Service PublicationsOrdering Information . . . . . . 13-16
Customer Satisfaction
Procedure . . . . . . . . . . . . . . 13-1, 13-3
D
Damage Repair, Collision . . . . . 13-14
Danger, Warnings, andCautions . . . . . . . . . . . . . . . . . . . . . . . . iv
Data Recorders, Event . . . . . . . 13-19
Daytime Running Lamps (DRL) . . . . . . . . . . . . . . . . . . 6-2
Defensive Driving . . . . . . . . . . . . . . . 9-3
Delayed Locking . . . . . . . . . . . . . . . 2-15
Devices Auxiliary . . . . . . . . . . . . . . . . . . . . . . 7-34
Diagnostics OnStar
®. . . . . . . . . . . . . . . . . . . . . . 14-5
Distracted Driving . . . . . . . . . . . . . . . 9-2
Door Ajar Messages . . . . . . . . . . . . . . . 5-34
Central Door Unlocking
System . . . . . . . . . . . . . . . . . . . . . . 2-15
Delayed Locking . . . . . . . . . . . . . . 2-15
Locks . . . . . . . . . . . . . . . . . . . 2-12, 2-13
Power Locks . . . . . . . . . . . . . . . . . . 2-15
Drive Belt Routing, Engine . . . . . 12-5
Drive Systems All-Wheel Drive . . . . . . . 10-27, 9-31
Driver Information
Center (DIC) . . . . . . . . . . . . . . . . . 5-27