display CADILLAC CTS 2014 User Guide
[x] Cancel search | Manufacturer: CADILLAC, Model Year: 2014, Model line: CTS, Model: CADILLAC CTS 2014Pages: 400, PDF Size: 4.53 MB
Page 66 of 400

Black plate (12,1)Cadillac CTS Owner Manual (GMNA-Localizing-U.S./Canada/Mexico-
6081492) - 2014 - CRC 2nd Edition - 11/18/13
3-12 Seats and Restraints
Heated Rear Seats
{Warning
If you cannot feel temperature
change or pain to the skin, the
seat heater may cause burns.
See the Warning underHeated
and Ventilated Front Seats on
page 3-8.
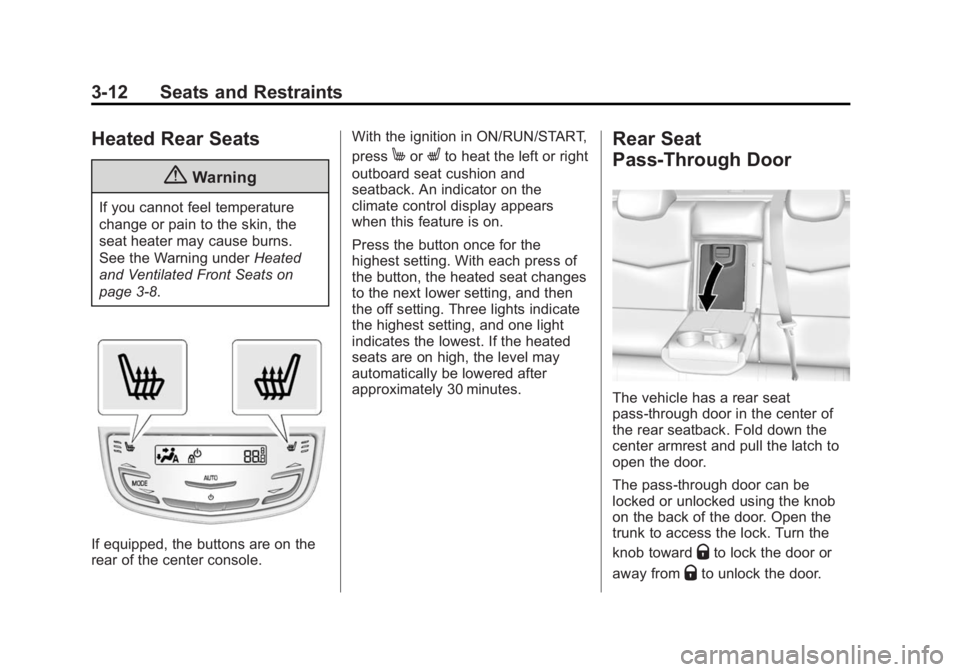
If equipped, the buttons are on the
rear of the center console. With the ignition in ON/RUN/START,
press
MorLto heat the left or right
outboard seat cushion and
seatback. An indicator on the
climate control display appears
when this feature is on.
Press the button once for the
highest setting. With each press of
the button, the heated seat changes
to the next lower setting, and then
the off setting. Three lights indicate
the highest setting, and one light
indicates the lowest. If the heated
seats are on high, the level may
automatically be lowered after
approximately 30 minutes.Rear Seat
Pass-Through Door
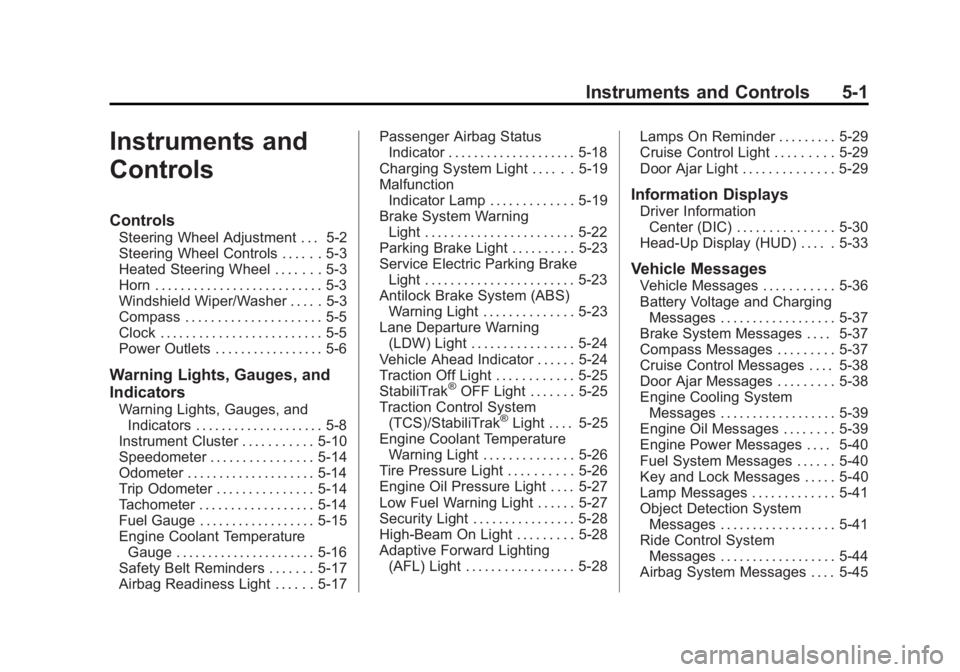
The vehicle has a rear seat
pass-through door in the center of
the rear seatback. Fold down the
center armrest and pull the latch to
open the door.
The pass-through door can be
locked or unlocked using the knob
on the back of the door. Open the
trunk to access the lock. Turn the
knob toward
Qto lock the door or
away from
Qto unlock the door.
Page 72 of 400

Black plate (18,1)Cadillac CTS Owner Manual (GMNA-Localizing-U.S./Canada/Mexico-
6081492) - 2014 - CRC 2nd Edition - 11/18/13
3-18 Seats and Restraints
Electronic Stability Control on
page 9-30. If there is a problem with
the Automatic Safety Belt Tightening
System, a message displays on the
Driver Information Center (DIC). See
Safety Belt Messages on page 5-45.
Other safety belt functions are not
affected by the Automatic Safety
Belt Tightening System.
Safety Belt Pretensioners
This vehicle has safety belt
pretensioners for front outboard
occupants. Although the safety belt
pretensioners cannot be seen, they
are part of the safety belt assembly.
They can help tighten the safety
belts during the early stages of a
moderate to severe frontal, near
frontal, or rear crash if the threshold
conditions for pretensioner
activation are met.
And, if the vehicle has side impact
airbags and roof-rail airbags, safety
belt pretensioners can help tighten
the safety belts in a side crash or
rollover event.Pretensioners work only once. If the
pretensioners activate in a crash,
the pretensioners and probably
other parts of the vehicle's safety
belt system will need to be replaced.
See
Replacing Safety Belt System
Parts after a Crash on page 3-21.
Rear Safety Belt Comfort
Guides
This vehicle may have rear shoulder
belt comfort guides. If not, they are
available through your dealer. The
guides may provide added safety
belt comfort for older children who
have outgrown booster seats and
for some adults. When installed and
properly adjusted, the comfort guide
positions the belt away from the
neck and head. There is one guide for each outside
passenger position in the rear seat.
Here is how to install a comfort
guide to the safety belt:
1. Remove the guide from its
storage pocket on the side of
the seat.
Page 113 of 400

Black plate (1,1)Cadillac CTS Owner Manual (GMNA-Localizing-U.S./Canada/Mexico-
6081492) - 2014 - CRC 2nd Edition - 11/18/13
Instruments and Controls 5-1
Instruments and
Controls
Controls
Steering Wheel Adjustment . . . 5-2
Steering Wheel Controls . . . . . . 5-3
Heated Steering Wheel . . . . . . . 5-3
Horn . . . . . . . . . . . . . . . . . . . . . . . . . . 5-3
Windshield Wiper/Washer . . . . . 5-3
Compass . . . . . . . . . . . . . . . . . . . . . 5-5
Clock . . . . . . . . . . . . . . . . . . . . . . . . . 5-5
Power Outlets . . . . . . . . . . . . . . . . . 5-6
Warning Lights, Gauges, and
Indicators
Warning Lights, Gauges, andIndicators . . . . . . . . . . . . . . . . . . . . 5-8
Instrument Cluster . . . . . . . . . . . 5-10
Speedometer . . . . . . . . . . . . . . . . 5-14
Odometer . . . . . . . . . . . . . . . . . . . . 5-14
Trip Odometer . . . . . . . . . . . . . . . 5-14
Tachometer . . . . . . . . . . . . . . . . . . 5-14
Fuel Gauge . . . . . . . . . . . . . . . . . . 5-15
Engine Coolant Temperature Gauge . . . . . . . . . . . . . . . . . . . . . . 5-16
Safety Belt Reminders . . . . . . . 5-17
Airbag Readiness Light . . . . . . 5-17 Passenger Airbag Status
Indicator . . . . . . . . . . . . . . . . . . . . 5-18
Charging System Light . . . . . . 5-19
Malfunction Indicator Lamp . . . . . . . . . . . . . 5-19
Brake System Warning Light . . . . . . . . . . . . . . . . . . . . . . . 5-22
Parking Brake Light . . . . . . . . . . 5-23
Service Electric Parking Brake Light . . . . . . . . . . . . . . . . . . . . . . . 5-23
Antilock Brake System (ABS) Warning Light . . . . . . . . . . . . . . 5-23
Lane Departure Warning (LDW) Light . . . . . . . . . . . . . . . . 5-24
Vehicle Ahead Indicator . . . . . . 5-24
Traction Off Light . . . . . . . . . . . . 5-25
StabiliTrak
®OFF Light . . . . . . . 5-25
Traction Control System (TCS)/StabiliTrak
®Light . . . . 5-25
Engine Coolant Temperature Warning Light . . . . . . . . . . . . . . 5-26
Tire Pressure Light . . . . . . . . . . 5-26
Engine Oil Pressure Light . . . . 5-27
Low Fuel Warning Light . . . . . . 5-27
Security Light . . . . . . . . . . . . . . . . 5-28
High-Beam On Light . . . . . . . . . 5-28
Adaptive Forward Lighting (AFL) Light . . . . . . . . . . . . . . . . . 5-28 Lamps On Reminder . . . . . . . . . 5-29
Cruise Control Light . . . . . . . . . 5-29
Door Ajar Light . . . . . . . . . . . . . . 5-29
Information Displays
Driver Information
Center (DIC) . . . . . . . . . . . . . . . 5-30
Head-Up Display (HUD) . . . . . 5-33
Vehicle Messages
Vehicle Messages . . . . . . . . . . . 5-36
Battery Voltage and Charging Messages . . . . . . . . . . . . . . . . . . 5-37
Brake System Messages . . . . 5-37
Compass Messages . . . . . . . . . 5-37
Cruise Control Messages . . . . 5-38
Door Ajar Messages . . . . . . . . . 5-38
Engine Cooling System Messages . . . . . . . . . . . . . . . . . . 5-39
Engine Oil Messages . . . . . . . . 5-39
Engine Power Messages . . . . 5-40
Fuel System Messages . . . . . . 5-40
Key and Lock Messages . . . . . 5-40
Lamp Messages . . . . . . . . . . . . . 5-41
Object Detection System Messages . . . . . . . . . . . . . . . . . . 5-41
Ride Control System Messages . . . . . . . . . . . . . . . . . . 5-44
Airbag System Messages . . . . 5-45
Page 115 of 400

Black plate (3,1)Cadillac CTS Owner Manual (GMNA-Localizing-U.S./Canada/Mexico-
6081492) - 2014 - CRC 2nd Edition - 11/18/13
Instruments and Controls 5-3
To set the power tilt wheel memory
position, seeMemory Seats on
page 3-6.
Steering Wheel Controls
The infotainment system can be
operated by using the steering
wheel controls. See "Steering
Wheel Controls" in the infotainment
manual.
Heated Steering Wheel
((Heated Steering Wheel, If
Equipped): Press to turn the
heated steering wheel on or off.
A light next to the button displays
when the feature is turned on. The steering wheel takes about
three minutes to be fully heated.
Horn
Pressaon the steering wheel pad
to sound the horn.
Windshield Wiper/Washer
With the ignition in ACC/
ACCESSORY or ON/RUN/START,
move the windshield wiper lever to
select the wiper speed.
HI: Use for fast wipes.
LO: Use for slow wipes.
INT (Intermittent Wipes): Move
the lever up to INT for intermittent
wipes, then turn the
xINT band
up for more frequent wipes or down
for less frequent wipes.
If the windshield wipers are in use
for about six seconds while driving,
the exterior lamps come on
automatically if the exterior lamp
control is in AUTO. See
“Wiper-Activated Headlamps” later
in this section.
OFF: Use to turn the wipers off.
1X (Mist): For a single wipe, briefly
move the wiper lever down. For
several wipes, hold the wiper
lever down.
Page 117 of 400

Black plate (5,1)Cadillac CTS Owner Manual (GMNA-Localizing-U.S./Canada/Mexico-
6081492) - 2014 - CRC 2nd Edition - 11/18/13
Instruments and Controls 5-5
With Rainsense, if the transmission
is in N (Neutral) and the vehicle
speed is very slow, the wipers will
automatically stop at the base of the
windshield.
The wiper operations return to
normal when the transmission is no
longer in N (Neutral) or the vehicle
speed has increased.
nL(Windshield Washer): Pull
the windshield wiper lever toward
you to spray windshield washer fluid
and activate the wipers. The wipers
will continue until the lever is
released or the maximum wash time
is reached. When the windshield
wiper lever is released, additional
wipes may occur depending on how
long the windshield washer had
been activated. See Washer Fluid
on page 10-22 for information on
filling the windshield washer fluid
reservoir.
{Warning
In freezing weather, do not use
the washer until the windshield is
warmed. Otherwise the washer
fluid can form ice on the
windshield, blocking your vision.
Wiper-Activated Headlamps
This feature activates the
headlamps and parking lamps after
the windshield wipers have been in
use for about six seconds. For this
feature to work, the exterior lamp
control must be in AUTO.
The wiper-activated headlamps
immediately turn off when the
ignition is turned to LOCK/OFF,
or the windshield wiper control is
turned off.
Compass
The vehicle may have a compass
display on the Driver Information
Center (DIC). The compass receives
its heading and other information from the Global Positioning
System (GPS) antenna,
StabiliTrak
®, and vehicle speed
information.
The compass system is designed to
operate for a certain number of
miles or degrees of turn before
needing a signal from the GPS
satellites. When the compass
display shows CAL, drive the
vehicle for a short distance in an
open area where it can receive a
GPS signal. The compass system
will automatically determine when a
GPS signal is restored and provide
a heading again. See Compass
Messages on page 5-37 for the
messages that may be displayed for
the compass.
Clock
The infotainment system controls
are used to access the time and
date settings through the menu
system. See “Home Page” in the
infotainment manual for information
about how to use the menu system.
Page 118 of 400

Black plate (6,1)Cadillac CTS Owner Manual (GMNA-Localizing-U.S./Canada/Mexico-
6081492) - 2014 - CRC 2nd Edition - 11/18/13
5-6 Instruments and Controls
Setting the Clock
Time
To set the time:
1. From the Home Page, press theSETTINGS screen button, then
press Time and Date.
2. Press Set Time, then press + or −to increase or decrease hours
or minutes, and change AM
or PM.
3. Press 12-24Hr for a 12 or 24 hour clock.
4. Press
[Back to go back to the
previous menu.
Date
To set the date:
1. Press the SETTINGS screen button and press Time and Date.
2. Press Set Date and press + or −
to increase or decrease month,
day, or year.
3. Press
[Back to go back to the
previous menu. Auto Set
When on, the time and date will
automatically update.
To set auto set:
1. Press the SETTINGS screen
button, then press Time
and Date.
2. Press Set Time or Set Date.
3. Press Auto Set, then select On-Cell Network or Off-Manual
to manually set the time
and date.
4. Press
[Back to go back to the
previous menu.
If auto timing is set, the time
displayed on the clock may not
update immediately when driving
into a new time zone.
Clock Display
When on, the digital clock will
display on the infotainment screen. To set the clock display:
1. Press the SETTINGS screen
button and press Time and Date.
2. Press Clock Display, then select Off or On.
3. Press
[Back to go back to the
previous menu.
Power Outlets
Accessory power outlets can be
used to plug in electrical equipment,
such as a cell phone or MP3 player.
The vehicle has three 12-volt
accessory power outlets:
.Inside the center console
storage in front of the armrest
cover.
.Inside the armrest bin behind the
cupholders.
.On the rear of the center
console, if equipped.
Page 124 of 400

Black plate (12,1)Cadillac CTS Owner Manual (GMNA-Localizing-U.S./Canada/Mexico-
6081492) - 2014 - CRC 2nd Edition - 11/18/13
5-12 Instruments and Controls
Reconfigurable Instrument
Cluster
There are four uplevel instrument
cluster display configurations to
choose from: Simple, Performance,
Balanced, or Enhanced.
Simple Configuration
The Simple configuration has one
interactive display zone in the
center.
Performance Configuration
The Performance configuration has
two interactive display zones: one in
the center of the speedometer and
one in the lower left of the cluster
screen.Balanced Configuration
The Balanced configuration has
three interactive display zones: one
in the center of each of the gauges.
Enhanced Configuration
The Enhanced configuration has
three interactive display zones.
Page 125 of 400

Black plate (13,1)Cadillac CTS Owner Manual (GMNA-Localizing-U.S./Canada/Mexico-
6081492) - 2014 - CRC 2nd Edition - 11/18/13
Instruments and Controls 5-13
Use the five-way control on the right
side of the steering wheel to move
between the different display zones
and scroll through the different
displays.
To change the cluster configuration:
1. With the vehicle in P (Park), findthe Settings page in one of the
interactive display zones on the
cluster.
2. Press SEL to enter the Settings menu.
3. Scroll down to highlight Display Layout. Then press SEL to
select it.
4. Each layout in the menu is represented by a small preview
image of the display layout.
Scroll up or down and highlight
the selection. Press SEL to
select the desired cluster
configuration.
5. Exit the Display Layout menu by pressing
S.
Cluster Application Displays
The cluster can display information
regarding Navigation, Audio, and
Phone. On the base cluster, a
speedometer can also be displayed
in the center zone.
Navigation (If Equipped)
If there is no active route, a
compass will be displayed. If there
is an active route, press SEL to end
route guidance or turn the voice
prompts on or off.
Audio
While the Audio application page is
displayed, press SEL to enter the
Audio menu. In the Audio menu,
search for music, select from
favorites, or change the audio
source
Phone
While the Phone application page is
displayed, press SEL to enter the
Phone menu. In the Phone menu,
if there is no active phone call, view
recent calls, select from favorites, or scroll through contacts. If there is
an active call, mute the phone or
switch to handset operation.
Cluster Settings Menu
To enter the cluster settings menu:
1. Use the five-way control on the
right side of the steering wheel
to find the Settings page in one
of the interactive display zones
on the cluster.
2. Press SEL on the center of the five-way control to enter the
Settings menu.
Units: Press SEL while Units is
highlighted to enter the Unit menu.
Choose English or metric units by
pressing SEL while the desired item
is highlighted. A checkmark will be
displayed next to the selected item.
Info Pages: Press SEL while Info
Pages is highlighted to select the
items to be displayed in the DIC info
displays. See Driver Information
Center (DIC) on page 5-30.
Page 126 of 400

Black plate (14,1)Cadillac CTS Owner Manual (GMNA-Localizing-U.S./Canada/Mexico-
6081492) - 2014 - CRC 2nd Edition - 11/18/13
5-14 Instruments and Controls
Display Layout:Press SEL while
Display Layout is highlighted to
change the configuration of the
uplevel cluster. See “Reconfigurable
Instrument Cluster” earlier in this
section.
Open Source Software: Press
SEL while Open Source Software is
highlighted to display open source
software information.
Speedometer
The speedometer shows the
vehicle's speed in either kilometers
per hour (km/h) or miles per
hour (mph).
Odometer
The odometer shows how far the
vehicle has been driven, in either
kilometers or miles.
This vehicle has a tamper-resistant
odometer. If the vehicle needs a
new cluster installed, the new
odometer is set to the mileage of
the old odometer. If this is not
possible, it is set at zero and a label
is put on the driver door to show the
old mileage reading.
Trip Odometer
The trip odometer can show how far
the vehicle has been driven since
the trip odometer was last reset.
The trip odometer is accessed and
reset through the Driver Information
Center (DIC). See Driver
Information Center (DIC) on
page 5-30.
Tachometer
The tachometer displays the engine
speed in revolutions per
minute (rpm).
{Caution
If the engine is operated with the
tachometer in the shaded warning
area, the vehicle could be
damaged, and the damages
would not be covered by the
vehicle warranty. Do not operate
the engine with the tachometer in
the shaded warning area.
Page 131 of 400

Black plate (19,1)Cadillac CTS Owner Manual (GMNA-Localizing-U.S./Canada/Mexico-
6081492) - 2014 - CRC 2nd Edition - 11/18/13
Instruments and Controls 5-19
If the word ON or the on symbol is
lit on the passenger airbag status
indicator, it means that the front
outboard passenger frontal airbag
and knee airbag are allowed to
inflate.
If the word OFF or the off symbol is
lit on the airbag status indicator, it
means that the passenger sensing
system has turned off the front
outboard passenger frontal airbag
and knee airbag.
If, after several seconds, both status
indicator lights remain on, or if there
are no lights at all, there may be a
problem with the lights or the
passenger sensing system. See
your dealer for service.
{Warning
If the airbag readiness light ever
comes on and stays on, it means
that something may be wrong
with the airbag system. To help
avoid injury to yourself or others,(Continued)
Warning (Continued)
have the vehicle serviced right
away. SeeAirbag Readiness
Light on page 5-17 for more
information, including important
safety information.
Charging System Light
On some vehicles the charging
system light comes on briefly when
the ignition is turned on, but the
engine is not running, as a check to
show the light is working. It should
go out when the engine is started.
For vehicles with a reconfigurable
cluster, this light may not come on
when the ignition is turned on. If the light stays on, or comes on
while driving, there may be a
problem with the electrical charging
system. Have it checked by your
dealer. Driving while this light is on
could drain the battery.
When this light comes on, or is
flashing, the Driver Information
Center (DIC) also displays a
message.
See
Battery Voltage and Charging
Messages on page 5-37.
If a short distance must be driven
with the light on, be sure to turn off
all accessories, such as the radio
and air conditioner.Malfunction
Indicator Lamp
A computer system called OBD II
(On-Board Diagnostics-Second
Generation) monitors the operation
of the vehicle to ensure emissions
are at acceptable levels, helping to
maintain a clean environment. The
malfunction indicator lamp comes