CADILLAC ELR 2016 Owners Manual
Manufacturer: CADILLAC, Model Year: 2016, Model line: ELR, Model: CADILLAC ELR 2016Pages: 368, PDF Size: 6.92 MB
Page 261 of 368

Cadillac ELR Owner Manual (GMNA-Localizing-U.S/Canada-9087644) -
2016 - crc - 9/17/15
260 Vehicle Care
Headlamp Aiming
Headlamp aim has been preset and
should need no further adjustment.
If the vehicle is damaged in a crash,
the headlamp aim may be affected.
If adjustment to the headlamps is
necessary, see your dealer.
Bulb Replacement
For the proper type of replacement
bulbs, seeReplacement
Bulbs 0261.
For any bulb-changing procedure
not listed in this section, contact
your dealer.
LED Lighting
This vehicle has several LED lamps.
For replacement of any LED lighting
assembly, contact your dealer.
Back-Up Lamps
1. Back-Up Bulb Socket 2. Back-Up Lamp Assembly
To replace one of these bulbs:
1. Reach under the rear fascia and locate the back-up lamp
assembly.
2. Remove the bulb socket (1) by turning counterclockwise and
pulling straight out of the lamp
assembly (2).
3. Pull the bulb out of the socket.
4. Install the new bulb in the bulb socket.
5. Install the bulb socket by turning clockwise.
ProCarManuals.com
Page 262 of 368

Cadillac ELR Owner Manual (GMNA-Localizing-U.S/Canada-9087644) -
2016 - crc - 9/17/15
Vehicle Care 261
License Plate Lamp
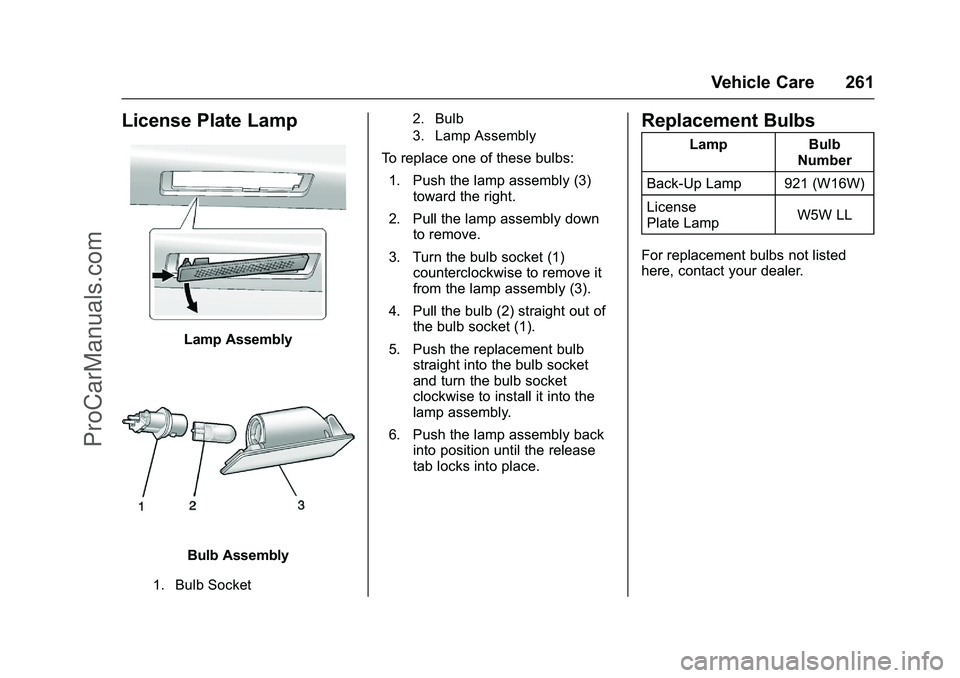
Lamp Assembly
Bulb Assembly
1. Bulb Socket2. Bulb
3. Lamp Assembly
To replace one of these bulbs:
1. Push the lamp assembly (3) toward the right.
2. Pull the lamp assembly down to remove.
3. Turn the bulb socket (1) counterclockwise to remove it
from the lamp assembly (3).
4. Pull the bulb (2) straight out of the bulb socket (1).
5. Push the replacement bulb straight into the bulb socket
and turn the bulb socket
clockwise to install it into the
lamp assembly.
6. Push the lamp assembly back into position until the release
tab locks into place.
Replacement Bulbs
Lamp Bulb
Number
Back-Up Lamp 921 (W16W)
License
Plate Lamp W5W LL
For replacement bulbs not listed
here, contact your dealer.
ProCarManuals.com
Page 263 of 368

Cadillac ELR Owner Manual (GMNA-Localizing-U.S/Canada-9087644) -
2016 - crc - 9/17/15
262 Vehicle Care
Electrical System
High Voltage Devices and
Wiring
{Warning
Exposure to high voltage can
cause shock, burns, and even
death. The high voltage
components in the vehicle can
only be serviced by technicians
with special training.
High voltage components are
identified by labels. Do not
remove, open, take apart,
or modify these components.
High voltage cable or wiring has
orange covering or labels. Do not
probe, tamper with, cut, or modify
high voltage cable or wiring.
Electrical System
Overload
The vehicle has fuses and circuit
breakers to protect against an
electrical system overload.When the current electrical load is
too heavy, the circuit breaker opens
and closes, protecting the circuit
until the current load returns to
normal or the problem is fixed. This
greatly reduces the chance of circuit
overload and fire caused by
electrical problems.
Fuses and circuit breakers protect
the following in the vehicle:
.
Headlamp Wiring
. Windshield Wiper Motor
. Power Windows and other
Power Accessories
Replace a bad fuse with a new one
of the identical size and rating.
If there is a problem on the road and
a fuse needs to be replaced, the
same amperage fuse can be
borrowed. Choose some feature of
the vehicle that is not needed to use
and replace it as soon as possible.
Headlamp Wiring
An electrical overload may cause
the lamps to go on and off, or in
some cases to remain off. Have the headlamp wiring checked right away
if the lamps go on and off or
remain off.
Windshield Wipers
If the wiper motor overheats due to
heavy snow or ice, the windshield
wipers will stop until the motor cools
and the wiper control is turned off.
After removal of the blockage, the
wiper motor will restart when the
control is then moved to the desired
operating position.
Although the circuit is protected
from electrical overload, overload
due to heavy snow or ice, may
cause wiper damage. Always clear
ice and heavy snow from the
windshield before using the
windshield wipers.
If the overload is caused by an
electrical problem and not snow or
ice, be sure to get it fixed.
ProCarManuals.com
Page 264 of 368

Cadillac ELR Owner Manual (GMNA-Localizing-U.S/Canada-9087644) -
2016 - crc - 9/17/15
Vehicle Care 263
Engine Compartment
Fuse Block
To open the fuse block cover, press
the clips at the front and back and
rotate the cover up to the side.
Caution
Spilling liquid on any electrical
component on the vehicle may
damage it. Always keep the
covers on any electrical
component.
Engine Compartment Fuse Block
A fuse puller is in the engine
compartment fuse block.
The vehicle may not be equipped
with all of the fuses, relays, and
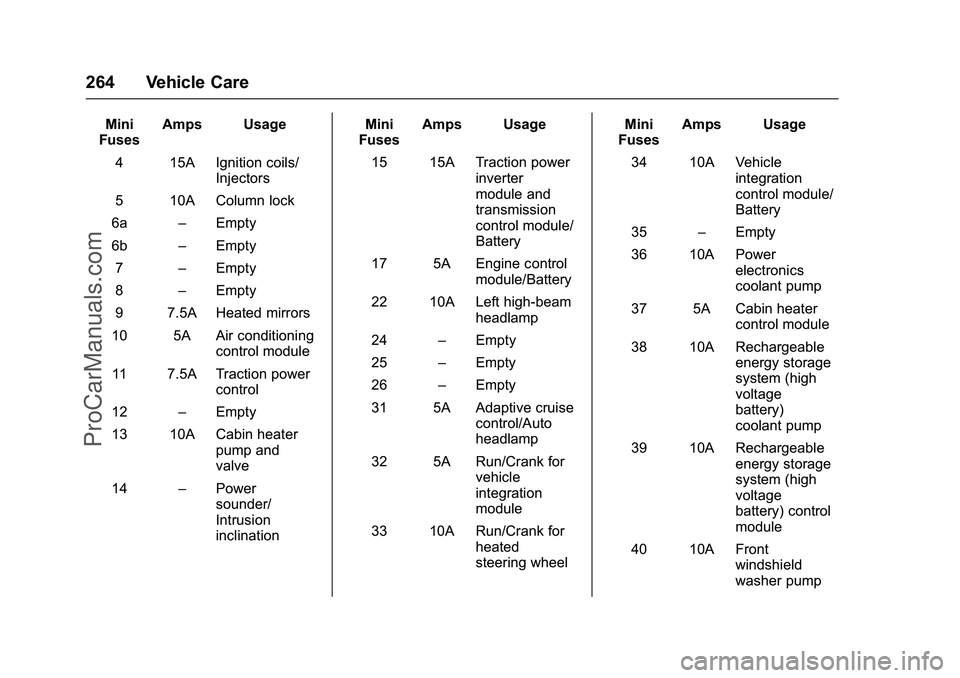
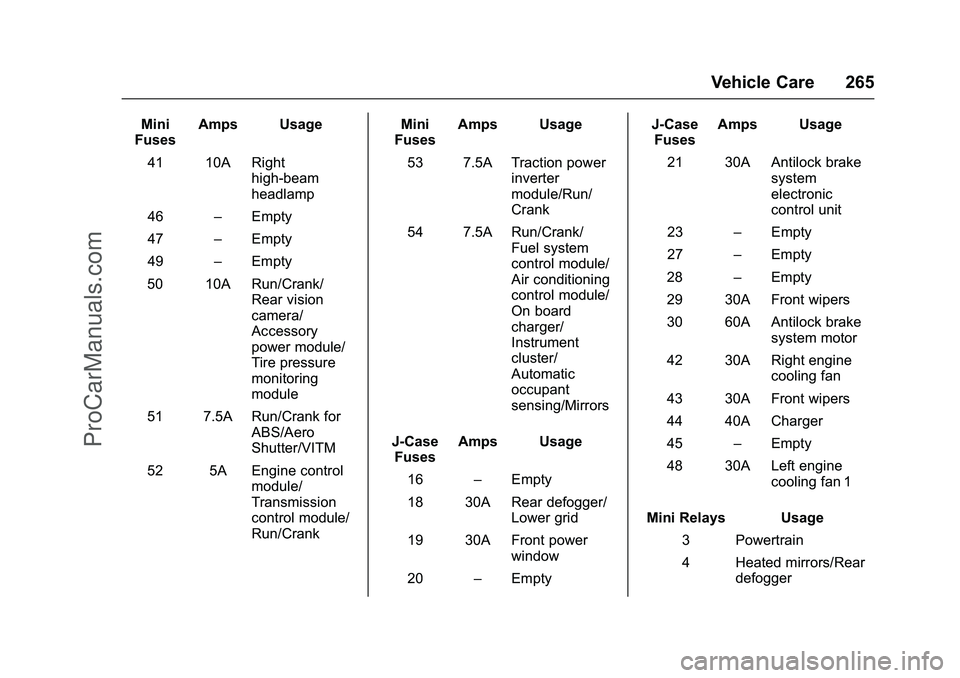
features shown. Mini
Fuses Amps Usage
1 15A Engine control module/
Switched
power
2 7.5A Emissions
3 –Empty
ProCarManuals.com
Page 265 of 368

Cadillac ELR Owner Manual (GMNA-Localizing-U.S/Canada-9087644) -
2016 - crc - 9/17/15
264 Vehicle Care
Mini
Fuses Amps Usage
4 15A Ignition coils/ Injectors
5 10A Column lock
6a –Empty
6b –Empty
7 –Empty
8 –Empty
9 7.5A Heated mirrors
10 5A Air conditioning control module
11 7.5A Traction power control
12 –Empty
13 10A Cabin heater pump and
valve
14 –Power
sounder/
Intrusion
inclination Mini
Fuses Amps Usage
15 15A Traction power inverter
module and
transmission
control module/
Battery
17 5A Engine control module/Battery
22 10A Left high-beam headlamp
24 –Empty
25 –Empty
26 –Empty
31 5A Adaptive cruise control/Auto
headlamp
32 5A Run/Crank for vehicle
integration
module
33 10A Run/Crank for heated
steering wheel Mini
Fuses Amps Usage
34 10A Vehicle integration
control module/
Battery
35 –Empty
36 10A Power electronics
coolant pump
37 5A Cabin heater control module
38 10A Rechargeable energy storage
system (high
voltage
battery)
coolant pump
39 10A Rechargeable energy storage
system (high
voltage
battery) control
module
40 10A Front windshield
washer pump
ProCarManuals.com
Page 266 of 368

Cadillac ELR Owner Manual (GMNA-Localizing-U.S/Canada-9087644) -
2016 - crc - 9/17/15
Vehicle Care 265
Mini
Fuses Amps Usage
41 10A Right high-beam
headlamp
46 –Empty
47 –Empty
49 –Empty
50 10A Run/Crank/ Rear vision
camera/
Accessory
power module/
Tire pressure
monitoring
module
51 7.5A Run/Crank for ABS/Aero
Shutter/VITM
52 5A Engine control module/
Transmission
control module/
Run/Crank Mini
Fuses Amps Usage
53 7.5A Traction power inverter
module/Run/
Crank
54 7.5A Run/Crank/ Fuel system
control module/
Air conditioning
control module/
On board
charger/
Instrument
cluster/
Automatic
occupant
sensing/Mirrors
J-Case Fuses Amps Usage
16 –Empty
18 30A Rear defogger/ Lower grid
19 30A Front power window
20 –Empty J-Case
Fuses Amps Usage
21 30A Antilock brake system
electronic
control unit
23 –Empty
27 –Empty
28 –Empty
29 30A Front wipers
30 60A Antilock brake system motor
42 30A Right engine cooling fan
43 30A Front wipers
44 40A Charger
45 –Empty
48 30A Left engine cooling fan 1
Mini Relays Usage 3 Powertrain
4 Heated mirrors/Rear defogger
ProCarManuals.com
Page 267 of 368

Cadillac ELR Owner Manual (GMNA-Localizing-U.S/Canada-9087644) -
2016 - crc - 9/17/15
266 Vehicle Care
Mini Relays Usage7 Empty
9 Empty
11 Empty
12 Empty
13 Empty
14 Run/Crank
Micro
Relays Usage
1 Empty
2 Empty
6 Empty
8 Empty
10 Empty
Ultra Micro Relays Usage
5 EmptyInstrument Panel Fuse
Block (Left Side)
The left instrument panel fuse block
is on the left side end of the
instrument panel, behind the end
cap. To access the fuses, insert a
plastic tool between the end panel
and the instrument panel, and
carefully release the end cap
retaining clips. When all clips are
released, remove the panel.
To reinstall the door, insert the
forward edge hook feature, and
press around the edges of the end
cap to reengage all of the clips.
ProCarManuals.com
Page 268 of 368

Cadillac ELR Owner Manual (GMNA-Localizing-U.S/Canada-9087644) -
2016 - crc - 9/17/15
Vehicle Care 267
A fuse puller is in the engine
compartment fuse block.
The vehicle may not be equipped
with all of the fuses, relays, and
features shown.Fuses Amp Usage
F1 20A Power outlet/ Cigarette
lighter
F2 15A Infotainment (HMI/CD)
F3 10A Instrument cluster Fuses Amp Usage
F4 10A Infotainment display
F5 10A Heating/ Ventilation/Air
conditioning
F6 10A Airbag
F7 15A Left data link connector
F8 10A Column lock
F9 10A OnStar (if equipped)
F10 15A Body control module 1 Fuses Amp Usage
F11 15A Body control module 4
F12 –Empty
F13 –Empty
F14 –Empty
F15 20A Power outlet
F16 5A Wireless charger
F17 –Empty
F18 –Empty
Relays Usage R1 Retained accessory power relay
R2 Empty
R3 Empty
R4 Empty
Diodes Usage Diode Empty
ProCarManuals.com
Page 269 of 368

Cadillac ELR Owner Manual (GMNA-Localizing-U.S/Canada-9087644) -
2016 - crc - 9/17/15
268 Vehicle Care
Instrument Panel Fuse
Block (Right Side)
The right instrument panel fuse
block is on the right side end of the
instrument panel, behind the end
cap. To access the fuses, insert a
plastic tool between the end panel
and the instrument panel, and
carefully release the end cap
retaining clips. When all clips are
released, remove the panel.
To reinstall the door, insert the
forward edge hook feature, and
press around the edges of the end
cap to reengage all of the clips.
A fuse puller is in the engine
compartment fuse block.
The vehicle may not be equipped
with all of the fuses, relays, and
features shown.Fuses Amps Usage
F1 2A Steering wheel switch
F2 10A Auto headlamp leveling
F3 10A Motorized cupholder
F4 15A Body control module 3 Fuses Amps Usage
F5 7.5A Body control module 2
F6 15A Tilt/Telescoping column
F7 7.5A Body control module 6
F8 15A Body control module 7
F9 –Empty
F10 15A Right data link connector
ProCarManuals.com
Page 270 of 368

Cadillac ELR Owner Manual (GMNA-Localizing-U.S/Canada-9087644) -
2016 - crc - 9/17/15
Vehicle Care 269
Fuses Amps UsageF11 7.5A Universal remote system/
Lane departure
warning/Rain
sensor
F12 30A Blower motor
F13 –Empty
F14 –Empty
F15 –Empty
F16 10A Glove box
F17 –Empty
F18 –Empty
Relays Usage R1 Empty
R2 Glove box relay
R3 Empty
R4 Empty
Diodes Usage DIODE EmptyRear Compartment Fuse
Block
There are two rear compartment
fuse blocks, located on the left side
of the trunk behind a cover.
ProCarManuals.com