key CADILLAC ESCALADE 2010 3.G Owners Manual
[x] Cancel search | Manufacturer: CADILLAC, Model Year: 2010, Model line: ESCALADE, Model: CADILLAC ESCALADE 2010 3.GPages: 616, PDF Size: 39.41 MB
Page 361 of 616
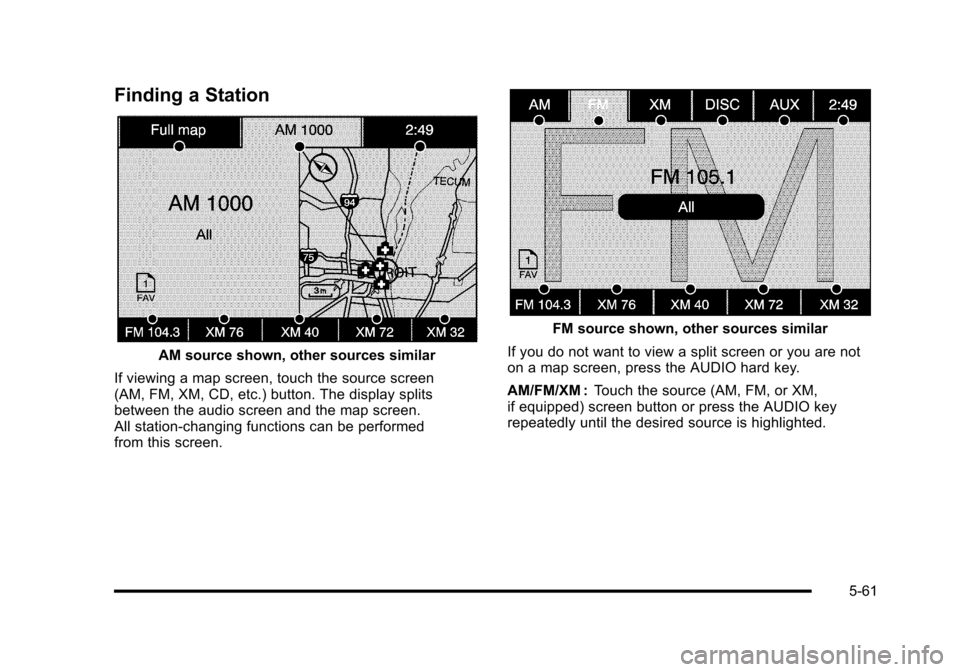
Finding a Station
AM source shown, other sources similar
If viewing a map screen, touch the source screen(AM, FM, XM, CD, etc.) button. The display splitsbetween the audio screen and the map screen.All station-changing functions can be performedfrom this screen.
FM source shown, other sources similar
If you do not want to view a split screen or you are noton a map screen, press the AUDIO hard key.
AM/FM/XM :Touch the source (AM, FM, or XM,if equipped) screen button or press the AUDIO keyrepeatedly until the desired source is highlighted.
5-61
Page 363 of 616
Storing Radio Station Presets
This feature stores a mix of up to 30 AM, FM, andXM (if equipped) preset stations. To store presets:
1. PressOto turn the system on.
2. If viewing a map screen, touch the sourcescreen button, press the AUDIO key, or pressthe FAV (favorite) key.
3. Select the band.
4. Seek, scan, or tune to the desired station, to selectthe station.
5. Press and hold one of the preset screen buttonsfor more than two seconds or until a beep is heard.
6. Repeat the steps for each preset.
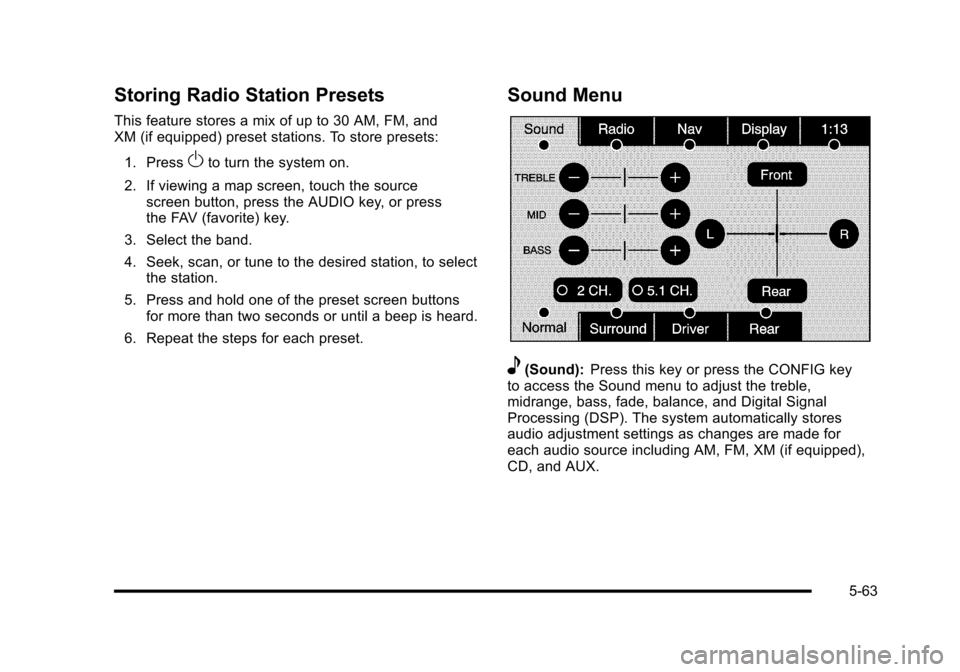
Sound Menu
e(Sound):Press this key or press the CONFIG keyto access the Sound menu to adjust the treble,midrange, bass, fade, balance, and Digital SignalProcessing (DSP). The system automatically storesaudio adjustment settings as changes are made foreach audio source including AM, FM, XM (if equipped),CD, and AUX.
5-63
Page 365 of 616
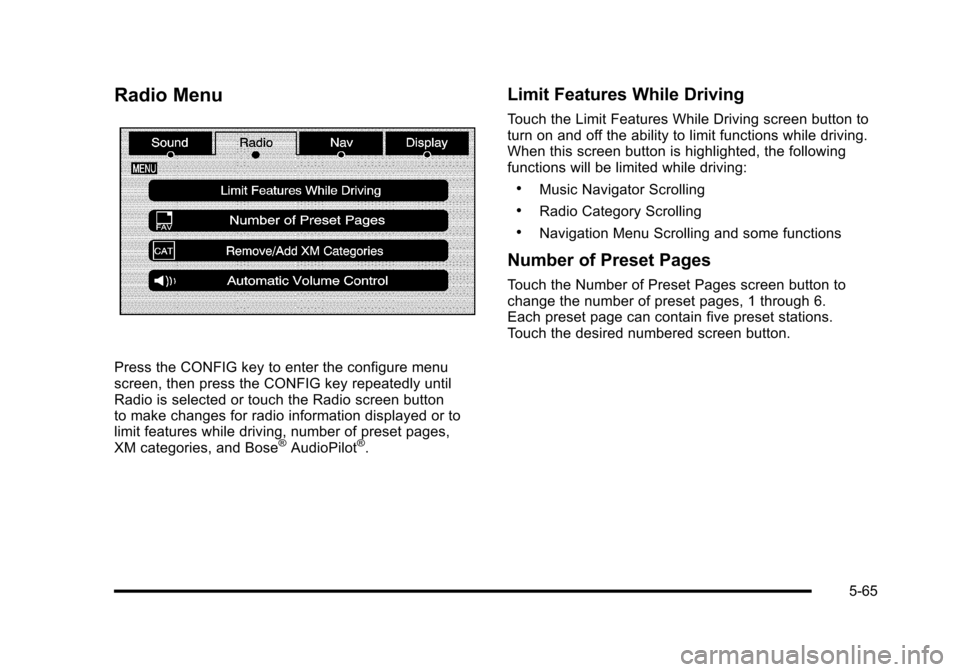
Radio Menu
Press the CONFIG key to enter the configure menuscreen, then press the CONFIG key repeatedly untilRadio is selected or touch the Radio screen buttonto make changes for radio information displayed or tolimit features while driving, number of preset pages,XM categories, and Bose®AudioPilot®.
Limit Features While Driving
Touch the Limit Features While Driving screen button toturn on and off the ability to limit functions while driving.When this screen button is highlighted, the followingfunctions will be limited while driving:
.Music Navigator Scrolling
.Radio Category Scrolling
.Navigation Menu Scrolling and some functions
Number of Preset Pages
Touch the Number of Preset Pages screen button tochange the number of preset pages, 1 through 6.Each preset page can contain five preset stations.Touch the desired numbered screen button.
5-65
Page 366 of 616
Bose®AudioPilot®
AudioPilot :The Bose®AudioPilot®noisecompensation technology.
To use AudioPilot®:
1. Press the CONFIG key to enter the menu screen,then press the CONFIG key repeatedly until Radiois selected or touch the Radio screen button
2. Press the Automatic Volume Control screen buttonto access the AudioPilot menu.
3. Press the ON screen button.
To turn it off, touch the OFF screen button. When on,AudioPilot®continuously adjusts the audio systemequalization, to compensate for background noise,so that the music sound is consistent at the setvolume level.
This feature is most effective at lower volume settingswhere background noise can affect how well the musicbeing played is heard through the vehicle's audiosystem. At higher volume settings, where the music ismuch louder than the background noise, there may belittle or no adjustments by AudioPilot®. For moreinformation on AudioPilot®, visit bose.com/audiopilot.
Remove/Add XM Categories
Touch the Remove/Add XM Categories screen buttonto remove or add XM categories when selectingXM categories from the category list screen. The listof XM categories appear on the screen. Use the up anddown arrow screen buttons to scroll through the list. Thecategories to remove are highlighted and the categoriesto add are dark in color. Touch the category to be addedor removed. Touch the Restore All Categories screenbutton to add all categories that have been removed.
Radio Data System (RDS)
The audio system has a Radio Data System (RDS).RDS features are available for use only on FM stationsthat broadcast RDS information. With RDS, the radiocan do the following:
.Receive announcements concerning local andnational emergencies
.Display messages from radio stations
This system relies on receiving specific informationfrom these stations and only works when theinformation is available. In rare cases, a radio stationmay broadcast incorrect information that causes theradio features to work improperly. If this happens,contact the radio station.
5-66
Page 368 of 616

No Artist Info :No artist information is available.The system is working properly.
No Title Info :No song title information is available.The system is working properly.
No CAT Info :No category information is available.The system is working properly.
CAT Not Found :There are no channels available forthe selected category. The system is working properly.
No Information :No text or informational messages areavailable. The system is working properly.
XM Theftlocked :The XM™receiver may havepreviously been in another vehicle. For securitypurposes, XM™receivers cannot be swapped betweenvehicles. If this message is received after having yourvehicle serviced, check with your dealer/retailer.
XM Radio ID :If tuned to channel 0, this message willalternate with the XM™Radio eight digit radio ID label.This label is needed to activate the service.
Unknown :If this message is received when tuned tochannel 0, there may be a receiver fault. Consult withyour dealer/retailer.
Check XM Receiver :If this message does not clearwithin a short period of time, the receiver may have afault. Consult with your dealer/retailer.
CD Player
The player can be used for CD, MP3, DVD audio, andas a DVD video player. SeeDVD Playeron page 5!75for more information about DVD audio and video.
Six-Disc CD Player
While playing a CD, the navigation system is available.
When you insert a CD, the CD tab displays. If a DSPsetting is selected for the CD, it activates each time youplay a CD.
If the ignition or radio is turned off with a CD in theplayer, it stays in the player. When the ignition or radiois turned on, the CD starts playing where it stopped, if itwas the last selected audio source.
As each new track starts to play, the track numberdisplays.
If an error appears on the display, see“CD Messages”later in this section.
If viewing a map screen, touch the CD screen button.The display will split between the audio screen and themap screen. If you do not want to view a split screen oryou are not on a map screen, press the AUDIO keythen press the AUDIO key repeatedly until CD isselected or touch the CD screen button.
5-68
Page 369 of 616
M(Load):To load one disc, do the following:
1. Press the load hard key and follow the screenmessage displayed.
2. When the system displays“Insert Disc (number)”,insert the disc partway into the slot, label side up.The system will pull it into the first available slotand start playing. The system will display the typeof disc inserted.
To load multiple discs, do the following:
1. Press and hold the load hard key and follow thescreen message displayed.
2. When the system displays“Insert Disc (number)”,insert the disc partway into the slot, label side up.The system will pull it in.
3. Once a disc is loaded, the system will display“Insert Disc (number)”again. Load the next disc.Repeat this procedure for each disc. The playertakes up to six discs, do not try to load morethan six. The system does not display the disctypes when loading all, until the discs have beenread by the system.
Z(Eject):To eject a disc, do the following:
1. Press the eject hard key.
2. The system displays“Ejecting Disc”.
Press the DISC screen button to display theDisc Changer screen. Select the disc to eject.If a selection is not made, the system will eject thedisc from the current slot. If the disc is not removedfrom the slot, the system pulls it back in after10 seconds and starts playing it.
To eject all discs, press and hold the eject hard key.The system displays the disc number being ejected.
5-69
Page 372 of 616

Order of Play
Play will begin from the first track under the rootdirectory. When all tracks from the root directory havebeen played, play will continue from files according totheir numerical listing. After playing the last track fromthe last folder, play will begin again at the first track ofthe first folder or root directory.
When play enters a new folder, the display will notautomatically show the new folder name. The new trackname will appear on the display.
File System and Naming
The song name that will display will be the song namethat is contained in the ID3 tag. If the song name is notpresent in the ID3 tag, then the radio will display the filename without the extension (such as .mp3) as thetrack name.
Track names longer than 32 characters or four pageswill be shortened. The display will not show parts ofwords on the last page of text and the extension of thefilename will not display.
Playing an MP3
While playing a CD, the navigation system is available.
When you insert a CD, the CD tab will display. If youselect a DSP setting for the CD, it will be activated eachtime you play a CD.
If you turn off the ignition or radio with a CD in theplayer, it will stay in the player. When you turn on theignition or radio, the CD will start playing where itstopped, if it was the last selected audio source.
As each new track starts to play, the track number willappear on the display.
If an error appears on the display, see“CD Messages”later in this section.
If viewing a map screen, touch the CD screen button.The display will split between the audio screen and themap screen. If you do not want to view a split screen oryou are not on a map screen, press the AUDIO keythen press the AUDIO key repeatedly until CD isselected or touch the CD screen button.
M(Load):To load one disc, do the following:
1. Press the load hard key and follow the screenmessage displayed.
2. When the system displays“Insert Disc (number)”,insert the disc partway into the slot, label side up.The system will pull it into the first available slotand start playing. The system will display the typeof disc inserted.
5-72
Page 373 of 616
To load multiple discs, do the following:
1. Press and hold the load hard key and follow thescreen message displayed.
2. When the system displays“Insert Disc (number)”,insert the disc partway into the slot, label side up.The system will pull it in.
3. Once a disc is loaded, the system will display“Insert Disc (number)”again. Load the next disc.Repeat this procedure for each disc. The playertakes up to six discs, do not try to load more thansix. The system will not display the disc typeswhen loading all, until the discs have been read bythe system.
Once all discs have been inserted, the system willstart playing the last loaded disc.
Z(Eject):To eject a disc, do the following:
1. Press the eject hard key.
2. The system will display“Ejecting Disc”.
Press the DISC screen button to display theDisc Changer screen. Select the disc to eject.If a selection is not made, the system will eject thedisc from the current slot. If the disc is not removedfrom the slot, the system will pull it back in after10 seconds and start playing it.
To eject all discs at once, press and hold the eject hardkey. The system will display the disc number beingejected.
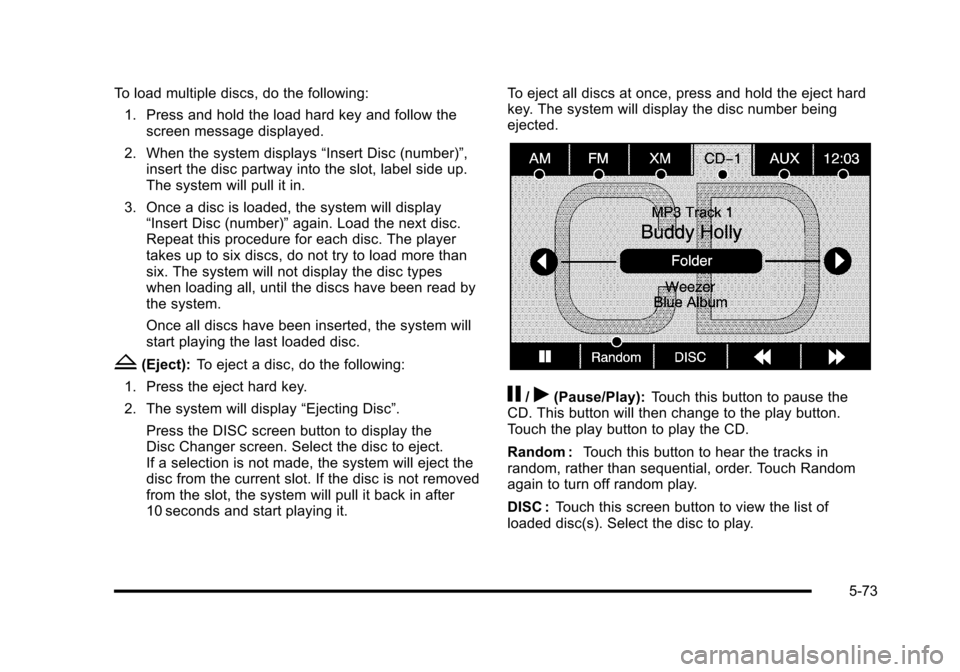
j/r(Pause/Play):Touch this button to pause theCD. This button will then change to the play button.Touch the play button to play the CD.
Random :Touch this button to hear the tracks inrandom, rather than sequential, order. Touch Randomagain to turn off random play.
DISC :Touch this screen button to view the list ofloaded disc(s). Select the disc to play.
5-73
Page 375 of 616

DVD Player
The player can be used for DVD audio and DVD video.
DVD video will not display on the navigation screenunless the vehicle is in PARK (P). It will operate on therear seat entertainment screens while the vehicle ismoving. The Rear Seat Entertainment (RSE) videoscreen will start play of the DVD when a DVD videohas been inserted into the navigation system. TheDVD player can be controlled by the buttons on thenavigation system, the Rear Seat Audio (RSA) system,and the remote control. The DVD player can also beused for the rear seat passengers with the radio off.The rear seat passengers can power on the videoscreen and use the remote control to navigate the disc.See“Rear Seat Entertainment System”in the Index ofyour vehicle's owner manual for more information.
The DVD player is only compatible with DVDs of theappropriate region code that is printed on the jacket ofmost DVDs.
The DVD slot is compatible with most audio CDs,CD-R, CD-RW, DVD-Video, DVD-Audio, DVD-R/RW,DVD+R/RW media along with MP3 and WMA formats.
If an error appears on the display, see“DVD Messages”later in this section.
M(Load):To load one disc, do the following:
1. Press the load hard key and follow the screenmessage displayed.
2. When the system displays“Insert Disc (number)”,insert the disc partway into the slot, label side up.The system will pull it into the first available slotand start playing. The system will display the typeof disc inserted.
To load multiple discs, do the following:
1. Press and hold the load hard key and follow thescreen message displayed.
2. When the system displays“Insert Disc (number)”,insert the disc partway into the slot, label side up.The system will pull it in.
3. Once a disc is loaded, the system will display“Insert Disc (number)”again. Load the next disc.Repeat this procedure for each disc. The playertakes up to six discs, do not try to load more thansix. The system will not display the disc typeswhen loading all, until the discs have been read bythe system.
Once all discs have been inserted, the system willstart playing the last loaded disc.
5-75
Page 376 of 616

Z(Eject):To eject a disc, do the following:
1. Press the eject hard key.
2. The system will display“Ejecting Disc”.
Press the DISC screen button to display the DiscChanger screen. Select the disc to eject. If aselection is not made, the system will eject the discfrom the current slot. If the disc is not removedfrom the slot, the system will pull it back in after10 seconds and start playing it.
To eject all discs at once, press and hold the eject hardkey. The system will display the disc number beingejected.
Playing a DVD
There are three ways to play a DVD:
.Once a DVD is inserted, the system willautomatically start play of the DVD.
.If you are on a map screen, touch theDVD screen button.
.Press the AUDIO hard key, then touchthe DVD screen button.
When a DVD is loaded, the rear seat passengers canpower on the RSE video screen and use the remotecontrol to navigate through the DVD.
O/3(Power/Volume):Press this knob to turn thesystem on and off. Turn the knob to increase ordecrease the volume of the audio system.
Press and hold this knob for more than two seconds toturn off the navigation system, RSE video screen, andRSA. If the vehicle has not been tuned off, the RSE andthe RSA can be turned back on by pressing this knoband will continue play of the last active source.
DVD Menu Options
Once a DVD starts to play, the menu options and cursorscreen buttons will automatically appear. To display themenu Options screen button while a DVD is playing,touch anywhere on the screen.
Options :Select this screen button to view the menuoption screen buttons. Menu options are available whenthey are highlighted. Some menu options are onlyavailable when the DVD is not playing.
Cursor :Touch this button to access the cursor menu.The arrows and other cursor options allow you tonavigate the DVD menu options. The cursor menuoptions are only available if a DVD has a menu.Use the cursor menu to start a DVD video from thedisc main menu.
q,Q,r,R(Arrow Buttons):Use these arrowbuttons to move around the DVD menu.
5-76