key CADILLAC ESCALADE 2010 3.G Manual Online
[x] Cancel search | Manufacturer: CADILLAC, Model Year: 2010, Model line: ESCALADE, Model: CADILLAC ESCALADE 2010 3.GPages: 616, PDF Size: 39.41 MB
Page 341 of 616
Adding or Changing Preset
Destinations
This feature allows additions or changes one of fivepreset destinations. When a destination has beenadded as a preset destination, it is available to selectfrom the Destination Entry screen. See“PresetDestination”previously for information on how to selecta preset destination as a final destination.
To store the current vehicle position as a presetdestination:
1. Select the Mark screen button from the mapscreen to add the current vehicle position to theaddress book. The Address Book screen appears.
2. Select the Name screen button. An alpha-keyboarddisplays. Enter the name. Press the OK screenbutton then the Back screen button to return to theaddress book information screen.
3. Press and hold one of the buttons at the bottom ofthe screen until the name appears in that presetdestination screen button. It is now available toselect from the Destination Entry screen.
To store an address book entry as a preset destination:
1. Select the CONFIG hard key.
2. Select the Nav screen button or press theCONFIG key until Nav is selected or touchthe Nav screen button.
3. Select the Edit/View screen button.
4. Select the address book entry to be storedas the preset destination. Select the Name screenbutton to add a name, if needed.
5. Press and hold one of the buttons at the bottom ofthe screen until the name appears in that presetdestination screen button. It is now available toselect from the Destination Entry screen.
5-41
Page 342 of 616

Configure Menu
Press the CONFIG (Configure) hard key to adjustseveral of the system's features and preferences.The last selected CONFIG screen is the screen thatdisplays: Sound, Radio, Nav (navigation), Display,or Time.
Sound
Press the CONFIG key to enter the configure menuoptions, then press the CONFIG key repeatedly untilSound is selected or touch the Sound screen button tomake speaker and DSP (Digital Signal Processing)adjustments. See“Sound Menu”under,NavigationAudio Systemon page 5!60for more information.
Radio
Press the CONFIG key to enter the configure menuoptions, then press the CONFIG key repeatedly untilRadio is selected or touch the Radio screen button tomake changes for radio information displayed, presetpages, XM™categories, and Bose®AudioPilot®.See“Radio Menu”under,Navigation Audio Systemonpage 5!60for more information.
5-42
Page 343 of 616

Nav (Navigation)
Press the CONFIG key to enter the configure menuoptions, then press the CONFIG key repeatedly untilNav is selected or touch the Nav screen button.
Voice Prompt
Voice Prompt :Touch the Voice Prompt screen buttonto change the volume of the voice prompts or to turnvoice guidance on and off.
Volume :Touch the + (plus) or!(minus) screen buttonsto increase or to decrease the volume of the voiceprompts. The system will respond with the adjustedvoice level.
Voice Guidance :Touch the On or Off screen buttonsto turn voice instructions on and off while traveling ona planned route.
Route Preference
Touch the Route Preference screen button to changeroute options when the system calculates a route.
Allow Major Roads :This feature allows the system touse major roads when calculating a planned route.
Allow toll road :This feature allows the system to usetoll roads when calculating a planned route.
Allow ferry :This feature allows the system to useferries when calculating a planned route.
Allow time and seasonal restricted road :Thisfeature allows the system to use time restricted andseasonal roads when calculating a planned route.
5-43
Page 344 of 616
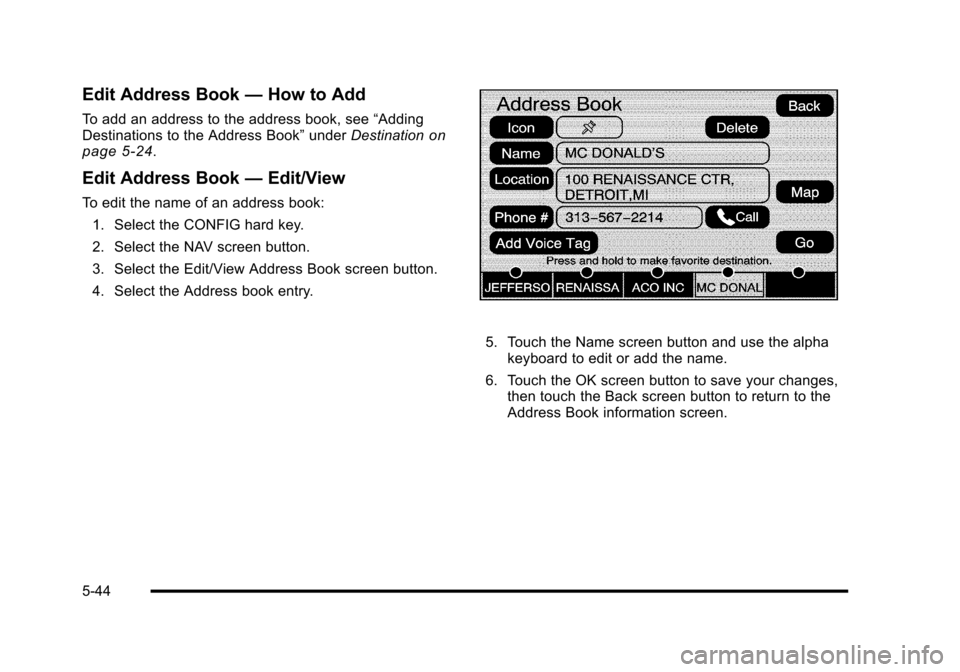
Edit Address Book—How to Add
To add an address to the address book, see“AddingDestinations to the Address Book”underDestinationonpage 5!24.
Edit Address Book—Edit/View
To edit the name of an address book:
1. Select the CONFIG hard key.
2. Select the NAV screen button.
3. Select the Edit/View Address Book screen button.
4. Select the Address book entry.
5. Touch the Name screen button and use the alphakeyboard to edit or add the name.
6. Touch the OK screen button to save your changes,then touch the Back screen button to return to theAddress Book information screen.
5-44
Page 345 of 616
To add or change the phone number of an addressbook entry:
1. Select the CONFIG hard key.
2. Select the NAV screen button.
3. Select the Edit/View Address Book screen button.
4. Select the address book entry to change.
5. Touch the Phone # screen button and usethe numeric keyboard to input or change thephone number.
6. Touch the OK screen button to save your changes,then touch the Back screen button to return to theAddress Book information screen.
To change the map icon of an address book entry:
1. Select the CONFIG hard key.
2. Select the NAV screen button.
3. Select the Edit/View Address Book screen button.
4. Select the address book entry to change.
5. Select the Icon screen button.
6. Select an icon from the list.
To add a voice tag to an address book entry:
1. Select the CONFIG hard key.
2. Select the NAV screen button.
3. Select the Edit/View Address Book screen button.
4. Select the Add Voice Tag screen button.
5. The system will ask for you to state the name.You will have four seconds to state the name.The system will respond back with the name andprompt you to repeat the name for confirmation.
To delete an address book entry:
1. Select the CONFIG hard key.
2. Select the NAV screen button.
3. Select the Edit/View Address Book screen button.
4. Select the address book entry to delete.
5. Press the Delete screen button to delete theaddress book entry.
6. A confirmation pop-up will display. Select Ok todelete; select Cancel to cancel the operation.
To delete the entire address book:
1. Select the CONFIG hard key.
2. Select the NAV screen button.
3. Select the Edit/View Address Book screen button.
4. A list of all the address book entries will display.Press and hold the Clear All screen button.
5. A confirmation pop-up will display. Select Ok todelete; select Cancel to cancel the operation.
5-45
Page 346 of 616

Map Database Information
Touch the Map Database Information screen button toview the coverage areas of the map DVD.
Off-Road Mode
To turn the Off-road mode on or off, do the following:
1. Press the CONFIG hard key.
2. Press the Nav screen button.
3. Press the Off-Road mode screen button. Thebutton will be highlighted when the feature is on.
When the off-road mode is turned on, the navigationsystem will show the path being traveled by thevehicle when not on a marked road. This path willbe a simulation since the map database coverage willnot have these roads on the DVD. This path will bestored in the navigation system's memory, see“Previous Destination”underDestinationon page 5!24for more information.
See“Off-Road Driving”in the Index of your vehicle'sowner manual for more information about off-roaddriving.
5-46
Page 348 of 616
XM NavTraffic™currently broadcasts the trafficinformation for many markets nationally, and the servicemay be available in more cities in the future. Visitxmnavtraffic.com for more details on local coverage.
A service fee is required in order to receive theXM NavTraffic™service.
Turning XM NavTraffic™On and Off
To turn traffic on or off:
1. Press the CONFIG hard key, then press theCONFIG key repeatedly until Nav is selected orpress the Nav screen button.
2. Touch the Traffic Options button.
3. Touch the Traffic button. This button is highlightedwhen it is active.
Selecting Alert for Approaching Traffic Eventsenables the system to show a pop-up screen thatnotifies of possible traffic issues ahead.
When this feature is highlighted, while traveling ona route, accidents located on the route areindicated and can be avoided.
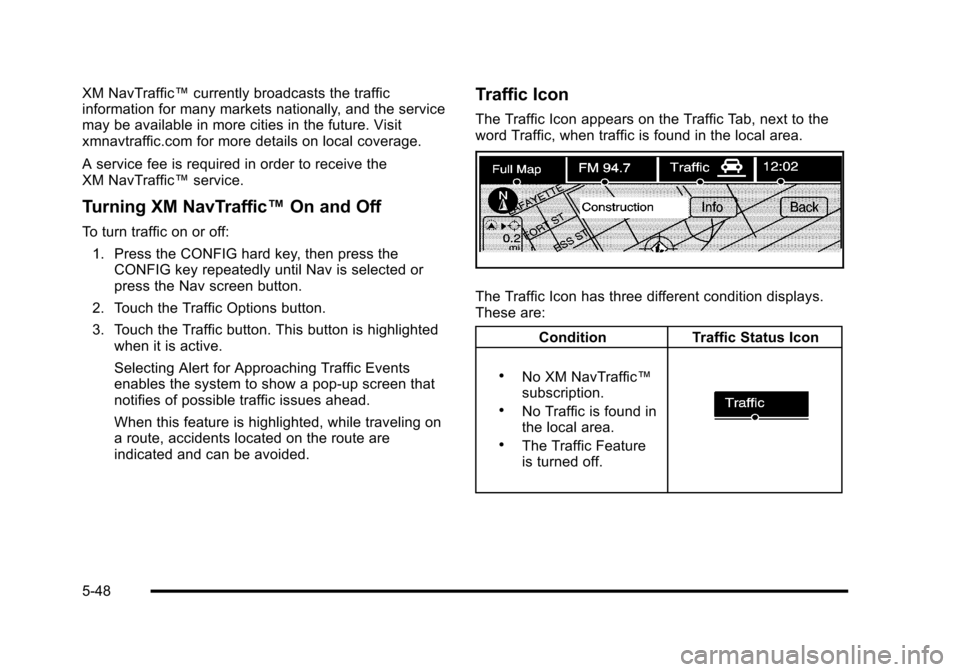
Traffic Icon
The Traffic Icon appears on the Traffic Tab, next to theword Traffic, when traffic is found in the local area.
The Traffic Icon has three different condition displays.These are:
ConditionTraffic Status Icon
.No XM NavTraffic™subscription..No Traffic is found inthe local area..The Traffic Featureis turned off.
5-48
Page 349 of 616
ConditionTraffic Status Icon
Traffic events are in thearea, but none are on route.
Traffic events are on route.
Locations and Information of Traffic
Conditions
The system may take some time to sort the information.The list of traffic conditions display in the order ofdistance from the vehicle, up to approximately75 mi (125 km). With a route planned, the systemdefaults to list traffic events on your route. Without aroute planned, if travelling on a major interstate, the
system lists events immediately ahead on the interstatefirst. Then all other traffic events follow. Not all trafficconditions may be listed.
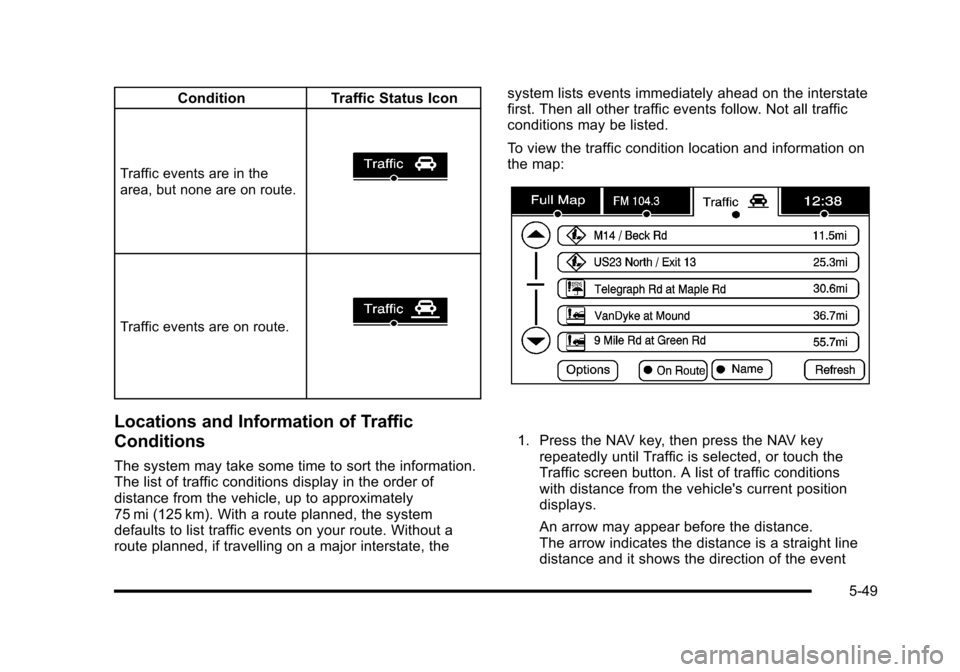
To view the traffic condition location and information onthe map:
1. Press the NAV key, then press the NAV keyrepeatedly until Traffic is selected, or touch theTraffic screen button. A list of traffic conditionswith distance from the vehicle's current positiondisplays.
An arrow may appear before the distance.The arrow indicates the distance is a straight linedistance and it shows the direction of the event
5-49
Page 355 of 616

Avoid :This button is used to avoid the location of anevent on the route. If selected, a new route is calculatedand the related traffic event is avoided. After the newroute has been calculated, the navigation system goesto the full map screen and shows the new route.
The Avoid button is only available if the event is onthe route ahead.
Traffic Voice Prompts
The traffic voice prompts are part of the currentnavigation voice prompts. If the navigation voiceprompts are turned off, all traffic prompts are alsoturned off.
If the voice prompts are on, whenever an Alert forApproaching Traffic is displayed, the system gives therelated voice prompt. The content of the voice promptdepends on actual traffic event data.
The RPT (Repeat) hard key is for navigation trafficmaneuvers only. It is not used to repeat traffic prompts.During a traffic voice prompt, if RPT is pressed, thecurrent prompt playback cancels.
Traffic prompts are disabled during OnStar®orVoice Recognition activity.
Display
Press the CONFIG key to enter the configure menuoptions, then press the CONFIG key repeatedly untilDisplay is selected or touch the Display screen button.
Display Off
Touch this screen button to turn the display off.Press any hard key to view the display.
5-55
Page 356 of 616
:Touch the + (plus) or!(minus) screenbuttons to increase or decrease the brig CADILLAC ESCALADE 2010 3.G Manual Online Brightness/Contrast/Mode
Touch this screen button to change the brightness,contrast, and mode of the display.
](Brightness):Touch the + (plus) or!(minus) screenbuttons to increase or decrease the brig](/img/23/7913/w960_7913-355.png)
Brightness/Contrast/Mode
Touch this screen button to change the brightness,contrast, and mode of the display.
](Brightness):Touch the + (plus) or!(minus) screenbuttons to increase or decrease the brightness of thescreen.
_(Contrast):Touch the + (plus) or!(minus) screenbuttons to increase or decrease the contrast of thescreen.
Auto (Automatic) :Touch this screen button for thesystem to automatically adjust the screen backgrounddepending on exterior lighting conditions.
Night :Touch this screen button and the system makesthe map background darker.
Day :Touch this screen button and the system makesthe map background brighter.
Setting the Clock
The navigation system time and the analog clockoperate independently. Changing the time through thenavigation system does not change the time on theanalog clock. SeeAnalog Clockon page 4!20tochange the analog clock time.
Press the CONFIG key to enter the configure menuoptions, then press the CONFIG key repeatedly until thetime is selected or touch the time screen button.
Hours :Press the!(minus) or + (plus) signs todecrease or increase the hours.
Minutes :Press the!(minus) or + (plus) signs todecrease or increase the minutes.
12/24 Format :Select the 12 screen button for standardtime; select the 24 screen button for military time.
5-56